Posted by Alan Karthikesalingam and Vivek Natarajan, Research Leads, Google Research

The physician-patient conversation is a cornerstone of medicine, in which skilled and intentional communication drives diagnosis, management, empathy and trust. AI systems capable of such diagnostic dialogues could increase availability, accessibility, quality and consistency of care by being useful conversational partners to clinicians and patients alike. But approximating clinicians’ considerable expertise is a significant challenge.
Recent progress in large language models (LLMs) outside the medical domain has shown that they can plan, reason, and use relevant context to hold rich conversations. However, there are many aspects of good diagnostic dialogue that are unique to the medical domain. An effective clinician takes a complete “clinical history” and asks intelligent questions that help to derive a differential diagnosis. They wield considerable skill to foster an effective relationship, provide information clearly, make joint and informed decisions with the patient, respond empathically to their emotions, and support them in the next steps of care. While LLMs can accurately perform tasks such as medical summarization or answering medical questions, there has been little work specifically aimed towards developing these kinds of conversational diagnostic capabilities.
Inspired by this challenge, we developed Articulate Medical Intelligence Explorer (AMIE), a research AI system based on a LLM and optimized for diagnostic reasoning and conversations. We trained and evaluated AMIE along many dimensions that reflect quality in real-world clinical consultations from the perspective of both clinicians and patients. To scale AMIE across a multitude of disease conditions, specialties and scenarios, we developed a novel self-play based simulated diagnostic dialogue environment with automated feedback mechanisms to enrich and accelerate its learning process. We also introduced an inference time chain-of-reasoning strategy to improve AMIE’s diagnostic accuracy and conversation quality. Finally, we tested AMIE prospectively in real examples of multi-turn dialogue by simulating consultations with trained actors.
 |
| AMIE was optimized for diagnostic conversations, asking questions that help to reduce its uncertainty and improve diagnostic accuracy, while also balancing this with other requirements of effective clinical communication, such as empathy, fostering a relationship, and providing information clearly. |
Evaluation of conversational diagnostic AI
Besides developing and optimizing AI systems themselves for diagnostic conversations, how to assess such systems is also an open question. Inspired by accepted tools used to measure consultation quality and clinical communication skills in real-world settings, we constructed a pilot evaluation rubric to assess diagnostic conversations along axes pertaining to history-taking, diagnostic accuracy, clinical management, clinical communication skills, relationship fostering and empathy.
We then designed a randomized, double-blind crossover study of text-based consultations with validated patient actors interacting either with board-certified primary care physicians (PCPs) or the AI system optimized for diagnostic dialogue. We set up our consultations in the style of an objective structured clinical examination (OSCE), a practical assessment commonly used in the real world to examine clinicians’ skills and competencies in a standardized and objective way. In a typical OSCE, clinicians might rotate through multiple stations, each simulating a real-life clinical scenario where they perform tasks such as conducting a consultation with a standardized patient actor (trained carefully to emulate a patient with a particular condition). Consultations were performed using a synchronous text-chat tool, mimicking the interface familiar to most consumers using LLMs today.
 |
| AMIE is a research AI system based on LLMs for diagnostic reasoning and dialogue. |
AMIE: an LLM-based conversational diagnostic research AI system
We trained AMIE on real-world datasets comprising medical reasoning, medical summarization and real-world clinical conversations.
It is feasible to train LLMs using real-world dialogues developed by passively collecting and transcribing in-person clinical visits, however, two substantial challenges limit their effectiveness in training LLMs for medical conversations. First, existing real-world data often fails to capture the vast range of medical conditions and scenarios, hindering the scalability and comprehensiveness. Second, the data derived from real-world dialogue transcripts tends to be noisy, containing ambiguous language (including slang, jargon, humor and sarcasm), interruptions, ungrammatical utterances, and implicit references.
To address these limitations, we designed a self-play based simulated learning environment with automated feedback mechanisms for diagnostic medical dialogue in a virtual care setting, enabling us to scale AMIE’s knowledge and capabilities across many medical conditions and contexts. We used this environment to iteratively fine-tune AMIE with an evolving set of simulated dialogues in addition to the static corpus of real-world data described.
This process consisted of two self-play loops: (1) an “inner” self-play loop, where AMIE leveraged in-context critic feedback to refine its behavior on simulated conversations with an AI patient simulator; and (2) an “outer” self-play loop where the set of refined simulated dialogues were incorporated into subsequent fine-tuning iterations. The resulting new version of AMIE could then participate in the inner loop again, creating a virtuous continuous learning cycle.
Further, we also employed an inference time chain-of-reasoning strategy which enabled AMIE to progressively refine its response conditioned on the current conversation to arrive at an informed and grounded reply.
 |
| AMIE uses a novel self-play based simulated dialogue learning environment to improve the quality of diagnostic dialogue across a multitude of disease conditions, specialities and patient contexts. |
We tested performance in consultations with simulated patients (played by trained actors), compared to those performed by 20 real PCPs using the randomized approach described above. AMIE and PCPs were assessed from the perspectives of both specialist attending physicians and our simulated patients in a randomized, blinded crossover study that included 149 case scenarios from OSCE providers in Canada, the UK and India in a diverse range of specialties and diseases.
Notably, our study was not designed to emulate either traditional in-person OSCE evaluations or the ways clinicians usually use text, email, chat or telemedicine. Instead, our experiment mirrored the most common way consumers interact with LLMs today, a potentially scalable and familiar mechanism for AI systems to engage in remote diagnostic dialogue.
 |
| Overview of the randomized study design to perform a virtual remote OSCE with simulated patients via online multi-turn synchronous text chat. |
Performance of AMIE
In this setting, we observed that AMIE performed simulated diagnostic conversations at least as well as PCPs when both were evaluated along multiple clinically-meaningful axes of consultation quality. AMIE had greater diagnostic accuracy and superior performance for 28 of 32 axes from the perspective of specialist physicians, and 24 of 26 axes from the perspective of patient actors.
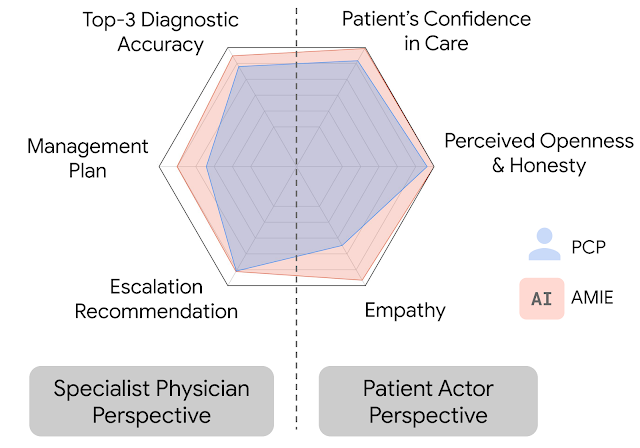 |
| AMIE outperformed PCPs on multiple evaluation axes for diagnostic dialogue in our evaluations. |
 |
| Specialist-rated top-k diagnostic accuracy. AMIE and PCPs top-k differential diagnosis (DDx) accuracy are compared across 149 scenarios with respect to the ground truth diagnosis (a) and all diagnoses listed within the accepted differential diagnoses (b). Bootstrapping (n=10,000) confirms all top-k differences between AMIE and PCP DDx accuracy are significant with p <0.05 after false discovery rate (FDR) correction. |
 |
| Diagnostic conversation and reasoning qualities as assessed by specialist physicians. On 28 out of 32 axes, AMIE outperformed PCPs while being comparable on the rest. |
Limitations
Our research has several limitations and should be interpreted with appropriate caution. Firstly, our evaluation technique likely underestimates the real-world value of human conversations, as the clinicians in our study were limited to an unfamiliar text-chat interface, which permits large-scale LLM–patient interactions but is not representative of usual clinical practice. Secondly, any research of this type must be seen as only a first exploratory step on a long journey. Transitioning from a LLM research prototype that we evaluated in this study to a safe and robust tool that could be used by people and those who provide care for them will require significant additional research. There are many important limitations to be addressed, including experimental performance under real-world constraints and dedicated exploration of such important topics as health equity and fairness, privacy, robustness, and many more, to ensure the safety and reliability of the technology.
AMIE as an aid to clinicians
In a recently released preprint, we evaluated the ability of an earlier iteration of the AMIE system to generate a DDx alone or as an aid to clinicians. Twenty (20) generalist clinicians evaluated 303 challenging, real-world medical cases sourced from the New England Journal of Medicine (NEJM) ClinicoPathologic Conferences (CPCs). Each case report was read by two clinicians randomized to one of two assistive conditions: either assistance from search engines and standard medical resources, or AMIE assistance in addition to these tools. All clinicians provided a baseline, unassisted DDx prior to using the respective assistive tools.
 |
| Assisted randomized reader study setup to investigate the assistive effect of AMIE to clinicians in solving complex diagnostic case challenges from the New England Journal of Medicine. |
AMIE exhibited standalone performance that exceeded that of unassisted clinicians (top-10 accuracy 59.1% vs. 33.6%, p= 0.04). Comparing the two assisted study arms, the top-10 accuracy was higher for clinicians assisted by AMIE, compared to clinicians without AMIE assistance (24.6%, p<0.01) and clinicians with search (5.45%, p=0.02). Further, clinicians assisted by AMIE arrived at more comprehensive differential lists than those without AMIE assistance.
 |
| In addition to strong standalone performance, using the AMIE system led to significant assistive effect and improvements in diagnostic accuracy of the clinicians in solving these complex case challenges. |
It's worth noting that NEJM CPCs are not representative of everyday clinical practice. They are unusual case reports in only a few hundred individuals so offer limited scope for probing important issues like equity or fairness.
Bold and responsible research in healthcare — the art of the possible
Access to clinical expertise remains scarce around the world. While AI has shown great promise in specific clinical applications, engagement in the dynamic, conversational diagnostic journeys of clinical practice requires many capabilities not yet demonstrated by AI systems. Doctors wield not only knowledge and skill but a dedication to myriad principles, including safety and quality, communication, partnership and teamwork, trust, and professionalism. Realizing these attributes in AI systems is an inspiring challenge that should be approached responsibly and with care. AMIE is our exploration of the “art of the possible”, a research-only system for safely exploring a vision of the future where AI systems might be better aligned with attributes of the skilled clinicians entrusted with our care. It is early experimental-only work, not a product, and has several limitations that we believe merit rigorous and extensive further scientific studies in order to envision a future in which conversational, empathic and diagnostic AI systems might become safe, helpful and accessible.
Acknowledgements
The research described here is joint work across many teams at Google Research and Google Deepmind. We are grateful to all our co-authors - Tao Tu, Mike Schaekermann, Anil Palepu, Daniel McDuff, Jake Sunshine, Khaled Saab, Jan Freyberg, Ryutaro Tanno, Amy Wang, Brenna Li, Mohamed Amin, Sara Mahdavi, Karan Sighal, Shekoofeh Azizi, Nenad Tomasev, Yun Liu, Yong Cheng, Le Hou, Albert Webson, Jake Garrison, Yash Sharma, Anupam Pathak, Sushant Prakash, Philip Mansfield, Shwetak Patel, Bradley Green, Ewa Dominowska, Renee Wong, Juraj Gottweis, Dale Webster, Katherine Chou, Christopher Semturs, Joelle Barral, Greg Corrado and Yossi Matias. We also thank Sami Lachgar, Lauren Winer and John Guilyard for their support with narratives and the visuals. Finally, we are grateful to Michael Howell, James Maynika, Jeff Dean, Karen DeSalvo, Zoubin Gharahmani and Demis Hassabis for their support during the course of this project.
 Posted by Tris Warkentin – Director, Product Management and Jane Fine - Senior Product Manager


 Posted by Fergus Hurley – Co-Founder & GM,
 Posted by Dave Burke, VP of Engineering


 Posted by


 Posted by Kaushik Sathupadi, Prakhar Srivastav, and Kristin Bi – Software Engineers; Alex Geboff – Technical Writer