Tag Archives: How-to

How it’s Made: Interacting with Gemini through multimodal prompting

Posted by Alexander Chen, Creative Director


Let’s try an experiment. We’ll show this picture to our multimodal model Gemini and ask it to describe what it sees:

A close up of a hand with five fingers spread out, palm facing down on a wooden surface.
Tell me what you see
Gemini:  I see a person's right hand. The hand is open with the fingers spread apart.

Ok, let’s try this one:

A closeup of the same hand, now balled up in a fist.
Gemini: A person knocking on a wooden door.

How about this one?

A closeup of the same hand, with two fingers extended like that of a peace sign.
Gemini: I see a hand with two fingers extended, which is a common symbol for the number two.

But wait … what if we asked Gemini to reason about all of these images together?

A sequence of three frames depicting the same hand in different formations. The first frame shows the hand with all five fingers spread out, palm facing down. The second frame shows the hand balled up in a fist. The third frame shows the hand with two fingers extended, like that of a peace sign.
What do you think I'm doing? Hint: it's a game.
Gemini: You're playing rock, paper, scissors.

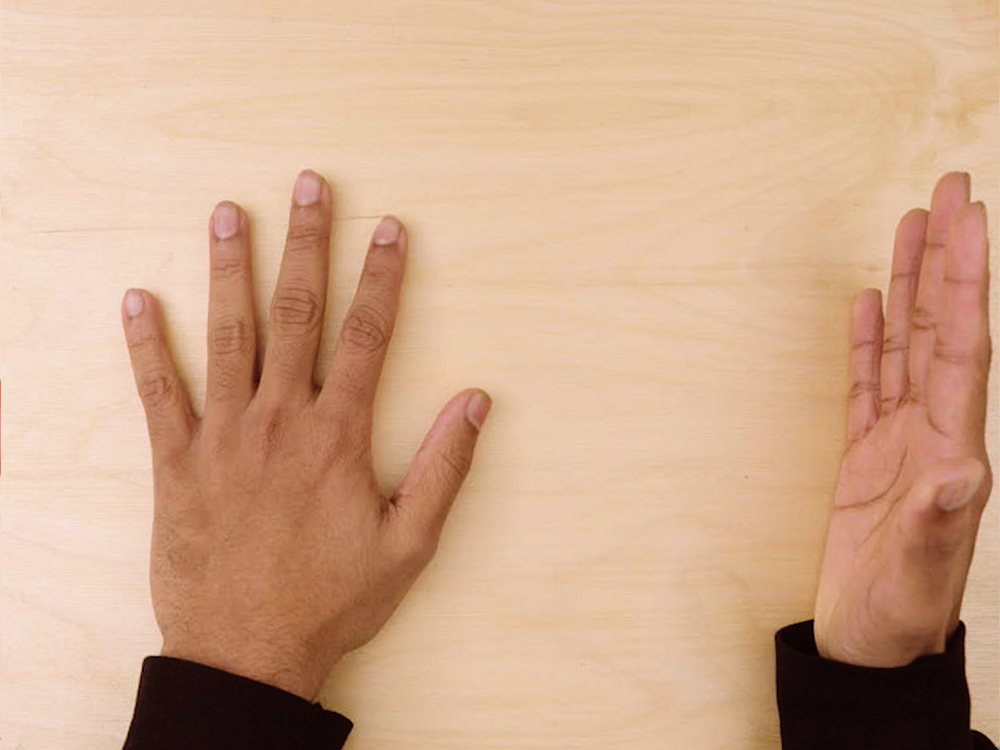
Nice. What else could we try? Let's see if Gemini can notice this pattern:

A sequence of six frames that alternate between a hand that is balled up in a fist, and a hand that has two fingers extended.
I’m playing rock paper scissors. Do you notice a pattern in my gameplay?
Gemini: You are alternating between rock and scissors.

Neat, it spotted the pattern! But does Gemini really know how this game works? Let’s try asking:

Hmm ... do you think it's a good strategy?
Gemini: No, it is not a good strategy. Your opponent will quickly learn your pattern and will be able to win every time. You should try to randomize your choices more.

Good advice, Gemini! Okay, for this last one, let’s put your multimodal reasoning capabilities to the test. Here’s your prompt:

This is a secret message. What does it say?

A six by eight grid of frames of a hands balled up in a fist or the hand with all five fingers spread out, palm facing down. The series of photos spells 'Gemini' in ASCII binary.

Can you figure it out? We have gotten Gemini to solve it, but we won’t spoil it by putting the answer in this post. 🙂


What is multimodal prompting?

Everything we did just now is an example of “multimodal prompting.” We’re basically giving Gemini combinations of different modalities — image and text in this case — and having Gemini respond by predicting what might come next. Gemini’s ability to seamlessly combine these modes together enables new possibilities for what you can do.

In this post, we’ll explore some of the prompting approaches we used in our Hands on with Gemini demo video. We’ll soon be rolling out Gemini for people to try in Google AI Studio, our free, web-based developer tool where you’ll be able to try your own multimodal prompts with Gemini. We’re hoping this guide of starter prompts and ideas helps inspire you to start exploring your own ideas.


🧮 Spatial reasoning and logic

Logic and puzzles are fun way to test Gemini. Let’s try one that requires both left-to-right spatial reasoning and knowledge about our solar system:

Three sticky notes on a wooden surface, each featuring a hand-drawn sketch of a solar-body. The left-most note depicts a drawing of the sun. The middle note has a drawing of saturn. The right-most note shows a drawing of earth.
Is this the right order? Consider the distance from the sun and explain your reasoning.

Gemini: No, the correct order is Sun, Earth, Saturn. The Sun is the closest to the center of the solar system, followed by the Earth, and then Saturn.

Nice! Here’s another, inspired by pinewood derby challenges:

Two sticky notes depicting two different hand-drawn cars going down-hill. The car on the left is blocky and awkwardly shaped, the car on the right is slanted and smooth.
Which of these cars is more aerodynamic? The one on the left or the right? Explain why, using specific visual details.

Gemini: The car on the right is more aerodynamic. It has a lower profile and a more streamlined shape. The car on the left has a higher profile and a more boxy shape, which makes it less aerodynamic.


📷 Image sequences

Next, what if we showed Gemini a sequence of images? Let’s see we can show a few still frames from a game of charades and have Gemini guess the movie:

Four frames from a video of a person leaning back and moving their arms wildly.
Guess what movie I'm acting out.
Gemini: The Matrix
Nice! But which part specifically? Look at my body movements.
Gemini: The part where Neo dodges bullets.


🪄 Magic tricks

Exploring image sequences really lets you dig into how Gemini reasons over time. Let’s try a classic magic trick.

An image of two hands with palms facing the camera, there is a coin in the right hand.
Explain what I'm doing.
Gemini: You are holding a coin in your right hand.
An image of two hands in motion, palms turning inward and away from the camera.
An image of two hands, palms facing down and away from the camera.
Where do you think the coin is?
Gemini: The coin is in your right hand.

Sure, that’s a logical answer given what it’s seen. But let’s pull a sleight of hand as we reveal this next image to Gemini...

An image of two hands, the left palm is facing down and the right hand is tilted upwards revealing nothing under the right palm.
Look here, what happened?
Gemini: The coin is gone.

Gemini notices it’s gone. But can it summarize what may have happened?

Summarize what may have happened, step by step, starting with the first image.

Gemini: 
1. You started with a coin in your right hand.
2. You then made a motion with your hands, and the coin disappeared.
3. You then showed that the coin was gone.

Gemini is leveraging the entire context of this conversation – both text and image – to summarize its answer. Finally, let’s ask:

Can you explain how it disappeared?
Gemini: The coin was palmed.

Gemini makes a really solid guess! But we won’t reveal our secret 🙂.
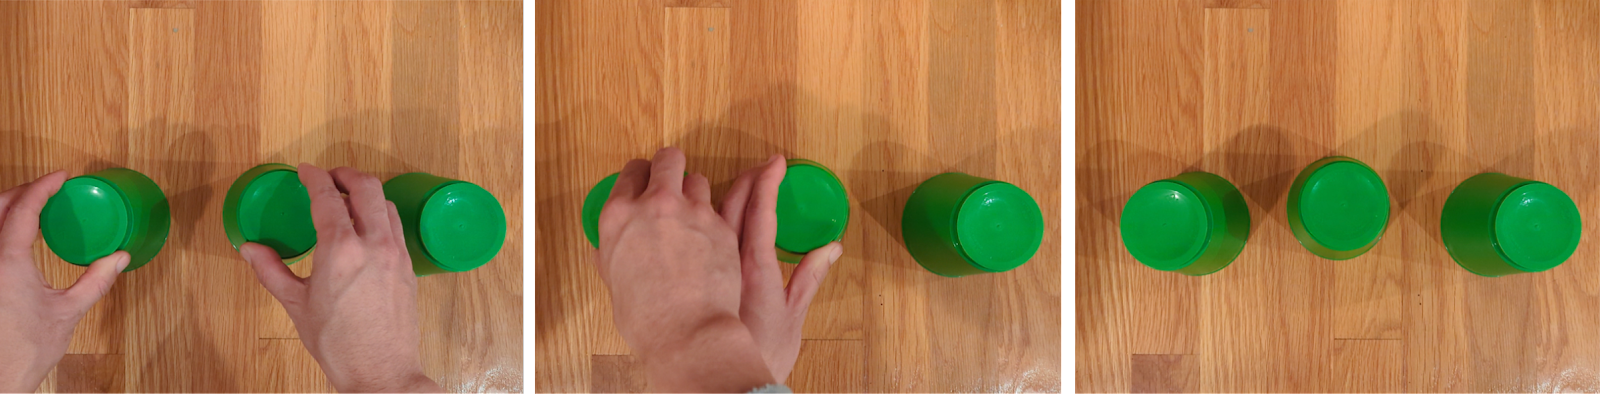


🔀 Cup shuffling

Let’s try a trick that requires memory and logic: the classic ball and cup shuffling game. For this one, we’ll break it down into steps for Gemini. First, let’s establish the basics with these instructions:

Instructions: There are three cups in position 1 (left), position 2 (middle), position 3 (right).

Next, we’ll need to tell Gemini where we’re placing the ball:

Starting position: The ball is in position 3.
Current state: empty, empty, ball

Notice how we came up with a simple format for remembering where the ball is with “empty, empty, ball.” Next, let’s show Gemini two example turns:

Images:
Three frames depicting a person shuffling three green cups. The person switches positions of the middle and right-most cups. 
Swap: 2 and 3
Current state: empty, ball, empty

Images:
Three frames depicting a person shuffling three green cups. The person switches positions of the middle and left-most cups. 
Swap: 1 and 2
Current state: ball, empty, empty

In these two example turns, we’re both showing it what a swap looks like, and how to update the ball position. Now, let’s see if Gemini can generalize to a swap it hasn't seen:

Images:
Three frames depicting a person shuffling three green cups. The person switches positions of the left-most and right-most cups. 
Swap: 

Here's Gemini's response:

1 and 3
Current state: empty, empty, ball

Gemini got it! It looked at these images and correctly inferred that cups 1 and 3 are being swapped. And it reasoned correctly about how to update the ball position. Let’s ask:

Tell me where the ball is and summarize how it got there, in paragraph form.

Gemini: The ball is in cup 3. 

Starting with the ball in cup 3, the first swap was cup 2 and 3. This put the ball in cup 2. The second swap was cup 1 and 2. This put the ball in cup 1. The third swap was cup 1 and 3. This put the ball in cup 3.

Not only did Gemini get the answer correctly, it accurately summarized the game history. Of course, it won’t always get this challenge right. Sometimes the fake out move (where you swap two empty cups) seems to trip it up, but sometimes it gets that too. But simple prompts like this make it really fun to rapidly test Gemini. You can change the variables in your prompt, including the order of swaps, and see how it does.


🔨 Tool use

If you want to use Gemini in your own apps, you’ll want it to be able to connect to other tools. Let’s try a simple idea where Gemini needs to combine multimodality with tool use: drawing a picture to search for music.

A musical instruments and palm tree sketch on a notebook. The sketch features a guitar, an amplifier, a drum set, and a palm tree drawn in a loose and expressive style. The notebook sits on a wooden desk.
Step 1. Look at this drawing, describe everything in it, and come up with a fun, specific idea for a good musical soundtrack genre, mood, or soundtrack. 
Step 2. Provide a search query in the form: "Search [insert query]"

Gemini: 
The drawing is of a guitar, drums, and an amplifier. There is also a palm tree. The mood is fun, upbeat, and tropical. The genre is reggae. The soundtrack could be used for a movie or TV show set in a tropical location. 

Search "Reggae music for a tropical vacation"

Nice! Gemini both reasons about what it sees and then generates a search query you can parse to do a search. It’s like Gemini is acting like a translator for you – but instead of translating between languages, it’s translating modalities – from drawing to music in this case. With multimodal prompting, you can use Gemini to invent your own entirely new translations between different inputs and outputs.


🕹️Game creation

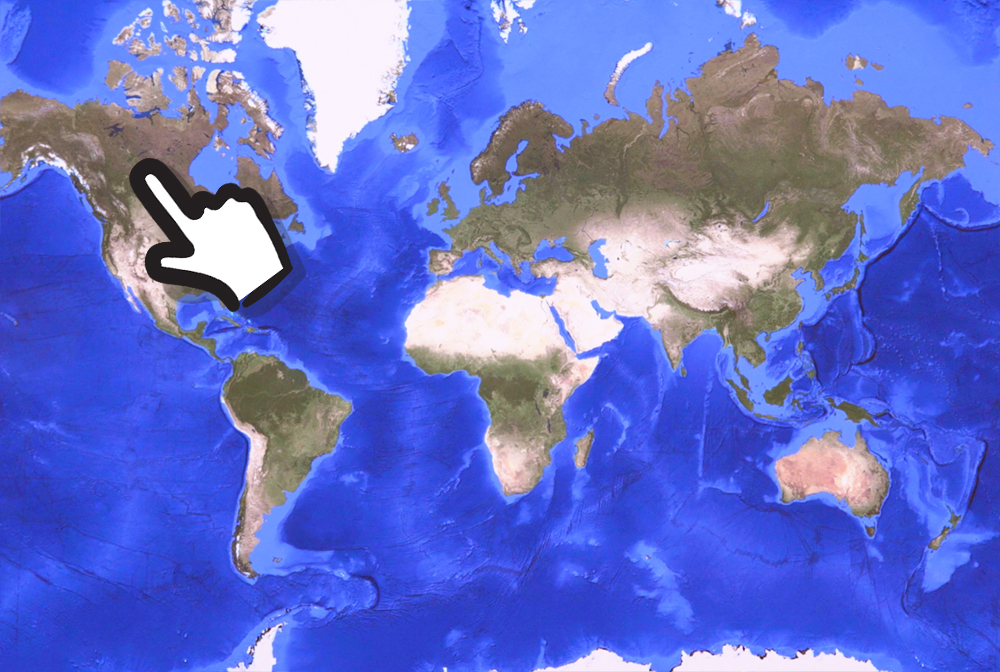
What if we tried using Gemini to quickly prototype a multimodal game? Here’s an idea: a geography guessing game where you have to point at a map to make your guess. Let’s start by prompting Gemini with the core idea:

Instructions: Let's play a game. Think of a country and give me a clue. The clue must be specific enough that there is only one correct country. I will try pointing at the country on a map.

Next, let’s give Gemini an example turn of gameplay, showing it how we want it to handle both incorrect and correct answers:

Country: This country is huge island that is mostly covered in ice.
(Answer: Greenland) 

Guess:
An image of a world map, a hand icon with the index finger pointing at Canada
I am pointing at the country of Canada *incorrect*

Guess:
An image of a world map, a hand icon with the index finger pointing at Greenland
I am pointing at the country of Greenland *correct*

Let’s give it a go and prompt Gemini to generate a clue:

Clue:
This country is known for its unique wildlife, including kangaroos and koalas. (Answer: Australia)

Ok, that’s a good clue. Let’s test out whether pointing will work. Just for fun, let’s try pointing at the wrong place first:

Guess:
A person pointing at Brazil on a map of the world with their right index finger. The map includes blue oceans, and green continents with no country borders.
I am pointing at the country of Brazil *incorrect*

Great! Gemini looked at my image and figured out I’m pointing at Brazil, and correctly reasoned that’s wrong. Now let’s point at the right place on the map:

A person pointing at Brazil on a map of the world with their right index finger. The map includes blue oceans, and green continents with no country borders.
I am pointing at the country of Australia *correct*

Nice! We’ve basically taught Gemini our game logic just by giving it an example. You'll also notice that it generalized from the illustrated hand in the examples.


⌨️ Coding

Of course, to bring your game idea to life, you’ll eventually have to write some executable code. Let’s see if Gemini can make a simple countdown timer for a game, but with a few fun twists:

Implement a simple timer in HTML/CSS/Javascript. Use a sans serif font and dark mode. Start it at 10 seconds and start counting down. When it reaches zero, replace the timer with a random emoji that is associated with excitement and motivation! Then go back to the timer at 10 seconds and start counting down again.

With just this single instruction, Gemini gives us a working timer that does what we asked for:

An animated gif of a countdown timer starting from 10. At the end of the countdown, a rocket emoji is shown followed lightning bolt emoji and a confetti emoji.

My favorite part is scrolling through Gemini’s source code to find the array of motivational emojis it picked for me:

 const emojis  = ['🚀', '⚡️', '🎉', '🎊', '🥳', '🤩', '✨'];


👀 A sneak peek

Throughout this post, we’ve been giving Gemini an input, and having Gemini make predictions for what might come next. That's basically what prompting is. And our inputs have been multimodal – image and text, combined.

But so far we've only shown Gemini responding in text. Maybe you’re wondering, can Gemini also respond with a combination of image and text? It can! This is a capability of Gemini called “interleaved text and image generation.” While this feature won’t be ready in the first version of Gemini for people to try, we hope to roll it out soon. Here’s a sneak peek of what’s possible.

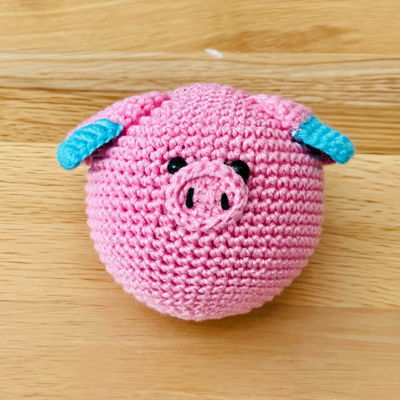
Let’s see if we could use Gemini to provide everyday creative inspiration. And let’s try it in a domain that requires a bit of multimodal reasoning ... knitting! 🧶. Similar to our map game above, let's provide one example turn of interaction:

Give me three ideas for crochet creations I could make with these two colors:

Balls of blue and yellow yarn on a wooden table.

Colors: I see blue and yellow yarn.
Idea 1: How about a cute dog with one yellow ear? 
Image 1:

A blue and yellow crocheted dog head with ears placed on a wooden table.

Idea 2: Or how about a jellyfish with a few yellow tentacles?
Image 2:

A blue and yellow crocheted octopus with tentacles placed on a wooden table.

Idea 3: Or how about a blue cat with a yellow nose?
Image 3:

A blue and yellow crocheted cat with whiskers placed on a wooden table.

We’re essentially teaching Gemini about how we want each interaction to go: “I’ll take a photo of two balls of yarn, and I expect you (Gemini) to both come up with an idea for something I could make, and generate an image of it.”

Now, let’s show it a new pair of yarn colors it hasn't yet seen, and see if it can generalize:

Give me three ideas for crochet creations I could make with these two colors:

Balls of blue and pink yarn on a wooden table.

Gemini:
Colors: I see blue and pink yarn.
Idea 1: How about a pig with blue ears?
Image 1:

A blue and pink crocheted pig face with ears placed on a wooden table.

Idea 2: Or an octopus with pink and blue tentacles?
Image 2:

A blue and yellow crocheted octopus with tentacles placed on a wooden table.

Idea 3: Or a bunny with a pink nose?
Image 3:

A blue and pink crocheted bunny placed on a wooden table.

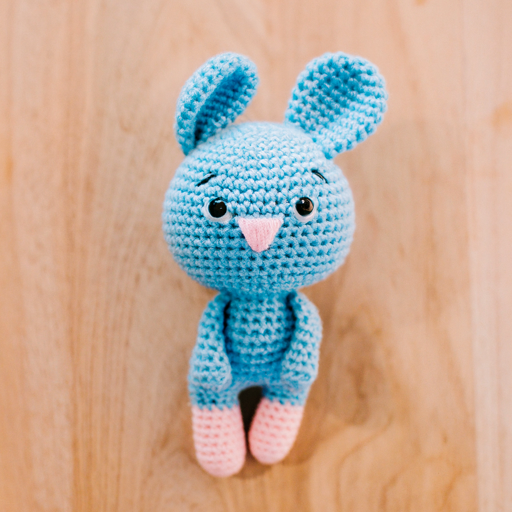
Nice! Gemini correctly reasoned about the new colors (“I see blue and pink yarn”) and generated these ideas and the images in a single, interleaved output of text and image.

What Gemini did here is fundamentally different from today’s text-to-image models. It's not just passing an instruction to a separate text-to-image model. It sees the image of my actual yarn on my wooden table, truly doing multimodal reasoning about my text and image together.


What's Next?

We hope you found this a helpful starter guide to get a sense of what’s possible with Gemini. We’re very excited to roll it out to more people soon so you can explore your own ideas through prompting. Stay tuned!

Full-stack development in Project IDX

Posted by Kaushik Sathupadi, Prakhar Srivastav, and Kristin Bi – Software Engineers; Alex Geboff – Technical Writer

We launched Project IDX, our experimental, new browser-based development experience, to simplify the chaos of building full-stack apps and streamline the development process from (back)end to (front)end.

In our experience, most web applications are built with at-least two different layers: a frontend (UI) layer and a backend layer. When you think about the kind of app you’d build in a browser-based developer workspace, you might not immediately jump to full-stack apps with robust, fully functional backends. Developing a backend in a web-based environment can get clunky and costly very quickly. Between different authentication setups for development and production environments, secure communication between backend and frontend, and the complexity of setting up a fully self-contained (hermetic) testing environment, costs and inconveniences can add up.

We know a lot of you are excited to try IDX yourselves, but in the meantime, we wanted to share this post about full-stack development in Project IDX. We’ll untangle some of the complex situations you might hit as a developer building both your frontend and backend layers in a web-based workspace — developer authentication, frontend-backend communication, and hermetic testing — and how we’ve tried to make it all just a little bit easier. And of course we want to hear from you about what else we should build that would make full-stack development easier for you!


Streamlined app previews

First and foremost, we've streamlined the process of enabling your applications frontend communication with its backend services in the VM, making it effortless to preview your full-stack application in the browser.

IDX workspaces are built on Google Cloud Workstations and securely access connected services through Service Accounts. Each workspace’s unique service account supports seamless, authenticated preview environments for your applications frontend. So, when you use Project IDX, application previews are built directly into your workspace, and you don’t actually have to set up a different authentication path to preview your UI. Currently, IDX only supports web previews, but Android and iOS application previews are coming soon to IDX workspaces near you.

Additionally, if your setup necessitates communication with the backend API under development in IDX from outside the browser preview, we've established a few mechanisms to temporarily provide access to the ports hosting these API backends.


Simple front-to-backend communication

If you’re using a framework that serves both the backend and frontend layers from the same port, you can pass the $PORT flag to use a custom PORT environment variable in your workspace configuration file (powered by Nix and stored directly in your workspace). This is part of the basic setup flow in Project IDX, so you don’t have to do anything particularly special (outside of setting the variable in your config file). Here’s an example Nix-based configuration file:


{ pkgs, ... }: {

# NOTE: This is an excerpt of a complete Nix configuration example.

# Enable previews and customize configuration
idx.previews = {
  enable = true;
  previews = [
    {
      command = [
        "npm"
        "run"
        "start"
        "--"
        "--port"
        "$PORT"
        "--host"
        "0.0.0.0"
        "--disable-host-check"
      ];
      manager = "web";
      id = "web";
    }
  ];
};

However, if your backend server is running on a different port from your UI server, you’ll need to implement a different strategy. One method is to have the frontend proxy the backend, as you would with Vite's custom server options.

Another way to establish communication between ports is to set up your code so the javascript running on your UI can communicate with the backend server using AJAX requests.

Let’s start with some sample code that includes both a backend and a frontend. Here’s a backend server written in Express.js:


import express from "express";
import cors from "cors";


const app= express();
app.use(cors());

app.get("/", (req, res) => {
    res.send("Hello World");
});

app.listen(6000, () => {
    console.log("Server is running on port 6000");
})

The bolded line in the sample — app.use(cors()); — sets up the CORS headers. Setup might be different based on the language/framework of your choice, but your backend needs to return these headers whether you’re developing locally or on IDX.

When you run the server in the IDX terminal, the backend ports show up in the IDX panel. And every port that your server runs on is automatically mapped to a URL you can call.

Moving text showing the IDX terminal and panel

Now, let's write some client code to make an AJAX call to this server.


// This URL is copied from the side panel showing the backend ports view
const WORKSPACE_URL = "https://6000-monospace-ksat-web-prod-79679-1677177068249.cluster-lknrrkkitbcdsvoir6wqg4mwt6.cloudworkstations.dev/";

async function get(url) {
  const response = await fetch(url, {
    credentials: 'include',
  });
  console.log(response.text());
}

// Call the backend
get(WORKSPACE_URL);

We’ve also made sure that the fetch() call includes credentials. IDX URLs are authenticated, so we need to include credentials. This way, the AJAX call includes the cookies to authenticate against our servers.

If you’re using XMLHttpRequest instead of fetch, you can set the “withCredentials” property, like this:


const xhr = new XMLHttpRequest();
xhr.open("GET", WORKSPACE_URL, true);
xhr.withCredentials = true;
xhr.send(null);

Your code might differ from our samples based on the client library you use to make the AJAX calls. If it does, check the documentation for your specific client library on how to make a credentialed request. Just be sure to make a credentialed request.


Server-side testing without a login

In some cases you might want to access your application on Project IDX without logging into your Google account — or from an environment where you can’t log into your Google account. For example, if you want to access an API you're developing in IDX using either Postman or cURL from your personal laptops's command line. You can do this by using a temporary access token generated by Project IDX.

Once you have a server running in Project IDX, you can bring up the command menu to generate an access token. This access token is a short-lived token that temporarily allows you to access your workstation.

It’s extremely important to note that this access token provides access to your entire IDX workspace, including but not limited to your application in preview, so you shouldn’t share it with just anyone. We recommend that you only use it for testing.

Generate access token in Project IDX

When you run this command from IDX, your access token shows up in a dialog window. Copy the access token and use it to make a cURL request to a service running on your workstation, like this one:


$ export ACCESS_TOKEN=myaccesstoken
$ curl -H "Authorization: Bearer $ACCESS_TOKEN" https://6000-monospace-ksat-web-prod-79679-1677177068249.cluster-lknrrkkitbcdsvoir6wqg4mwt6.cloudworkstations.dev/
Hello world

And now you can run tests from an authenticated server environment!


Web-based, fully hermetic testing

As we’ve highlighted, you can test your application’s frontend and backend in a fully self-contained, authenticated, secure environment using IDX. You can also run local emulators in your web-based development environment to test your application’s backend services.

For example, you can run the Firebase Local Emulator Suite directly from your IDX workspace. To install the emulator suite, you’d run firebase init emulators from the IDX Terminal tab and follow the steps to configure which emulators you want on what ports.

ALT TEXT

Once you’ve installed them, you can configure and use them the same way you would in a local development environment from the IDX terminal.


Next Steps

As you can see, Project IDX can meet many of your full-stack development needs — from frontend to backend and every emulator in between.

If you're already using Project IDX, tag us on social with #projectidx to let us know how Project IDX has helped you with your full-stack development. Or to sign up for the waitlist, visit idx.dev.

Make with MakerSuite Part 2: Tuning LLMs

Posted by Pranay Bhatia – Product Manager, Google Labs

AI is changing how developers work, and it’s also making it possible for more people to build. In Part 1, we learned how MakerSuite can be used to easily prompt LLMs through plain language. Today, in Part 2, we’re introducing Tuning in MakerSuite, which will let you customize a model for your specific needs in minutes.

What is tuning?

In Part 1, we introduced a technique called few-shot prompting to improve a model’s performance by giving it a handful of examples. Tuning improves on this technique by training the model on many more examples—so many that they can’t all fit in the prompt.


Fine-tuning vs. Parameter Efficient Tuning

You may have heard about classic “fine-tuning” of models. This is where a pre-trained model is adapted to a particular task by training it on a smaller set of task-specific labeled data. But with today’s LLMs and their huge number of parameters, re-training is complex: it requires machine learning expertise, lots of data, and lots of compute.

Tuning in MakerSuite uses a technique called Parameter Efficient Tuning (PET) to produce customized, high-quality models without the additional costs and complexity of traditional fine-tuning. In addition, PET produces high quality models with as little as a few hundred data points, reducing the burden of data collection for the developer.


Tune models in MakerSuite in minutes


1. Create a tuned model

It’s easy to tune models in MakerSuite. Simply select “Create new” and choose “Tuned model.”

Moving image of how to access 'Tuned Model' option from Create New menu in MakerSuite

2. Select data for tuning

You can tune your model from a saved data prompt or import data from Google Sheets or a CSV file. We recommend using at least 100 examples to get the best performance before you hit the Tune button.

Moving image of importing data for tuning into MakerSuite

3. View your tuned model

View your tuning progress in your library. Once the model has finished tuning, you can view the details by clicking on your model.

Moving image of viewing details of a model once it has fiunished tuning

4. Run your tuned model

To start using your newly tuned model, create a new text or data prompt and select your newly tuned model from the list of available models.

Image showing location of model in list of available models in MakerSuite


MakerSuite: a powerful, easy tool for tuning

Tuning in MakerSuite empowers developers to harness the full potential of models like PaLM 2 with delightful ease. Whether you've already tuned a model with the API or just started experimenting with generative AI, you’ll find that MakerSuite opens up exciting possibilities to make the model more relevant and effective for your own application in just minutes.

Try the K2 compiler in your Android projects

Posted by Márton Braun, Developer Relations Engineer

The Kotlin compiler is being rewritten for Kotlin 2.0. The new compiler implementation–codenamed K2–brings with it significant build speed improvements, compiling Kotlin code up to twice as fast as the original compiler. It also has a more flexible architecture that will enable the introduction of new language features after 2.0.

Try the new compiler

With Kotlin 1.9, K2 is now available in Beta for JVM targets, including Android projects. To help stabilize the new compiler and make sure you’re ready for Kotlin 2.0, we encourage you to try compiling your projects with the new compiler. If you run into any issues, you can report them on the Kotlin issue tracker.

To try the new compiler, update to Kotlin 1.9 and add the following to your project’s gradle.properties file:
kotlin.experimental.tryK2=true

Note that the new compiler should not be used for production builds yet. A good approach for trying it early is to create a separate branch in your project for compiling with K2. You can find an example of this in the Now in Android repository.

Tooling support

Plugins and tools that depend on the Kotlin compiler frontend will also have to be updated to add support for K2. Some tools already have experimental support for building with K2: the Jetpack Compose compiler plugin supports K2 starting in 1.5.0, which is compatible with Kotlin 1.9.

Android Lint also supports K2 starting in version 8.2.0-alpha12. To run Lint on K2, upgrade to this version and add android.lint.useK2Uast=true to your gradle.properties file. Note that any custom lint rules that rely on APIs from the old frontend will have to be updated to use the analysis API instead.

Adding K2 support in other tools is still in progress: KSP and KAPT tasks currently fall back to using the old compiler when building your project with K2. However, compilation tasks can still run using K2 when these tools are used.

Android Studio also relies on the Kotlin compiler for code analysis. Until Android Studio has support for K2, building with K2 might result in some discrepancies between the code analysis of the IDE and command line builds in certain edge cases.

If you use any additional compiler plugins, check their documentation to see whether they are compatible with K2 yet.

Get started with the K2 compiler today

The Kotlin 2.0 Compiler offers significant improvements to help you ship updates faster, be more productive, and spend more time focusing on what makes your app unique.

It already works with Jetpack Compose and we have a roadmap to improve support in other tools, including Android Studio, KSP, and compiler plugins. Now is a great time to try it in your app's codebase and provide feedback related to Kotlin, Compose, or Lint.

Your YouTube "How To" Guide to the Holidays


The holidays should be a festive time of year, not frenzied. But there’s no need to panic: our community of YouTube gurus is here to keep calm this holiday season with more than 135 million how-to videos.

From figuring out what to do with your leftovers, pleasing your vegan guests, or keeping your kids occupied with holiday-themed activities, these Canadian YouTube Creators have the answers to all your holiday questions.

How to get the party started
Whether it's throwing a formal dinner party or entertaining last-minute guests, you're likely to host guests at least once over the holiday season. To impress your guests when they arrive, The Domestic Geek, has tons of easy-to-make crowd pleasers, including the classic cheeseboard, herbed popcorn, sweet rosemary bar nuts and 3 delicious party dips.
How to rock a holiday look under $100
The holiday season means parties galore. Although you want to look your best at all times, you also don’t want to break the bank. Canada’s beauty guru, RachhLoves, shows you how to put together an entire holiday look (outfit, shoes, jewelry, makeup) for under $100.
How to clean your space post-holidays: Cleaning up your holiday decor or cleaning once your guests have left can sometimes be the worst part about the holidays. Not to fear, Melissa Maker of Clean My Space has all sorts of tips for how to clean up post-holiday, including how to clean up after a party, holiday meal cleanup tips, and holiday decor cleanup.
We hope these YouTubers' tutorials can help you impress your guests and loved ones this holiday season. Have a safe and happy holiday!

Posted by Jenn Kaiser, Communications Manager, YouTube Canada