Tag Archives: Firebase

Androidify: Building powerful AI-driven experiences with Jetpack Compose, Gemini and CameraX

Posted by Rebecca Franks – Developer Relations Engineer

The Android bot is a beloved mascot for Android users and developers, with previous versions of the bot builder being very popular - we decided that this year we’d rebuild the bot maker from the ground up, using the latest technology backed by Gemini. Today we are releasing a new open source app, Androidify, for learning how to build powerful AI driven experiences on Android using the latest technologies such as Jetpack Compose, Gemini through Firebase, CameraX, and Navigation 3.

a moving image of various droid bots dancing individually

Androidify app demo

Here’s an example of the app running on the device, showcasing converting a photo to an Android bot that represents my likeness:

moving image showing the conversion of an image of a woman in a pink dress holding na umbrella into a 3D image of a droid bot wearing a pink dress holding an umbrella

Under the hood

The app combines a variety of different Google technologies, such as:

    • Gemini API - through Firebase AI Logic SDK, for accessing the underlying Imagen and Gemini models.
    • Jetpack Compose - for building the UI with delightful animations and making the app adapt to different screen sizes.
    • Navigation 3 - the latest navigation library for building up Navigation graphs with Compose.
    • CameraX Compose and Media3 Compose - for building up a custom camera with custom UI controls (rear camera support, zoom support, tap-to-focus) and playing the promotional video.

This sample app is currently using a standard Imagen model, but we've been working on a fine-tuned model that's trained specifically on all of the pieces that make the Android bot cute and fun; we'll share that version later this year. In the meantime, don't be surprised if the sample app puts out some interesting looking examples!

How does the Androidify app work?

The app leverages our best practices for Architecture, Testing, and UI to showcase a real world, modern AI application on device.

Flow chart describing Androidify app flow
Androidify app flow chart detailing how the app works with AI

AI in Androidify with Gemini and ML Kit

The Androidify app uses the Gemini models in a multitude of ways to enrich the app experience, all powered by the Firebase AI Logic SDK. The app uses Gemini 2.5 Flash and Imagen 3 under the hood:

    • Image validation: We ensure that the captured image contains sufficient information, such as a clearly focused person, and assessing for safety. This feature uses the multi-modal capabilities of Gemini API, by giving it a prompt and image at the same time:

val response = generativeModel.generateContent(
   content {
       text(prompt)
       image(image)
   },
)

    • Text prompt validation: If the user opts for text input instead of image, we use Gemini 2.5 Flash to ensure the text contains a sufficiently descriptive prompt to generate a bot.

    • Image captioning: Once we’re sure the image has enough information, we use Gemini 2.5 Flash to perform image captioning., We ask Gemini to be as descriptive as possible,focusing on the clothing and its colors.

    • “Help me write” feature: Similar to an “I’m feeling lucky” type feature, “Help me write” uses Gemini 2.5 Flash to create a random description of the clothing and hairstyle of a bot.

    • Image generation from the generated prompt: As the final step, Imagen generates the image, providing the prompt and the selected skin tone of the bot.

The app also uses the ML Kit pose detection to detect a person in the viewfinder and enable the capture button when a person is detected, as well as adding fun indicators around the content to indicate detection.

Explore more detailed information about AI usage in Androidify.

Jetpack Compose

The user interface of Androidify is built using Jetpack Compose, the modern UI toolkit that simplifies and accelerates UI development on Android.

Delightful details with the UI

The app uses Material 3 Expressive, the latest alpha release that makes your apps more premium, desirable, and engaging. It provides delightful bits of UI out-of-the-box, like new shapes, componentry, and using the MotionScheme variables wherever a motion spec is needed.

MaterialShapes are used in various locations. These are a preset list of shapes that allow for easy morphing between each other—for example, the cute cookie shape for the camera capture button:


Androidify app UI showing camera button
Camera button with a MaterialShapes.Cookie9Sided shape

Beyond using the standard Material components, Androidify also features custom composables and delightful transitions tailored to the specific needs of the app:

    • There are plenty of shared element transitions across the app—for example, a morphing shape shared element transition is performed between the “take a photo” button and the camera surface.

      moving example of expressive button shapes in slow motion

    • Custom enter transitions for the ResultsScreen with the usage of marquee modifiers.

      animated marquee example

    • Fun color splash animation as a transition between screens.

      moving image of a blue color splash transition between Androidify demo screens

    • Animating gradient buttons for the AI-powered actions.

      animated gradient button for AI powered actions example

To learn more about the unique details of the UI, read Androidify: Building delightful UIs with Compose

Adapting to different devices

Androidify is designed to look great and function seamlessly across candy bar phones, foldables, and tablets. The general goal of developing adaptive apps is to avoid reimplementing the same app multiple times on each form factor by extracting out reusable composables, and leveraging APIs like WindowSizeClass to determine what kind of layout to display.

a collage of different adaptive layouts for the Androidify app across small and large screens
Various adaptive layouts in the app

For Androidify, we only needed to leverage the width window size class. Combining this with different layout mechanisms, we were able to reuse or extend the composables to cater to the multitude of different device sizes and capabilities.

    • Responsive layouts: The CreationScreen demonstrates adaptive design. It uses helper functions like isAtLeastMedium() to detect window size categories and adjust its layout accordingly. On larger windows, the image/prompt area and color picker might sit side-by-side in a Row, while on smaller windows, the color picker is accessed via a ModalBottomSheet. This pattern, called “supporting pane”, highlights the supporting dependencies between the main content and the color picker.

    • Foldable support: The app actively checks for foldable device features. The camera screen uses WindowInfoTracker to get FoldingFeature information to adapt to different features by optimizing the layout for tabletop posture.

    • Rear display: Support for devices with multiple displays is included via the RearCameraUseCase, allowing for the device camera preview to be shown on the external screen when the device is unfolded (so the main content is usually displayed on the internal screen).

Using window size classes, coupled with creating a custom @LargeScreensPreview annotation, helps achieve unique and useful UIs across the spectrum of device sizes and window sizes.

CameraX and Media3 Compose

To allow users to base their bots on photos, Androidify integrates CameraX, the Jetpack library that makes camera app development easier.

The app uses a custom CameraLayout composable that supports the layout of the typical composables that a camera preview screen would include— for example, zoom buttons, a capture button, and a flip camera button. This layout adapts to different device sizes and more advanced use cases, like the tabletop mode and rear-camera display. For the actual rendering of the camera preview, it uses the new CameraXViewfinder that is part of the camerax-compose artifact.

CameraLayout in Compose
CameraLayout composable that takes care of different device configurations, such as table top mode

CameraLayout in Compose
CameraLayout composable that takes care of different device configurations, such as table top mode

The app also integrates with Media3 APIs to load an instructional video for showing how to get the best bot from a prompt or image. Using the new media3-ui-compose artifact, we can easily add a VideoPlayer into the app:

@Composable
private fun VideoPlayer(modifier: Modifier = Modifier) {
    val context = LocalContext.current
    var player by remember { mutableStateOf<Player?>(null) }
    LifecycleStartEffect(Unit) {
        player = ExoPlayer.Builder(context).build().apply {
            setMediaItem(MediaItem.fromUri(Constants.PROMO_VIDEO))
            repeatMode = Player.REPEAT_MODE_ONE
            prepare()
        }
        onStopOrDispose {
            player?.release()
            player = null
        }
    }
    Box(
        modifier
            .background(MaterialTheme.colorScheme.surfaceContainerLowest),
    ) {
        player?.let { currentPlayer ->
            PlayerSurface(currentPlayer, surfaceType = SURFACE_TYPE_TEXTURE_VIEW)
        }
    }
}

Using the new onLayoutRectChanged modifier, we also listen for whether the composable is completely visible or not, and play or pause the video based on this information:

var videoFullyOnScreen by remember { mutableStateOf(false) }     

LaunchedEffect(videoFullyOnScreen) {
     if (videoFullyOnScreen) currentPlayer.play() else currentPlayer.pause()
} 

// We add this onto the player composable to determine if the video composable is visible, and mutate the videoFullyOnScreen variable, that then toggles the player state. 
Modifier.onVisibilityChanged(
                containerWidth = LocalView.current.width,
                containerHeight = LocalView.current.height,
) { fullyVisible -> videoFullyOnScreen = fullyVisible }

// A simple version of visibility changed detection
fun Modifier.onVisibilityChanged(
    containerWidth: Int,
    containerHeight: Int,
    onChanged: (visible: Boolean) -> Unit,
) = this then Modifier.onLayoutRectChanged(100, 0) { layoutBounds ->
    onChanged(
        layoutBounds.boundsInRoot.top > 0 &&
            layoutBounds.boundsInRoot.bottom < containerHeight &&
            layoutBounds.boundsInRoot.left > 0 &&
            layoutBounds.boundsInRoot.right < containerWidth,
    )
}

Additionally, using rememberPlayPauseButtonState, we add on a layer on top of the player to offer a play/pause button on the video itself:

val playPauseButtonState = rememberPlayPauseButtonState(currentPlayer)
            OutlinedIconButton(
                onClick = playPauseButtonState::onClick,
                enabled = playPauseButtonState.isEnabled,
            ) {
                val icon =
                    if (playPauseButtonState.showPlay) R.drawable.play else R.drawable.pause
                val contentDescription =
                    if (playPauseButtonState.showPlay) R.string.play else R.string.pause
                Icon(
                    painterResource(icon),
                    stringResource(contentDescription),
                )
            }

Check out the code for more details on how CameraX and Media3 were used in Androidify.

Navigation 3

Screen transitions are handled using the new Jetpack Navigation 3 library androidx.navigation3. The MainNavigation composable defines the different destinations (Home, Camera, Creation, About) and displays the content associated with each destination using NavDisplay. You get full control over your back stack, and navigating to and from destinations is as simple as adding and removing items from a list.

@Composable
fun MainNavigation() {
   val backStack = rememberMutableStateListOf<NavigationRoute>(Home)
   NavDisplay(
       backStack = backStack,
       onBack = { backStack.removeLastOrNull() },
       entryProvider = entryProvider {
           entry<Home> { entry ->
               HomeScreen(
                   onAboutClicked = {
                       backStack.add(About)
                   },
               )
           }
           entry<Camera> {
               CameraPreviewScreen(
                   onImageCaptured = { uri ->
                       backStack.add(Create(uri.toString()))
                   },
               )
           }
           // etc
       },
   )
}

Notably, Navigation 3 exposes a new composition local, LocalNavAnimatedContentScope, to easily integrate your shared element transitions without needing to keep track of the scope yourself. By default, Navigation 3 also integrates with predictive back, providing delightful back experiences when navigating between screens, as seen in this prior shared element transition:

CameraLayout in Compose

Learn more about Jetpack Navigation 3, currently in alpha.

Learn more

By combining the declarative power of Jetpack Compose, the camera capabilities of CameraX, the intelligent features of Gemini, and thoughtful adaptive design, Androidify is a personalized avatar creation experience that feels right at home on any Android device. You can find the full code sample at github.com/android/androidify where you can see the app in action and be inspired to build your own AI-powered app experiences.

Explore this announcement and all Google I/O 2025 updates on io.google starting May 22.


Androidify: How Androidify leverages Gemini, Firebase and ML Kit

Posted by Thomas Ezan – Developer Relations Engineer, Rebecca Franks – Developer Relations Engineer, and Avneet Singh – Product Manager

We’re bringing back Androidify later this year, this time powered by Google AI, so you can customize your very own Android bot and share your creativity with the world. Today, we’re releasing a new open source demo app for Androidify as a great example of how Google is using its Gemini AI models to enhance app experiences.

In this post, we'll dive into how the Androidify app uses Gemini models and Imagen via the Firebase AI Logic SDK, and we'll provide some insights learned along the way to help you incorporate Gemini and AI into your own projects. Read more about the Androidify demo app.

App flow

The overall app functions as follows, with various parts of it using Gemini and Firebase along the way:

flow chart demonstrating Androidify app flow

Gemini and image validation

To get started with Androidify, take a photo or choose an image on your device. The app needs to make sure that the image you upload is suitable for creating an avatar.

Gemini 2.5 Flash via Firebase helps with this by verifying that the image contains a person, that the person is in focus, and assessing image safety, including whether the image contains abusive content.

val jsonSchema = Schema.obj(
   properties = mapOf("success" to Schema.boolean(), "error" to Schema.string()),
   optionalProperties = listOf("error"),
   )
   
val generativeModel = Firebase.ai(backend = GenerativeBackend.googleAI())
   .generativeModel(
            modelName = "gemini-2.5-flash-preview-04-17",
   	     generationConfig = generationConfig {
                responseMimeType = "application/json"
                responseSchema = jsonSchema
            },
            safetySettings = listOf(
                SafetySetting(HarmCategory.HARASSMENT, HarmBlockThreshold.LOW_AND_ABOVE),
                SafetySetting(HarmCategory.HATE_SPEECH, HarmBlockThreshold.LOW_AND_ABOVE),
                SafetySetting(HarmCategory.SEXUALLY_EXPLICIT, HarmBlockThreshold.LOW_AND_ABOVE),
                SafetySetting(HarmCategory.DANGEROUS_CONTENT, HarmBlockThreshold.LOW_AND_ABOVE),
                SafetySetting(HarmCategory.CIVIC_INTEGRITY, HarmBlockThreshold.LOW_AND_ABOVE),
    	),
    )

 val response = generativeModel.generateContent(
            content {
                text("You are to analyze the provided image and determine if it is acceptable and appropriate based on specific criteria.... (more details see the full sample)")
                image(image)
            },
        )

val jsonResponse = Json.parseToJsonElement(response.text)
val isSuccess = jsonResponse.jsonObject["success"]?.jsonPrimitive?.booleanOrNull == true
val error = jsonResponse.jsonObject["error"]?.jsonPrimitive?.content

In the snippet above, we’re leveraging structured output capabilities of the model by defining the schema of the response. We’re passing a Schema object via the responseSchema param in the generationConfig.

We want to validate that the image has enough information to generate a nice Android avatar. So we ask the model to return a json object with success = true/false and an optional error message explaining why the image doesn't have enough information.

Structured output is a powerful feature enabling a smoother integration of LLMs to your app by controlling the format of their output, similar to an API response.

Image captioning with Gemini Flash

Once it's established that the image contains sufficient information to generate an Android avatar, it is captioned using Gemini 2.5 Flash with structured output.

val jsonSchema = Schema.obj(
            properties = mapOf(
                "success" to Schema.boolean(),
                "user_description" to Schema.string(),
            ),
            optionalProperties = listOf("user_description"),
        )
val generativeModel = createGenerativeTextModel(jsonSchema)

val prompt = "You are to create a VERY detailed description of the main person in the given image. This description will be translated into a prompt for a generative image model..."

val response = generativeModel.generateContent(
content { 
       	text(prompt) 
             	image(image) 
	})
        
val jsonResponse = Json.parseToJsonElement(response.text!!) 
val isSuccess = jsonResponse.jsonObject["success"]?.jsonPrimitive?.booleanOrNull == true

val userDescription = jsonResponse.jsonObject["user_description"]?.jsonPrimitive?.content

The other option in the app is to start with a text prompt. You can enter in details about your accessories, hairstyle, and clothing, and let Imagen be a bit more creative.

Android generation via Imagen

We’ll use this detailed description of your image to enrich the prompt used for image generation. We’ll add extra details around what we would like to generate and include the bot color selection as part of this too, including the skin tone selected by the user.

val imagenPrompt = "A 3D rendered cartoonish Android mascot in a photorealistic style, the pose is relaxed and straightforward, facing directly forward [...] The bot looks as follows $userDescription [...]"

We then call the Imagen model to create the bot. Using this new prompt, we create a model and call generateImages:

// we supply our own fine-tuned model here but you can use "imagen-3.0-generate-002" 
val generativeModel = Firebase.ai(backend = GenerativeBackend.googleAI()).imagenModel(
            "imagen-3.0-generate-002",
            safetySettings =
            ImagenSafetySettings(
                ImagenSafetyFilterLevel.BLOCK_LOW_AND_ABOVE,
                personFilterLevel = ImagenPersonFilterLevel.ALLOW_ALL,
            ),
)

val response = generativeModel.generateImages(imagenPrompt)

val image = response.images.first().asBitmap()

And that’s it! The Imagen model generates a bitmap that we can display on the user’s screen.

Finetuning the Imagen model

The Imagen 3 model was finetuned using Low-Rank Adaptation (LoRA). LoRA is a fine-tuning technique designed to reduce the computational burden of training large models. Instead of updating the entire model, LoRA adds smaller, trainable "adapters" that make small changes to the model's performance. We ran a fine tuning pipeline on the Imagen 3 model generally available with Android bot assets of different color combinations and different assets for enhanced cuteness and fun. We generated text captions for the training images and the image-text pairs were used to finetune the model effectively.

The current sample app uses a standard Imagen model, so the results may look a bit different from the visuals in this post. However, the app using the fine-tuned model and a custom version of Firebase AI Logic SDK was demoed at Google I/O. This app will be released later this year and we are also planning on adding support for fine-tuned models to Firebase AI Logic SDK later in the year.

moving image of Androidify app demo turning a selfie image of a bearded man wearing a black tshirt and sunglasses, with a blue back pack into a green 3D bearded droid wearing a black tshirt and sunglasses with a blue backpack
The original image... and Androidifi-ed image

ML Kit

The app also uses the ML Kit Pose Detection SDK to detect a person in the camera view, which triggers the capture button and adds visual indicators.

To do this, we add the SDK to the app, and use PoseDetection.getClient(). Then, using the poseDetector, we look at the detectedLandmarks that are in the streaming image coming from the Camera, and we set the _uiState.detectedPose to true if a nose and shoulders are visible:

private suspend fun runPoseDetection() {
    PoseDetection.getClient(
        PoseDetectorOptions.Builder()
            .setDetectorMode(PoseDetectorOptions.STREAM_MODE)
            .build(),
    ).use { poseDetector ->
        // Since image analysis is processed by ML Kit asynchronously in its own thread pool,
        // we can run this directly from the calling coroutine scope instead of pushing this
        // work to a background dispatcher.
        cameraImageAnalysisUseCase.analyze { imageProxy ->
            imageProxy.image?.let { image ->
                val poseDetected = poseDetector.detectPersonInFrame(image, imageProxy.imageInfo)
                _uiState.update { it.copy(detectedPose = poseDetected) }
            }
        }
    }
}

private suspend fun PoseDetector.detectPersonInFrame(
    image: Image,
    imageInfo: ImageInfo,
): Boolean {
    val results = process(InputImage.fromMediaImage(image, imageInfo.rotationDegrees)).await()
    val landmarkResults = results.allPoseLandmarks
    val detectedLandmarks = mutableListOf<Int>()
    for (landmark in landmarkResults) {
        if (landmark.inFrameLikelihood > 0.7) {
            detectedLandmarks.add(landmark.landmarkType)
        }
    }

    return detectedLandmarks.containsAll(
        listOf(PoseLandmark.NOSE, PoseLandmark.LEFT_SHOULDER, PoseLandmark.RIGHT_SHOULDER),
    )
}
moving image showing the camera shutter button activating when an orange droid figurine is held in the camera frame
The camera shutter button is activated when a person (or a bot!) enters the frame.

Get started with AI on Android

The Androidify app makes an extensive use of the Gemini 2.5 Flash to validate the image and generate a detailed description used to generate the image. It also leverages the specifically fine-tuned Imagen 3 model to generate images of Android bots. Gemini and Imagen models are easily integrated into the app via the Firebase AI Logic SDK. In addition, ML Kit Pose Detection SDK controls the capture button, enabling it only when a person is present in front of the camera.

To get started with AI on Android, go to the Gemini and Imagen documentation for Android.

Explore this announcement and all Google I/O 2025 updates on io.google starting May 22.

Androidify: Building delightful UIs with Compose

Posted by Rebecca Franks - Developer Relations Engineer

Androidify is a new sample app we built using the latest best practices for mobile apps. Previously, we covered all the different features of the app, from Gemini integration and CameraX functionality to adaptive layouts. In this post, we dive into the Jetpack Compose usage throughout the app, building upon our base knowledge of Compose to add delightful and expressive touches along the way!

Material 3 Expressive

Material 3 Expressive is an expansion of the Material 3 design system. It’s a set of new features, updated components, and design tactics for creating emotionally impactful UX.


It’s been released as part of the alpha version of the Material 3 artifact (androidx.compose.material3:material3:1.4.0-alpha10) and contains a wide range of new components you can use within your apps to build more personalized and delightful experiences. Learn more about Material 3 Expressive's component and theme updates for more engaging and user-friendly products.

Material Expressive Component updates

In addition to the new component updates, Material 3 Expressive introduces a new motion physics system that's encompassed in the Material theme.

In Androidify, we’ve utilized Material 3 Expressive in a few different ways across the app. For example, we’ve explicitly opted-in to the new MaterialExpressiveTheme and chosen MotionScheme.expressive() (this is the default when using expressive) to add a bit of playfulness to the app:

@Composable
fun AndroidifyTheme(
   content: @Composable () -> Unit,
) {
   val colorScheme = LightColorScheme


   MaterialExpressiveTheme(
       colorScheme = colorScheme,
       typography = Typography,
       shapes = shapes,
       motionScheme = MotionScheme.expressive(),
       content = {
           SharedTransitionLayout {
               CompositionLocalProvider(LocalSharedTransitionScope provides this) {
                   content()
               }
           }
       },
   )
}

Some of the new componentry is used throughout the app, including the HorizontalFloatingToolbar for the Prompt type selection:

moving example of expressive button shapes in slow motion

The app also uses MaterialShapes in various locations, which are a preset list of shapes that allow for easy morphing between each other. For example, check out the cute cookie shape for the camera capture button:

Material Expressive Component updates
Camera button with a MaterialShapes.Cookie9Sided shape

Animations

Wherever possible, the app leverages the Material 3 Expressive MotionScheme to obtain a themed motion token, creating a consistent motion feeling throughout the app. For example, the scale animation on the camera button press is powered by defaultSpatialSpec(), a specification used for animations that move something across a screen (such as x,y or rotation, scale animations):

val interactionSource = remember { MutableInteractionSource() }
val animationSpec = MaterialTheme.motionScheme.defaultSpatialSpec<Float>()
Spacer(
   modifier
       .indication(interactionSource, ScaleIndicationNodeFactory(animationSpec))
       .clip(MaterialShapes.Cookie9Sided.toShape())
       .size(size)
       .drawWithCache {
           //.. etc
       },
)

Camera button scale interaction

Shared element animations

The app uses shared element transitions between different screen states. Last year, we showcased how you can create shared elements in Jetpack Compose, and we’ve extended this in the Androidify sample to create a fun example. It combines the new Material 3 Expressive MaterialShapes, and performs a transition with a morphing shape animation:

moving example of expressive button shapes in slow motion

To do this, we created a custom Modifier that takes in the target and resting shapes for the sharedBounds transition:

@Composable
fun Modifier.sharedBoundsRevealWithShapeMorph(
   sharedContentState: 
SharedTransitionScope.SharedContentState,
   sharedTransitionScope: SharedTransitionScope = 
LocalSharedTransitionScope.current,
   animatedVisibilityScope: AnimatedVisibilityScope = 
LocalNavAnimatedContentScope.current,
   boundsTransform: BoundsTransform = 
MaterialTheme.motionScheme.sharedElementTransitionSpec,
   resizeMode: SharedTransitionScope.ResizeMode = 
SharedTransitionScope.ResizeMode.RemeasureToBounds,
   restingShape: RoundedPolygon = RoundedPolygon.rectangle().normalized(),
   targetShape: RoundedPolygon = RoundedPolygon.circle().normalized(),
)

Then, we apply a custom OverlayClip to provide the morphing shape, by tying into the AnimatedVisibilityScope provided by the LocalNavAnimatedContentScope:

val animatedProgress =
   animatedVisibilityScope.transition.animateFloat(targetValueByState = targetValueByState)


val morph = remember {
   Morph(restingShape, targetShape)
}
val morphClip = MorphOverlayClip(morph, { animatedProgress.value })


return this@sharedBoundsRevealWithShapeMorph
   .sharedBounds(
       sharedContentState = sharedContentState,
       animatedVisibilityScope = animatedVisibilityScope,
       boundsTransform = boundsTransform,
       resizeMode = resizeMode,
       clipInOverlayDuringTransition = morphClip,
       renderInOverlayDuringTransition = renderInOverlayDuringTransition,
   )

View the full code snippet for this Modifer on GitHub.

Autosize text

With the latest release of Jetpack Compose 1.8, we added the ability to create text composables that automatically adjust the font size to fit the container’s available size with the new autoSize parameter:

BasicText(text,
style = MaterialTheme.typography.titleLarge,
autoSize = TextAutoSize.StepBased(maxFontSize = 220.sp),
)

This is used front and center for the “Customize your own Android Bot” text:

Text reads Customize your own Android Bot with an inline moving image
“Customize your own Android Bot” text with inline GIF

This text composable is interesting because it needed to have the fun dancing Android bot in the middle of the text. To do this, we use InlineContent, which allows us to append a composable in the middle of the text composable itself:

@Composable
private fun DancingBotHeadlineText(modifier: Modifier = Modifier) {
   Box(modifier = modifier) {
       val animatedBot = "animatedBot"
       val text = buildAnnotatedString {
           append(stringResource(R.string.customize))
           // Attach "animatedBot" annotation on the placeholder
           appendInlineContent(animatedBot)
           append(stringResource(R.string.android_bot))
       }
       var placeHolderSize by remember {
           mutableStateOf(220.sp)
       }
       val inlineContent = mapOf(
           Pair(
               animatedBot,
               InlineTextContent(
                   Placeholder(
                       width = placeHolderSize,
                       height = placeHolderSize,
                       placeholderVerticalAlign = PlaceholderVerticalAlign.TextCenter,
                   ),
               ) {
                   DancingBot(
                       modifier = Modifier
                           .padding(top = 32.dp)
                           .fillMaxSize(),
                   )
               },
           ),
       )
       BasicText(
           text,
           modifier = Modifier
               .align(Alignment.Center)
               .padding(bottom = 64.dp, start = 16.dp, end = 16.dp),
           style = MaterialTheme.typography.titleLarge,
           autoSize = TextAutoSize.StepBased(maxFontSize = 220.sp),
           maxLines = 6,
           onTextLayout = { result ->
               placeHolderSize = result.layoutInput.style.fontSize * 3.5f
           },
           inlineContent = inlineContent,
       )
   }
}

Composable visibility with onLayoutRectChanged

With Compose 1.8, a new modifier, Modifier.onLayoutRectChanged, was added. This modifier is a more performant version of onGloballyPositioned, and includes features such as debouncing and throttling to make it performant inside lazy layouts.

In Androidify, we’ve used this modifier for the color splash animation. It determines the position where the transition should start from, as we attach it to the “Let’s Go” button:

var buttonBounds by remember {
   mutableStateOf<RelativeLayoutBounds?>(null)
}
var showColorSplash by remember {
   mutableStateOf(false)
}
Box(modifier = Modifier.fillMaxSize()) {
   PrimaryButton(
       buttonText = "Let's Go",
       modifier = Modifier
           .align(Alignment.BottomCenter)
           .onLayoutRectChanged(
               callback = { bounds ->
                   buttonBounds = bounds
               },
           ),
       onClick = {
           showColorSplash = true
       },
   )
}

We use these bounds as an indication of where to start the color splash animation from.

moving image of a blue color splash transition between Androidify demo screens

Learn more delightful details

From fun marquee animations on the results screen, to animated gradient buttons for the AI-powered actions, to the path drawing animation for the loading screen, this app has many delightful touches for you to experience and learn from.

animated marquee example

animated gradient button for AI powered actions example

animated loading screen example

Check out the full codebase at github.com/android/androidify and learn more about the latest in Compose from using Material 3 Expressive, the new modifiers, auto-sizing text and of course a couple of delightful interactions!

Explore this announcement and all Google I/O 2025 updates on io.google starting May 22.

Meet the Android Studio Team: A Conversation with Engineering Director, Tor Norbye

Posted by Ashley Tschudin – Social Media Specialist, MTP at Google

Welcome to "Meet the Android Studio Team," our new ongoing blog series. Each week, we'll introduce you to the talented people behind Android Studio. Get to know the engineers, designers, product managers, and more who create the best possible experience for Android developers like you. Join us and explore their unique perspectives.


Tor Norbye: Building Android Studio for You

Trevor Johns, Staff Developer Programs Engineer

Meet Tor Norbye, an Engineering Director at Google leading the development of Android Studio.

From his early days of coding to leading the charge on AI-powered development tools, Tor shares his insights on the evolution of Android and the vital role Android Studio plays in its future.

We'll delve into the challenges of creating developer tools, the importance of community feedback, and how Google strives to empower developers worldwide.


Can you tell us about your journey to becoming a part of the Android Studio team? What sparked your interest in Android development?

I grew up in Norway and I was fascinated by programming; my first exposure was as a middle schooler reading program listings in magazines (yes, in the early 80s, monthly computer magazines would include source code!) and in 1983 I got my hands on a microcomputer, and knew immediately that's what I wanted to do as a career. And now, 40+ years later, I still love programming. It's not my day-job anymore, but I still write bits and pieces of code for Android Studio on the shuttle and during quiet periods.

I've worked on developer tools my whole career - first, 14 years at Sun Microsystems after college. In 2010 I got increasingly interested in the rise of mobile computing and really wanted to be part of it, so I joined the Android team, and I've been here since.

Back then there was no "Android Studio". At the time we were working on Eclipse-based tooling for Android development. But we all knew that IntelliJ was the gold-standard for Java development, so a couple years later we began the work on building Android Studio on top of IntelliJ and with various new and ported code from our Eclipse plugins. I then had the honor of doing the unveiling demo at Google I/O in 2013.

How has the integration of AI and machine learning impacted Android developer capabilities, and how do you see it evolving in the future?

The integration of artificial intelligence has absolutely impacted Android developer capabilities, and this is just the beginning.

I felt very fortunate to be part of bringing about the massive shift from desktop computing to mobile computing when I joined Android, and I can't believe I get to be in the middle of a second massive industry shift as well, with AI and large language models.

I actually spend a lot of my time on this, working with Studio engineers, UX and product managers on our various AI related features, and talking to partner AI teams at Google. We've made a huge amount of progress in the last couple of years, both on the Studio feature integration side, as well as Google-wide on the AI side. While there is some skepticism that we're just doing AI features for AI's sake, I don't see it that way. With AI, we can suddenly, with relatively low effort, build useful features not previously possible.

Here's a very simple example from the latest Studio version: When you invoke the Rename refactoring feature, we use Gemini to add additional naming suggestions into the name popup based on what your code is doing. Here we're helping you pick good names – and naming is famously one of the two hardest problems in computer science – naming, cache invalidation and off-by-one errors. Yet LLMs are good at this – so coupled with the safe refactoring machinery in the IDE, we were able to safely add a useful feature with relatively low engineering cost on the IDE side (of course, this is building on top of a massive investment from Google over on the Gemini side).

The field is moving incredibly quickly, so it's hard to predict where things are going, but we're actively working in several areas, making the AI more aware of your codebase, and making it handle larger, complex tasks via AI Agents, and so much more.

What are some of the biggest challenges you've faced in your career as a developer, and how have those experiences shaped your approach to your job?

Earlier in my career, at a different company, we had big annual releases. I took a lot of pride in my productivity, and as my responsibilities grew, I'd try to do the impossible and deliver, no matter what. I'd not only work long hours, but I'd also try to work as quickly as I can. This led to a lot of stress. I remember putting my (at the time) young children to bed and impatiently waiting for them to fall asleep such that I could head back out to the garage office and start the evening coding shift. And I knew that stress isn't healthy, so I'd also stress about being stressed! This obviously wasn't sustainable.

Now, I emphasize work life balance not only for myself, but also for our team. I want to make sure our work is sustainable, and that people can thrive and be in it for the long term. It's a marathon, not a sprint.

Can you share an example of how feedback from the developer community has directly influenced a feature or improvement?

We have a number of feedback channels; the most important one is the Android Studio issue tracker.

We still have a very large backlog of bugs, so it's easy to get the impression that we're ignoring user reports, but that's not true. As a team, we've actually fixed several thousand bugs in 2024 alone. The best bugs are those that are clear and actionable, ideally with steps to reproduce.

I'm also very thankful to everyone who turns on data sharing in Studio; if you don't already, please consider it! Our analytics is more of an indirect, but still vital, feedback channel from the community. In addition to collecting information on, for example, which menu items are clicked, we also use it to collect quality metrics on system health. For instance, when we detect that the UI is lagging (such as a 1+ second freeze in the UI thread), we grab a thread dump and send it to the server, then aggregate these into a dashboard where we can see top freeze spots in the IDE across the user population, and can focus our efforts on fixing those.

How does the Studio team contribute to Google's broader vision for the Android platform?

In Android Studio we're always making sure we support the latest technologies and recommendations from Android, Firebase, Material, and other Google technologies. That way, it's easier for developers to adopt recommendations, like using Kotlin, Coroutines, Compose, Material, and so on.

Explore the Power of AI

Unlock the full potential of AI in your Android development journey. Explore the latest advancements in Android Studio, including intelligent code completion, automated refactoring, and other AI-driven tools.

Stay tuned!

Don't miss our next and final installment in the "Meet the Android Studio Team" series; we'll feature one more talented team member and share their unique perspective. Stay tuned to learn more about the amazing people behind Android Studio.

Find Tor Norbye on Bluesky.

Meet the Android Studio Team: A Conversation with Staff Developer Programs Engineer, Trevor Johns

Posted by Ashley Tschudin – Social Media Specialist, MTP at Google

Android Studio isn't just code and algorithms – it's built by real people with fascinating stories. Our "Meet the Android Studio Team" series gives you a glimpse into the lives and passions of the talented individuals who craft the tools you use every day. Tune in each month to meet new team members and discover their unique journey.


Trevor Johns: Building Android Studio for You

Trevor Johns, Staff Developer Programs Engineer

Meet Trevor Johns, a seasoned Staff Developer Programs Engineer at Google.

Reflecting on his journey, Trevor sheds light on the most impactful advancements in the Android ecosystem and offers a glimpse into his vision for the future where AI plays a pivotal role in streamlining development workflows.

Trevor discusses the Android Studio team's dedication to enhancing developer productivity through AI, highlighting their focus on understanding and addressing developer needs, and reflects on the dynamic journey of Android development while sharing valuable insights.


Can you tell us about your journey to becoming a part of the Android Studio team? What sparked your interest in Android development?

I've been at Google in various roles since Google since 2007, and transferred to Android team in 2009 shortly after the launch of the HTC G1 — the first publicly available Android phone. Even in those early days it was clear that mobile computing was a unique opportunity to reimagine many of the limitations of desktop computers and how users interact with the digital world.

Among my first projects were helping developers optimize their apps for the MyTouch 3G and Motorola Droid, as well as creating developer resources for Android's 1.6 Donut release.

Over the years, I've worked on various parts of the Android OS including our first tablet devices, Android Wear, helping develop the original Android support libraries (which later became Jetpack), and the migration to Kotlin.

Recently I joined the Android Studio team to help improve developer productivity, using AI to streamline common developer tasks and help developers have more time to focus on creativity.

How does the Android Studio team ensure that products or features meet the ever-changing needs of developers?

Like the rest of Android, we approach development of new features by listening to our developer community. We hold regular listening sessions with publishers, work with our UX research team to conduct case studies, and participate in online discussions to get a sense for where developers face the most friction — and then try to find ways to reduce that friction.

For example, we developed Gemini in Android Studio's integration with Play Vitals and Firebase Crashlytics based on feedback from members of the developer community who commented to let us know where they would find AI most useful across their developer workflow.

Speaking of, if you'd like to provide us with feedback, you can always file a bug or feature request on the Android Studio issue tracker.

How does the Studio team contribute to Google's broader vision for the Android platform?

In addition to listening to the Android community, we also keep an eye on what's being developed across the rest of the Android team and make sure that Android Studio has the right tools to help developers quickly migrate between Android versions and adopt those new platform features.

Beyond that, the Studio team provides leading edge editing tools to make sure that Android remains one of the easiest computing platforms to develop for — unlocking this unique computing platform for millions of developers.

In your opinion, what is the most impactful feature or improvement the Android team has introduced in recent years, and why?

For developers, my answer would have to be the migration to Kotlin. This language has modernized the Android developer experience — letting developers write apps with less code and fewer errors. It's also the foundation for Jetpack Compose, which is the future of Android UI development.

If you could wave a magic wand and add one dream feature to the Android universe, what would it be and why?

I'd love to see Gemini be able to not just autocomplete code for me, but generate scaffolds for new projects. That way I can focus on building features rather than worrying about basic structure when starting a new project.

Develop Android Apps with Kotlin

Follow Trevor's lead and embrace the power of Kotlin for modern Android development. Enhance your skills and write better Android apps faster with Kotlin.

Stay tuned!

Get ready for another inspiring story! The "Meet the Android Studio Team" series continues next week with a new team member in the spotlight. Don't miss their unique insights and journey.

Find Trevor Johns on LinkedIn, X, Bluesky, and Medium.

Android Device Streaming, powered by Firebase, is now in Beta

Posted by Adarsh Fernando, Senior Product Manager, Android Developer Tools

Validating your app on a range of Android screens is an important step to developing a high quality Android app. However, getting access to the device you need, when you need it, can be challenging and time consuming. From trying to reproduce a device specific behavior on a Samsung device to testing your adaptive app layouts on the Google Pixel Fold, having the right device at the right time is critical.

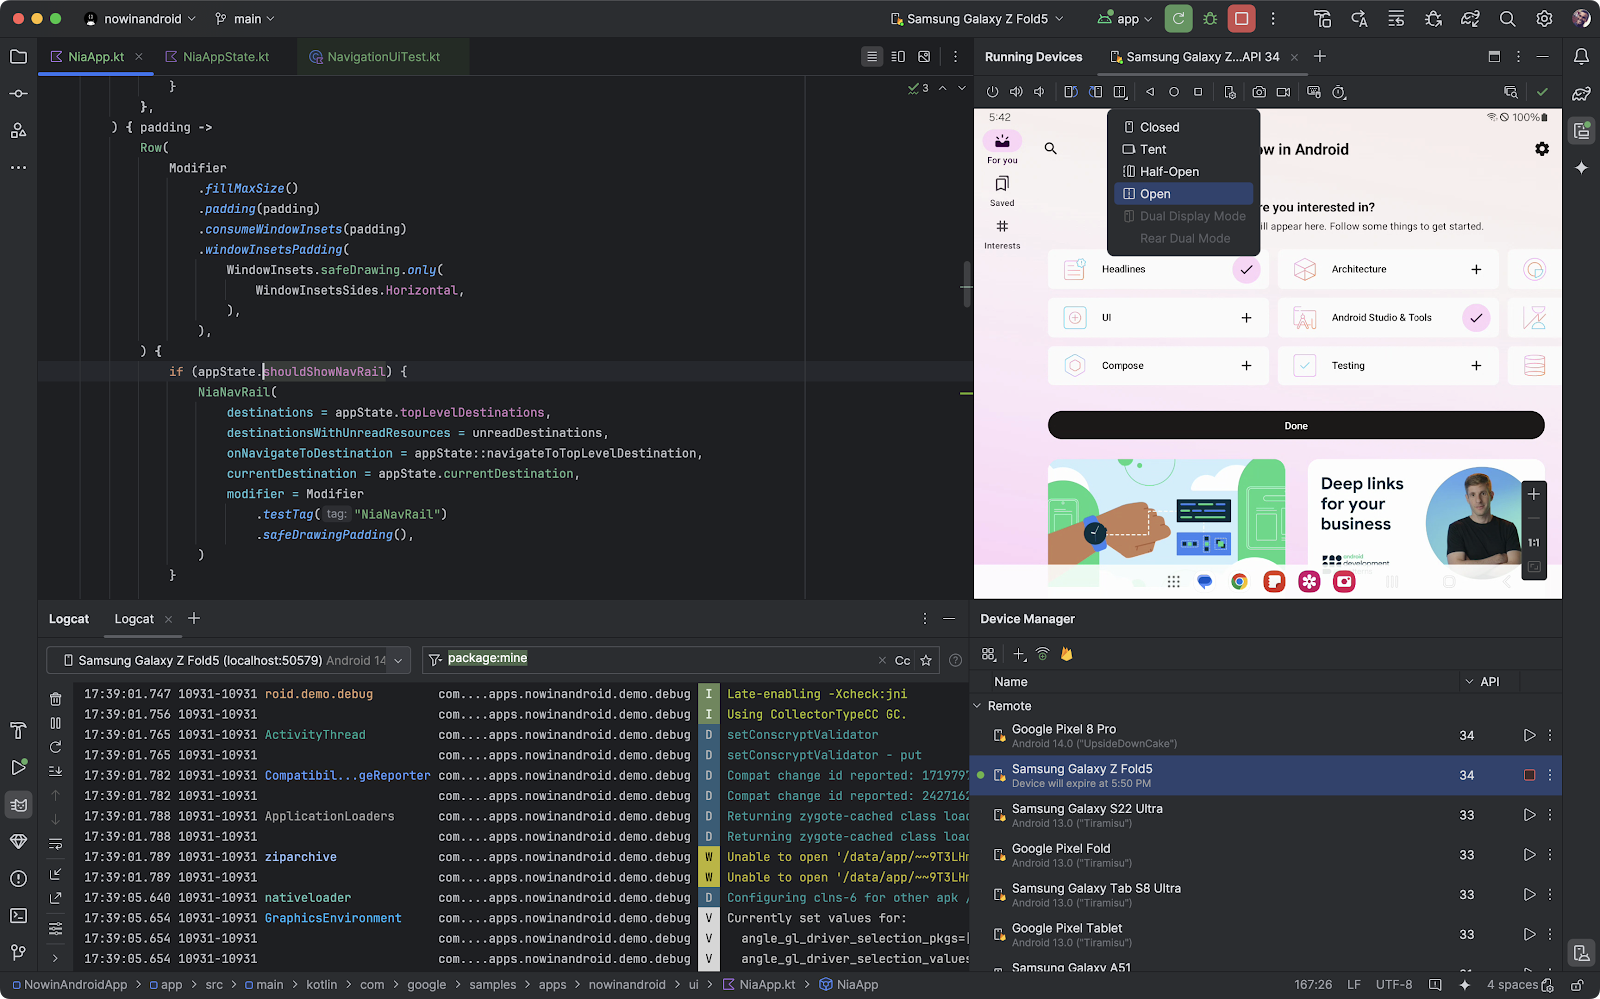
To address this app developer use case, we created Android Device Streaming, powered by Firebase. With just a few clicks, you and your team can access real physical devices, such as the latest Pixel and Samsung devices, and use them in the IDE in many of the ways you would use a physical device sitting on your desk.

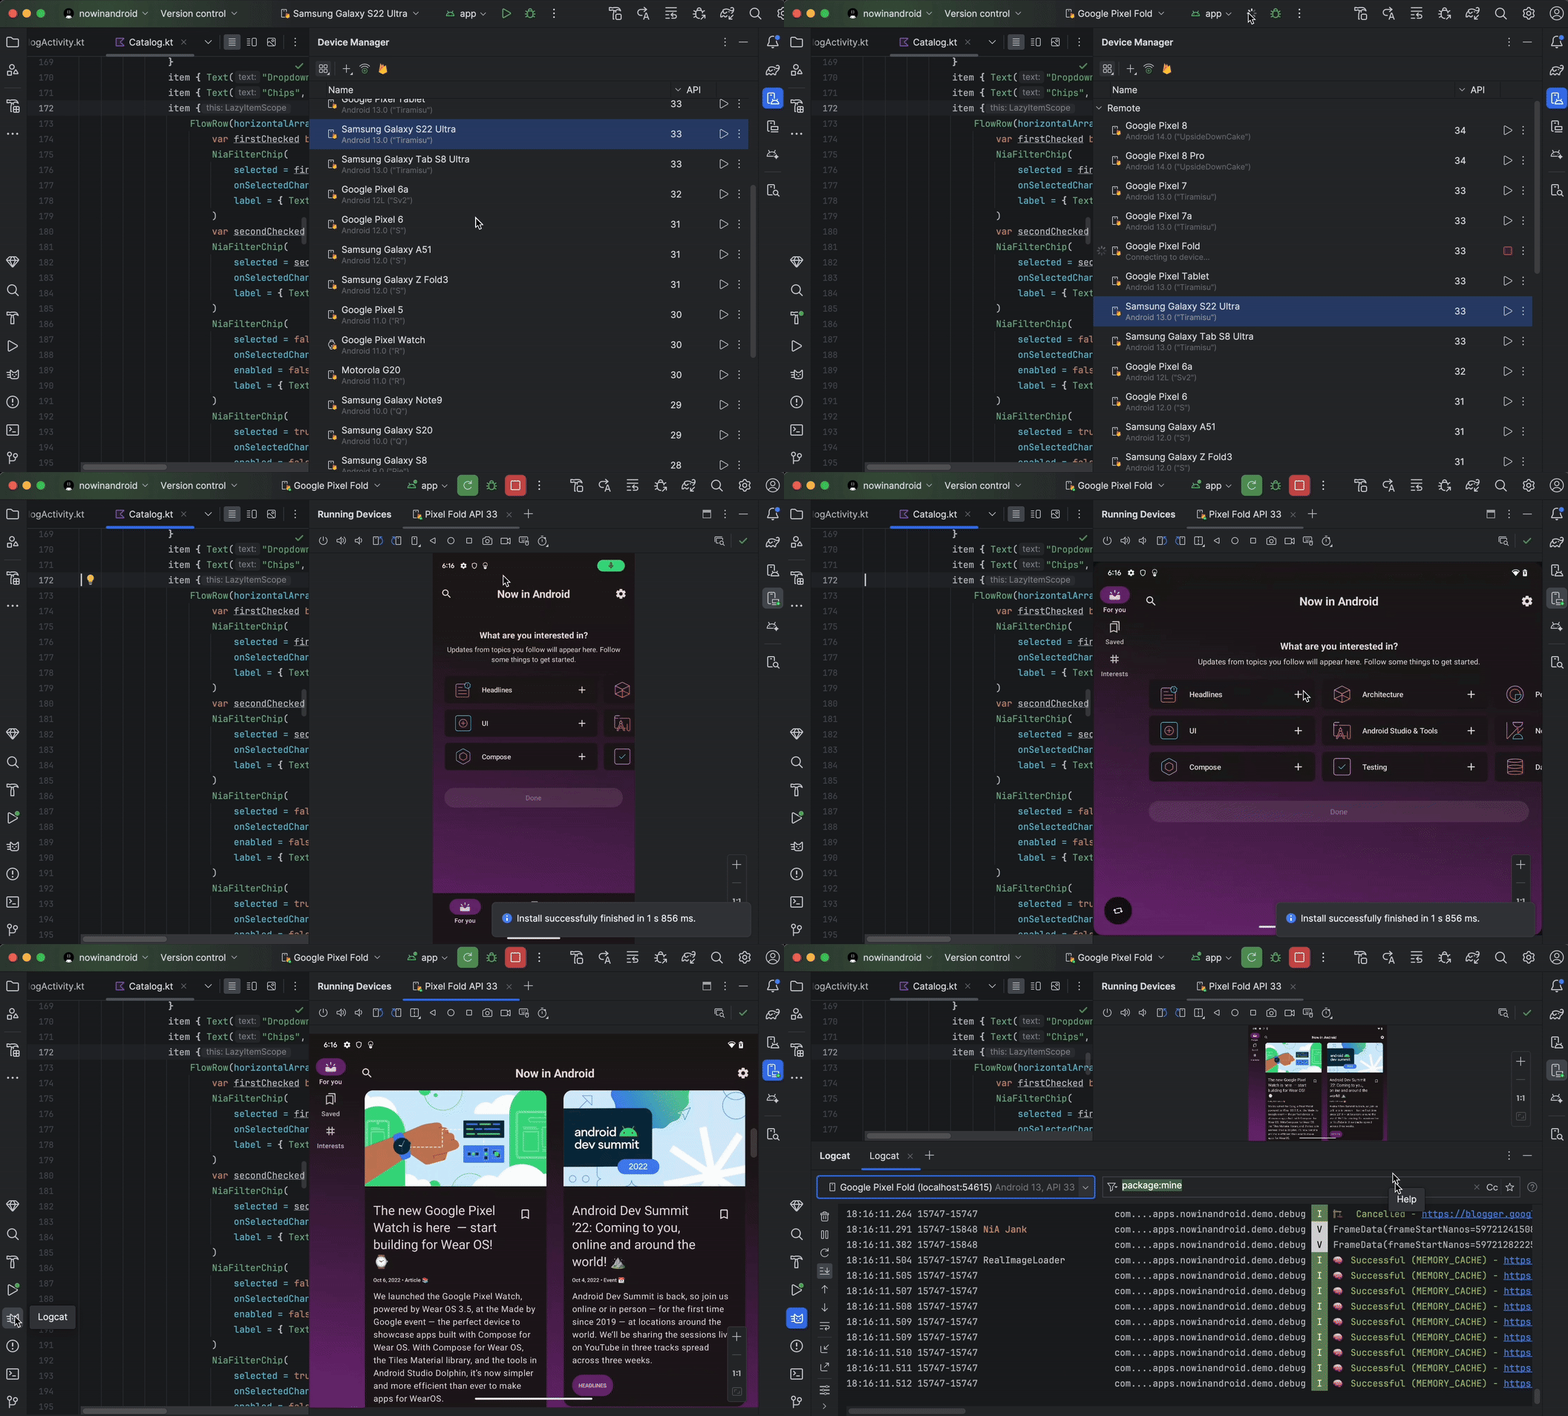
Animation of using Device Streaming in Android Studio
Android Device Streaming, powered by Firebase, available in Android Studio Jellyfish

Today, Android Device Streaming is in beta and is available to all Android developers using Android Studio Jellyfish or later. We’ve also added new devices to the catalog and introduced flexible pricing that provides low-cost access to the latest Android devices.

Read below to learn what changes are in this release, as well as common questions around uses, security, and pricing. However, if you want to get started right away and try Android Device Streaming at no cost, see our getting started guide.

What can you do with Android Device Streaming?

If you’ve ever used Device Mirroring, you know that Android Studio lets you see the screen of your local physical device within the IDE window. Without having to physically reach out to your device, you’re able to change the device orientation, change the posture of foldables, simulate pressing physical buttons, interact with your app, and more. Android Device Streaming leverages these same capabilities, allowing you to connect and interact with remote physical devices provided by Firebase.

Screen capture of using the debugger with Android Device Streaming
Using the Debugger with Android Device Streaming

When you use Android Studio to request a device from Android Device Streaming, the IDE establishes a secure ADB over SSL connection to the device. The connection also lets you use familiar tools in Android Studio that communicate with the device, such as the Debugger, Profiler, Device Explorer, Logcat, Compose Live Edit, and more. These tools let you more accurately validate, test, and debug the behavior of your app on real OEM hardware.

What devices would my team have access to?

Android Device Streaming gives you and your team access to a number of devices running Android versions 8.1 through 14. You have access to the latest flagship devices from top device manufacturers, such as Google Pixel and Samsung. You can expand testing your app across more form factors with access to the latest foldables and tablets, such as the Samsung Tab S8 Ultra.

Screen capture of browsing the list of devices and selecting the one you want to use in Android Studio
Browse and select devices you want to use from Android Studio

And we’re frequently adding new devices to our existing catalog of 20+ device models, such as the following recent additions:

    • Samsung Galaxy Z Fold5
    • Samsung Galaxy S23 Ultra
    • Google Pixel 8a

Without having to purchase expensive devices, each team member can access Firebase’s catalog of devices in just a few clicks, for as long as they need—giving your team confidence that your app looks great across a variety of popular devices.


Google OEM partner logos - Samsung, Google Pixel, Oppo, and Xiaomi

As we mentioned at Google I/O ‘24, we’re partnering with top Original Equipment Manufacturers (OEMs), such as Samsung, Google Pixel, Oppo, and Xiaomi, to expand device selection and availability even further in the months to come. This helps the catalog of devices grow and stay ahead of ecosystem trends, so that you can validate that your apps work great on the latest devices before they reach the majority of your users.

Is Android Device Streaming secure?

Android Device Streaming, powered by Firebase, takes the security and privacy of your device sessions very seriously. Firebase devices are hosted in secure global data centers and Android Studio uses an SSL connection to connect to the device.

A device that you’ve used to install and test your app on is never shared with another user or Google service before being completely erased and factory reset. When you’re done using a device, you can do this yourself by clicking “Return and Erase Device” to fully erase and factory reset it. The same applies if the session expires and the device is returned automatically.

Screen capture of Reuturn and Erase Device function in Android Device Streaming
When your session ends, the device is fully erased and factory reset.

How much does Android Device Streaming cost?

Depending on your Firebase project’s pricing plan, Android Device Streaming users can use Android Device Streaming with the following pricing:

    • On June 1, 2024, for a promotional period:
        • (no cost) Spark plan: 120 no cost minutes per project, per month
        • Blaze plan: 120 no cost minutes per project, per month, 15 cents for each additional minute
    • On or around February, 2025, the promotional period will end and billing will be based on the following quota limits:
        • (no cost) Spark plan: 30 no cost minutes per project, per month
        • Blaze plan: 30 no cost minutes per project, per month, 15 cents for each additional minute

With no monthly or yearly contracts, Android Device Streaming’s per-minute billing provides unparalleled flexibility for you and your team. And importantly, you don’t pay for any period of time required to set up the device before you connect, or erase the device after you end your session. This allows you and your team to save time and costs compared to purchasing and managing your own device lab.

To learn more, see Usage levels, quotas, and pricing.

What’s next

We’re really excited for you and your team to try Android Device Streaming, powered by Firebase. We think it’s an easy and cost-effective way for you to access the devices you need, when you need them, and right from your IDE, so that you can ensure the best quality and functionality of your app for your users.

The best part is, you can try out this new service in just a few clicks and at no cost. And our economical per-minute pricing provides increased flexibility for your team to go beyond the monthly quota, so that you only pay for the time you’re actively connected to a device—no subscriptions or long-term commitments required.

You can expect that the service will be adding more devices from top OEM partners to the catalog, to ensure that device selection remains up-to-date and becomes increasingly diverse. Try Android Device Streaming today and share your experience with the Android developer committee on LinkedIn, Medium, YouTube, or X.

Google I/O 2024: What’s new in Android Development Tools

Posted by Mayank Jain – Product Manager, Android Studio

At Google I/O 2024, we announced an exciting new set of features and tools aimed at making Android development faster and easier. We also shared updates to Android Studio that will help you leverage AI and make it easier for you to build high quality apps for Android across the Android ecosystem.

You can check out the What’s new in Android Developer Tools session at Google I/O 2024 to see some of the new features in action or better yet, try them out yourself by downloading Android Studio Koala 🐨 Feature Drop in the preview release channel. Here’s a look at our announcements:

Leverage Gemini in Android Studio

Since launching AI features in Android Studio last year, we continue to evolve our underlying models, integrate your feedback, and expand availability to more countries and territories so that you can leverage AI in your workflow and become a more productive Android app developer. Using the built-in AI privacy controls, you can opt in to using the latest AI feature improvements that are tailored for your Android app project.

Code suggestions with Gemini in Android Studio

You can now provide custom prompts for Gemini in Android Studio to generate code suggestions. After you enable Gemini from the View > Tool Windows > Gemini tool window, right-click in the code editor and select Gemini > Transform selected code from the context menu to see the prompt field. You can then prompt Gemini to generate a code suggestion that either adds new code or transforms selected code. You can ask Gemini to simplify complex code by rewriting it, perform very specific code transformations such as “make this code idiomatic,” or generate new functions you describe. Android Studio then shows you Gemini’s code suggestion as a code diff, so that you can review and accept only the suggestions you want.

Code suggestions with Gemini in Android Studio

Gemini for recommendations on crash reports

App Quality Insights in Android Studio seamlessly incorporates both Firebase Crashlytics and Android Vitals data into Android Studio so you can access the most important app stability related information, without having to switch tools.

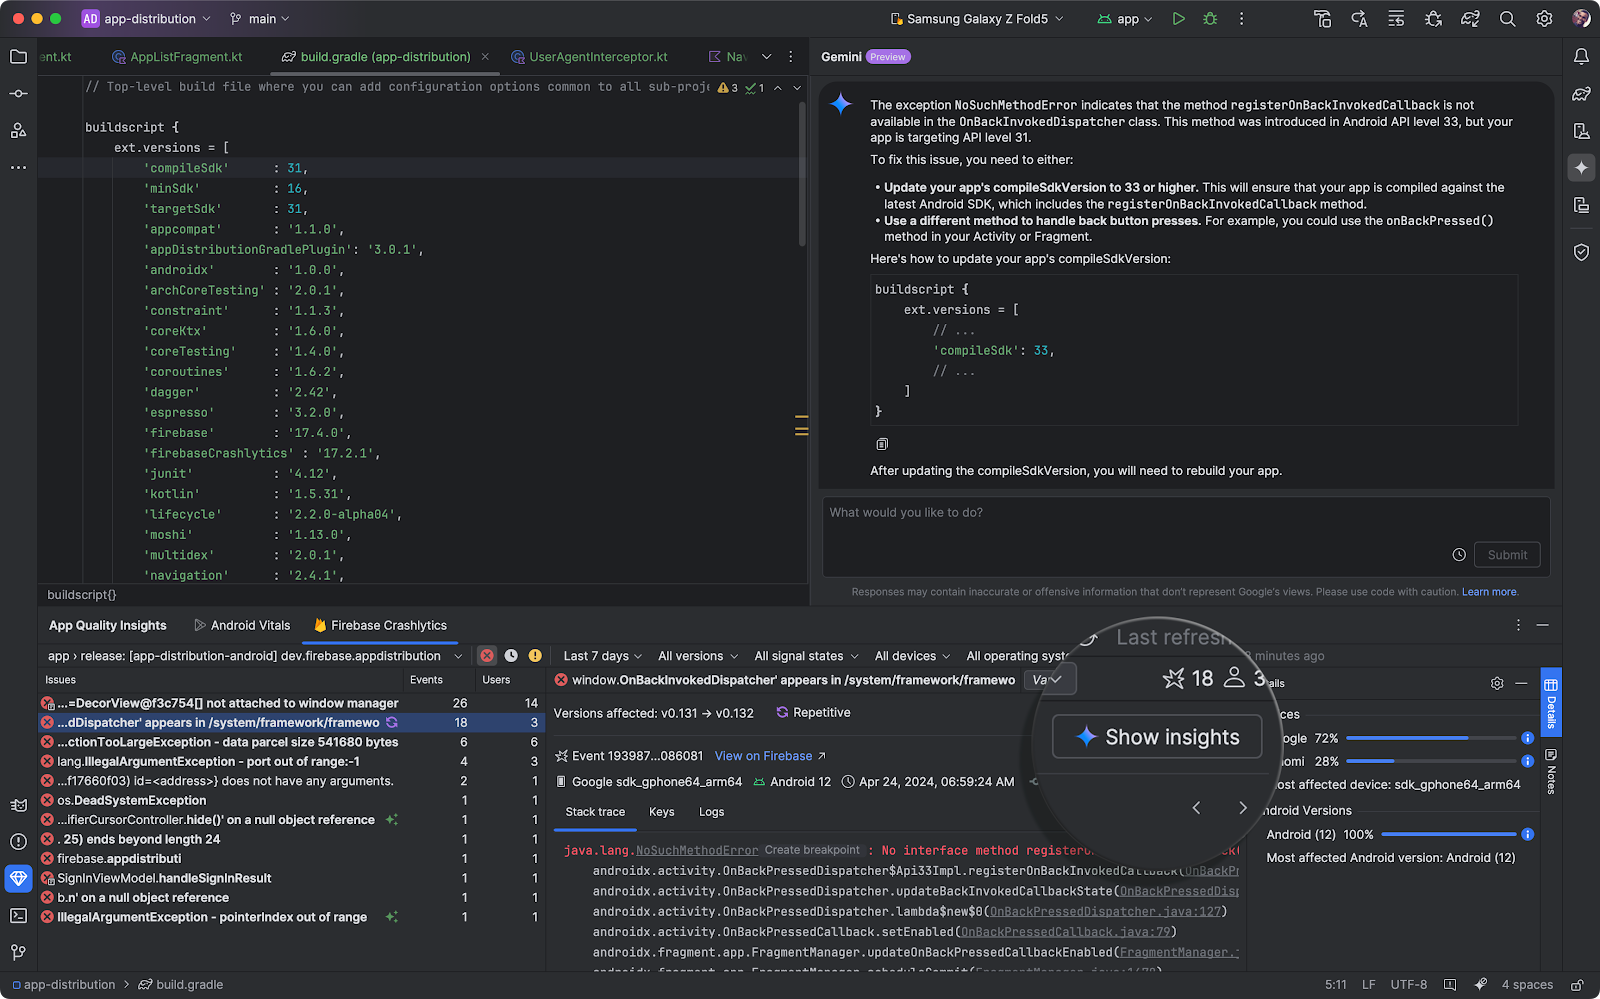
You can now use Gemini in Android Studio to analyze your crash reports, generate insights which are shown in the Gemini tool window, provide a crash summary, and when possible recommend next steps, including sample code and links to relevant documentation.

You can generate all of this information directly from the App Quality Insights tool window in Android Studio after you enable Gemini from View > Tool Windows > Gemini.

Gemini for recommendations on crash reports

Integrate Gemini API into your app with a starter template

Start prototyping with Gemini models in your apps with our new starter app template provided in Android Studio. In this app template, you can issue prompts directly to the Gemini API, add image sources as input, and display the responses on the screen. Additionally, use Google AI Studio to craft custom prompts for your app.

When you are ready to scale your AI features to production with Google Cloud infrastructure, you can also access the powerful capabilities of Gemini models through Vertex AI. This is Google’s fully-managed development platform designed for building and deploying generative AI. Whether you simply need world class inference capabilities, or want to build end-to-end AI workflows with Vertex, the Gemini API is a great solution.

Integrate Gemini API into your app with a starter template

Gemini 1.5 Pro coming to Android Studio

We previously announced that Gemini in Android Studio uses the Gemini 1.0 Pro model to help you by answering Android development questions, generating code, finding resources, or explaining best practices. In this preview stage of Gemini in Android Studio, we are offering Gemini 1.0 Pro at no-cost for all users for now. Gemini 1.0 Pro is a versatile model, making it ideal to scale. However we acknowledge that its quality of responses may be limited in some cases. Based on your feedback, we are committed to improving the quality for Android development, and excited to add more features using Gemini to make your developer experience even more productive.

Along this journey, the Gemini 1.5 Pro model will be coming to Android Studio later this year. Equipped with a Large Context Window, this model notably leads to higher quality responses, and unlocks use cases like multimodal input that you might have seen in the Google I/O 2024 sessions. Stay tuned for more updates on how you can access more capable models in Android Studio.

Productivity enhancements

Release Monitoring with Firebase

Today we announced the general availability of the Firebase Release Monitoring Dashboard. The Firebase Release Monitoring Dashboard is a single dashboard powered by Firebase Crashlytics to monitor your most recent production releases of your Android app. It updates in real time to give you a high-level view of the most important release metrics, like crash-free sessions, comparisons, and benchmarking based on your previous releases.

Android Device Streaming

Android Device Streaming, powered by Firebase, lets you securely connect to remote physical Android devices hosted in Google's data centers. It is a convenient way to test your app against physical units of some of the latest Android devices, including the Google Pixel 8 and 8 Pro, Pixel Fold, and more.

Starting today, Android Device Streaming now includes the following devices, in addition to the portfolio of 20+ device models already available:

    • Samsung Galaxy Fold5
    • Samsung Galaxy S23 Ultra
    • Google Pixel 8a

Additionally, if you’re new to Firebase, Android Studio automatically creates and sets up a no-cost Firebase project for you when you sign in to Koala Feature Drop to use Device Streaming. So, you can get to streaming the device you need much faster. Learn more about Android Device Streaming quotas, including promotional quota for the Firebase Blaze plan projects available for a limited time.

Connect to the latest physical Android devices in moments with Android Device Streaming, 
powered by Firebase

USB cable speed detection

Did you know that USB cable bandwidth varies from 480 Mbps (USB-2) to up to 40,000 Mbps (USB-4)? Android Studio Koala Feature Drop now makes it trivial to differentiate low performing USB cables from the high performing ones.

When you connect an Android device, Android Studio automatically detects the device and USB cable bandwidth and warns you if there’s a mismatch in USB bandwidth.

Note: USB cable speed detection requires an updated ADB found in Android SDK Platform Tools v34+, and is currently available for macOS and Linux.

USB cable speed detection.
Learn more about USB speeds here

A new way to sign in with Google in Android Studio

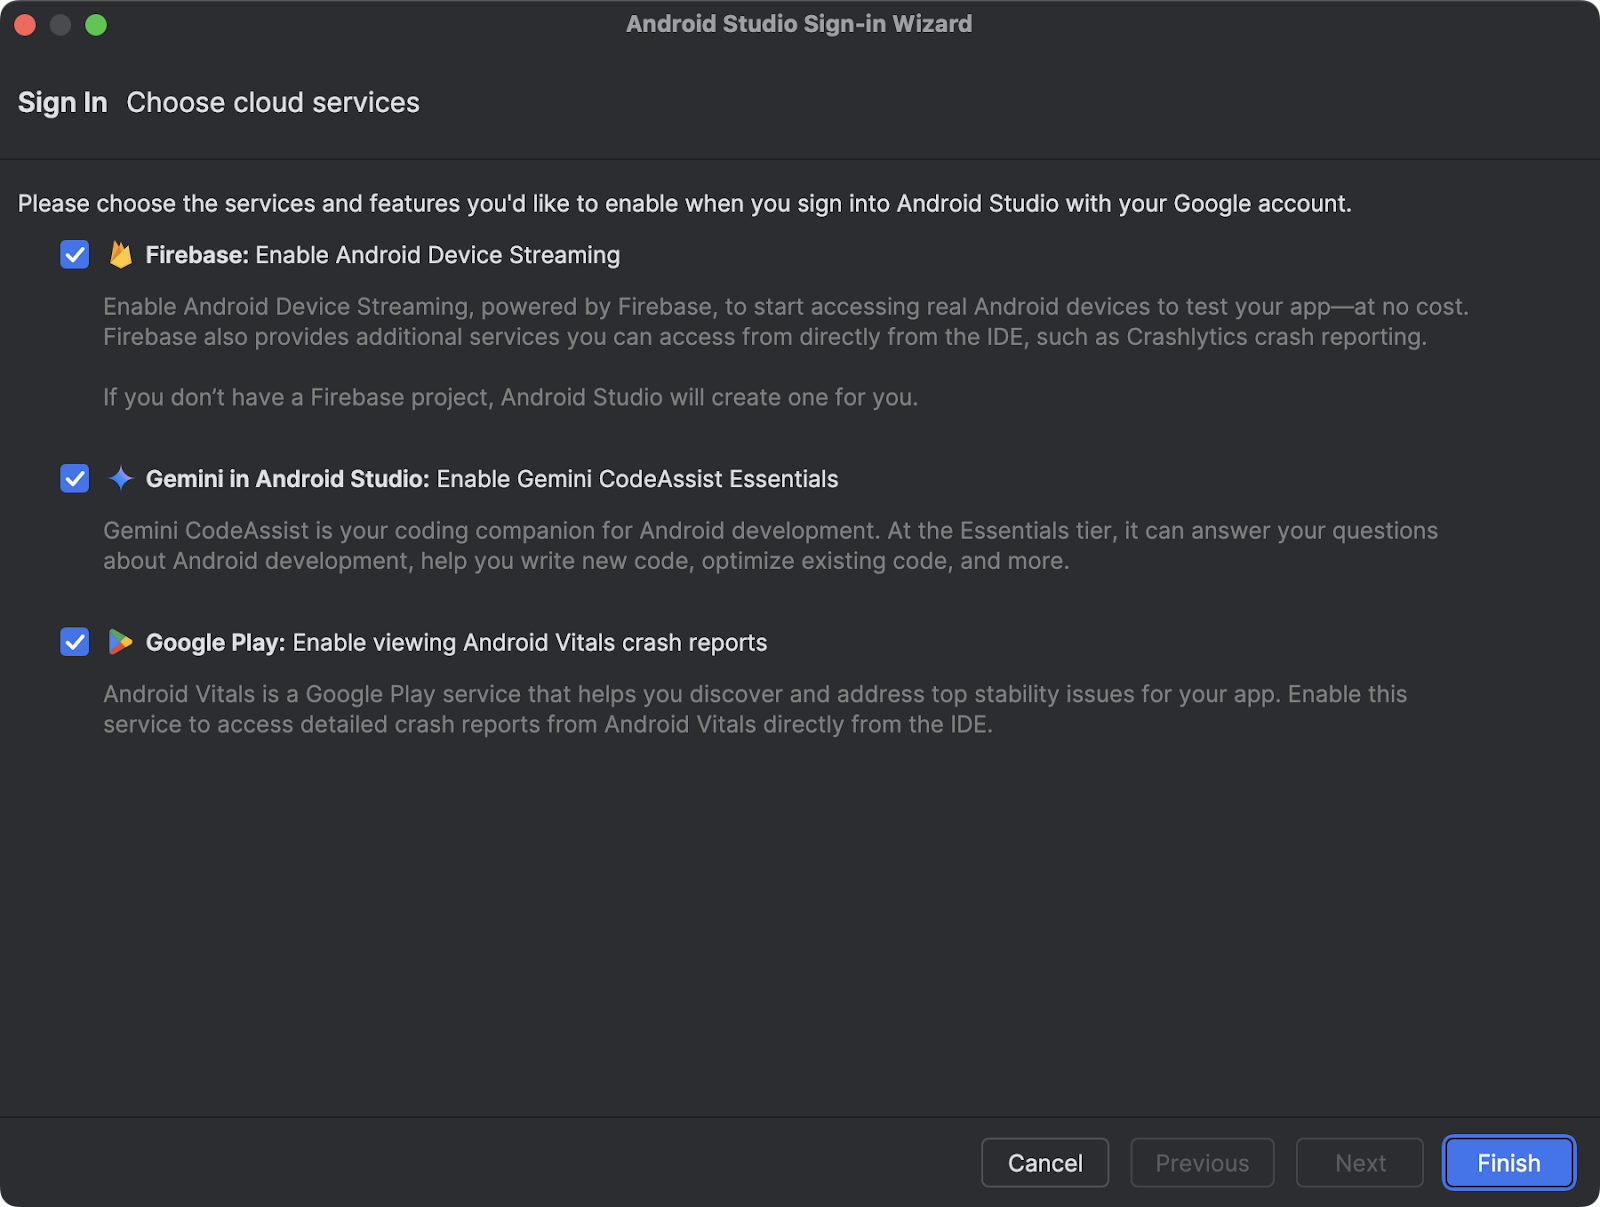
It’s now easier to sign in to multiple Google services with one authentication step. Whether you want to use Gemini in Android Studio, Firebase for Android Device Streaming, Google Play for Android Vitals reports, or all these useful services, the new sign in flow makes it easier to get up and running. If you’re new to Firebase and want to use Android Device Streaming, Android Studio automatically creates a project for you, so you can quickly start streaming a real physical Firebase device. With granular permissions scoping, you will always be in control of which services have access to your account. To get started, just click the profile avatar and sign in with your developer account.

A new way to sign in with Google in Android Studio

Device UI setting shortcut

Using the device UI setting shortcut, you can now effortlessly configure your devices to desired settings related to dark theme, font size, display size, app language, and more, all directly through the Running Devices window. You can now test and debug your UI seamlessly for any of the possible scenarios required by your use case.

Device UI settings shortcuts

Faster and improved Profiler with a task-centric approach

The internals of the Android Studio Profiler have been dramatically improved. Popular profiling tasks like capturing a system trace with profileable apps now start up to 60% faster.*

We’ve redesigned the profiler to make it easier to start the task you’re interested in, whether it’s profiling your app’s CPU, memory, or power usage. For example, initiating a system trace task to profile and improve your app’s startup time is integrated right in the UI as you open the profiler.

Faster and improved Profiler with a task-centric approach 
*Based on internal data, as tested in April 2024

Google Play SDK Index integration

Android Studio is integrated with the Google Play SDK Index to inform when there are known policy or version issues with SDKs used by your app. This enables you to update those dependencies and avoid issues that could prevent you from publishing new versions of your app.

In the Android Studio Koala Feature Drop release, the integration has been expanded to also include warnings from the Google Play SDK Console. This gives you a complete view of any potential version or policy issues in your dependencies before submitting your app to the Google Play Console.

Notes from SDK authors are now also displayed directly in Android Studio to save you time.

A warning from the SDK Index with the corresponding SDK author note

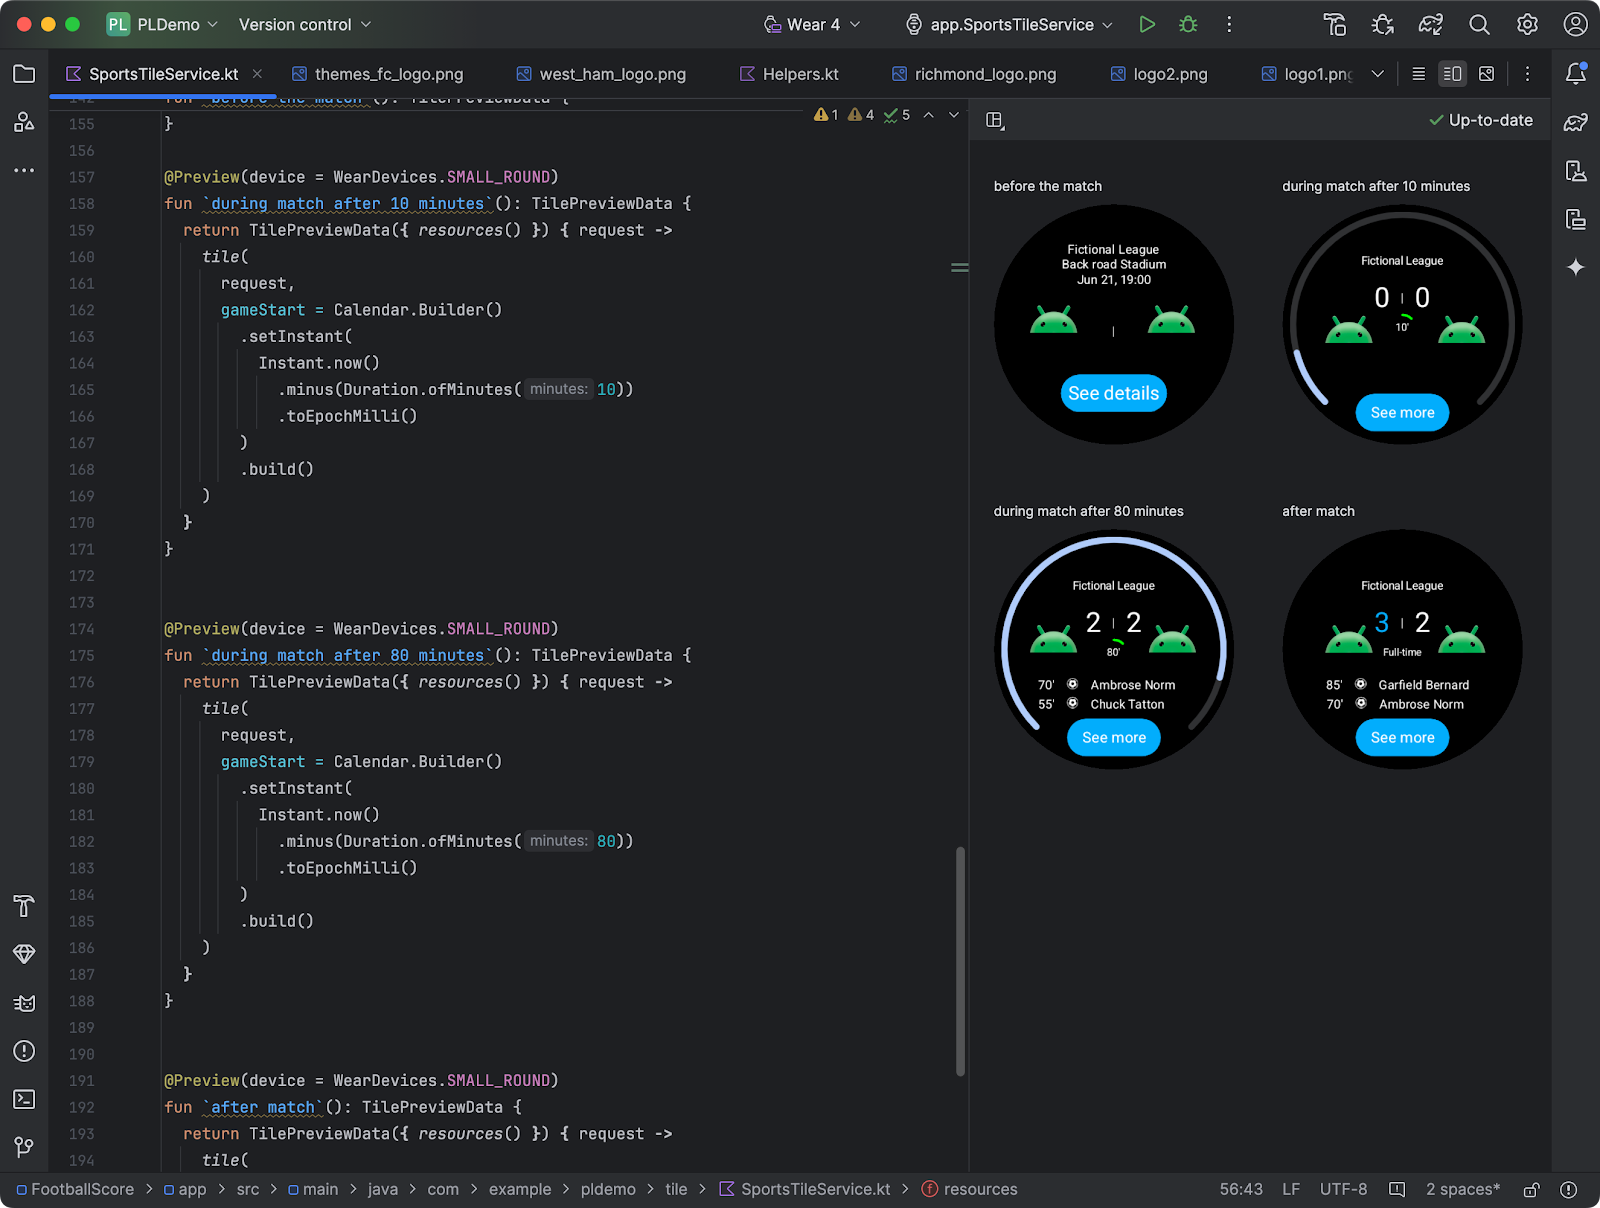
Preview tiles for Wear OS apps

Android Studio now has preview support for Tiles. You can now iterate much quicker when creating tiles, enabling you to quickly see what a Tile looks like on different configurations without needing to run it on a device.

Tiles previews usage for Wear OS apps

Generate synthetic sensor data for testing on Wear OS apps

To help simulate real life scenarios you can now generate synthetic (fake) data for a Wear OS emulator for health related sensors such as heart rate, speed, steps, and more. You are now able to set up and perform testing for a multi-sport training session in minutes, end-to-end in Android Studio, without ever leaving your desk.

Generate synthetic sensor data for testing on Wear OS apps

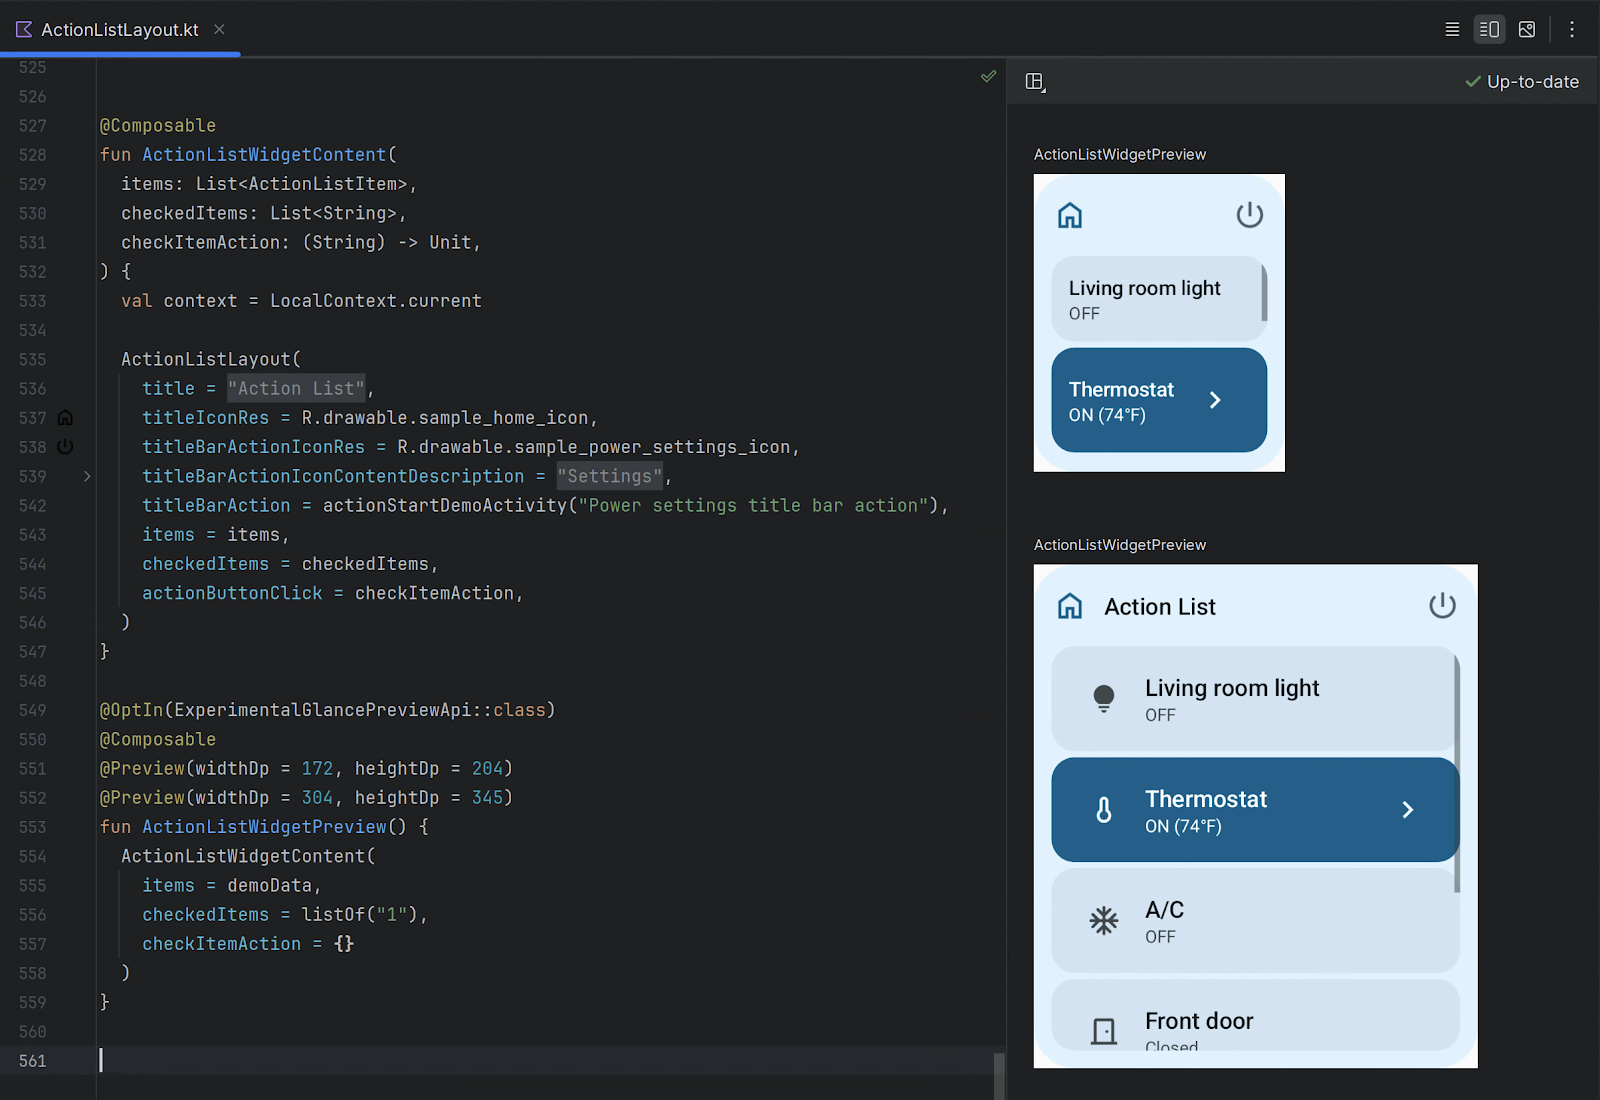
Compose Glance widget previews

Android Studio Koala Feature Drop makes it easy to preview your Jetpack Compose Glance widgets (1.1.0-rc01) directly within the IDE. Catch potential UI issues and fine-tune your widget's appearance early in the development process. Learn more about how to get started.

Previews for Compose Glance widgets

Live Edit for Compose enabled by default

Live Edit for Compose can accelerate your Compose development experience by automatically deploying code changes to the running application on an emulator or physical device. Live Edit can help you see the effect of updates to UX elements—for example new composables, modifier updates, and animations—on the overall app experience. As you become more familiar with Live Edit you will find many creative ways it can help improve your development experience and productivity.

In Android Studio Koala Feature Drop, Live Edit is enabled by default in manual mode and has increased stability and more robust change detection, including support for import statements.

ALT TEXT
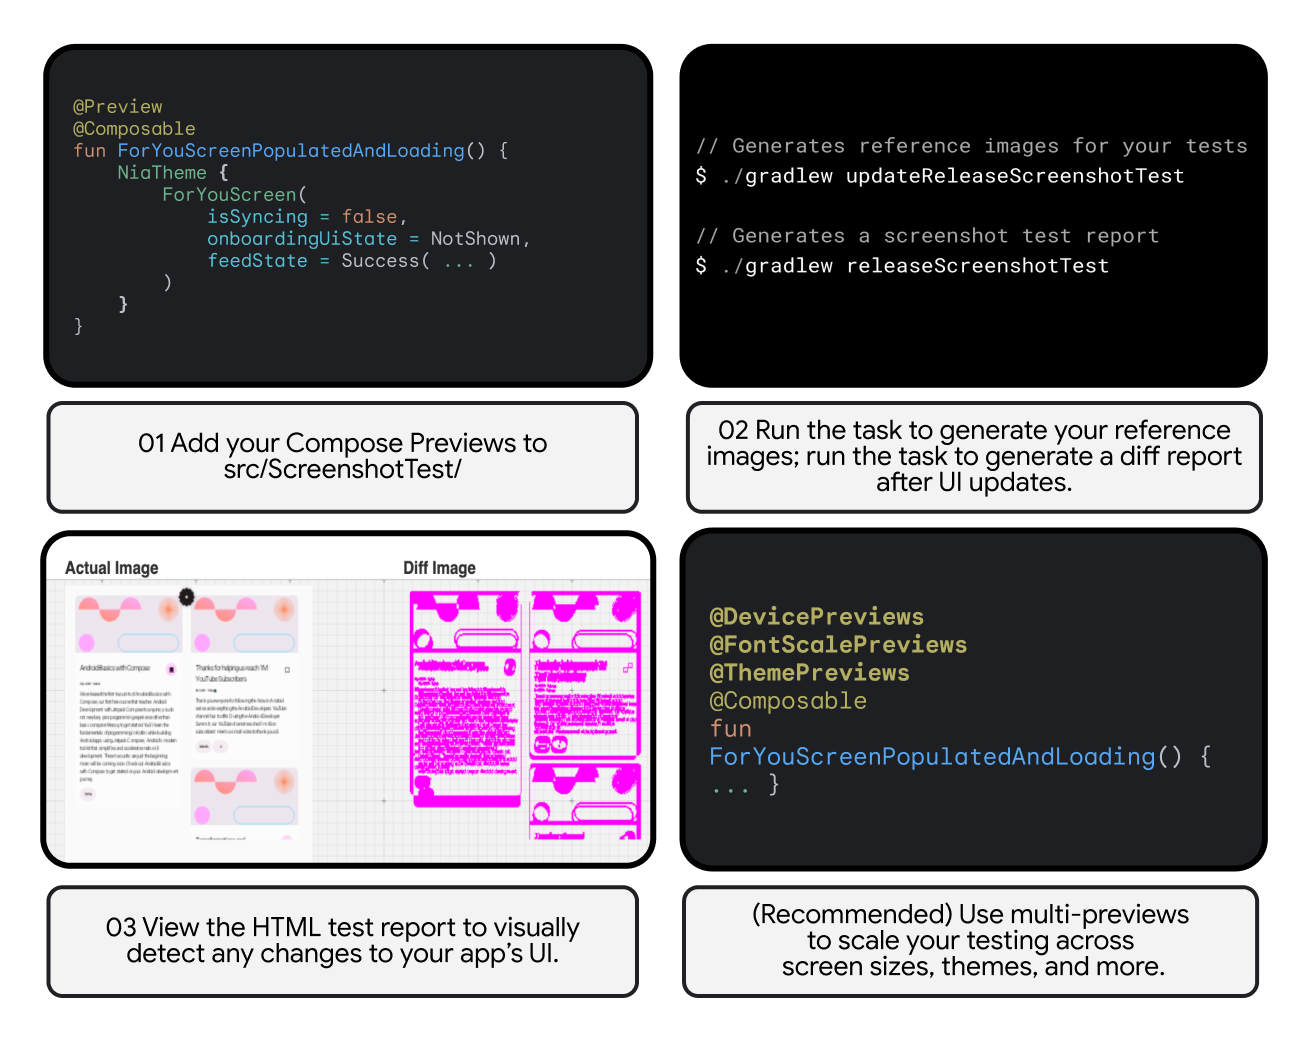
Compose Preview Screenshot Testing with Now in Android app

Compose preview screenshot testing plugin (alpha)

Host-side screenshot testing is an easy and powerful way to test UIs and prevent regressions. Today, the first alpha version of the Compose Preview Screenshot Testing plugin is available as a separate plugin, to be used together with AGP 8.5.0-beta01 or higher. Add your Compose Previews to the src/main/screenshotTest folder and run the task to generate a diff report after UI updates. The generated HTML test report lets you visually detect any changes to your app’s UI.

This alpha version of the plugin is designed for rapid iteration and feedback. We plan to merge it back into AGP in the future, but for now, this separate plugin lets us experiment and improve the feature quickly. Learn more about how to get started.

IntelliJ Platform Update (2024.1)

Android Studio Koala Feature Drop includes the IntelliJ 2024.1 platform release, which comes with some very useful IDE improvements:

    • An overhauled terminal featuring both visual and functional enhancements to streamline command-line tasks. Learn more in this blog post.
    • A new feature called sticky lines in the editor simplifies working with large files and exploring new codebases. This feature keeps key structural elements, like the beginnings of classes or methods, pinned to the top of the editor as you scroll and provides an option to promptly navigate through the code by clicking on a pinned line.
    • Basic IDE functionalities like code highlighting and completion now work for Java and Kotlin during project indexing, which should enhance your startup experience.
    • You can now scale the IDE down to 90%, 80%, or 70%, giving you the flexibility to adjust the size of IDE elements both upward and downward.

Read the detailed IntelliJ release notes here.

To summarize

Android Studio Koala Feature Drop (2024.1.2) is now available in the Android Studio canary channel with

    • Gemini in Android Studio
        • Code suggestions with Gemini in Android Studio
        • Gemini for recommendations on crash reports
        • Gemini API starter app template to help integrate Gemini into your app (also available in Koala 2024.1.1)

    • Productivity enhancements
        • Release Monitoring with Firebase
        • Android Device Streaming
        • USB cable speed detection
        • A new way to sign in with Google in Android Studio
        • Device UI setting shortcut
        • Faster and improved Profiler with a task-centric approach
        • Google Play SDK Index integration
        • Preview tiles for Wear OS apps
        • Generate synthetic sensor data for testing on Wear OS apps
        • Compose Glance widget previews
        • Live Edit for Compose enabled by default
        • Compose preview screenshot testing plugin (alpha) - to be installed additionally

    • IntelliJ Platform Update (2024.1): also available in Koala 2024.1.1
        • An overhauled terminal
        • Sticky lines in editor simplifies working with large files
        • Code highlighting and completion now work during project indexing
        • Flexible IDE size adjustments

And last, a quick reminder that going forward, the initial Android Studio releases will have the .1 Android Studio major version and introduce the updated IntelliJ platform version, while subsequent Feature Drops will increase the Android major version to .2 and focus on introducing Android-specific features that help you be more productive for Android app development.

How to get started

Ready to try the exciting new features in Android Studio?

You can download the canary version Android Studio Koala 🐨 Feature Drop (2024.1.2) today to incorporate these new features into your workflow or try the stable version Android Studio Jellyfish 🪼. You can also install them side by side by following these instructions.

As always, your feedback is important to us – check known issues, report bugs, suggest improvements, and be part of our vibrant community on LinkedIn Medium, YouTube, or X. Let's build the future of Android apps together!

Global developers use Google tools to build solutions in recruiting, mentorship and more

Posted by Lyanne Alfaro, DevRel Program Manager, Google Developer Studio

Developer Journey is a monthly series highlighting diverse and global developers sharing relatable challenges, opportunities, and wins in their journey. Every month, we will spotlight developers around the world, the Google tools they leverage, and the kinds of products they are building.

This month we speak with global developers across Google Developer Experts, and Women Techmakers, to learn more about their favorite Google tools, the applications they’ve built to serve diverse communities and the role of inclusive design in their process.


Miguel Ángel Durán Garcí

Headshot of Miguel Ángel Durán Garcí, smiling
Barcelona, Spain
Google Developer Expert, Web Technologies
Content Creator & Software Engineer

What Google tools have you used to build?

I've been using Firebase, Google Cloud Platform, CrUX Dashboard, and Chrome DevTools for years. As a web developer, I'm always excited about the new features that DevTools brings to us to improve our productivity and the performance of our applications.


Which tool has been your favorite to use? Why?

Lately, I've been trying Project IDX, an entirely web-based workspace for full-stack application development, and I'm really excited about the future of this project. I love the idea of being able to develop and deploy applications from the browser, without having to install anything on my computer.


Please share with us about something you’ve built in the past using Google tools.

Most recently, I've deployed AdventJS, a holiday calendar for developers. For optimizing the images, I've used Squoosh from the GoogleChromeLabs team. To ensure the website was accessible and to tweak performance, I've used Lighthouse from Chrome DevTools. Also, I used Google Bard to translate the content of the website into English and Portuguese.


What will you create with Google Bard?

I'm planning to expand a website I've created for the Spanish-speaking community to teach JavaScript from scratch. With Google Bard, I can check the content, create some code, and make it help me create challenges for the students.


What advice would you give someone starting in their developer journey?

I would tell them to be patient and to enjoy the process. It's a long journey, but it's worth it. Also, I would tell them to be curious and avoid sticking to only a few technologies. And finally, I would tell them to share their knowledge with the community, because it's the best way to learn and meet new people. You don't need to be an expert to share your knowledge; you just need to be one step ahead of the people you're teaching.


Marian Villa

Headshot of Marian Villa, smiling
Medellín, Colombia
Google Developer Expert, Web Technologies
Co-founder / Director Pionerasdev

What Google tools have you used to build?

Development and Creativity:

  • Google Chrome DevTools
  • Bard
  • TensorflowJS

Productivity and Communication:

  • Gmail
  • Google Calendar
  • Google Drive
  • Google Docs
  • Google Sheets
  • Google Slides
  • Google Meet

Marketing and Business:

  • Google Ads
  • Google Analytics
  • Google My Business
  • Google Workspace
  • Google Cloud Platform
  • Google Marketing Platform

Education and Learning:

  • Google Classroom
  • Google Forms
  • Google Sites
  • YouTube

Which tool has been your favorite to use? Why?

Choosing a favorite tool is quite a task given the unique strengths of Bard, TensorflowJS and Google Chrome DevTools, but I'd have to say that Google Chrome DevTools stands out for me. Its versatility in inspecting and debugging web pages, testing code variations, and providing insights into JavaScript behavior has been crucial in my web development endeavors. That being said, both Bard and TensorFlow.js have incredible capabilities. Bard plays a vital role in generating creative content, answering queries, and even composing code. TensorFlow.js, on the other hand, is a game-changer, enabling machine learning in JavaScript, and making it accessible for a wide range of applications. Each tool has its unique appeal, and the choice will depend on the context and specific requirements of the task at hand.


Please share with us about something you’ve built in the past using Google tools.

On our latest website, we use all the Google technologies at hand to enhance our image as an NGO. Find it here.


What will you create with Google Bard?

We are once again resuming a winning mentorship project to advance our career as developers, so Bard and Duet AI are great allies to inspect our code and once again create an MVP of this product for our community.


What advice would you give someone starting in their developer journey?

First, think about the problem you want to solve, or what you want to contribute to the world, then create and make it come true. This is easier if you rely on communities, and people who help you as mentors, sponsors and guides.


Rubens de Almeida Zimbres

Headshot of Rubens Zimbres, smiling
São Paulo - Brazil
Google Developer Expert, Machine Learning and Google Cloud
ML Engineer

What Google tools have you used to build?

I’ve been using the full stack of Google Products. I use Google Workspace daily in my life, my personal website is made on Google Sites, and Google Cloud; I started with Compute Engine and Jupyter Notebooks, customized to my needs.

As I acquired more knowledge through practical experience, Coursera and Google Cloud Skills Boost, I started building end to-end solutions using BigQuery, SQL, lots of Vertex AI (Generative AI Studio, Matching Engine, Speech-to-text, Pipelines, AutoML, Model Fine-Tuning), Cloud Run (and a little GKE - Kubernetes), Cloud Functions, Dialogflow and Document AI.

As the requirements of clients change according to the industry, like recruiting (Virtual Career Center) and contact center (Contact Center AI), I was able to test and deploy in production different Google products to solve the clients’ needs.


Which tool has been your favorite to use? Why?

Vertex AI is my favorite, as it is pure ML and Deep Learning optimized. Using AutoML with NAS (Neural Architecture Search) was a very interesting experience with awesome results. Developing Machine Learning pipelines with Kubeflow is a special pleasure, as this is going into production and the whole MLOps is involved.


Please share with us about something you’ve built in the past using Google tools.

I’ve built a recruiting solution that was implemented in six countries of Latin America, benefiting more than 365,000 people. This solution automatically analyzes resumes using OCR via Document AI.

I delivered a revenue prediction for a hotel chain using Tensorflow, where we increased the accuracy of the client’s model by 0.95%. I also built a Contact Center solution which uses Google Speech-to-Text and analytics to make management easier and also to generate strategic insights.

Lately, I was part of the team that delivered an end-to-end Virtual Career Center solution that matches job candidates to job vacancies using Vertex AI Matching Engine via text embeddings and SCANN. Both the recruiting solution and the contact center solution generated patents in Brazil, in the field of NLP (Natural Language Processing).


What will you create with Google Bard?

Google Bard is part of my daily routine. It helps me while coding, it helps me to plan trips, get to the right public transportation, visit interesting places around the world and it also helps by retrieving the Google search in an organized way, with updated content. My idea is to use Bard along with LangChain to perform optimizations in the finance industry.


What advice would you give someone starting in their developer journey?

Learn the basics first.

The temptation of learning this magnificent field as Machine Learning is gigantic, but coding is a great part of the solution. Learn to code properly, in whatever language you want. This brings efficiency and security if your solution needs to scale, decreasing infrastructure costs and improving user experience.

The same applies to Machine Learning: learn basic disciplines such as Calculus, Computer Science fundamentals and you will understand most of the content is shared today online. Only after learning ML you should dive into Deep Learning and the disciplines associated. Don’t fake it. Make it.

Global Google Developer Experts Share Their Favorite Tools and Advice for New Developers

Posted by Lyanne Alfaro, DevRel Program Manager, Google Developer Studio

Developer Journey is a monthly series highlighting diverse and global developers sharing relatable challenges, opportunities, and wins in their journey. Every month, we will spotlight developers around the world, the Google tools they leverage, and the kinds of products they are building.

This month we speak with global Google Developer Experts in Firebase, Women Techmakers, and beyond, to learn more about their favorite Google tools, the applications they’ve built to serve diverse communities, and their best advice for anyone just getting started as a developer.

Juan Lombana

Headshot of Juan Lombana, smiling
Mexico City, Mexico
Founder, Mercatitlán

What Google tools have you used to build?

Google Analytics and Firebase's A/B testing features have been pivotal in our data-driven approach, enabling continuous improvement in our conversion strategies. More recently, Bard has become a significant asset in developing new products and in our educational endeavors, especially with the introduction of our AI course. Its utility in both product development and educational settings is profound.


Which tool has been your favorite to use? Why?

If I had to choose, it would be Google Ads. Its ability to consistently drive new customers and provide unparalleled visibility to quality products is unmatched. While it may not traditionally be considered a 'tool' in the strictest sense, its impact on business growth and visibility is indisputable.


Please share with us about something you’ve built in the past using Google tools.

My entire business, Mercatitlán, has been built and scaled using Google Tools. We have cultivated a community of over 40,000 paid students, educating them on effective use of Google Ads, leveraging Bard for enhanced website content, and employing Google Analytics for strategic A/B testing to boost sales. The transformational impact of these tools on both my business and my students' ventures is a testament to their potential.


What will you create with Google Bard?

The integration of Bard AI into our daily operations is revolutionizing the way we approach digital marketing. Beyond its current uses in social media content creation, ad ideas generation, email composition, and customer support enhancement, we're exploring several innovative applications:

  • Personalized Marketing Campaigns: Using Bard AI, we can analyze customer data and preferences to create highly personalized marketing campaigns. This helps in delivering more relevant content to our audience, thereby increasing engagement and conversion rates. 
  • Competitive Analysis: By analyzing competitor data, Bard AI can help us understand their strategies, strengths, and weaknesses. This intelligence is crucial for refining our marketing approach and differentiating our brand in the marketplace.
  • Content Optimization for SEO: Bard can assist in optimizing website and blog content for search engines. By understanding and integrating key SEO principles, it can help us rank higher in search results, thus improving our online visibility. 
  • Automated Reporting and Insights: Automating the generation of marketing reports and insights with Bard saves time and resources, allowing our team to focus on strategy and creativity rather than manual data analysis.

What advice would you give someone starting in their developer journey?

The key is to start with action rather than waiting for perfection. Adopt a mindset focused on experimentation and analytics. This approach allows you to follow data-driven insights rather than solely relying on innovation, leading to significant societal impact through technology.


Jirawat Karanwittayakarn

Headshot of Jirawat Karanwittayakarn, smiling
Bangkok, Thailand
Tech Evangelist, LINE Thailand

What Google tools have you used to build?

I have used a variety of Firebase services to build LINE chatbots for a number of years. These services have included Cloud Functions, Cloud Firestore, Cloud Storage, Firebase Hosting, and etc. Recently I have also used the PaLM API, a very powerful tool that allows me to build Generative AI chatbots.


Which tool has been your favorite to use? Why?

Firebase is my favorite tool because it is a platform that provides a complete set of tools for building and managing mobile, web, and chatbots. It is very easy to use and has a wide range of features that make it a great choice for developers of all levels. Furthermore, Firebase services have allowed me to scale my chatbots and make them more reliable.


Please share with us about something you’ve built in the past using Google tools.

  • LINE Developers TH is a chatbot that allows Thai developers to learn about LINE APIs and get started with building services. It also provides users with the ability to try out demos of LINE APIs.
  • TrueMoney is a wallet app that I have built in the past using Firebase. The app allows users to store money, send money, and pay bills. It is a very popular app in Thailand, with over 10 million users.
  • Sanook is an app that allows users to access news, articles, and other content from the number one web portal in Thailand on their mobile devices.

What will you create with Google Bard?

I would like to create a use case of building a powerful LINE chatbot using PaLM API and Firebase for developers. I believe this will be a great way to showcase the power of these tools and how they can be used to create innovative solutions.


What advice would you give someone starting in their developer journey?

First and foremost, I would encourage them to be curious and always be willing to learn new things. The world of technology is constantly changing, so it's important to stay up-to-date on the latest trends and technologies. This can be done by reading articles, attending conferences, and taking online courses.

Secondly, I would recommend that they find a mentor or role model who can help guide them on their journey. Having someone who has been through the process can be invaluable in providing support and advice. They can help you identify areas where you need to improve, and provide you with tips and tricks for success.

Finally, I would encourage them to never give up. The road to becoming a developer can be challenging, but it's also incredibly rewarding. If you're passionate about technology, then don't let anything stop you from pursuing your dreams.


Laura Morinigo

Headshot of Lauren Moringo, smiling
London, England
Women Techmakers Ambassador
Principal Engineer and Consultant, Samsung Electronics UK

What Google tools have you used to build?

I have used tools like Google Cloud and Firebase.


Which tool has been your favorite to use? Why?

I would say Firebase! It helped me to build web apps and explore new technologies easily while saving a lot of time and resources. Additionally, a lot of functionalities have been added recently. Over the years, I've witnessed its evolution, with the addition of numerous functionalities that continually enhance its utility and user experience. This constant innovation within Firebase not only simplifies complex tasks but also opens doors to creative possibilities in web app development.


Please share with us about something you’ve built in the past using Google tools.

I've been leading a project in partnership with the United Nations to help share information about its worldwide global goals. We used Firebase hosting and Cloud functions for the first release of the web app and it was a success! It felt very good to help create tools that support a good cause.


What will you create with Google Bard?

I'm experimenting with the current extensions to improve personal productivity. It's very interesting how you can improve the way that you do your daily tasks.


What advice would you give someone starting in their developer journey?

Remember that as a developer you will have the power to create! Use this power to build personal projects and combine it with things that you enjoy. You will start building a portfolio and have fun while learning. Finally, don't hesitate to find a mentor and connect with a community of developers to support and guidance in your journey. You can find a lot of help, improve your networking, and even have friends for life!

Full-stack development in Project IDX

Posted by Kaushik Sathupadi, Prakhar Srivastav, and Kristin Bi – Software Engineers; Alex Geboff – Technical Writer

We launched Project IDX, our experimental, new browser-based development experience, to simplify the chaos of building full-stack apps and streamline the development process from (back)end to (front)end.

In our experience, most web applications are built with at-least two different layers: a frontend (UI) layer and a backend layer. When you think about the kind of app you’d build in a browser-based developer workspace, you might not immediately jump to full-stack apps with robust, fully functional backends. Developing a backend in a web-based environment can get clunky and costly very quickly. Between different authentication setups for development and production environments, secure communication between backend and frontend, and the complexity of setting up a fully self-contained (hermetic) testing environment, costs and inconveniences can add up.

We know a lot of you are excited to try IDX yourselves, but in the meantime, we wanted to share this post about full-stack development in Project IDX. We’ll untangle some of the complex situations you might hit as a developer building both your frontend and backend layers in a web-based workspace — developer authentication, frontend-backend communication, and hermetic testing — and how we’ve tried to make it all just a little bit easier. And of course we want to hear from you about what else we should build that would make full-stack development easier for you!


Streamlined app previews

First and foremost, we've streamlined the process of enabling your applications frontend communication with its backend services in the VM, making it effortless to preview your full-stack application in the browser.

IDX workspaces are built on Google Cloud Workstations and securely access connected services through Service Accounts. Each workspace’s unique service account supports seamless, authenticated preview environments for your applications frontend. So, when you use Project IDX, application previews are built directly into your workspace, and you don’t actually have to set up a different authentication path to preview your UI. Currently, IDX only supports web previews, but Android and iOS application previews are coming soon to IDX workspaces near you.

Additionally, if your setup necessitates communication with the backend API under development in IDX from outside the browser preview, we've established a few mechanisms to temporarily provide access to the ports hosting these API backends.


Simple front-to-backend communication

If you’re using a framework that serves both the backend and frontend layers from the same port, you can pass the $PORT flag to use a custom PORT environment variable in your workspace configuration file (powered by Nix and stored directly in your workspace). This is part of the basic setup flow in Project IDX, so you don’t have to do anything particularly special (outside of setting the variable in your config file). Here’s an example Nix-based configuration file:


{ pkgs, ... }: {

# NOTE: This is an excerpt of a complete Nix configuration example.

# Enable previews and customize configuration
idx.previews = {
  enable = true;
  previews = [
    {
      command = [
        "npm"
        "run"
        "start"
        "--"
        "--port"
        "$PORT"
        "--host"
        "0.0.0.0"
        "--disable-host-check"
      ];
      manager = "web";
      id = "web";
    }
  ];
};

However, if your backend server is running on a different port from your UI server, you’ll need to implement a different strategy. One method is to have the frontend proxy the backend, as you would with Vite's custom server options.

Another way to establish communication between ports is to set up your code so the javascript running on your UI can communicate with the backend server using AJAX requests.

Let’s start with some sample code that includes both a backend and a frontend. Here’s a backend server written in Express.js:


import express from "express";
import cors from "cors";


const app= express();
app.use(cors());

app.get("/", (req, res) => {
    res.send("Hello World");
});

app.listen(6000, () => {
    console.log("Server is running on port 6000");
})

The bolded line in the sample — app.use(cors()); — sets up the CORS headers. Setup might be different based on the language/framework of your choice, but your backend needs to return these headers whether you’re developing locally or on IDX.

When you run the server in the IDX terminal, the backend ports show up in the IDX panel. And every port that your server runs on is automatically mapped to a URL you can call.

Moving text showing the IDX terminal and panel

Now, let's write some client code to make an AJAX call to this server.


// This URL is copied from the side panel showing the backend ports view
const WORKSPACE_URL = "https://6000-monospace-ksat-web-prod-79679-1677177068249.cluster-lknrrkkitbcdsvoir6wqg4mwt6.cloudworkstations.dev/";

async function get(url) {
  const response = await fetch(url, {
    credentials: 'include',
  });
  console.log(response.text());
}

// Call the backend
get(WORKSPACE_URL);

We’ve also made sure that the fetch() call includes credentials. IDX URLs are authenticated, so we need to include credentials. This way, the AJAX call includes the cookies to authenticate against our servers.

If you’re using XMLHttpRequest instead of fetch, you can set the “withCredentials” property, like this:


const xhr = new XMLHttpRequest();
xhr.open("GET", WORKSPACE_URL, true);
xhr.withCredentials = true;
xhr.send(null);

Your code might differ from our samples based on the client library you use to make the AJAX calls. If it does, check the documentation for your specific client library on how to make a credentialed request. Just be sure to make a credentialed request.


Server-side testing without a login

In some cases you might want to access your application on Project IDX without logging into your Google account — or from an environment where you can’t log into your Google account. For example, if you want to access an API you're developing in IDX using either Postman or cURL from your personal laptops's command line. You can do this by using a temporary access token generated by Project IDX.

Once you have a server running in Project IDX, you can bring up the command menu to generate an access token. This access token is a short-lived token that temporarily allows you to access your workstation.

It’s extremely important to note that this access token provides access to your entire IDX workspace, including but not limited to your application in preview, so you shouldn’t share it with just anyone. We recommend that you only use it for testing.

Generate access token in Project IDX

When you run this command from IDX, your access token shows up in a dialog window. Copy the access token and use it to make a cURL request to a service running on your workstation, like this one:


$ export ACCESS_TOKEN=myaccesstoken
$ curl -H "Authorization: Bearer $ACCESS_TOKEN" https://6000-monospace-ksat-web-prod-79679-1677177068249.cluster-lknrrkkitbcdsvoir6wqg4mwt6.cloudworkstations.dev/
Hello world

And now you can run tests from an authenticated server environment!


Web-based, fully hermetic testing

As we’ve highlighted, you can test your application’s frontend and backend in a fully self-contained, authenticated, secure environment using IDX. You can also run local emulators in your web-based development environment to test your application’s backend services.

For example, you can run the Firebase Local Emulator Suite directly from your IDX workspace. To install the emulator suite, you’d run firebase init emulators from the IDX Terminal tab and follow the steps to configure which emulators you want on what ports.

ALT TEXT

Once you’ve installed them, you can configure and use them the same way you would in a local development environment from the IDX terminal.


Next Steps

As you can see, Project IDX can meet many of your full-stack development needs — from frontend to backend and every emulator in between.

If you're already using Project IDX, tag us on social with #projectidx to let us know how Project IDX has helped you with your full-stack development. Or to sign up for the waitlist, visit idx.dev.