Helping users modernize their serverless apps
Earlier this year, the Google Cloud team introduced a series of codelabs (free, online, self-paced, hands-on tutorials) designed for technical practitioners modernizing their serverless applications. Today, we're excited to announce companion videos, forming a set of "learning modules" made up of these videos and their corresponding codelab tutorials. Modernizing your applications allows you to access continuing product innovation and experience a more open Google Cloud. The initial content is designed with App Engine developers in mind, our earliest users, to help you take advantage of the latest features in Google Cloud. Here are some of the key migrations and why they benefit you:
- Migrate to Cloud NDB: App Engine's legacy
ndblibrary used to access Datastore is tied to Python 2 (which has been sunset by its community). Cloud NDB gives developers the same NDB-style Datastore access but is Python 2-3 compatible and allows Datastore to be used outside of App Engine. - Migrate to Cloud Run: There has been a continuing shift towards containerization, an app modernization process making apps more portable and deployments more easily reproducible. If you appreciate App Engine's easy deployment and autoscaling capabilities, you can get the same by containerizing your App Engine apps for Cloud Run.
- Migrate to Cloud Tasks: while the legacy App Engine
taskqueueservice is still available, new features and continuing innovation are going into Cloud Tasks, its standalone equivalent letting users create and execute App Engine and non-App Engine tasks.
The "Serverless Migration Station" videos are part of the long-running Serverless Expeditions series you may already be familiar with. In each video, Google engineer Martin Omander and I explore a variety of different modernization techniques. Viewers will be given an overview of the task at hand, a deeper-dive screencast takes a closer look at the code or configuration files, and most importantly, illustrates to developers the migration steps necessary to transform the same sample app across each migration.
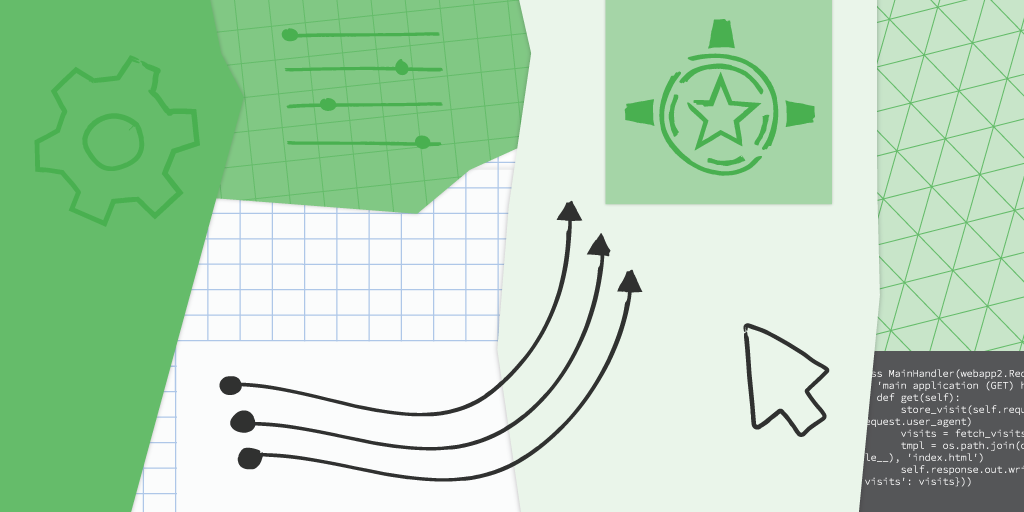
Sample app
The baseline sample app is a simple Python 2 App Engine NDB and webapp2 application. It registers every web page visit (saving visiting IP address and browser/client type) and displays the most recent queries. The entire application is shown below, featuring Visit as the data Kind, the store_visit() and fetch_visits() functions, and the main application handler, MainHandler.
import os
import webapp2
from google.appengine.ext import ndb
from google.appengine.ext.webapp import template

class Visit(ndb.Model):
    'Visit entity registers visitor IP address & timestamp'
    visitor   = ndb.StringProperty()
    timestamp = ndb.DateTimeProperty(auto_now_add=True)

def store_visit(remote_addr, user_agent):
    'create new Visit entity in Datastore'
    Visit(visitor='{}: {}'.format(remote_addr, user_agent)).put()

def fetch_visits(limit):
    'get most recent visits'
    return (v.to_dict() for v in Visit.query().order(
            -Visit.timestamp).fetch(limit))

class MainHandler(webapp2.RequestHandler):
    'main application (GET) handler'
    def get(self):
        store_visit(self.request.remote_addr, self.request.user_agent)
        visits = fetch_visits(10)
        tmpl = os.path.join(os.path.dirname(__file__), 'index.html')
        self.response.out.write(template.render(tmpl, {'visits': visits}))

app = webapp2.WSGIApplication([
    ('/', MainHandler),
], debug=True)
Upon deploying this application to App Engine, users will get output similar to the following:

This application is the subject of today's launch video, and the main.py file above along with other application and configuration files can be found in the Module 0 repo folder.
Next steps
Each migration learning module covers one modernization technique. A video outlines the migration while the codelab leads developers through it. Developers will always get a starting codebase ("START") and learn how to do a specific migration, resulting in a completed codebase ("FINISH"). Developers can hit the reset button (back to START) if something goes wrong or compare their solutions to ours (FINISH). The hands-on experience helps users build muscle-memory for when they're ready to do their own migrations.
All of the migration learning modules, corresponding Serverless Migration Station videos (when published), codelab tutorials, START and FINISH code, etc., can all be found in the migration repo. While there's an initial focus on Python 2 and App Engine, you'll also find content for Python 3 users as well as non-App Engine users. We're looking into similar content for other legacy languages as well so stay tuned. We hope you find all these resources helpful in your quest to modernize your serverless apps!


 Posted by the Google I/O Team


 Posted by the Flutter Team at Google
 Posted by Kacey Fahey, Developer Marketing, Google Play


 Posted by Christina Chiou Yeh, Google Registry
