Tag Archives: Development

Migrating App Engine push queues to Cloud Tasks

Posted by Wesley Chun (@wescpy), Developer Advocate, Google Cloud

Banner image that shows the Cloud Task logo

Introduction

The previous Module 7 episode of Serverless Migration Station gave developers an idea of how App Engine push tasks work and how to implement their use in an existing App Engine ndb Flask app. In this Module 8 episode, we migrate this app from the App Engine Datastore (ndb) and Task Queue (taskqueue) APIs to Cloud NDB and Cloud Tasks. This makes your app more portable and provides a smoother transition from Python 2 to 3. The same principle applies to upgrading other legacy App Engine apps from Java 8 to 11, PHP 5 to 7, and up to Go 1.12 or newer.

Over the years, many of the original App Engine services such as Datastore, Memcache, and Blobstore, have matured to become their own standalone products, for example, Cloud Datastore, Cloud Memorystore, and Cloud Storage, respectively. The same is true for App Engine Task Queues, whose functionality has been split out to Cloud Tasks (push queues) and Cloud Pub/Sub (pull queues), now accessible to developers and applications outside of App Engine.

Migrating App Engine push queues to Cloud Tasks video

Migrating to Cloud NDB and Cloud Tasks

The key updates being made to the application:

  1. Add support for Google Cloud client libraries in the app's configuration
  2. Switch from App Engine APIs to their standalone Cloud equivalents
  3. Make required library adjustments, e.g., add use of Cloud NDB context manager
  4. Complete additional setup for Cloud Tasks
  5. Make minor updates to the task handler itself

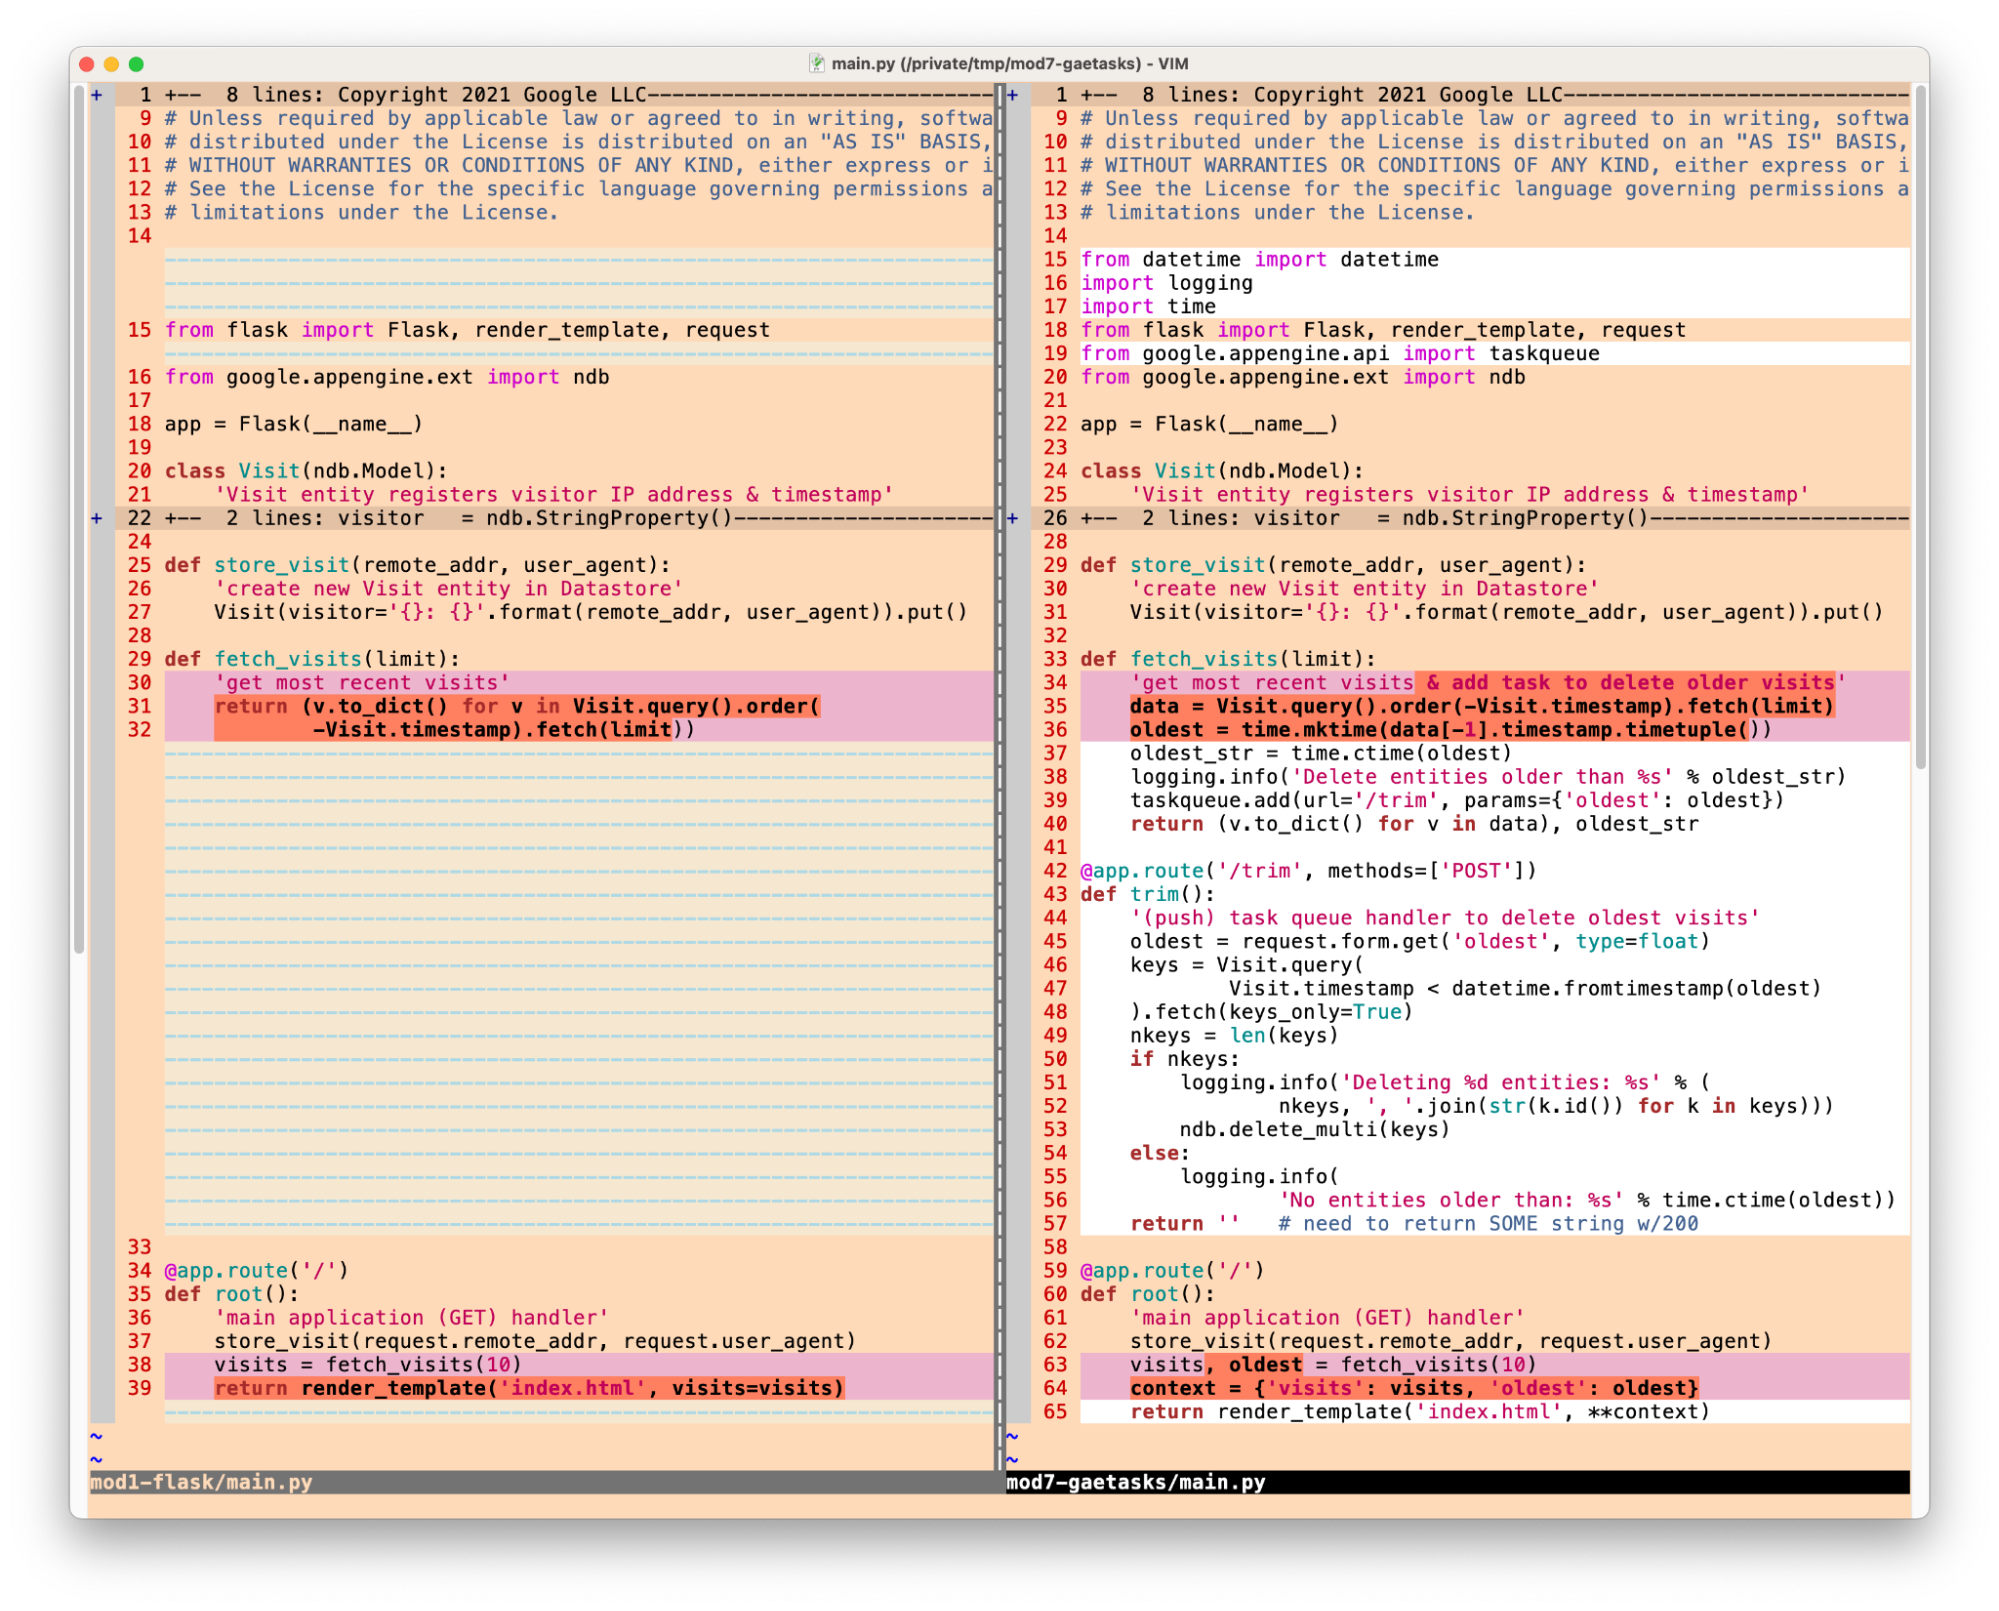
The bulk of the updates are in #3 and #4 above, and those are reflected in the following "diff"s for the main application file:

Screenshot shows primary differences in code when switching to Cloud NDB & Cloud Tasks

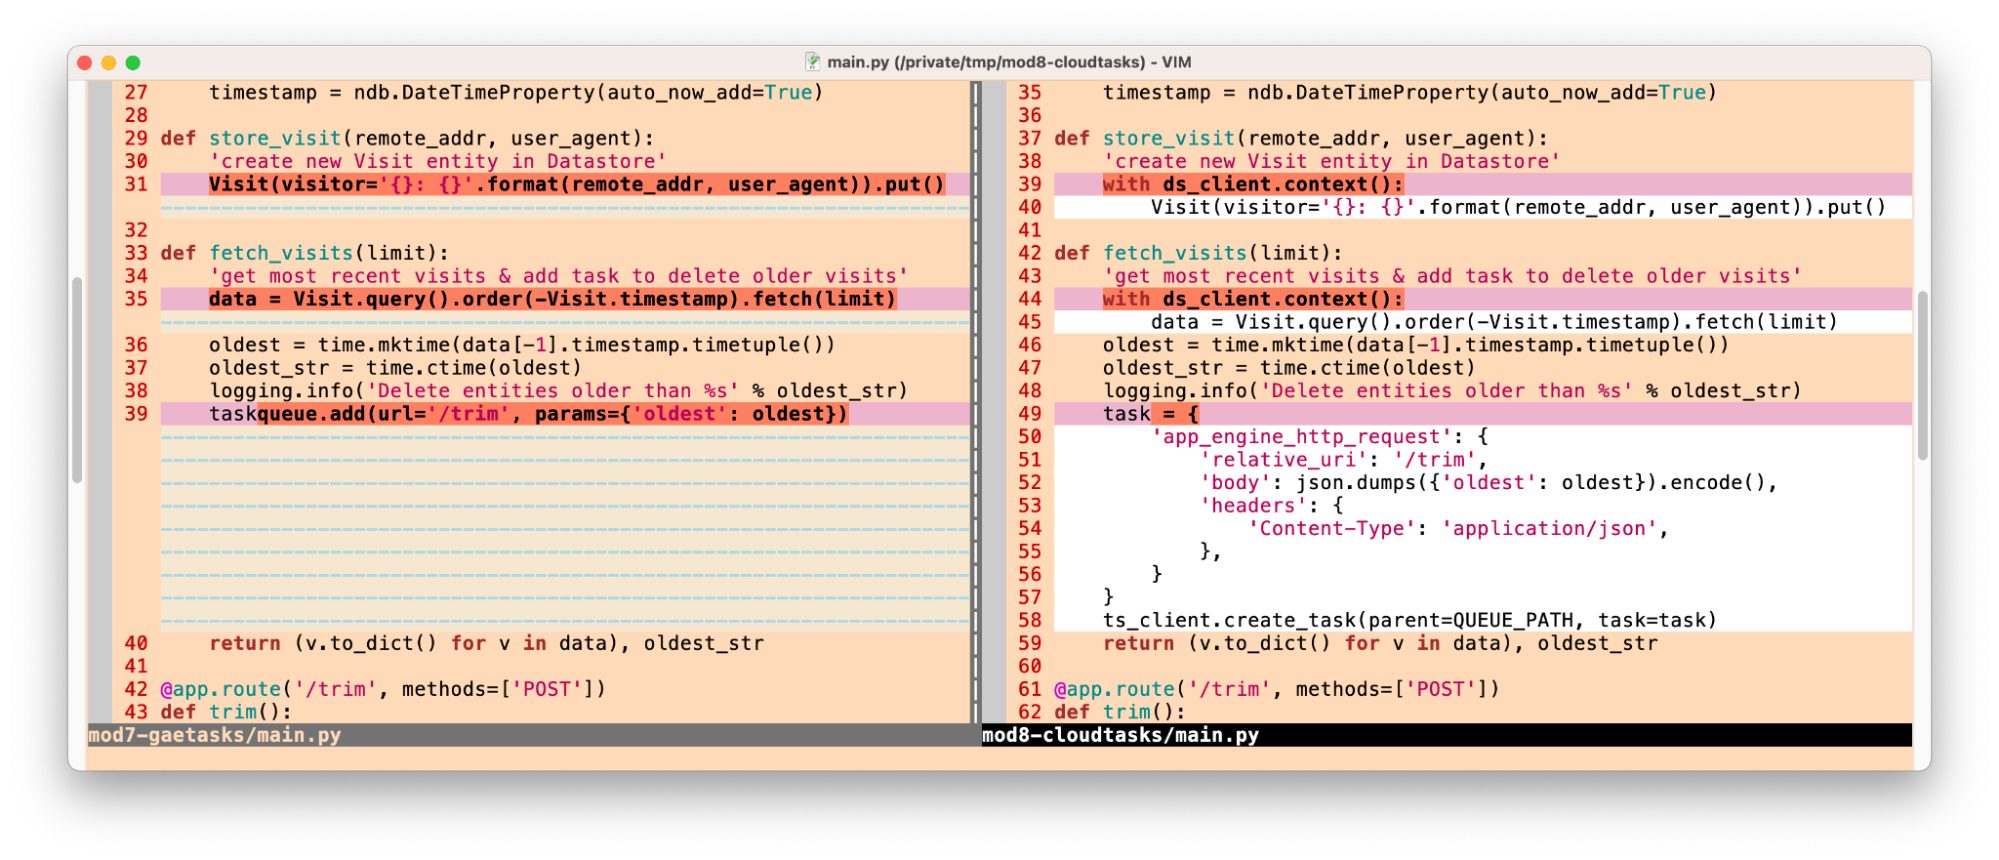
Primary differences switching to Cloud NDB & Cloud Tasks

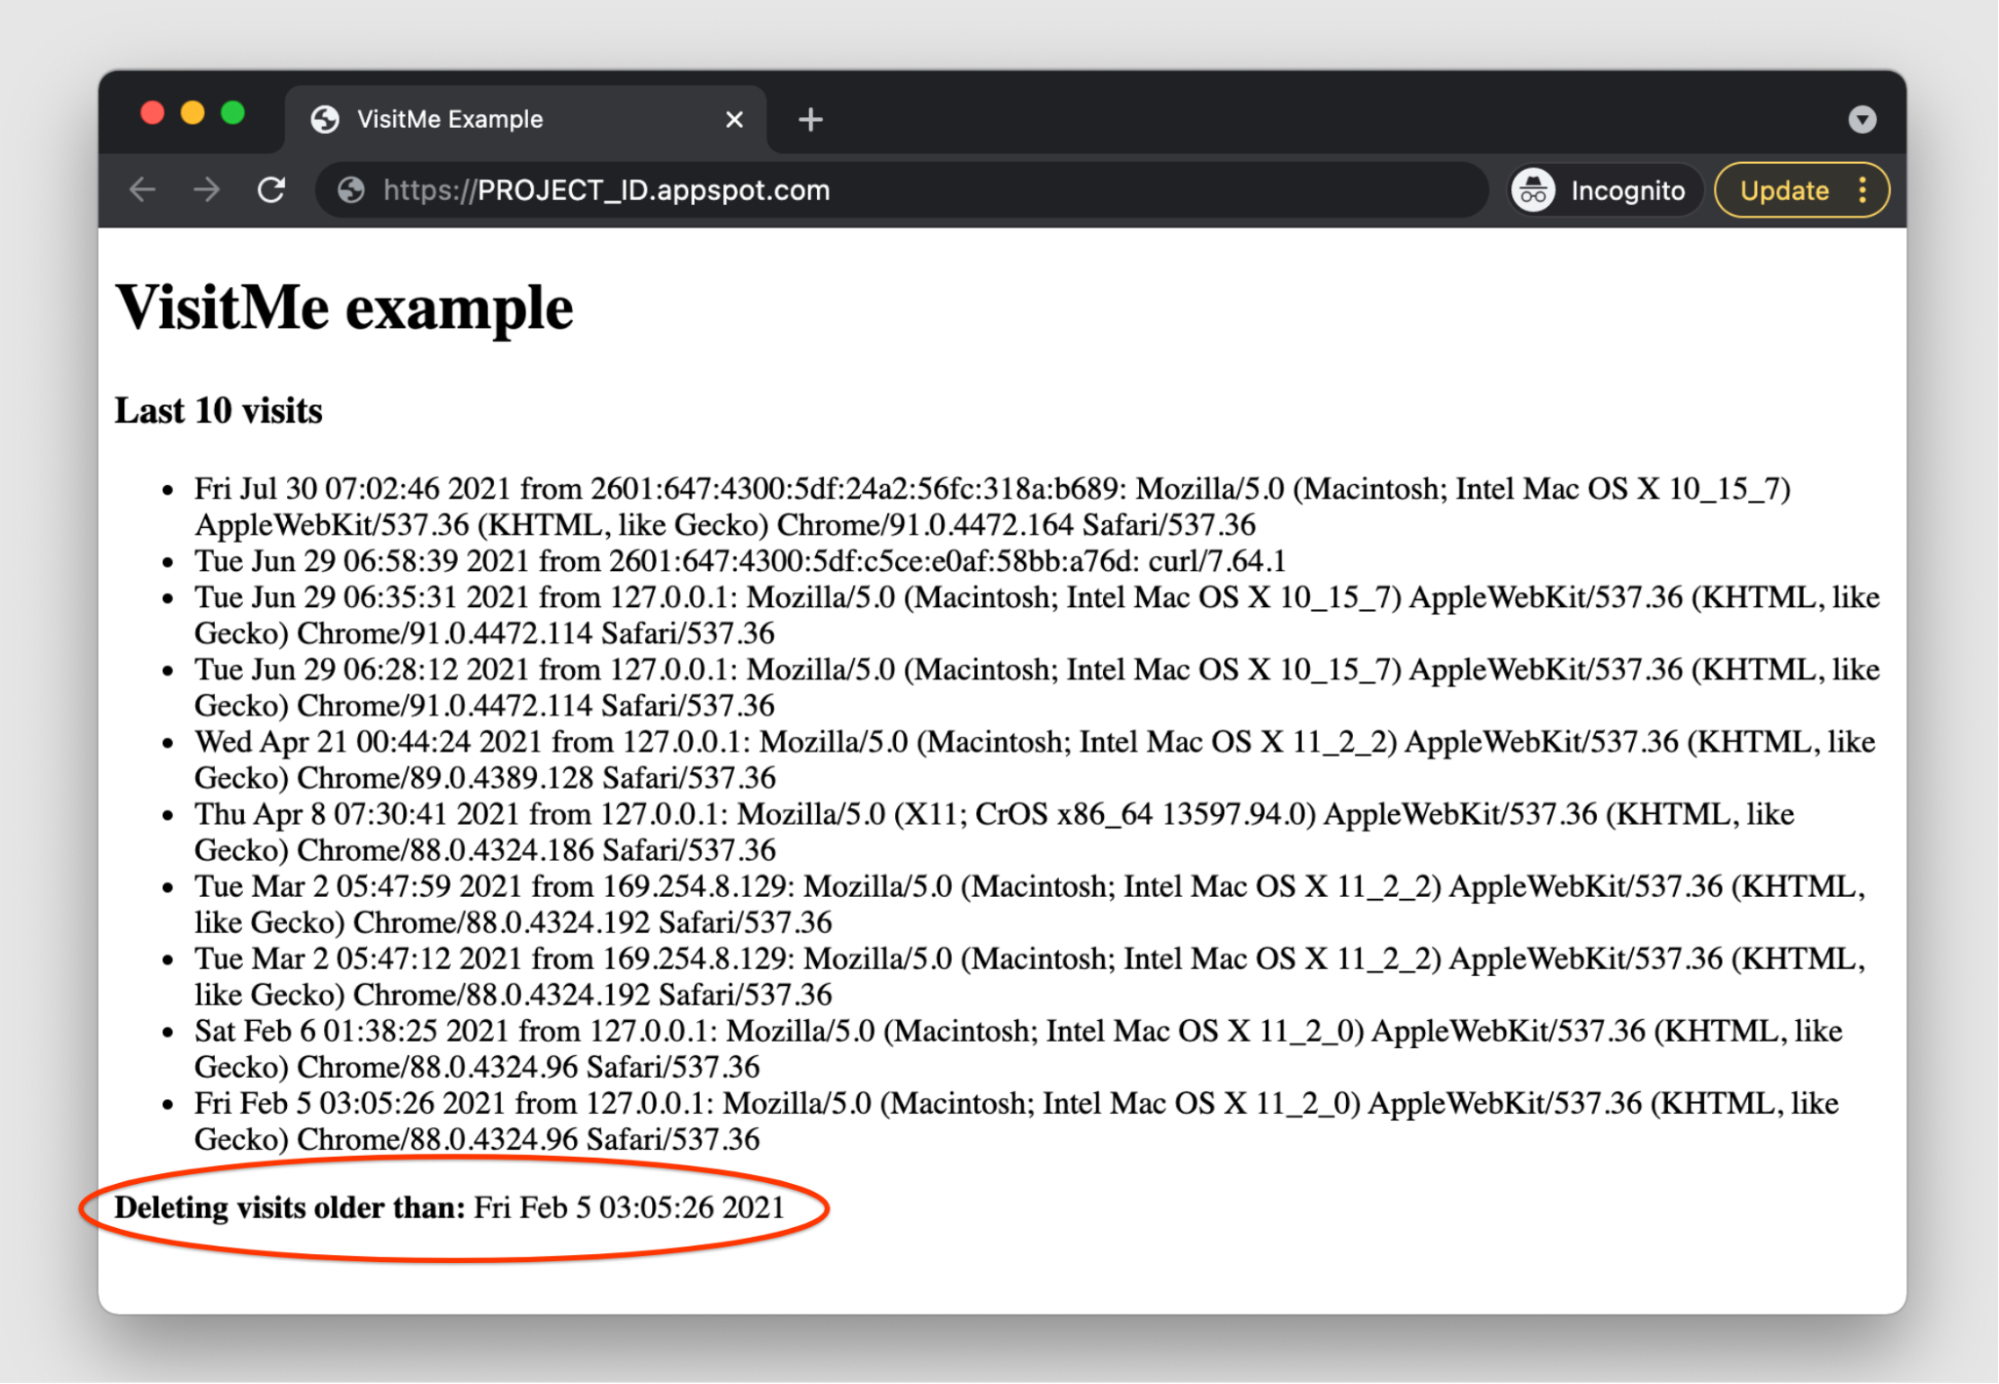
With these changes implemented, the web app works identically to that of the Module 7 sample, but both the database and task queue functionality have been completely swapped to using the standalone/unbundled Cloud NDB and Cloud Tasks libraries… congratulations!

Next steps

To do this exercise yourself, check out our corresponding codelab which leads you step-by-step through the process. You can use this in addition to the video, which can provide guidance. You can also review the push tasks migration guide for more information. Arriving at a fully-functioning Module 8 app featuring Cloud Tasks sets the stage for a larger migration ahead in Module 9. We've accomplished the most important step here, that is, getting off of the original App Engine legacy bundled services/APIs. The Module 9 migration from Python 2 to 3 and Cloud NDB to Cloud Firestore, plus the upgrade to the latest version of the Cloud Tasks client library are all fairly optional, but they represent a good opportunity to perform a medium-sized migration.

All migration modules, their videos (when available), codelab tutorials, and source code, can be found in the migration repo. While the content focuses initially on Python users, we will cover other legacy runtimes soon so stay tuned.

How to use App Engine push queues in Flask apps

Posted by Wesley Chun (@wescpy), Developer Advocate, Google Cloud

Banner image that shows the Cloud Task logo

Introduction

Since its original launch in 2008, many of the core Google App Engine services such as Datastore, Memcache, and Blobstore, have matured to become their own standalone products: for example, Cloud Datastore, Cloud Memorystore, and Cloud Storage, respectively. The same is true for App Engine Task Queues with Cloud Tasks. Today's Module 7 episode of Serverless Migration Station reviews how App Engine push tasks work, by adding this feature to an existing App Engine ndb Flask app.

App Engine push queues in Flask apps video

That app is where we left off at the end of Module 1, migrating its web framework from App Engine webapp2 to Flask. The app registers web page visits, creating a Datastore Entity for each. After a new record is created, the ten most recent visits are displayed to the end-user. If the app only shows the latest visits, there is no reason to keep older visits, so the Module 7 exercise adds a push task that deletes all visits older than the oldest one shown. Tasks execute asynchronously outside the normal application flow.

Key updates

The following are the changes being made to the application:

  1. Add use of App Engine Task Queues (taskqueue) API
  2. Determine oldest visit displayed, logging and saving that timestamp
  3. Create task to delete old visits
  4. Update web page template to display timestamp threshold
  5. Log how many and which visits (by Entity ID) are deleted

Except for #4 which occurs in the HTML template file, these updates are reflected in the "diff"s for the main application file:

Screenshot of App Engine push tasks application source code differences

Adding App Engine push tasks application source code differences

With these changes implemented, the web app now shows the end-user which visits will be deleted by the new push task:

Screenshot of VisitMe example showing last ten site visits. A red circle around older visits being deleted

Sample application output

Next steps

To do this exercise yourself, check out our corresponding codelab which leads you step-by-step through the process. You can use this in addition to the video, which can provide guidance. You can also review the push queue documentation for more information. Arriving at a fully-functioning Module 7 app featuring App Engine push tasks sets the stage for migrating it to Cloud Tasks (and Cloud NDB) ahead in Module 8.

All migration modules, their videos (when available), codelab tutorials, and source code, can be found in the migration repo. While the content focuses initially on Python users, we will cover other legacy runtimes soon so stay tuned.

Flutter and Chrome OS: Better Together

Posted by the Flutter and Chrome OS teams

Chrome OS is the fast, simple, and secure operating system that powers Chromebooks, including the Google Pixelbook and millions of devices used by consumers and students every day. The latest Flutter release adds support for building beautiful, tailored Chrome OS applications, including rich support for keyboard and mouse, and tooling to ensure that your app runs well on a Chromebook. Furthermore, Chrome OS is a great developer workstation for building general-purpose Flutter apps, thanks to its support for developing and running Flutter apps locally on the same device.

Flutter is a great way to build Chrome OS apps

Since its inception, Flutter has shared many of the same principles as Chrome OS: productive, fast, and beautiful experiences. Flutter allows developers to build beautiful, fast UIs, while also providing a high degree of developer productivity, and a completely open-source engine, framework and tools. In short, it’s the ideal modern toolkit for building multi-platform apps, including apps for Chrome OS.

Flutter initially focused on providing a UI toolkit for building apps for mobile devices, which typically feature touch input and small screens. However, we’ve been building keyboard and mouse support into Flutter since before our 1.0 release last December. And today, we’re pleased to announce that Flutter for Chrome OS is now stronger with scroll wheel support, hover management, and better keyboard event support. In addition, Flutter has always been great at allowing you to build apps that run at any size (large screen or small), with seamless resizing, as shown here in the Chrome OS Best Practices Sample:

The Chrome OS best practices sample in action

The Chrome OS best practices sample in action

The Chrome OS Hello World sample is an app built with Flutter that is optimized for Chrome OS. This includes a responsive UI to showcase how to reposition items and have layouts that respond well to changes in size from mobile to desktop.

Because Chrome OS runs Android apps, targeting Android is the way to build Chrome OS apps. However, while building Chrome OS apps on Android has always been possible, as described in these guidelines, it’s often difficult to know whether your Android app is going to run well on Chrome OS. To help with that problem, today we are adding a new set of lint rules to the Flutter tooling to catch violations of the most important of the Chrome OS best practice guidelines:

The Flutter Chrome OS lint rules in action

The Flutter Chrome OS lint rules in action

When you’re able to put these Chrome OS lint rules in place, you’ll quickly be able to see any problems in your Android app that would hamper it when running on Chrome OS. To learn how to take advantage of these rules, see the linting docs for Flutter Chrome OS.

But all of that is just the beginning -- the Flutter tools allow you to develop and test your apps directly on Chrome OS as well.

Chrome OS is a great developer platform to build Flutter apps

No matter what platform you're targeting, Flutter has support for rich IDEs and programming tools like Android Studio and Visual Studio Code. Over the last year, Chrome OS has been building support for running the Linux version of these tools with the beta of Linux on Chrome OS (aka Crostini). And, because Chrome OS also supports Android natively, you can configure the Flutter tooling to run your Android apps directly without an emulator involved.

The Flutter development tools running on Chrome OS

The Flutter development tools running on Chrome OS

All of the great productivity of Flutter is available, including Stateful Hot Reload, seamless resizing, keyboard and mouse support, and so on. Recent improvements in Crostini, such as high DPI support, Crostini file system integration, easier adb, and so on, have made this experience even better! Of course, you don’t have to test against the Android container running on Chrome OS; you can also test against Android devices attached to your Chrome OS box. In short, Chrome OS is the ideal environment in which to develop and test your Flutter apps, especially when you’re targeting Chrome OS itself.

Customers love Flutter on Chrome OS

With its unique combination of simplicity, security, and capability, Chrome OS is an increasingly popular platform for enterprise applications. These apps often work with large quantities of data, whether it’s a chart, or a graph for visualization, or lists and forms for data entry. The support in Flutter for high quality graphics, large screen layout, and input features (like text selection, tab order and mousewheel), make it an ideal way to port mobile applications for the enterprise. One purveyor of such apps is AppTree, who use Flutter and Chrome OS to solve problems for their enterprise customers.

“Creating a Chrome OS version of our app took very little effort. In 10 minutes we tweaked a few values and now our users have access to our app on a whole new class of devices. This is a huge deal for our enterprise customers who have been wanting access to our app on Desktop devices.”
--Matthew Smith, CTO, AppTree Software

By using Flutter to target Chrome OS, AppTree was able to start with their existing Flutter mobile app and easily adapt it to take advantage of the capabilities of Chrome OS.

Try Flutter on Chrome OS today!

If you’d like to target Chrome OS with Flutter, you can do so today simply by installing the latest version of Flutter. If you’d like to run the Flutter development tools on Chrome OS, you can follow these instructions to get started fast. To see a real-world app built with Flutter that has been optimized for Chrome OS, check out the the Developer Quest sample that the Flutter DevRel team launched at the 2019 Google I/O conference. And finally, don’t forget to try out the Flutter Chrome OS linting rules to make sure that your Chrome OS apps are following the most important practices.

Flutter and Chrome OS go great together. What are you going to build?