Tag Archives: cloud platform

Migrating App Engine push queues to Cloud Tasks

Posted by Wesley Chun (@wescpy), Developer Advocate, Google Cloud

Banner image that shows the Cloud Task logo

Introduction

The previous Module 7 episode of Serverless Migration Station gave developers an idea of how App Engine push tasks work and how to implement their use in an existing App Engine ndb Flask app. In this Module 8 episode, we migrate this app from the App Engine Datastore (ndb) and Task Queue (taskqueue) APIs to Cloud NDB and Cloud Tasks. This makes your app more portable and provides a smoother transition from Python 2 to 3. The same principle applies to upgrading other legacy App Engine apps from Java 8 to 11, PHP 5 to 7, and up to Go 1.12 or newer.

Over the years, many of the original App Engine services such as Datastore, Memcache, and Blobstore, have matured to become their own standalone products, for example, Cloud Datastore, Cloud Memorystore, and Cloud Storage, respectively. The same is true for App Engine Task Queues, whose functionality has been split out to Cloud Tasks (push queues) and Cloud Pub/Sub (pull queues), now accessible to developers and applications outside of App Engine.

Migrating App Engine push queues to Cloud Tasks video

Migrating to Cloud NDB and Cloud Tasks

The key updates being made to the application:

  1. Add support for Google Cloud client libraries in the app's configuration
  2. Switch from App Engine APIs to their standalone Cloud equivalents
  3. Make required library adjustments, e.g., add use of Cloud NDB context manager
  4. Complete additional setup for Cloud Tasks
  5. Make minor updates to the task handler itself

The bulk of the updates are in #3 and #4 above, and those are reflected in the following "diff"s for the main application file:

Screenshot shows primary differences in code when switching to Cloud NDB & Cloud Tasks

Primary differences switching to Cloud NDB & Cloud Tasks

With these changes implemented, the web app works identically to that of the Module 7 sample, but both the database and task queue functionality have been completely swapped to using the standalone/unbundled Cloud NDB and Cloud Tasks libraries… congratulations!

Next steps

To do this exercise yourself, check out our corresponding codelab which leads you step-by-step through the process. You can use this in addition to the video, which can provide guidance. You can also review the push tasks migration guide for more information. Arriving at a fully-functioning Module 8 app featuring Cloud Tasks sets the stage for a larger migration ahead in Module 9. We've accomplished the most important step here, that is, getting off of the original App Engine legacy bundled services/APIs. The Module 9 migration from Python 2 to 3 and Cloud NDB to Cloud Firestore, plus the upgrade to the latest version of the Cloud Tasks client library are all fairly optional, but they represent a good opportunity to perform a medium-sized migration.

All migration modules, their videos (when available), codelab tutorials, and source code, can be found in the migration repo. While the content focuses initially on Python users, we will cover other legacy runtimes soon so stay tuned.

How to use App Engine push queues in Flask apps

Posted by Wesley Chun (@wescpy), Developer Advocate, Google Cloud

Banner image that shows the Cloud Task logo

Introduction

Since its original launch in 2008, many of the core Google App Engine services such as Datastore, Memcache, and Blobstore, have matured to become their own standalone products: for example, Cloud Datastore, Cloud Memorystore, and Cloud Storage, respectively. The same is true for App Engine Task Queues with Cloud Tasks. Today's Module 7 episode of Serverless Migration Station reviews how App Engine push tasks work, by adding this feature to an existing App Engine ndb Flask app.

App Engine push queues in Flask apps video

That app is where we left off at the end of Module 1, migrating its web framework from App Engine webapp2 to Flask. The app registers web page visits, creating a Datastore Entity for each. After a new record is created, the ten most recent visits are displayed to the end-user. If the app only shows the latest visits, there is no reason to keep older visits, so the Module 7 exercise adds a push task that deletes all visits older than the oldest one shown. Tasks execute asynchronously outside the normal application flow.

Key updates

The following are the changes being made to the application:

  1. Add use of App Engine Task Queues (taskqueue) API
  2. Determine oldest visit displayed, logging and saving that timestamp
  3. Create task to delete old visits
  4. Update web page template to display timestamp threshold
  5. Log how many and which visits (by Entity ID) are deleted

Except for #4 which occurs in the HTML template file, these updates are reflected in the "diff"s for the main application file:

Screenshot of App Engine push tasks application source code differences

Adding App Engine push tasks application source code differences

With these changes implemented, the web app now shows the end-user which visits will be deleted by the new push task:

Screenshot of VisitMe example showing last ten site visits. A red circle around older visits being deleted

Sample application output

Next steps

To do this exercise yourself, check out our corresponding codelab which leads you step-by-step through the process. You can use this in addition to the video, which can provide guidance. You can also review the push queue documentation for more information. Arriving at a fully-functioning Module 7 app featuring App Engine push tasks sets the stage for migrating it to Cloud Tasks (and Cloud NDB) ahead in Module 8.

All migration modules, their videos (when available), codelab tutorials, and source code, can be found in the migration repo. While the content focuses initially on Python users, we will cover other legacy runtimes soon so stay tuned.

Exploring serverless with a nebulous app: Deploy the same app to App Engine, Cloud Functions, or Cloud Run

Posted by Wesley Chun (@wescpy), Developer Advocate, Google Cloud

Banner image that shows the App Engine, Cloud Functions, and Cloud Run logos

Introduction

Google Cloud offers three distinct ways of running your code or application in a serverless way, each serving different use cases. Google App Engine, our first Cloud product, was created to give users the ability to deploy source-based web applications or mobile backends directly to the cloud without the need of thinking about servers or scaling. Cloud Functions came later for scenarios where you may not have an entire app, great for one-off utility functions or event-driven microservices. Cloud Run is our latest fully-managed serverless product that gives developers the flexibility of containers along with the convenience of serverless.

As all are serverless compute platforms, users recognize they share some similarities along with clear differences, and often, they ask:

  1. How different is deploying code to App Engine, Cloud Functions, or Cloud Run?
  2. Is it challenging to move from one to another if I feel the other may better fit my needs?

We're going to answer these questions today by sharing a unique application with you, one that can be deployed to all three platforms without changing any application code. All of the necessary changes are done in configuration.

More motivation

Another challenge for developers can be trying to learn how to use another Cloud product, such as this request, paraphrased from a user:

  1. I have a Google App Engine app
  2. I want to call the Cloud Translation API from that app

Sounds simple enough. This user went straight to the App Engine and Translation API documentation where they were able to get started with the App Engine Quickstart to get their app up and going, then found the Translation API setup page and started looking into permissions needed to access the API. However, they got stuck at the Identity and Access Management (IAM) page on roles, being overwhelmed at all the options but no clear path forward. In light of this, let's add a third question to preceding pair outlined earlier:

  1. How do you access Cloud APIs from a Cloud serverless platform?
Without knowing what that user was going to build, let's just implement a barebones translator, an "MVP" (minimally viable product) version of a simple "My Google Translate" Python Flask app using the Translation API, one of Google Cloud's AI/ML "building block" APIs. These APIs are backed by pre-trained machine learning models, giving developers with little or no background in AI/ML the ability to leverage the benefits of machine learning with only API calls.

The application

The app consists of a simple web page prompting the user for a phrase to translate from English to Spanish. The translated results along with the original phrase are presented along with an empty form for a follow-up translation if desired. While the majority of this app's deployments are in Python 3, there are still many users working on upgrading from Python 2, so some of those deployments are available to help with migration planning. Taking this into account, this app can be deployed (at least) eight different ways:
  1. Local (or hosted) Flask server (Python 2)
  2. Local (or hosted) Flask server (Python 3)
  3. Google App Engine (Python 2)
  4. Google App Engine (Python 3)
  5. Google Cloud Functions (Python 3)
  6. Google Cloud Run (Python 2 via Docker)
  7. Google Cloud Run (Python 3 via Docker)
  8. Google Cloud Run (Python 3 via Cloud Buildpacks)
The following is a brief glance at the files and which configurations they're for: Screenshot of Nebulous serverless sample app files

Nebulous serverless sample app files

Diving straight into the application, let's look at its primary function, translate():
@app.route('/', methods=['GET', 'POST'])
def translate(gcf_request=None):
local_request = gcf_request if gcf_request else request
text = translated = None
if local_request.method == 'POST':
text = local_request.form['text'].strip()
if text:
data = {
'contents': [text],
'parent': PARENT,
'target_language_code': TARGET[0],
}
rsp = TRANSLATE.translate_text(request=data)
translated = rsp.translations[0].translated_text
context = {
'orig': {'text': text, 'lc': SOURCE},
'trans': {'text': translated, 'lc': TARGET},
}
return render_template('index.html', **context)

Core component (translate()) of sample application


Some key app components:
  • Upon an initial request (GET), an HTML template is rendered featuring a simple form with an empty text field for the text to translate.
  • The form POSTs back to the app, and in this case, grabs the text to translate, sends the request to the Translation API, receives and displays the results to the user along with an empty form for another translation.
  • There is a special "ifdef" for Cloud Functions near the top to receive a request object because a web framework isn't used like you'd have with App Engine or Cloud Run, so Cloud Functions provides one for this reason.
The app runs identically whether running locally or deployed to App Engine, Cloud Functions, or Cloud Run. The magic is all in the configuration. The requirements.txt file* is used in all configurations, whether to install third-party packages locally, or to direct the Cloud Build system to automatically install those libraries during deployment. Beyond requirements.txt, things start to differ:
  1. App Engine has an app.yaml file and possibly an appengine_config.py file.
  2. Cloud Run has either a Dockerfile (Docker) or Procfile (Cloud Buildpacks), and possibly a service.yaml file.
  3. Cloud Functions, the "simplest" of the three, has no configuration outside of a package requirements file (requirements.txt, package.json, etc.).
The following is what you should expect to see after completing one translation request: Screenshot of My Google Translate (1990s Edition) in Incognito Window

"My Google Translate" MVP app (Cloud Run edition)

Next steps

The sample app can be run locally or on your own hosting server, but now you also know how to deploy it to each of Cloud's serverless platforms and what those subtle differences are. You also have a sense of the differences between each platform as well as what it takes to switch from one to another. For example, if your organization is moving to implement containerization into your software development workflow, you can migrate your existing App Engine apps to Cloud Run using Docker or using Cloud Buildpacks if you don't want to think about containers or Dockerfiles. Lastly, you now know how to access Cloud APIs from these platforms. Lastly, you now know how to access Cloud APIs from these platforms.

The user described earlier was overwhelmed at all the IAM roles and options available because this type of detail is required to provide the most security options for accessing Cloud services, but when prototyping, the fastest on-ramp is to use the default service account that comes with Cloud serverless platforms. These help you get that prototype working while allowing you to learn more about IAM roles and required permissions. Once you've progressed far enough to consider deploying to production, you can then follow the best practice of "least privileges" and create your own (user-managed) service accounts with the minimal permissions required so your application functions properly.

To dive in, the code and codelabs (free, self-paced, hands-on tutorials) for each deployment are available in its open source repository. An active Google Cloud billing account is required to deploy this application to each of our serverless platforms even though you can do all of them without incurring charges. More information can be found in the "Cost" section of the repo's README. We hope this sample app teaches you more about the similarities and differences between our plaforms, shows you how you can "shift" applications comfortably between them, and provides a light introduction to another Cloud API. Also check out my colleague's post featuring similar content for Node.js.

Cloud NDB to Cloud Datastore migration

Posted by Wesley Chun (@wescpy), Developer Advocate, Google Cloud

An optional migration

Serverless Migration Station is a mini-series from Serverless Expeditions focused on helping users on one of Google Cloud's serverless compute platforms modernize their applications. The video today demonstrates how to migrate a sample app from Cloud NDB (or App Engine ndb) to Cloud Datastore. While Cloud NDB suffices as a current solution for today's App Engine developers, this optional migration is for those who want to consolidate their app code to using a single client library to talk to Datastore.

Cloud Datastore started as Google App Engine's original database but matured to becoming its own standalone product in 2013. At that time, native client libraries were created for the new product so non-App Engine apps as well as App Engine second generation apps could access the service. Long-time developers have been using the original App Engine service APIs to access Datastore; for Python, this would be App Engine ndb. While the legacy ndb service is still available, its limitations and lack of availability in Python 3 are why we recommend users switch to standalone libraries like Cloud NDB in the preceding video in this series.

While Cloud NDB lets users break free from proprietary App Engine services and upgrade their applications to Python 3, it also gives non-App Engine apps access to Datastore. However, Cloud NDB's primary role is a transition tool for Python 2 App Engine developers. Non-App Engine developers and new Python 3 App Engine developers are directed to the Cloud Datastore native client library, not Cloud NDB.

As a result, those with a collection of Python 2 or Python 3 App Engine apps as well as non-App Engine apps may be using completely different libraries (ndb, Cloud NDB, Cloud Datastore) to connect to the same Datastore product. Following the best practices of code reuse, developers should consider consolidating to a single client library to access Datastore. Shared libraries provide stability and robustness with code that's constantly tested, debugged, and battle-proven. Module 2 showed users how to migrate from App Engine ndb to Cloud NDB, and today's Module 3 content focuses on migrating from Cloud NDB to Cloud Datastore. Users can also go straight from ndb directly to Cloud Datastore, skipping Cloud NDB entirely.

Migration sample and next steps

Cloud NDB follows an object model identical to App Engine ndb and is deliberately meant to be familiar to long-time Python App Engine developers while use of the Cloud Datastore client library is more like accessing a JSON document store. Their querying styles are also similar. You can compare and contrast them in the "diffs" screenshot below and in the video.

The diffs between the Cloud NDB and Cloud Datastore versions of the sample app

The "diffs" between the Cloud NDB and Cloud Datastore versions of the sample app

All that said, this migration is optional and only useful if you wish to consolidate to using a single client library. If your Python App Engine apps are stable with ndb or Cloud NDB, and you don't have any code using Cloud Datastore, there's no real reason to move unless Cloud Datastore has a compelling feature inaccessible from your current client library. If you are considering this migration and want to try it on a sample app before considering for yours, see the corresponding codelab and use the video for guidance.

It begins with the Module 2 code completed in the previous codelab/video; use your solution or ours as the "START". Both Python 2 (Module 2a folder) and Python 3 (Module 2b folder) versions are available. The goal is to arrive at the "FINISH" with an identical, working app but using a completely different Datastore client library. Our Python 2 FINISH can be found in the Module 3a folder while Python 3's FINISH is in the Module 3b folder. If something goes wrong during your migration, you can always rollback to START, or compare your solution with our FINISH. We will continue our Datastore discussion ahead in Module 6 as Cloud Firestore represents the next generation of the Datastore service.

All of these learning modules, corresponding videos (when published), codelab tutorials, START and FINISH code, etc., can be found in the migration repo. We hope to also one day cover other legacy runtimes like Java 8 and others, so stay tuned. Up next in Module 4, we'll take a different turn and showcase a product crossover, showing App Engine developers how to containerize their apps and migrate them to Cloud Run, our scalable container-hosting service in the cloud. If you can't wait for either Modules 4 or 6, try out their respective codelabs or access the code samples in the table at the repo above. Migrations aren't always easy, and we hope content like this helps you modernize your apps.

Migrating from App Engine ndb to Cloud NDB

Posted by Wesley Chun (@wescpy), Developer Advocate, Google Cloud

Migrating to standalone services

Today we're introducing the first video showing long-time App Engine developers how to migrate from the App Engine ndb client library that connects to Datastore. While the legacy App Engine ndb service is still available for Datastore access, new features and continuing innovation are going into Cloud Datastore, so we recommend Python 2 users switch to standalone product client libraries like Cloud NDB.

This video and its corresponding codelab show developers how to migrate the sample app introduced in a previous video and gives them hands-on experience performing the migration on a simple app before tackling their own applications. In the immediately preceding "migration module" video, we transitioned that app from App Engine's original webapp2 framework to Flask, a popular framework in the Python community. Today's Module 2 content picks up where that Module 1 leaves off, migrating Datastore access from App Engine ndb to Cloud NDB.

Migrating to Cloud NDB opens the doors to other modernizations, such as moving to other standalone services that succeed the original App Engine legacy services, (finally) porting to Python 3, breaking up large apps into microservices for Cloud Functions, or containerizing App Engine apps for Cloud Run.

Moving to Cloud NDB

App Engine's Datastore matured to becoming its own standalone product in 2013, Cloud Datastore. Cloud NDB is the replacement client library designed for App Engine ndb users to preserve much of their existing code and user experience. Cloud NDB is available in both Python 2 and 3, meaning it can help expedite a Python 3 upgrade to the second generation App Engine platform. Furthermore, Cloud NDB gives non-App Engine apps access to Cloud Datastore.

As you can see from the screenshot below, one key difference between both libraries is that Cloud NDB provides a context manager, meaning you would use the Python with statement in a similar way as opening files but for Datastore access. However, aside from moving code inside with blocks, no other changes are required of the original App Engine ndb app code that accesses Datastore. Of course your "YMMV" (your mileage may vary) depending on the complexity of your code, but the goal of the team is to provide as seamless of a transition as possible as well as to preserve "ndb"-style access.

The difference between the App Engine ndb and Cloud NDB versions of the sample app

The "diffs" between the App Engine ndb and Cloud NDB versions of the sample app

Next steps

To try this migration yourself, hit up the corresponding codelab and use the video for guidance. This Module 2 migration sample "STARTs" with the Module 1 code completed in the previous codelab (and video). Users can use their solution or grab ours in the Module 1 repo folder. The goal is to arrive at the end with an identical, working app that operates just like the Module 1 app but uses a completely different Datastore client library. You can find this "FINISH" code sample in the Module 2a folder. If something goes wrong during your migration, you can always rollback to START, or compare your solution with our FINISH. Bonus content migrating to Python 3 App Engine can also be found in the video and codelab, resulting in a second FINISH, the Module 2b folder.

All of these learning modules, corresponding videos (when published), codelab tutorials, START and FINISH code, etc., can be found in the migration repo. We hope to also one day cover other legacy runtimes like Java 8 and others, so stay tuned! Developers should also check out the official Cloud NDB migration guide which provides more migration details, including key differences between both client libraries.

Ahead in Module 3, we will continue the Cloud NDB discussion and present our first optional migration, helping users move from Cloud NDB to the native Cloud Datastore client library. If you can't wait, try out its codelab found in the table at the repo above. Migrations aren't always easy; we hope this content helps you modernize your apps and shows we're focused on helping existing users as much as new ones.

Migrating from App Engine webapp2 to Flask

Posted by Wesley Chun (@wescpy), Developer Advocate, Google Cloud
graphic showing movement with arrows,. settings, lines, and more

Migrating web framework

The Google Cloud team recently introduced a series of codelabs (free, self-paced, hands-on tutorials) and corresponding videos designed to help users on one of our serverless compute platforms modernize their apps, with an initial focus on our earliest users running their apps on Google App Engine. We kick off this content by showing users how to migrate from App Engine's webapp2 web framework to Flask, a popular framework in the Python community.

While users have always been able to use other frameworks with App Engine, webapp2 comes bundled with App Engine, making it the default choice for many developers. One new requirement in App Engine's next generation platform (which launched in 2018) is that web frameworks must do their own routing, which unfortunately, means that webapp2 is no longer supported, so here we are. The good news is that as a result, modern App Engine is more flexible, lets users to develop in a more idiomatic fashion, and makes their apps more portable.

For example, while webapp2 apps can run on App Engine, Flask apps can run on App Engine, your servers, your data centers, or even on other clouds! Furthermore, Flask has more users, more published resources, and is better supported. If Flask isn't right for you, you can select from other WSGI-compliant frameworks such as Django, Pyramid, and others.

Video and codelab content

In this "Module 1" episode of Serverless Migration Station (part of the Serverless Expeditions series) Google engineer Martin Omander and I explore this migration and walk developers through it step-by-step.

In the previous video, we introduced developers to the baseline Python 2 App Engine NDB webapp2 sample app that we're taking through each of the migrations. In the video above, users see that the majority of the changes are in the main application handler, MainHandler:

The diffs between the webapp2 and Flask versions of the sample app

The "diffs" between the webapp2 and Flask versions of the sample app

Upon (re)deploying the app, users should see no visible changes to the output from the original version:

VisitMe application sample output

VisitMe application sample output

Next steps

Today's video picks up from where we left off: the Python 2 baseline app in its Module 0 repo folder. We call this the "START". By the time the migration has completed, the resulting source code, called "FINISH", can be found in the Module 1 repo folder. If you mess up partway through, you can rewind back to the START, or compare your solution with ours, FINISH. We also hope to one day provide a Python 3 version as well as cover other legacy runtimes like Java 8, PHP 5, and Go 1.11 and earlier, so stay tuned!

All of the migration learning modules, corresponding videos (when published), codelab tutorials, START and FINISH code, etc., can all be found in the migration repo. The next video (Module 2) will cover migrating from App Engine's ndb library for Datastore to Cloud NDB. We hope you find all these resources helpful in your quest to modernize your serverless apps!

Introducing "Serverless Migration Station" Learning Modules

Posted by Wesley Chun (@wescpy), Developer Advocate, Google Cloud
graphic showing movement with arrows,. settings, lines, and more

Helping users modernize their serverless apps

Earlier this year, the Google Cloud team introduced a series of codelabs (free, online, self-paced, hands-on tutorials) designed for technical practitioners modernizing their serverless applications. Today, we're excited to announce companion videos, forming a set of "learning modules" made up of these videos and their corresponding codelab tutorials. Modernizing your applications allows you to access continuing product innovation and experience a more open Google Cloud. The initial content is designed with App Engine developers in mind, our earliest users, to help you take advantage of the latest features in Google Cloud. Here are some of the key migrations and why they benefit you:

  • Migrate to Cloud NDB: App Engine's legacy ndb library used to access Datastore is tied to Python 2 (which has been sunset by its community). Cloud NDB gives developers the same NDB-style Datastore access but is Python 2-3 compatible and allows Datastore to be used outside of App Engine.
  • Migrate to Cloud Run: There has been a continuing shift towards containerization, an app modernization process making apps more portable and deployments more easily reproducible. If you appreciate App Engine's easy deployment and autoscaling capabilities, you can get the same by containerizing your App Engine apps for Cloud Run.
  • Migrate to Cloud Tasks: while the legacy App Engine taskqueue service is still available, new features and continuing innovation are going into Cloud Tasks, its standalone equivalent letting users create and execute App Engine and non-App Engine tasks.


The "Serverless Migration Station" videos are part of the long-running Serverless Expeditions series you may already be familiar with. In each video, Google engineer Martin Omander and I explore a variety of different modernization techniques. Viewers will be given an overview of the task at hand, a deeper-dive screencast takes a closer look at the code or configuration files, and most importantly, illustrates to developers the migration steps necessary to transform the same sample app across each migration.

Sample app

The baseline sample app is a simple Python 2 App Engine NDB and webapp2 application. It registers every web page visit (saving visiting IP address and browser/client type) and displays the most recent queries. The entire application is shown below, featuring Visit as the data Kind, the store_visit() and fetch_visits() functions, and the main application handler, MainHandler.


import os
import webapp2
from google.appengine.ext import ndb
from google.appengine.ext.webapp import template

class Visit(ndb.Model):
'Visit entity registers visitor IP address & timestamp'
visitor = ndb.StringProperty()
timestamp = ndb.DateTimeProperty(auto_now_add=True)

def store_visit(remote_addr, user_agent):
'create new Visit entity in Datastore'
Visit(visitor='{}: {}'.format(remote_addr, user_agent)).put()

def fetch_visits(limit):
'get most recent visits'
return (v.to_dict() for v in Visit.query().order(
-Visit.timestamp).fetch(limit))

class MainHandler(webapp2.RequestHandler):
'main application (GET) handler'
def get(self):
store_visit(self.request.remote_addr, self.request.user_agent)
visits = fetch_visits(10)
tmpl = os.path.join(os.path.dirname(__file__), 'index.html')
self.response.out.write(template.render(tmpl, {'visits': visits}))

app = webapp2.WSGIApplication([
('/', MainHandler),
], debug=True)

Baseline sample application code

Upon deploying this application to App Engine, users will get output similar to the following:

image of a website with text saying VisitMe example

VisitMe application sample output

This application is the subject of today's launch video, and the main.py file above along with other application and configuration files can be found in the Module 0 repo folder.

Next steps

Each migration learning module covers one modernization technique. A video outlines the migration while the codelab leads developers through it. Developers will always get a starting codebase ("START") and learn how to do a specific migration, resulting in a completed codebase ("FINISH"). Developers can hit the reset button (back to START) if something goes wrong or compare their solutions to ours (FINISH). The hands-on experience helps users build muscle-memory for when they're ready to do their own migrations.

All of the migration learning modules, corresponding Serverless Migration Station videos (when published), codelab tutorials, START and FINISH code, etc., can all be found in the migration repo. While there's an initial focus on Python 2 and App Engine, you'll also find content for Python 3 users as well as non-App Engine users. We're looking into similar content for other legacy languages as well so stay tuned. We hope you find all these resources helpful in your quest to modernize your serverless apps!

Modernizing your Google App Engine applications

Posted by Wesley Chun, Developer Advocate, Google Cloud

Modernizing your Google App Engine applications header

Next generation service

Since its initial launch in 2008 as the first product from Google Cloud, Google App Engine, our fully-managed serverless app-hosting platform, has been used by many developers worldwide. Since then, the product team has continued to innovate on the platform: introducing new services, extending quotas, supporting new languages, and adding a Flexible environment to support more runtimes, including the ability to serve containerized applications.

With many original App Engine services maturing to become their own standalone Cloud products along with users' desire for a more open cloud, the next generation App Engine launched in 2018 without those bundled proprietary services, but coupled with desired language support such as Python 3 and PHP 7 as well as introducing Node.js 8. As a result, users have more options, and their apps are more portable.

With the sunset of Python 2, Java 8, PHP 5, and Go 1.11, by their respective communities, Google Cloud has assured users by expressing continued long-term support of these legacy runtimes, including maintaining the Python 2 runtime. So while there is no requirement for users to migrate, developers themselves are expressing interest in updating their applications to the latest language releases.

Google Cloud has created a set of migration guides for users modernizing from Python 2 to 3, Java 8 to 11, PHP 5 to 7, and Go 1.11 to 1.12+ as well as a summary of what is available in both first and second generation runtimes. However, moving from bundled to unbundled services may not be intuitive to developers, so today we're introducing additional resources to help users in this endeavor: App Engine "migration modules" with hands-on "codelab" tutorials and code examples, starting with Python.

Migration modules

Each module represents a single modernization technique. Some are strongly recommended, others less so, and, at the other end of the spectrum, some are quite optional. We will guide you as far as which ones are more important. Similarly, there's no real order of modules to look at since it depends on which bundled services your apps use. Yes, some modules must be completed before others, but again, you'll be guided as far as "what's next."

More specifically, modules focus on the code changes that need to be implemented, not changes in new programming language releases as those are not within the domain of Google products. The purpose of these modules is to help reduce the friction developers may encounter when adapting their apps for the next-generation platform.

Central to the migration modules are the codelabs: free, online, self-paced, hands-on tutorials. The purpose of Google codelabs is to teach developers one new skill while giving them hands-on experience, and there are codelabs just for Google Cloud users. The migration codelabs are no exception, teaching developers one specific migration technique.

Developers following the tutorials will make the appropriate updates on a sample app, giving them the "muscle memory" needed to do the same (or similar) with their applications. Each codelab begins with an initial baseline app ("START"), leads users through the necessary steps, then concludes with an ending code repo ("FINISH") they can compare against their completed effort. Here are some of the initial modules being announced today:

  • Web framework migration from webapp2 to Flask
  • Updating from App Engine 
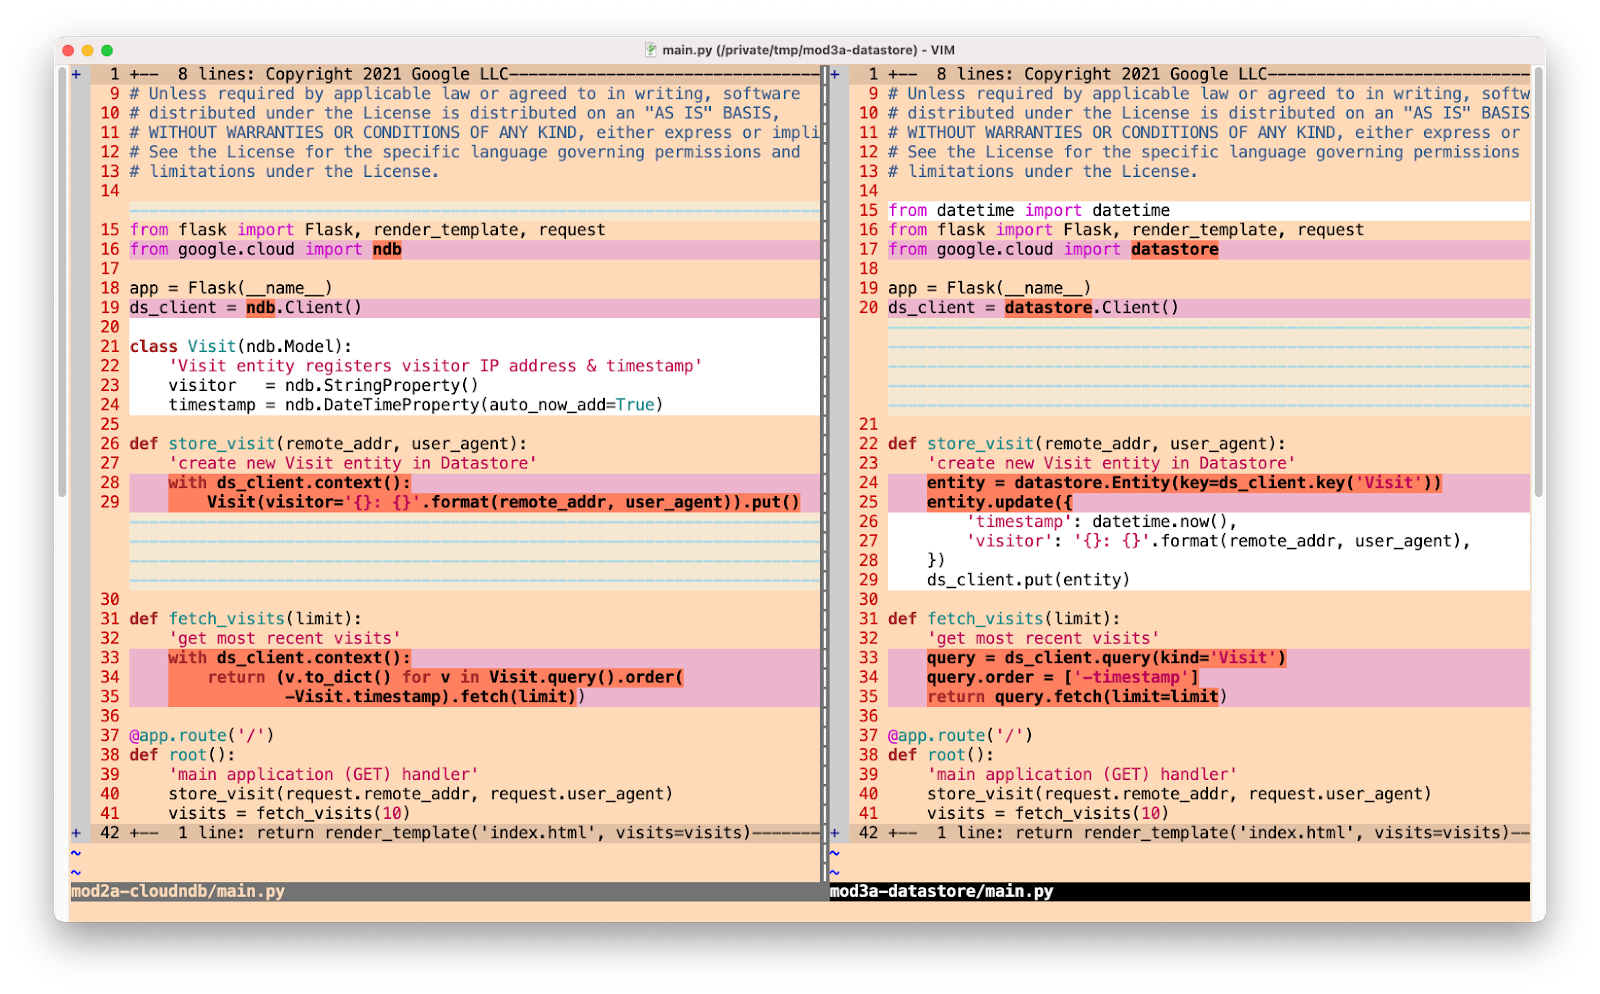
ndb to Google Cloud NDB client libraries for Datastore access
  • Upgrading from the Google Cloud NDB to Cloud Datastore client libraries
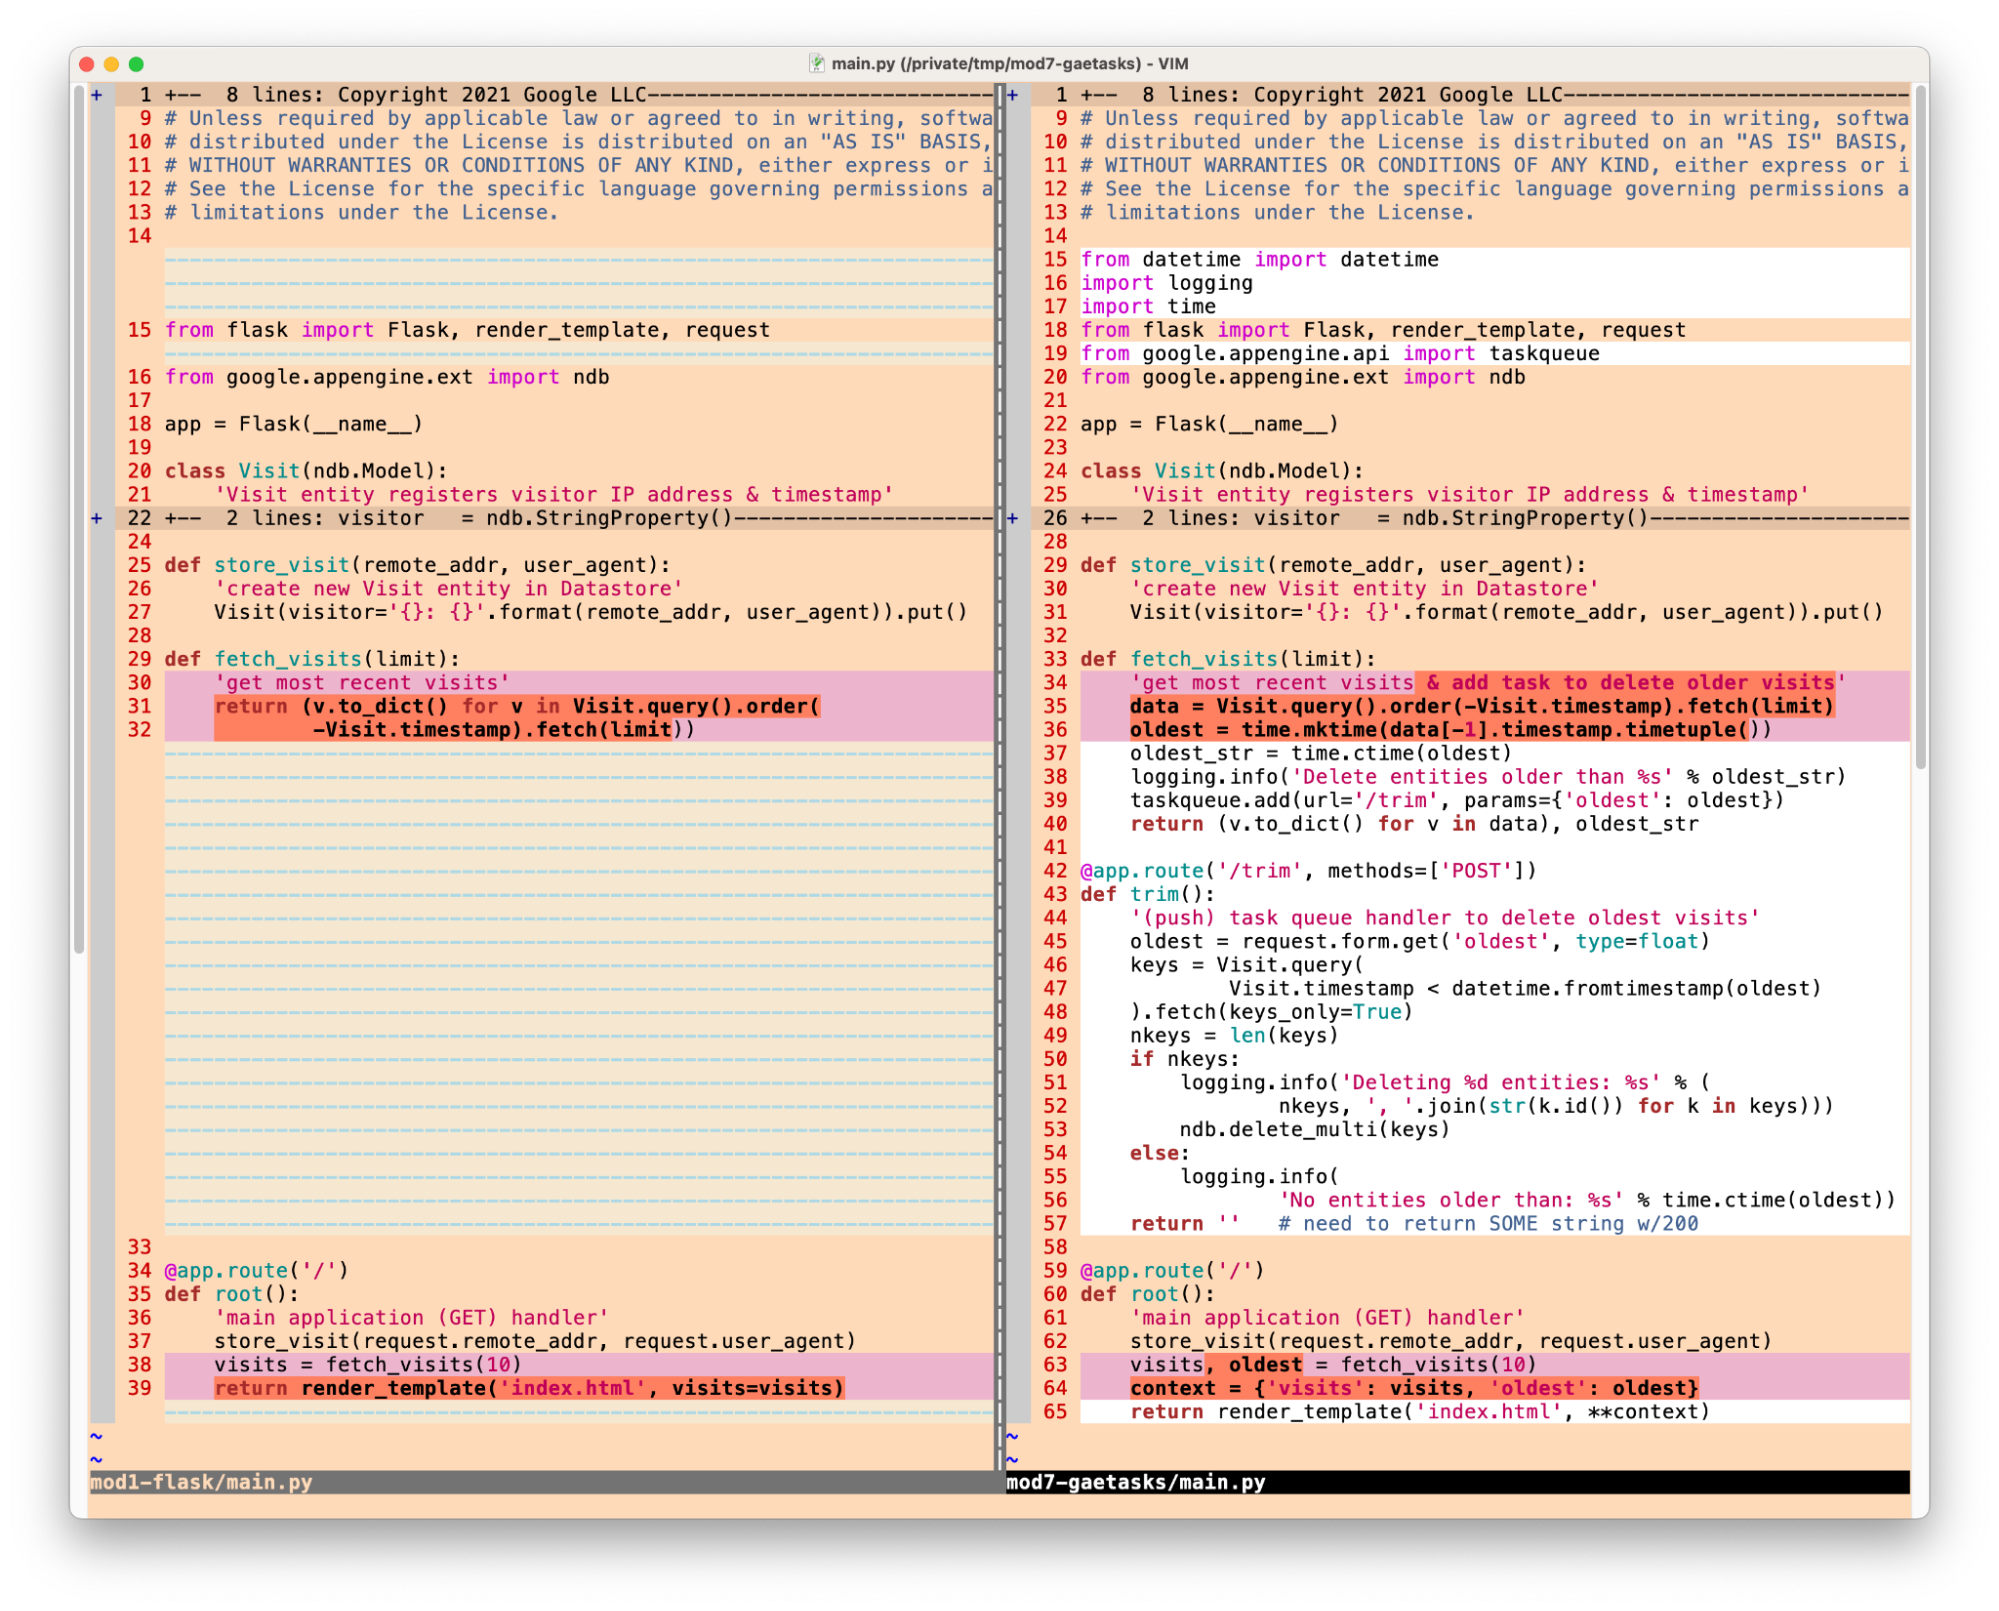
  • Moving from App Engine
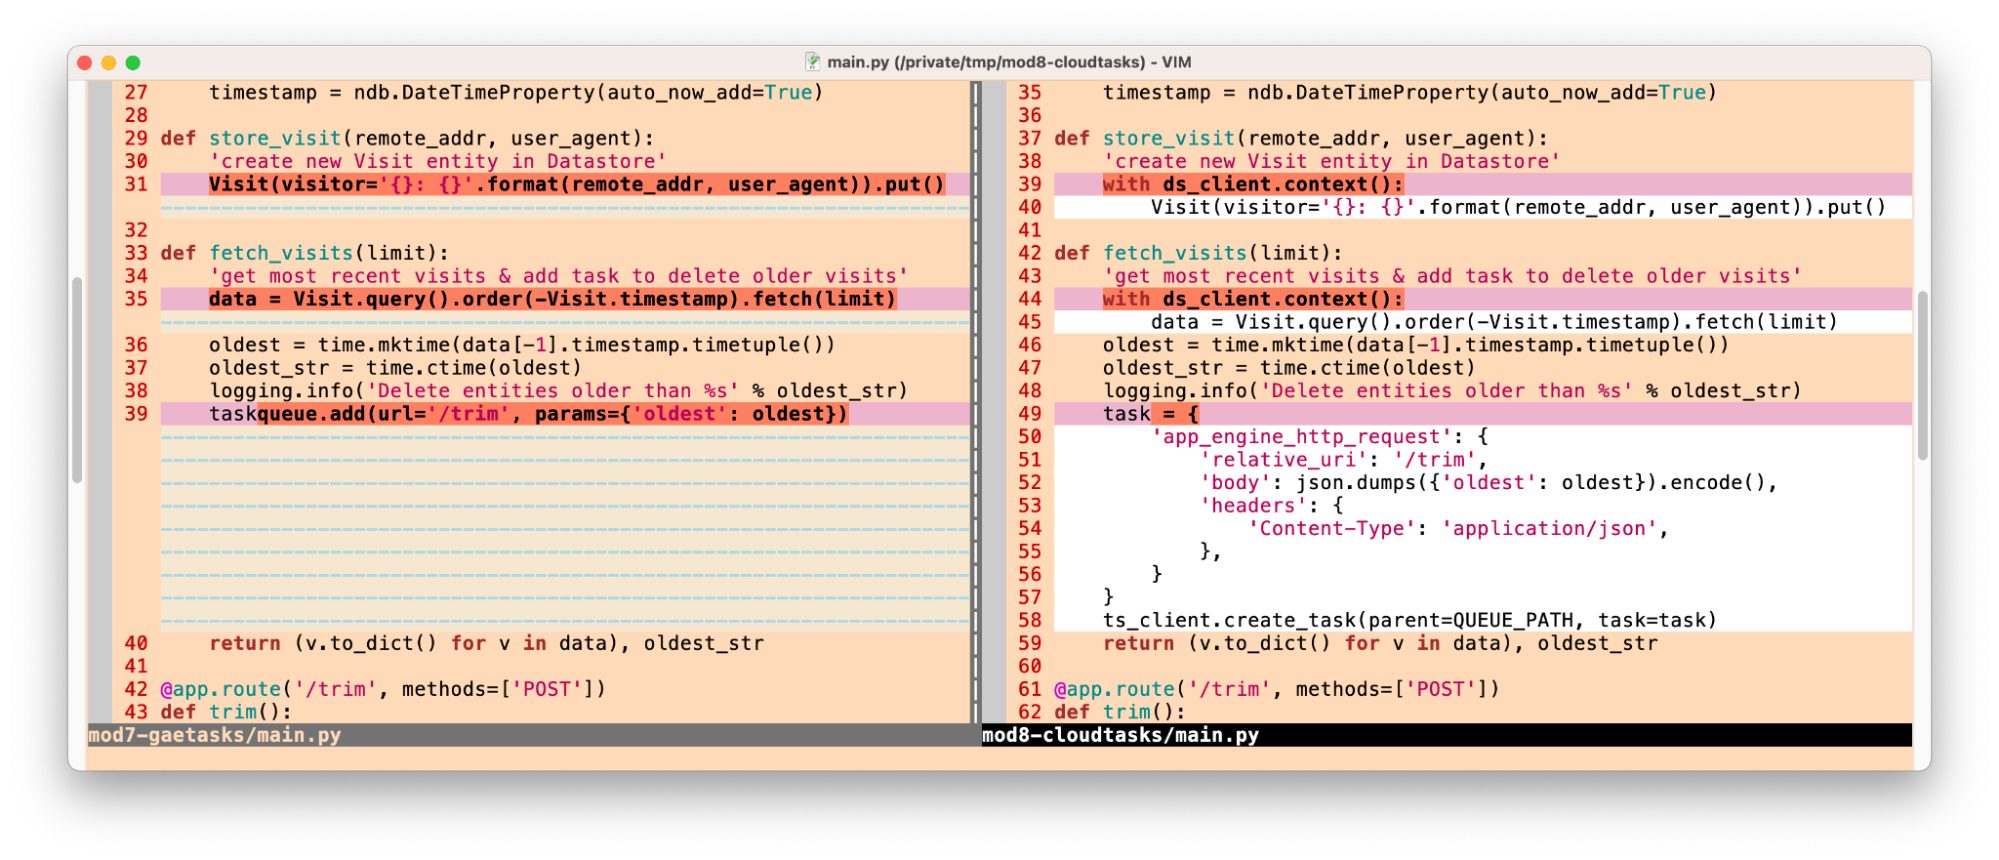
 taskqueue to Google Cloud Tasks
  • Containerizing App Engine applications to execute on Cloud Run

Examples

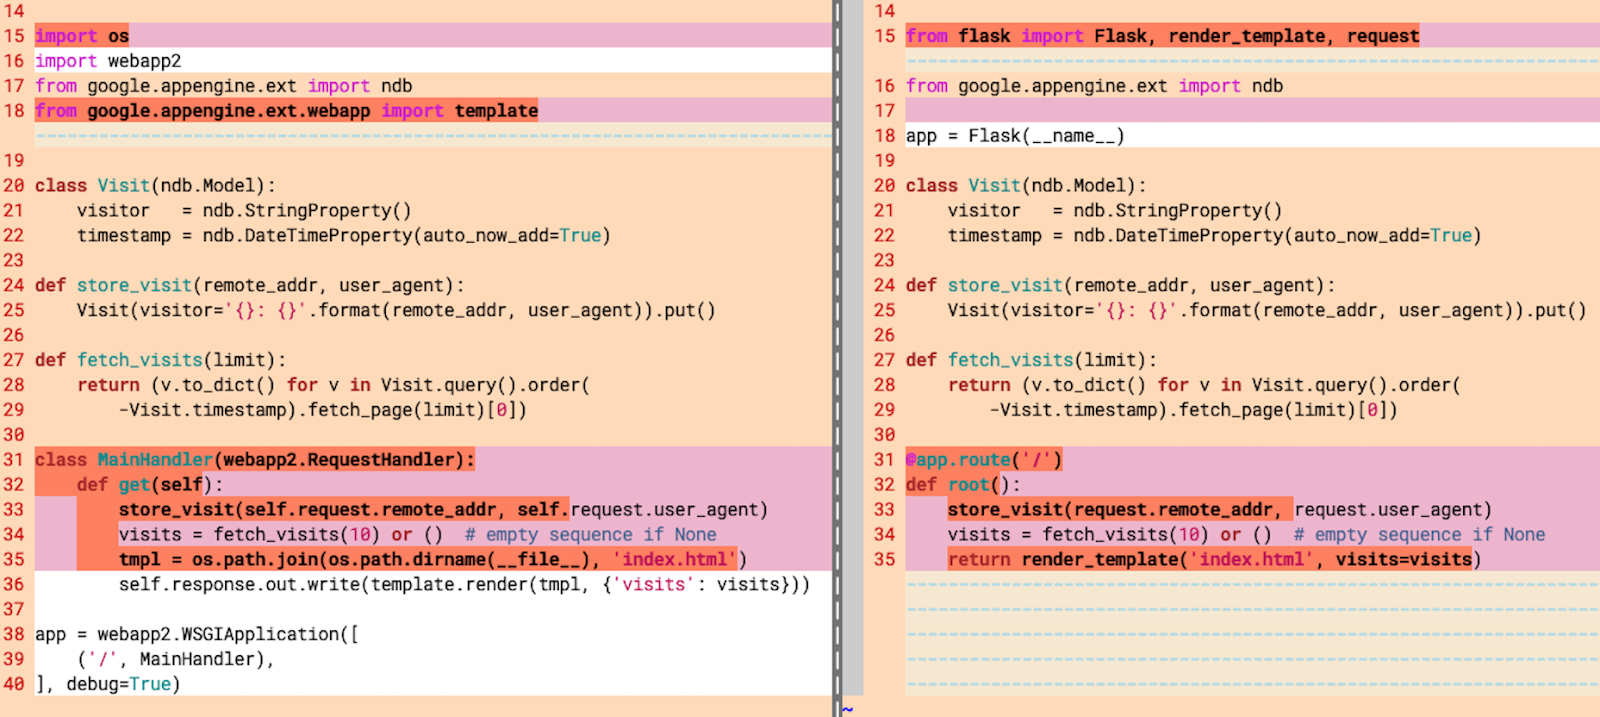
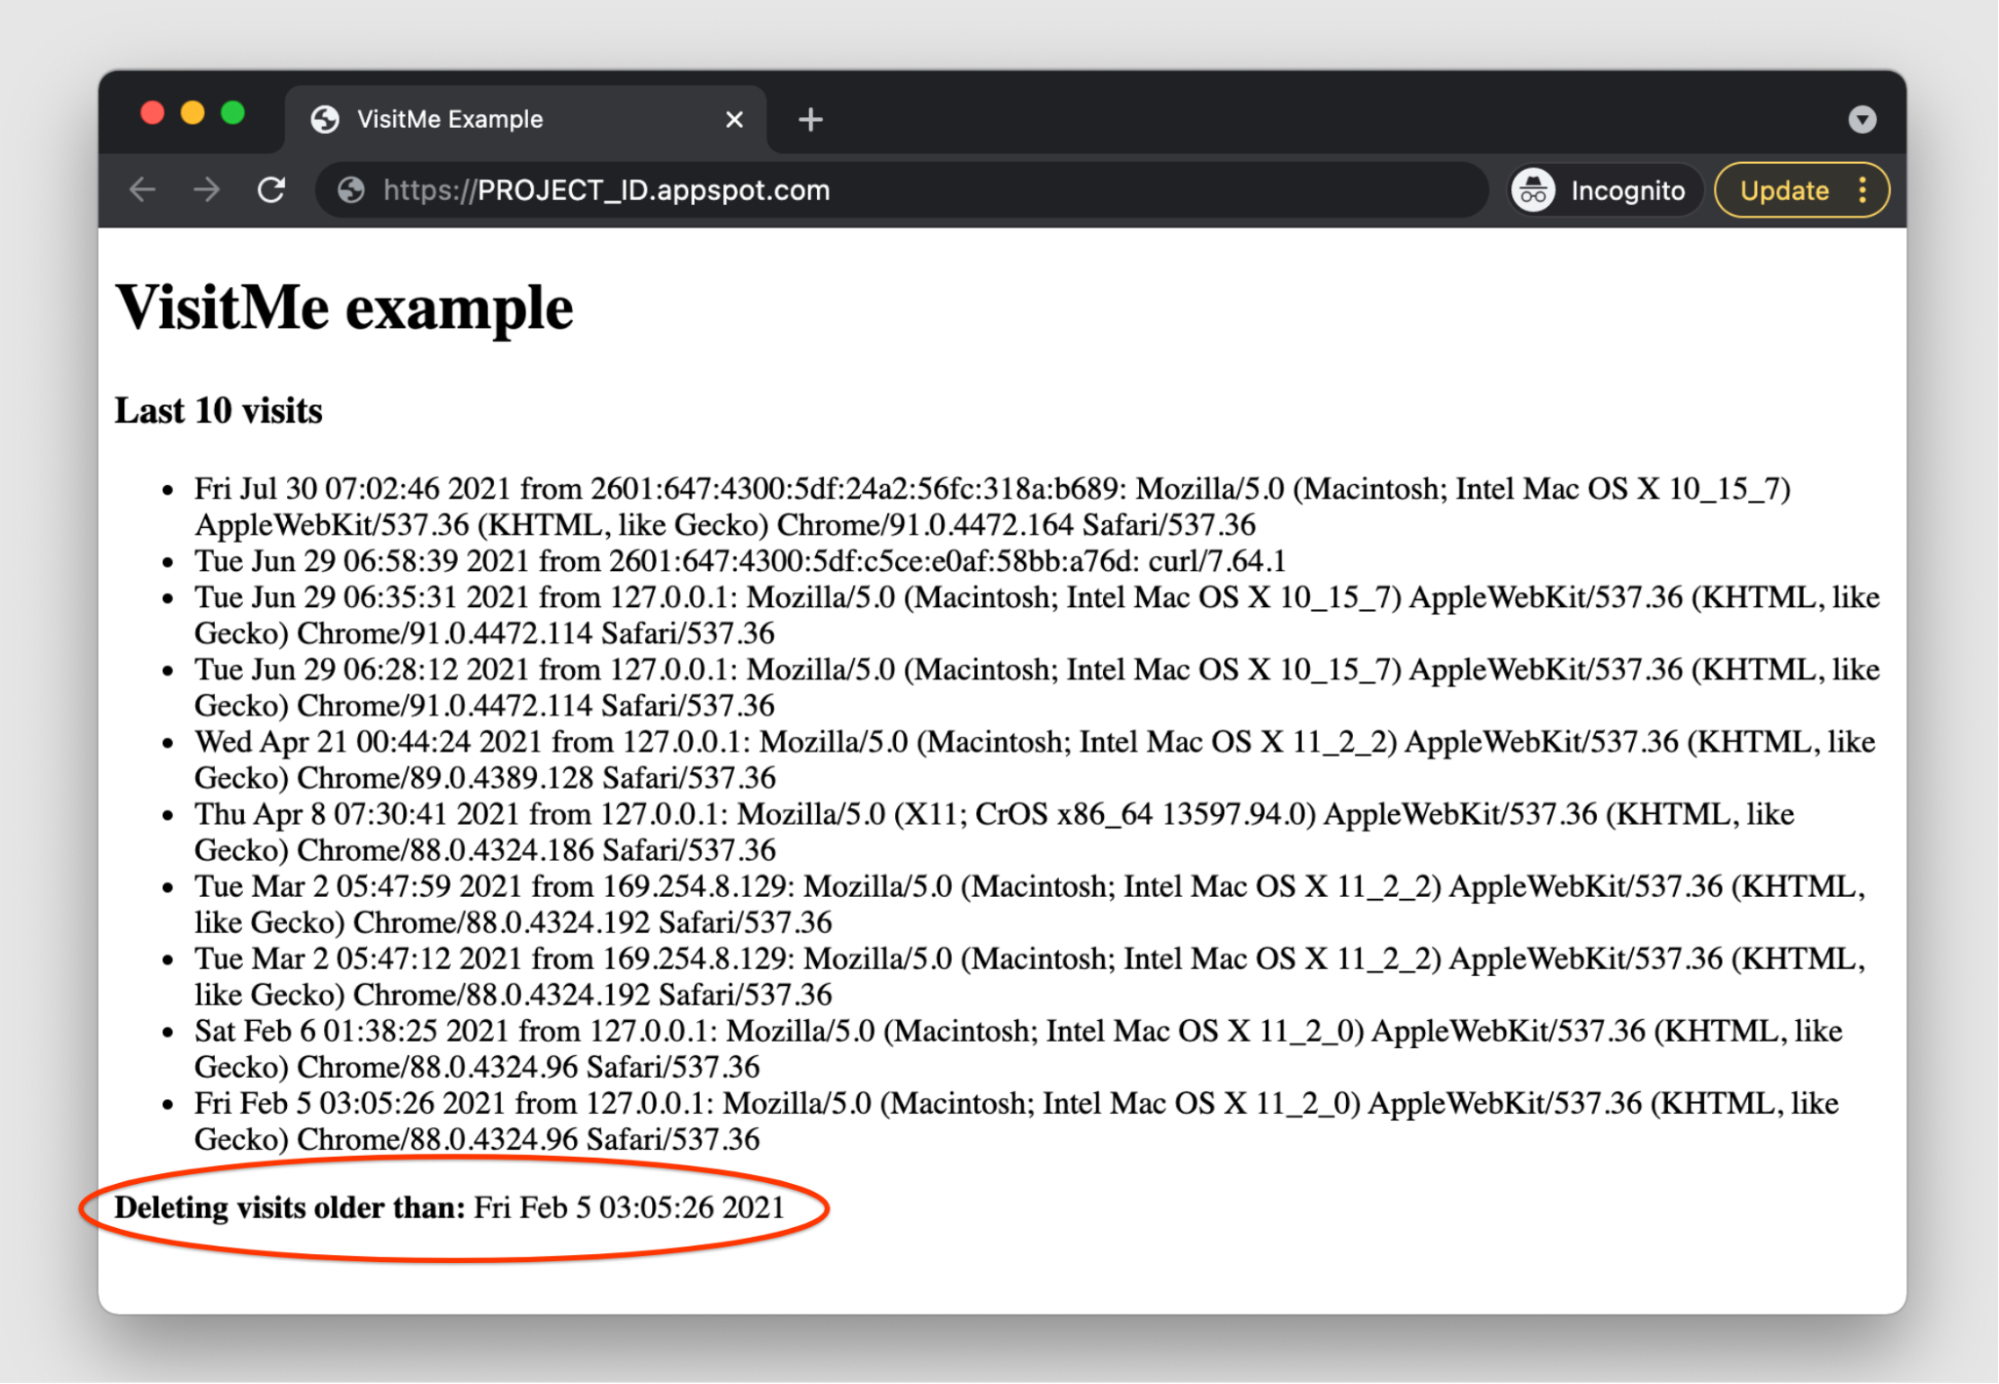
What should you expect from the migration codelabs? Let's preview a pair, starting with the web framework: below is the main driver for a simple webapp2-based "guestbook" app registering website visits as Datastore entities:

class MainHandler(webapp2.RequestHandler):
'main application (GET) handler'
def get(self):
store_visit(self.request.remote_addr, self.request.user_agent)
visits = fetch_visits(LIMIT)
tmpl = os.path.join(os.path.dirname(__file__), 'index.html')
self.response.out.write(template.render(tmpl, {'visits': visits}))

A "visit" consists of a request's IP address and user agent. After visit registration, the app queries for the latest LIMIT visits to display to the end-user via the app's HTML template. The tutorial leads developers a migration to Flask, a web framework with broader support in the Python community. An Flask equivalent app will use decorated functions rather than webapp2's object model:

@app.route('/')
def root():
'main application (GET) handler'
store_visit(request.remote_addr, request.user_agent)
visits = fetch_visits(LIMIT)
return render_template('index.html', visits=visits)

The framework codelab walks users through this and other required code changes in its sample app. Since Flask is more broadly used, this makes your apps more portable.

The second example pertains to Datastore access. Whether you're using App Engine's ndb or the Cloud NDB client libraries, the code to query the Datastore for the most recent limit visits may look like this:

def fetch_visits(limit):
'get most recent visits'
query = Visit.query()
visits = query.order(-Visit.timestamp).fetch(limit)
return (v.to_dict() for v in visits)

If you decide to switch to the Cloud Datastore client library, that code would be converted to:

def fetch_visits(limit):
'get most recent visits'
query = DS_CLIENT.query(kind='Visit')
query.order = ['-timestamp']
return query.fetch(limit=limit)

The query styles are similar but different. While the sample apps are just that, samples, giving you this kind of hands-on experience is useful when planning your own application upgrades. The goal of the migration modules is to help you separate moving to the next-generation service and making programming language updates so as to avoid doing both sets of changes simultaneously.

As mentioned above, some migrations are more optional than others. For example, moving away from the App Engine bundled ndb library to Cloud NDB is strongly recommended, but because Cloud NDB is available for both Python 2 and 3, it's not necessary for users to migrate further to Cloud Datastore nor Cloud Firestore unless they have specific reasons to do so. Moving to unbundled services is the primary step to giving users more flexibility, choices, and ultimately, makes their apps more portable.

Next steps

For those who are interested in modernizing their apps, a complete table describing each module and links to corresponding codelabs and expected START and FINISH code samples can be found in the migration module repository. We are also working on video content based on these migration modules as well as producing similar content for Java, so stay tuned.

In addition to the migration modules, our team has also setup a separate repo to support community-sourced migration samples. We hope you find all these resources helpful in your quest to modernize your App Engine apps!

Code that final mile: from big data analysis to slide presentation

Posted by Wesley Chun (@wescpy), Developer Advocate, Google Cloud

Google Cloud Platform (GCP) provides infrastructure, serverless products, and APIs that help you build, innovate, and scale. G Suite provides a collection of productivity tools, developer APIs, extensibility frameworks and low-code platforms that let you integrate with G Suite applications, data, and users. While each solution is compelling on its own, users can get more power and flexibility by leveraging both together.

In the latest episode of the G Suite Dev Show, I'll show you one example of how you can take advantage of powerful GCP tools right from G Suite applications. BigQuery, for example, can help you surface valuable insight from massive amounts of data. However, regardless of "the tech" you use, you still have to justify and present your findings to management, right? You've already completed the big data analysis part, so why not go that final mile and tap into G Suite for its strengths? In the sample app covered in the video, we show you how to go from big data analysis all the way to an "exec-ready" presentation.

The sample application is meant to give you an idea of what's possible. While the video walks through the code a bit more, let's give all of you a high-level overview here. Google Apps Script is a G Suite serverless development platform that provides straightforward access to G Suite APIs as well as some GCP tools such as BigQuery. The first part of our app, the runQuery() function, issues a query to BigQuery from Apps Script then connects to Google Sheets to store the results into a new Sheet (note we left out CONSTANT variable definitions for brevity):

function runQuery() {
// make BigQuery request
var request = {query: BQ_QUERY};
var queryResults = BigQuery.Jobs.query(request, PROJECT_ID);
var jobId = queryResults.jobReference.jobId;
queryResults = BigQuery.Jobs.getQueryResults(PROJECT_ID, jobId);
var rows = queryResults.rows;

// put results into a 2D array
var data = new Array(rows.length);
for (var i = 0; i < rows.length; i++) {
var cols = rows[i].f;
data[i] = new Array(cols.length);
for (var j = 0; j < cols.length; j++) {
data[i][j] = cols[j].v;
}
}

// put array data into new Sheet
var spreadsheet = SpreadsheetApp.create(QUERY_NAME);
var sheet = spreadsheet.getActiveSheet();
var headers = queryResults.schema.fields;
sheet.appendRow(headers); // header row
sheet.getRange(START_ROW, START_COL,
rows.length, headers.length).setValues(data);

// return Sheet object for later use
return spreadsheet;
}

It returns a handle to the new Google Sheet which we can then pass on to the next component: using Google Sheets to generate a Chart from the BigQuery data. Again leaving out the CONSTANTs, we have the 2nd part of our app, the createColumnChart() function:

function createColumnChart(spreadsheet) {
// create & put chart on 1st Sheet
var sheet = spreadsheet.getSheets()[0];
var chart = sheet.newChart()
.setChartType(Charts.ChartType.COLUMN)
.addRange(sheet.getRange(START_CELL + ':' + END_CELL))
.setPosition(START_ROW, START_COL, OFFSET, OFFSET)
.build();
sheet.insertChart(chart);

// return Chart object for later use
return chart;
}

The chart is returned by createColumnChart() so we can use that plus the Sheets object to build the desired slide presentation from Apps Script with Google Slides in the 3rd part of our app, the createSlidePresentation() function:

function createSlidePresentation(spreadsheet, chart) {
// create new deck & add title+subtitle
var deck = SlidesApp.create(QUERY_NAME);
var [title, subtitle] = deck.getSlides()[0].getPageElements();
title.asShape().getText().setText(QUERY_NAME);
subtitle.asShape().getText().setText('via GCP and G Suite APIs:\n' +
'Google Apps Script, BigQuery, Sheets, Slides');

// add new slide and insert empty table
var tableSlide = deck.appendSlide(SlidesApp.PredefinedLayout.BLANK);
var sheetValues = spreadsheet.getSheets()[0].getRange(
START_CELL + ':' + END_CELL).getValues();
var table = tableSlide.insertTable(sheetValues.length, sheetValues[0].length);

// populate table with data in Sheets
for (var i = 0; i < sheetValues.length; i++) {
for (var j = 0; j < sheetValues[0].length; j++) {
table.getCell(i, j).getText().setText(String(sheetValues[i][j]));
}
}

// add new slide and add Sheets chart to it
var chartSlide = deck.appendSlide(SlidesApp.PredefinedLayout.BLANK);
chartSlide.insertSheetsChart(chart);

// return Presentation object for later use
return deck;
}

Finally, we need a driver application that calls all three one after another, the createColumnChart() function:

function createBigQueryPresentation() {
var spreadsheet = runQuery();
var chart = createColumnChart(spreadsheet);
var deck = createSlidePresentation(spreadsheet, chart);
}

We left out some detail in the code above but hope this pseudocode helps kickstart your own project. Seeking a guided tutorial to building this app one step-at-a-time? Do our codelab at g.co/codelabs/bigquery-sheets-slides. Alternatively, go see all the code by hitting our GitHub repo at github.com/googlecodelabs/bigquery-sheets-slides. After executing the app successfully, you'll see the fruits of your big data analysis captured in a presentable way in a Google Slides deck:

This isn't the end of the story as this is just one example of how you can leverage both platforms from Google Cloud. In fact, this was one of two sample apps featured in our Cloud NEXT '18 session this summer exploring interoperability between GCP & G Suite which you can watch here:

Stay tuned as more examples are coming. We hope these videos plus the codelab inspire you to build on your own ideas.

Hangouts Chat alerts & notifications… with asynchronous messages

Posted by Wesley Chun (@wescpy), Developer Advocate, G Suite

While most chatbots respond to user requests in a synchronous way, there are scenarios when bots don't perform actions based on an explicit user request, such as for alerts or notifications. In today's DevByte video, I'm going to show you how to send messages asynchronously to rooms or direct messages (DMs) in Hangouts Chat, the team collaboration and communication tool in G Suite.

What comes to mind when you think of a bot in a chat room? Perhaps a user wants the last quarter's European sales numbers, or maybe, they want to look up local weather or the next movie showtime. Assuming there's a bot for whatever the request is, a user will either send a direct message (DM) to that bot or @mention the bot from within a chat room. The bot then fields the request (sent to it by the Hangouts Chat service), performs any necessary magic, and responds back to the user in that "space," the generic nomenclature for a room or DM.

Our previous DevByte video for the Hangouts Chat bot framework shows developers what bots and the framework are all about as well as how to build one of these types of bots, in both Python and JavaScript. However, recognize that these bots are responding synchronously to a user request. This doesn't suffice when users want to be notified when a long-running background job has completed, when a late bus or train will be arriving soon, or when one of their servers has just gone down. Recognize that such alerts can come from a bot but also perhaps a monitoring application. In the latest episode of the G Suite Dev Show, learn how to integrate this functionality in either type of application.

From the video, you can see that alerts and notifications are "out-of-band" messages, meaning they can come in at any time. The Hangouts Chat bot framework provides several ways to send asynchronous messages to a room or DM, generically referred to as a "space." The first is the HTTP-based REST API. The other way is using what are known as "incoming webhooks."

The REST API is used by bots to send messages into a space. Since a bot will never be a human user, a Google service account is required. Once you create a service account for your Hangouts Chat bot in the developers console, you can download its credentials needed to communicate with the API. Below is a short Python sample snippet that uses the API to send a message asynchronously to a space.

from apiclient import discovery
from httplib2 import Http
from oauth2client.service_account import ServiceAccountCredentials

SCOPES = 'https://www.googleapis.com/auth/chat.bot'
creds = ServiceAccountCredentials.from_json_keyfile_name(
'svc_acct.json', SCOPES)
CHAT = discovery.build('chat', 'v1', http=creds.authorize(Http()))

room = 'spaces/<ROOM-or-DM>'
message = {'text': 'Hello world!'}
CHAT.spaces().messages().create(parent=room, body=message).execute()

The alternative to using the API with services accounts is the concept of incoming webhooks. Webhooks are a quick and easy way to send messages into any room or DM without configuring a full bot, i.e., monitoring apps. Webhooks also allow you to integrate your custom workflows, such as when a new customer is added to the corporate CRM (customer relationship management system), as well as others mentioned above. Below is a Python snippet that uses an incoming webhook to communicate into a space asynchronously.

import requests
import json

URL = 'https://chat.googleapis.com/...&thread_key=T12345'
message = {'text': 'Hello world!'}
requests.post(URL, data = json.dumps(message))

Since incoming webhooks are merely endpoints you HTTP POST to, you can even use curl to send a message to a Hangouts Chat space from the command-line:

curl \
-X POST \
-H 'Content-Type: application/json' \
'https://chat.googleapis.com/...&thread_key=T12345' \
-d '{"text": "Hello!"}'

To get started, take a look at the Hangouts Chat developer documentation, especially the specific pages linked to above. We hope this video helps you take your bot development skills to the next level by showing you how to send messages to the Hangouts Chat service asynchronously.