Google Workspace Updates Weekly Recap – August 18, 2023

2 New updates 

Unless otherwise indicated, the features below are available to all Google Workspace customers, and are fully launched or in the process of rolling out. Rollouts should take no more than 15 business days to complete if launching to both Rapid and Scheduled Release at the same time. If not, each stage of rollout should take no more than 15 business days to complete.


Get started with smart canvas in Google Sheets 
When opening a new spreadsheet or tab in Google Sheets, you will now see “Type @ to insert” to help you start using the smart canvas features available in Sheets. 
Get started with smart canvas in Google Sheets

A new look for Google Docs, Sheets, and Slides apps on Android devices 
We’re introducing a modernized visual design for the Google Docs, Sheets, and Slides apps on Android devices. In the coming weeks, Android users will notice a refreshed look for things like the editing toolbar, icons, background colors, and more. 
A new look for Google Docs on Android devices
Refreshed visual design of Google Docs app

Previous announcements

The announcements below were published on the Workspace Updates blog earlier this week. Please refer to the original blog posts for complete details.


Programmatically read and write working locations with the Calendar API, now generally available 
Previously available in beta through our Developer Preview Program, the ability to read and write a user’s working location using the Calendar API is now generally available. | Available to Google Workspace Business Standard, Business Plus, Enterprise Standard, Enterprise Plus, Education Fundamentals, Education Plus, Education Standard, the Teaching and Learning Upgrade and Nonprofits customers, as well as legacy G Suite Business customers only. | Learn more about Calendar API

Google Voice users can manage incoming calls across individuals and groups 
Admins can now designate specific Voice users as managers of a ring group, allowing them to make changes from voice.google.com instead of the Admin console. | Available to Google Voice Starter, Standard and Premier customers only. | Learn more about managing incoming calls. 

Resolve conflict accounts faster with the new Conflict Accounts Management tool 
We’re introducing an automated workflow to help reduce the manual effort needed to turn unmanaged accounts into managed accounts. Unmanaged accounts are users who independently created a Google account using one of your organization's domains. | Learn more about the new Conflict Accounts Management tool


Completed rollouts

The features below completed their rollouts to Rapid Release domains, Scheduled Release domains, or both. Please refer to the original blog posts for additional details.


Rapid Release Domains: 

Autonomous visual information seeking with large language models

There has been great progress towards adapting large language models (LLMs) to accommodate multimodal inputs for tasks including image captioning, visual question answering (VQA), and open vocabulary recognition. Despite such achievements, current state-of-the-art visual language models (VLMs) perform inadequately on visual information seeking datasets, such as Infoseek and OK-VQA, where external knowledge is required to answer the questions.

Examples of visual information seeking queries where external knowledge is required to answer the question. Images are taken from the OK-VQA dataset.

In “AVIS: Autonomous Visual Information Seeking with Large Language Models”, we introduce a novel method that achieves state-of-the-art results on visual information seeking tasks. Our method integrates LLMs with three types of tools: (i) computer vision tools for extracting visual information from images, (ii) a web search tool for retrieving open world knowledge and facts, and (iii) an image search tool to glean relevant information from metadata associated with visually similar images. AVIS employs an LLM-powered planner to choose tools and queries at each step. It also uses an LLM-powered reasoner to analyze tool outputs and extract key information. A working memory component retains information throughout the process.

An example of AVIS’s generated workflow for answering a challenging visual information seeking question. The input image is taken from the Infoseek dataset.

Comparison to previous work

Recent studies (e.g., Chameleon, ViperGPT and MM-ReAct) explored adding tools to LLMs for multimodal inputs. These systems follow a two-stage process: planning (breaking down questions into structured programs or instructions) and execution (using tools to gather information). Despite success in basic tasks, this approach often falters in complex real-world scenarios.

There has also been a surge of interest in applying LLMs as autonomous agents (e.g., WebGPT and ReAct). These agents interact with their environment, adapt based on real-time feedback, and achieve goals. However, these methods do not restrict the tools that can be invoked at each stage, leading to an immense search space. Consequently, even the most advanced LLMs today can fall into infinite loops or propagate errors. AVIS tackles this via guided LLM use, influenced by human decisions from a user study.


Informing LLM decision making with a user study

Many of the visual questions in datasets such as Infoseek and OK-VQA pose a challenge even for humans, often requiring the assistance of various tools and APIs. An example question from the OK-VQA dataset is shown below. We conducted a user study to understand human decision-making when using external tools.

We conducted a user study to understand human decision-making when using external tools. Image is taken from the OK-VQA dataset.

The users were equipped with an identical set of tools as our method, including PALI, PaLM, and web search. They received input images, questions, detected object crops, and buttons linked to image search results. These buttons offered diverse information about the detected object crops, such as knowledge graph entities, similar image captions, related product titles, and identical image captions.

We record user actions and outputs and use it as a guide for our system in two key ways. First, we construct a transition graph (shown below) by analyzing the sequence of decisions made by users. This graph defines distinct states and restricts the available set of actions at each state. For example, at the start state, the system can take only one of these three actions: PALI caption, PALI VQA, or object detection. Second, we use the examples of human decision-making to guide our planner and reasoner with relevant contextual instances to enhance the performance and effectiveness of our system.

AVIS transition graph.

General framework

Our approach employs a dynamic decision-making strategy designed to respond to visual information-seeking queries. Our system has three primary components. First, we have a planner to determine the subsequent action, including the appropriate API call and the query it needs to process. Second, we have a working memory that retains information about the results obtained from API executions. Last, we have a reasoner, whose role is to process the outputs from the API calls. It determines whether the obtained information is sufficient to produce the final response, or if additional data retrieval is required.

The planner undertakes a series of steps each time a decision is required regarding which tool to employ and what query to send to it. Based on the present state, the planner provides a range of potential subsequent actions. The potential action space may be so large that it makes the search space intractable. To address this issue, the planner refers to the transition graph to eliminate irrelevant actions. The planner also excludes the actions that have already been taken before and are stored in the working memory.

Next, the planner collects a set of relevant in-context examples that are assembled from the decisions previously made by humans during the user study. With these examples and the working memory that holds data collected from past tool interactions, the planner formulates a prompt. The prompt is then sent to the LLM, which returns a structured answer, determining the next tool to be activated and the query to be dispatched to it. This design allows the planner to be invoked multiple times throughout the process, thereby facilitating dynamic decision-making that gradually leads to answering the input query.

We employ a reasoner to analyze the output of the tool execution, extract the useful information and decide into which category the tool output falls: informative, uninformative, or final answer. Our method utilizes the LLM with appropriate prompting and in-context examples to perform the reasoning. If the reasoner concludes that it’s ready to provide an answer, it will output the final response, thus concluding the task. If it determines that the tool output is uninformative, it will revert back to the planner to select another action based on the current state. If it finds the tool output to be useful, it will modify the state and transfer control back to the planner to make a new decision at the new state.

AVIS employs a dynamic decision-making strategy to respond to visual information-seeking queries.

Results

We evaluate AVIS on Infoseek and OK-VQA datasets. As shown below, even robust visual-language models, such as OFA and PaLI, fail to yield high accuracy when fine-tuned on Infoseek. Our approach (AVIS), without fine-tuning, achieves 50.7% accuracy on the unseen entity split of this dataset.

AVIS visual question answering results on Infoseek dataset. AVIS achieves higher accuracy in comparison to previous baselines based on PaLI, PaLM and OFA.

Our results on the OK-VQA dataset are shown below. AVIS with few-shot in-context examples achieves an accuracy of 60.2%, higher than most of the previous works. AVIS achieves lower but comparable accuracy in comparison to the PALI model fine-tuned on OK-VQA. This difference, compared to Infoseek where AVIS outperforms fine-tuned PALI, is due to the fact that most question-answer examples in OK-VQA rely on common sense knowledge rather than on fine-grained knowledge. Therefore, PaLI is able to encode such generic knowledge in the model parameters and doesn’t require external knowledge.

Visual question answering results on A-OKVQA. AVIS achieves higher accuracy in comparison to previous works that use few-shot or zero-shot learning, including Flamingo, PaLI and ViperGPT. AVIS also achieves higher accuracy than most of the previous works that are fine-tuned on OK-VQA dataset, including REVEAL, ReVIVE, KAT and KRISP, and achieves results that are close to the fine-tuned PaLI model.

Conclusion

We present a novel approach that equips LLMs with the ability to use a variety of tools for answering knowledge-intensive visual questions. Our methodology, anchored in human decision-making data collected from a user study, employs a structured framework that uses an LLM-powered planner to dynamically decide on tool selection and query formation. An LLM-powered reasoner is tasked with processing and extracting key information from the output of the selected tool. Our method iteratively employs the planner and reasoner to leverage different tools until all necessary information required to answer the visual question is amassed.


Acknowledgements

This research was conducted by Ziniu Hu, Ahmet Iscen, Chen Sun, Kai-Wei Chang, Yizhou Sun, David A. Ross, Cordelia Schmid and Alireza Fathi.

Source: Google AI Blog


Resolve conflict accounts faster with the new Conflict Accounts Management tool

What’s changing 

We’re introducing an automated workflow to help reduce the manual effort needed to turn unmanaged accounts into managed accounts. Unmanaged accounts are users who independently created a Google account using one of your organization's domains. 


Admins can access the feature within the Admin console under Account settings > Conflicting accounts management. Here, they can specify their preferences for how to resolve unmanaged accounts when provisioning users for their domains. This preference will apply only when users are provisioned using the public Directory API with URL parameter resolveConflictAccount set to true. 

  • Automatically invite users to transfer unmanaged accounts 
    • Admins can specify how many daily follow-up messages should be sent.
    • If a user declines or does not accept the transfer invitation, admins can specify which next steps should be taken. 
    • Further, admins will have the option to take over the email address of users who decline or ignore the invite. 

  • Replace unmanaged accounts with managed ones 
    • Note that data owned by the account will not be imported.
    • The user will receive a temporary account address, which they’ll need to manually replace with a @gmail.com address of their choice. 
    • They’ll receive an email notification of this, and are informed they cannot use the original email any longer. 
    • Refer to this documentation for more information

  • Don’t create new accounts if unmanaged accounts exist.


Who’s impacted

Admins and end users


Why you’d use it 

Conflict accounts refer to personal Google accounts that get registered with a corporate email address. These accounts cannot be managed by admins, which is outside of the scope of protection admins can apply to keep work data secure. Further, reconciling conflicting accounts creates churn for admins and adds to the workload of onboarding users to Google Workspace & Google Cloud.


While admins can mitigate these accounts using the transfer tool or the “UserInvitation” API functionality, the Conflict Accounts Management tool is a scaled solution for larger customers, helping reduce time spent migrating to business accounts and accelerating adoption of Google Workspace and Google Cloud.

Getting started


  • Admins: 
    • Visit the Help Center to learn more about using the Conflict Accounts Management tool and unmanaged accounts.

  • End users: Depending on your admin configuration:
    • You’ll be invited to transfer your account — if accepted, your admin will have the ability to manage your account.
    • If you do not accept the request, your admin may replace your unmanaged account with a managed one. In that case, you’ll receive a new @gmail.com address and retain your content in this unmanaged, personal Google account.

Rollout pace


Availability

  • Available to all Google Workspace customers

Resources


MediaPipe for Raspberry Pi and iOS

Posted by Paul Ruiz, Developer Relations Engineer

Back in May we released MediaPipe Solutions, a set of tools for no-code and low-code solutions to common on-device machine learning tasks, for Android, web, and Python. Today we’re happy to announce that the initial version of the iOS SDK, plus an update for the Python SDK to support the Raspberry Pi, are available. These include support for audio classification, face landmark detection, and various natural language processing tasks. Let’s take a look at how you can use these tools for the new platforms.

Object Detection for Raspberry Pi

Aside from setting up your Raspberry Pi hardware with a camera, you can start by installing the MediaPipe dependency, along with OpenCV and NumPy if you don’t have them already.

python -m pip install mediapipe

From there you can create a new Python file and add your imports to the top.

import mediapipe as mp from mediapipe.tasks import python from mediapipe.tasks.python import vision import cv2 import numpy as np

You will also want to make sure you have an object detection model stored locally on your Raspberry Pi. For your convenience, we’ve provided a default model, EfficientDet-Lite0, that you can retrieve with the following command.

wget -q -O efficientdet.tflite -q https://storage.googleapis.com/mediapipe-models/object_detector/efficientdet_lite0/int8/1/efficientdet_lite0.tflite

Once you have your model downloaded, you can start creating your new ObjectDetector, including some customizations, like the max results that you want to receive, or the confidence threshold that must be exceeded before a result can be returned.

# Initialize the object detection model base_options = python.BaseOptions(model_asset_path=model)options = vision.ObjectDetectorOptions(                                   base_options=base_options,                                   running_mode=vision.RunningMode.LIVE_STREAM,                                   max_results=max_results,                                                       score_threshold=score_threshold,                                    result_callback=save_result) detector = vision.ObjectDetector.create_from_options(options)

After creating the ObjectDetector, you will need to open the Raspberry Pi camera to read the continuous frames. There are a few preprocessing steps that will be omitted here, but are available in our sample on GitHub.

Within that loop you can convert the processed camera image into a new MediaPipe.Image, then run detection on that new MediaPipe.Image before displaying the results that are received in an associated listener.

mp_image = mp.Image(image_format=mp.ImageFormat.SRGB, data=rgb_image) detector.detect_async(mp_image, time.time_ns())

Once you draw out those results and detected bounding boxes, you should be able to see something like this:

Moving image of a person holidng up a cup and a phone, and detected bounded boxes identifying these items in real time

You can find the complete Raspberry Pi example shown above on GitHub, or see the official documentation here.

Text Classification on iOS

While text classification is one of the more direct examples, the core ideas will still apply to the rest of the available iOS Tasks. Similar to the Raspberry Pi, you’ll start by creating a new MediaPipe Tasks object, which in this case is a TextClassifier.

var textClassifier: TextClassifier? textClassifier = TextClassifier(modelPath: model.modelPath)

Now that you have your TextClassifier, you just need to pass a String to it to get a TextClassifierResult.

func classify(text: String) -> TextClassifierResult? { guard let textClassifier = textClassifier else { return nil } return try? textClassifier.classify(text: text) }

You can do this from elsewhere in your app, such as a ViewController DispatchQueue, before displaying the results.

let result = self?.textClassifier.classify(text: inputText) let categories = result?.classificationResult.classifications.first?.categories?? []

You can find the rest of the code for this project on GitHub, as well as see the full documentation on developers.google.com/mediapipe.

Moving image of TextClasifier on an iPhone

Getting started

To learn more, watch our I/O 2023 sessions: Easy on-device ML with MediaPipe, Supercharge your web app with machine learning and MediaPipe, and What's new in machine learning, and check out the official documentation over on developers.google.com/mediapipe.

We look forward to all the exciting things you make, so be sure to share them with @googledevs and your developer communities!

Beta Channel Release for ChromeOS / ChromeOS Flex

Hello All,

The Beta channel has been updated to 116.0.5845.102 (Platform version: 15509.57.0) for most ChromeOS devices.

If you find new issues, please let us know one of the following ways:

Interested in switching channels? Find out how.


Google ChromeOS

Neural network pruning with combinatorial optimization

Modern neural networks have achieved impressive performance across a variety of applications, such as language, mathematical reasoning, and vision. However, these networks often use large architectures that require lots of computational resources. This can make it impractical to serve such models to users, especially in resource-constrained environments like wearables and smartphones. A widely used approach to mitigate the inference costs of pre-trained networks is to prune them by removing some of their weights, in a way that doesn’t significantly affect utility. In standard neural networks, each weight defines a connection between two neurons. So after weights are pruned, the input will propagate through a smaller set of connections and thus requires less computational resources.

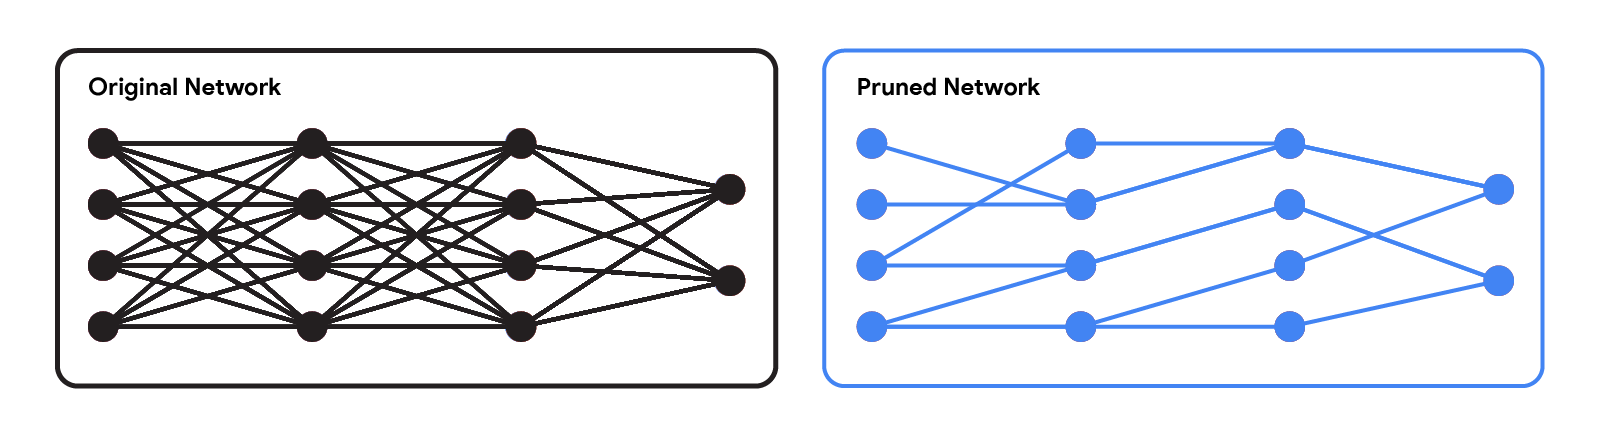
Original network vs. a pruned network.

Pruning methods can be applied at different stages of the network’s training process: post, during, or before training (i.e., immediately after weight initialization). In this post, we focus on the post-training setting: given a pre-trained network, how can we determine which weights should be pruned? One popular method is magnitude pruning, which removes weights with the smallest magnitude. While efficient, this method doesn’t directly consider the effect of removing weights on the network’s performance. Another popular paradigm is optimization-based pruning, which removes weights based on how much their removal impacts the loss function. Although conceptually appealing, most existing optimization-based approaches seem to face a serious tradeoff between performance and computational requirements. Methods that make crude approximations (e.g., assuming a diagonal Hessian matrix) can scale well, but have relatively low performance. On the other hand, while methods that make fewer approximations tend to perform better, they appear to be much less scalable.

In “Fast as CHITA: Neural Network Pruning with Combinatorial Optimization”, presented at ICML 2023, we describe how we developed an optimization-based approach for pruning pre-trained neural networks at scale. CHITA (which stands for “Combinatorial Hessian-free Iterative Thresholding Algorithm”) outperforms existing pruning methods in terms of scalability and performance tradeoffs, and it does so by leveraging advances from several fields, including high-dimensional statistics, combinatorial optimization, and neural network pruning. For example, CHITA can be 20x to 1000x faster than state-of-the-art methods for pruning ResNet and improves accuracy by over 10% in many settings.


Overview of contributions

CHITA has two notable technical improvements over popular methods:

  • Efficient use of second-order information: Pruning methods that use second-order information (i.e., relating to second derivatives) achieve the state of the art in many settings. In the literature, this information is typically used by computing the Hessian matrix or its inverse, an operation that is very difficult to scale because the Hessian size is quadratic with respect to the number of weights. Through careful reformulation, CHITA uses second-order information without having to compute or store the Hessian matrix explicitly, thus allowing for more scalability.
  • Combinatorial optimization: Popular optimization-based methods use a simple optimization technique that prunes weights in isolation, i.e., when deciding to prune a certain weight they don’t take into account whether other weights have been pruned. This could lead to pruning important weights because weights deemed unimportant in isolation may become important when other weights are pruned. CHITA avoids this issue by using a more advanced, combinatorial optimization algorithm that takes into account how pruning one weight impacts others.

In the sections below, we discuss CHITA’s pruning formulation and algorithms.


A computation-friendly pruning formulation

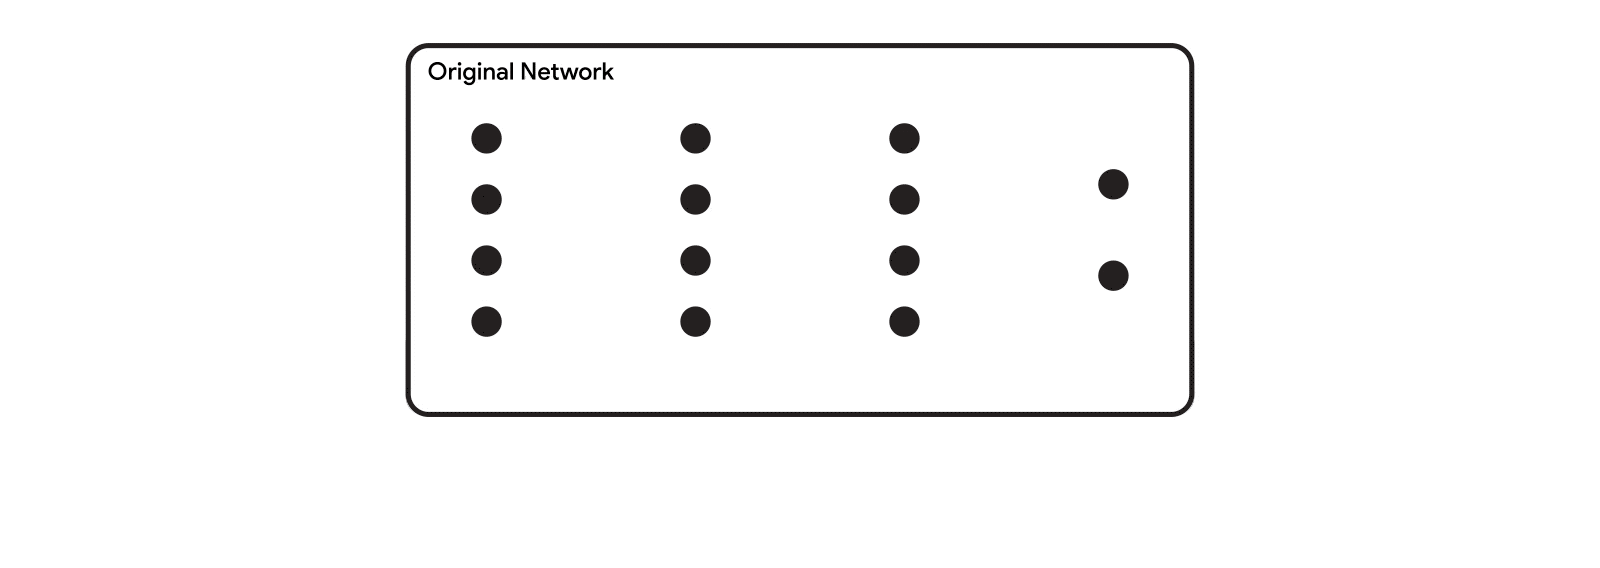
There are many possible pruning candidates, which are obtained by retaining only a subset of the weights from the original network. Let k be a user-specified parameter that denotes the number of weights to retain. Pruning can be naturally formulated as a best-subset selection (BSS) problem: among all possible pruning candidates (i.e., subsets of weights) with only k weights retained, the candidate that has the smallest loss is selected.

Pruning as a BSS problem: among all possible pruning candidates with the same total number of weights, the best candidate is defined as the one with the least loss. This illustration shows four candidates, but this number is generally much larger.

Solving the pruning BSS problem on the original loss function is generally computationally intractable. Thus, similar to previous work, such as OBD and OBS, we approximate the loss with a quadratic function by using a second-order Taylor series, where the Hessian is estimated with the empirical Fisher information matrix. While gradients can be typically computed efficiently, computing and storing the Hessian matrix is prohibitively expensive due to its sheer size. In the literature, it is common to deal with this challenge by making restrictive assumptions on the Hessian (e.g., diagonal matrix) and also on the algorithm (e.g., pruning weights in isolation).

CHITA uses an efficient reformulation of the pruning problem (BSS using the quadratic loss) that avoids explicitly computing the Hessian matrix, while still using all the information from this matrix. This is made possible by exploiting the low-rank structure of the empirical Fisher information matrix. This reformulation can be viewed as a sparse linear regression problem, where each regression coefficient corresponds to a certain weight in the neural network. After obtaining a solution to this regression problem, coefficients set to zero will correspond to weights that should be pruned. Our regression data matrix is (n x p), where n is the batch (sub-sample) size and p is the number of weights in the original network. Typically n << p, so storing and operating with this data matrix is much more scalable than common pruning approaches that operate with the (p x p) Hessian.

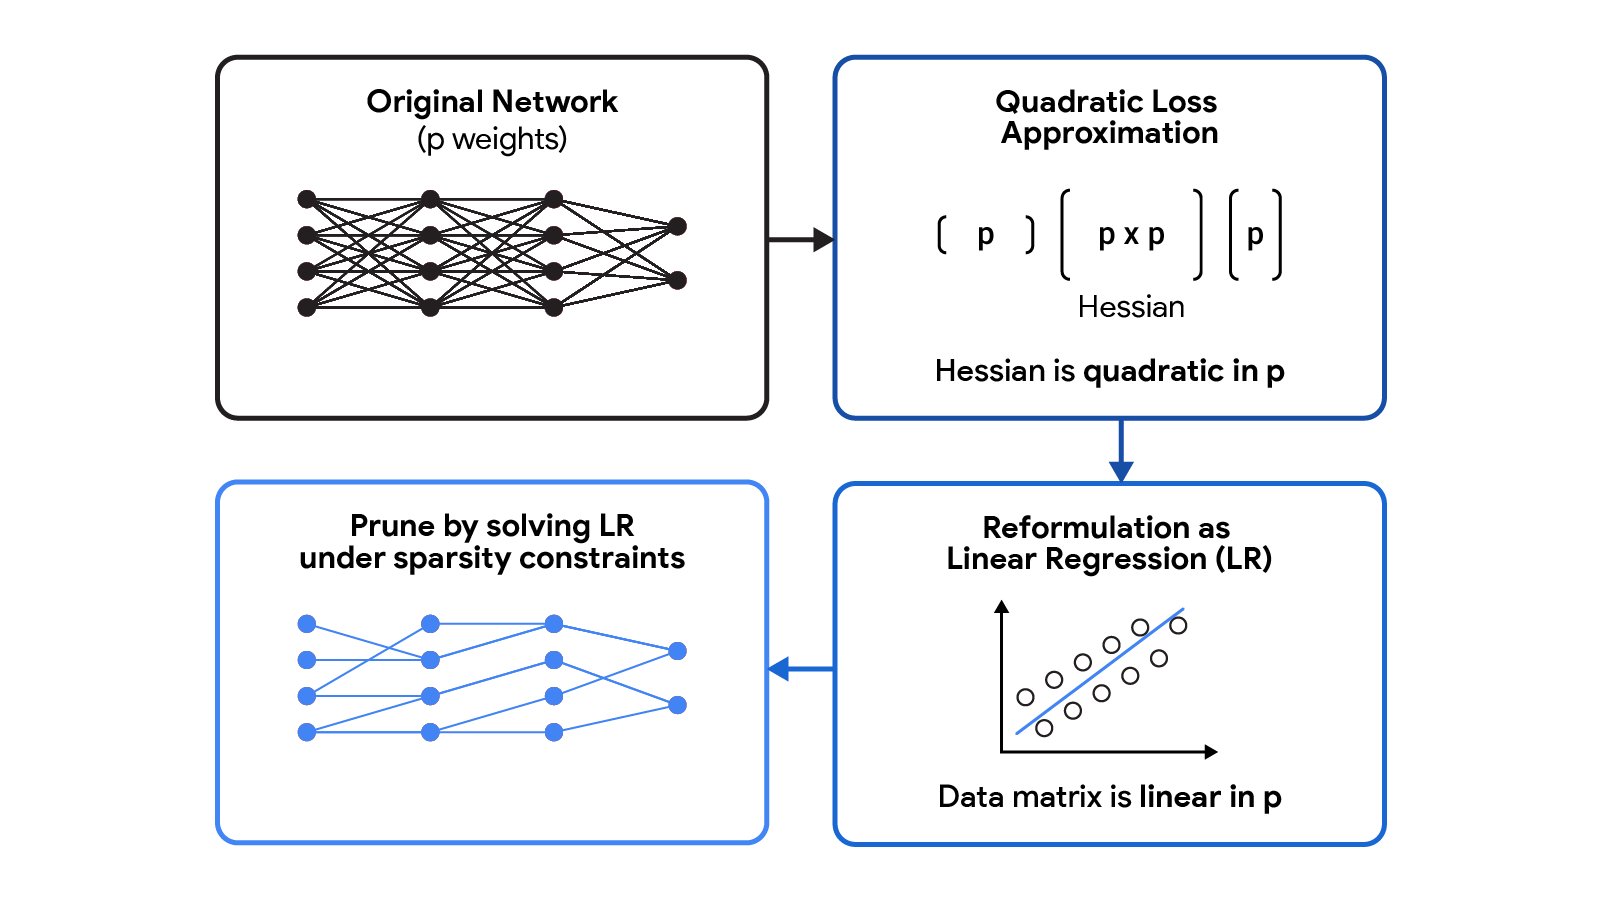
CHITA reformulates the quadratic loss approximation, which requires an expensive Hessian matrix, as a linear regression (LR) problem. The LR’s data matrix is linear in p, which makes the reformulation more scalable than the original quadratic approximation.


Scalable optimization algorithms

CHITA reduces pruning to a linear regression problem under the following sparsity constraint: at most k regression coefficients can be nonzero. To obtain a solution to this problem, we consider a modification of the well-known iterative hard thresholding (IHT) algorithm. IHT performs gradient descent where after each update the following post-processing step is performed: all regression coefficients outside the Top-k (i.e., the k coefficients with the largest magnitude) are set to zero. IHT typically delivers a good solution to the problem, and it does so iteratively exploring different pruning candidates and jointly optimizing over the weights.

Due to the scale of the problem, standard IHT with constant learning rate can suffer from very slow convergence. For faster convergence, we developed a new line-search method that exploits the problem structure to find a suitable learning rate, i.e., one that leads to a sufficiently large decrease in the loss. We also employed several computational schemes to improve CHITA’s efficiency and the quality of the second-order approximation, leading to an improved version that we call CHITA++.


Experiments

We compare CHITA’s run time and accuracy with several state-of-the-art pruning methods using different architectures, including ResNet and MobileNet.

Run time: CHITA is much more scalable than comparable methods that perform joint optimization (as opposed to pruning weights in isolation). For example, CHITA’s speed-up can reach over 1000x when pruning ResNet.

Post-pruning accuracy: Below, we compare the performance of CHITA and CHITA++ with magnitude pruning (MP), Woodfisher (WF), and Combinatorial Brain Surgeon (CBS), for pruning 70% of the model weights. Overall, we see good improvements from CHITA and CHITA++.

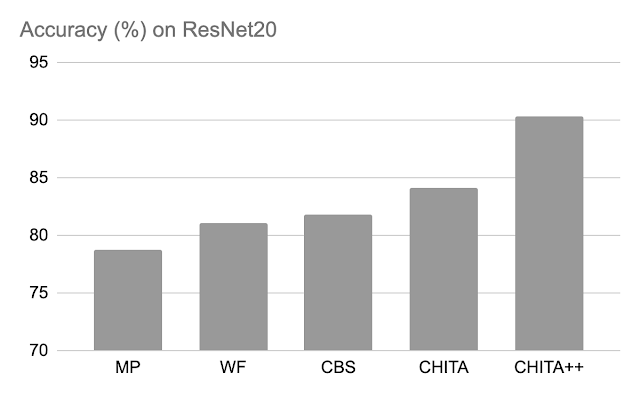
Post-pruning accuracy of various methods on ResNet20. Results are reported for pruning 70% of the model weights.
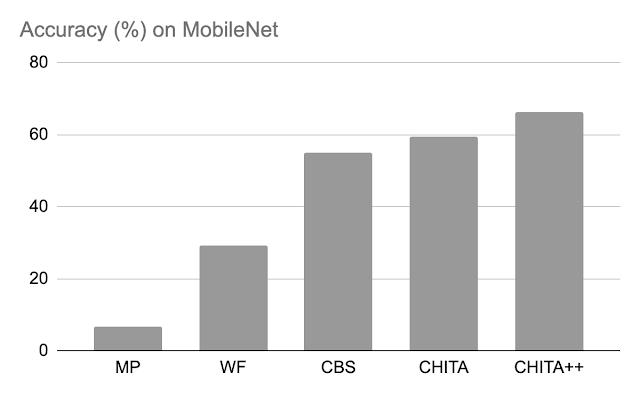
Post-pruning accuracy of various methods on MobileNet. Results are reported for pruning 70% of the model weights.

Next, we report results for pruning a larger network: ResNet50 (on this network, some of the methods listed in the ResNet20 figure couldn’t scale). Here we compare with magnitude pruning and M-FAC. The figure below shows that CHITA achieves better test accuracy for a wide range of sparsity levels.

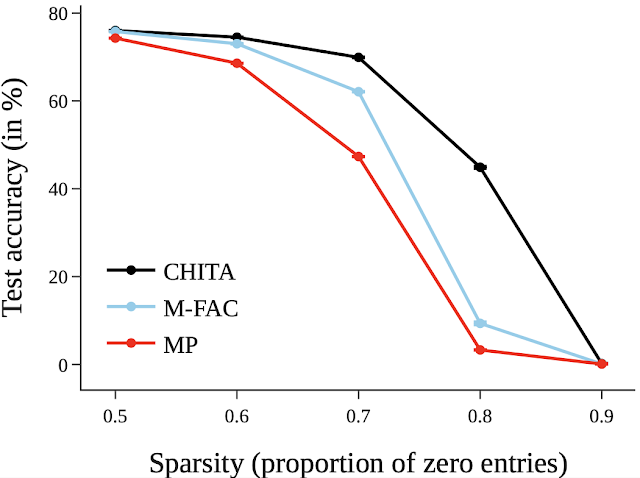
Test accuracy of pruned networks, obtained using different methods.


Conclusion, limitations, and future work

We presented CHITA, an optimization-based approach for pruning pre-trained neural networks. CHITA offers scalability and competitive performance by efficiently using second-order information and drawing on ideas from combinatorial optimization and high-dimensional statistics.

CHITA is designed for unstructured pruning in which any weight can be removed. In theory, unstructured pruning can significantly reduce computational requirements. However, realizing these reductions in practice requires special software (and possibly hardware) that support sparse computations. In contrast, structured pruning, which removes whole structures like neurons, may offer improvements that are easier to attain on general-purpose software and hardware. It would be interesting to extend CHITA to structured pruning.


Acknowledgements

This work is part of a research collaboration between Google and MIT. Thanks to Rahul Mazumder, Natalia Ponomareva, Wenyu Chen, Xiang Meng, Zhe Zhao, and Sergei Vassilvitskii for their help in preparing this post and the paper. Also thanks to John Guilyard for creating the graphics in this post.

Source: Google AI Blog