Tag Archives: MediaPipe

7 dos and don’ts of using ML on the web with MediaPipe

Posted by Jen Person, Developer Relations Engineer

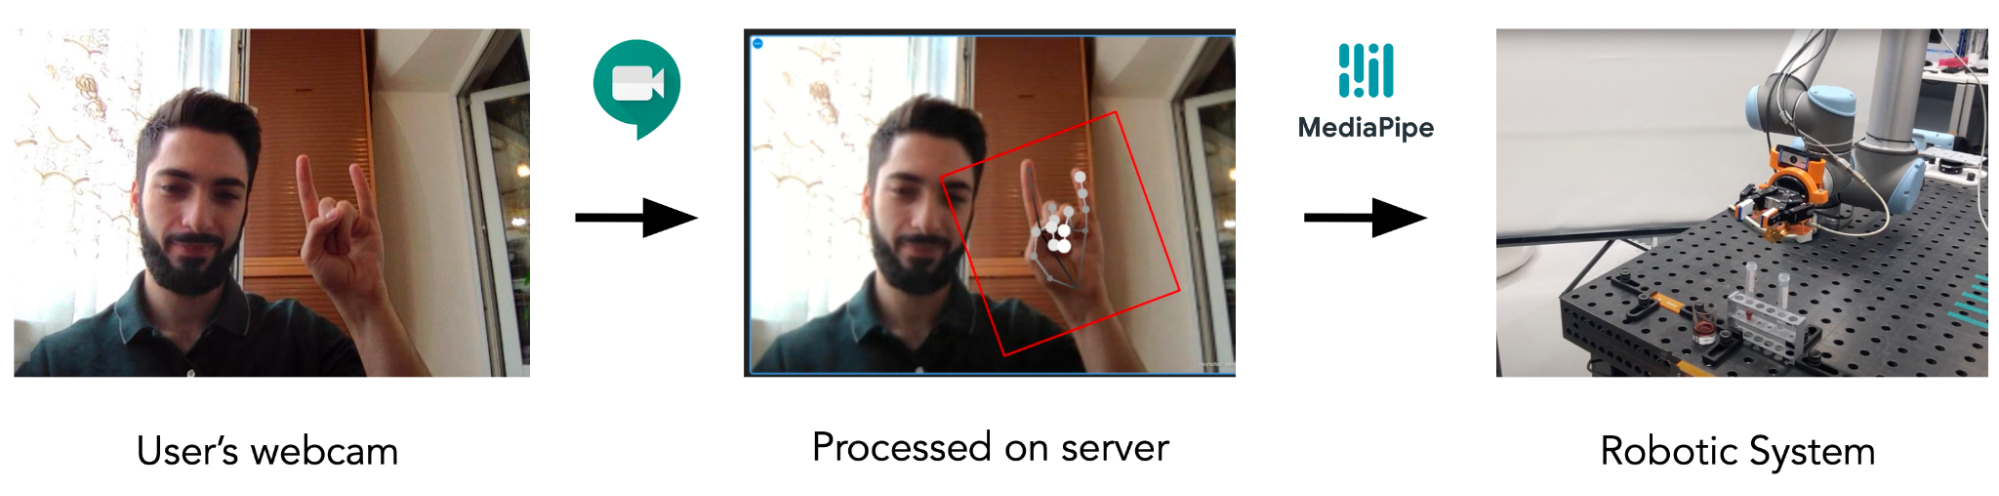
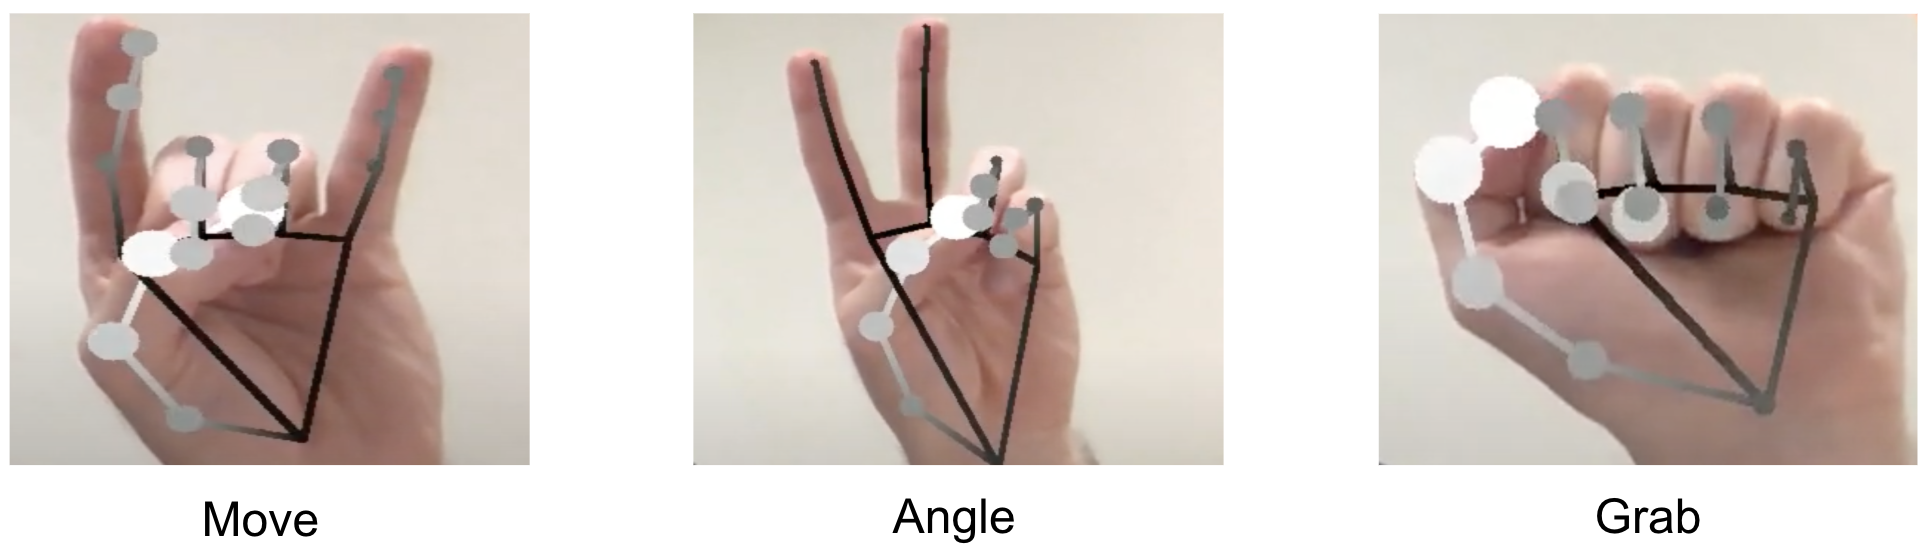
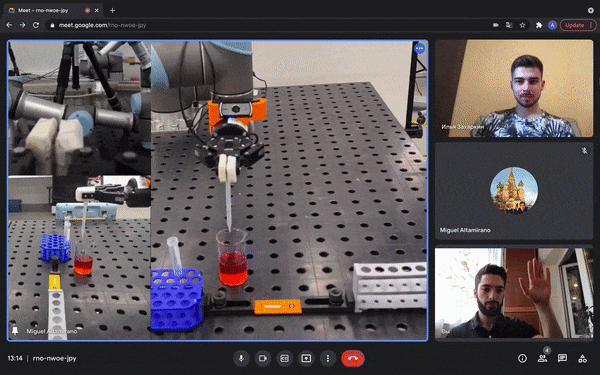
If you're a web developer looking to bring the power of machine learning (ML) to your web apps, then check out MediaPipe Solutions! With MediaPipe Solutions, you can deploy custom tasks to solve common ML problems in just a few lines of code. View the guides in the docs and try out the web demos on Codepen to see how simple it is to get started. While MediaPipe Solutions handles a lot of the complexity of ML on the web, there are still a few things to keep in mind that go beyond the usual JavaScript best practices. I've compiled them here in this list of seven dos and don'ts. Do read on to get some good tips!


❌ DON'T bundle your model in your app

As a web developer, you're accustomed to making your apps as lightweight as possible to ensure the best user experience. When you have larger items to load, you already know that you want to download them in a thoughtful way that allows the user to interact with the content quickly rather than having to wait for a long download. Strategies like quantization have made ML models smaller and accessible to edge devices, but they're still large enough that you don't want to bundle them in your web app. Store your models in the cloud storage solution of your choice. Then, when you initialize your task, the model and WebAssembly binary will be downloaded and initialized. After the first page load, use local storage or IndexedDB to cache the model and binary so future page loads run even faster. You can see an example of this in this touchless ATM sample app on GitHub.


✅ DO initialize your task early

Task initialization can take a bit of time depending on model size, connection speed, and device type. Therefore, it's a good idea to initialize the solution before user interaction. In the majority of the code samples on Codepen, initialization takes place on page load. Keep in mind that these samples are meant to be as simple as possible so you can understand the code and apply it to your own use case. Initializing your model on page load might not make sense for you. Just focus on finding the right place to spin up the task so that processing is hidden from the user.

After initialization, you should warm up the task by passing a placeholder image through the model. This example shows a function for running a 1x1 pixel canvas through the Pose Landmarker task:

function dummyDetection(poseLandmarker: PoseLandmarker) { const width = 1; const height = 1; const canvas = document.createElement('canvas'); canvas.width = width; canvas.height = height; const ctx = canvas.getContext('2d'); ctx.fillStyle = 'rgba(0, 0, 0, 1)'; ctx.fillRect(0, 0, width, height); poseLandmarker.detect(canvas); }


✅ DO clean up resources

One of my favorite parts of JavaScript is automatic garbage collection. In fact, I can't remember the last time memory management crossed my mind. Hopefully you've cached a little information about memory in your own memory, as you'll need just a bit of it to make the most of your MediaPipe task. MediaPipe Solutions for web uses WebAssembly (WASM) to run C++ code in-browser. You don't need to know C++, but it helps to know that C++ makes you take out your own garbage. If you don't free up unused memory, you will find that your web page uses more and more memory over time. It can have performance issues or even crash.

When you're done with your solution, free up resources using the .close() method.

For example, I can create a gesture recognizer using the following code:

const createGestureRecognizer = async () => { const vision = await FilesetResolver.forVisionTasks( "https://cdn.jsdelivr.net/npm/@mediapipe/[email protected]/wasm" ); gestureRecognizer = await GestureRecognizer.createFromOptions(vision, { baseOptions: { modelAssetPath: "https://storage.googleapis.com/mediapipe-models/gesture_recognizer/gesture_recognizer/float16/1/gesture_recognizer.task", delegate: "GPU" }, }); }; createGestureRecognizer();

Once I'm done recognizing gestures, I dispose of the gesture recognizer using the close() method:

gestureRecognizer.close();

Each task has a close method, so be sure to use it where relevant! Some tasks have close() methods for the returned results, so refer to the API docs for details.


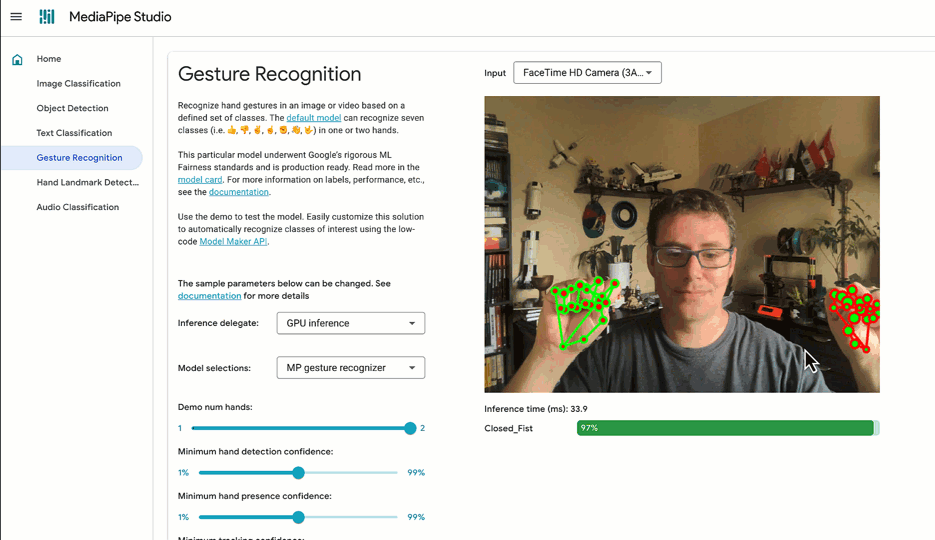
✅ DO try out tasks in MediaPipe Studio

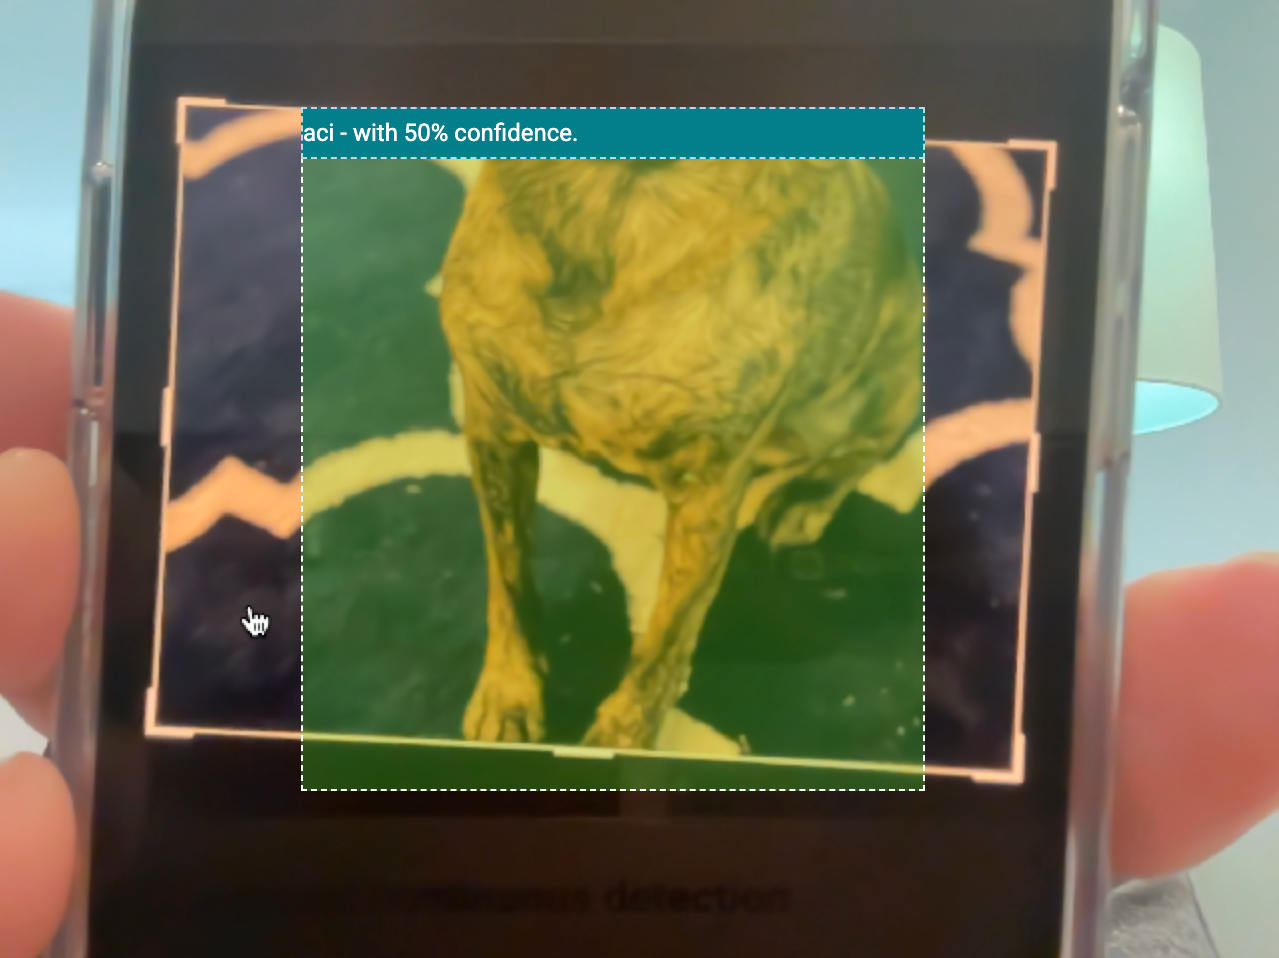
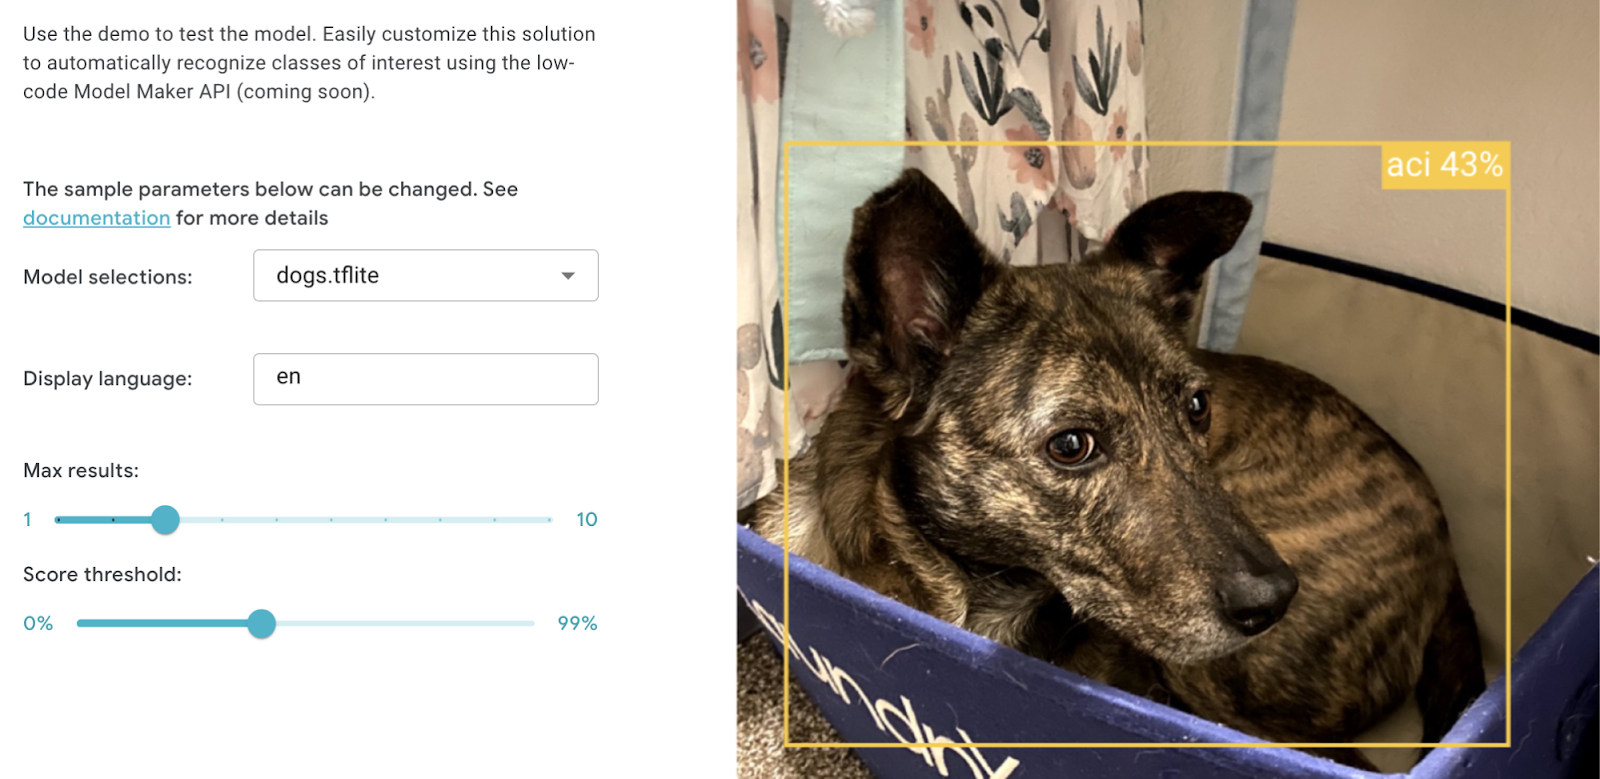
When deciding on or customizing your solution, it's a good idea to try it out in MediaPipe Studio before writing your own code. MediaPipe Studio is a web-based application for evaluating and customizing on-device ML models and pipelines for your applications. The app lets you quickly test MediaPipe solutions in your browser with your own data, and your own customized ML models. Each solution demo also lets you experiment with model settings for the total number of results, minimum confidence threshold for reporting results, and more. You'll find this especially useful when customizing solutions so you can see how your model performs without needing to create a test web page.

Screenshot of Image Classification page in MediaPipe Studio


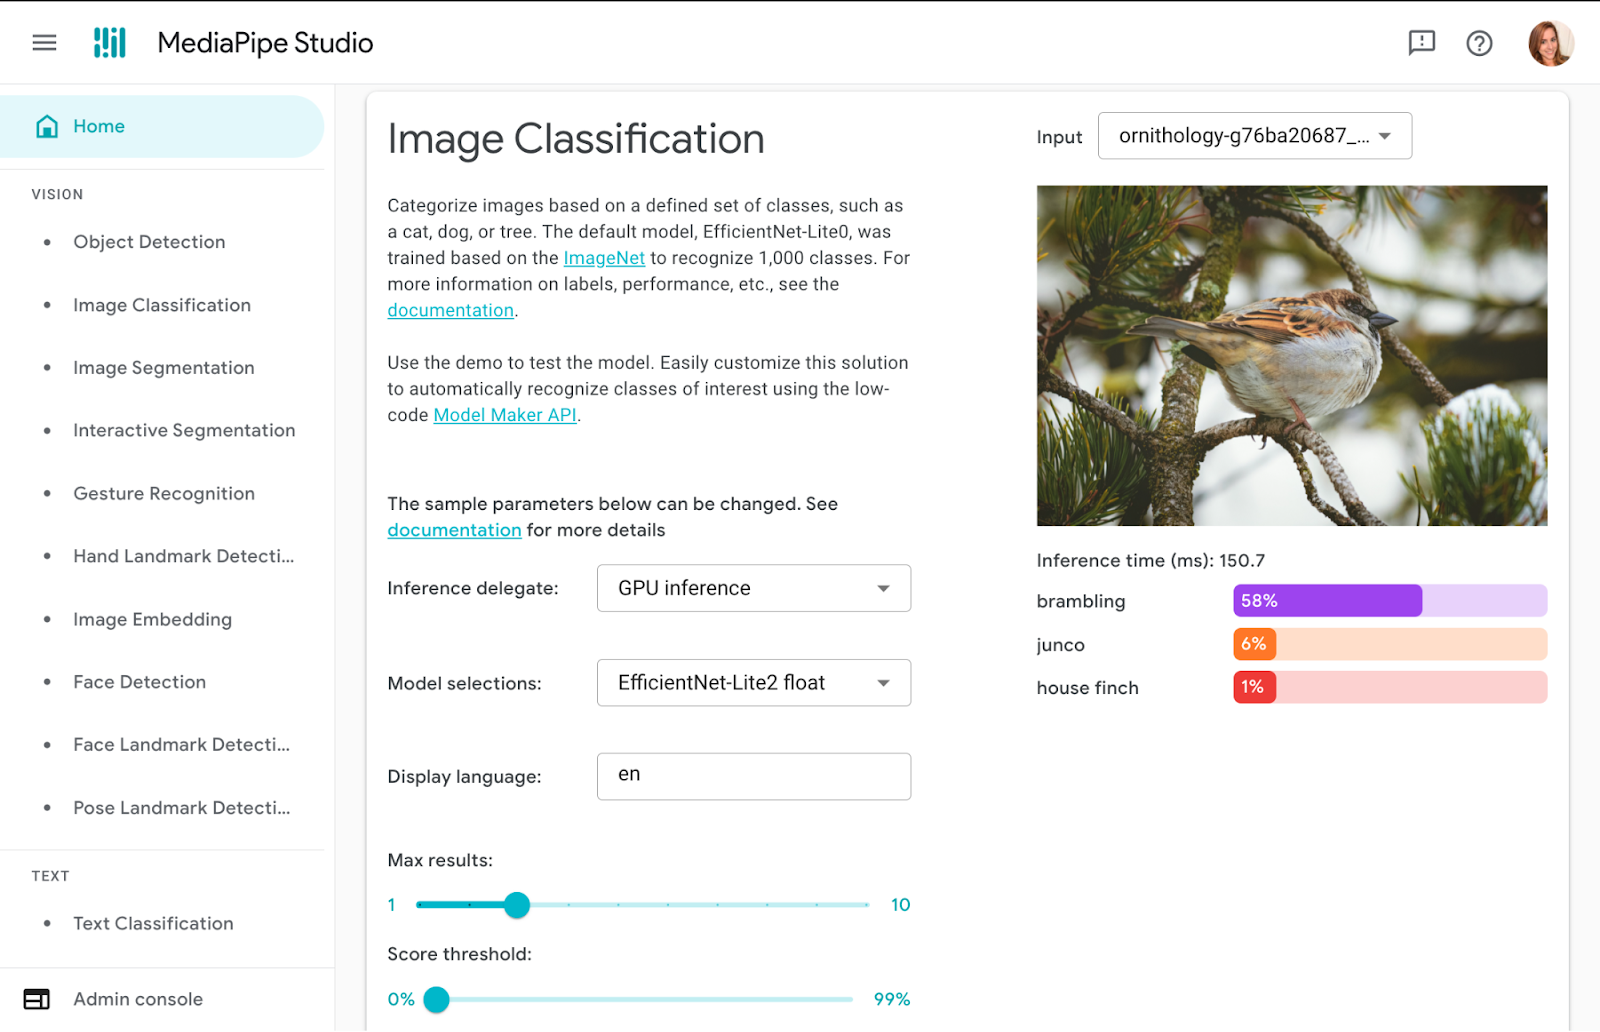
✅ DO test on different devices

It's always important to test your web apps on various devices and browsers to ensure they work as expected, but I think it's worth adding a reminder here to test early and often on a variety of platforms. You can use MediaPipe Studio to test devices as well so you know right away that a solution will work on your users' devices.


❌ DON'T default to the biggest model

Each task lists one or more recommended models. For example, the Object Detection task lists three different models, each with benefits and drawbacks based on speed, size and accuracy. It can be tempting to think that the most important thing is to choose the model with the very highest accuracy, but if you do so, you will be sacrificing speed and increasing the size of your model. Depending on your use case, your users might benefit from a faster result rather than a more accurate one. The best way to compare model options is in MediaPipe Studio. I realize that this is starting to sound like an advertisement for MediaPipe Studio, but it really does come in handy here!

photo of a whale breeching against a background of clouds in a deep, vibrant blue sky

✅ DO reach out!

Do you have any dos or don'ts of ML on the web that you think I missed? Do you have questions about how to get started? Or do you have a cool project you want to share? Reach out to me on LinkedIn and tell me all about it!

MediaPipe for Raspberry Pi and iOS

Posted by Paul Ruiz, Developer Relations Engineer

Back in May we released MediaPipe Solutions, a set of tools for no-code and low-code solutions to common on-device machine learning tasks, for Android, web, and Python. Today we’re happy to announce that the initial version of the iOS SDK, plus an update for the Python SDK to support the Raspberry Pi, are available. These include support for audio classification, face landmark detection, and various natural language processing tasks. Let’s take a look at how you can use these tools for the new platforms.

Object Detection for Raspberry Pi

Aside from setting up your Raspberry Pi hardware with a camera, you can start by installing the MediaPipe dependency, along with OpenCV and NumPy if you don’t have them already.

python -m pip install mediapipe

From there you can create a new Python file and add your imports to the top.

import mediapipe as mp from mediapipe.tasks import python from mediapipe.tasks.python import vision import cv2 import numpy as np

You will also want to make sure you have an object detection model stored locally on your Raspberry Pi. For your convenience, we’ve provided a default model, EfficientDet-Lite0, that you can retrieve with the following command.

wget -q -O efficientdet.tflite -q https://storage.googleapis.com/mediapipe-models/object_detector/efficientdet_lite0/int8/1/efficientdet_lite0.tflite

Once you have your model downloaded, you can start creating your new ObjectDetector, including some customizations, like the max results that you want to receive, or the confidence threshold that must be exceeded before a result can be returned.

# Initialize the object detection model base_options = python.BaseOptions(model_asset_path=model)options = vision.ObjectDetectorOptions(                                   base_options=base_options,                                   running_mode=vision.RunningMode.LIVE_STREAM,                                   max_results=max_results,                                                       score_threshold=score_threshold,                                    result_callback=save_result) detector = vision.ObjectDetector.create_from_options(options)

After creating the ObjectDetector, you will need to open the Raspberry Pi camera to read the continuous frames. There are a few preprocessing steps that will be omitted here, but are available in our sample on GitHub.

Within that loop you can convert the processed camera image into a new MediaPipe.Image, then run detection on that new MediaPipe.Image before displaying the results that are received in an associated listener.

mp_image = mp.Image(image_format=mp.ImageFormat.SRGB, data=rgb_image) detector.detect_async(mp_image, time.time_ns())

Once you draw out those results and detected bounding boxes, you should be able to see something like this:

Moving image of a person holidng up a cup and a phone, and detected bounded boxes identifying these items in real time

You can find the complete Raspberry Pi example shown above on GitHub, or see the official documentation here.

Text Classification on iOS

While text classification is one of the more direct examples, the core ideas will still apply to the rest of the available iOS Tasks. Similar to the Raspberry Pi, you’ll start by creating a new MediaPipe Tasks object, which in this case is a TextClassifier.

var textClassifier: TextClassifier? textClassifier = TextClassifier(modelPath: model.modelPath)

Now that you have your TextClassifier, you just need to pass a String to it to get a TextClassifierResult.

func classify(text: String) -> TextClassifierResult? { guard let textClassifier = textClassifier else { return nil } return try? textClassifier.classify(text: text) }

You can do this from elsewhere in your app, such as a ViewController DispatchQueue, before displaying the results.

let result = self?.textClassifier.classify(text: inputText) let categories = result?.classificationResult.classifications.first?.categories?? []

You can find the rest of the code for this project on GitHub, as well as see the full documentation on developers.google.com/mediapipe.

Moving image of TextClasifier on an iPhone

Getting started

To learn more, watch our I/O 2023 sessions: Easy on-device ML with MediaPipe, Supercharge your web app with machine learning and MediaPipe, and What's new in machine learning, and check out the official documentation over on developers.google.com/mediapipe.

We look forward to all the exciting things you make, so be sure to share them with @googledevs and your developer communities!

MediaPipe: Enhancing Virtual Humans to be more realistic

A guest post by the XR Development team at KDDI & Alpha-U

Please note that the information, uses, and applications expressed in the below post are solely those of our guest author, KDDI.

AI generated rendering of virtual human ‘Metako’
KDDI is integrating text-to-speech & Cloud Rendering to virtual human ‘Metako’

VTubers, or virtual YouTubers, are online entertainers who use a virtual avatar generated using computer graphics. This digital trend originated in Japan in the mid-2010s, and has become an international online phenomenon. A majority of VTubers are English and Japanese-speaking YouTubers or live streamers who use avatar designs.

KDDI, a telecommunications operator in Japan with over 40 million customers, wanted to experiment with various technologies built on its 5G network but found that getting accurate movements and human-like facial expressions in real-time was challenging.


Creating virtual humans in real-time

Announced at Google I/O 2023 in May, the MediaPipe Face Landmarker solution detects facial landmarks and outputs blendshape scores to render a 3D face model that matches the user. With the MediaPipe Face Landmarker solution, KDDI and the Google Partner Innovation team successfully brought realism to their avatars.


Technical Implementation

Using Mediapipe's powerful and efficient Python package, KDDI developers were able to detect the performer’s facial features and extract 52 blendshapes in real-time.

import mediapipe as mp from mediapipe.tasks import python as mp_python MP_TASK_FILE = "face_landmarker_with_blendshapes.task" class FaceMeshDetector: def __init__(self): with open(MP_TASK_FILE, mode="rb") as f: f_buffer = f.read() base_options = mp_python.BaseOptions(model_asset_buffer=f_buffer) options = mp_python.vision.FaceLandmarkerOptions( base_options=base_options, output_face_blendshapes=True, output_facial_transformation_matrixes=True, running_mode=mp.tasks.vision.RunningMode.LIVE_STREAM, num_faces=1, result_callback=self.mp_callback) self.model = mp_python.vision.FaceLandmarker.create_from_options( options) self.landmarks = None self.blendshapes = None self.latest_time_ms = 0 def mp_callback(self, mp_result, output_image, timestamp_ms: int): if len(mp_result.face_landmarks) >= 1 and len( mp_result.face_blendshapes) >= 1: self.landmarks = mp_result.face_landmarks[0] self.blendshapes = [b.score for b in mp_result.face_blendshapes[0]] def update(self, frame): t_ms = int(time.time() * 1000) if t_ms <= self.latest_time_ms: return frame_mp = mp.Image(image_format=mp.ImageFormat.SRGB, data=frame) self.model.detect_async(frame_mp, t_ms) self.latest_time_ms = t_ms def get_results(self): return self.landmarks, self.blendshapes

The Firebase Realtime Database stores a collection of 52 blendshape float values. Each row corresponds to a specific blendshape, listed in order.

_neutral, browDownLeft, browDownRight, browInnerUp, browOuterUpLeft, ...

These blendshape values are continuously updated in real-time as the camera is open and the FaceMesh model is running. With each frame, the database reflects the latest blendshape values, capturing the dynamic changes in facial expressions as detected by the FaceMesh model.

Screenshot of realtime Database

After extracting the blendshapes data, the next step involves transmitting it to the Firebase Realtime Database. Leveraging this advanced database system ensures a seamless flow of real-time data to the clients, eliminating concerns about server scalability and enabling KDDI to focus on delivering a streamlined user experience.

import concurrent.futures import time import cv2 import firebase_admin import mediapipe as mp import numpy as np from firebase_admin import credentials, db pool = concurrent.futures.ThreadPoolExecutor(max_workers=4) cred = credentials.Certificate('your-certificate.json') firebase_admin.initialize_app( cred, { 'databaseURL': 'https://your-project.firebasedatabase.app/' }) ref = db.reference('projects/1234/blendshapes') def main(): facemesh_detector = FaceMeshDetector() cap = cv2.VideoCapture(0) while True: ret, frame = cap.read() facemesh_detector.update(frame) landmarks, blendshapes = facemesh_detector.get_results() if (landmarks is None) or (blendshapes is None): continue blendshapes_dict = {k: v for k, v in enumerate(blendshapes)} exe = pool.submit(ref.set, blendshapes_dict) cv2.imshow('frame', frame) if cv2.waitKey(1) & 0xFF == ord('q'): break cap.release() cv2.destroyAllWindows() exit()


To continue the progress, developers seamlessly transmit the blendshapes data from the Firebase Realtime Database to Google Cloud's Immersive Stream for XR instances in real-time. Google Cloud’s Immersive Stream for XR is a managed service that runs Unreal Engine project in the cloud, renders and streams immersive photorealistic 3D and Augmented Reality (AR) experiences to smartphones and browsers in real time.

This integration enables KDDI to drive character face animation and achieve real-time streaming of facial animation with minimal latency, ensuring an immersive user experience.

Illustrative example of how KDDI transmits data from the Firebase Realtime Database to Google Cloud Immersive Stream for XR in real time to render and stream photorealistic 3D and AR experiences like character face animation with minimal latency

On the Unreal Engine side running by the Immersive Stream for XR, we use the Firebase C++ SDK to seamlessly receive data from the Firebase. By establishing a database listener, we can instantly retrieve blendshape values as soon as updates occur in the Firebase Realtime database table. This integration allows for real-time access to the latest blendshape data, enabling dynamic and responsive facial animation in Unreal Engine projects.

Screenshot of Modify Curve node in use in Unreal Engine

After retrieving blendshape values from the Firebase SDK, we can drive the face animation in Unreal Engine by using the "Modify Curve" node in the animation blueprint. Each blendshape value is assigned to the character individually on every frame, allowing for precise and real-time control over the character's facial expressions.

Flowchart demonstrating how BlendshapesReceiver handles the database connection, authentication, and continuous data reception

An effective approach for implementing a realtime database listener in Unreal Engine is to utilize the GameInstance Subsystem, which serves as an alternative singleton pattern. This allows for the creation of a dedicated BlendshapesReceiver instance responsible for handling the database connection, authentication, and continuous data reception in the background.

By leveraging the GameInstance Subsystem, the BlendshapesReceiver instance can be instantiated and maintained throughout the lifespan of the game session. This ensures a persistent database connection while the animation blueprint reads and drives the face animation using the received blendshape data.

Using just a local PC running MediaPipe, KDDI succeeded in capturing the real performer’s facial expression and movement, and created high-quality 3D re-target animation in real time.

Flow chart showing how a real performer's facial expression and movement being captured and run through MediaPipe on a Local PC, and the high quality 3D re-target animation being rendered in real time by KDDI
      

KDDI is collaborating with developers of Metaverse anime fashion like Adastria Co., Ltd.


Getting started

To learn more, watch Google I/O 2023 sessions: Easy on-device ML with MediaPipe, Supercharge your web app with machine learning and MediaPipe, What's new in machine learning, and check out the official documentation over on developers.google.com/mediapipe.


What’s next?

This MediaPipe integration is one example of how KDDI is eliminating the boundary between the real and virtual worlds, allowing users to enjoy everyday experiences such as attending live music performances, enjoying art, having conversations with friends, and shopping―anytime, anywhere. 

KDDI’s αU provides services for the Web3 era, including the metaverse, live streaming, and virtual shopping, shaping an ecosystem where anyone can become a creator, supporting the new generation of users who effortlessly move between the real and virtual worlds.

Controlling Stable Diffusion with JAX, diffusers, and Cloud TPUs

Diffusion models are state-of-the-art in generating photorealistic images from text. These models are hard to control through only text and generation parameters. To overcome this, the open source community developed ControlNet (GitHub), a neural network structure to control diffusion models by adding more conditions on top of the text prompts. These conditions include canny edge filters, segmentation maps, and pose keypoints. Thanks to the 🧨diffusers library, it is very easy to train, fine-tune or control diffusion models written in various frameworks, including JAX!

At Hugging Face, we were particularly excited to see the open source machine learning (ML) community leverage these tools to explore fun and creative diffusion models. We joined forces with Google Cloud to host a community sprint where participants explored the capabilities of controlling Stable Diffusion by building various open source applications with JAX and Diffusers, using Google Cloud TPU v4 accelerators. In this three week sprint, participants teamed up, came up with various project ideas, trained ControlNet models, and built applications based on them. The sprint resulted in 26 projects, accessible via a leaderboard here. These demos use Stable Diffusion (v1.5 checkpoint) initialized with ControlNet models. We worked with Google Cloud to provide access to TPU v4-8 hardware with 3TB storage, as well as NVIDIA A10G GPUs to speed up the inference in these applications.

Below, we showcase a few projects that stood out from the sprint, and that anyone can create a demo themselves. When picking projects to highlight, we considered several factors:

  • How well-described are the models produced?
  • Are the models, datasets, and other artifacts fully open sourced?
  • Are the applications easy to use? Are they well described?

The projects were voted on by a panel of experts and the top ten projects on the leaderboard won prizes.

Control with SAM

One team used the state-of-the-art Segment Anything Model (SAM) output as an additional condition to control the generated images. SAM produces zero-shot segmentation maps with fine details, which helps extract semantic information from images for control. You can see an example below and try the demo here.

Screencap of the 'Control with SAM' project

Fusing MediaPipe and ControlNet

Another team used MediaPipe to extract hand landmarks to control Stable Diffusion. This application allows you to generate images based on your hand pose and prompt. You can also use a webcam to input an image. See an example below, and try it yourself here.

Screencap of a project fusing MediaPipe and ControlNet

Make-a-Video

Top on the leaderboard is Make-a-Video, which generates video from a text prompt and a hint image. It is based on latent diffusion with temporal convolutions for video and attention. You can try the demo here.

Screencap of the 'Make-a-Video' project

Bootstrapping interior designs

The project that won the sprint is ControlNet for interior design. The application can generate interior design based on a room image and prompt. It can also perform segmentation and generations, guided by image inpainting. See the application in inpainting mode below.

Screencap of a project using ControlNet for interior design

In addition to the projects above, many applications were built to enhance images, like this application to colorize grayscale images. You can check out the leaderboard to try all the projects.

Learning more about diffusion models

To kick-off the sprint, we organized a three-day series of talks by leading scientists and engineers from Google, Hugging Face, and the open source diffusion community. We'd recommend that anyone interested in learning more about diffusion models and generative AI take a look at the recorded sessions below!

Tim Salimans (Google Research) speaking on Discrete Diffusion Models
You can watch all the talks from the links below.

You can check out the sprint homepage to learn more about the sprint.

Acknowledgements

We would like to thank Google Cloud for providing TPUs and storage to help make this great sprint happen, in particular Bertrand Rondepierre and Jonathan Caton for the hard work behind the scenes to get all of the Cloud TPUs allocated so participants had cutting-edge hardware to build on and an overall great experience. And also Andreas Steiner and Cristian Garcia for helping to answer questions in our Discord forum and for helping us make the training script example better. Their help is deeply appreciated.

By Merve Noyan and Sayak Paul – Hugging Face

Introducing MediaPipe Solutions for On-Device Machine Learning

Posted by Paul Ruiz, Developer Relations Engineer & Kris Tonthat, Technical Writer
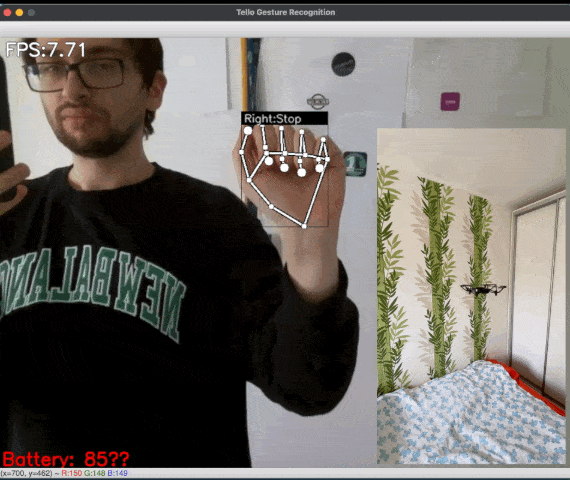
MediaPipe Solutions is available in preview today

This week at Google I/O 2023, we introduced MediaPipe Solutions, a new collection of on-device machine learning tools to simplify the developer process. This is made up of MediaPipe Studio, MediaPipe Tasks, and MediaPipe Model Maker. These tools provide no-code to low-code solutions to common on-device machine learning tasks, such as audio classification, segmentation, and text embedding, for mobile, web, desktop, and IoT developers.

image showing a 4 x 2 grid of solutions via MediaPipe Tools

New solutions

In December 2022, we launched the MediaPipe preview with five tasks: gesture recognition, hand landmarker, image classification, object detection, and text classification. Today we’re happy to announce that we have launched an additional nine tasks for Google I/O, with many more to come. Some of these new tasks include:

  • Face Landmarker, which detects facial landmarks and blendshapes to determine human facial expressions, such as smiling, raised eyebrows, and blinking. Additionally, this task is useful for applying effects to a face in three dimensions that matches the user’s actions.
moving image showing a human with a racoon face filter tracking a range of accurate movements and facial expressions
  • Image Segmenter, which lets you divide images into regions based on predefined categories. You can use this functionality to identify humans or multiple objects, then apply visual effects like background blurring.
moving image of two panels showing a person on the left and how the image of that person is segmented into rergions on the right
  • Interactive Segmenter, which takes the region of interest in an image, estimates the boundaries of an object at that location, and returns the segmentation for the object as image data.
moving image of a dog  moving around as the interactive segmenter identifies boundaries and segments

Coming soon

  • Image Generator, which enables developers to apply a diffusion model within their apps to create visual content.
moving image showing the rendering of an image of a puppy among an array of white and pink wildflowers in MediaPipe from a prompt that reads, 'a photo realistic and high resolution image of a cute puppy with surrounding flowers'
  • Face Stylizer, which lets you take an existing style reference and apply it to a user’s face.
image of a 4 x 3 grid showing varying iterations of a known female and male face acrosss four different art styles

MediaPipe Studio

Our first MediaPipe tool lets you view and test MediaPipe-compatible models on the web, rather than having to create your own custom testing applications. You can even use MediaPipe Studio in preview right now to try out the new tasks mentioned here, and all the extras, by visiting the MediaPipe Studio page.

In addition, we have plans to expand MediaPipe Studio to provide a no-code model training solution so you can create brand new models without a lot of overhead.

moving image showing Gesture Recognition in MediaPipe Studio

MediaPipe Tasks

MediaPipe Tasks simplifies on-device ML deployment for web, mobile, IoT, and desktop developers with low-code libraries. You can easily integrate on-device machine learning solutions, like the examples above, into your applications in a few lines of code without having to learn all the implementation details behind those solutions. These currently include tools for three categories: vision, audio, and text.

To give you a better idea of how to use MediaPipe Tasks, let’s take a look at an Android app that performs gesture recognition.

moving image showing Gesture Recognition across a series of hand gestures in MediaPipe Studio including closed fist, victory, thumb up, thumb down, open palm and i love you.

The following code will create a GestureRecognizer object using a built-in machine learning model, then that object can be used repeatedly to return a list of recognition results based on an input image:

// STEP 1: Create a gesture recognizer val baseOptions = BaseOptions.builder() .setModelAssetPath("gesture_recognizer.task") .build() val gestureRecognizerOptions = GestureRecognizerOptions.builder() .setBaseOptions(baseOptions) .build() val gestureRecognizer = GestureRecognizer.createFromOptions( context, gestureRecognizerOptions) // STEP 2: Prepare the image val mpImage = BitmapImageBuilder(bitmap).build() // STEP 3: Run inference val result = gestureRecognizer.recognize(mpImage)

As you can see, with just a few lines of code you can implement seemingly complex features in your applications. Combined with other Android features, like CameraX, you can provide delightful experiences for your users.

Along with simplicity, one of the other major advantages to using MediaPipe Tasks is that your code will look similar across multiple platforms, regardless of the task you’re using. This will help you develop even faster as you can reuse the same logic for each application.


MediaPipe Model Maker

While being able to recognize and use gestures in your apps is great, what if you have a situation where you need to recognize custom gestures outside of the ones provided by the built-in model? That’s where MediaPipe Model Maker comes in. With Model Maker, you can retrain the built-in model on a dataset with only a few hundred examples of new hand gestures, and quickly create a brand new model specific to your needs. For example, with just a few lines of code you can customize a model to play Rock, Paper, Scissors.

image showing 5 examples of the 'paper' hand gesture in the top row and 5 exaples of the 'rock' hand gesture on the bottom row

from mediapipe_model_maker import gesture_recognizer # STEP 1: Load the dataset. data = gesture_recognizer.Dataset.from_folder(dirname='images') train_data, validation_data = data.split(0.8) # STEP 2: Train the custom model. model = gesture_recognizer.GestureRecognizer.create( train_data=train_data, validation_data=validation_data, hparams=gesture_recognizer.HParams(export_dir=export_dir) ) # STEP 3: Evaluate using unseen data. metric = model.evaluate(test_data) # STEP 4: Export as a model asset bundle. model.export_model(model_name='rock_paper_scissor.task')

After retraining your model, you can use it in your apps with MediaPipe Tasks for an even more versatile experience.

moving image showing Gesture Recognition in MediaPipe Studio recognizing rock, paper, and scissiors hand gestures

Getting started

To learn more, watch our I/O 2023 sessions: Easy on-device ML with MediaPipe, Supercharge your web app with machine learning and MediaPipe, and What's new in machine learning, and check out the official documentation over on developers.google.com/mediapipe.


What’s next?

We will continue to improve and provide new features for MediaPipe Solutions, including new MediaPipe Tasks and no-code training through MediaPipe Studio. You can also keep up to date by joining the MediaPipe Solutions announcement group, where we send out announcements as new features are available.

We look forward to all the exciting things you make, so be sure to share them with @googledevs and your developer communities!

5 things to know before customizing your first machine learning model with MediaPipe Model Maker

Posted by Jen Person, DevRel Engineer, CoreML

If you're reading this blog, then you're probably interested in creating a custom machine learning (ML) model. I recently went through the process myself, creating a custom dog detector to go with a Codelab, Create a custom object detection web app with MediaPipe. Like any new coding task, the process took some trial and error to figure out what I was doing along the way. To minimize the error part of your "trial and error" experience, I'm happy to share five takeaways from my model training experience with you.


1. Preparing data takes a long time. Be sure to make the time

Preparing your data for training will look different depending on the type of model you're customizing. In general, there is a step for sourcing data and a step for annotating data.

Sourcing data

Finding enough data points that best represent your use case can be a challenge. For one, you want to make sure you have the right to use any images or text you include in your data. Check the licensing for your data before training. One way to resolve this is to provide your own data. I just so happen to have hundreds of photos of my dogs, so choosing them for my object detector was a no-brainer. You can also look for existing datasets on Kaggle. There are so many options on Kaggle covering a wide range of use cases. If you're lucky, you'll find an existing dataset that serves your needs and it might even already have annotations!

Annotating data

MediaPipe Model Maker accepts data where each input has a corresponding XML file listing its annotations. For example:

There are several software programs that can help with annotation. This is especially useful when you need to highlight specific areas in images. Some software programs are designed to enable collaboration–an intuitive UI and instructions for annotators mean you can enlist the help of others. A common open source option is Label Studio, which is what I used to annotate my images.

So expect this step to take a long time, but keep in mind that it will take longer than you expect.


2. Simplify your custom model

If you're anything like me, you have a wonderfully grand idea planned for your first custom model. My dog Ben was the inspiration for my first model. He came from a local golden retriever rescue, but when I did a DNA test, it turned out that he's 0% golden retriever! My first idea was to create a golden retriever detector – a solution that could tell you if a dog was a "golden retriever" or "not golden retriever". I thought it could be fun to see what the model thought of Ben, but I quickly realized that I would have to source a lot more images of dogs than I had so I could run the model on other dogs as well. And, I'd have to make sure that it could accurately identify golden retrievers of all shades. After hours into this endeavor I realized I needed to simplify. That's when I decided to try building a solution for just my three dogs. I had plenty of photos to choose from, so I picked the ones that best showed the dogs in detail. This was a much more successful solution, and a great proof of concept for my golden retriever model because I refuse to abandon that idea.

Here are a few ways to simplify your first custom model:

  1. Start with fewer labels. Choose 2-5 classes to assign to your data.
  2. Leave off the edge cases. If you're coming from a background in software engineering, then you're used to paying attention to and addressing any edge cases. In machine learning, you might be introducing some errors or strange behavior when you try to train for edge cases. For example, I didn't choose any dog photos where their heads aren't visible. Sure, I may want a model that can detect my dogs even from just the back half. But I left partial dog photos out of my training and it turns out that the model is still able to detect them.
    Image showing partial photo of author's dog being recognized by model with 50% confidence
    The web app still identifies ACi in an image even when her head isn't visible
    Include some edge cases in your testing and prototyping to see how the model handles them. Otherwise, don't sweat the edge cases.
  3. A little data goes a long way. Since MediaPipe Model Maker uses transfer learning, you need much less data to train than you would if you were training a model from scratch. Aim for 100 examples for each class. You might be able to train with fewer than 100 examples if there aren't many possible iterations of the data. For example, my colleague trained a model to detect two different Android figurines. He didn't need too many photos because there are only so many angles at which to view the figurines. You might need more than 100 examples to start if you need more to show the possible iterations of the data. For example, a golden retriever comes in many colors. You might need several dozen examples for each color to ensure the model can accurately identify them, resulting in over 100 examples.

So when it comes to your first ML training experience, remember to simplify, simplify, simplify.

Simplify.

Simplify.


3. Expect several training iterations

As much as I'd like to confidently say you'll get the right results from your model the first time you train, it probably won't happen. Taking your time with choosing data samples and annotation will definitely improve your success rate, but there are so many factors that can change how the model behaves. You might find that you need to start with a different model architecture to reach your desired accuracy. Or, you might try a different split of training and validation data. You might need to add more samples to your dataset. Fortunately, transfer learning with MediaPipe Model Maker generally takes several minutes, so you can turn around new iterations fairly quickly.


4. Prototype outside of your app

When you finish training a model, you're probably going to be very excited and eager to add it to your app. However, I encourage you to first try out your model in MediaPipe Studio for a couple of reasons:

  1. Any time you make a change to your app, you probably have to wait for some compile and/or build step to complete. Even with a hot reload, there can be a wait time. So if you decide you want to tweak a configuration option like score threshold, you'll be waiting through every tweak you make and that time can add up. It's not worth the extra time to wait for a whole app to build out when you're just trying to test one component. With MediaPipe Studio, you can try out options and see results with very low latency.
  2. If you don't get the expected results, you can't confidently determine if the issue is with your model, task configuration, or app.

With MediaPipe Studio, I was able to quickly try out different score thresholds on various images to determine what threshold I should use in my app. I also eliminated my own web app as a factor in this performance.

Image showing screen grab of author testing the score threshold of the model with a photo of the author's pet sitting in a box. the model has identified the photo with 43% confidence

5. Make incremental changes

After sourcing quality data, simplifying your use case, training, and prototyping, you might find that you need to repeat the cycle to get the right result. When that happens, choose just one part of the process to change, and make a small change. In my case, many photos of my dogs were taken on the same blue couch. If the model started picking up on this couch since it's often inside the bounding box, that could be affecting how it categorized images where the dogs aren't on the couch. Rather than throwing out all the couch photos, I removed just a couple and added about 10 more of each dog where they aren't on the couch. This greatly improved my results. If you try to make a big change right away, you might end up introducing new issues rather than resolving them.


Go forth and customize!

With these tips in mind, it's time for you to customize your own ML solution! You can customize your image classification, gesture recognition, text classification, or object detection model to use in MediaPipe Tasks.

If you’d like to share some learnings from training your first model, post the details on LinkedIn along with a link to this blog post, and then tag me. I can't wait to see what you learn and what you build!

Drone control via gestures using MediaPipe Hands

A guest post by Neurons Lab

Please note that the information, uses, and applications expressed in the below post are solely those of our guest author, Neurons Lab, and not necessarily those of Google.

How the idea emerged

With the advancement of technology, drones have become not only smaller, but also have more compute. There are many examples of iPhone-sized quadcopters in the consumer drone market and the computing power to do live tracking while recording 4K video. However, the most important element has not changed much - the controller. It is still bulky and not intuitive for beginners to use. There is a smartphone with on-display control as an option; however, the control principle is still the same. 

That is how the idea for this project emerged: a more personalised approach to control the drone using gestures. ML Engineer Nikita Kiselov (me) together with consultation from my colleagues at Neurons Lab undertook this project. 

Demonstration of drone flight control via gestures using MediaPipe Hands

Figure 1: [GIF] Demonstration of drone flight control via gestures using MediaPipe Hands

Why use gesture recognition?

Gestures are the most natural way for people to express information in a non-verbal way.  Gesture control is an entire topic in computer science that aims to interpret human gestures using algorithms. Users can simply control devices or interact without physically touching them. Nowadays, such types of control can be found from smart TV to surgery robots, and UAVs are not the exception.

Although gesture control for drones have not been widely explored lately, the approach has some advantages:

  • No additional equipment needed.
  • More human-friendly controls.
  • All you need is a camera that is already on all drones.

With all these features, such a control method has many applications.

Flying action camera. In extreme sports, drones are a trendy video recording tool. However, they tend to have a very cumbersome control panel. The ability to use basic gestures to control the drone (while in action)  without reaching for the remote control would make it easier to use the drone as a selfie camera. And the ability to customise gestures would completely cover all the necessary actions.

This type of control as an alternative would be helpful in an industrial environment like, for example, construction conditions when there may be several drone operators (gesture can be used as a stop-signal in case of losing primary source of control).

The Emergencies and Rescue Services could use this system for mini-drones indoors or in hard-to-reach places where one of the hands is busy. Together with the obstacle avoidance system, this would make the drone fully autonomous, but still manageable when needed without additional equipment.

Another area of application is FPV (first-person view) drones. Here the camera on the headset could be used instead of one on the drone to recognise gestures. Because hand movement can be impressively precise, this type of control, together with hand position in space, can simplify the FPV drone control principles for new users. 

However, all these applications need a reliable and fast (really fast) recognition system. Existing gesture recognition systems can be fundamentally divided into two main categories: first - where special physical devices are used, such as smart gloves or other on-body sensors; second - visual recognition using various types of cameras. Most of those solutions need additional hardware or rely on classical computer vision techniques. Hence, that is the fast solution, but it's pretty hard to add custom gestures or even motion ones. The answer we found is MediaPipe Hands that was used for this project.

Overall project structure

To create the proof of concept for the stated idea, a Ryze Tello quadcopter was used as a UAV. This drone has an open Python SDK, which greatly simplified the development of the program. However, it also has technical limitations that do not allow it to run gesture recognition on the drone itself (yet). For this purpose a regular PC or Mac was used. The video stream from the drone and commands to the drone are transmitted via regular WiFi, so no additional equipment was needed. 

To make the program structure as plain as possible and add the opportunity for easily adding gestures, the program architecture is modular, with a control module and a gesture recognition module. 

Scheme that shows overall project structure and how videostream data from the drone is processed

Figure 2: Scheme that shows overall project structure and how videostream data from the drone is processed

The application is divided into two main parts: gesture recognition and drone controller. Those are independent instances that can be easily modified. For example, to add new gestures or change the movement speed of the drone.

Video stream is passed to the main program, which is a simple script with module initialisation, connections, and typical for the hardware while-true cycle. Frame for the videostream is passed to the gesture recognition module. After getting the ID of the recognised gesture, it is passed to the control module, where the command is sent to the UAV. Alternatively, the user can control a drone from the keyboard in a more classical manner.

So, you can see that the gesture recognition module is divided into keypoint detection and gesture classifier. Exactly the bunch of the MediaPipe key point detector along with the custom gesture classification model distinguishes this gesture recognition system from most others.

Gesture recognition with MediaPipe

Utilizing MediaPipe Hands is a winning strategy not only in terms of speed, but also in flexibility. MediaPipe already has a simple gesture recognition calculator that can be inserted into the pipeline. However, we needed a more powerful solution with the ability to quickly change the structure and behaviour of the recognizer. To do so and classify gestures, the custom neural network was created with 4 Fully-Connected layers and 1 Softmax layer for classification.

Figure 3: Scheme that shows the structure of classification neural network

Figure 3: Scheme that shows the structure of classification neural network

This simple structure gets a vector of 2D coordinates as an input and gives the ID of the classified gesture. 

Instead of using cumbersome segmentation models with a more algorithmic recognition process, a simple neural network can easily handle such tasks. Recognising gestures by keypoints, which is a simple vector with 21 points` coordinates, takes much less data and time. What is more critical, new gestures can be easily added because model retraining tasks take much less time than the algorithmic approach.

To train the classification model, dataset with keypoints` normalised coordinates and ID of a gesture was used. The numerical characteristic of the dataset was that:

  • 3 gestures with 300+ examples (basic gestures)
  • 5 gestures with 40 -150 examples 

All data is a vector of x, y coordinates that contain small tilt and different shapes of hand during data collection.

Figure 4: Confusion matrix and classification report for classification

Figure 4: Confusion matrix and classification report for classification

We can see from the classification report that the precision of the model on the test dataset (this is 30% of all data) demonstrated almost error-free for most classes, precision > 97% for any class. Due to the simple structure of the model, excellent accuracy can be obtained with a small number of examples for training each class. After conducting several experiments, it turned out that we just needed the dataset with less than 100 new examples for good recognition of new gestures. What is more important, we don’t need to retrain the model for each motion in different illumination because MediaPipe takes over all the detection work.

Figure 5: [GIF] Test that demonstrates how fast classification network can distinguish newly trained gestures using the information from MediaPipe hand detector

Figure 5: [GIF] Test that demonstrates how fast classification network can distinguish newly trained gestures using the information from MediaPipe hand detector

From gestures to movements

To control a drone, each gesture should represent a command for a drone. Well, the most excellent part about Tello is that it has a ready-made Python API to help us do that without explicitly controlling motors hardware. We just need to set each gesture ID to a command.

Figure 6: Command-gesture pairs representation

Figure 6: Command-gesture pairs representation

Each gesture sets the speed for one of the axes; that’s why the drone’s movement is smooth, without jitter. To remove unnecessary movements due to false detection, even with such a precise model, a special buffer was created, which is saving the last N gestures. This helps to remove glitches or inconsistent recognition.

The fundamental goal of this project is to demonstrate the superiority of the keypoint-based gesture recognition approach compared to classical methods. To demonstrate all the potential of this recognition model and its flexibility, there is an ability to create the dataset on the fly … on the drone`s flight! You can create your own combinations of gestures or rewrite an existing one without collecting massive datasets or manually setting a recognition algorithm. By pressing the button and ID key, the vector of detected points is instantly saved to the overall dataset. This new dataset can be used to retrain classification network to add new gestures for the detection. For now, there is a notebook that can be run on Google Colab or locally. Retraining the network-classifier takes about 1-2 minutes on a standard CPU instance. The new binary file of the model can be used instead of the old one. It is as simple as that. But for the future, there is a plan to do retraining right on the mobile device or even on the drone.

Figure 7: Notebook for model retraining in action

Figure 7: Notebook for model retraining in action

Summary 

This project is created to make a push in the area of the gesture-controlled drones. The novelty of the approach lies in the ability to add new gestures or change old ones quickly. This is made possible thanks to MediaPipe Hands. It works incredibly fast, reliably, and ready out of the box, making gesture recognition very fast and flexible to changes. Our Neuron Lab`s team is excited about the demonstrated results and going to try other incredible solutions that MediaPipe provides. 

We will also keep track of MediaPipe updates, especially about adding more flexibility in creating custom calculators for our own models and reducing barriers to entry when creating them. Since at the moment our classifier model is outside the graph, such improvements would make it possible to quickly implement a custom calculator with our model into reality.

Another highly anticipated feature is Flutter support (especially for iOS). In the original plans, the inference and visualisation were supposed to be on a smartphone with NPU\GPU utilisation, but at the moment support quality does not satisfy our requests. Flutter is a very powerful tool for rapid prototyping and concept checking. It allows us to throw and test an idea cross-platform without involving a dedicated mobile developer, so such support is highly demanded. 

Nevertheless, the development of this demo project continues with available functionality, and there are already several plans for the future. Like using the MediaPipe Holistic for face recognition and subsequent authorisation. The drone will be able to authorise the operator and give permission for gesture control. It also opens the way to personalisation. Since the classifier network is straightforward, each user will be able to customise gestures for themselves (simply by using another version of the classifier model). Depending on the authorised user, one or another saved model will be applied. Also in the plans to add the usage of Z-axis. For example, tilt the palm of your hand to control the speed of movement or height more precisely. We encourage developers to innovate responsibly in this area, and to consider responsible AI practices such as testing for unfair biases and designing with safety and privacy in mind.

We highly believe that this project will motivate even small teams to do projects in the field of ML computer vision for the UAV, and MediaPipe will help to cope with the limitations and difficulties on their way (such as scalability, cross-platform support and GPU inference).


If you want to contribute, have ideas or comments about this project, please reach out to [email protected], or visit the GitHub page of the project.

This blog post is curated by Igor Kibalchich, ML Research Product Manager at Google AI.

Video-Touch: Multi-User Remote Robot Control in Google Meet call by DNN-based Gesture Recognition

A guest post by the Engineering team at Video-Touch

Please note that the information, uses, and applications expressed in the below post are solely those of our guest author, Video-Touch.

A guest post by Video-Touch

You may have watched some science fiction movies where people could control robots with the movements of their bodies. Modern computer vision and robotics approaches allow us to make such an experience real, but no less exciting and incredible.

Inspired by the idea to make remote control and teleoperation practical and accessible during such a hard period of coronavirus, we came up with a VideoTouch project.

Video-Touch is the first robot-human interaction system that allows multi-user control via video calls application (e.g. Google Meet, Zoom, Skype) from anywhere in the world.

The Video-Touch system in action.

Figure 1: The Video-Touch system in action: single user controls a robot during a Video-Touch call. Note the sensors’ feedback when grasping a tube [source video].

We were wondering if it is even possible to control a robot remotely using only your own hands - without any additional devices like gloves or a joystick - not suffering from a significant delay. We decided to use computer vision to recognize movements in real-time and instantly pass them to the robot. Thanks to MediaPipe now it is possible.

Our system looks as follows:

  1. Video conference application gets a webcam video on the user device and sends it to the robot computer (“server”);
  2. User webcam video stream is being captured on the robot's computer display via OBS virtual camera tool;
  3. The recognition module reads user movements and gestures with the help of MediaPipe and sends it to the next module via ZeroMQ;
  4. The robotic arm and its gripper are being controlled from Python, given the motion capture data.

Figure 2: Overall scheme of the Video-Touch system: from users webcam to the robot control module [source video].

As it clearly follows from the scheme, all the user needs to operate a robot is a stable internet connection and a video conferencing app. All the computation, such as screen capture, hand tracking, gesture recognition, and robot control, is being carried on a separate device (just another laptop) connected to the robot via Wi-Fi. Next, we describe each part of the pipeline in detail.

Video stream and screen capture

One can use any software that sends a video from one computer to another. In our experiments, we used the video conference desktop application. A user calls from its device to a computer with a display connected to the robot. Thus it can see the video stream from the user's webcam.

Now we need some mechanism to pass the user's video from the video conference to the Recognition module. We use Open Broadcaster Software (OBS) and its virtual camera tool to capture the open video conference window. We get a virtual camera that now has frames from the users' webcam and its own unique device index that can be further used in the Recognition module.

Recognition module

The role of the Recognition module is to capture a users' movements and pass them to the Robot control module. Here is where the MediaPipe comes in. We searched for the most efficient and precise computer vision software for hand motion capture. We found many exciting solutions, but MediaPipe turned out to be the only suitable tool for such a challenging task - real-time on-device fine-grained hand movement recognition.

We made two key modifications to the MediaPipe Hand Tracking module: added gesture recognition calculator and integrated ZeroMQ message passing mechanism.

At the moment of our previous publication we had two versions of the gesture recognition implementation. The first version is depicted in Figure 3 below and does all the computation inside the Hand Gesture Recognition calculator. The calculator has scaled landmarks as its input, i.e. these landmarks are normalized on the size of the hand bounding box, not on the whole image size. Next it recognizes one of 4 gestures (see also Figure 4): “move”, “angle”, “grab” and “no gesture” (“finger distance” gesture from the paper was an experimental one and was not included in the final demo) and outputs the gesture class name. Despite this version being quite robust and useful, it is based only on simple heuristic rules like: “if this landmark[i].x < landmark[j].x then it is a `move` gesture”, and is failing for some real-life cases like hand rotation.

Modified MediaPipe Hand Landmark CPU subgraph.

Figure 3: Modified MediaPipe Hand Landmark CPU subgraph. Note the HandGestureRecognition calculator

To alleviate the problem of bad generalization, we implemented the second version. We trained the Gradient Boosting classifier from scikit-learn on a manually collected and labeled dataset of 1000 keypoints: 200 per “move”, “angle” and “grab” classes, and 400 for “no gesture” class. By the way, today such a dataset could be easily obtained using the recently released Jesture AI SDK repo (note: another project of some of our team members).

We used scaled landmarks, angles between joints, and pairwise landmark distances as an input to the model to predict the gesture class. Next, we tried to pass only the scaled landmarks without any angles and distances, and it resulted in similar multi-class accuracy of 91% on a local validation set of 200 keypoints. One more point about this version of gesture classifier is that we were not able to run the scikit-learn model from C++ directly, so we implemented it in Python as a part of the Robot control module.

Figure 4: Gesture classes recognized by our model (“no gesture” class is not shown).

Figure 4: Gesture classes recognized by our model (“no gesture” class is not shown).

Right after the publication, we came up with a fully-connected neural network trained in Keras on just the same dataset as the Gradient Boosting model, and it gave an even better result of 93%. We converted this model to the TensorFlow Lite format, and now we are able to run the gesture recognition ML model right inside the Hand Gesture Recognition calculator.

Figure 5: Fully-connected network for gesture recognition converted to TFLite model format.

Figure 5: Fully-connected network for gesture recognition converted to TFLite model format.

When we get the current hand location and current gesture class, we need to pass it to the Robot control module. We do this with the help of the high-performance asynchronous messaging library ZeroMQ. To implement this in C++, we used the libzmq library and the cppzmq headers. We utilized the request-reply scenario: REP (server) in C++ code of the Recognition module and REQ (client) in Python code of the Robot control module.

So using the hand tracking module with our modifications, we are now able to pass the motion capture information to the robot in real-time.

Robot control module

A robot control module is a Python script that takes hand landmarks and gesture class as its input and outputs a robot movement command (on each frame). The script runs on a computer connected to the robot via Wi-Fi. In our experiments we used MSI laptop with the Nvidia GTX 1050 Ti GPU. We tried to run the whole system on Intel Core i7 CPU and it was also real-time with a negligible delay, thanks to the highly optimized MediaPipe compute graph implementation.

We use the 6DoF UR10 robot by Universal Robotics in our current pipeline. Since the gripper we are using is a two-finger one, we do not need a complete mapping of each landmark to the robots’ finger keypoint, but only the location of the hands’ center. Using this center coordinates and python-urx package, we are now able to change the robots’ velocity in a desired direction and orientation: on each frame, we calculate the difference between the current hand center coordinate and the one from the previous frame, which gives us a velocity change vector or angle. Finally, all this mechanism looks very similar to how one would control a robot with a joystick.

Hand-robot control logic follows the idea of a joystick with pre-defined movement directions

Figure 6: Hand-robot control logic follows the idea of a joystick with pre-defined movement directions [source video].

Tactile perception with high-density tactile sensors

Dexterous manipulation requires a high spatial resolution and high-fidelity tactile perception of objects and environments. The newest sensor arrays are well suited for robotic manipulation as they can be easily attached to any robotic end effector and adapted at any contact surface.

High fidelity tactile sensor array

Figure 7: High fidelity tactile sensor array: a) Array placement on the gripper. b) Sensor data when the gripper takes a pipette. c) Sensor data when the gripper takes a tube [source publication].

Video-Touch is embedded with a kind of high-density tactile sensor array. They are installed in the two-fingers robotic gripper. One sensor array is attached to each fingertip. A single electrode array can sense a frame area of 5.8 [cm2] with a resolution of 100 points per frame. The sensing frequency equals 120 [Hz]. The range of force detection per point is of 1-9 [N]. Thus, the robot detects the pressure applied to solid or flexible objects grasped by the robotic fingers with a resolution of 200 points (100 points per finger).

The data collected from the sensor arrays are processed and displayed to the user as dynamic finger-contact maps. The pressure sensor arrays allow the user to perceive the grasped object's physical properties such as compliance, hardness, roughness, shape, and orientation.

Multi-user robotic arm control feature.

Figure 8: Multi-user robotic arm control feature. The users are able to perform a COVID-19 test during a regular video call [source video].

Endnotes

Thus by using MediaPipe and a robot we built an effective, multi-user robot teleoperation system. Potential future uses of teleoperation systems include medical testing and experiments in difficult-to-access environments like outer space. Multi-user functionality of the system addresses an actual problem of effective remote collaboration, allowing to work on projects which need manual remote control in a group of several people.

Another nice feature of our pipeline is that one could control the robot using any device with a camera, e.g. a mobile phone. One also could operate another hardware form factor, such as edge devices, mobile robots, or drones instead of a robotic arm. Of course, the current solution has some limitations: latency, the utilization of z-coordinate (depth), and the convenience of the gesture types could be improved. We can’t wait for the updates from the MediaPipe team to try them out, and looking forward to trying new types of the gripper (with fingers), two-hand control, or even a whole-body control (hello, “Real Steel”!).

We hope the post was useful for you and your work. Keep coding and stay healthy. Thank you very much for your attention!

This blog post is curated by Igor Kibalchich, ML Research Product Manager at Google AI