Author Archives: Google Developers

Bringing artworks to life with AR

Posted by Richard Adem, UX Engineer at Google Arts & Culture

What is Art Filter?

One of the best ways to learn about global culture is by trying on famous art pieces using Google’s Augmented Reality technology on your mobile device. What does it feel like to wear a three thousand year old necklace, put on a sixteenth century Japanese helmet or don pearl earrings and pose in a Vermeer?

Google Arts & Culture have created a new feature called Art Filter allowing everyone to learn about culturally significant art pieces from around the world and put themselves inside famous paintings, normally safely displayed in a museum.

We teamed up with the MediaPipe team, which offers cross-platform, customizable ML solutions to combine ML with rendering to generate stunning visuals.

Working closely with the MediaPipe team to utilize their face mesh and 3D face transform allowed us to create custom effects for each of the artifacts we had chosen, and easily display them on as part of the Google Arts & Culture iOS and Android app.

gif of the art filter feature

Figure 1. The Art Filter feature.

The Challenges

We selected five iconic cultural treasures from around the world:

Given their diverse formats or textures each artwork or object required special approaches to bring it to life in AR.

gif of user wearing jewelry on art filter feature

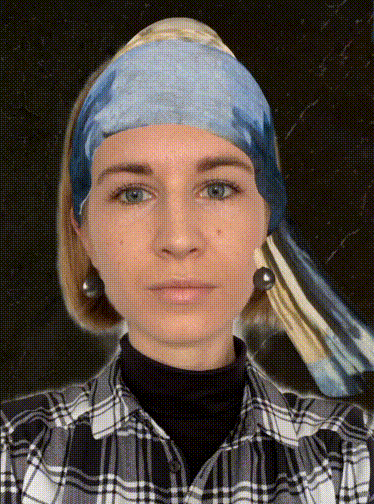
Figure 2. User wearing the jewelry from Johannes Vermeer's "Girl with a Pearl Earring" - Mauritshuis museum, Hague.

Creating 3D objects that can be viewed from all sides, using 2D references.

Some of the artwork we selected are 2D paintings and we wanted everyone to immerse themselves in the paintings. Our team of 3D artists and designers took high resolution gigapixel images from Google Arts & Culture and projected them onto 3D meshes to texture them. We also extended the 2D textures all the way around the 3D meshes while maintaining the style of the original artist. This means that when you turn your head the previously hidden parts of the piece are viewable from every angle, mimicking how the object would look in real-life.

Gif of the Van Gogh Self-Portrait filter

Figure 3. The Van Gogh Self-Portrait filter - Musée d’Orsay, Paris.

Our cultural partners were immensely helpful during the creation of Art Filter. They have sourced a huge amount of reference images allowing us to reproduce the pieces accurately using photographs from different angles, to help them appear to fit into the “real world” in AR (using size comparisons).

Layering elements of the effect along with the image of the user.

Art Filter takes an image of the user from their device’s camera and uses that to generate a 3D mesh of the user’s face. All processing of user images or video feeds is run entirely on device. We do not use this feature to identify or collect any personal biometric data; the feature cannot be used to identify an individual.

The image is then reused to texture the face mesh, generated in real-time on-device with MediaPipe Face Mesh, representing it in the virtual 3D world within the device. We then add virtual 2D and 3D layers around the face to complete the effect. The Tengu Helmet, for example, sits on top of the face mesh in 3D and is “attached” to the face mesh so it moves around when the user moves their head around. The Vermeer earrings with a headscarf and Frida Kahlo’s necklace are attached to the user’s image in a similar way. The Van Gogh effect works slightly differently since we still use a mesh of the user’s face but this time we apply a texture from the painting.

We use 2D elements to complete the scene as well, such as the backgrounds in the Kahlo and Van Gogh paintings. These were created by carefully separating the painting subjects from the background then placing them behind the user in 3D. You may notice that Van Gogh’s body is also 2D, shown as a “billboard” so that it always faces the camera.

Figure 4. Creating the 3D mesh showing layers and masks.

Figure 4. Creating the 3D mesh showing layers and masks.

Using shaders for different materials such as the metal helmet.

To create a realistic looking material we used “Physically Based” Rendering shaders. You can see this on the Tengu helmet, it has a bumpy surface that is affected by the real life light captured by the device. This requires creating extra textures, texture maps, for the effect that uses colors to represent how bumpy or shiny the 3D object should appear. Texture maps look like bright pink and blue images but tell the renderer about tiny details on the surface of the object without creating any extra polygons, which can slow down the frame rate of the feature.

Figure 5. User wearing Helmet with Tengu Mask and Crows - The Metropolitan Museum of Art

Figure 5. User wearing Helmet with Tengu Mask and Crows - The Metropolitan Museum of Art.

Conclusion

We hope you enjoy the collection we have created in Art Filter. Please visit and try for yourself! You can also explore more amazing ML features with Google Arts & Culture such as Art Selfie and Art Transfer.

We hope to bring many more filters to the feature and are looking forward to new features from MediaPipe.

Google updates Passes API to store COVID vaccination and testing information on Android devices

Posted by Irfan Faizullabhoy

Google has updated its Passes API to enable a simple and secure way to store and access COVID vaccination and test cards on Android devices. Starting today, developers from healthcare organizations, government agencies and organizations authorized by public health authorities to distribute COVID vaccines and/or tests will have access to these APIs to create a digital version of COVID vaccination or test information. This will roll out initially in the United States followed by other countries.

Image of three smart phones side by side showing Covid vaccination cards

Example COVID Cards from Healthvana, a company serving Los Angeles County

Once a user stores the digital version of the COVID Card to their device, they will be able to access it via a shortcut on their device home screen, even when they are offline or in areas that have weak internet service. To use this feature, the device needs to run Android 5 or later and be Play Protect certified. Installing the Google Pay app is not a requirement to access COVID Cards.

The COVID Card has been designed with privacy and security at its core.

  • Storing information: The user’s COVID vaccination and test information is stored on their Android device. If a user wants to access this information on multiple devices, the user will need to manually store it on each device. Google does not retain a copy of the user’s COVID vaccination or test information.
  • Sharing information: Users can choose to show their COVID Card to others. The information in the user’s COVID Card is not shared by Google with its various services or third parties and it is not used for targeting ads.
  • Securing information: A lock screen is required in order to store a COVID Card on a device. This is for added security and to protect the user’s personal information. When a user wants to access their COVID Card, they will be asked for the password, pin or biometric method set up for their Android device.

If you are a qualified provider, please sign up to share your interest here. And, for more information about COVID cards and their privacy and security features, please see the help center.

What do you think?

Do you have any questions? Let us know in the comments below or tweet using #AskGooglePayDevs and follow us @GooglePayDevs.

Upcoming security changes to Google’s OAuth 2.0 authorization endpoint in embedded webviews

Posted by Badi Azad, Group Product Manager (@badiazad)

The Google Identity team is continually working to improve Google Account security and create a safer and more secure experience for our users. As part of that work, we recently introduced a new secure browser policy prohibiting Google OAuth requests in embedded browser libraries commonly referred to as embedded webviews. All embedded webviews will be blocked starting on September 30, 2021.

Embedded webview libraries are problematic because they allow a nefarious developer to intercept and alter communications between Google and its users by acting as a "man in the middle." An application embedding a webview can modify or intercept network requests, insert custom scripts that can potentially record every keystroke entered in a login form, access session cookies, or alter the content of the webpage. These libraries also allow the removal of key elements of a browser that hold user trust, such as the guarantee that the response originates from Google's servers, display of the website domain, and the ability to inspect the security of a connection. Additionally the OAuth 2.0 for Native Apps guidelines from IETF require that native apps must not use embedded user-agents such as webviews to perform authorization requests.

Embedded webviews not only affect account security, they could affect usability of your application. The sandboxed storage environment of an embedded webview disconnects a user from the single sign-on features they expect from Google. A full-featured web browser supports multiple tools to help a logged-out user quickly sign-in to their account including password managers and Web Authentication libraries. Google's users also expect multiple-step login processes, including two-step verification and child account authorizations, to function seamlessly when a login flow involves multiple devices, when switching to another app on the device, or when communicating with peripherals such as a security key.

Instructions for impacted developers

Developers must register an appropriate OAuth client for each platform (Desktop, Android, iOS, etc.) on which your app will run, in compliance with Google's OAuth 2.0 Policies. You can verify the OAuth client ID used by your installed application is the most appropriate choice for your platform by visiting the Google API Console's Credentials page. A "Web application" client type in use by an Android application is an example of mismatched use. Reference our OAuth 2.0 for Mobile & Desktop Apps guide to properly integrate the appropriate client for your app's platform.

Applications opening all links and URLs inside an embedded webview should follow the following instructions for Android, iOS, macOS, and captive portals:

Android

Embedded webviews implementing or extending Android WebView do not comply with Google's secure browser policy for its OAuth 2.0 Authorization Endpoint. Apps should allow general, third-party links to be handled by the default behaviors of the operating system, enabling a user's preferred routing to their chosen default web browser or another developer's preferred routing to its installed app through Android App Links. Apps may alternatively open general links to third-party sites in Android Custom Tabs.

iOS & macOS

Embedded webviews implementing or extending WKWebView, or the deprecated UIWebView, do not comply with Google's secure browser policy for its OAuth 2.0 Authorization Endpoint. Apps should allow general, third-party links to be handled by the default behaviors of the operating system, enabling a user's preferred routing to their chosen default web browser or another developer's preferred routing to its installed app through Universal Links. Apps may alternatively open general links to third-party sites in SFSafariViewController.

Captive portals

If your computer network intercepts network requests, redirecting to a web portal supporting authorization with a Google Account, your web content could be displayed in an embedded webview controlled by a captive network assistant. You should provide potential viewers instructions on how to access your network using their default web browser. For more information reference the Google Account Help article Sign in to a Wi-Fi network with your Google Account.

New IETF standards adopted by Android and iOS may help users access your captive pages in a full-featured web browser. Captive networks should integrate Captive-Portal Identification in DHCP and Router Advertisements (RAs) proposed IETF standard to inform clients that they are behind a captive portal enforcement device when joining the network, rather than relying on traffic interception. Networks should also integrate the Captive Portal API proposed IETF standard to quickly direct clients to a required portal URL to access the Internet. For more information reference Captive portal API support for Android and Apple's How to modernize your captive network developer articles.

Test for compatibility

If you're a developer that currently uses an embedded webview for Google OAuth 2.0 authorization flows, be aware that embedded webviews will be blocked as of September 30, 2021. To verify whether the authorization flow launched by your application is affected by these changes, test your application for compatibility and compliance with the policies outlined in this post.

You can add a query parameter to your authorization request URI to test for potential impact to your application before September 30, 2021. The following steps describe how to adjust your current requests to Google's OAuth 2.0 Authorization Endpoint to include an additional query parameter for testing purposes.

  1. Go to where you send requests to Google's OAuth 2.0 Authorization Endpoint. Example URI: https://accounts.google.com/o/oauth2/v2/auth
  2. Add the disallow_webview parameter with a value of true to the query component of the URI. Example: disallow_webview=true

An implementation affected by the planned changes will see a disallowed_useragent error when loading Google's OAuth 2.0 Authorization Endpoint, with the disallow_webview=true query string, in an embedded webview instead of the authorization flows currently displayed. If you do not see an error message while testing the effect of the new embedded webview policies your app's implementation might not be impacted by this announcement.

Note: A website's ability to request authorization from a Google Account may be impacted due to another developer's decision to use an embedded webview in their app. For example, if a messaging or news application opens links to your site in an embedded webview, the features available on your site, including Google OAuth 2.0 authorization flows, may be impacted. If your site or app is impacted by the implementation choice of another developer please contact that developer directly.

User-facing warning message

A warning message may be displayed in non-compliant authorization requests after August 30, 2021. The warning message will include the user support email defined in your project's OAuth consent screen in Google API Console and direct the user to visit our Sign in with a supported browser support article.

A screenshot showing an example Google OAuth authorization dialog including a warning message: To help protect your account, Google will soon block apps that don't comply with Google's embedded webview policy. You can let the app developer (moo@gmail.com) know that this app should stop using embedded webviews

Developers may acknowledge the upcoming enforcement and suppress the warning message by passing a specific query parameter to the authorization request URI. The following steps explain how to adjust your authorization requests to include the acknowledgement parameter:

  1. Go to where you send requests to Google's OAuth 2.0 Authorization Endpoint. Example URI: https://accounts.google.com/o/oauth2/v2/auth
  2. Add an ack_webview_shutdown parameter with a value of the enforcement date: 2021-09-30. Example: ack_webview_shutdown=2021-09-30

A successful request to Google's OAuth 2.0 Authorization Endpoint including the acknowledgement query parameter and enforcement date will suppress the warning message in non-compliant authorization requests. All non-compliant authorization requests will display a disallowed_useragent error when loading Google's OAuth 2.0 Authorization Endpoint after the enforcement date.

Related content

With 1,600 students by his side, Jack Lee grew the largest Google Developer Student Club in the world

Posted by Noa Havazelet, Program Manager, Google Developer Student Clubs, UK & Ireland

With 1,600 students by his side, Jack Lee grew the largest Google Developer Student Club in the world in just 6 months at the London School of Economics (LSE). A life-long athlete, who loves leading teams, Jack saw that reigniting his university’s GDSC would be a great opportunity to have a large impact on the local tech scene. With a heavy focus on partnerships, Jack connected members of his club with leaders at top companies and other student groups across Scotland, France, Norway, Canada, and Nigeria. These collaborations enabled students to practice networking, while gaining access to key internships.

Learn more about Jack and his club below.

Image of Jack Lee

Image of Jack Lee speaking at a GDSC event

Student-to-student mentorship with impact

Leaders like Jack Lee make Google Developer Student Clubs around the world special by providing a trusted and fun space for student-to-student mentorship. When students step up to help their peers, a strong camaraderie and support system forms beyond the classroom.

One of the secrets to Jack’s success was to appeal to both computer science students as well as those with a non-technical background, like business majors. To inspire more students with different backgrounds to join the club, Jack put together a team of additional student leaders. Under his leadership, this team had the freedom to independently build tech-focused events that would interest students across the university.

Image of GDSC LSE team

After the first semester, Jack’s approach was working. They hosted over 80 events, covering a wide range of topics including front end web development and career talks with financial firms.

The intersection of students with different backgrounds inspired club members to work together on community projects, utilizing their different skills. In fact, a few club members formed teams to solve for one of the United Nations 17 Sustainable Development Goals. As part of the Google Developer Student Clubs 2021 Solution Challenge, students from the London School of Economics developed prototype solutions for NGOs on 1) wildfire analysis using TensorFlow, 2) raising donations and grant access, and 3) increasing voter registrations.

As more students continued to join their GDSC, Jack decided to up the tempo to keep the momentum going.

Connecting students to companies

Since the London School of Economics is not only a tech-focused university, Jack requested support from a team at Google for Startups. Together they reached out to some of the world’s largest firms and startups to collaborate on events and specialized programs for the student club. Jack’s GDSC established relationships with 6 partners, and 3 local sponsors from startups, NGOs, and financial firms. All these partners contributed to nearly 30 events throughout the academic year, which included:

  • Introductory Python courses
  • Mentorship sessions
  • Networking events
  • Talks with CEOs
  • Panel talks across industries

These events started catching the attention of students across Europe and Asia, with some students who could not afford to attend university reaching out for technical learning resources and opportunities.

Connecting 150 students to mentors from different startups is one of the achievements that makes Jack and the club leaders most proud.

This is yet another example of how Jack’s determination to grow a stronger community led him to build a global Google Developer Student Club that left a profound impact on his fellow students.

If you’re also a student and want to join a Google Developer Student Club community like this, find one near you here.

Pride Week with Google Developer Group Floripa

Posted by Rodrigo Akira Hirooka, Program Manager, Google Developer Groups Latin America

Lorena Locks is on a mission to grow the LGBTQIA+ tech community in Brazil. Her inspiration came from hosting Google Developer Group (GDG) Floripa meetups with her friend Catarina, where they were able to identify a need in their community.

We felt there wasn't a forum to meet people in the tech industry that reflected ourselves. So we decided to think bigger.”

Image from GDG Floripa event

Image from GDG Floripa event

Pride Week at GDG Floripa, Brazil

As a Women Techmakers Ambassador and Google Developer Group lead in Floripa, Brazil, Lorena worked with the local community to create a week of special events, including over 12 talks and sessions centered on empowering the LGBTQIA+ experience in tech.

The events took place every night at 7pm from June 21st - 25th and focused on creating inclusive representation and building trust among developer communities.

Lorena’s commitment to this underrepresented group gained the attention of many local leaders in tech who identify as LGBTQIA+ and volunteered as speakers during Pride Week.

By creating spaces to talk about important LGBTQIA+ topics in tech, Pride Week with Google Developer Groups Floripa included sessions on:

  • Spotting binary designs in products
  • How to build inclusive tech teams
  • Being an LGBTQIA+ manager
  • Developing 'Nohs Somos' an app for the LGBTQIA+ community
  • The best practices for D&I
  • General Personal Data Protection Law and inclusive gender questions on forms
Image from event

Speakers in photo: Lorena Locks and Catarina Schein

With one-hundred percent of the speakers at these events coming from the LGTBQIA+ community, Pride Week at GDG Floripa was a high impact program that has gone on to inspire GDGs around the world.

If you want to learn more about how to get involved in Google Developer Group communities like this one, visit the site here.

Developer updates from Coral

Posted by The Coral Team

We're always excited to share updates to our Coral platform for building edge ML applications. In this post, we have some interesting demos, interfaces, and tutorials to share, and we'll start by pointing you to an important software update for the Coral Dev Board.

Important update for the Dev Board / SoM

If you have a Coral Dev Board or Coral SoM, please install our latest Mendel update as soon as possible to receive a critical fix to part of the SoC power configuration. To get it, just log onto your board and install the update as follows:

Dev Board / Som

This will install a patch from NXP for the Dev Board / SoM's SoC, without which it's possible the SoC will overstress and the lifetime of the device could be reduced. If you recently flashed your board with the latest system image, you might already have this fix (we also updated the flashable image today), but it never hurts to fetch all updates, as shown above.

Note: This update does not apply to the Dev Board Mini.


Manufacturing demo

We recently published the Coral Manufacturing Demo, which demonstrates how to use a single Coral Edge TPU to simultaneously accomplish two common manufacturing use-cases: worker safety and visual inspection.

The demo is designed for two specific videos and tasks (worker keepout detection and apple quality grading) but it is designed to be easily customized with different inputs and tasks. The demo, written in C++, requires OpenGL and is primarily targeted at x86 systems which are prevalent in manufacturing gateways – although ARM Cortex-A systems, like the Coral Dev Board, are also supported.

demo image

Web Coral

We've been working hard to make ML acceleration with the Coral Edge TPU available for most popular systems. So we're proud to announce support for WebUSB, allowing you to use the Coral USB Accelerator directly from Chrome. To get started, check out our WebCoral demo, which builds a webpage where you can select a model and run an inference accelerated by the Edge TPU.

 Edge TPU

New models repository

We recently released a new models repository that makes it easier to explore the various trained models available for the Coral platform, including image classification, object detection, semantic segmentation, pose estimation, and speech recognition. Each family page lists the various models, including details about training dataset, input size, latency, accuracy, model size, and other parameters, making it easier to select the best fit for the application at hand. Lastly, each family page includes links to training scripts and example code to help you get started. Or for an overview of all our models, you can see them all on one page.

Models, trained TensorFlow models for the Edge TPU

Transfer learning tutorials

Even with our collection of pre-trained models, it can sometimes be tricky to create a task-specific model that's compatible with our Edge TPU accelerator. To make this easier, we've released some new Google Colab tutorials that allow you to perform transfer learning for object detection, using MobileDet and EfficientDet-Lite models. You can find these and other Colabs in our GitHub Tutorials repo.

We are excited to share all that Coral has to offer as we continue to evolve our platform. Keep an eye out for more software and platform related news coming this summer. To discover more about our edge ML platform, please visit Coral.ai and share your feedback at [email protected].

Apply now for Google for Startups Accelerator: Women Founders

Posted by Ashley Francisco

Women Founders apply now header

The Google for Startups Accelerator: Women Founders program is now open for applications until July 19.

Last year, we launched the inaugural Google for Startups Accelerator: Women Founders program in North America to help women-led startups identify and solve technical challenges while scaling their companies. The inaugural cohort also received tailored programming to address some of the longstanding barriers that women founders face.

Women founders remain underrepresented in the tech startup ecosystem because they often lack access to the resources needed to start, build, and grow their businesses. The COVID-19 pandemic exacerbated these structural barriers by disproportionately impacting women in the workforce—and research shows women were more vulnerable to the economic effects of COVID-19 because of existing gender disparities.

For women founders, access to capital is one of the major challenges to launching their business. A recent report showed women-led startups received a mere 2.3% of global venture capitalist funding in 2020, falling from 2.8% the year before.

The Google for Startups Accelerator: Women Founders program aims to help bridge the gap and create opportunities for women founders to succeed. Beyond mentorship and technical project support, the accelerator also includes deep dives and workshops focused on product design, customer acquisition, and leadership development for founders. Participants will also hear from a roster of speakers and facilitators who deliver both technical and nontechnical programming for women-led startups.

Applications for the second Google for Startups Accelerator: Women Founders program are now open until July 19, for North American applicants. Approximately 10-12 startups with at least one woman founder will be selected from across North America. The accelerator runs from September through to December 2021.

To learn more about the program and to apply, visit the website.

Introducing "Serverless Migration Station" Learning Modules

Posted by Wesley Chun (@wescpy), Developer Advocate, Google Cloud
graphic showing movement with arrows,. settings, lines, and more

Helping users modernize their serverless apps

Earlier this year, the Google Cloud team introduced a series of codelabs (free, online, self-paced, hands-on tutorials) designed for technical practitioners modernizing their serverless applications. Today, we're excited to announce companion videos, forming a set of "learning modules" made up of these videos and their corresponding codelab tutorials. Modernizing your applications allows you to access continuing product innovation and experience a more open Google Cloud. The initial content is designed with App Engine developers in mind, our earliest users, to help you take advantage of the latest features in Google Cloud. Here are some of the key migrations and why they benefit you:

  • Migrate to Cloud NDB: App Engine's legacy ndb library used to access Datastore is tied to Python 2 (which has been sunset by its community). Cloud NDB gives developers the same NDB-style Datastore access but is Python 2-3 compatible and allows Datastore to be used outside of App Engine.
  • Migrate to Cloud Run: There has been a continuing shift towards containerization, an app modernization process making apps more portable and deployments more easily reproducible. If you appreciate App Engine's easy deployment and autoscaling capabilities, you can get the same by containerizing your App Engine apps for Cloud Run.
  • Migrate to Cloud Tasks: while the legacy App Engine taskqueue service is still available, new features and continuing innovation are going into Cloud Tasks, its standalone equivalent letting users create and execute App Engine and non-App Engine tasks.


The "Serverless Migration Station" videos are part of the long-running Serverless Expeditions series you may already be familiar with. In each video, Google engineer Martin Omander and I explore a variety of different modernization techniques. Viewers will be given an overview of the task at hand, a deeper-dive screencast takes a closer look at the code or configuration files, and most importantly, illustrates to developers the migration steps necessary to transform the same sample app across each migration.

Sample app

The baseline sample app is a simple Python 2 App Engine NDB and webapp2 application. It registers every web page visit (saving visiting IP address and browser/client type) and displays the most recent queries. The entire application is shown below, featuring Visit as the data Kind, the store_visit() and fetch_visits() functions, and the main application handler, MainHandler.


import os
import webapp2
from google.appengine.ext import ndb
from google.appengine.ext.webapp import template

class Visit(ndb.Model):
'Visit entity registers visitor IP address & timestamp'
visitor = ndb.StringProperty()
timestamp = ndb.DateTimeProperty(auto_now_add=True)

def store_visit(remote_addr, user_agent):
'create new Visit entity in Datastore'
Visit(visitor='{}: {}'.format(remote_addr, user_agent)).put()

def fetch_visits(limit):
'get most recent visits'
return (v.to_dict() for v in Visit.query().order(
-Visit.timestamp).fetch(limit))

class MainHandler(webapp2.RequestHandler):
'main application (GET) handler'
def get(self):
store_visit(self.request.remote_addr, self.request.user_agent)
visits = fetch_visits(10)
tmpl = os.path.join(os.path.dirname(__file__), 'index.html')
self.response.out.write(template.render(tmpl, {'visits': visits}))

app = webapp2.WSGIApplication([
('/', MainHandler),
], debug=True)

Baseline sample application code

Upon deploying this application to App Engine, users will get output similar to the following:

image of a website with text saying VisitMe example

VisitMe application sample output

This application is the subject of today's launch video, and the main.py file above along with other application and configuration files can be found in the Module 0 repo folder.

Next steps

Each migration learning module covers one modernization technique. A video outlines the migration while the codelab leads developers through it. Developers will always get a starting codebase ("START") and learn how to do a specific migration, resulting in a completed codebase ("FINISH"). Developers can hit the reset button (back to START) if something goes wrong or compare their solutions to ours (FINISH). The hands-on experience helps users build muscle-memory for when they're ready to do their own migrations.

All of the migration learning modules, corresponding Serverless Migration Station videos (when published), codelab tutorials, START and FINISH code, etc., can all be found in the migration repo. While there's an initial focus on Python 2 and App Engine, you'll also find content for Python 3 users as well as non-App Engine users. We're looking into similar content for other legacy languages as well so stay tuned. We hope you find all these resources helpful in your quest to modernize your serverless apps!

Add dialogs and slash commands to your Google Workspace Chat bots

Posted by Charles Maxson, Developer Advocate


Developing your own custom Google Chat bot is a great way for users and teams to interact with your solutions and services both directly and within context as they collaborate in Chat. More specifically, Chat bots can be used in group conversations to streamline workflows, assist with activities in the context of discussions, and provide information and notifications in real time. Chat bots can also be used in direct messages, offering a new way to optimize workflows and personal productivity, such as managing project tasks or reporting time activity. Because use cases for bots are varied, you can consistently reach a growing audience of Chat users over time, directly where they work and uh-hum, chat.

Once you’ve identified your specific use case for your custom Chat bot, how you design the bot itself is super important. Bots that are intuitive and easy to use see better adoption and develop a more loyal following. Those that are not as fluid or approachable, or come across as confusing and complicated to use, will likely miss the mark of becoming an essential “sticky” tool even if your back end is compelling. To help you build an engaging, must-have Google Chat bot, we recently added a one-two feature punch to the Chat bot framework that allows you to build a much richer bot experience than ever before!

(Re)Introducing slash commands for Google Chat bots

The first new(er) feature that you can leverage to enhance the usability of your Chat bots are slash commands. Released a few months back, slash commands simplify the way users interact with your Chat bot, offering them a visual leading way to discover and execute your bot’s primary features. Unlike bots created prior to slash commands, where users had to learn what features a bot offered and then invoke the bot and type the command correctly to execute them, slash commands make Chat bot usage faster and help users get the most out of your bot.

Users can now simply type “/” in the message line to reveal a list of all the functions offered by the bots available to the room or direct message, and select the one to their liking to execute it. Slash commands can be invoked standalone (e.g. /help) or include user added text as parameters (e.g. /new_task review project doc ) that the developer can handle when invoked. To help make bot command discovery even simpler, the slash commands list filters matching commands once the user starts typing beyond the / (e.g. “/h” shows all commands beginning with H). This is super helpful as more and more bots are added to a room, and as more bots with slash commands are introduced by developers. Also included directly in the Slash Command UI is a description of what each command does (up to 50 characters), easing the guesswork out of learning.

Example of implementing slashbot in Google Chat

As a developer, slash commands are straightforward to implement, and daresay essential in offering a better bot experience. In fact, if you have an existing Google Chat bot you’ve built and deployed, it’s likely more than worthwhile to revise your bot to include slash commands in an updated release.

To add slash commands to any Chat bot, you will need to register your commands in the Hangouts Chat API configuration page. (e.g. https://console.cloud.google.com/apis/api/chat.googleapis.com/hangouts-chat?project=<?yourprojectname?>) There is a section for slash commands that allows you to provide the /name and the description the user will see, along with the important Command Id unique identifier (a number between 1-1000) that you will later need to handle these events in your code.

Example of editing slash command

When a user invokes your bot via a Slash Command, there is a slashCommand field attached to the message sent to the bot that indicates the call was initiated from a Slash Command. Remember users can still @mention your bot to call it directly by name without a / command and this helps you distinguish the difference. The message also includes the corresponding commandId for the invoked command based on what you set up in the bot configuration page, allowing you to identify the user’s requested command to execute. Finally, the message also offers additional annotations about the event and includes any argumentText supplied by the user already parsed from the command text itself.

{
...
"message": {
"slashCommand": {
"commandId": 4
},
"annotations": [
{
"length": 6,
"slashCommand": {
"type": "INVOKE",
"commandId": 4,
"bot": {
"type": "BOT",
"displayName": "Slashbot"
},
"commandName": "/debug"
},
"type": "SLASH_COMMAND"
}
],
...
"argumentText": " show code",
"text": "/debug show code",
...
}

Here is a simple example used to determine if a Slash Command was invoked by the user, and if so, runs the requested command identified by its Command Id.

function onMessage(event) {

if (event.message.slashCommand) {

switch (event.message.slashCommand.commandId) {
case 1: // Command Id 1
return { 'text': 'You called commandId 1' }

case 2: // Command Id 2
return { 'text': 'You called commandId 2' }

case 3: // Help
return { 'text': 'You asked for help' }

}
}
}

Introducing dialogs for Google Chat bots

The second part of the one-two punch of new Google Chat bots features are dialogs. This is a brand new capability being introduced to the Chat bot framework that allows developers to build user interfaces to capture inputs and parameters in a structured, reliable way. This is a tremendous step forward for bot usability because it will simplify and streamline the process of users interacting with bot commands. Now with dialogs, users can be led visually to supply inputs via prompts, versus having to rely on wrapping bot commands with natural language inputs -- and hoping they correctly executed syntax the bot could decipher.

For developers, you can design UIs that are targeted to work precisely with the inputs you need users to supply your commands, without having to parse out arguments and logically infer the intent of users. In the end, dialogs will greatly expand the type of solution patterns and use cases that Chat bots can handle, as well as making the experience truly richer and more rewarding for users and developers alike.

Slashbot project notifier

Technically, Chat bot dialogs leverage the aforementioned slash commands combined with the existing Google Workspace Add-on Card framework to support the creation and handling of dialogs. To get started, you create a Slash Command that will invoke your dialog by designating it’s Slash command triggers a dialog setting to true in the Slash Command configuration process, as seen below:

Example of enabling the slash command triggers a dialog setting

Once you have configured a Slash Command to trigger a dialog, it will send an onMessage event when it’s invoked as it would before, but now it includes new details that indicate it is representing a dialog request. To handle this event you can use the example above with non-dialog Slash Command, using the commandId you can use a switch to determine what the user requested.

Designing the actual elements that the dialog renders is where you draw from the Google Workspace Add-on Card-based framework. If you’ve built a new generation of Google Workspace Add-on, this part will be familiar where you construct widgets, add headers and sections, create events, etc. In fact, you can even reuse or share some of your Add-on UIs within your Chat bots, but do note there currently is a lighter subset of elements available for bots. The benefits of using Cards allows you to build modern, consistently-styled user interfaces for your bots that doesn’t require that you get bogged down in low level details like managing tags or CSS. You can learn more about working with Cards starting here. To make building your Cards-based interfaces for Add-ons and Chat bots even easier, we have also just introduced the GWAO Card Builder tool, which employs a drag-n-drop visual designer to boost your development efforts.

Once you’ve assembled your Card’s widgets, to make it render as a dialog when invoked you must specify that its a DIALOG type within the action_response as seen stubbed out here below:

{
"action_response": {
"type": "DIALOG",
"dialog_action": {
"dialog": {
"body": {
"sections": [
{
"widgets": [
{
"textInput": {
"label": "Email",
"type": "SINGLE_LINE",
"name": "fieldEmail",
"hintText": "Add others using a comma separator",
...

Now with a working dialog, all there is left to do is handle user events once it's displayed. Again this is similar to how you would handle events working with Cards within Add-ons. Your bot will receive an event that is type CARD_CLICKED with a DialogEventType set to SUBMIT_DIALOG. The actionMethodName value will let you know what element the user clicked to process the request, e.g. ‘assign’ as depicted below. The response includes the formInputs details which are the user provided inputs returned from the dialog, which you can process as your solution needs to.

{ dialogEventType: 'SUBMIT_DIALOG',
type: 'CARD_CLICKED',
action: { actionMethodName: 'assign' },
...
common:
{ hostApp: 'CHAT',
formInputs:
{ 'whotochoose-dropdown': [Object],
whotochoose: [Object],
email: [Object] },
invokedFunction: 'assign' },
isDialogEvent: true }

Once your bot is finished processing its task, it can respond back to the user in one of two ways. The first is with a simple acknowledgement (aka OK) response letting them know their action was handled correctly and close out the dialog.

{
"action_response": {
"type": "DIALOG",
"dialog_action": {
"action_status": "OK",
...

The other option is to respond with another dialog, allowing you to follow-up with a new or revised dialog useful for complex or conditional input scenarios. This is accomplished as it was originally when you called a dialog using a dialog card within an ActionResponse to get started.

{
"action_response": {
"type": "DIALOG",
"dialog_action": {
"dialog": {
...

Next Steps

To get started building Google Workspace Chat bots, or to add slash commands and dialogs to your existing Chat bots, please explore the following resources: