Posted by Charles Maxson, Developer Advocate
Developing your own custom Google Chat bot is a great way for users and teams to interact with your solutions and services both directly and within context as they collaborate in Chat. More specifically, Chat bots can be used in group conversations to streamline workflows, assist with activities in the context of discussions, and provide information and notifications in real time. Chat bots can also be used in direct messages, offering a new way to optimize workflows and personal productivity, such as managing project tasks or reporting time activity. Because use cases for bots are varied, you can consistently reach a growing audience of Chat users over time, directly where they work and uh-hum, chat.
Once you’ve identified your specific use case for your custom Chat bot, how you design the bot itself is super important. Bots that are intuitive and easy to use see better adoption and develop a more loyal following. Those that are not as fluid or approachable, or come across as confusing and complicated to use, will likely miss the mark of becoming an essential “sticky” tool even if your back end is compelling. To help you build an engaging, must-have Google Chat bot, we recently added a one-two feature punch to the Chat bot framework that allows you to build a much richer bot experience than ever before!
(Re)Introducing slash commands for Google Chat bots
The first new(er) feature that you can leverage to enhance the usability of your Chat bots are slash commands. Released a few months back, slash commands simplify the way users interact with your Chat bot, offering them a visual leading way to discover and execute your bot’s primary features. Unlike bots created prior to slash commands, where users had to learn what features a bot offered and then invoke the bot and type the command correctly to execute them, slash commands make Chat bot usage faster and help users get the most out of your bot.
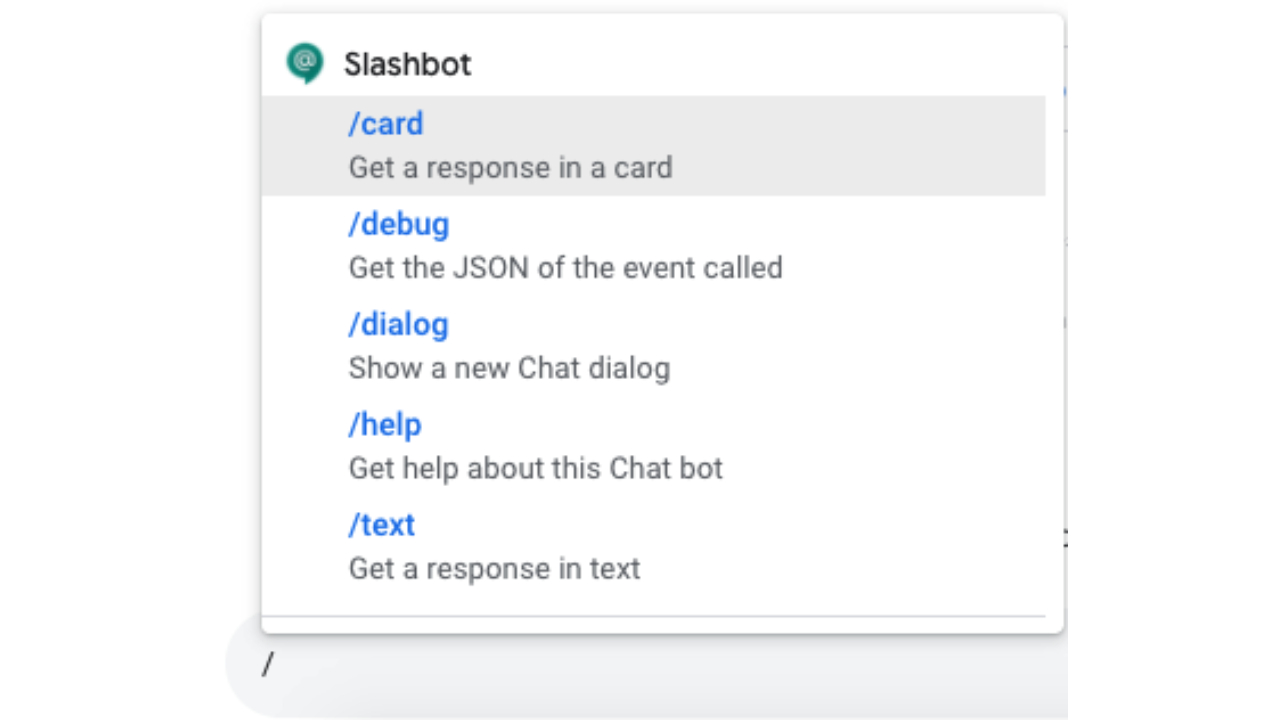
Users can now simply type “/” in the message line to reveal a list of all the functions offered by the bots available to the room or direct message, and select the one to their liking to execute it. Slash commands can be invoked standalone (e.g. /help) or include user added text as parameters (e.g. /new_task review project doc ) that the developer can handle when invoked. To help make bot command discovery even simpler, the slash commands list filters matching commands once the user starts typing beyond the / (e.g. “/h” shows all commands beginning with H). This is super helpful as more and more bots are added to a room, and as more bots with slash commands are introduced by developers. Also included directly in the Slash Command UI is a description of what each command does (up to 50 characters), easing the guesswork out of learning.
As a developer, slash commands are straightforward to implement, and daresay essential in offering a better bot experience. In fact, if you have an existing Google Chat bot you’ve built and deployed, it’s likely more than worthwhile to revise your bot to include slash commands in an updated release.
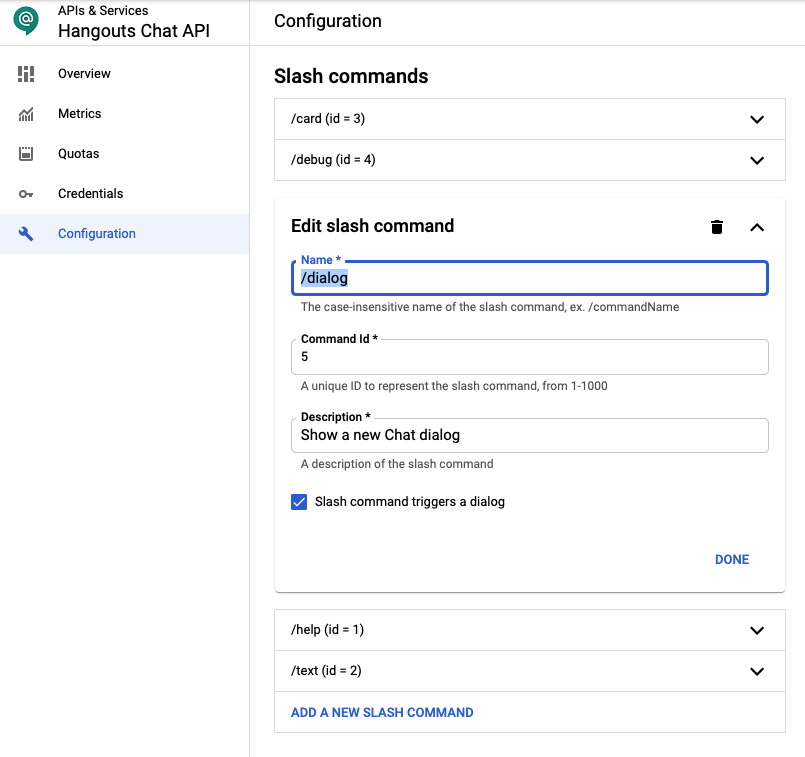
To add slash commands to any Chat bot, you will need to register your commands in the Hangouts Chat API configuration page. (e.g. https://console.cloud.google.com/apis/api/chat.googleapis.com/hangouts-chat?project=<?yourprojectname?>) There is a section for slash commands that allows you to provide the /name and the description the user will see, along with the important Command Id unique identifier (a number between 1-1000) that you will later need to handle these events in your code.
When a user invokes your bot via a Slash Command, there is a slashCommand field attached to the message sent to the bot that indicates the call was initiated from a Slash Command. Remember users can still @mention your bot to call it directly by name without a / command and this helps you distinguish the difference. The message also includes the corresponding commandId for the invoked command based on what you set up in the bot configuration page, allowing you to identify the user’s requested command to execute. Finally, the message also offers additional annotations about the event and includes any argumentText supplied by the user already parsed from the command text itself.
{
  ...
  "message": {
    "slashCommand": {
      "commandId": 4
    },
    "annotations": [
      {
        "length": 6,
        "slashCommand": {
          "type": "INVOKE",
          "commandId": 4,
          "bot": {
            "type": "BOT",
            "displayName": "Slashbot"
          },
          "commandName": "/debug"
        },
        "type": "SLASH_COMMAND"
      }
    ],
    ...
    "argumentText": " show code",
    "text": "/debug show code",
    ...
}
Here is a simple example used to determine if a Slash Command was invoked by the user, and if so, runs the requested command identified by its Command Id.
function onMessage(event) {

  if (event.message.slashCommand) {

    switch (event.message.slashCommand.commandId) {
      case 1: // Command Id 1
        return { 'text': 'You called commandId 1' }

      case 2: // Command Id 2
        return { 'text': 'You called commandId 2' }

      case 3: // Help
        return { 'text': 'You asked for help'  }

    }
  }
}
Introducing dialogs for Google Chat bots
The second part of the one-two punch of new Google Chat bots features are dialogs. This is a brand new capability being introduced to the Chat bot framework that allows developers to build user interfaces to capture inputs and parameters in a structured, reliable way. This is a tremendous step forward for bot usability because it will simplify and streamline the process of users interacting with bot commands. Now with dialogs, users can be led visually to supply inputs via prompts, versus having to rely on wrapping bot commands with natural language inputs -- and hoping they correctly executed syntax the bot could decipher.
For developers, you can design UIs that are targeted to work precisely with the inputs you need users to supply your commands, without having to parse out arguments and logically infer the intent of users. In the end, dialogs will greatly expand the type of solution patterns and use cases that Chat bots can handle, as well as making the experience truly richer and more rewarding for users and developers alike.
Technically, Chat bot dialogs leverage the aforementioned slash commands combined with the existing Google Workspace Add-on Card framework to support the creation and handling of dialogs. To get started, you create a Slash Command that will invoke your dialog by designating it’s Slash command triggers a dialog setting to true in the Slash Command configuration process, as seen below:
Once you have configured a Slash Command to trigger a dialog, it will send an onMessage event when it’s invoked as it would before, but now it includes new details that indicate it is representing a dialog request. To handle this event you can use the example above with non-dialog Slash Command, using the commandId you can use a switch to determine what the user requested.
Designing the actual elements that the dialog renders is where you draw from the Google Workspace Add-on Card-based framework. If you’ve built a new generation of Google Workspace Add-on, this part will be familiar where you construct widgets, add headers and sections, create events, etc. In fact, you can even reuse or share some of your Add-on UIs within your Chat bots, but do note there currently is a lighter subset of elements available for bots. The benefits of using Cards allows you to build modern, consistently-styled user interfaces for your bots that doesn’t require that you get bogged down in low level details like managing tags or CSS. You can learn more about working with Cards starting here. To make building your Cards-based interfaces for Add-ons and Chat bots even easier, we have also just introduced the GWAO Card Builder tool, which employs a drag-n-drop visual designer to boost your development efforts.
Once you’ve assembled your Card’s widgets, to make it render as a dialog when invoked you must specify that its a DIALOG type within the action_response as seen stubbed out here below:
{
  "action_response": {
  "type": "DIALOG",
  "dialog_action": {
    "dialog": {
      "body": {
        "sections": [
          {
           "widgets": [
             {
               "textInput": {
                 "label": "Email",
                 "type": "SINGLE_LINE",
                 "name": "fieldEmail",
                 "hintText": "Add others using a comma separator",
...
Now with a working dialog, all there is left to do is handle user events once it's displayed. Again this is similar to how you would handle events working with Cards within Add-ons. Your bot will receive an event that is type CARD_CLICKED with a DialogEventType set to SUBMIT_DIALOG. The actionMethodName value will let you know what element the user clicked to process the request, e.g. ‘assign’ as depicted below. The response includes the formInputs details which are the user provided inputs returned from the dialog, which you can process as your solution needs to.
{ dialogEventType: 'SUBMIT_DIALOG',
  type: 'CARD_CLICKED',
  action: { actionMethodName: 'assign' },
  ...
  common:
   { hostApp: 'CHAT',
     formInputs:
      { 'whotochoose-dropdown': [Object],
        whotochoose: [Object],
        email: [Object] },
     invokedFunction: 'assign' },
  isDialogEvent: true }
Once your bot is finished processing its task, it can respond back to the user in one of two ways. The first is with a simple acknowledgement (aka OK) response letting them know their action was handled correctly and close out the dialog.
{
    "action_response": {
      "type": "DIALOG",
      "dialog_action": {
        "action_status": "OK",
...
The other option is to respond with another dialog, allowing you to follow-up with a new or revised dialog useful for complex or conditional input scenarios. This is accomplished as it was originally when you called a dialog using a dialog card within an ActionResponse to get started.
{
  "action_response": {
  "type": "DIALOG",
  "dialog_action": {
    "dialog": {
...
Next Steps
To get started building Google Workspace Chat bots, or to add slash commands and dialogs to your existing Chat bots, please explore the following resources:


