Posted by Wesley Chun (@wescpy), Developer Advocate, Google Cloud
An optional migration
Serverless Migration Station is a mini-series from Serverless Expeditions focused on helping users on one of Google Cloud's serverless compute platforms modernize their applications. The video today demonstrates how to migrate a sample app from Cloud NDB (or App Engine ndb) to Cloud Datastore. While Cloud NDB suffices as a current solution for today's App Engine developers, this optional migration is for those who want to consolidate their app code to using a single client library to talk to Datastore.
Cloud Datastore started as Google App Engine's original database but matured to becoming its own standalone product in 2013. At that time, native client libraries were created for the new product so non-App Engine apps as well as App Engine second generation apps could access the service. Long-time developers have been using the original App Engine service APIs to access Datastore; for Python, this would be App Engine ndb. While the legacy ndb service is still available, its limitations and lack of availability in Python 3 are why we recommend users switch to standalone libraries like Cloud NDB in the preceding video in this series.
While Cloud NDB lets users break free from proprietary App Engine services and upgrade their applications to Python 3, it also gives non-App Engine apps access to Datastore. However, Cloud NDB's primary role is a transition tool for Python 2 App Engine developers. Non-App Engine developers and new Python 3 App Engine developers are directed to the Cloud Datastore native client library, not Cloud NDB.
As a result, those with a collection of Python 2 or Python 3 App Engine apps as well as non-App Engine apps may be using completely different libraries (ndb, Cloud NDB, Cloud Datastore) to connect to the same Datastore product. Following the best practices of code reuse, developers should consider consolidating to a single client library to access Datastore. Shared libraries provide stability and robustness with code that's constantly tested, debugged, and battle-proven. Module 2 showed users how to migrate from App Engine ndb to Cloud NDB, and today's Module 3 content focuses on migrating from Cloud NDB to Cloud Datastore. Users can also go straight from ndb directly to Cloud Datastore, skipping Cloud NDB entirely.
Migration sample and next steps
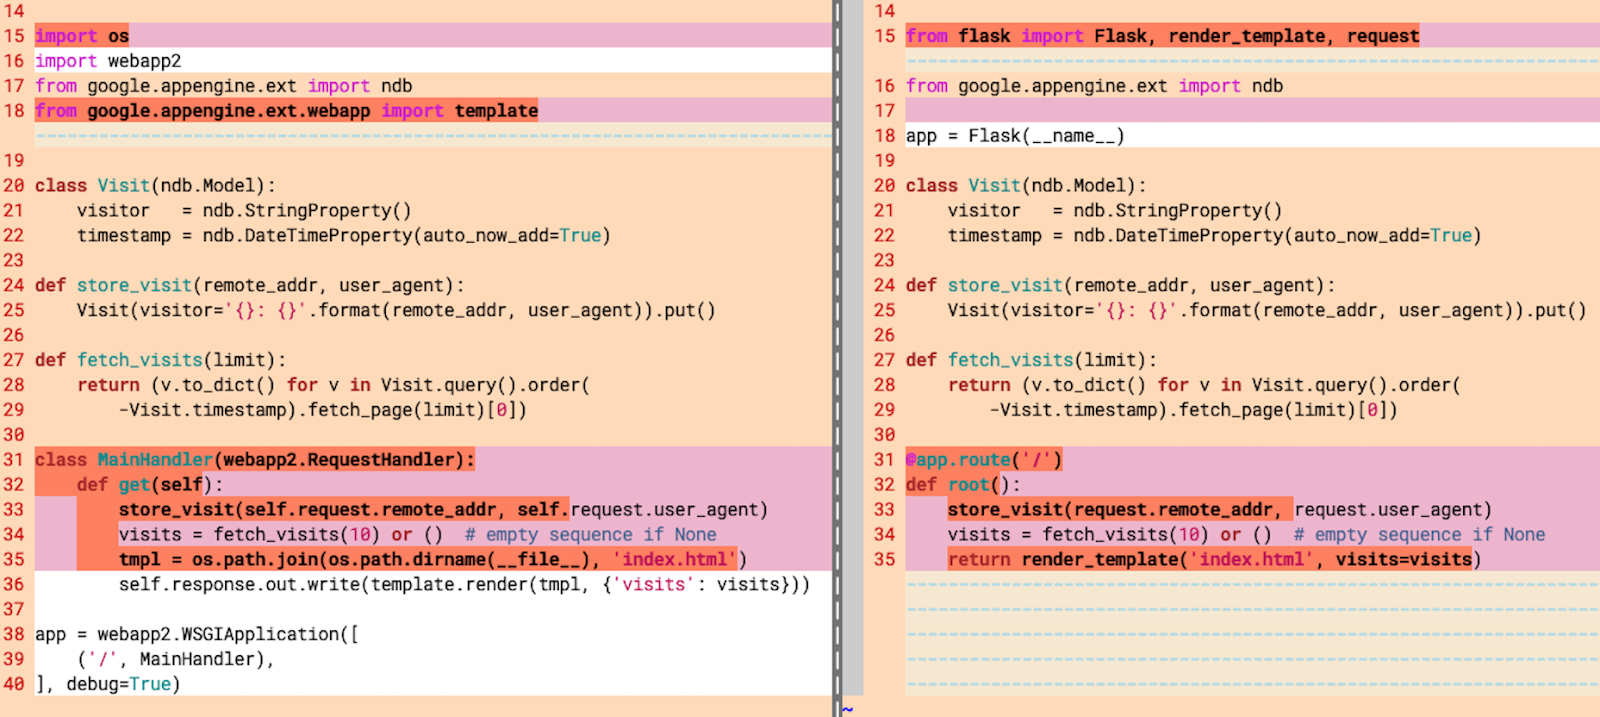
Cloud NDB follows an object model identical to App Engine ndb and is deliberately meant to be familiar to long-time Python App Engine developers while use of the Cloud Datastore client library is more like accessing a JSON document store. Their querying styles are also similar. You can compare and contrast them in the "diffs" screenshot below and in the video.
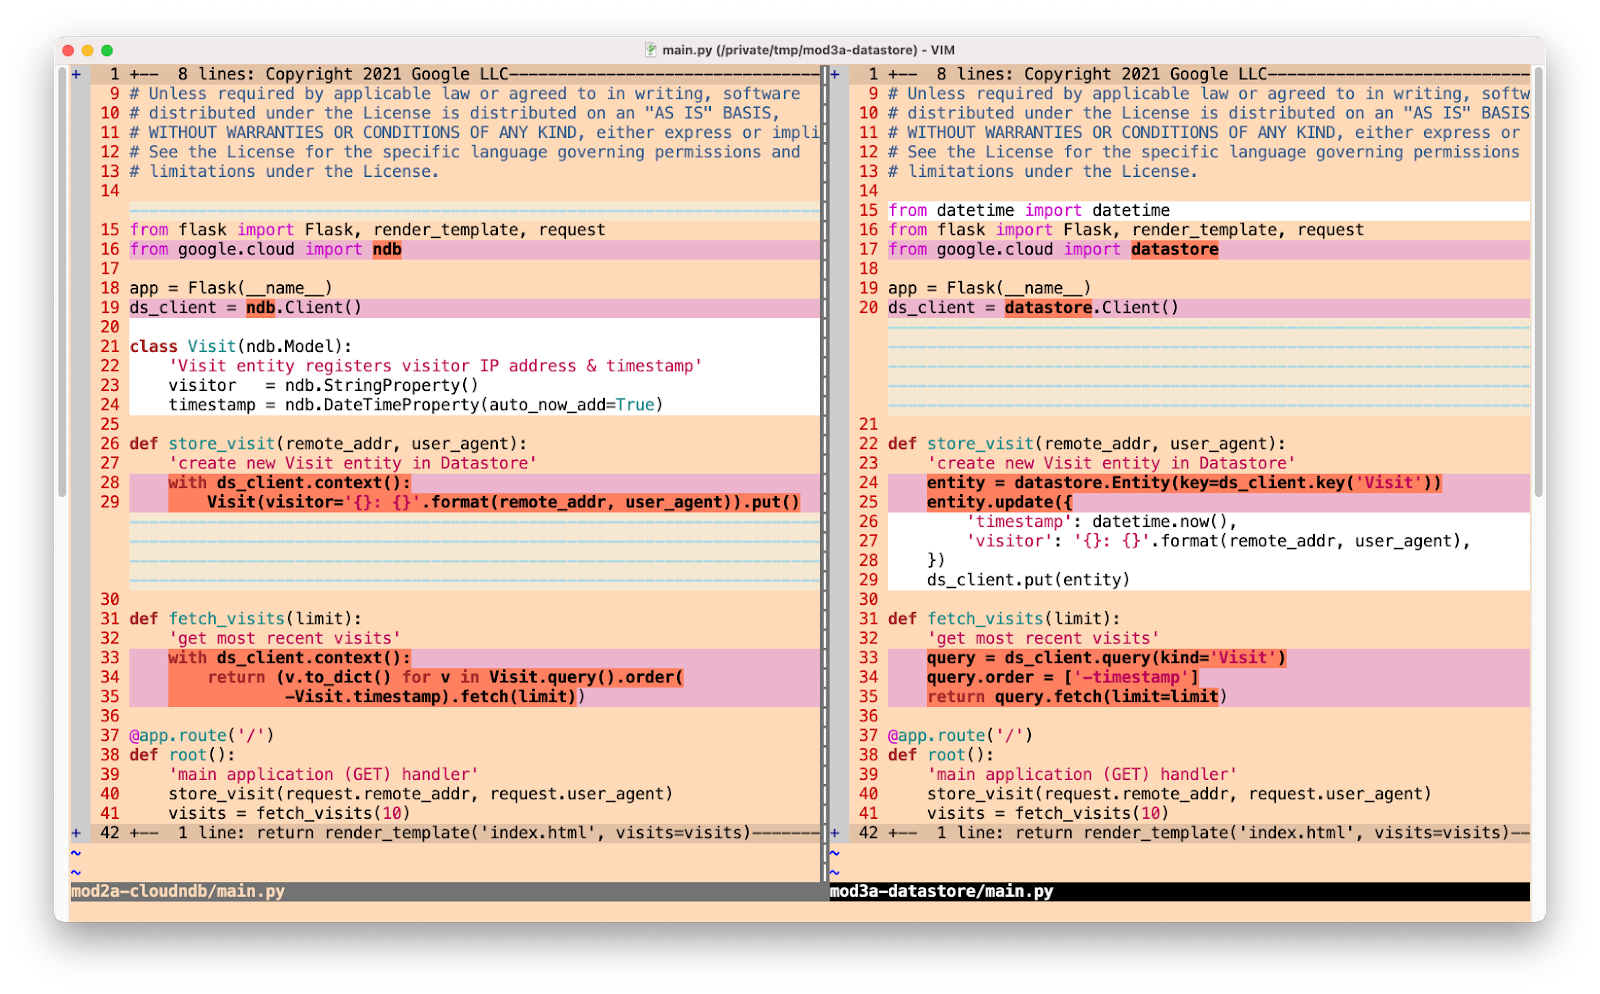
The "diffs" between the Cloud NDB and Cloud Datastore versions of the sample app
All that said, this migration is optional and only useful if you wish to consolidate to using a single client library. If your Python App Engine apps are stable with ndb or Cloud NDB, and you don't have any code using Cloud Datastore, there's no real reason to move unless Cloud Datastore has a compelling feature inaccessible from your current client library. If you are considering this migration and want to try it on a sample app before considering for yours, see the corresponding codelab and use the video for guidance.
It begins with the Module 2 code completed in the previous codelab/video; use your solution or ours as the "START". Both Python 2 (Module 2a folder) and Python 3 (Module 2b folder) versions are available. The goal is to arrive at the "FINISH" with an identical, working app but using a completely different Datastore client library. Our Python 2 FINISH can be found in the Module 3a folder while Python 3's FINISH is in the Module 3b folder. If something goes wrong during your migration, you can always rollback to START, or compare your solution with our FINISH. We will continue our Datastore discussion ahead in Module 6 as Cloud Firestore represents the next generation of the Datastore service.
All of these learning modules, corresponding videos (when published), codelab tutorials, START and FINISH code, etc., can be found in the migration repo. We hope to also one day cover other legacy runtimes like Java 8 and others, so stay tuned. Up next in Module 4, we'll take a different turn and showcase a product crossover, showing App Engine developers how to containerize their apps and migrate them to Cloud Run, our scalable container-hosting service in the cloud. If you can't wait for either Modules 4 or 6, try out their respective codelabs or access the code samples in the table at the repo above. Migrations aren't always easy, and we hope content like this helps you modernize your apps.

 Posted by Wesley Chun (