Tag Archives: mobile

Updates for managed iOS devices with the release of Chrome 120

What’s changing

In the coming weeks, we’ll be introducing several improvements to Chrome-on-iOS that will help admins more seamlessly apply policies and preferences across their users’ managed devices. This launch will align with the planned release of Chrome 120. Specifically, these improvements are: 
  • Cross-device policy application: Whether it’s a company-owned or personal device, Chrome User Policies can be applied when a user signs into the Chrome browser with their managed account. This ensures a consistent and secure browsing experience across all devices.
  • Management notice for end-users: Managed end-users will begin seeing a management notice, informing them that their organization manages the account they are signing into. This transparency not only fosters trust but also keeps users informed about the security measures in place to protect their data. 
  • Admin console integration: Admins can easily activate this functionality through the Admin console under the "Chrome on iOS" Browser setting. This centralized control allows admins to tailor policies to meet the specific needs of their organization, ensuring a customized and secure browsing environment for all users.

Getting started

 
We’ll remind you that your account is managed upon login and when you’re logged in.


Rollout pace

End user notifications

Admin console integration

Availability

  • Available to all Chrome Browser Cloud Management and Google Workspace customers

Resources


Increase your app’s availability across device types

Posted by Alex Vanyo – Developer Relations Engineer

TL;DR: Remove unnecessary feature requirements that prevent users from downloading your app on devices that don’t support the features. Automate tracking feature requirements and maximize app availability with badging!

Required features reduce app availability

<uses-feature> is an app manifest element that specifies whether your app depends on a hardware or software feature. By default, <uses-feature> specifies that a feature is required. To indicate that the feature is optional, you must add the android:required="false" attribute.

Google Play filters which apps are available to download based on required features. If the user’s device doesn’t support some hardware or software feature, then an app that requires that feature won’t be available for the user to download.

<uses-permission>, another app manifest element, complicates things by implicitly requiring features for permissions such as CAMERA or BLUETOOTH (see Permissions that imply feature requirements). The initial declared orientations for your activities can also implicitly require hardware features.

The system determines implicitly required features after merging all modules and dependencies, so it may not be clear to you which features your app ultimately requires. You might not even be aware when the list of required features has changed. For example, integrating a new dependency into your app might introduce a new required feature. Or the integration might request additional permissions, and the permissions could introduce new, implicitly required features.

This behavior has been around for a while, but Android has changed a lot over the years. Android apps now run on phones, foldables, tablets, laptops, cars, TVs and watches, and these devices are more varied than ever. Some devices don’t have telephony services, some don’t have touchscreens, some don’t have cameras.

Expectations based on permissions have also changed. With runtime permissions, a <uses-permission> declaration in the manifest no longer guarantees that your app will be granted that permission. Users can choose to deny access to hardware in favor of other ways to interact with the app. For example, instead of giving an app permission to access the device’s location, a user may prefer to always search for a particular location instead.

Banking apps shouldn’t require the device to have an autofocusing camera for check scanning. They shouldn’t specify that the camera must be a front or rear camera or that the device has a camera at all! It should be enough to allow the user to upload a picture of a check from another source.

Apps should support keyboard navigation and mouse input for accessibility and usability reasons, so strictly requiring a hardware touchscreen should not be necessary.

Apps should support both landscape and portrait orientations, so they shouldn’t require that the screen could be landscape-oriented or could be portrait-oriented. For example, screens built in to cars may be in a fixed landscape orientation. Even if the app supports both landscape and portrait, the app could be unnecessarily requiring that the device supports being used in portrait, which would exclude those cars.

Determine your app’s required features

You can use aapt2 to output information about your APK, including the explicitly and implicitly required features. The logic matches how the Play Store filters app availability.

aapt2 dump badging <path_to_.apk>

In the Play Console, you can also check which devices are being excluded from accessing your app.

Increase app availability by making features optional

Most apps should not strictly require hardware and software features. There are few guarantees that the user will allow using that feature in the first place, and users expect to be able to use all parts of your app in the way they see fit. To increase your app’s availability across form factors:

    • Provide alternatives in case the feature is not available, ensuring your app doesn’t need the feature to function.
    • Add android:required="false" to existing <uses-feature> tags to mark the feature as not required (or remove the tag entirely if the app no longer uses a feature).
    • Add the <uses-feature> tag with android:required="false" for implicitly required feature due to declaring permissions that imply feature requirements.

Prevent regressions with CI and badging

To guard against regressions caused by inadvertently adding a new feature requirement that reduces device availability, automate the task of determining your app’s features as part of your build system. By storing the badging output of the aapt2 tool in a text file and checking the file into version control, you can track all declared permissions and explicitly and implicitly required features from your final universal apk. This includes all features and permissions included by transitive dependencies, in addition to your own.

You can automate badging as part of your continuous integration setup by setting up three Gradle tasks for each variant of your app you want to validate. Using release as an example, create these three tasks:

    • generateReleaseBadging – Generates the badging file from the universal APK using the aapt2 executable. The output of this task (the badging information) is used for the following two tasks.
    • updateReleaseBadging – Copies the generated badging file into the main project directory. The file is checked into source control as a golden badging file.
    • checkReleaseBadging – Validates the generated badging file against the golden badging file.

CI should run checkReleaseBadging to verify that the checked-in golden badging file still matches the generated badging file for the current code. If code changes or dependency updates have caused the badging file to change in any way, CI fails.

Screen grab of failing CI due to adding a new permission and required feature without updating the badging file.
Failing CI due to adding a new permission and required feature without updating the badging file.

When changes are intentional, run updateReleaseBadging to update the golden badging file and recheck it into source control. Then, this change will surface in code review to be validated by reviewers that the badging changes are expected.

Screen grab showing updated golden badging file for review with additional permission and implied required feature.
Updated golden badging file for review with additional permission and implied required feature.

CI-automated badging guards against changes inadvertently causing a new feature to be required, which would reduce availability of the app.

For a complete working example of a CI system verifying the badging file, check out the setup in the Now in Android app.

Keep features optional

Android devices are continually becoming more varied, with users expecting a great experience from your Android app regardless of the type of device they’re using. While some software or hardware features might be essential to your app’s function, in many cases they should not be strictly required, needlessly preventing some users from downloading your app.

Use the badging output from aapt2 to check which features your app requires, and use the Play Console to verify which devices the requirements are preventing from downloading your app. You can automatically check your app’s badging in CI and catch regressions.

Bottom line: If you don’t absolutely need a feature for your entire app to function, make the feature optional to ensure your app’s availability to the greatest number of devices and users.

Learn more by checking out our developer guide.

Updates for managing iOS devices: user enrollment is now supported; purchase and distribute apps using the Apple Volume Purchase program

What’s changing 

We’re expanding mobile device enrollment options for iOS devices to include user enrollment. User enrollment separates work and personal data on iOS devices, giving admins control over Workspace data on the device while users retain privacy over their personal data. 


Additionally, admins can use the Apple Volume Purchase Program (VPP) to purchase and disturbed apps in bulk to user-enrolled iOS devices in their organization. 


Who’s impacted 

Admins and end users 


Why you’d use it 

Managing how Workspace data is accessed is a cornerstone of security. The new user enrollment option ensures end users can keep their personal data separate from their work data, while admins can ensure their users are using and accessing apps appropriately. 


Using the VPP, admins can efficiently curate a suite of work-related apps—both free and paid—for their team. This streamlined process not only simplifies the deployment of essential business apps but also ensures that employees have access to the right apps they need to be productive and efficient, all within the secure perimeter of our MDM platform.


Getting started

Admins: 
  • Volume Purchasing Program:
    • To begin, admins need to access Apple’s volume purchasing program with their Business Manager credentials. Through the VPP, admins can purchase app licenses that can be distributed to their employee’s devices in bulk. 

From the Apple Business Manager, you can purchase app licenses in bulk.


Once purchased, admins will need to download the content token, which needs to be uploaded into the Admin console.


VPP tokens can be uploaded in the Admin console at Devices > Mobile and endpoints > iOS settings > Apple Volume Purchase Program (VPP).


For complete instructions, use this Help Center about distributing iOS apps with Apple VPP and applying settings for iOS devices.

  • End users:

The user enrollment process starts when a user signs-in to an app for the first time or re-signs into an app. They’ll be prompted to begin downloading the configuration profile, which will open in an internet browser with more instructions and information. Once the profile has been downloaded, the user will be directed to their devices settings to complete user enrollment.


Rollout pace


Availability

  • Available to Google Workspace Enterprise Plus, Enterprise Standard, Enterprise Essentials, Enterprise Essentials Plus, Frontline Standard, Frontline Starter, Business Plus, Cloud Identity Premium, Education Standard, Education Plus and Nonprofits customers

Resources


Snapchat integrated new camera features 50% faster with the Camera2 Extensions API

Posted by Fred Chung, Android Developer Relations

Snapchat is a visual messaging app that enhances Snapchatters’ relationships with friends, family, and the world. It opens to the camera and offers millions of augmented reality and AI-powered Lenses for self expression, learning, and play. Ensuring Snapchatters can easily capture and share their lives with close friends and family is a priority for Snapchat, and they're always exploring new ways to improve the overall app experience.

As part of this, the Snapchat team added new camera features into the app using Android’s Camera2 Extensions API, which allows developers to access various capabilities that OEMs have implemented on various devices, like Night Mode and Bokeh. Thanks to Android’s intuitive API, the Snapchat team implemented new camera features 50% faster than before.

Camera2 Extensions API gives access to advanced features

The Snapchat team wanted to optimize the application for the expanding selection of Android devices, knowing many OEMs differentiate their devices with their respective camera technologies. As Snapchat is a primarily visual app that works with a device’s camera, the team optimizes the app to take full advantage of each device’s unique hardware.

“We wanted to leverage each OEM’s software to enhance the Snapchat experience on Android,” said Ye Tian, a software engineer at Snapchat. “This would help the app achieve higher-quality Snaps that are comparable to what a device's native camera offers.”

https://blogger.googleusercontent.com/img/b/R29vZ2xl/AVvXsEiU-F-r5DnCnu0YdvwT1OYmjJinR-gH1LNVq_wmImMPU4rwXDfroLQlvht1k8640kMaTabS8maaYYeRgfDQwBYrjv8Gi5QygnmWMb1nw-X8OfxSxEoSjp3V56uhg3lbdoaXRruZHzHuvscejVS-9dsqeQHzJ9QDytZQuQmmZRQcfLYb42v578M4Ln8OX9g/s1600/image3.gif
Snapchat developers enhanced the app’s zoom and night mode camera capabilities using the Camera2 Extensions API

What started as a goal to improve the app’s low-light capabilities led to much more. The Snapchat team worked on finding new ways to improve the app’s camera capabilities by implementing features like night mode, portrait mode, face retouch, tap-to-focus, zoom, and more.

“Our collaboration with Google Pixel paved the way for collaboration with other OEMs to implement night mode and super-night mode in their devices with very minimal code changes,” said Ye. “The Camera2 Extensions API is flexible and extensive. Snapchat can now use it to build full-fledged applications on demand without negatively impacting performance and stability.”

The implementation via the Camera2 Extension API made it easy for Snapchat developers to add more camera features into the app. And using the extensions made available with Android’s camera API, Snapchat integrated new camera features 50% faster when compared to the typical industry-standard approaches it used in the past.

The Camera2 Extensions API is flexible and extensive. Snapchat can now use it to build full-fledged applications on demand without negatively impacting performance and stability.” — Ye Tian, Software Engineer at Snapchat

More opportunities on more devices

The Snapchat team was happy to give its users a more cohesive experience using the Camera2 Extensions API. Thanks to the extensions provided in the API, developers easily improved the app’s camera on a range of manufacturer devices using the Android platform, and much faster than before.

“I enjoy the diversity of the Android platform and utilizing the unique advantages of each mobile phone manufacturers’ devices,” said Ye. “It helps us bring their cutting-edge innovations into the Snapchat app, allowing Snapchatters to better capture their life moments.”

Snapchat’s team looks forward to working with more OEMs to further improve the app’s processing capabilities across devices using the Camera2 Extensions API. They’re also looking forward to improving the app’s backward compatibility using the new API, which will allow even more users to benefit from the extensions.

“I would recommend using Camera2 Extension API. It provides extensive functionalities and stable performance to improve the velocity that developers can deliver features,” said Ye.

Get started

Learn how to increase your app’s camera capabilities with the Camera2 Extensions API.

Order Files in Android

Posted by Aditya Kumar – Software Engineer

Context

Binary layout using a symbol order file (also known as binary order file or linker order file) is a well-known link-time optimization. The linker uses the order of symbols in order file to lay out symbols in the binary. Order file based binary layout improves application launch time as well as other critical user journeys. Order file generation is typically a multi-step process where developers use different tools at every stage. We are providing a unified set of tools and documentation that will allow every native app developer to leverage this optimization. Both Android app developers and the AOSP community can benefit from the tools.

Background

Source code is typically structured to facilitate software development and comprehension. The layout of functions and variables in a binary is also impacted by their relative ordering in the source code. The binary layout impacts application performance as the operating system has no way of knowing which symbols will be required in future and typically uses spatial locality as one of the cost models for prefetching subsequent pages.

But the order of symbols in a binary may not reflect the program execution order. When an application executes, fetching symbols that are not present in memory would result in page faults. For example, consider the following program:

// Test.cpp
int foo() { /* */ } int bar() { /* */ } // Other functions... int main() { bar(); foo();

}

Which gets compiled into:

# Test.app page_x: _foo page_y: _bar # Other symbols page_z:_main

When Test.app starts, its entrypoint _main is fetched first then _bar followed by _foo. Executing Test.app can lead to page faults for fetching each function. Compare this to the following binary layout where all the functions are located in the same page (assuming the functions are small enough).

# Test.app page_1: _main page_1: _bar page_1: _foo # Other symbols

In this case when _main gets fetched, _bar and _foo can get fetched in the memory at the same time. In case these symbols are large and they are located in consecutive pages, there is a high chance the operating system may prefetch those pages resulting in less page faults.

Because execution order of functions during an application lifecycle may depend on various factors it is impossible to have a unique order of symbols that is most efficient. Fortunately, application startup sequence is fairly deterministic and stable in general. And it is also possible to build a binary having a desired symbol order with the help of linkers like lld which is the default linker for Android NDK toolchain.

Order file is a text file containing a list of symbols. The linker uses the order of symbols in order file to lay out symbols in the binary. An order file having functions that get called during the app startup sequence can reduce page faults resulting in improved launch time. Order files can improve the launch time of mobile applications by more than 2%. The benefits of order files are more meaningful on larger apps and lower end devices. A more mature order file generation system can improve other critical user journeys.

Design

The order file generation involves the following steps

    • Collect app startup sequence using compiler instrumentation technique
      • Use compiler instrumentation to report every function invocation
      • Run the instrumented binary to collect launch sequence in a (binary) profraw file
    • Generate order file from the profraw files
    • Validate order file
    • Merge multiple order files into one
    • Recompile the app with the merged order file

Overview

The order file generation is based on LLVM’s compiler instrumentation process. LLVM has a stage to generate the order file then recompile the source code using the order file.ALT TEXT


Collect app startup sequence

The source code is instrumented by passing -forder-file-instrumentation to the compiler. Additionally, the -orderfile-write-mapping flag is also required for the compiler to generate a mapping file. The mapping file is generated during compilation and it is used while processing the profraw file. The mapping file shows the mapping from MD5 hash to function symbol (as shown below).

# Mapping file MD5 db956436e78dd5fa main MD5 83bff1e88ac48f32 _GLOBAL__sub_I_main.cpp MD5 c943255f95351375 _Z5mergePiiii MD5 d2d2238cf08db816 _Z9mergeSortPiii MD5 11ed18006e729e73 _Z4partPiii MD5 3e897b5ee8bebbd1 _Z9quickSortPiii

The profile (profraw file) is generated every time the instrumented application is executed. The profile data in the profraw file contains the MD5 hash of the functions executed in chronological order. The profraw file does not have duplicate entries because each function only outputs its MD5 hash on first invocation. A typical run of binary containing the functions listed in the mapping file above can have the following profraw entries.

# Profraw file 00000000 32 8f c4 8a e8 f1 bf 83 fa d5 8d e7 36 64 95 db |2...........6d..| 00000010 16 b8 8d f0 8c 23 d2 d2 75 13 35 95 5f 25 43 c9 |.....#..u.5._%C.| 00000020 d1 bb be e8 5e 7b 89 3e 00 00 00 00 00 00 00 00 |....^{.>........| 00000030 00 00 00 00 00 00 00 00 00 00 00 00 00 00 00 00 |................|

In order to find the function names corresponding to the MD5 hashes in a profraw file, a corresponding mapping file is used.

Note: The compiler instrumentation for order files (-forder-file-instrumentation) only works when an optimization flag (01, 02, 03, 0s, 0z) is passed. So, if -O0 (compiler flag typically used for debug builds) is passed, the compiler will not instrument the binary. In principle, one should use the same optimization flag for instrumentation that is used in shipping release binaries.

The Android NDK repository has scripts that automate the order file generation given a mapping file and an order file.


Recompiling with Order File

Once you have an order file, you provide the path of the order file to the linker using the --symbol-ordering-file flag.


Detailed design

Creating Order File Build Property

The Android Open Source Project (AOSP) uses a build system called soong so we can leverage this build system to pass the flags as necessary. The order file build property has four main fields:

    • instrumentation
    • load_order_file
    • order_file_path
    • cflags

The cflags are meant to add other necessary flags (like mapping flags) during compilation. The load_order_file and order_file_path tells the build system to recompile with the order file rather than set it to the profiling stage. The order files must be in saved in one of two paths:

    • toolchain/pgo-profiles/orderfiles
    • vendor/google_data/pgo_profile/orderfiles

# Profiling orderfile: { instrumentation: true, load_order_file: false, order_file_path: "", cflags: [ "-mllvm", "-orderfile-write-mapping=<filename>-mapping.txt", ], } #Recompiling with Order File orderfile: { instrumentation: true, load_order_file: true, order_file_path: "<filename>.orderfile", }

Creating order files

We provide a python script to create an order file from a mapping file and a profraw file. The script also allows removing a particular symbol or creating an order file until a particular symbol.

Script Flags:

        • Profile file (--profile-file):
                • Description: The profile file generated by running a binary compiled with -forder-file-instrumentation
        • Mapping file (--mapping-file):
                • Description: The mapping file generated during compilation that maps MD5 hashes to symbol names
        • Output file (--output):
                • Description: The output file name for the order file. Default Name: default.orderfile
        • Deny List (--denylist):
                • Description: Symbols that you want to exclude from the order file
        • Last symbol (--last-symbol):
                • Description: The order file will end at the passed last symbol and ignore the symbols after it. If you want an order file only for startup, you should pass the last startup symbol. Last-symbol has priority over leftover so we will output until the last symbol and ignore the leftover flag.
        • Leftover symbols (--leftover):
                • Description: Some symbols (functions) might not have been executed so they will not appear in the profile file. If you want these symbols in your order file, you can use this flag and it will add them at the end.

Validating order files

Once we get an order file for a library or binary, we need to check if it is valid based on a set of criteria. Some order files may not be of good quality so they are better discarded. This can happen due to several reasons like application terminated unexpectedly, the runtime could not write the complete profraw file before exiting, an undesired code-sequence was collected in the profile, etc. To automate this process, we provide a python script that can help developers check for:

    • Partial order that needs to be in the order file
    • Symbols that have to be present in order file
    • Symbols that should not be present in order file
    • Minimum number of symbols to make an order file

Script Flags:

        • Order file (--order-file):
                • Description: The order file you are validating on the below criteria.
        • Partial Order (--partial):
                • Description: A partial order of symbols that must be held in the order file.
        • Allowed Lists (--allowlist):
                • Description: Symbols that must be present in the order file.
        • Denied Lists (--denylist):
                • Description: Symbols that should not be in the order file. Denylist flag has priority over allowlist.
        • Minimum Number of Entries (--min):
                • Description: Minimum number of symbols needed for an order file

Merging orderfiles

At a higher level, the order file symbols in a collection of order files approximate a partial order (poset) of function names with order defined by time of execution. Across different runs of an application, the order files might have variations. These variations could be due to OS, device class, build version, user configurations etc. However, the linker can only take one order file to build an application. In order to have one order file that provides the desired benefits, we need to merge these order files into a single order file. The merging algorithm also needs to be efficient so as to not slow down the build time. There are non-linear clustering algorithms that may not scale well for merging large numbers of order files, each having many symbols. We provide an efficient merging algorithm that converges quickly. The algorithm allows for customizable parameters, such that developers can tune the outcome.

Merging N partial order sets can be done either pessimistically (merging a selection of order files all the way until there is one order file left) or optimistically (merging all of them at once). The pessimistic approach can be inefficient as well as sub-optimal. As a result, it is better to work with all N partial order sets at once. In order to have an efficient implementation it helps to represent all N posets with a weighted directed Graph (V,E) where:

    • V: Elements of partial order sets (symbols) and the number of times it appears in different partial order sets. Note that the frequency of vertices may be greater than the sum of all incoming edges because of invocations from uninstrumented parts of binary, dependency injection etc.
    • E (V1 -> V2): An edge occurs if the element of V2 immediately succeeds V1 in any partial order set with its weight being the number of times this happens.

For a binary executable, there is one root (e.g., main) vertex, but shared libraries might have many roots based on which functions are called in the binary using them. The graph gets complicated if the application has threads as they frequently result in cycles. To have a topological order, cycles are removed by preferring the highest probability path over others. A Depth-First traversal that selects the highest weighted edge serves the purpose.

Removing Cycles:

- Mark back edges during a Depth-First traversal - For each Cycle (c):      - Add the weights of all in-edges of each vertex (v) in the cycle excluding the edges in the cycle      - Remove the cycle edge pointing **to** the vertex with highest sum

After cycles are removed, the same depth first traversal gives a topological order (the order file) when all the forward edges are removed. Essentially, the algorithm computes a minimum-spanning-tree of maximal weights and traverses the tree in topological order.

Producing an order:

printOrderUtil(G, n, order):    - If n was visited:         - return    - Add n to the end of order    - Sort all out edges based on weight    - For every out_edge (n, v):        - printOrderUtil(G, v, order) printOrder(G):    - Get all roots    - order = []    - For each root r:        - printOrderUtil(G, r, order)    - return order

Example:

Given the following order files:

    • main -> b -> c -> d
    • main -> a -> c
    • main -> e -> f
    • main -> b
    • main -> b
    • main -> c -> b
Flow diagram of orderfiles

The graph to the right is obtained by removing cycles.

    • DFS: main -> b-> c -> b
    • Back edge: c -> b
    • Cycle: b -> c-> b
    • Cycle edges: [b -> c, c -> b]
    • b’s sum of in-edges is 3
    • c’s sum of in-edges is 2
    • This implies b will be traversed from a higher frequency edge, so c -> b is removed
    • Ignore forward edges a->c, main->c
    • The DFS of the acyclic graph on the right will produce an order file main -> b -> c -> d -> a -> e -> f after ignoring the forward edges.

Collecting order files for Android Apps (Java, Kotlin)

The order file instrumentation and profile data collection is only enabled for C/C++ applications. As a result, it cannot benefit Java or Kotlin applications. However, Android apps that ship compiled C/C++ libraries can benefit from order file.

To generate order file for libraries that are used by Java/Kotlin applications, we need to invoke the runtime methods (called as part of order file instrumentation) at the right places. There are three functions that users have to call:

    • __llvm_profile_set_filename(char *f): Set the name of the file where profraw data will be dumped.
    • __llvm_profile_initialize_file: Initialize the file set by __llvm_profile_set_filename
    • __llvm_orderfile_dump: Dumps the profile(order file data) collected while running instrumented binary

Similarly, the compiler and linker flags should be added to build configurations. We provide template build system files e.g, CMakeLists.txt to compile with the correct flags and add a function to dump the order files when the Java/Kotlin application calls it.

# CMakeLists.txt set(GENERATE_PROFILES ON) #set(USE_PROFILE "${CMAKE_SOURCE_DIR}/demo.orderfile") add_library(orderfiledemo SHARED orderfile.cpp) target_link_libraries(orderfiledemo log) if(GENERATE_PROFILES) # Generating profiles require any optimization flag aside from -O0. # The mapping file will not generate and the profile instrumentation does not work without an optimization flag. target_compile_options( orderfiledemo PRIVATE -forder-file-instrumentation -O2 -mllvm -orderfile-write-mapping=mapping.txt ) target_link_options( orderfiledemo PRIVATE -forder-file-instrumentation ) target_compile_definitions(orderfiledemo PRIVATE GENERATE_PROFILES) elseif(USE_PROFILE) target_compile_options( orderfiledemo PRIVATE -Wl,--symbol-ordering-file=${USE_PROFILE} -Wl,--no-warn-symbol-ordering ) target_link_options( orderfiledemo PRIVATE -Wl,--symbol-ordering-file=${USE_PROFILE} -Wl,--no-warn-symbol-ordering ) endif()

We also provide a sample app to dump order files from a Kotlin application. The sample app creates a shared library called “orderfiledemo” and invokes the DumpProfileDataIfNeeded function to dump the order file. This library can be taken out of this sample app and can be repurposed for other applications.

// Order File Library #if defined(GENERATE_PROFILES) extern "C" int __llvm_profile_set_filename(const char *); extern "C" int __llvm_profile_initialize_file(void); extern "C" int __llvm_orderfile_dump(void); #endif void DumpProfileDataIfNeeded(const char *temp_dir) { #if defined(GENERATE_PROFILES) char profile_location[PATH_MAX] = {}; snprintf(profile_location, sizeof(profile_location), "%s/demo.output", temp_dir); __llvm_profile_set_filename(profile_location); __llvm_profile_initialize_file(); __llvm_orderfile_dump(); __android_log_print(ANDROID_LOG_DEBUG, kLogTag, "Wrote profile data to %s", profile_location); #else __android_log_print(ANDROID_LOG_DEBUG, kLogTag, "Did not write profile data because the app was not " "built for profile generation"); #endif } extern "C" JNIEXPORT void JNICALL Java_com_example_orderfiledemo_MainActivity_runWorkload(JNIEnv *env, jobject /* this */, jstring temp_dir) { DumpProfileDataIfNeeded(env->GetStringUTFChars(temp_dir, 0)); }

# Kotlin Application class MainActivity : AppCompatActivity() { private lateinit var binding: ActivityMainBinding override fun onCreate(savedInstanceState: Bundle?) { super.onCreate(savedInstanceState) binding = ActivityMainBinding.inflate(layoutInflater) setContentView(binding.root) runWorkload(applicationContext.cacheDir.toString()) binding.sampleText.text = "Hello, world!" } /** * A native method that is implemented by the 'orderfiledemo' native library, * which is packaged with this application. */ external fun runWorkload(tempDir: String) companion object { // Used to load the 'orderfiledemo' library on application startup. init { System.loadLibrary("orderfiledemo") } } }

Limitation

order file generation only works for native binaries. The validation and merging scripts will work for any set of order files.

References

External References

Aligning the user experience across surfaces for Google Pay

Posted by Dominik Mengelt – Developer Relations Engineer

During the last months we've been working hard to align the Google Pay user experience across Web and Android. We are committed to advancing all Google Pay surfaces progressively, and creating a more cohesive experience for your users. In addition, the Google Pay sheets for Android and Chrome on Android now use the latest Material 3 design system with Web to follow in early 2024.

UX improvements on Android

Aligning the bottom sheets on Android and Chrome for Android (Mobile Web) led to a ~2.5% increase in conversion rate and a ~39% reduction in errors for users using Google Pay with Chrome on Android[1].

Side by side photos of Gogle Pay sheet on Android and Mobile Web
Figure 1: The identical Google Pay bottom sheets for Android (left) and Chrome on Android (right)


A completely revamped Google Pay sheet on the Web

On the web we aligned the user experience to be the same as on Android. Additionally we gave the Payment Handler window a more minimalistic look. With these changes we are seeing a conversion rate increase of ~9%.[1]

Google Pay displayed inside the new minimalistic Payment Handler window
Figure 2: Google Pay displayed inside the new minimalistic Payment Handler window


No changes required!

Whether you are a merchant integrating Google Pay on your own or through a PSP, you don’t need to make any changes. We've already rolled out these changes to most of our users. This means that your users are likely already benefiting from the new experience or will very soon. For certain features, for example dynamic price updates, Google Pay will temporarily show the previous user experience. We are actively working on migrating all features to benefit from the new updated design.


Getting started with Google Pay

Not yet using Google Pay? Take a look at the documentation to start integrating Google Pay today. Learn more about the integration by taking a look at our sample application for Android on GitHub or use one of our button components for your web integration. When you are ready, head over to the Google Pay & Wallet console and submit your integration for production access.

Follow @GooglePayDevs on X (formerly Twitter) for future updates. If you have questions, tag @GooglePayDevs and include #AskGooglePayDevs in your tweets.


[1] internal Google study

All treats, no tricks: 6 solutions to common developers challenges

Posted by Google for Developers

For many, Halloween is the perfect excuse to dress up and celebrate the things that haunt us. Google for Developers is embracing the spirit of the season by diving into the spine-chilling challenges that spook software developers and engineers. Read on to uncover these lurking terrors and discover the tricks – and treats – to conquer them.


The code cemetery

Resilient code requires regular updates, and when it comes to solving bugs, it’s much easier to find them when there are fewer lines of code. When faced with legacy or lengthy code, consider simplifying and refreshing it to make it more manageable – because no one likes an ancient or overly complex codebase. Here are some best practices.

Start small: Don't try to update your entire codebase at once. Instead, start by updating small, isolated parts of the codebase to minimize the risk of introducing new bugs.

Use a version control system: Track your changes and easily revert to a previous version if necessary.

Consider a refactoring tool: This can help you to make changes to your code without breaking it.

Test thoroughly: Make sure to test your changes thoroughly before deploying them to production. This includes testing the changes in isolation, as well as testing them in conjunction with the rest of the codebase. See more tips about testing motivation below.

Document your changes: Include new tooling, updated APIs, and any changes so other developers understand what you have done and why.


Testing terrors

When you want to build and ship quickly, it’s tempting to avoid writing tests for your code because they might slow you down in the short term. But beware, untested code will come back to haunt you later. Testing is a best practice that can save you time, money, and angst in the long run. Even if you know you should run tests, it doesn’t mean you want to. Use these tips to help make writing tests easier.

Test gamification: Turn test writing into a game. Challenge yourself to write tests faster than your coworker can say "code coverage."

Pair programming: Write tests together with a colleague. It's like having a workout buddy – more fun and motivating.

Set up test automation: Automate tests wherever possible– it's better AND more efficient.


A monster problem: not being able to choose your tech stack

Many developers have strong preferences when it comes to products, but sometimes legacy technology or organizational needs can limit choices. This can be deflating, especially if it prevents you from using the latest tools. If you’re faced with a similar situation, it’s worth expressing your recommendations to your team. Here’s how:

Lobby for change: If the current tech stack really isn't working out, advocate for a change. This may require documentation over a series of events, but you can use that to build your case.

Pitch the benefits: If you’re ready to share your preferences, explain how your tech stack of choice benefits the project, similarly to how optimized code improves performance.

Showcase expertise: Demonstrate your knowledge in your preferred stack, whether it’s through a Proof of Concept or a presentation.

Upskill: If you have to dive into a top-down tech stack that you are not familiar with, consider it a learning opportunity. It’s like exploring a new coding language.

Compromise is key: First, recognize that all of the points above are still well-worth aiming for, but sometimes, you do have to compromise. Think of it as working with legacy code - not ideal, but doable. So if you aren’t able to influence in your favor, don’t be dismayed.


Not a trick: ship your code smarter

The only thing worse than spending the end of the week fixing buggy code isexcept for spending the weekend fixing buggy code when you had other plans. Between less time to react to problems, taking up personal time, and fewer people available to help troubleshoot – shipping code when you don’t have the proper resources in place to help is risky at best. Here are a handful of best practices to help you build a better schedule and avoid the Saturday and Sunday Scaries.

Consider business hours and user impact: Schedule deployments during off-peak times when fewer users will be impacted. For B2B companies, Friday afternoons can minimize disruption for customers, but for smaller companies, Friday deployments might mean spending your weekend fixing critical issues. Pick a schedule that works for you.

Automate testing: Implement automated testing in your development process to catch issues early.

Make sure your staging environment is right: Thoroughly test changes in a staging environment that mirrors production.

Be rollback-ready: Have a rollback plan ready to revert quickly if problems arise.

Monitoring and alerts: Set up monitoring and alerts to catch issues 24/7.

Communication: Ensure clear communication among team members regarding deployment schedules and procedures.

Scheduled deployments: If you’re a team who doesn’t regularly ship at the end of the week, consider READ-ONLY Fridays. Or if necessary, schedule Friday deployments for the morning or early afternoon.

Weekend on-call: Consider a weekend on-call rotation to address critical issues.

Post-deployment review: Analyze and learn from each deployment's challenges to improve processes.

Plan thoroughly: Ensure deployment processes are well-documented and communication is clear across teams and stakeholders.

Evaluate risks: Assess potential business and user impact to determine deployment frequency and timing.


A nightmare come true: getting hacked

Realizing you've been hacked is a heart-stopping event, but even the most tech-savvy developers are vulnerable to attacks. Before it happens to you, remember to implement these best practices.

Keep your systems and software up-to-date: Think of it as patching vulnerabilities in your code.

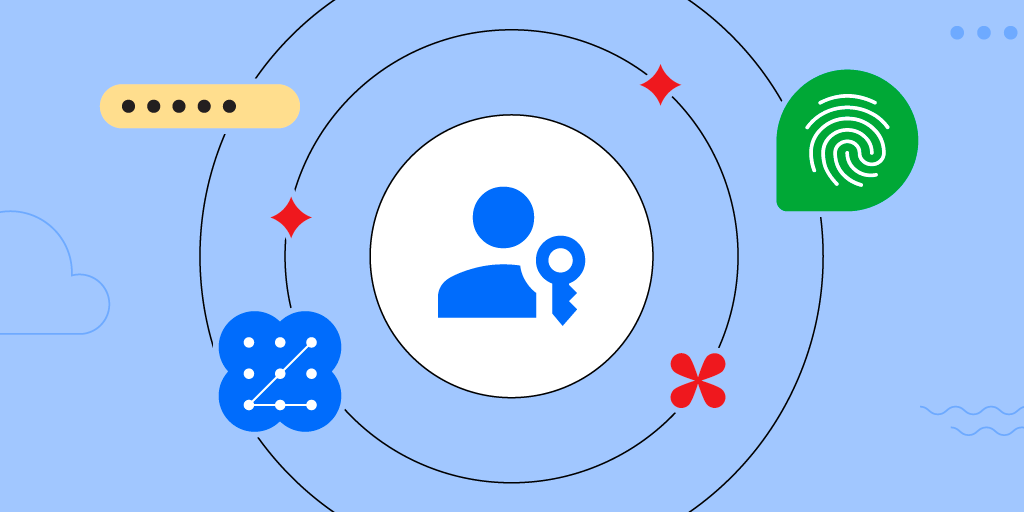
Use strong passwords: Just like strong encryption, use robust passwords.

Use two-factor authentication: Always add a second layer of security.

Beware of phishermen: Don't take the bait. Be as cautious with suspicious emails as you are with untested code.

Perform security audits: Regularly audit your systems for vulnerabilities, like running code reviews but for your cybersecurity.

Backup plan: Just like version control, maintain backups. They're your safety net in case things go full horror-movie.


The horror: third party data breaches

Data breaches are arguably the most terrifying yet plausible threat to developer happiness. No company wants to be associated with them, let alone the dev who chose the service or API to work with. Here are some tips for minimizing issues with third party vendors to help you avoid this scenario.

Perform due diligence on third-party vendors: Before working with a third-party vendor, carefully review their security practices and policies. Ask about security certifications, vulnerability management practices, and their incident response plan.

Require vendors to comply with security requirements: Create or add your input in a written contract with each third-party vendor that outlines the security requirements that the vendor must meet. This contract should include requirements for data encryption, access control, and incident reporting.

Monitor vendor activity: Ensure vendors comply with the security requirements in the contract by reviewing audit logs and conducting security assessments. Only grant access to data that a vendor needs to perform their job duties to help to minimize the impact of a data breach if the vendor is compromised.

Implement strong security controls: Within your own systems, protect data from unauthorized access through firewalls, intrusion detection systems, and data encryption.

Be wary of third-party APIs: Vet all security risks. Carefully review the API documentation to understand the permissions that are required and to ensure the API uses strong security practices.

Use secure coding practices: Use input validation, escaping output, and strong cryptography.

Keep software up to date: Always update with the latest security patch to help to protect against known vulnerabilities.


Creepin' it real

It’s easy to get spooked knowing what can go wrong, but by implementing these best practices, the chance of your work going awry goes down significantly.

What other spine-chilling developer challenges have you experienced? Share them with the community.

Meta built threads in only 5 months using Jetpack Compose

Posted by Yasmine Evjen – Product Manager, and Florina Muntenescu – Developer Relations Engineer

Following its release in July of 2023, Meta’s Threads became the most rapidly downloaded app ever with over 100 million downloads in its first week. Meta created the new text-based social media platform as a place to build connections and have meaningful conversations. To ensure the app was set up for success at its release and into the future, Threads developers used Jetpack Compose, Android’s modern declarative toolkit for building UI.

An easier way to build UI with Jetpack Compose

Threads is built on top of existing code from its sister app Instagram, which uses Views for its UI development. After positive reports from other Android developers about Compose, and following internal testing and an assessment of the toolkit’s benefits, Threads engineers opted to build the all-new app from scratch using Compose. By using Compose, the team could move faster and better prepare the app for any future updates.

“We decided Jetpack Compose would be our target UI framework going forward,” said Richard Zadorozny, a software engineer at Threads. “We wanted to build the new app UI from scratch using Compose because it would enable us to move faster than refactoring a large application like Instagram.”

Even though most of Threads’ engineers had no prior experience using Compose, they found it easy to get started and learn the new toolkit. With Compose, Threads engineers built and shipped the app in only five months. This greatly exceeded the team’s speed expectations for developing a high-quality Android application — especially of this complexity and scale. The team attributes much of this speed to the flexibility and decoupling Compose provided.

Compose helped Threads engineers streamline the development of new product features. The modular nature of the toolkit let Threads developers iterate on the app as it evolved and teed up the app’s architecture for future development. Compose also helped engineers build user-friendly features that adhered to Material Design guidelines.

Threads was built and shipped in five months, exceeding our speed expectations for building a high-quality Android app of this complexity and scale.”  — Richard Zadorozny, software engineer at Threads

Going all in with Compose

Threads engineers developed almost all of the app’s surfaces using Compose. In the end, they built over 90% of Threads using Compose, including the app’s activity feed, navigation, search, profiles, onboarding page, shared element transitions, media viewer, settings, and more.

While Compose did mostly everything Threads engineers needed it to, it was still easy for them to interoperate with Views as necessary. They used Views for Threads’ videos and the media picker that’s available when creating a new post.

Compose provides modern APIs that ship directly with an app. Because of this, Threads engineers spent less time worrying about backward compatibility, missing features, or differing functionality between different versions of Android. Instead, they could focus their energy on developing a high-quality application.

“Compose’s design encourages a modular, plug-in approach to development,” said Richard. “Modifiers make all sorts of functionality inherently reusable, so you no longer have to subclass complicated ViewGroups or lump all sorts of logic into one place.”

Moving image shows Jetpack Compose/Modifiers code appears on screen

The Threads team used Modifiers for the app’s custom click behaviors and its thread line illustration that appears on the left side of posts. Modifiers also allowed Threads developers to easily add the app’s branding to any elements and ensured they were properly aligned on-screen.

Threads engineers also ensured the app was ready for users across platforms at launch. That meant making sure Threads resizes to work on different devices, like large screens and foldables. The adaptive layouts Compose offers ensure an app responds properly to different screen sizes, orientations, and form factors. This made it easier for the Threads app to “just work” for configuration changes, according to Richard.

For developers who are building new apps, I would definitely recommend using Compose. Not only is it enjoyable… it sets your team up for success in the future.” — Richard Zadorozny, software engineer at Threads

Compose is the ‘future’ of Android UI

Compose offered Threads developers an easier way to design and create UI while preparing the app’s architecture for the future. With its intuitive composables and modern declarative framework, Compose made end-to-end development smooth and gave Threads developers confidence that updating the app would be easy.

Given the positive results the team saw with the release of Threads, Meta plans to expand its use of Compose to some of Instagram’s most important surfaces, like the app’s main feed.

“It’s reached a point where Jetpack Compose can do almost everything you’ll need, and its modular nature makes it easy to make most of the changes you would need to fill the gaps,” said Richard. “I believe Compose is the future of Android UI development, and it’s just fun!”

Get started

Optimize your UI development with Jetpack Compose.

Make the passkey endpoints well-known URL part of your passkey implementation

Posted by Amy Zeppenfeld – Developer Relations Engineer

Passkeys are leading the charge towards a more secure future without passwords. Passkeys are a new type of cryptographic credential that leverages FIDO2 and WebAuthn to provide an authentication mechanism that is phishing-resistant, user friendly, simple to implement, and more secure than password-based authentication. Most major operating systems and browsers now feature full passkey support. Passkeys are expected to replace passwords as the predominant authentication mechanism in the not-too-distant future, and developers are advised to begin implementing passkey-enabled authentication solutions today.

As you implement passkeys in your app or web service, take a moment to implement a passkey endpoints well-known URL.

This is a standardized way to advertise your support for passkeys and optimize user experience. This well-known URL will allow third party services like password managers, passkey providers, and other security tools to direct users to enroll and manage their passkeys for any site that supports them. You can use app-links or deep linking with the passkey-endpoints well-known URL to allow these pages to open directly in your app.

Password management tool usage has been steadily rising, and we expect most providers will integrate passkey management as well. You can allow third party tools and services to direct your users to your dedicated passkey management page by implementing the passkey-endpoints well-known URL.

The best part is that in most cases you can implement this feature in two hours or less! All you need to do is host a simple schema on your site. Check out the example below:

  1. For a web service at https://example.com, the well-known URLwould be https://example.com/.well-known/passkey-endpoints
  2. When the URL is queried, the response should use the following schema:
{ "enroll": "https://example.com/account/manage/passkeys/create", "manage": "https://example.com/account/manage/passkeys" }

Note: You can decide the exact value of the URLs for both enroll and manage based on your website’s own configuration.

If you have a mobile app, we strongly recommend utilizing deep linking to have these URLs open the corresponding screen for each activity directly in your app to “enroll” or “manage” passkeys. This will keep your users focused and on track to enroll into passkeys.

And that’s it!

Further details and examples can be found in the passkey endpoints well-known URL explainer.

Updates to Google Identity Services (GIS) and migration to the Credential Manager API

Posted by Kateryna Semenova – Developer Relations Engineer, Diego Zavala and Gina Biernacki – Product Managers

Introducing Credential Manager

At Google, we are dedicated to improving the sign in experience across platforms for developers and users. For Android developers, we recently announced the public availability of Credential Manager as the future of authentication on Android. Credential Manager is a new Jetpack library designed to consolidate authentication types for Android developers into a single UI, reducing complexity for your applications while increasing usability. Credential Manager also supports passkeys, creating a unified interface for users and a single API for developers.

Instead of having to integrate with multiple identity providers, developers can now use Credential Manager as a single, unified authentication API. Credential Manager simplifies integration and makes it easier to develop authentication solutions that can work with all password managers, identity providers, and authentication methods.

Implementing Credential Manager with your Android applications will provide a single authentication experience for all Android users, integrated directly with the operating system and aligned with high-trust surfaces such as system login. We encourage all developers to migrate to Credential Manager.

Authentication APIs moving from Google Identity Services to Credential Manager on Android

The authentication APIs from Google Identity Services on Android—which include One Tap sign-in, Credential Saving, Sign in with Google button and Sign-In for Android(GSI) — can all now be implemented using Credential Manager. This enables developers to integrate with a single API for their authentication journeys.

Since these APIs are now generally available in Credential Manager, these individual APIs will be deprecated in Google Identity Services.

Removal of Smart Lock for Passwords

Smart Lock for Passwords, which was deprecated in 2022, will be removed from the Google Play Services SDK in November 2023. To minimize breaking changes that may impact existing integrations, all existing apps in the Play Store will continue to work. New app versions compiled with the new SDK will not be able to access the Smart Lock for Password API, so we encourage all developers to migrate to Credential Manager as soon as possible.

Get started with your migration to Credential Manager

All Android developers should plan their migration to the new Credential Manager API. To assist you in this process, read the following guides and resources:

Share your feedback

We are excited to improve Android authentication with the launch of Credential Manager API, delivering a simple and streamlined UX for secure sign-in methods such as Sign in with Google.

We value your feedback and invite you to share your experience integrating with Credential Manager or any other feedback you might have: