The Serverless Migration Stationvideo series and corresponding codelabs aim to help App Engine developers modernize their apps, whether it's upgrading language runtimes like from Python 2 to 3 and Java 8 to 17, or to move laterally to sister serverless platforms like Cloud Functions or Cloud Run. For developers who want more control, like being able to SSH into instances, Compute Engine VMs or GKE, our managed Kubernetes service, are also viable options.
In order to consider moving App Engine apps to other compute services, developers must move their apps away from its original APIs (now referred to as legacy bundled services), either to Cloud standalone replacement or alternative 3rd-party services. Once no longer dependent on these proprietary services, apps become much more portable. Apps can stay on App Engine while upgrading to its 2nd-generation platform, or move to other compute platforms as listed above.
Today's Migration Module 20 content focuses on helping developers refamiliarize themselves with App Engine's Users service, a user authentication system serving as a lightweight wrapper around Google Sign-In (now called Google Identity Services). The video and its corresponding codelab (self-paced, hands-on tutorial) demonstrate how to add use of the Users service to the sample baseline app from Module 1. After adding the Users service in Module 20, Module 21 follows, showing developers how to migrate that usage to Cloud Identity Platform.
How to use the App Engine Users service
Adding use of Users service
The sample app's basic functionality consists of registering each page visit in Datastore and displaying the most recent visits. The Users service helps apps support user logins, App Engine administrative ("admin'") users. It also provides convenient functions for generating login/logout links and retrieving basic user information for logged-in users. Below is a screenshot of the modified app which now supports user logins via the user interface (UI):
Sample app now supports user logins and App Engine admin users (click to enlarge)
Below is the pseudocode reflecting the changes made to support user logins for the sample app, including integrating the Users service and updating what shows up in the UI:
If the user is logged in, show their "nickname" (display name or email address) and display a Logout button. If the logged-in user is an App Engine app admin, also display an "admin" badge (between nickname and Logout button).
If the user is not logged in, display the username generically as "user", remove any admin badge, and display a Login button.
Because the Users service is primarily a user-facing endeavor, the most significant changes take place in the UI, whereas the data model and core functionality of registering visits remain unchanged. The new support for user management primarily results in additional context to be rendered in the web template. New or altered code is bolded to highlight the updates.
Adding App Engine Users service usage to sample app (click to enlarge)
Wrap-up
Today's "migration" consists of adding usage of the App Engine Users service to support user management and recognize App Engine admin users, starting with the Module 1 baseline app and finishing with the Module 20 app. To get hands-on experience doing it yourself, try the codelab and follow along with the video. Then you'll be ready to upgrade to Identity Platform should you choose to do so.
In Fall 2021, the App Engine team extended support of many of the bundled services to 2nd generation runtimes (that have a 1st generation runtime), meaning you are no longer required to migrate from the Users service to Identity Platform when porting your app to Python 3. You can continue using the Users service in your Python 3 app so long as you retrofit the code to access bundled services from next-generation runtimes.
If you do want to move to Identity Platform, see the Module 21 content, including its codelab. All Serverless Migration Station content (codelabs, videos, and source code [when available]) are available at its open source repo. While we're initially focusing on Python users, the Cloud team is covering other runtimes soon, so stay tuned. Also check out other videos in the broader Serverless Expeditions series.
Move to VM-based services like GKE or Compute Engine, or to other compute platforms
Understanding the migrations
Module 19 consists of implementing three different migrations on the Module 18 sample app:
Migrate from App Engine NDB to Cloud NDB
Migrate from App Engine Task Queue pull tasks to Cloud Pub/Sub
Migrate from Python 2 to Python (2 and) 3
The NDB to Cloud NDB migration is identical to the Module 2 migration content, so it's not covered in-depth in Module 19. The original app was designed to be Python 2 and 3 compatible, so there's no work there either. Module 19 boils down to three key updates:
Setup: Enable APIs and create Pub/Sub Topic & Subscription
How work is created: Publish Pub/Sub messages instead of adding pull tasks
How work is processed: Pull messages instead of leasing tasks
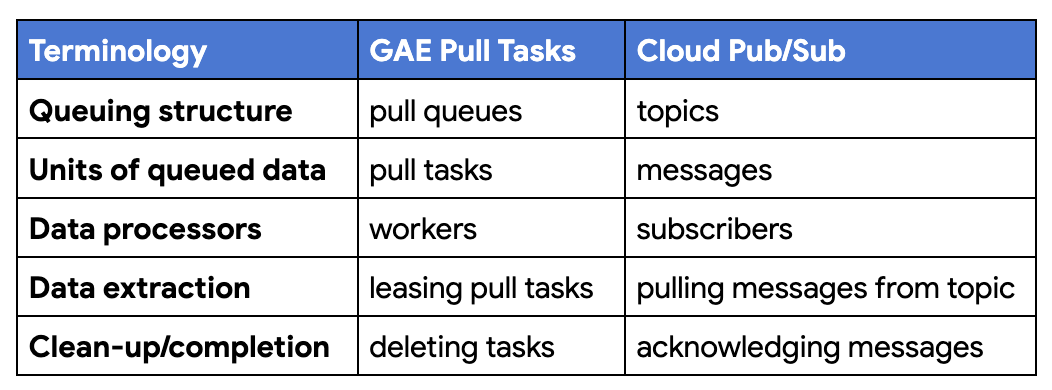
Aside from these physical changes, a key hurdle to overcome is understanding the differences in terminology between pull tasks and Pub/Sub. The following chart attempts to demystify this so developers can more easily grasp how they differ:
Terminology differences between App Engine pull tasks and Cloud Pub/Sub
Reflecting the chart, these differences can be summarized like this:
With Pull Queues, work is created in pull queues while work is sent to Pub/Sub topics
Task Queue pull tasks are called messages in Pub/Sub
With Task Queues, workers access pull tasks; with Pub/Sub, subscribers receive messages
Leasing a pull task is the same as pulling a message from a Pub/Sub topic via a subscription
Deleting a task from a pull queue when you're done is analogous to successfully acknowledging a Pub/Sub message
The video walks developers through the terminology as well as the code changes described above. Below is pseudocode implementing the key changes to the main application (new or updated lines of code bolded):
Migration from App Engine Task Queue pull tasks to Cloud Pub/Sub
Observe how most of the code, especially app operations and data models are left relatively unchanged. The only visible changes are switching from App Engine NDB and Task Queue to Cloud NDB and Pub/Sub. Complete versions of the app before and after making the changes can be found in the Module 18 and Module 19 repo folders, respectively. In addition to the video, be sure to check out the Module 19 codelab which leads you step-by-step through the migrations discussed.
Wrap-up
Module 19 features a migration of App Engine pull tasks to Cloud Pub/Sub, but developers should note that Pub/Sub itself is not based on pull tasks. It is a fully-featured asynchronous, scalable messaging service that has many more features than the pull functionality provided by Task Queue. For example, Pub/Sub has other features like streaming to BigQuery and push functionality. Pub/Sub push operates differently than Task Queue push tasks, hence why we recommend push tasks be migrated to Cloud Tasks instead (see Module 8). For more information on all of its features, see the Pub/Sub documentation. Because Cloud Tasks doesn't support pull functionality, we turn to Pub/Sub instead for pull task users.
While we recommend users move to the latest offerings from Google Cloud, neither of those migrations are required, and should you opt to do so, can do them on your own timeline. In Fall 2021, the App Engine team extended support of many of the bundled services to 2nd generation runtimes (that have a 1st generation runtime), meaning you don't have to migrate to standalone Cloud services before porting your app to Python 3. You can continue using Task Queue in Python 3 so long as you retrofit your code to access bundled services from next-generation runtimes.
If you're using other App Engine legacy services be sure to check out the other Migration Modules in this series. All Serverless Migration Station content (codelabs, videos, source code [when available]) can be accessed at its open source repo. While our content initially focuses on Python users, the Cloud team is working on covering other language runtimes, so stay tuned. For additional video content, check out our broader Serverless Expeditions series.
The Serverless Migration Station mini-series helps App Engine developers modernize their apps to the latest language runtimes, such as from Python 2 to 3 or Java 8 to 17, or to sister serverless platforms Cloud Functions and Cloud Run. Another goal of this series is to demonstrate how to move away from App Engine's original APIs (now referred to as legacy bundled services) to Cloud standalone replacement services. Once no longer dependent on these proprietary services, apps become much more portable, making them flexible enough to:
Move to VM-based services like GKE or Compute Engine, or to other compute platforms
App Engine's Task Queue service provides infrastructure for executing tasks outside of the standard request-response workflow. Tasks may consist of workloads exceeding request timeouts or periodic tangential work. The Task Queue service provides two different queue types, push and pull, for developers to perform auxiliary work.
Push queues are covered in Migration Modules 7-9, demonstrating how to add use of push tasks to an existing baseline app followed by steps to migrate that functionality to Cloud Tasks, the standalone successor to the Task Queues push service. We turn to pull queues in today's video where Module 18 demonstrates how to add use of pull tasks to the same baseline sample app. Module 19 follows, showing how to migrate that usage to Cloud Pub/Sub.
Adding use of pull queues
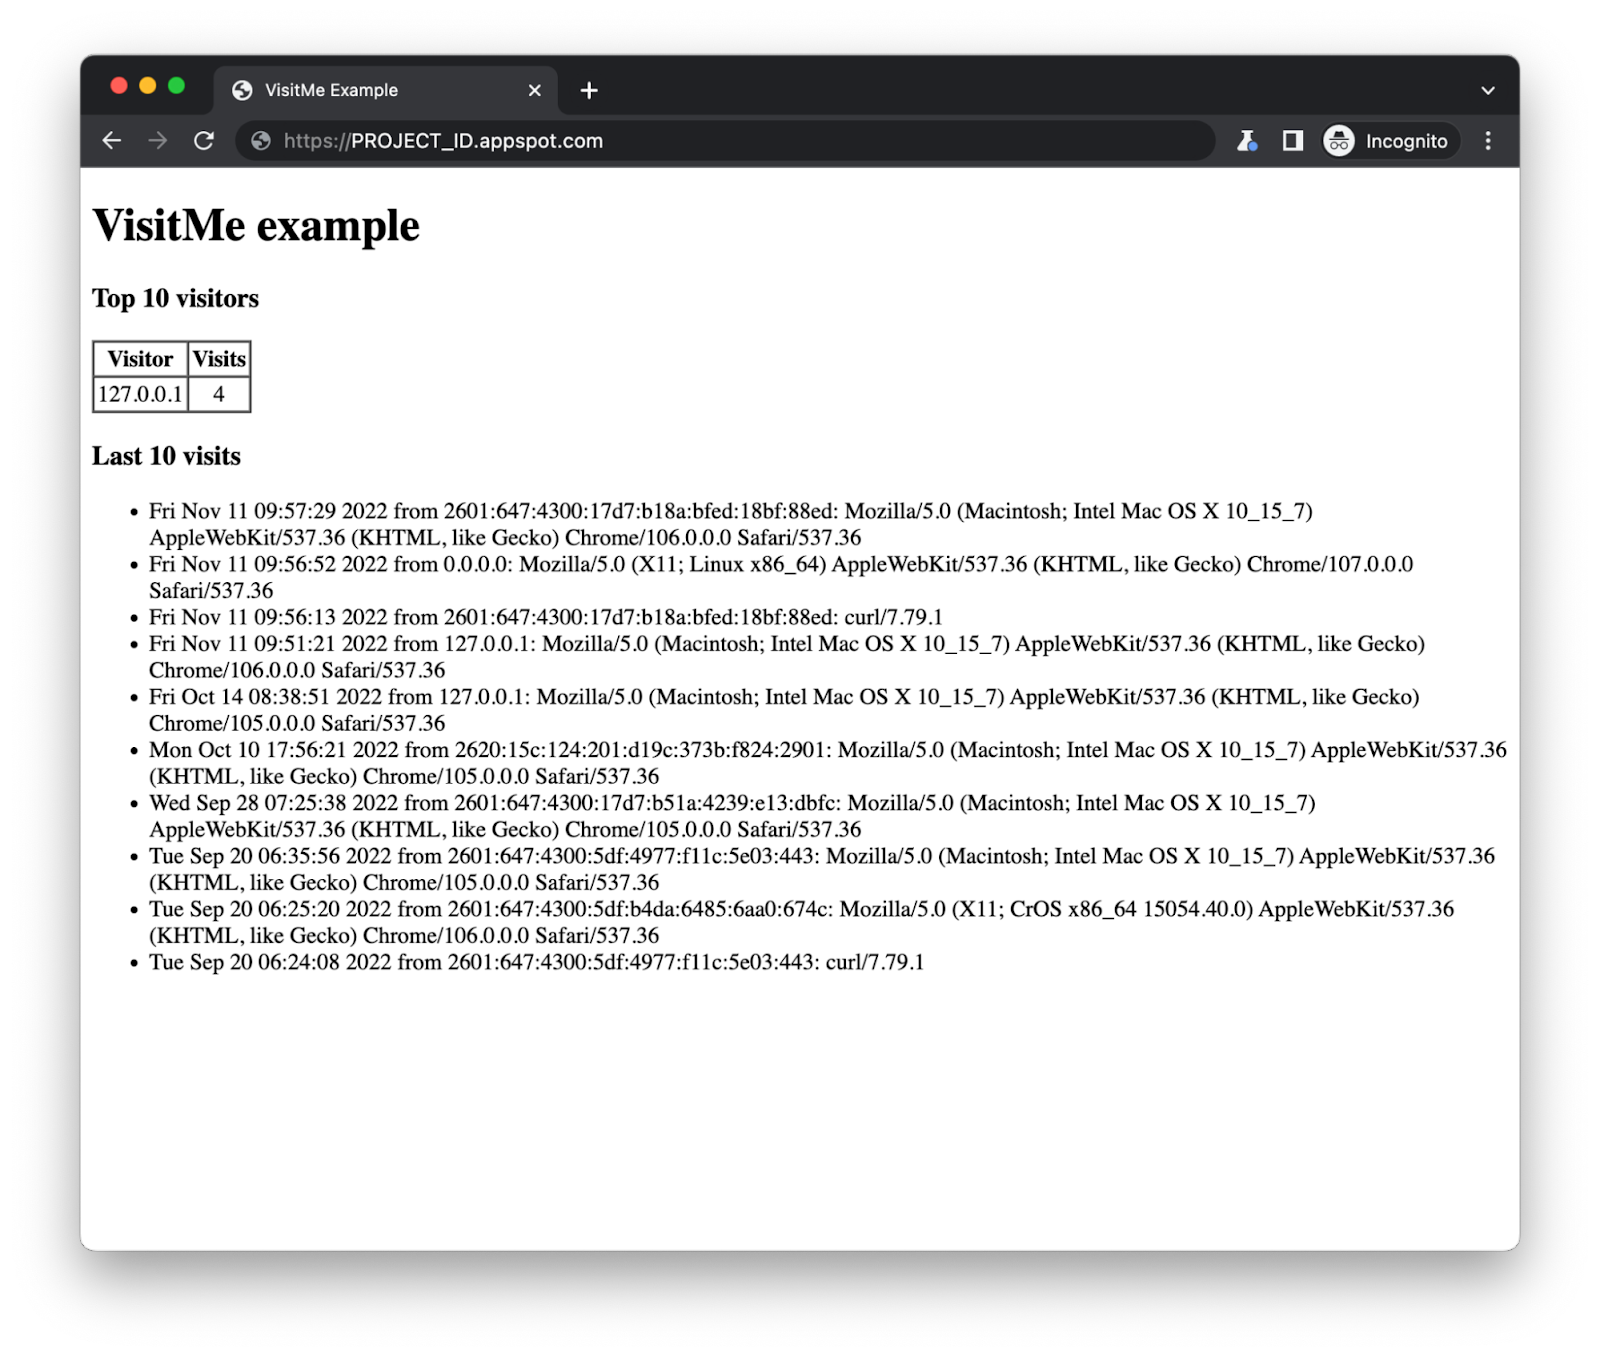
In addition to registering page visits, the sample app needs to be modified to track visitors. Visits are comprised of a timestamp and visitor information such as the IP address and user agent. We'll modify the app to use the IP address and track how many visits come from each address seen. The home page is modified to show the top visitors in addition to the most recent visits:
The sample app's updated home page tracking visits and visitors
When visits are registered, pull tasks are created to track the visitors. The pull tasks sit patiently in the queue until they are processed in aggregate periodically. Until that happens, the top visitors table stays static. These tasks can be processed in a number of ways: periodically by a cron or Cloud Scheduler job, a separate App Engine backend service, explicitly by a user (via browser or command-line HTTP request), event-triggered Cloud Function, etc. In the tutorial, we issue a curl request to the app's endpoint to process the enqueued tasks. When all tasks have completed, the table then reflects any changes to the current top visitors and their visit counts:
Processed pull tasks update the top visitors table
Below is some pseudocode representing the core part of the app that was altered to add Task Queue pull task usage, namely a new data model class, VisitorCount, to track visitor counts, enqueuing a (pull) task to update visitor counts when registering individual visits in store_visit(), and most importantly, a new function fetch_counts(), accessible via /log, to process enqueued tasks and update overall visitor counts. The bolded lines represent the new or altered code.
This "migration" is comprised of adding Task Queue pull task usage to support tracking visitor counts to the Module 1 baseline app and arrives at the finish line with the Module 18 app. To get hands-on experience doing it yourself, do the codelab by hand and follow along with the video. Then you'll be ready to upgrade to Cloud Pub/Sub should you choose to do so.
If you do want to move to Pub/Sub, see Module 19, including its codelab. All Serverless Migration Station content (codelabs, videos, and source code) are available at its open source repo. While we're initially focusing on Python users, the Cloud team is covering other runtimes soon, so stay tuned. Also check out other videos in the broader Serverless Expeditions series.
App Engine initially launched in 2008, providing a suite of bundled services making it convenient for applications to access a database (Datastore), caching service (Memcache), independent task execution (Task Queue), Google Sign-In authentication (Users), or large "blob" storage (Blobstore), or other companion services. However, apps leveraging those services can only run their apps on App Engine.
To increase app portability and help Google move towards its goal of having the most open cloud on the market, App Engine launched its 2nd-generation service in 2018, initially removing those legacy services. The newer platform allows developers to upgrade apps to the latest language runtimes, such as moving from Python 2 to 3 or Java 8 to 11 (and today, Java 17). One of the major drawbacks to the 1st-generation runtimes is that they're customized, proprietary, and restrictive in what you can use or can't.
Instead, the 2nd-generation platform uses open source runtimes, meaning ability to follow standard development practices, use common/known idioms, and have fewer restrictions of 3rd-party libraries, and obviating the need to copy or "vendor" them with your code. Unfortunately, to use these newer runtimes, migrating away from App Engine services were required because while you could upgrade language releases, there was no access to bundled services, breaking apps or requiring complete rewrites, making it a showstopper for many users.
Showing App Engine users how to use bundled services on Python 3
Performing the upgrade
Modernizing the typical Python 2 App Engine app looks something like this:
Migrate from the webapp2 framework (not available in Python 3)
Port from Python 2 to 3, preserve use of bundled services
Optional migration to Cloud standalone or similar 3rd-party services
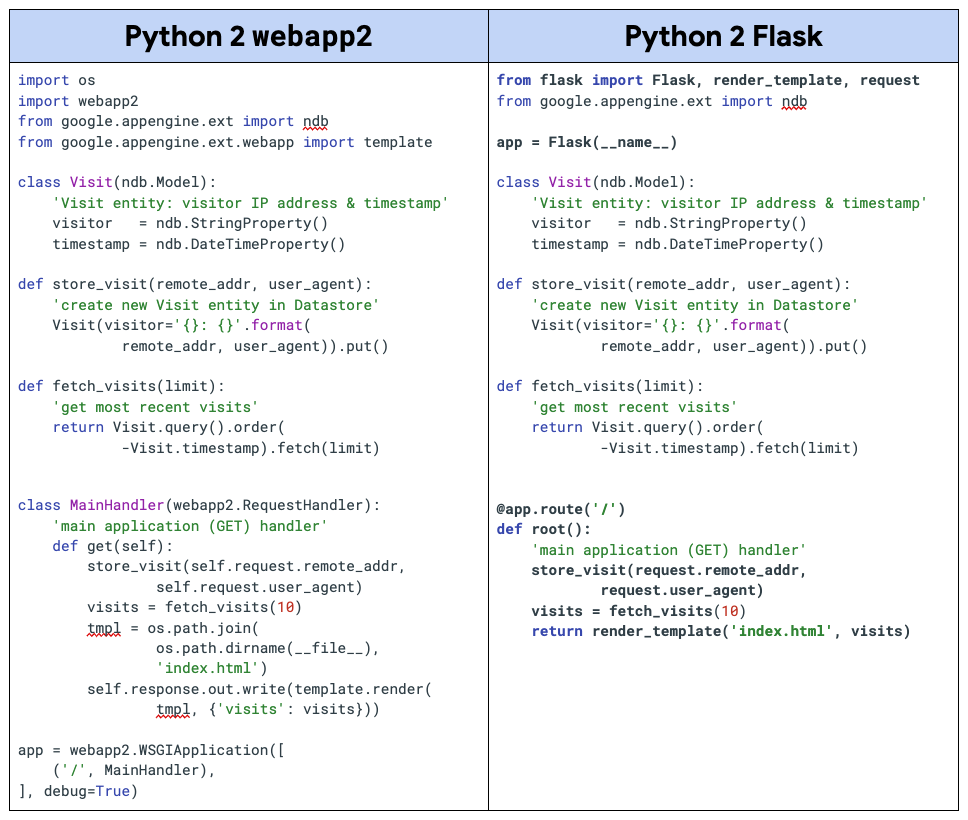
The first step is to move to a standard Python web framework like Flask, Django, Pyramid, etc. Below is some pseudocode from Migration Module 1 demonstrating how to migrate from webapp2 to Flask:
Step 1: Port Python 2 sample app from webapp2 to Flask
The key changes are bolded in the above code snippets. Notice how the App Engine NDB code [the Visit class definition plus store_visit() and fetch_visits() functions] are unaffected by this web framework migration. The full webapp2 code sample can be found in the Module 0 repo folder while the completed migration to Flask sample is located in the Module 1 repo folder.
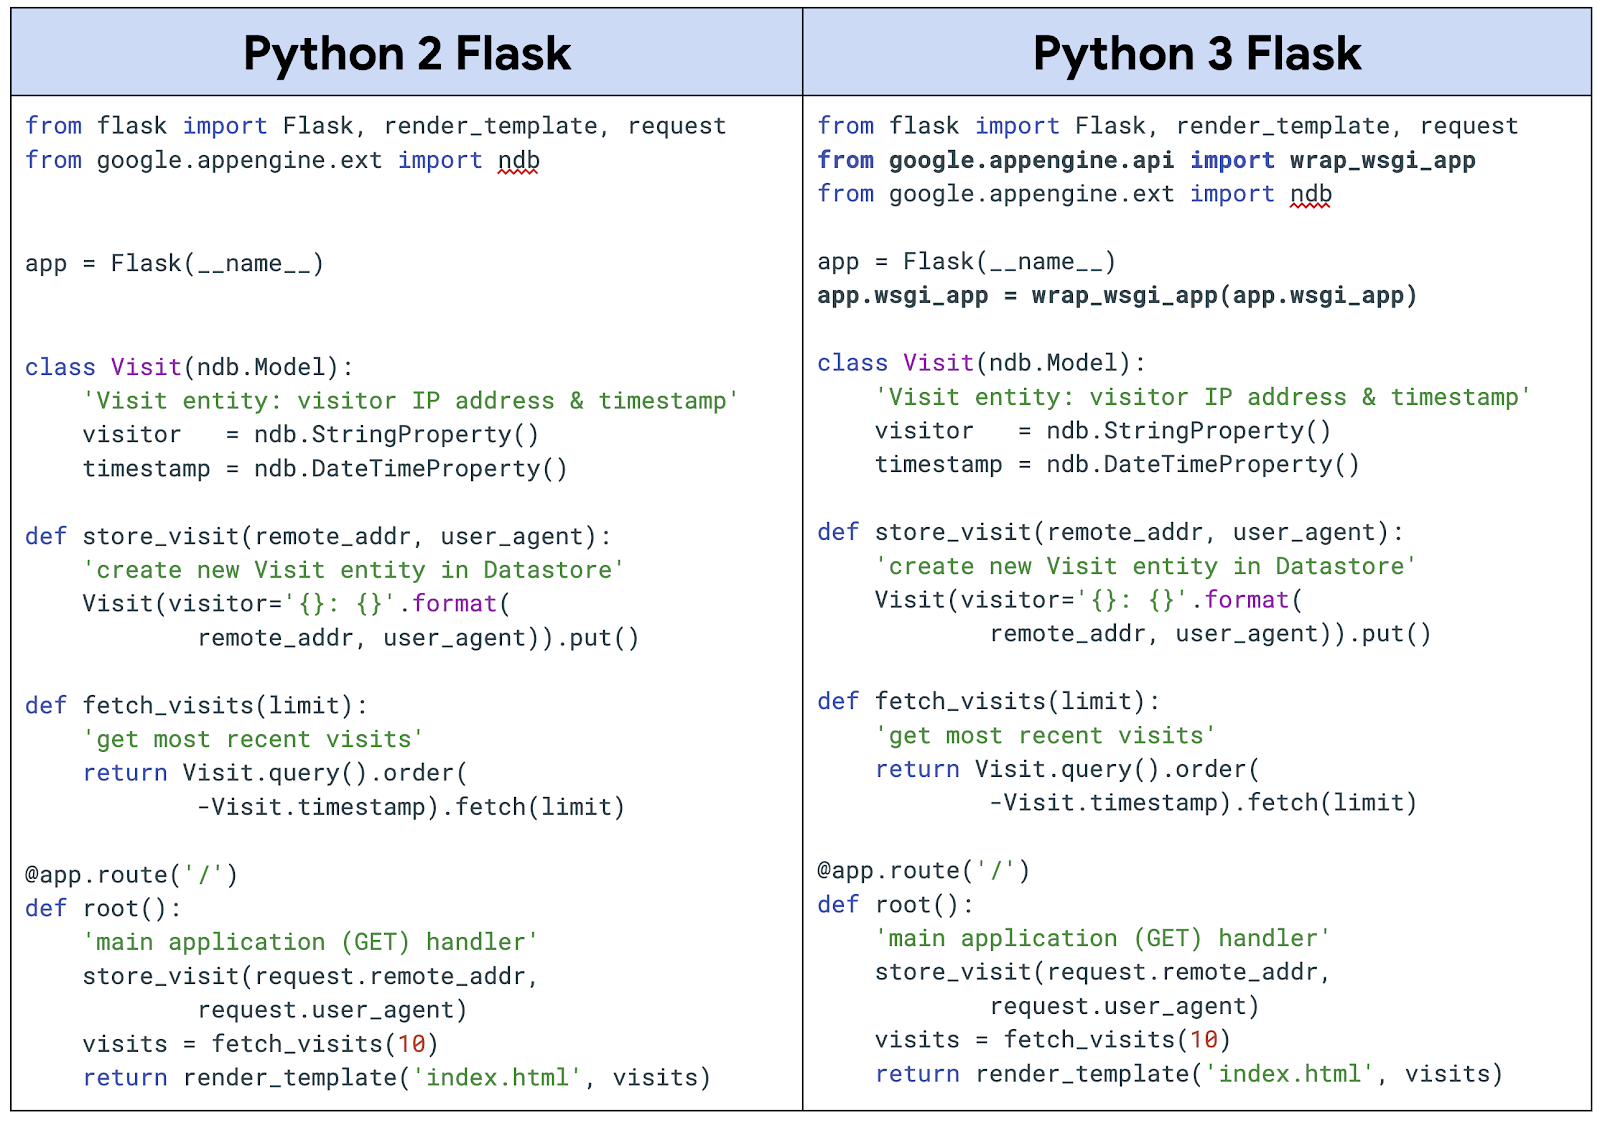
After your app has ported frameworks, you're free to upgrade to Python 3 while preserving access to the bundled services if your app uses any. Below is pseudocode demonstrating how to upgrade the same sample app to Python 3 as well as the code changes needed to continue to use App Engine NDB:
Step 2: Port sample app to Python 3, preserving use of NDB bundled service
The original app was designed to work under both Python 2 and 3 interpreters, so no language changes were required in this case. We added an import of the new App Engine SDK followed by the key update wrapping the WSGI object so the app can access the bundled services. As before, the key updates are bolded. Some updates to configuration are also required, and those are outlined in the documentation and the (Module 17) codelab.
The NDB code is also left untouched in this migration. Not all of the bundled services feature such a hands-free migration, and we hope to cover some of the more complex ones ahead in Module 22. Java, PHP, and Go users have it even better, requiring fewer or no code changes at all. The Python 2 Flask sample is located in the Module 1 repo folder, and the resulting Python 3 app can be found in the Module 1b repo folder.
The immediate benefit of step two is the ability to upgrade to a more current version of language runtime. This leaves the third step of migrating off the bundled services as optional, especially if you plan on staying on App Engine for the long-term.
Additional options
If you decide to migrate off the bundled services, you can do so on your own timeline. It should be a consideration should you ever want to move to modern serverless platforms such as Cloud Functions or Cloud Run, to lower-level platforms because you want more control, like GKE, our managed Kubernetes service, or Compute Engine VMs.
Step three is also where the rest of the Serverless Migration Station content may be useful:
*code samples and codelabs available;videos forthcoming
As far as moving to modern serverless platforms, if you want to break apart a large App Engine app into multiple microservices, consider Cloud Functions. If your organization has added containerization as part of your software development workflow, consider Cloud Run. It's suitable for apps if you're familiar with containers and Docker, but even if you or your team don't have that experience, Cloud Buildpacks can do the heavy lifting for you. Here are the relevant migration modules to explore:
Early App Engine users appreciate the convenience of the platform's bundled services, and after listening to user feedback, adding them back to 2nd-generation runtimes is another way we can help developers modernize their apps. Whether upgrading to newer language runtimes to stay on App Engine and continue to use its bundled services, migrating to Cloud standalone products, or shifting to other serverless platforms, the Google Cloud team aims to provide the tools to help streamline your modernization efforts.
All Serverless Migration Station content (codelabs, videos, source code [when available]) can be accessed at its open source repo. While our content initially focuses on Python users, the Cloud team is working on covering other language runtimes, so stay tuned. Today's video features a special guest to provide a teaser of what to expect for Java. For additional video content, check out the broader Serverless Expeditions series.
The previous Module 12 episode of the Serverless Migration Station video series demonstrated how to add App Engine Memcache usage to an existing app that has transitioned from the webapp2 framework to Flask. Today's Module 13 episode continues its modernization by demonstrating how to migrate that app from Memcache to Cloud Memorystore. Moving from legacy APIs to standalone Cloud services makes apps more portable and provides an easier transition from Python 2 to 3. It also makes it possible to shift to other Cloud compute platforms should that be desired or advantageous. Developers benefit from upgrading to modern language releases and gain added flexibility in application-hosting options.
While App Engine Memcache provides a basic, low-overhead, serverless caching service, Cloud Memorystore "takes it to the next level" as a standalone product. Rather than a proprietary caching engine, Cloud Memorystore gives users the option to select from a pair of open source engines, Memcached or Redis, each of which provides additional features unavailable from App Engine Memcache. Cloud Memorystore is typically more cost efficient at-scale, offers high availability, provides automatic backups, etc. On top of this, one Memorystore instance can be used across many applications as well as incorporates improvements to memory handling, configuration tuning, etc., gained from experience managing a huge fleet of Redis and Memcached instances.
While Memcached is more similar to Memcache in usage/features, Redis has a much richer set of data structures that enable powerful application functionality if utilized. Redis has also been recognized as the most loved database by developers in StackOverflow's annual developers survey, and it's a great skill to pick up. For these reasons, we chose Redis as the caching engine for our sample app. However, if your apps' usage of App Engine Memcache is deeper or more complex, a migration to Cloud Memorystore for Memcached may be a better option as a closer analog to Memcache.
Migrating to Cloud Memorystore for Redis featured video
Performing the migration
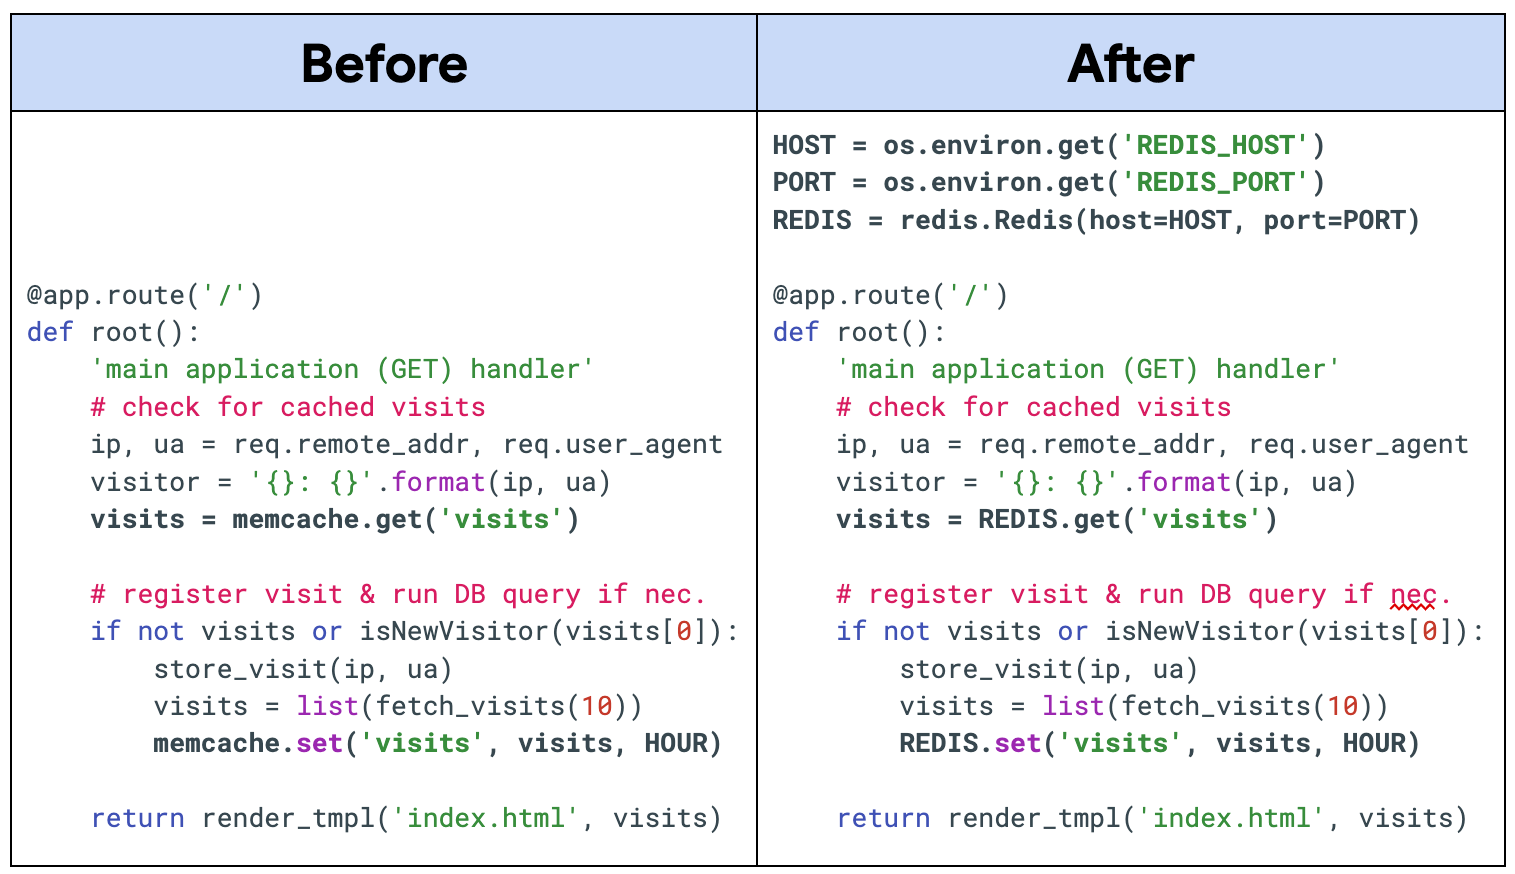
The sample application registers individual web page "visits," storing visitor information such as IP address and user agent. In the original app, the most recent visits are cached into Memcache for an hour and used for display if the same user continuously refreshes their browser during this period; caching is a one way to counter this abuse. New visitors or cache expiration results new visits as well as updating the cache with the most recent visits. Such functionality must be preserved when migrating to Cloud Memorystore for Redis.
Below is pseudocode representing the core part of the app that saves new visits and queries for the most recent visits. Before, you can see how the most recent visits are cached into Memcache. After completing the migration, the underlying caching infrastructure has been swapped out in favor of Memorystore (via language-specific Redis client libraries). In this migration, we chose Redis version 5.0, and we recommend the latest versions, 5.0 and 6.x at the time of this writing, as the newest releases feature additional performance benefits, fixes to improve availability, and so on. In the code snippets below, notice how the calls between both caching systems are nearly identical. The bolded lines represent the migration-affected code managing the cached data.
Switching from App Engine Memcache to Cloud Memorystore for Redis
Wrap-up
The migration covered begins with the Module 12 sample app ("START"). Migrating the caching system to Cloud Memorystore and other requisite updates results in the Module 13 sample app ("FINISH") along with an optional port to Python 3. To practice this migration on your own to help prepare for your own migrations, follow the codelab to do it by-hand while following along in the video.
While the code migration demonstrated seems straightforward, the most critical change is that Cloud Memorystore requires dedicated server instances. For this reason, a Serverless VPC connector is also needed to connect your App Engine app to those Memorystore instances, requiring more dedicated servers. Furthermore, neither Cloud Memorystore nor Cloud VPC are free services, and neither has an "Always free" tier quota. Before moving forward this migration, check the pricing documentation for Cloud Memorystore for Redis and Serverless VPC access to determine cost considerations before making a commitment.
One key development that may affect your decision: In Fall 2021, the App Engine team extended support of many of the legacy bundled services like Memcache to next-generation runtimes, meaning you are no longer required to migrate to Cloud Memorystore when porting your app to Python 3. You can continue using Memcache even when upgrading to 3.x so long as you retrofit your code to access bundled services from next-generation runtimes.
A move to Cloud Memorystore and today's migration techniques will be here if and when you decide this is the direction you want to take for your App Engine apps. All Serverless Migration Station content (codelabs, videos, source code [when available]) can be accessed at its open source repo. While our content initially focuses on Python users, we plan to cover other language runtimes, so stay tuned. For additional video content, check out our broader Serverless Expeditions series.
Recently, we discussed containerizing App Engine apps for Cloud Run, with or without Docker. But what about Cloud Functions… can App Engine users take advantage of that platform somehow? Back in the day, App Engine was always the right decision, because it was the only option. With Cloud Functions and Cloud Run joining in the serverless product suite, that's no longer the case.
Back when App Engine was the only choice, it was selected to host small, single-function apps. Yes, when it was the only option. Other developers have created huge monolithic apps for App Engine as well… because it was also the only option. Fast forward to today where code follows more service-oriented or event-driven architectures. Small apps can be moved to Cloud Functions to simplify the code and deployments while large apps could be split into smaller components, each running on Cloud Functions.
Refactoring App Engine apps for Cloud Functions
Small, single-function apps can be seen as a microservice, an API endpoint "that does something," or serve some utility likely called as a result of some event in a larger multi-tiered application, say to update a database row or send a customer email message. App Engine apps require some kind web framework and routing mechanism while Cloud Function equivalents can be freed from much of those requirements. Refactoring these types of App Engine apps for Cloud Functions will like require less overhead, helps ease maintenance, and allow for common components to be shared across applications.
Large, monolithic applications are often made up of multiple pieces of functionality bundled together in one big package, such as requisitioning a new piece of equipment, opening a customer order, authenticating users, processing payments, performing administrative tasks, and so on. By breaking this monolith up into multiple microservices into individual functions, each component can then be reused in other apps, maintenance is eased because software bugs will identify code closer to their root origins, and developers won't step on each others' toes.
Migration to Cloud Functions
In this latest episode of Serverless Migration Station, a Serverless Expeditions mini-series focused on modernizing serverless apps, we take a closer look at this product crossover, covering how to migrate App Engine code to Cloud Functions. There are several steps you need to take to prepare your code for Cloud Functions:
Divest from legacy App Engine "bundled services," e.g., Datastore, Taskqueue, Memcache, Blobstore, etc.
If your app is a monolith, break it up into multiple independent functions. (You can also keep a monolith together and containerize it for Cloud Run as an alternative.)
Make appropriate application updates to support Cloud Functions
The first three bullets are outside the scope of this video and its codelab, so we'll focus on the last one. The changes needed for your app include the following:
Remove unneeded and/or unsupported configuration
Remove use of the web framework and supporting routing code
For each of your functions, assign an appropriate name and install the request object it will receive when it is called.
Regarding the last point, note that you can have multiple "endpoints" coming into a single function which processes the request path, calling other functions to handle those routes. If you have many functions in your app, separate functions for every endpoint becomes unwieldy; if large enough, your app may be more suited for Cloud Run. The sample app in this video and corresponding code sample only has one function, so having a single endpoint for that function works perfectly fine here.
This migration series focuses on our earliest users, starting with Python 2. Regarding the first point, the app.yaml file is deleted. Next, almost all Flask resources are removed except for the template renderer (the app still needs to output the same HTML as the original App Engine app). All app routes are removed, and there's no instantiation of the Flask app object. Finally for the last step, the main function is renamed more appropriately to visitme() along with a request object parameter.
This "migration module" starts with the (Python 3 version of the) Module 2 sample app, applies the steps above, and arrives at the migrated Module 11 app. Implementing those required changes is illustrated by this code "diff:"
Migration of sample app to Cloud Functions
Next steps
If you're interested in trying this migration on your own, feel free to try the corresponding codelab which leads you step-by-step through this exercise and use the video for additional guidance.
All migration modules, their videos (when published), codelab tutorials, START and FINISH code, etc., can be found in the migration repo. We hope to also one day cover other legacy runtimes like Java 8 as well as content for the next-generation Cloud Functions service, so stay tuned. If you're curious whether it's possible to write apps that can run on App Engine, Cloud Functions, or Cloud Run with no code changes at all, the answer is yes. Hope this content is useful for your consideration when modernizing your own serverless applications!
Always apply the principle of least privilege when you provide access to Google Cloud resources. The best practice is to grant only the most limited predefined roles or custom roles that meet your needs.
API quotas protect the Google infrastructure from excessive API requests. Traffic is blocked when the level of requests reaches the daily API quota level or a per-user rate limit.
To avoid disruptions due to an API quota level that's too low, set the quota for your app or API appropriately. Note that the lead time for the increase of quotas is one month.
Checklist for production-ready enterprise workloads
Use this checklist to set up scalable, production-ready enterprise workloads. Note that the checklist assumes that you're an administrator with control over your company's Google Cloud resources.
Google Workspace domain ownership of your group's project lets you tie it into a Google Workspace account, rather than have it tied to a personal account.
IAP lets you hide your website until you’re ready for people to see it. IAP establishes a central authorization layer for apps accessed by HTTPS, so you can adopt an app-level access-control model rather than use network-level firewalls. When IAP protects an app or resource, only users who have the correct Identity and Access Management (IAM) role can access it through the proxy.
Cloud Build can import source code from a variety of repositories or cloud storage spaces, execute a build to your specifications, and produce artifacts, such as Docker containers or Java archives. You can configure builds to fetch dependencies and run unit tests, static analyzes, and integration tests.
Google Groups can help you manage teams across projects, which includes the setup of the group access through IAM. Groups such as project teams, departments, or classmates can communicate and collaborate with Google Groups. If you want to invite a group to an event or share documents with a group, you can send a single email to everyone in the group.
For more information about how to set up a group, see Google Groups.
Watch for Google suggestions
Google provides many useful tips and suggestions for best practices within the context of your work. For example, if you go to a project that you haven't used in a while, you may get a warning like this one:
If you click the link, you see a page that tells you how to apply role recommendations to help you enforce the principle of least privilege to ensure that principals have only the permissions that they actually need. Google offers many suggestions for best practices such as this one, so watch for them as you work.
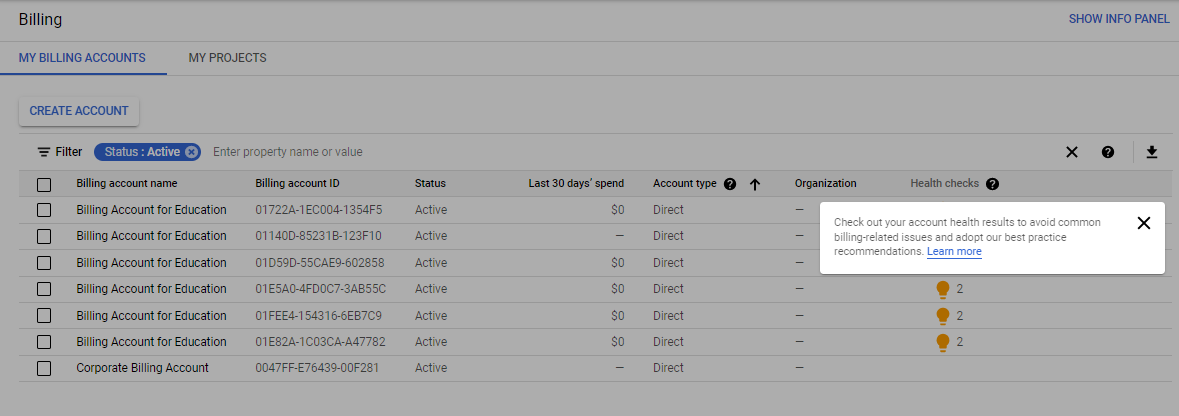
Here's an example of a useful in-console recommendation that you might see from your billing page:
If you click Learn more, you arrive at a Cloud billing checklist, which is part of a longer billing-specific checklist that you might find useful.
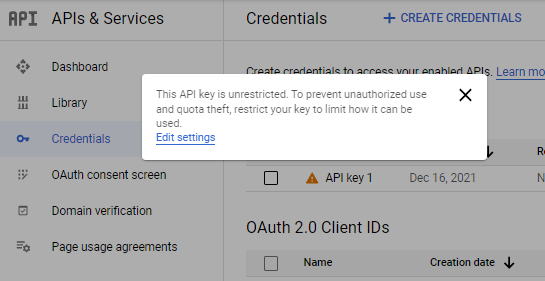
Here's another example found on the API & Services page:
If you click Edit settings, you arrive on a page where you can change the settings.
Posted by Álvaro Lamas, Héctor Parra, Jaime Martínez, Julia Hernández, Miguel Fernandes, Pablo Gil
Acquiring high value customers using predicted Lifetime Value, taking specific actions on high propensity of churn users, generating and activating audiences based on machine learning processed signals…All of those marketing scenarios require of analyzing first party data, performing predictions on the data and activating the results into the different marketing platforms like Google Ads as frequently as possible to keep the data fresh.
Feeding marketing platforms like Google Ads on a regular and frequent basis, requires a robust, report oriented and cost reduced ETL & prediction pipeline. These pipelines are very similar regardless of the use case and it’s very easy to fall into reinventing the wheel every time or manually copy & paste structural code increasing the risk of introducing errors.
Wouldn't it be great to have a common reusable structure and just add the specific code for each of the stages?
Here is where Prediction Framework plays a key role in helping you implement and accelerate your first-party data prediction projects by providing the backbone elements of the predictive process.
Prediction Framework is a fully customizable pipeline that allows you to simplify the implementation of prediction projects. You only need to have the input data source, the logic to extract and process the data and a Vertex AutoML model ready to use along with the right feature list, and the framework will be in charge of creating and deploying the required artifacts. With a simple configuration, all the common artifacts of the different stages of this type of projects will be created and deployed for you: data extraction, data preparation (aka feature engineering), filtering, prediction and post-processing, in addition to some other operational functionality including backfilling, throttling (for API limits), synchronization, storage and reporting.
The Prediction Framework was built to be hosted in the Google Cloud Platform and it makes use of Cloud Functions to do all the data processing (extraction, preparation, filtering and post-prediction processing), Firestore, Pub/Sub and Schedulers for the throttling system and to coordinate the different phases of the predictive process, Vertex AutoML to host your machine learning model and BigQuery as the final storage of your predictions.
Prediction Framework Architecture
To get involved and start using the Prediction Framework, a configuration file needs to be prepared with some environment variables about the Google Cloud Project to be used, the data sources, the ML model to make the predictions and the scheduler for the throttling system. In addition, custom queries for the data extraction, preparation, filtering and post-processing need to be added in the deploy files customization. Then, the deployment is done automatically using a deployment script provided by the tool.
Once deployed, all the stages will be executed one after the other, storing the intermediate and final data in the BigQuery tables:
Extract: this step will, on a timely basis, query the transactions from the data source, corresponding to the run date (scheduler or backfill run date) and will store them in a new table into the local project BigQuery.
Prepare: immediately after the extract of the transactions for one specific date is available, the data will be picked up from the local BigQuery and processed according to the specs of the model. Once the data is processed, it will be stored in a new table into the local project BigQuery.
Filter: this step will query the data stored by the prepare process and will filter the required data and store it into the local project BigQuery. (i.e only taking into consideration new customers transactionsWhat a new customer is up to the instantiation of the framework for the specific use case. Will be covered later).
Predict: once the new customers are stored, this step will read them from BigQuery and call the prediction using Vertex API. A formula based on the result of the prediction could be applied to tune the value or to apply thresholds. Once the data is ready, it will be stored into the BigQuery within the target project.
Post_process: A formula could be applied to the AutoML batch results to tune the value or to apply thresholds. Once the data is ready, it will be stored into the BigQuery within the target project.
One of the powerful features of the prediction framework is that it allows backfilling directly from the BigQuery user interface, so in case you’d need to reprocess a whole period of time, it could be done in literally 4 clicks.
In summary: Prediction Framework simplifies the implementation of first-party data prediction projects, saving time and minimizing errors of manual deployments of recurrent architectures.
For additional information and to start experimenting, you can visit the Prediction Framework repository on Github.
In 2018, the Knative project was founded and released by Google, and was subsequently developed in close partnership with IBM, Red Hat, VMware, and SAP. The project provides a serverless experience layer on Kubernetes, providing the building blocks you need to build and deploy modern, container-based serverless applications. Over the last three years, Knative has become the most widely-installed serverless layer on Kubernetes. More recently, Knative 1.0 was released, reaching an important milestone that was made possible thanks to the contributions and collaboration of over 600 developers in the community.
Google has worked closely with key maintainers and partners on the evolution of Knative, including conformance definition and stability ahead of the 1.0 milestone. To enable the next phase of community-driven innovation in Knative, today we have submitted Knative to the Cloud Native Computing Foundation (CNCF) for consideration as an incubating project, which begins the process to donate the Knative trademark, IP, and code.
As a leader in serverless computing, we’re committed to the future of Knative, and offering Knative 1.0 conformant Cloud Run and Cloud Run For Anthos products. Finding a home in the CNCF secures Knative’s long-term future and encourages continuing and open innovation. This donation recognizes the adoption and investment in Knative from the community, and will encourage further multi-vendor innovation, broader education and training.
At Google, we believe that using open source comes with a responsibility to contribute, sustain, and improve the projects that help drive innovation and make better software. We are excited to see how developers will continue to build and innovate in serverless using Knative.
By Alexandra Bush and Edd Wilder-James, Google Open Source


![Adding App Engine Task Queue pull task usage to sample app showing 'Before'[Module 1] on the left and 'After' [Module 18] with altered code on the right](https://blogger.googleusercontent.com/img/b/R29vZ2xl/AVvXsEjRVGVYc9fl4xI9xUpOUaAwXup8p-wUf5nbKllG7OYJSVAYSPVCGw7DU8EbMoTE3kBBgVZiICFvsn_7fHP2oymA_1ASKBrAE2Qt8PzCGAAkK7_WnyvAIEMKQUrxP8FSz3tGykLrlu9nyluN5vgEPrWZrBqIAalCoRmos169g9m9NHz3cGqQyych9eEG/s1600/Screen%20Shot%202022-11-29%20at%205.19.28%20PM.png)