Tag Archives: Android

CameraX update makes dual concurrent camera even easier

Posted by Donovan McMurray – Developer Relations Engineer

CameraX, Android's Jetpack camera library, is getting an exciting update to its Dual Concurrent Camera feature, making it even easier to integrate this feature into your app. This feature allows you to stream from 2 different cameras at the same time. The original version of Dual Concurrent Camera was released in CameraX 1.3.0, and it was already a huge leap in making this feature easier to implement.

Starting with 1.5.0-alpha01, CameraX will now handle the composition of the 2 camera streams as well. This update is additional functionality, and it doesn’t remove any prior functionality nor is it a breaking change to your existing Dual Concurrent Camera code. To tell CameraX to handle the composition, simply use the new SingleCameraConfig constructor which has a new parameter for a CompositionSettings object. Since you’ll be creating 2 SingleCameraConfigs, you should be consistent with what constructor you use.

Nothing has changed in the way you check for concurrent camera support from the prior version of this feature. As a reminder, here is what that code looks like.

// Set up primary and secondary camera selectors if supported on device.
var primaryCameraSelector: CameraSelector? = null
var secondaryCameraSelector: CameraSelector? = null

for (cameraInfos in cameraProvider.availableConcurrentCameraInfos) {
    primaryCameraSelector = cameraInfos.first {
        it.lensFacing == CameraSelector.LENS_FACING_FRONT
    }.cameraSelector
    secondaryCameraSelector = cameraInfos.first {
        it.lensFacing == CameraSelector.LENS_FACING_BACK
    }.cameraSelector

    if (primaryCameraSelector == null || secondaryCameraSelector == null) {
        // If either a primary or secondary selector wasn't found, reset both
        // to move on to the next list of CameraInfos.
        primaryCameraSelector = null
        secondaryCameraSelector = null
    } else {
        // If both primary and secondary camera selectors were found, we can
        // conclude the search.
        break
    }
}

if (primaryCameraSelector == null || secondaryCameraSelector == null) {
    // Front and back concurrent camera not available. Handle accordingly.
}

Here’s the updated code snippet showing how to implement picture-in-picture, with the front camera stream scaled down to fit into the lower right corner. In this example, CameraX handles the composition of the camera streams.

// If 2 concurrent camera selectors were found, create 2 SingleCameraConfigs
// and compose them in a picture-in-picture layout.
val primary = SingleCameraConfig(
    cameraSelectorPrimary,
    useCaseGroup,
    CompositionSettings.Builder()
        .setAlpha(1.0f)
        .setOffset(0.0f, 0.0f)
        .setScale(1.0f, 1.0f)
        .build(),
    lifecycleOwner);
val secondary = SingleCameraConfig(
    cameraSelectorSecondary,
    useCaseGroup,
    CompositionSettings.Builder()
        .setAlpha(1.0f)
        .setOffset(2 / 3f - 0.1f, -2 / 3f + 0.1f)
        .setScale(1 / 3f, 1 / 3f)
        .build()
    lifecycleOwner);

// Bind to lifecycle
ConcurrentCamera concurrentCamera =
    cameraProvider.bindToLifecycle(listOf(primary, secondary));

You are not constrained to a picture-in-picture layout. For instance, you could define a side-by-side layout by setting the offsets and scaling factors accordingly. You want to keep both dimensions scaled by the same amount to avoid a stretched preview. Here’s how that might look.

// If 2 concurrent camera selectors were found, create 2 SingleCameraConfigs
// and compose them in a picture-in-picture layout.
val primary = SingleCameraConfig(
    cameraSelectorPrimary,
    useCaseGroup,
    CompositionSettings.Builder()
        .setAlpha(1.0f)
        .setOffset(0.0f, 0.25f)
        .setScale(0.5f, 0.5f)
        .build(),
    lifecycleOwner);
val secondary = SingleCameraConfig(
    cameraSelectorSecondary,
    useCaseGroup,
    CompositionSettings.Builder()
        .setAlpha(1.0f)
        .setOffset(0.5f, 0.25f)
        .setScale(0.5f, 0.5f)
        .build()
    lifecycleOwner);

// Bind to lifecycle
ConcurrentCamera concurrentCamera =
    cameraProvider.bindToLifecycle(listOf(primary, secondary));

We’re excited to offer this improvement to an already developer-friendly feature. Truly the CameraX way! CompositionSettings in Dual Concurrent Camera is currently in alpha, so if you have feature requests to improve upon it before the API is locked in, please give us feedback in the CameraX Discussion Group. And check out the full CameraX 1.5.0-alpha01 release notes to see what else is new in CameraX.

Chrome on Android to support third-party autofill services natively

Posted by Eiji Kitamura – Developer Advocate

Chrome on Android will soon allow third-party autofill services (like password managers) to natively autofill forms on websites. Developers of these services need to tell their users to toggle a setting in Chrome to continue using their service with Chrome.


Background

Google is the default autofill service on Chrome, providing passwords, passkeys and autofill for other information like addresses and payment data.

A third-party password manager can be set as the preferred autofill service on Android through System Settings. The preferred autofill service can fill across all Android apps. However, to autofill forms on Chrome, the autofill service needs to use "compatibility mode". This causes glitches on Chrome such as janky page scrolling and potentially showing duplicate suggestions from Google and a third-party.

With this coming change, Chrome on Android will allow third-party autofill services to natively autofill forms giving users a smoother and simpler user experience. Third-party autofill services can autofill passwords, passkeys and other information like addresses and payment data, as they would in other Android apps.


Try the feature yourself

You can already test the functionality on Chrome 131 and later. First, set a third-party autofill service as preferred in Android 14:

Note: Instructions may vary by device manufacturer. The below steps are for a Google Pixel device running Android 15.
    1. Open Android's System Settings
    2. Select Passwords, passkeys & accounts
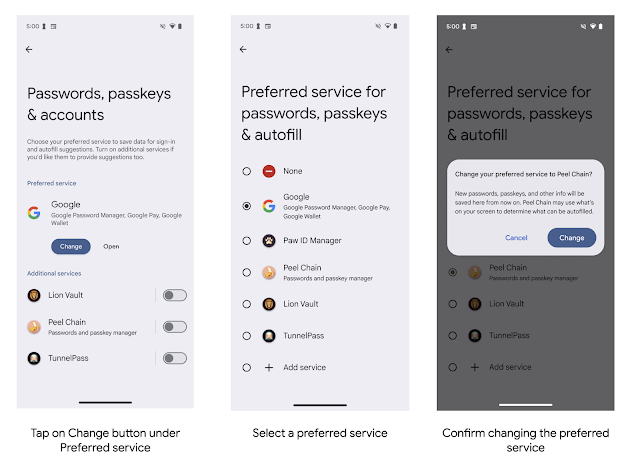
    3. Tap on Change button under Preferred service
    4. Select a preferred service
    5. Confirm changing the preferred autofill service

Side by side screenshots show the steps involved in enabling third-party autofill service from your device: first tap 'Change', then select the new service, and finally confirm the change.

Secondly, enable third-party autofill service on Chrome

    1. Open Chrome on Android
    2. Open chrome://flags#enable-autofill-virtual-view-structure
    3. Set the flag to "Enabled" and restart
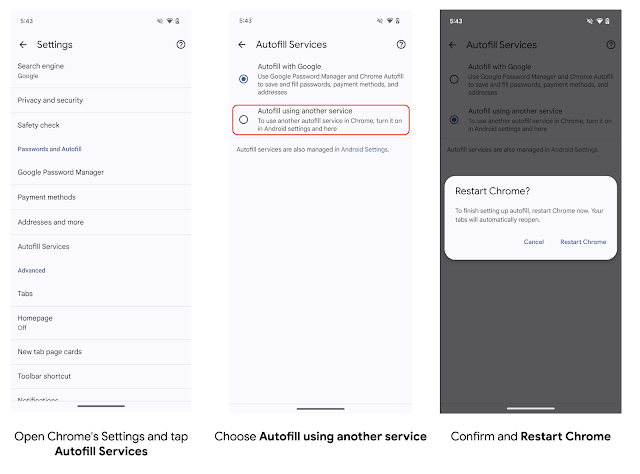
    4. Open Chrome's Settings and tap Autofill Services
    5. Choose Autofill using another service
    6. Confirm and restart Chrome
Note: Steps 2 and 3 are not necessary after Chrome 131. Chrome 131 is scheduled to be stable on November 12th, 2024.
Side by side screenshots show the steps involved in changing your preferred password service on a smartphone: first tap 'Autofill Services', then select 'Autofill using another service', and finally restart Chrome to complete setup.

You can emulate how Chrome behaves after compatibility mode is disabled by updating chrome://flags#suppress-autofill-via-accessibility to Enabled.

Actions required from third-party autofill services

Implementation wise, autofill service developers don't need an additional implementation as long as they have a proper integration with autofill services. Chrome will gracefully respect it and autofill forms.

Chrome plans to stop supporting compatibility mode in early 2025. Users must select Autofill using another service in Chrome settings to ensure their autofill experience is unaffected. The new setting is available in Chrome 131. You should encourage your users to toggle the setting, to ensure they have the best autofill experience possible with your service and Chrome on Android.


Timeline

    • October 16th, 2024: Chrome 131 beta is available
    • November 12th, 2024: Chrome 131 is in stable
    • Early 2025: Compatibility mode is no longer available on Chrome

Creating a responsive dashboard layout for JetLagged with Jetpack Compose

Posted by Rebecca Franks - Developer Relations Engineer

This blog post is part of our series: Adaptive Spotlight Week where we provide resources—blog posts, videos, sample code, and more—all designed to help you adapt your apps to phones, foldables, tablets, ChromeOS and even cars. You can read more in the overview of the Adaptive Spotlight Week, which will be updated throughout the week.


We’ve heard the news, creating adaptive layouts in Jetpack Compose is easier than ever. As a declarative UI toolkit, Jetpack Compose is well suited for designing and implementing layouts that adjust themselves to render content differently across a variety of sizes. By using logic coupled with Window Size Classes, Flow layouts, movableContentOf and LookaheadScope, we can ensure fluid responsive layouts in Jetpack Compose.

Following the release of the JetLagged sample at Google I/O 2023, we decided to add more examples to it. Specifically, we wanted to demonstrate how Compose can be used to create a beautiful dashboard-like layout. This article shows how we’ve achieved this.

Moving image demonstrating responsive design in Jetlagged where items animate positions automatically
Responsive design in Jetlagged where items animate positions automatically

Use FlowRow and FlowColumn to build layouts that respond to different screen sizes

Using Flow layouts ( FlowRow and FlowColumn ) make it much easier to implement responsive, reflowing layouts that respond to screen sizes and automatically flow content to a new line when the available space in a row or column is full.

In the JetLagged example, we use a FlowRow, with a maxItemsInEachRow set to 3. This ensures we maximize the space available for the dashboard, and place each individual card in a row or column where space is used wisely, and on mobile devices, we mostly have 1 card per row, only if the items are smaller are there two visible per row.

Some cards leverage Modifiers that don’t specify an exact size, therefore allowing the cards to grow to fill the available width, for instance using Modifier.widthIn(max = 400.dp), or set a certain size, like Modifier.width(200.dp).

FlowRow(
    modifier = Modifier.fillMaxSize(),
    horizontalArrangement = Arrangement.Center,
    verticalArrangement = Arrangement.Center,
    maxItemsInEachRow = 3
) {
    Box(modifier = Modifier.widthIn(max = 400.dp))
    Box(modifier = Modifier.width(200.dp))
    Box(modifier = Modifier.size(200.dp))
    // etc 
}

We could also leverage the weight modifier to divide up the remaining area of a row or column, check out the documentation on item weights for more information.


Use WindowSizeClasses to differentiate between devices

WindowSizeClasses are useful for building up breakpoints in our UI for when elements should display differently. In JetLagged, we use the classes to know whether we should include cards in Columns or keep them flowing one after the other.

For example, if WindowWidthSizeClass.COMPACT, we keep items in the same FlowRow, where as if the layout it larger than compact, they are placed in a FlowColumn, nested inside a FlowRow:

            FlowRow(
                modifier = Modifier.fillMaxSize(),
                horizontalArrangement = Arrangement.Center,
                verticalArrangement = Arrangement.Center,
                maxItemsInEachRow = 3
            ) {
                JetLaggedSleepGraphCard(uiState.value.sleepGraphData)
                if (windowSizeClass == WindowWidthSizeClass.COMPACT) {
                    AverageTimeInBedCard()
                    AverageTimeAsleepCard()
                } else {
                    FlowColumn {
                        AverageTimeInBedCard()
                        AverageTimeAsleepCard()
                    }
                }
                if (windowSizeClass == WindowWidthSizeClass.COMPACT) {
                    WellnessCard(uiState.value.wellnessData)
                    HeartRateCard(uiState.value.heartRateData)
                } else {
                    FlowColumn {
                        WellnessCard(uiState.value.wellnessData)
                        HeartRateCard(uiState.value.heartRateData)
                    }
                }
            }

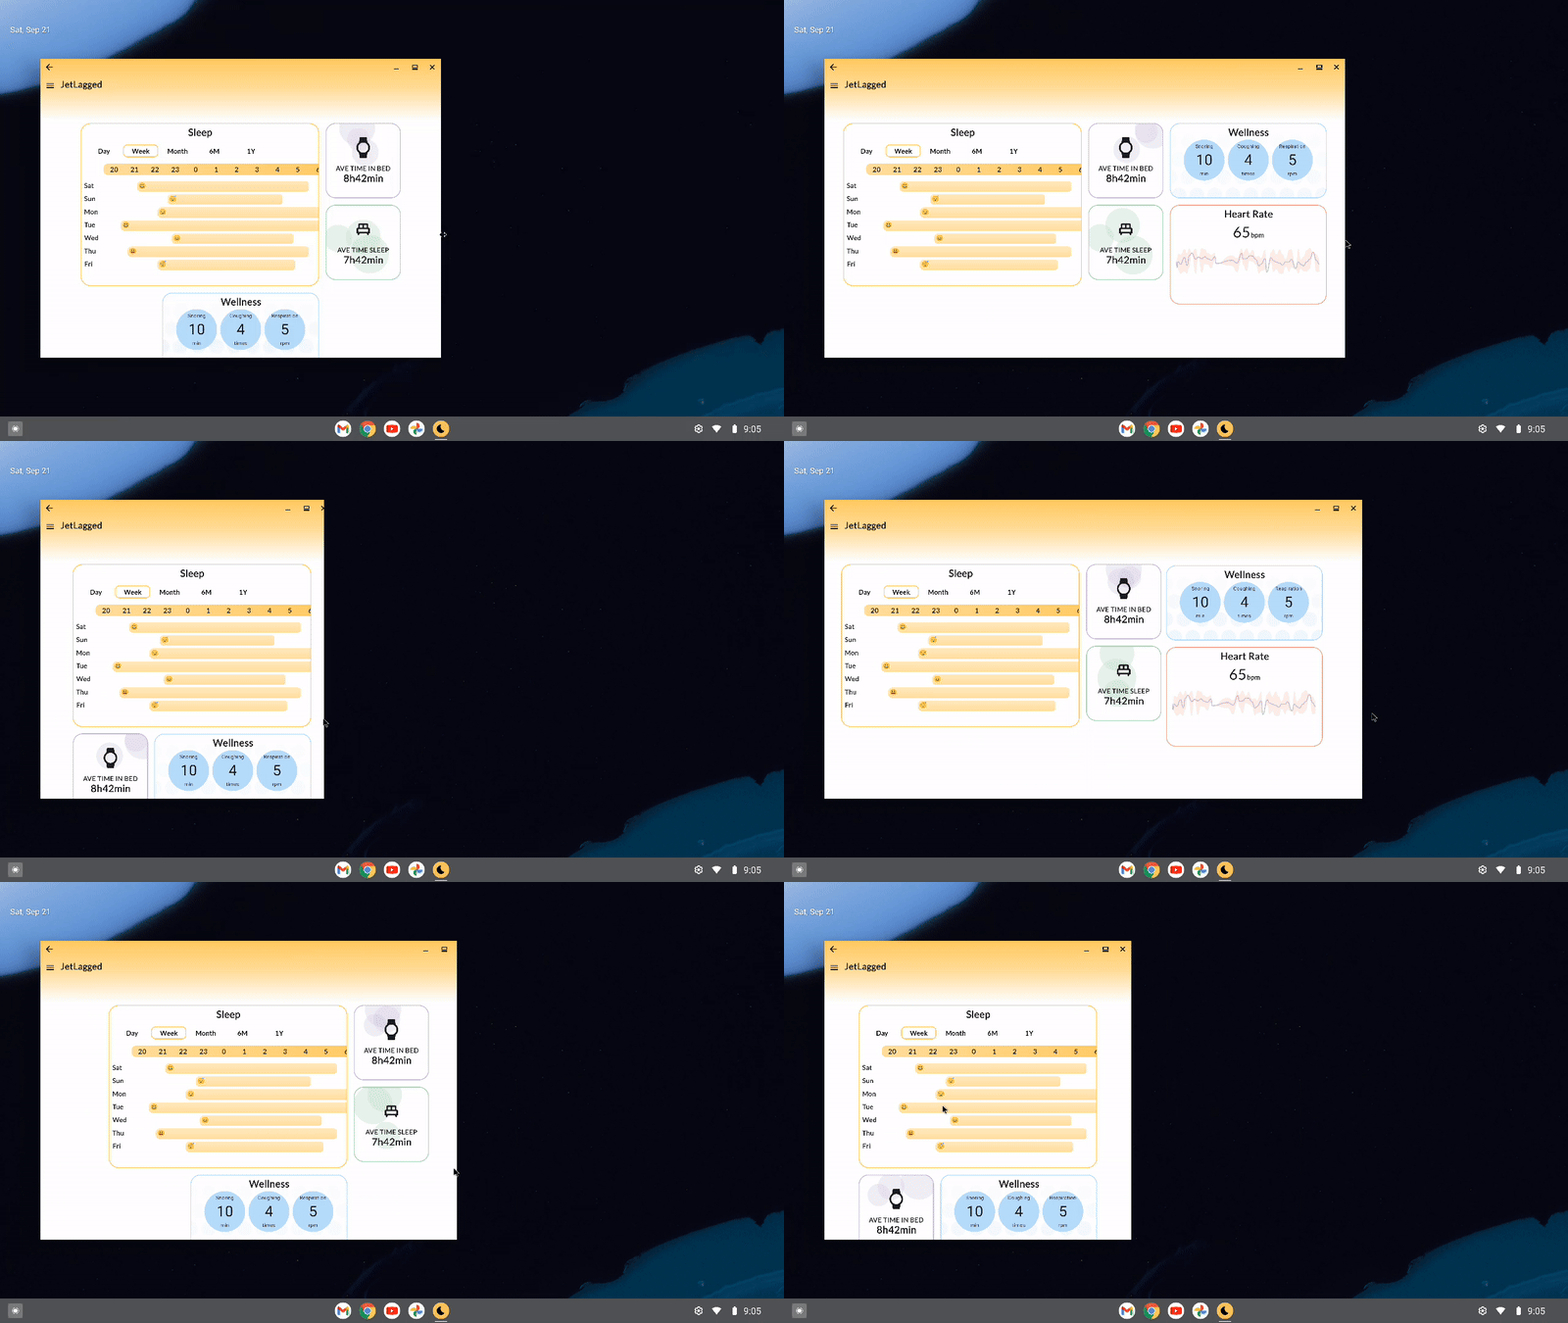
From the above logic, the UI will appear in the following ways on different device sizes:

Side by side comparisons of the differeces in UI on three different sized devices
Different UI on different sized devices

Use movableContentOf to maintain bits of UI state across screen resizes

Movable content allows you to save the contents of a Composable to move it around your layout hierarchy without losing state. It should be used for content that is perceived to be the same - just in a different location on screen.

Imagine this, you are moving house to a different city, and you pack a box with a clock inside of it. Opening the box in the new home, you’d see that the time would still be ticking from where it left off. It might not be the correct time of your new timezone, but it will definitely have ticked on from where you left it. The contents inside the box don’t reset their internal state when the box is moved around.

What if you could use the same concept in Compose to move items on screen without losing their internal state?

Take the following scenario into account: Define different Tile composables that display an infinitely animating value between 0 and 100 over 5000ms.


@Composable
fun Tile1() {
    val repeatingAnimation = rememberInfiniteTransition()

    val float = repeatingAnimation.animateFloat(
        initialValue = 0f,
        targetValue = 100f,
        animationSpec = infiniteRepeatable(repeatMode = RepeatMode.Reverse,
            animation = tween(5000))
    )
    Box(modifier = Modifier
        .size(100.dp)
        .background(purple, RoundedCornerShape(8.dp))){
        Text("Tile 1 ${float.value.roundToInt()}",
            modifier = Modifier.align(Alignment.Center))
    }
}

We then display them on screen using a Column Layout - showing the infinite animations as they go:

A purple tile stacked in a column above a pink tile. Both tiles show a counter, counting up from 0 to 100 and back down to 0

But what If we wanted to lay the tiles differently, based on if the phone is in a different orientation (or different screen size), and we don’t want the animation values to stop running? Something like the following:

@Composable
fun WithoutMovableContentDemo() {
    val mode = remember {
        mutableStateOf(Mode.Portrait)
    }
    if (mode.value == Mode.Landscape) {
        Row {
           Tile1()
           Tile2()
        }
    } else {
        Column {
           Tile1()
           Tile2()
        }
    }
}

This looks pretty standard, but running this on device - we can see that switching between the two layouts causes our animations to restart.

A purple tile stacked in a column above a pink tile. Both tiles show a counter, counting upward from 0. The column changes to a row and back to a column, and the counter restarts everytime the layout changes

This is the perfect case for movable content - it is the same Composables on screen, they are just in a different location. So how do we use it? We can just define our tiles in a movableContentOf block, using remember to ensure its saved across compositions:

val tiles = remember {
        movableContentOf {
            Tile1()
            Tile2()
        }
 }

Now instead of calling our composables again inside the Column and Row respectively, we call tiles() instead.

@Composable
fun MovableContentDemo() {
    val mode = remember {
        mutableStateOf(Mode.Portrait)
    }
    val tiles = remember {
        movableContentOf {
            Tile1()
            Tile2()
        }
    }
    Box(modifier = Modifier.fillMaxSize()) {
        if (mode.value == Mode.Landscape) {
            Row {
                tiles()
            }
        } else {
            Column {
                tiles()
            }
        }

        Button(onClick = {
            if (mode.value == Mode.Portrait) {
                mode.value = Mode.Landscape
            } else {
                mode.value = Mode.Portrait
            }
        }, modifier = Modifier.align(Alignment.BottomCenter)) {
            Text("Change layout")
        }
    }
}

This will then remember the nodes generated by those Composables and preserve the internal state that these composables currently have.

A purple tile stacked in a column above a pink tile. Both tiles show a counter, counting upward from 0 to 100. The column changes to a row and back to a column, and the counter continues seamlessly when the layout changes

We can now see that our animation state is remembered across the different compositions. Our clock in the box will now keep state when it's moved around the world.

Using this concept, we can keep the animating bubble state of our cards, by placing the cards in movableContentOf:

Language
val timeSleepSummaryCards = remember { movableContentOf { AverageTimeInBedCard() AverageTimeAsleepCard() } } LookaheadScope { FlowRow( modifier = Modifier.fillMaxSize(), horizontalArrangement = Arrangement.Center, verticalArrangement = Arrangement.Center, maxItemsInEachRow = 3 ) { //.. if (windowSizeClass == WindowWidthSizeClass.Compact) { timeSleepSummaryCards() } else { FlowColumn { timeSleepSummaryCards() } } // } }

This allows the cards state to be remembered and the cards won't be recomposed. This is evident when observing the bubbles in the background of the cards, on resizing the screen the bubble animation continues without restarting the animation.

A purple tile showing Average time in bed stacked in a column above a green tile showing average time sleep. Both tiles show moving bubbles. The column changes to a row and back to a column, and the bubbles continue to move across the tiles as the layout changes

Use Modifier.animateBounds() to have fluid animations between different window sizes

From the above example, we can see that state is maintained between changes in layout size (or layout itself), but the difference between the two layouts is a bit jarring. We’d like this to animate between the two states without issue.

In the latest compose-bom-alpha (2024.09.03), there is a new experimental custom Modifier, Modifier.animateBounds(). The animateBounds modifier requires a LookaheadScope.

LookaheadScope enables Compose to perform intermediate measurement passes of layout changes, notifying composables of the intermediate states between them. LookaheadScope is also used for the new shared element APIs, that you may have seen recently.

To use Modifier.animateBounds(), we wrap the top-level FlowRow in a LookaheadScope, and then apply the animateBounds modifier to each card. We can also customize how the animation runs, by specifying the boundsTransform parameter to a custom spring spec:

val boundsTransform = { _ : Rect, _: Rect ->
   spring(
       dampingRatio = Spring.DampingRatioNoBouncy,
       stiffness = Spring.StiffnessMedium,
       visibilityThreshold = Rect.VisibilityThreshold
   )
}


LookaheadScope {
   val animateBoundsModifier = Modifier.animateBounds(
       lookaheadScope = this@LookaheadScope,
       boundsTransform = boundsTransform)
   val timeSleepSummaryCards = remember {
       movableContentOf {
           AverageTimeInBedCard(animateBoundsModifier)
           AverageTimeAsleepCard(animateBoundsModifier)
       }
   }
   FlowRow(
       modifier = Modifier
           .fillMaxSize()
           .windowInsetsPadding(insets),
       horizontalArrangement = Arrangement.Center,
       verticalArrangement = Arrangement.Center,
       maxItemsInEachRow = 3
   ) {
       JetLaggedSleepGraphCard(uiState.value.sleepGraphData, animateBoundsModifier.widthIn(max = 600.dp))
       if (windowSizeClass == WindowWidthSizeClass.Compact) {
           timeSleepSummaryCards()
       } else {
           FlowColumn {
               timeSleepSummaryCards()
           }
       }


       FlowColumn {
           WellnessCard(
               wellnessData = uiState.value.wellnessData,
               modifier = animateBoundsModifier
                   .widthIn(max = 400.dp)
                   .heightIn(min = 200.dp)
           )
           HeartRateCard(
               modifier = animateBoundsModifier
                   .widthIn(max = 400.dp, min = 200.dp),
               uiState.value.heartRateData
           )
       }
   }
}

Applying this to our layout, we can see the transition between the two states is more seamless without jarring interruptions.

A purple tile showing Average time in bed stacked in a column above a green tile showing average time sleep. Both tiles show moving bubbles. The column changes to a row and back to a column, and the bubbles continue to move across the tiles as the layout changes

Applying this logic to our whole dashboard, when resizing our layout, you will see that we now have a fluid UI interaction throughout the whole screen.

Moving image demonstrating responsive design in Jetlagged where items animate positions automatically

Summary

As you can see from this article, using Compose has enabled us to build a responsive dashboard-like layout by leveraging flow layouts, WindowSizeClasses, movable content and LookaheadScope. These concepts can also be used for your own layouts that may have items moving around in them too.

For more information on these different topics, be sure to check out the official documentation, for the detailed changes to JetLagged, take a look at this pull request.

Bringing new theft protection features to Android users around the world

Janine Roberta Ferreira was driving home from work in São Paulo when she stopped at a traffic light. A man suddenly appeared and broke the window of her unlocked car, grabbing her phone. She struggled with him for a moment before he wrestled the phone away and ran off. The incident left her deeply shaken. Not only was she saddened at the loss of precious data, like pictures of her nephew, but she also felt vulnerable knowing her banking information was on her phone that was just stolen by a thief.

Situations like Janine’s highlighted the need for a comprehensive solution to phone theft that exceeded existing tools on any platform. Phone theft is a widespread concern in many countries – 97 phones are robbed or stolen every hour in Brazil. The GSM Association reports millions of devices stolen every year, and the numbers continue to grow.

With our phones becoming increasingly central to storing sensitive data, like payment information and personal details, losing one can be an unsettling experience. That’s why we developed and thoroughly beta tested, a full suite of features designed to protect you and your data at every stage – before, during, and after device theft.

These advanced theft protection features are now available to users around the world through Android 15 and a Google Play Services update (Android 10+ devices).

AI-powered protection for your device the moment it is stolen

Theft Detection Lock uses powerful AI to proactively protect you at the moment of a theft attempt. By using on-device machine learning, Theft Detection Lock is able to analyze various device signals to detect potential theft attempts. If the algorithm detects a potential theft attempt on your unlocked device, it locks your screen to keep thieves out.

To protect your sensitive data if your phone is stolen, Theft Detection Lock uses device sensors to identify theft attempts. We’re working hard to bring this feature to as many devices as possible. This feature is rolling out gradually to ensure compatibility with various devices, starting today with Android devices that cover 90% of active users worldwide. Check your theft protection settings page periodically to see if your device is currently supported.

In addition to Theft Detection Lock, Offline Device Lock protects you if a thief tries to take your device offline to extract data or avoid a remote wipe via Android’s Find My Device. If an unlocked device goes offline for prolonged periods, this feature locks the screen to ensure your phone can’t be used in the hands of a thief.

If your Android device does become lost or stolen, Remote Lock can quickly help you secure it. Even if you can’t remember your Google account credentials in the moment of theft, you can use any device to visit Android.com/lock and lock your phone with just a verified phone number. Remote Lock secures your device while you regain access through Android’s Find My Device – which lets you secure, locate or remotely wipe your device. As a security best practice, we always recommend backing up your device on a continuous basis, so remotely wiping your device is not an issue.

These features are now available on most Android 10+ devices1 via a Google Play Services update and must be enabled in settings.

Advanced security to deter theft before it happens

Android 15 introduces new security features to deter theft before it happens by making it harder for thieves to access sensitive settings, apps, or reset your device for resale:

  • Changes to sensitive settings like Find My Device now require your PIN, password, or biometric authentication.
  • Multiple failed login attempts, which could be a sign that a thief is trying to guess your password, will lock down your device, preventing unauthorized access.
  • And enhanced factory reset protection makes it even harder for thieves to reset your device without your Google account credentials, significantly reducing its resale value and protecting your data.

Later this year, we’ll launch Identity Check, an opt-in feature that will add an extra layer of protection by requiring biometric authentication when accessing critical Google account and device settings, like changing your PIN, disabling theft protection, or accessing Passkeys from an untrusted location. This helps prevent unauthorized access even if your device PIN is compromised.

Real-world protection for billions of Android users

By integrating advanced technology like AI and biometric authentication, we're making Android devices less appealing targets for thieves to give you greater peace of mind. These theft protection features are just one example of how Android is working to provide real-world protection for everyone. We’re dedicated to working with our partners around the world to continuously improve Android security and help you and your data stay safe.

You can turn on the new Android theft features by clicking here on a supported Android device. Learn more about our theft protection features by visiting our help center.

Notes


  1. Android Go smartphones, tablets and wearables are not supported 

#WeArePlay | NomadHer helps women travel the world

Posted by Robbie McLachlan, Developer Marketing


In our latest film for #WeArePlay, which celebrates the people behind apps and games, we meet Hyojeong - the visionary behind the app NomadHer. She’s aiming to reshape how women explore the world by building a global community: sharing travel tips, prioritizing safety, and connecting with one another to explore new destinations.


What inspired you to create NomadHer?

Honestly, NomadHer was born out of a personal need. I started traveling solo when I was 19 and have visited over 60 countries alone, and while it was an incredibly empowering and enriching journey, it wasn’t always easy—especially as a woman. There was this one moment when I was traveling in Italy that really shook me. I realized just how important it was to have a support system, not just friends or family, but other women who understand what it's like to be out there on your own. That’s when the idea hit me— I wanted to create a space where women could feel safe and confident while seeing the world.


NomadHer Founder - Hyojeong Kim from South Korean smiling, wearing a white tshirt with green text that reads 'she can travel anywhere'

The focus on connecting women who share similar travel plans is a powerful tool. Can you share feedback from someone who has found travel buddies through NomadHer?

Absolutely! One of my favorite stories comes from a woman who was planning a solo trip to Bali. She connected with another ‘NomadHer’ through the app who had the exact same travel dates and itinerary. They started chatting, and by the time they met up in Bali, it was like they’d known each other forever. They ended up traveling together, trying out new restaurants, exploring hidden beaches, and even taking a surfing class! After the trip, they both messaged us saying how the experience felt safer and more fun because they had each other. It’s stories like these that remind me why I started NomadHer in the first place.

How did Google Play help you grow NomadHer?

We couldn’t connect with the 90,000+ women worldwide without Google Play. We’ve been able to reach people from Latin America, Africa, Asia, and beyond. It’s incredible seeing women connect, share tips, and support each other, no matter where they are. With tools like Firebase, we can track and improve the app experience, making sure everything runs smoothly. Plus, Google Play's startup programs gave us mentorship and visibility, which really helped us grow and expand our reach faster. It’s been a game-changer.

NomadHer on Google Play on a device

What are your hopes for NomadHer in the future?

I want NomadHer to be more than just an app—it’s a movement. My dream is for it to become the go-to platform for women travelers everywhere. I want to see more partnerships with local women entrepreneurs, like the surf shop owner we work with in Busan. We host offline events like the She Can Travel Festival in Busan and I’m excited to host similar events in other countries like Paris, Tokyo, and Delhi. The goal is to continue creating these offline connections to build a community that empowers women, both socially and economically, through partnerships with local female businesses.

Discover more global #WeArePlay stories and share your favorites.


How useful did you find this blog post?

Here’s what happening in our latest Spotlight Week: Adaptive Android Apps

Posted by Alex Vanyo - Developer Relations Engineer

Adaptive Spotlight Week

With Android powering a diverse range of devices, users expect a seamless and optimized experience across their foldables, tablets, ChromeOS, and even cars. To meet these expectations, developers need to build their apps with multiple screen sizes and form factors in mind. Changing how you approach UI can drastically improve users' experiences across foldables, tablets, and more, while preventing tech debt that a portrait-only mindset can create – simply put, building adaptive is a great way to help future-proof your app.

The latest in our Spotlight Week series will focus on Building Adaptive Android apps all this week (October 14-18), and we’ll highlight the many ways you can improve your mobile app to adapt to all of these different environments.


Here’s what we’re covering during Adaptive Spotlight Week

Monday: What is adaptive?

October 14, 2024

Check out the new documentation for building adaptive apps and catch up on building adaptive Android apps if you missed it at I/O 2024. Also, learn how adaptive apps can be made available on another new form factor: cars!

Tuesday: Adaptive UIs with Compose

October 15, 2024

Learn the principles for how you can use Compose to build layouts that adapt to available window size and how the Material 3 adaptive library enables you to create list-detail and supporting pane layouts with out-of-the-box behavior.

Wednesday: Desktop windowing and productivity

October 16, 2024

Learn what desktop windowing on Android is, together with details about how to handle it in your app and build productivity experiences that let users take advantage of more powerful multitasking Android environments.

Thursday: Stylus

October 17, 2024

Take a closer look at how you can build powerful drawing experiences across stylus and touch input with the new Ink API.

Friday: #AskAndroid

October 18, 2024

Join us for a live Q&A on making apps more adaptive. During Spotlight Week, ask your questions on X and LinkedIn with #AskAndroid.


These are just some of the ways that you can improve your mobile app’s experience for more than just the smartphone with touch input. Keep checking this blog post for updates. We’ll be adding links and more throughout the week. Follow Android Developers on X and Android by Google at LinkedIn to hear even more about ways to adapt your app, and send in your questions with #AskAndroid.

Introducing Ink API, a new Jetpack library for stylus apps

Posted by Chris Assigbe – Developer Relations Engineer and Tom Buckley – Product Manager

With stylus input, Android apps on phones, foldables, tablets, and Chromebooks become even more powerful tools for productivity and creativity. While there's already a lot to think about when designing for large screens – see our full guidance and inspiration gallery – styluses are especially impactful, transforming these devices into a digital notebook or sketchbook. Users expect stylus experiences to feel as fluid and natural as writing on paper, which is why Android previously added APIs to reduce inking latency to as low as 4ms; virtually imperceptible. However, latency is just one aspect of an inking experience – developers currently need to generate stroke shapes from stylus input, render those strokes quickly, and efficiently run geometric queries over strokes for tools like selection and eraser. These capabilities can require significant investment in geometry and graphics just to get started.

Today, we're excited to share Ink API, an alpha Jetpack library that makes it easy to create, render, and manipulate beautiful ink strokes, enabling developers to build amazing features on top of these APIs. Ink API builds upon the Android framework's foundation of low latency and prediction, providing you with a powerful and intuitive toolkit for integrating rich inking features into your apps.

moving image of a stylus writing with Ink API on a Samsung Tab S8, 4ms showing end-to-end latency
Writing with Ink API on a Samsung Tab S8, 4ms end-to-end latency

What is Ink API?

Ink API is a comprehensive stylus input library that empowers you to quickly create innovative and expressive inking experiences. It offers a modular architecture rather than a one-size-fits-all canvas, so you can tailor Ink API to your app's stack and needs. The modules encompass key functionalities like:

    • Strokes module: Represents the ink input and its visual representation.
    • Geometry module: Supports manipulating and analyzing strokes, facilitating features like erasing, and selecting strokes.
    • Brush module: Provides a declarative way to define the visual style of strokes, including color, size, and the type of tool to draw with.
    • Rendering module: Efficiently displays ink strokes on the screen, allowing them to be combined with Jetpack Compose or Android Views.
    • Live Authoring module: Handles real-time inking input to create smooth strokes with the lowest latency a device can provide.

Ink API is compatible with devices running Android 5.0 (API level 21) or later, and offers benefits on all of these devices. It can also take advantage of latency improvements in Android 10 (API 29) and improved rendering effects and performance in Android 14 (API 34).

Why choose Ink API?

Ink API provides an out-of-the-box implementation for basic inking tasks so you can create a unique drawing experience for your own app. Ink API offers several advantages over a fully custom implementation:

    • Ease of Use: Ink API abstracts away the complexities of graphics and geometry, allowing you to focus on your app's unique inking features.
    • Performance: Built-in low latency support and optimized rendering ensure a smooth and responsive inking experience.
    • Flexibility: The modular design allows you to pick and choose the components you need, tailoring the library to your specific requirements.

Ink API has already been adopted across many Google apps because of these advantages, including for markup in Docs and Circle-to-Search; and the underlying technology also powers markup in Photos, Drive, Meet, Keep, and Classroom. For Circle to Search, the Ink API modular design empowered the team to utilize only the components they needed. They leveraged the live authoring and brush capabilities of Ink API to render a beautiful stroke as users circle (to search). The team also built custom geometry tools tailored to their ML models. That’s modularity at its finest.

moving image of a stylus writing with Ink API on a Samsung Tab S8, 4ms showing end-to-end latency

“Ink API was our first choice for Circle-to-Search (CtS). Utilizing their extensive documentation, integrating the Ink API was a breeze, allowing us to reach our first working prototype w/in just one week. Ink's custom brush texture and animation support allowed us to quickly iterate on the stroke design.” 

- Jordan Komoda, Software Engineer, Google

We have also designed Ink API with our Android app partners' feedback in mind to make sure it fits with their existing app architectures and requirements.

With Ink API, building a natural and fluid inking experience on Android is simpler than ever. Ink API lets you focus on what differentiates your experience rather than on the details of paths, meshes, and shaders. Whether you are exploring inking for note-taking, photo or document markup, interactive learning, or something completely different, we hope you’ll give Ink API a try!

Get started with Ink API

Ready to dive into the well of Ink API? Check out the official developer guide and explore the API reference to start building your next-generation inking app. We're eager to see the innovative experiences you create!

Note: This alpha release is just the beginning for Ink API. We're committed to continuously improving the library, adding new features and functionalities based on your feedback. Stay tuned for updates and join us in shaping the future of inking on Android!

Gemini API in action: showcase of innovative Android apps

Posted by Thomas Ezan, Sr Developer Relation Engineer

With the advent of Generative AI, Android developers now have access to capabilities that were previously out of reach. For instance, you can now easily add image captioning to your app without any computer vision knowledge.

With the upcoming launch of the stable version of VertexAI in Firebase in a few weeks (available in Beta Since Google I/O), you'll be able to effortlessly incorporate the capabilities of Gemini 1.5 Flash and Gemini 1.5 Pro into your app. The inference runs on Google's servers, making these capabilities accessible to any device with an internet connection.

Several Android developers have already begun leveraging this technology. Let's explore some of their creations.


Generate your meals for the week

The team behind Meal Planner, a meal planner and shopping list management app, is leveraging Gemini 1.5 Flash to create original meal plans. Based on the user’s diet, the number of people you are cooking for and any food allergies or intolerances, the app automatically creates a meal plan for the selected week.

For each dish, the model lists ingredients and quantities, taking into account the number of portions. It also provides instructions on how to prepare it. The app automatically generates a shopping list for the week based on the ingredient list for each meal.

moving image of Meal Planner app user experience

To enable reliable processing of the model’s response and to integrate it in the app, the team leveraged Gemini's JSON mode. They specified responseMimeType = "application/json" in the model configuration and defined the expected JSON response schema in the prompt (see API documentation).

Following the launch of the meal generation feature, Meal Planner received overwhelmingly positive feedback. The feature simplified meal planning for users with dietary restrictions and helped reduce food waste. In the months after its introduction, Meal Planner experienced a 17% surge in premium users.


Journaling while chatting with Leo

A few months ago, the team behind the journal app Life wanted to provide an innovative way to let their users log entries. They created "Leo", an AI diary assistant chatting with users and converting conversations into a journal entry.

To modify the behavior of the model and the tone of its responses, the team used system instructions to define the chatbot persona. This allows the user to set the behavior and tone of the assistant: Pick “Professional and formal” and the model will keep the conversation strict, select “Friendly and cheerful” and it will lighten up the dialogue with lots of emojis!

moving image of Leo app user experience

The team saw an increase of user engagement following the launch of the feature.

And if you want to know more about how the Life developers used Gemini API in their app, we had a great conversation with Jomin from the team. This conversation is part of a new Android podcast series called Android Build Time, that you can also watch on YouTube.


Create a nickname on the fly

The HiiKER app provides offline hiking maps. The app also fosters a community by letting users rating trails and leaving comments. But users signing up don’t always add a username to their profile. To avoid the risk of lowering the conversion rate by making username selection mandatory at signup time, the team decided to use the Gemini API to suggest unique usernames based on the user’s country or area.

moving image of HiiKER app user experience

To generate original usernames, the team set a high temperature value and played with the top-K and top-P values to increase the creativity of the model.

This AI-assisted feature led to a significant lift in the percentage of users with "complete" profiles contributing to a positive impact on engagement and retention.

It’s time to build!

Generative AI is still a very new space and we are just starting to have easy access to these capabilities for Android. From enabling advanced personalization, creating delightful interactive experiences or simplifying signup, you might have unique challenges that you are trying to solve as an Android app developer. It is a great time to start looking at these challenges as opportunities that generative AI can help you tackle!


You can learn more about the advanced features of the Gemini Cloud models, find an introduction to generative AI for Android developers, and get started with Vertex AI in Firebase documentation.

To learn more about AI on Android, check out other resources we have available during AI in Android Spotlight Week.

Use #AndroidAI hashtag to share your creations or feedback on social media, and join us at the forefront of the AI revolution!