Author Archives: Google Developers

You’re invited to the Google Smart Home Developer Summit

Posted by Toni Klopfenstein, Developer Relations Engineer

Google Smart Home Developer Summit

Today there are over 276 million smart home households globally, and the industry continues to see rapid growth every year. Users have never been more comfortable bringing home new smart home devices — but they also continue to expect more from their devices, and their smart homes. To meet and exceed these expectations, we want to make sure developers have the tools and support to build their best experience across the Google Home app, Nest, Android, and Assistant.

That’s why we’re excited to announce the return of the Google Smart Home Developer Summit on October 21, 2021! This year’s event is free to join, fully virtual and will be hosted on our website with broadcast times available for our developer communities in the AMER, EMEA, and APAC regions.

To kick things off, Michele Turner, Senior Director of Product for Google’s Smart Home Ecosystem, will share our vision for the home and preview upcoming tools and features to build your next devices and apps using Matter and Thread — technologies transforming the industry. This will be followed by a developer keynote to dig deeper into announcements, and a round of technical sessions, workshops, and more, hosted by Google's smart home leaders.

Building the best smart home platform means using trusted technology and intelligence to develop your integrations faster, provide tools to drive your innovation, and allow you new paths to growth. We can’t wait to engage with you and share more about how we can lead and grow the smart home together.

You can register for the Google Smart Home Developer Summit 2021 here, and follow along with the event using the tag #GoogleHomeSummit on social media. We hope to see you there!

Mark your calendars: Android Dev Summit, Chrome Dev Summit and Firebase Summit are coming your way in a few weeks!

Posted by the Google Developer Team

Developers: it’s time to start marking your calendars, we’re hard at work on a busy slate of summits coming your way in just a few weeks. Here’s a quick rundown of three summits we just announced this week:

  • Android Dev Summit: October 27-28
  • Chrome Dev Summit: November 3
  • Firebase Summit: November 10

Android Dev Summit is back, October 27-28

Directly from the team who builds Android, the Android Dev Summit returns this year on October 27-28. Join us to hear about the latest updates in Android development, centered on this year’s theme: excellent apps, across devices. We have over 30 sessions on a range of technical Android development topics. Plus, we’ve assembled the team that builds Android to get your burning #AskAndroid questions answered live. Interested in learning more? Be sure to sign up for updates through our Android newsletter here.

Discover, Connect, Inspire at Chrome Dev Summit 2021

The countdown to Chrome Dev Summit 2021 is on — and we can’t wait to share what we have in store. We’ll kick things off on November 3 by sharing the latest product updates in our keynote and hosting a live ask me anything (AMA) with Chrome leaders. You’ll also have the chance to chat live with Googlers and developers around the world, participate in workshops with industry experts, attend interactive learning lounges to consult with engineers in a group setting, and receive personalized support during one-on-one office hours. Everyone can tune into the keynote and AMA, but space is limited for the workshops, office hours, and learning lounges. Request an invite to secure your spot — we’ll see you on November 3!

And follow the Firebase Twitter channel for more updates on Firebase Summit, which will be coming to you on November 10!

How to use App Engine push queues in Flask apps

Posted by Wesley Chun (@wescpy), Developer Advocate, Google Cloud

Banner image that shows the Cloud Task logo

Introduction

Since its original launch in 2008, many of the core Google App Engine services such as Datastore, Memcache, and Blobstore, have matured to become their own standalone products: for example, Cloud Datastore, Cloud Memorystore, and Cloud Storage, respectively. The same is true for App Engine Task Queues with Cloud Tasks. Today's Module 7 episode of Serverless Migration Station reviews how App Engine push tasks work, by adding this feature to an existing App Engine ndb Flask app.

App Engine push queues in Flask apps video

That app is where we left off at the end of Module 1, migrating its web framework from App Engine webapp2 to Flask. The app registers web page visits, creating a Datastore Entity for each. After a new record is created, the ten most recent visits are displayed to the end-user. If the app only shows the latest visits, there is no reason to keep older visits, so the Module 7 exercise adds a push task that deletes all visits older than the oldest one shown. Tasks execute asynchronously outside the normal application flow.

Key updates

The following are the changes being made to the application:

  1. Add use of App Engine Task Queues (taskqueue) API
  2. Determine oldest visit displayed, logging and saving that timestamp
  3. Create task to delete old visits
  4. Update web page template to display timestamp threshold
  5. Log how many and which visits (by Entity ID) are deleted

Except for #4 which occurs in the HTML template file, these updates are reflected in the "diff"s for the main application file:

Screenshot of App Engine push tasks application source code differences

Adding App Engine push tasks application source code differences

With these changes implemented, the web app now shows the end-user which visits will be deleted by the new push task:

Screenshot of VisitMe example showing last ten site visits. A red circle around older visits being deleted

Sample application output

Next steps

To do this exercise yourself, check out our corresponding codelab which leads you step-by-step through the process. You can use this in addition to the video, which can provide guidance. You can also review the push queue documentation for more information. Arriving at a fully-functioning Module 7 app featuring App Engine push tasks sets the stage for migrating it to Cloud Tasks (and Cloud NDB) ahead in Module 8.

All migration modules, their videos (when available), codelab tutorials, and source code, can be found in the migration repo. While the content focuses initially on Python users, we will cover other legacy runtimes soon so stay tuned.

Exploring serverless with a nebulous app: Deploy the same app to App Engine, Cloud Functions, or Cloud Run

Posted by Wesley Chun (@wescpy), Developer Advocate, Google Cloud

Banner image that shows the App Engine, Cloud Functions, and Cloud Run logos

Introduction

Google Cloud offers three distinct ways of running your code or application in a serverless way, each serving different use cases. Google App Engine, our first Cloud product, was created to give users the ability to deploy source-based web applications or mobile backends directly to the cloud without the need of thinking about servers or scaling. Cloud Functions came later for scenarios where you may not have an entire app, great for one-off utility functions or event-driven microservices. Cloud Run is our latest fully-managed serverless product that gives developers the flexibility of containers along with the convenience of serverless.

As all are serverless compute platforms, users recognize they share some similarities along with clear differences, and often, they ask:

  1. How different is deploying code to App Engine, Cloud Functions, or Cloud Run?
  2. Is it challenging to move from one to another if I feel the other may better fit my needs?

We're going to answer these questions today by sharing a unique application with you, one that can be deployed to all three platforms without changing any application code. All of the necessary changes are done in configuration.

More motivation

Another challenge for developers can be trying to learn how to use another Cloud product, such as this request, paraphrased from a user:

  1. I have a Google App Engine app
  2. I want to call the Cloud Translation API from that app

Sounds simple enough. This user went straight to the App Engine and Translation API documentation where they were able to get started with the App Engine Quickstart to get their app up and going, then found the Translation API setup page and started looking into permissions needed to access the API. However, they got stuck at the Identity and Access Management (IAM) page on roles, being overwhelmed at all the options but no clear path forward. In light of this, let's add a third question to preceding pair outlined earlier:

  1. How do you access Cloud APIs from a Cloud serverless platform?
Without knowing what that user was going to build, let's just implement a barebones translator, an "MVP" (minimally viable product) version of a simple "My Google Translate" Python Flask app using the Translation API, one of Google Cloud's AI/ML "building block" APIs. These APIs are backed by pre-trained machine learning models, giving developers with little or no background in AI/ML the ability to leverage the benefits of machine learning with only API calls.

The application

The app consists of a simple web page prompting the user for a phrase to translate from English to Spanish. The translated results along with the original phrase are presented along with an empty form for a follow-up translation if desired. While the majority of this app's deployments are in Python 3, there are still many users working on upgrading from Python 2, so some of those deployments are available to help with migration planning. Taking this into account, this app can be deployed (at least) eight different ways:
  1. Local (or hosted) Flask server (Python 2)
  2. Local (or hosted) Flask server (Python 3)
  3. Google App Engine (Python 2)
  4. Google App Engine (Python 3)
  5. Google Cloud Functions (Python 3)
  6. Google Cloud Run (Python 2 via Docker)
  7. Google Cloud Run (Python 3 via Docker)
  8. Google Cloud Run (Python 3 via Cloud Buildpacks)
The following is a brief glance at the files and which configurations they're for: Screenshot of Nebulous serverless sample app files

Nebulous serverless sample app files

Diving straight into the application, let's look at its primary function, translate():
@app.route('/', methods=['GET', 'POST'])
def translate(gcf_request=None):
local_request = gcf_request if gcf_request else request
text = translated = None
if local_request.method == 'POST':
text = local_request.form['text'].strip()
if text:
data = {
'contents': [text],
'parent': PARENT,
'target_language_code': TARGET[0],
}
rsp = TRANSLATE.translate_text(request=data)
translated = rsp.translations[0].translated_text
context = {
'orig': {'text': text, 'lc': SOURCE},
'trans': {'text': translated, 'lc': TARGET},
}
return render_template('index.html', **context)

Core component (translate()) of sample application


Some key app components:
  • Upon an initial request (GET), an HTML template is rendered featuring a simple form with an empty text field for the text to translate.
  • The form POSTs back to the app, and in this case, grabs the text to translate, sends the request to the Translation API, receives and displays the results to the user along with an empty form for another translation.
  • There is a special "ifdef" for Cloud Functions near the top to receive a request object because a web framework isn't used like you'd have with App Engine or Cloud Run, so Cloud Functions provides one for this reason.
The app runs identically whether running locally or deployed to App Engine, Cloud Functions, or Cloud Run. The magic is all in the configuration. The requirements.txt file* is used in all configurations, whether to install third-party packages locally, or to direct the Cloud Build system to automatically install those libraries during deployment. Beyond requirements.txt, things start to differ:
  1. App Engine has an app.yaml file and possibly an appengine_config.py file.
  2. Cloud Run has either a Dockerfile (Docker) or Procfile (Cloud Buildpacks), and possibly a service.yaml file.
  3. Cloud Functions, the "simplest" of the three, has no configuration outside of a package requirements file (requirements.txt, package.json, etc.).
The following is what you should expect to see after completing one translation request: Screenshot of My Google Translate (1990s Edition) in Incognito Window

"My Google Translate" MVP app (Cloud Run edition)

Next steps

The sample app can be run locally or on your own hosting server, but now you also know how to deploy it to each of Cloud's serverless platforms and what those subtle differences are. You also have a sense of the differences between each platform as well as what it takes to switch from one to another. For example, if your organization is moving to implement containerization into your software development workflow, you can migrate your existing App Engine apps to Cloud Run using Docker or using Cloud Buildpacks if you don't want to think about containers or Dockerfiles. Lastly, you now know how to access Cloud APIs from these platforms. Lastly, you now know how to access Cloud APIs from these platforms.

The user described earlier was overwhelmed at all the IAM roles and options available because this type of detail is required to provide the most security options for accessing Cloud services, but when prototyping, the fastest on-ramp is to use the default service account that comes with Cloud serverless platforms. These help you get that prototype working while allowing you to learn more about IAM roles and required permissions. Once you've progressed far enough to consider deploying to production, you can then follow the best practice of "least privileges" and create your own (user-managed) service accounts with the minimal permissions required so your application functions properly.

To dive in, the code and codelabs (free, self-paced, hands-on tutorials) for each deployment are available in its open source repository. An active Google Cloud billing account is required to deploy this application to each of our serverless platforms even though you can do all of them without incurring charges. More information can be found in the "Cost" section of the repo's README. We hope this sample app teaches you more about the similarities and differences between our plaforms, shows you how you can "shift" applications comfortably between them, and provides a light introduction to another Cloud API. Also check out my colleague's post featuring similar content for Node.js.

GDG NYC members apply their skills to help a local nonprofit reach higher

Posted by Kübra Zengin, Program Manager, Developer Relations

Image of Anna Nerezova and GDG NYC meetup on blog header image that reads GDG NYC members apply their skills to help a local nonprofit reach higher

Google Developer Group (GDG) chapters are in a unique position to help make an impact during a time where many companies and businesses are trying to shift to a digital first world. Perhaps no one knows this better than GDG NYC Lead, Anna Nerezova. Over the past year, she’s seen firsthand just how powerful the GDG NYC community can be when the right opportunity presents itself.

GDG NYC levels up their Google Cloud skills

In the past few years, Anna and other GDG NYC organizers have hosted a number of events focused on learning and sharing Cloud technologies with community members, including Cloud Study Jams and in-person workshops on Machine Learning Cloud-Speech-to-Text, Natural Language Processing, and more. Last year, GDG NYC took Google Cloud learning to the next level with a series of virtual Google Cloud tech talks on understanding BigQuery, Serverless best practices, and Anthos, with speakers from the Google Cloud team.

Image of GDG NYC members watching a speaker give a talk

A GDG NYC speaker session

Thanks to these hands-on workshops, speaker sessions, and technical resources provided by Google, GDG NYC community members are able to upskill in a wide variety of technologies at an accelerated pace, all the while gaining the confidence to put those skills into practice. Beyond gaining new skills, Google Developer Group members are often able to unlock opportunities to make positive impacts in ways they never thought possible. As a GDG Lead, Anna is always on the lookout for opportunities that give community members the chance to apply their skills for a higher purpose.

Building a Positive Planet

Anna identified one such opportunity for her community via Positive Planet US, a local nonprofit dedicated to alleviating global and local poverty through positive entrepreneurship. Positive Planet International, originally formed in France, has helped 11 million people escape poverty across 42 countries in Europe, the Middle East, and Africa since its inception in 1998. Just last year, Positive Planet US was launched in New York City, with a mission to create local and global economic growth in underprivileged communities in the wake of the pandemic.

Anna recognized how the past few years' emphasis on learning and leveraging Google Cloud technology in her GDG chapter could help make a transformative impact on the nonprofit. A partnership wouldn’t just benefit Positive Planet US, it would give community members a chance to apply what they’ve learned, build experience, and give back. Anna and fellow GDG NYC Lead, Ralph Yozzo, worked with Positive Planet US to identify areas of opportunity where GDG NYC members could best apply their skills. With Positive Planet US still needing to build the infrastructure necessary to get up and running, it seemed that there were limitless opportunities for GDG NYC community members to step in and help out.

Volunteers from GDG NYC quickly got to work, building Positive Planet US’ website from the ground up. Google Cloud Platform was used to build out the site’s infrastructure, set up secure payments for donations, launch email campaigns, and more. Applying learnings from a series of AMP Study Jams held by GDG NYC, volunteers implemented the AMP plugin for WordPress to improve user experience and keep the website optimized, all according to Google’s Core Web Vitals and page experience guidelines. Volunteers from GDG NYC have also helped with program management, video creation, social media, and more. No matter the job, the work that volunteers put in makes a real impact and helps drive Positive Planet US’ efforts to make a difference in marginalized communities.

Positive Planet drives community impact

Positive Planet US volunteers are currently working hard to support the nonprofit’s flagship project, the Accelerator Hub for Minority Women Entrepreneurs, launched last year. As part of the program, participants receive personalized coaching from senior executives at Genpact and Capgemini, helping them turn their amazing ideas into thriving businesses. From learning how to grow a business to applying for a business loan, participating women from disadvantaged communities get the tools they need to flourish as entrepreneurs. The 10-week program is running its second cohort now, and aims to support 1,000 women by next year.

Screenshot of participants of Positive Planet US’ second Accelerator Hub Program in a virtual meeting

Some participants of Positive Planet US’ second Accelerator Hub Program

With Positive Planet US’ next cohort for 50 women entrepreneurs starting soon, Anna is working to find coaches of all different skill levels directly from the GDG community. If you’re interested in volunteering with Positive Planet US, click here.

Anna is excited about the ongoing collaboration between Positive Planet US and GDG NYC, and is continuing to identify opportunities for GDG members to give back. And with a new series of Android and Cloud Study Jams on the horizon and DevFest 2021 right around the corner, GDG NYC organizers hope to welcome even more developers into the Google Developer Group community. For more info about GDG NYC’s upcoming events, click here.

Join a Google Developer Group chapter near you here.

From Beginner to Machine Learning Instructor In A Year

Posted by Salim Abid, MENA Regional Lead, Developer Relations

Banner that reads Google Developer Student Clubs, Misr University for Science and Technology (MUST). Includes overhead image of person coding on a laptop

Yara Elkady, Google Developer Student Club (GDSC) Lead, can trace her passion for tech all the way back to a single moment. She was sitting in computer class when her middle school teacher posed a question to the class:

“Did you know that you can create apps and games like the ones that you spend so much time on?”

It was a simple question, but it was enough to plant the seed that would define the trajectory of Yara’s career. Following in the footsteps of so many beginners before her, Yara did a Google search to find out more about creating apps. She didn’t realize it at the time, but Yara had just taken her first steps down the path to becoming a developer.

Knowing that she wanted to pursue tech further, Yara went to college at Misr University for Science and Technology (MUST) in Giza, Egypt to study computer science. In her second year, she had begun reading more about artificial intelligence. Yara was blown away by the potential of training a machine to make decisions on its own. With machine learning, she could pursue more creative ideas that went beyond what was possible with traditional programming. As Yara explains, “It felt like magic”. Still, she felt lost like any beginner interested in AI.

Enter Google Developer Student Clubs

Yara first discovered the GDSC chapter at MUST through her school’s social media page. For the entirety of her second year, Yara attended workshops and saw firsthand how GDSC events could leave an impact on students aspiring to become developers. With help from Google Developer Student Clubs, Yara was able to grow her skills as a developer and connect with peers who shared her interests. At the end of the year, Yara applied to be a Lead so that she could help more students engage with the community. Not too long after, Yara was accepted as a GDSC Lead for the 2020-2021 season!

A classroom of people attend a GDSC MUST speaker session

A GDSC MUST speaker session

As part of becoming a GDSC Lead, Yara enrolled in the MENA DSC Leads Academy to receive hands-on training in various Google technologies. Despite being only the first time the Academy had ever been hosted (both in person and virtually), 100+ Leads from 150 GDSC chapters attended over the course of six weeks. Yara applied to the Machine Learning track and was chosen for the program. During the course, Yara mastered advanced machine learning concepts, including classical ML models, deep learning, data manipulation, and TensorFlow training. She also got to work with other Leads on advanced machine learning projects, helping her gain even more confidence in her ML knowledge.

Soon after passing the program, Yara collaborated with the GDSC Leads she met during the course to host a one-month ML track to pass on the knowledge they had learned to the GDSC community. Through the sessions she hosted, Yara was contacted by BambooGeeks, a startup that creates training opportunities for local tech aspirants to help them become industry-ready. Yara was offered a job as a machine learning instructor, and could now create sessions for the largest audience of trainees she’d ever worked with.

The road to certification

Yara didn’t realize it yet, but even more opportunities were headed her way. She learned from the GDSC MENA program manager that GDSC Leads would have the opportunity to take the TensorFlow Certification exam, if they wished to take it. It wouldn’t be easy, but Yara knew she had all the resources she needed to succeed. She wasted no time and created a study group with other GDSC Leads working to get certified. Together, Yara and her fellow Leads pulled endless all-nighters over the next few months so that they could skill up for the exam and support each other through the arduous study process. They also worked with Elyes Manai, a ML Google Developer Expert, who gave them an overview of the exam and recommended resources that would help them pass.

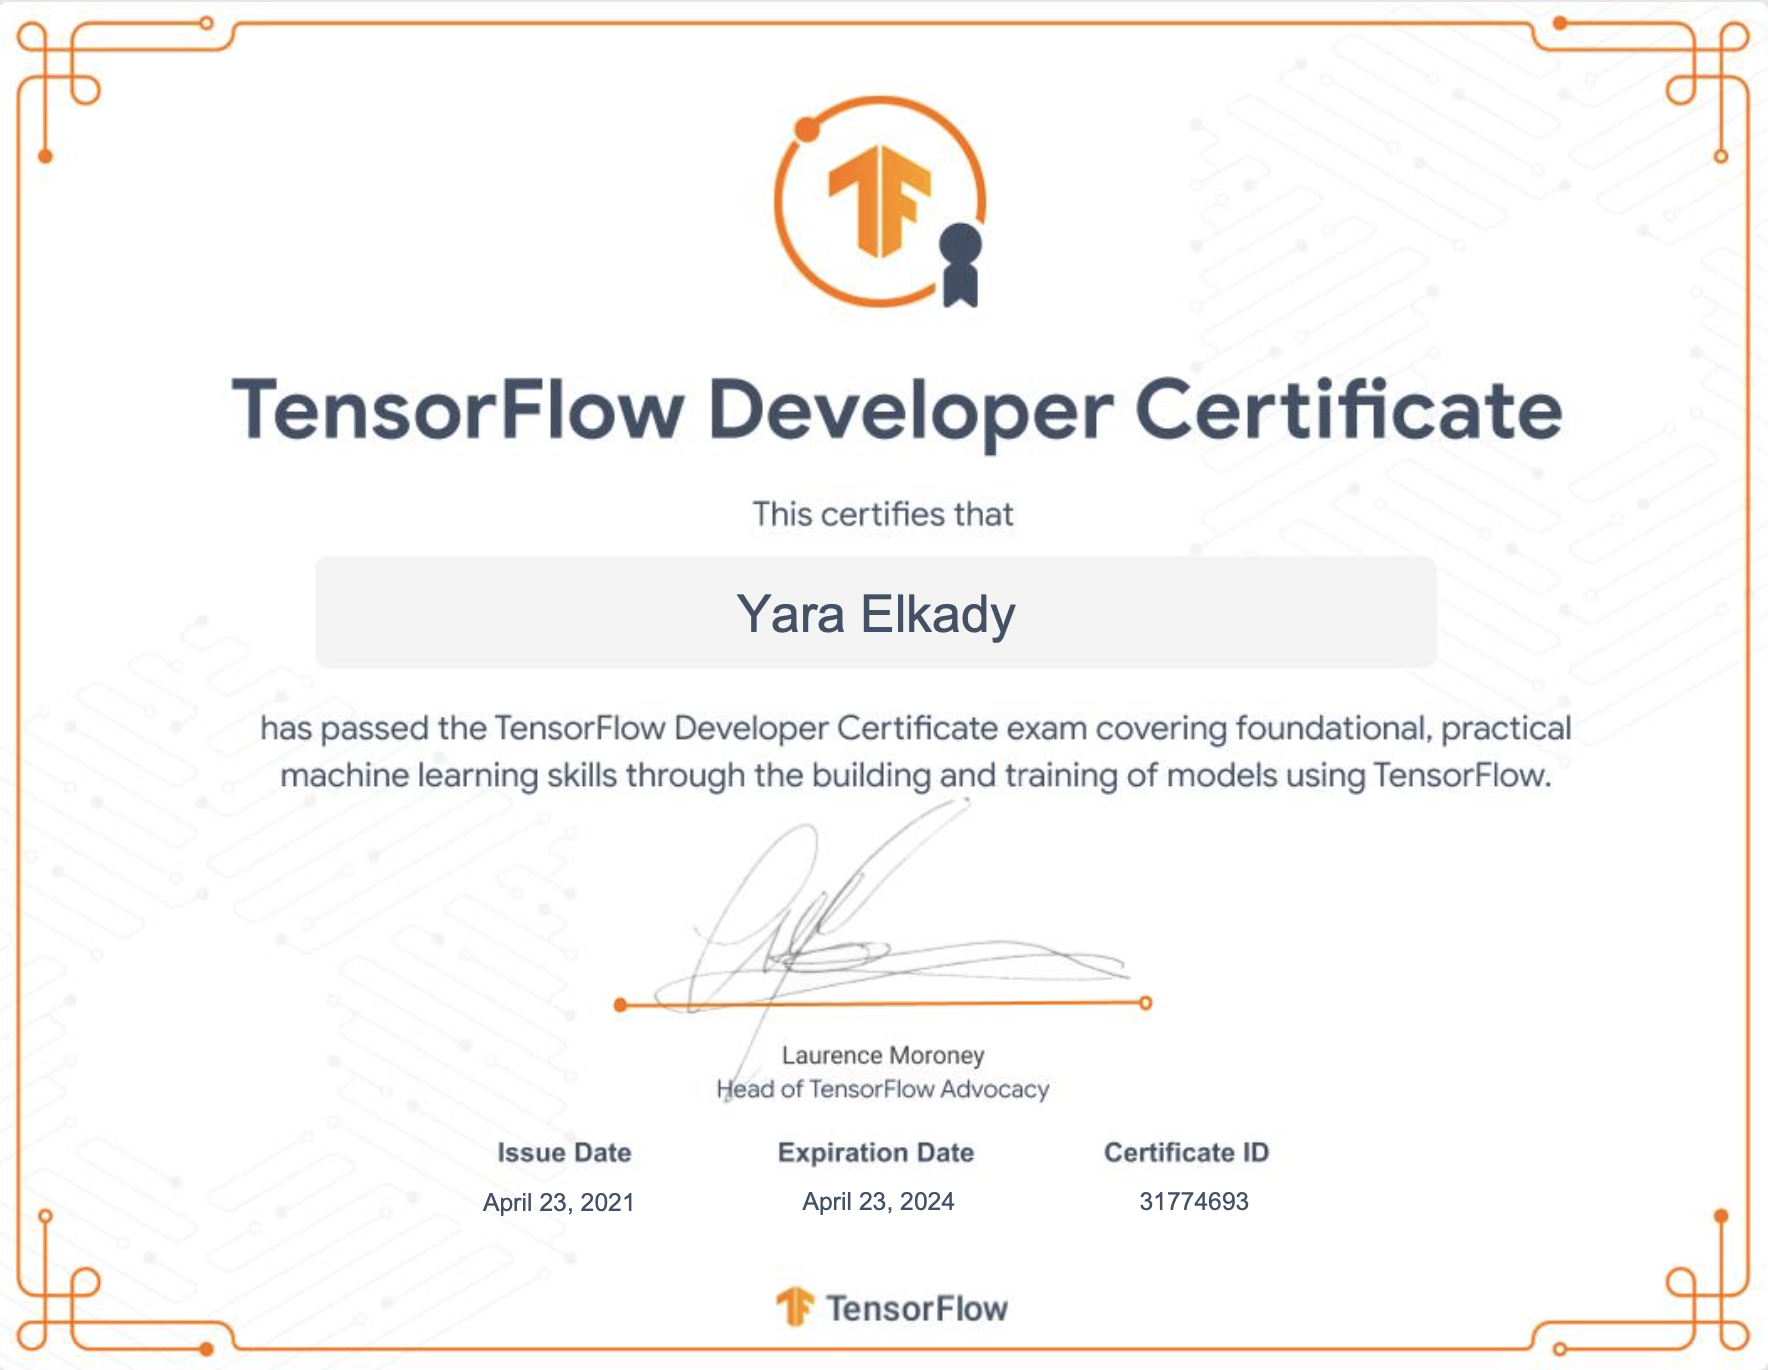
Thanks to those resources, support from her peers, and tons of hard work, Yara passed the exam and received her TensorFlow certification! And she wasn’t the only one. 11 other MENA GDSC Leads also passed the exam to receive their certifications. Yara and her study partners were the first women in Egypt to be featured in the TensorFlow Certificate Network, and Yara became one of 27 people in Africa to receive the TensorFlow Developer Certificate!

Image of Yara Elkady's TensorFlow Developer Certificate

Yara’s TensorFlow Developer Certificate

When Yara looks back at how she was able to fast track from beginner to certified machine learning developer in just a year, she credits Google Developer Student Clubs with:

  • Offering advanced Machine Learning training
  • Fostering connections with other Leads to host study jams
  • Providing guidance from machine learning GDEs
  • TensorFlow certification exam prep
  • Exposure to opportunities that enabled her to inspire others
  • Endless community support

The truth is, students like Yara make Google Developer Student Clubs special by sharing their knowledge with the community and building a support system with their peers that extends far beyond the classroom.

On the importance of community, Yara says it best:

“Reaching your goals is a much more enjoyable process when you have someone with you on the same journey, to share your ups and downs, and push you to do more when you feel like quitting. Your success becomes their success and that gives more meaning to your accomplishments.”

If you’re a student who is ready to join your own Google Developer Student Club community, find one near you here.

Skip the setup— Run code directly from Google Cloud’s documentation

Posted by Abby Carey, Developer Advocate

Blog header

Long gone are the days of looking for documentation, finding a how-to guide, and questioning whether the commands and code samples actually work.

Google Cloud recently added a Cloud Shell integration within each and every documentation page.

This new functionality lets you test code in a preprovisioned virtual machine instance while learning about Google Cloud services. Running commands and code from the documentation cuts down on context switching between the documentation and a terminal window to run the commands in a tutorial.

This gif shows how Google Cloud’s documentation uses Cloud Shell, letting you run commands in a quickstart within your Cloud Shell environment.

gif showing how Google Cloud’s documentation uses Cloud Shell, letting you run commands in a quickstart within your Cloud Shell environment.

If you’re new to developing on Google Cloud, this creates a low barrier to entry for trying Google Cloud services and APIs. After activating billing verification with your Google Cloud account, you can test services that have a free tier at no charge, like Pub/Sub and Cloud Vision.

  1. Open a Google Cloud documentation page (like this Pub/Sub quickstart).
  2. Sign into your Google account.
  3. In the top navigation, click Activate Cloud Shell.
  4. Select your project or create one if you don’t already have one. You can select a project by running the gcloud config set project command or by using this drop-down menu:
    image showing how to select a project
  5. Copy, paste, and run your commands.

If you want to test something a bit more adventurous, try to deploy a containerized web application, or get started with BigQuery.

A bit about Cloud Shell

If you’ve been developing on Google Cloud, chances are you’ve already interacted with Cloud Shell in the Cloud Console. Cloud Shell is a ready-to-go, online development and operations environment. It comes preinstalled with common command-line tools, programming languages, and the Cloud SDK.

Just like in the Cloud Console, your Cloud Shell terminal stays open as you navigate the site. As you work through tutorials within Google Cloud’s documentation, the Cloud Shell terminal stays on your screen. This helps with progressing from two connected tutorials, like the Pub/Sub quickstart and setting up a Pub/Sub Proxy.

Having a preprovisioned environment setup by Google eliminates the age old question of “Is my machine the problem?” when you eventually try to run these commands locally.

What about code samples?

While Cloud Shell is useful for managing your Google Cloud resources, it also lets you test code samples. If you’re using Cloud Client Libraries, you can customize and run sample code in the Cloud Shell’s built in code editor: Cloud Shell Editor.

Cloud Shell Editor is Cloud Shell’s built-in, browser-based code editor, powered by the Eclipse Theia IDE platform. To open it, click the Open Editor button from your Cloud Shell terminal:

Image showing how to open Cloud Shell Editor

Cloud Shell Editor has rich language support and debuggers for Go, Java, .Net, Python, NodeJS and more languages, integrated source control, local emulators for Kubernetes, and more features. With the Cloud Shell Editor open, you can then walk through a client library tutorial like Cloud Vision’s Detect labels guide, running terminal commands and code from one browser tab.

Open up a Google Cloud quickstart and give it a try! This could be a game-changer for your learning experience.

Mentoring future women Experts

Posted by Justyna Politanska-Pyszko

Google Developers Experts is a global community of developers, engineers and thought leaders who passionately share their technical knowledge with others.

Becoming a Google Developers Expert is no easy task. First, you need to have strong skills in one of the technical areas - Android, Kotlin, Google Cloud, Machine Learning, Web Technologies, Angular, Firebase, Google Workspace, Flutter or other. You also need to have a track record of sharing your knowledge - be it via conference talks, your personal blog, youtube videos or in some other form. Finally, you need one more thing. The courage to approach an existing Expert or a Google employee and ask them to support your application.

It’s not easy, but it’s worth it. Joining the Experts community comes with many opportunities: direct access to product teams at Google, invitations to events and projects, entering a network of technology enthusiasts from around the world.

On a quest to make these opportunities available to a diverse group of talented people globally, we launched “Road to GDE”: a mentoring program to support women in their journey to become Google Developers Experts.

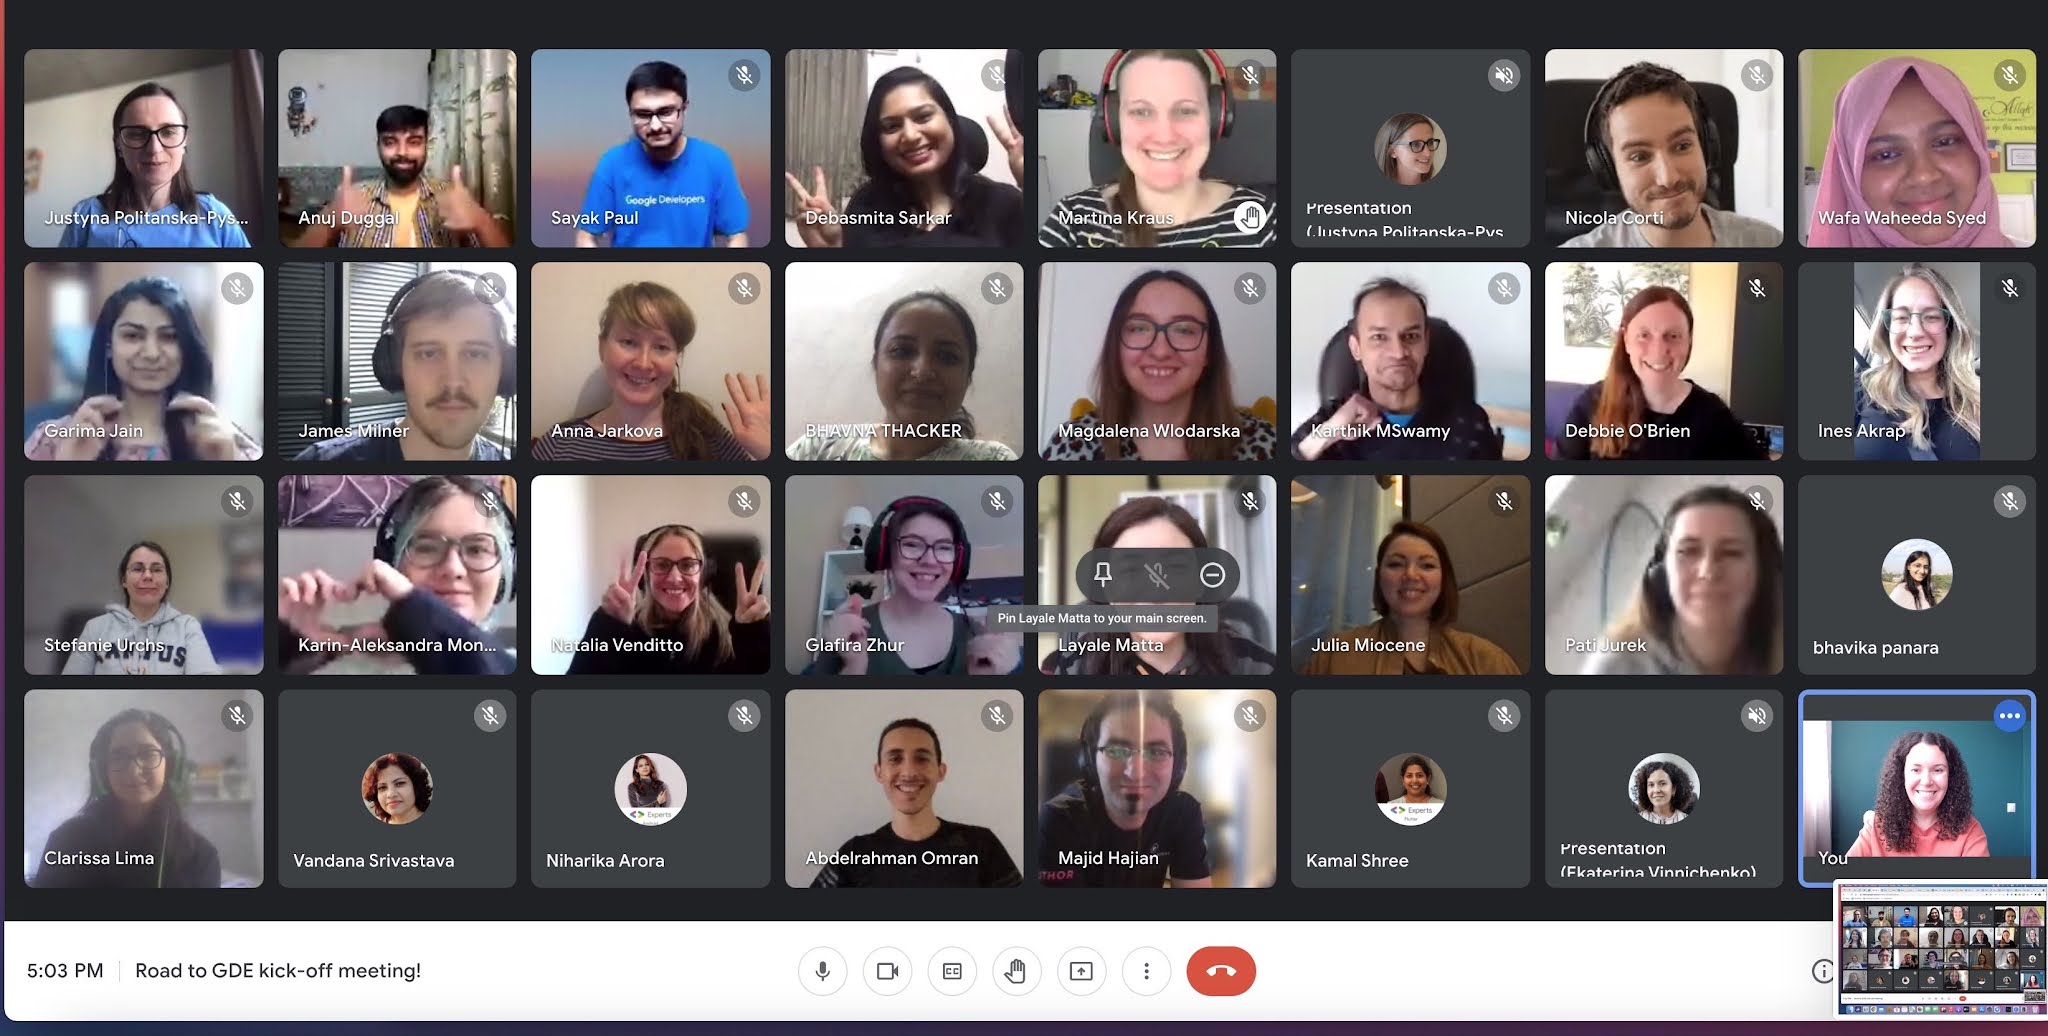
Mentors and Mentees meeting online

Mentors and Mentees meeting online

For 3 months, 17 mentors from the Experts community were mentoring mentees on topics like public speaking, building their professional portfolio and confidence boosting. What did they learn during the program?

Glafira Zhur: No time for fear! With my Mentor’s help, I got invited to speak at several events, two of which are already scheduled for the summer. I created my speaker portfolio and made new friends in the community. It was a great experience.

Julia Miocene: I learned that I shouldn't be afraid to do what someone else has already done. Even if there are talks or articles on some topic already, I will do them differently anyway. And for people, it’s important to see things from different perspectives. Just do what you like and don’t be afraid.

Bhavna Thacker: I got motivated to continue my community contributions, learnt how to promote my work and reach more developers, so that they can benefit from my efforts. Overall, It was an excellent program. Thanks to all organisers and my mentor - Garima Jain. I am definitely looking forward to applying to the Experts program soon!

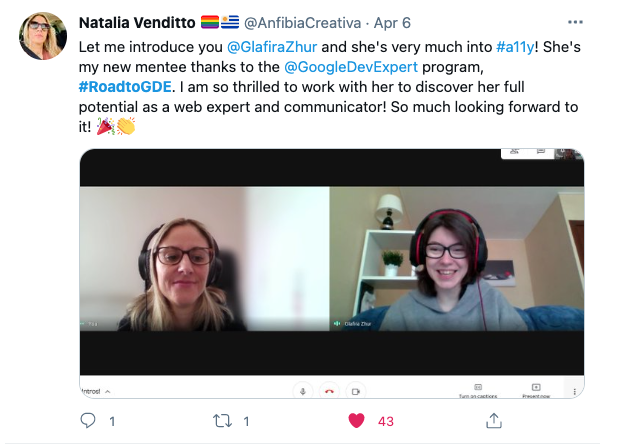
Road to GDE mentee - Glafira Zhur and her mentor - Natalia Venditto.

Road to GDE mentee - Glafira Zhur and her mentor - Natalia Venditto.

Congratulations to all 17 mentees who completed the Program: Maris Botero, Clarissa Loures, Layale Matta, Bhavika Panara, Stefanie Urchs, Alisa Tsvetkova, Glafira Zhur, Wafa Waheeda Syed, Helen Kapatsa, Karin-Aleksandra Monoid, Sveta Krivosheeva, Ines Akrap, Julia Miocene, Vandana Srivastava, Anna Zharkova, Bhavana Thacker, Debasmita Sarkar

And to their mentors - all members of the Google Developers Experts community: Lesly Zerna, Bianca Ximenes, Kristina Simakova, Sayak Paul, Karthik Muthuswamy, Jeroen Meijer, Natalia Venditto, Martina Kraus, Merve Noyan, Annyce Davis, Majid Hajian, James Milner, Debbie O'Brien, Niharika Arora, Nicola Corti, Garima Jain, Kamal Shree Soundirapandian

To learn more about the Experts program, follow us on Twitter, Linkedin or Medium.

Drone control via gestures using MediaPipe Hands

A guest post by Neurons Lab

Please note that the information, uses, and applications expressed in the below post are solely those of our guest author, Neurons Lab, and not necessarily those of Google.

How the idea emerged

With the advancement of technology, drones have become not only smaller, but also have more compute. There are many examples of iPhone-sized quadcopters in the consumer drone market and the computing power to do live tracking while recording 4K video. However, the most important element has not changed much - the controller. It is still bulky and not intuitive for beginners to use. There is a smartphone with on-display control as an option; however, the control principle is still the same. 

That is how the idea for this project emerged: a more personalised approach to control the drone using gestures. ML Engineer Nikita Kiselov (me) together with consultation from my colleagues at Neurons Lab undertook this project. 
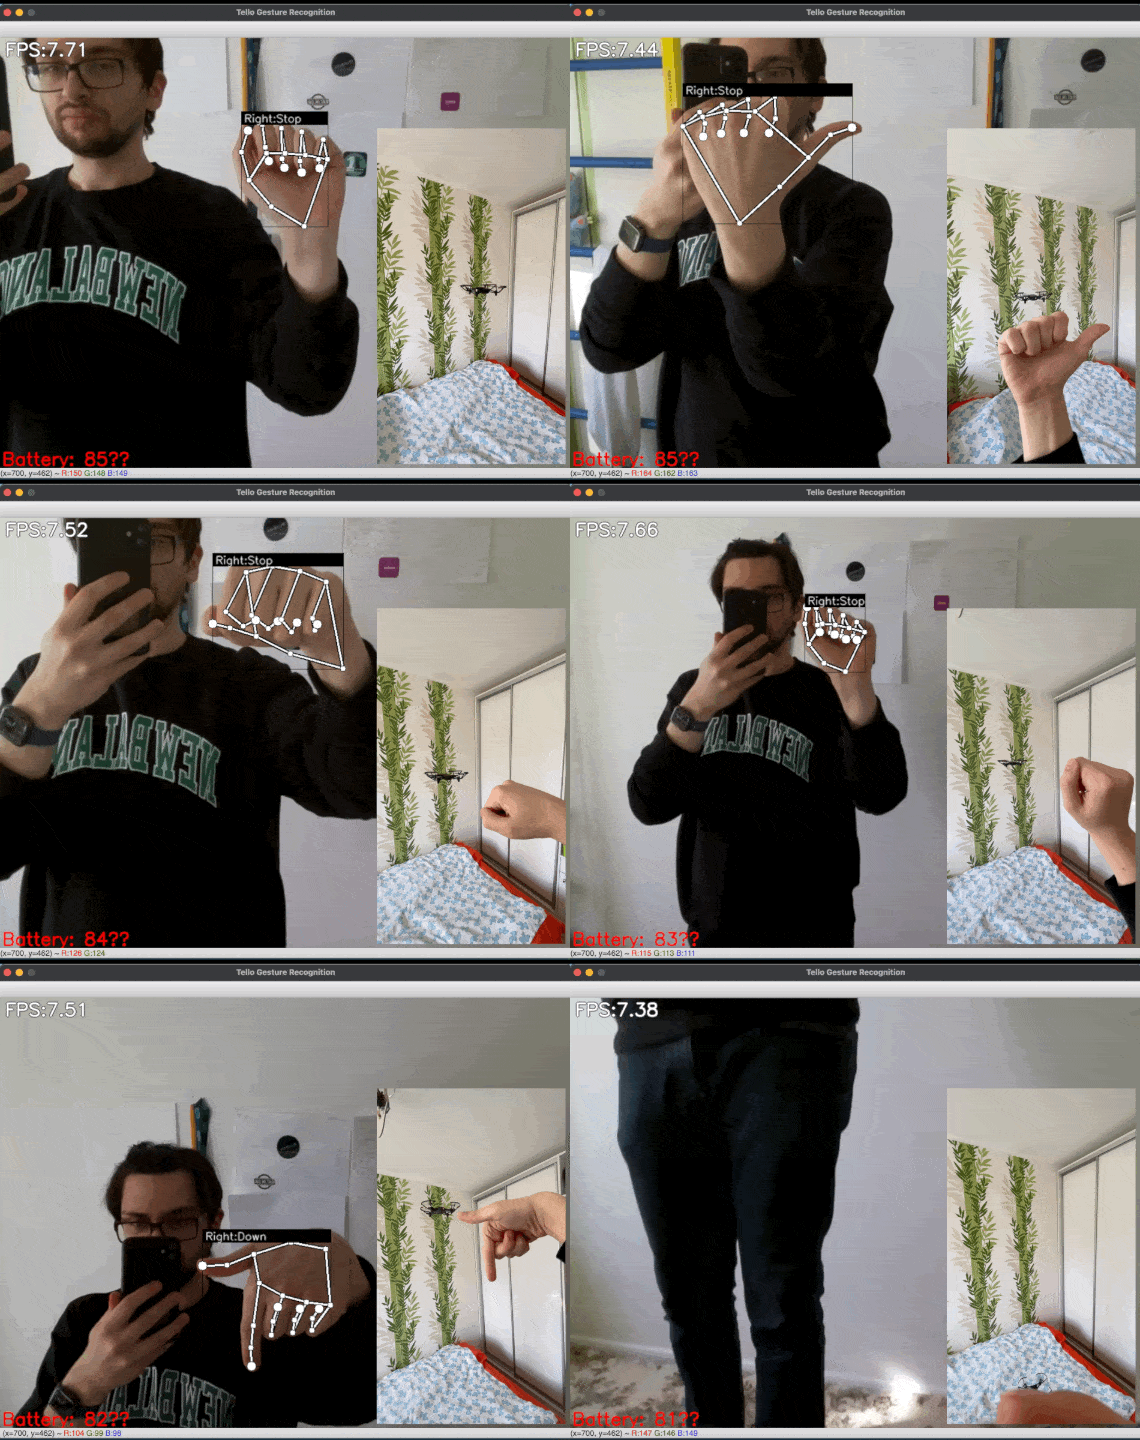
Demonstration of drone flight control via gestures using MediaPipe Hands

Figure 1: [GIF] Demonstration of drone flight control via gestures using MediaPipe Hands

Why use gesture recognition?

Gestures are the most natural way for people to express information in a non-verbal way.  Gesture control is an entire topic in computer science that aims to interpret human gestures using algorithms. Users can simply control devices or interact without physically touching them. Nowadays, such types of control can be found from smart TV to surgery robots, and UAVs are not the exception.

Although gesture control for drones have not been widely explored lately, the approach has some advantages:

  • No additional equipment needed.
  • More human-friendly controls.
  • All you need is a camera that is already on all drones.

With all these features, such a control method has many applications.

Flying action camera. In extreme sports, drones are a trendy video recording tool. However, they tend to have a very cumbersome control panel. The ability to use basic gestures to control the drone (while in action)  without reaching for the remote control would make it easier to use the drone as a selfie camera. And the ability to customise gestures would completely cover all the necessary actions.

This type of control as an alternative would be helpful in an industrial environment like, for example, construction conditions when there may be several drone operators (gesture can be used as a stop-signal in case of losing primary source of control).

The Emergencies and Rescue Services could use this system for mini-drones indoors or in hard-to-reach places where one of the hands is busy. Together with the obstacle avoidance system, this would make the drone fully autonomous, but still manageable when needed without additional equipment.

Another area of application is FPV (first-person view) drones. Here the camera on the headset could be used instead of one on the drone to recognise gestures. Because hand movement can be impressively precise, this type of control, together with hand position in space, can simplify the FPV drone control principles for new users. 

However, all these applications need a reliable and fast (really fast) recognition system. Existing gesture recognition systems can be fundamentally divided into two main categories: first - where special physical devices are used, such as smart gloves or other on-body sensors; second - visual recognition using various types of cameras. Most of those solutions need additional hardware or rely on classical computer vision techniques. Hence, that is the fast solution, but it's pretty hard to add custom gestures or even motion ones. The answer we found is MediaPipe Hands that was used for this project.

Overall project structure

To create the proof of concept for the stated idea, a Ryze Tello quadcopter was used as a UAV. This drone has an open Python SDK, which greatly simplified the development of the program. However, it also has technical limitations that do not allow it to run gesture recognition on the drone itself (yet). For this purpose a regular PC or Mac was used. The video stream from the drone and commands to the drone are transmitted via regular WiFi, so no additional equipment was needed. 

To make the program structure as plain as possible and add the opportunity for easily adding gestures, the program architecture is modular, with a control module and a gesture recognition module. 
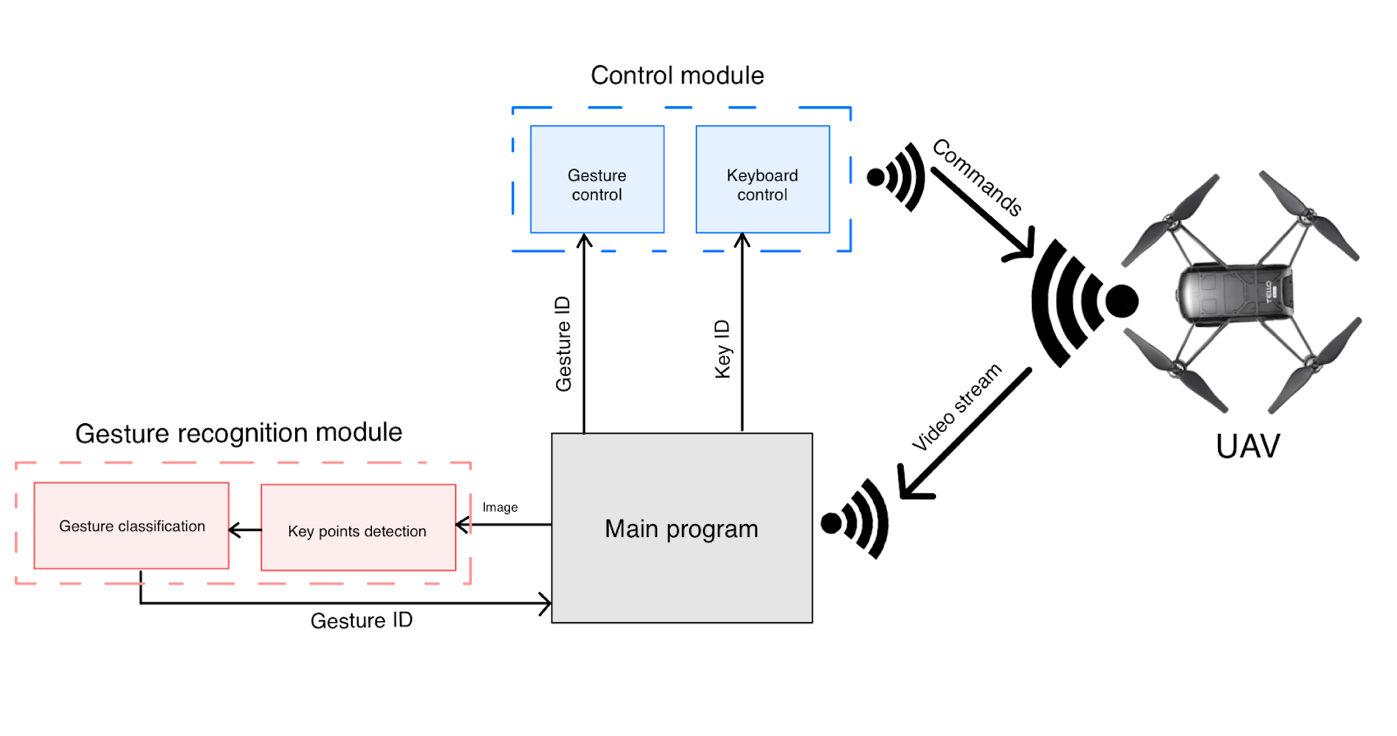
Scheme that shows overall project structure and how videostream data from the drone is processed

Figure 2: Scheme that shows overall project structure and how videostream data from the drone is processed

The application is divided into two main parts: gesture recognition and drone controller. Those are independent instances that can be easily modified. For example, to add new gestures or change the movement speed of the drone.

Video stream is passed to the main program, which is a simple script with module initialisation, connections, and typical for the hardware while-true cycle. Frame for the videostream is passed to the gesture recognition module. After getting the ID of the recognised gesture, it is passed to the control module, where the command is sent to the UAV. Alternatively, the user can control a drone from the keyboard in a more classical manner.

So, you can see that the gesture recognition module is divided into keypoint detection and gesture classifier. Exactly the bunch of the MediaPipe key point detector along with the custom gesture classification model distinguishes this gesture recognition system from most others.

Gesture recognition with MediaPipe

Utilizing MediaPipe Hands is a winning strategy not only in terms of speed, but also in flexibility. MediaPipe already has a simple gesture recognition calculator that can be inserted into the pipeline. However, we needed a more powerful solution with the ability to quickly change the structure and behaviour of the recognizer. To do so and classify gestures, the custom neural network was created with 4 Fully-Connected layers and 1 Softmax layer for classification.

Figure 3: Scheme that shows the structure of classification neural network

Figure 3: Scheme that shows the structure of classification neural network

This simple structure gets a vector of 2D coordinates as an input and gives the ID of the classified gesture. 

Instead of using cumbersome segmentation models with a more algorithmic recognition process, a simple neural network can easily handle such tasks. Recognising gestures by keypoints, which is a simple vector with 21 points` coordinates, takes much less data and time. What is more critical, new gestures can be easily added because model retraining tasks take much less time than the algorithmic approach.

To train the classification model, dataset with keypoints` normalised coordinates and ID of a gesture was used. The numerical characteristic of the dataset was that:

  • 3 gestures with 300+ examples (basic gestures)
  • 5 gestures with 40 -150 examples 

All data is a vector of x, y coordinates that contain small tilt and different shapes of hand during data collection.
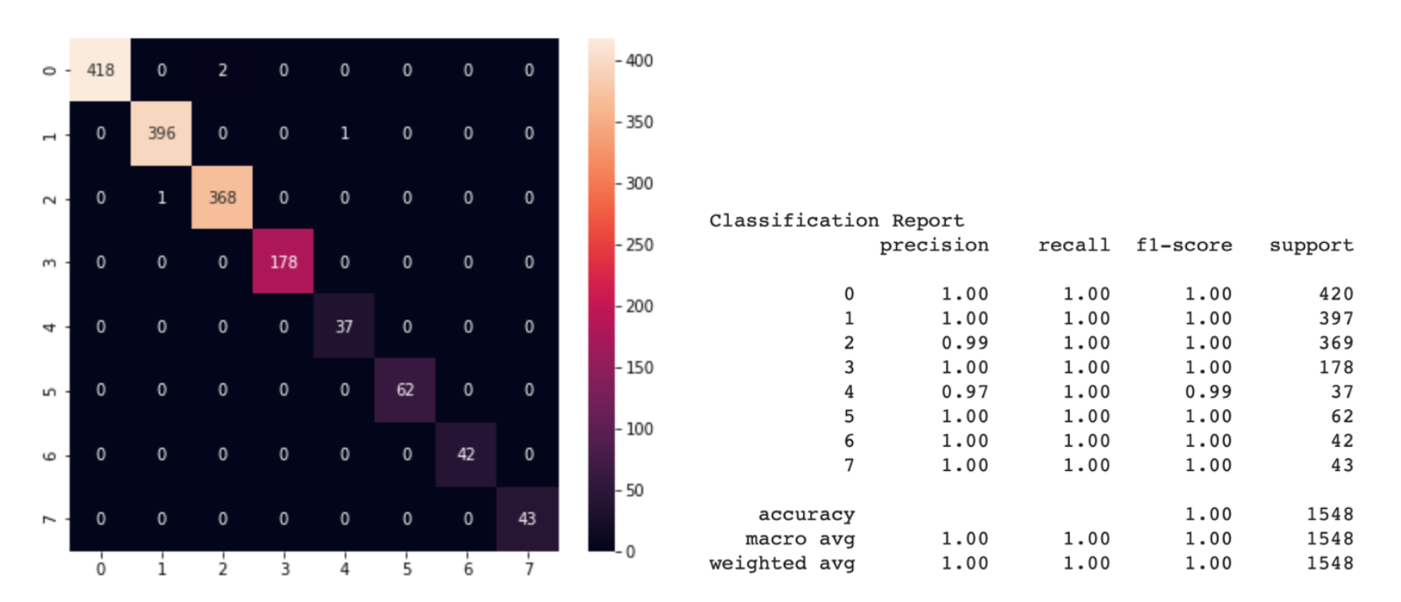
Figure 4: Confusion matrix and classification report for classification

Figure 4: Confusion matrix and classification report for classification

We can see from the classification report that the precision of the model on the test dataset (this is 30% of all data) demonstrated almost error-free for most classes, precision > 97% for any class. Due to the simple structure of the model, excellent accuracy can be obtained with a small number of examples for training each class. After conducting several experiments, it turned out that we just needed the dataset with less than 100 new examples for good recognition of new gestures. What is more important, we don’t need to retrain the model for each motion in different illumination because MediaPipe takes over all the detection work.

Figure 5: [GIF] Test that demonstrates how fast classification network can distinguish newly trained gestures using the information from MediaPipe hand detector

Figure 5: [GIF] Test that demonstrates how fast classification network can distinguish newly trained gestures using the information from MediaPipe hand detector

From gestures to movements

To control a drone, each gesture should represent a command for a drone. Well, the most excellent part about Tello is that it has a ready-made Python API to help us do that without explicitly controlling motors hardware. We just need to set each gesture ID to a command.
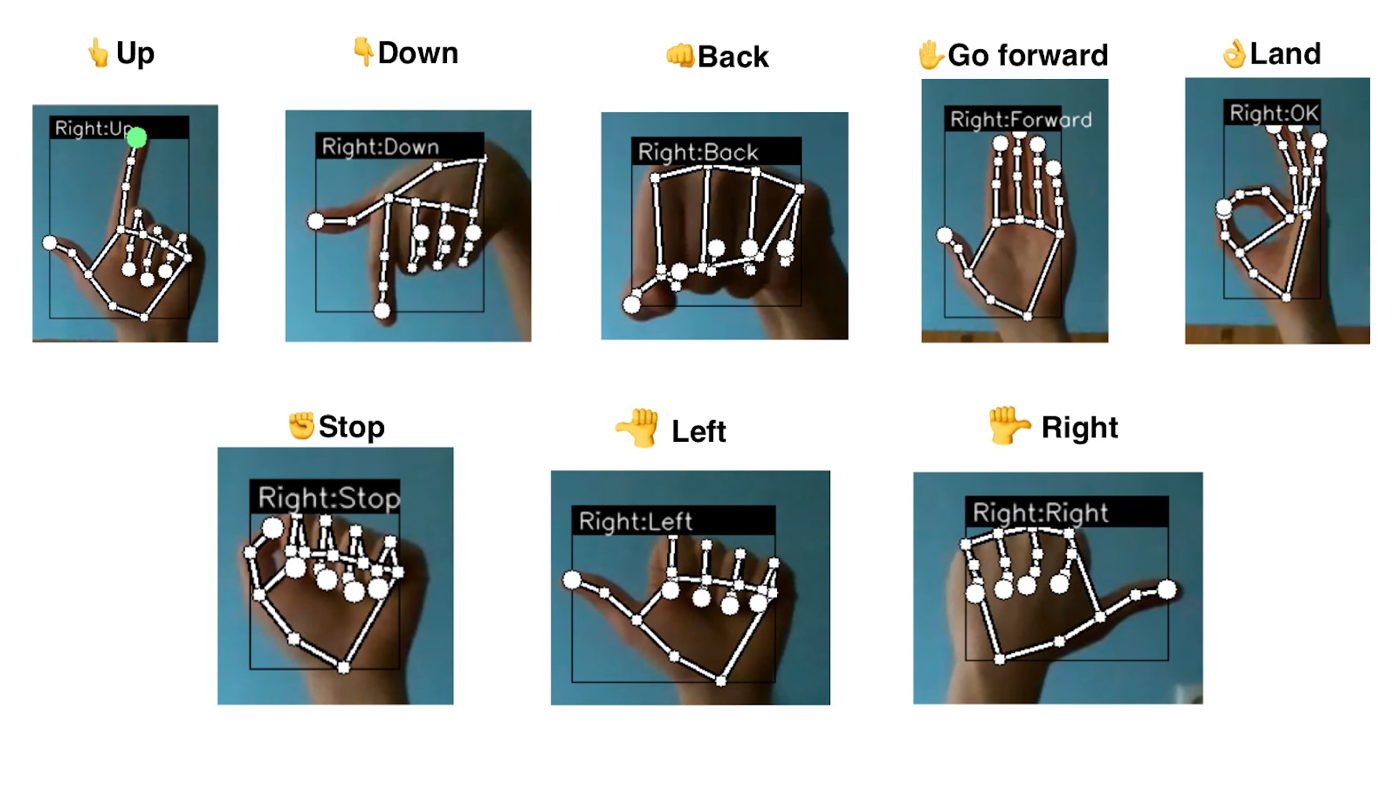
Figure 6: Command-gesture pairs representation

Figure 6: Command-gesture pairs representation

Each gesture sets the speed for one of the axes; that’s why the drone’s movement is smooth, without jitter. To remove unnecessary movements due to false detection, even with such a precise model, a special buffer was created, which is saving the last N gestures. This helps to remove glitches or inconsistent recognition.

The fundamental goal of this project is to demonstrate the superiority of the keypoint-based gesture recognition approach compared to classical methods. To demonstrate all the potential of this recognition model and its flexibility, there is an ability to create the dataset on the fly … on the drone`s flight! You can create your own combinations of gestures or rewrite an existing one without collecting massive datasets or manually setting a recognition algorithm. By pressing the button and ID key, the vector of detected points is instantly saved to the overall dataset. This new dataset can be used to retrain classification network to add new gestures for the detection. For now, there is a notebook that can be run on Google Colab or locally. Retraining the network-classifier takes about 1-2 minutes on a standard CPU instance. The new binary file of the model can be used instead of the old one. It is as simple as that. But for the future, there is a plan to do retraining right on the mobile device or even on the drone.
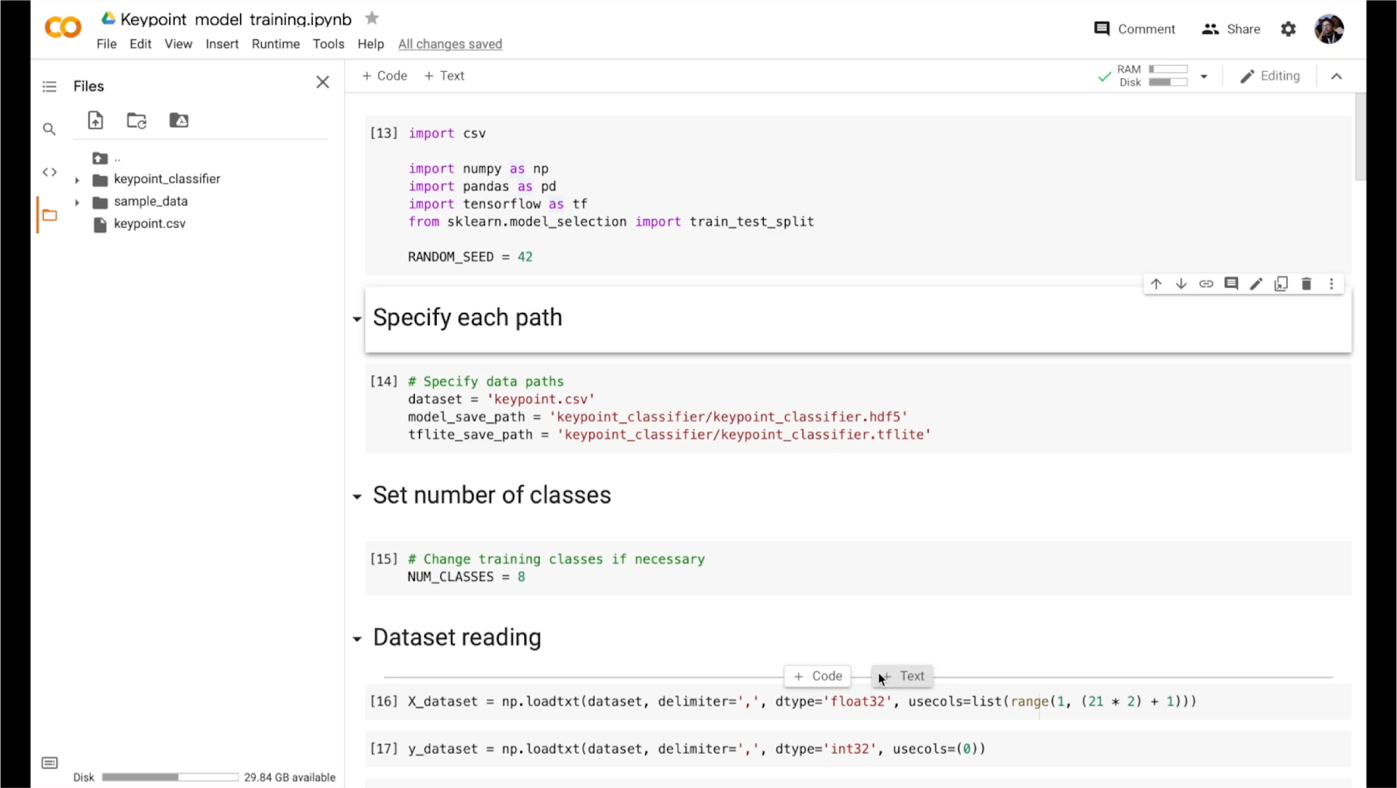
Figure 7: Notebook for model retraining in action

Figure 7: Notebook for model retraining in action

Summary 

This project is created to make a push in the area of the gesture-controlled drones. The novelty of the approach lies in the ability to add new gestures or change old ones quickly. This is made possible thanks to MediaPipe Hands. It works incredibly fast, reliably, and ready out of the box, making gesture recognition very fast and flexible to changes. Our Neuron Lab`s team is excited about the demonstrated results and going to try other incredible solutions that MediaPipe provides. 

We will also keep track of MediaPipe updates, especially about adding more flexibility in creating custom calculators for our own models and reducing barriers to entry when creating them. Since at the moment our classifier model is outside the graph, such improvements would make it possible to quickly implement a custom calculator with our model into reality.

Another highly anticipated feature is Flutter support (especially for iOS). In the original plans, the inference and visualisation were supposed to be on a smartphone with NPU\GPU utilisation, but at the moment support quality does not satisfy our requests. Flutter is a very powerful tool for rapid prototyping and concept checking. It allows us to throw and test an idea cross-platform without involving a dedicated mobile developer, so such support is highly demanded. 

Nevertheless, the development of this demo project continues with available functionality, and there are already several plans for the future. Like using the MediaPipe Holistic for face recognition and subsequent authorisation. The drone will be able to authorise the operator and give permission for gesture control. It also opens the way to personalisation. Since the classifier network is straightforward, each user will be able to customise gestures for themselves (simply by using another version of the classifier model). Depending on the authorised user, one or another saved model will be applied. Also in the plans to add the usage of Z-axis. For example, tilt the palm of your hand to control the speed of movement or height more precisely. We encourage developers to innovate responsibly in this area, and to consider responsible AI practices such as testing for unfair biases and designing with safety and privacy in mind.

We highly believe that this project will motivate even small teams to do projects in the field of ML computer vision for the UAV, and MediaPipe will help to cope with the limitations and difficulties on their way (such as scalability, cross-platform support and GPU inference).


If you want to contribute, have ideas or comments about this project, please reach out to [email protected], or visit the GitHub page of the project.

This blog post is curated by Igor Kibalchich, ML Research Product Manager at Google AI.