Tag Archives: Application Development

PaLM API & MakerSuite: an approachable way to start prototyping and building generative AI applications

Posted by Scott Huffman, Vice President, Engineering and Josh Woodward, Senior Director, Product Management

We’re seeing a new wave of generative AI applications that are transforming the way people interact with technology – from games and dialog agents to creative brainstorming and coding tools. At Google, we want to continue making AI accessible by empowering all developers to start building the next generation of applications with generative AI by providing easy-to-use APIs and tools.

Earlier today, we announced the PaLM API, a new developer offering that makes it easy and safe to experiment with Google’s large language models. Alongside the API, we’re releasing MakerSuite, a tool that lets developers start prototyping quickly and easily. We’ll be making these tools available to select developers through a Private Preview, and stay tuned for our waitlist soon.


Access Google’s large language models using the PaLM API

The PaLM API is a simple entry point for Google’s large language models, which can be used for a variety of applications. It will provide developers access to models that are optimized for multi-turn use cases, such as content generation and chat, and general purpose models that are optimized for use cases such as summarization, classification, and more. Starting today, we’re making an efficient model available in terms of size and capabilities, and we’ll add other models and sizes soon.

Start building quickly

We’ve spent the last several years building and deploying large language models—from bringing MUM to Search to exploring applications with LaMDA in the AI Test Kitchen. We learned a lot about generative AI development workflows and how fragmented they can be. Developers have to use different tools to accomplish tasks like crafting and iterating on a prompt, generating synthetic data, and tuning a custom model.

That’s why we’re releasing MakerSuite, a tool that simplifies this workflow. With MakerSuite, you’ll be able to iterate on prompts, augment your dataset with synthetic data, and easily tune custom models. When you’re ready to move to code, MakerSuite will let you export your prompt as code in your favorite languages and frameworks, like Python and Node.js.

Tune a model

Generative models offer developers powerful out-of-the-box functionality. But for specialized tasks, tuning leads to better results. Our tooling will enable developers to leverage parameter-efficient tuning techniques to create models customized to their use case. And with MakerSuite, you’ll be able to quickly test and iterate on your tuned model right in the browser.

Augment your dataset with synthetic data

High-quality data is crucial when developing with AI, and developers are often limited by the data they have. Our tooling will allow you to generate additional data based on a few examples, and then you’ll be able to manage and manipulate the data from there. This synthetic data can be used in various scenarios, such as tuning or evaluations.

Generate state of the art embeddings

We’ve been excited by the range of applications developers have found for embeddings, from semantic search to recommendations and classification. With embeddings generated through the PaLM API, developers will be able to build applications with their own data or on top of external data sources. Embeddings can also be used in downstream applications built with TensorFlow, Keras, JAX, and other open-source libraries.

Build responsibly and safely

We built our models according to Google’s AI Principles to give developers a responsible AI foundation to start from. We know that control is necessary so developers can define and enforce responsibility and safety in the context of their own applications. Our tools will give developers an easy way to test and adjust safety dimensions to best suit each unique application and use case.

Scale your generative AI application

These developer tools will make it easy to start prototyping and building generative AI applications, but when you need scale, we want to make sure you have the support you need. Google's infrastructure supports the PaLM API and MakerSuite, so you don’t have to worry about hosting or serving. For developers who want to scale their ideas and get enterprise-grade support, security and compliance, and service level agreement (SLA), they can go to Google Cloud Vertex AI and access the same models, along with a host of advanced capabilities such as enterprise search and conversation AI.

It’s an exciting time in AI for developers and we want to continue to make sure we build AI tools that help make your lives easier. We plan to onboard new developers, roll out new features, and make this technology available to the broader developer community soon. During this time, we’ll listen to feedback, learn, and improve these tools to meet developers where they are.

To stay updated on our progress, subscribe to the Google Developers newsletter.

How to use the App Engine Users service (Module 20)

Posted by Wesley Chun (@wescpy), Developer Advocate, Google Cloud


Introduction and background

The Serverless Migration Station video series and corresponding codelabs aim to help App Engine developers modernize their apps, whether it's upgrading language runtimes like from Python 2 to 3 and Java 8 to 17, or to move laterally to sister serverless platforms like Cloud Functions or Cloud Run. For developers who want more control, like being able to SSH into instances, Compute Engine VMs or GKE, our managed Kubernetes service, are also viable options.

In order to consider moving App Engine apps to other compute services, developers must move their apps away from its original APIs (now referred to as legacy bundled services), either to Cloud standalone replacement or alternative 3rd-party services. Once no longer dependent on these proprietary services, apps become much more portable. Apps can stay on App Engine while upgrading to its 2nd-generation platform, or move to other compute platforms as listed above.

Today's Migration Module 20 content focuses on helping developers refamiliarize themselves with App Engine's Users service, a user authentication system serving as a lightweight wrapper around Google Sign-In (now called Google Identity Services). The video and its corresponding codelab (self-paced, hands-on tutorial) demonstrate how to add use of the Users service to the sample baseline app from Module 1. After adding the Users service in Module 20, Module 21 follows, showing developers how to migrate that usage to Cloud Identity Platform.

How to use the App Engine Users service

Adding use of Users service


The sample app's basic functionality consists of registering each page visit in Datastore and displaying the most recent visits. The Users service helps apps support user logins, App Engine administrative ("admin'") users. It also provides convenient functions for generating login/logout links and retrieving basic user information for logged-in users. Below is a screenshot of the modified app which now supports user logins via the user interface (UI):
Sample app now supports user logins and App Engine admin users (click to enlarge) 
Below is the pseudocode reflecting the changes made to support user logins for the sample app, including integrating the Users service and updating what shows up in the UI:
  • If the user is logged in, show their "nickname" (display name or email address) and display a Logout button. If the logged-in user is an App Engine app admin, also display an "admin" badge (between nickname and Logout button).
  • If the user is not logged in, display the username generically as "user", remove any admin badge, and display a Login button.
Because the Users service is primarily a user-facing endeavor, the most significant changes take place in the UI, whereas the data model and core functionality of registering visits remain unchanged. The new support for user management primarily results in additional context to be rendered in the web template. New or altered code is bolded to highlight the updates.
Table showing code 'Before'(Module 1) on left, and 'After' (Module 20) on the right
 Adding App Engine Users service usage to sample app (click to enlarge)

Wrap-up


Today's "migration" consists of adding usage of the App Engine Users service to support user management and recognize App Engine admin users, starting with the Module 1 baseline app and finishing with the Module 20 app. To get hands-on experience doing it yourself, try the codelab and follow along with the video. Then you'll be ready to upgrade to Identity Platform should you choose to do so.

In Fall 2021, the App Engine team extended support of many of the bundled services to 2nd generation runtimes (that have a 1st generation runtime), meaning you are no longer required to migrate from the Users service to Identity Platform when porting your app to Python 3. You can continue using the Users service in your Python 3 app so long as you retrofit the code to access bundled services from next-generation runtimes.

If you do want to move to Identity Platform, see the Module 21 content, including its codelab. All Serverless Migration Station content (codelabs, videos, and source code [when available]) are available at its open source repo. While we're initially focusing on Python users, the Cloud team is covering other runtimes soon, so stay tuned. Also check out other videos in the broader Serverless Expeditions series.

Migrating from App Engine pull tasks to Cloud Pub/Sub (Module 19)

Posted by Wesley Chun (@wescpy), Developer Advocate, Google Cloud

Introduction and background

The Serverless Migration Station series is aimed at helping developers modernize their apps running one of Google Cloud's serverless platforms. The preceding (Migration Module 18) video demonstrates how to add use of App Engine's Task Queue pull tasks service to a Python 2 App Engine sample app. Today's Module 19 video picks up from where that leaves off, migrating that pull task usage to Cloud Pub/Sub.

Moving away from proprietary App Engine services like Task Queue makes apps more portable, giving them enough flexibility to:


    Understanding the migrations

    Module 19 consists of implementing three different migrations on the Module 18 sample app:

    • Migrate from App Engine NDB to Cloud NDB
    • Migrate from App Engine Task Queue pull tasks to Cloud Pub/Sub
    • Migrate from Python 2 to Python (2 and) 3

    The NDB to Cloud NDB migration is identical to the Module 2 migration content, so it's not covered in-depth in Module 19. The original app was designed to be Python 2 and 3 compatible, so there's no work there either. Module 19 boils down to three key updates:

    • Setup: Enable APIs and create Pub/Sub Topic & Subscription
    • How work is created: Publish Pub/Sub messages instead of adding pull tasks
    • How work is processed: Pull messages instead of leasing tasks

    Aside from these physical changes, a key hurdle to overcome is understanding the differences in terminology between pull tasks and Pub/Sub. The following chart attempts to demystify this so developers can more easily grasp how they differ:
    Table of terminology with related GAE Pull Tasks and Cloud Pub/Sub
    Terminology differences between App Engine pull tasks and Cloud Pub/Sub

    Reflecting the chart, these differences can be summarized like this:
    1. With Pull Queues, work is created in pull queues while work is sent to Pub/Sub topics
    2. Task Queue pull tasks are called messages in Pub/Sub
    3. With Task Queues, workers access pull tasks; with Pub/Sub, subscribers receive messages
    4. Leasing a pull task is the same as pulling a message from a Pub/Sub topic via a subscription
    5. Deleting a task from a pull queue when you're done is analogous to successfully acknowledging a Pub/Sub message
    The video walks developers through the terminology as well as the code changes described above. Below is pseudocode implementing the key changes to the main application (new or updated lines of code bolded):
    Table showing changes in code Before (Module 18) on the left, and After (Module 19) on the right
    Migration from App Engine Task Queue pull tasks to Cloud Pub/Sub

    Observe how most of the code, especially app operations and data models are left relatively unchanged. The only visible changes are switching from App Engine NDB and Task Queue to Cloud NDB and Pub/Sub. Complete versions of the app before and after making the changes can be found in the Module 18 and Module 19 repo folders, respectively. In addition to the video, be sure to check out the Module 19 codelab which leads you step-by-step through the migrations discussed.

    Wrap-up

    Module 19 features a migration of App Engine pull tasks to Cloud Pub/Sub, but developers should note that Pub/Sub itself is not based on pull tasks. It is a fully-featured asynchronous, scalable messaging service that has many more features than the pull functionality provided by Task Queue. For example, Pub/Sub has other features like streaming to BigQuery and push functionality. Pub/Sub push operates differently than Task Queue push tasks, hence why we recommend push tasks be migrated to Cloud Tasks instead (see Module 8). For more information on all of its features, see the Pub/Sub documentation. Because Cloud Tasks doesn't support pull functionality, we turn to Pub/Sub instead for pull task users.

    While we recommend users move to the latest offerings from Google Cloud, neither of those migrations are required, and should you opt to do so, can do them on your own timeline. In Fall 2021, the App Engine team extended support of many of the bundled services to 2nd generation runtimes (that have a 1st generation runtime), meaning you don't have to migrate to standalone Cloud services before porting your app to Python 3. You can continue using Task Queue in Python 3 so long as you retrofit your code to access bundled services from next-generation runtimes.

    If you're using other App Engine legacy services be sure to check out the other Migration Modules in this series. All Serverless Migration Station content (codelabs, videos, source code [when available]) can be accessed at its open source repo. While our content initially focuses on Python users, the Cloud team is working on covering other language runtimes, so stay tuned. For additional video content, check out our broader Serverless Expeditions series.

    How to use App Engine pull tasks (Module 18)

    Posted by Wesley Chun (@wescpy), Developer Advocate, Google Cloud

    Introduction and background

    The Serverless Migration Station mini-series helps App Engine developers modernize their apps to the latest language runtimes, such as from Python 2 to 3 or Java 8 to 17, or to sister serverless platforms Cloud Functions and Cloud Run. Another goal of this series is to demonstrate how to move away from App Engine's original APIs (now referred to as legacy bundled services) to Cloud standalone replacement services. Once no longer dependent on these proprietary services, apps become much more portable, making them flexible enough to:

    App Engine's Task Queue service provides infrastructure for executing tasks outside of the standard request-response workflow. Tasks may consist of workloads exceeding request timeouts or periodic tangential work. The Task Queue service provides two different queue types, push and pull, for developers to perform auxiliary work.

    Push queues are covered in Migration Modules 7-9, demonstrating how to add use of push tasks to an existing baseline app followed by steps to migrate that functionality to Cloud Tasks, the standalone successor to the Task Queues push service. We turn to pull queues in today's video where Module 18 demonstrates how to add use of pull tasks to the same baseline sample app. Module 19 follows, showing how to migrate that usage to Cloud Pub/Sub.

    Adding use of pull queues

    In addition to registering page visits, the sample app needs to be modified to track visitors. Visits are comprised of a timestamp and visitor information such as the IP address and user agent. We'll modify the app to use the IP address and track how many visits come from each address seen. The home page is modified to show the top visitors in addition to the most recent visits:

    Screen grab of the sample app's updated home page tracking visits and visitors
    The sample app's updated home page tracking visits and visitors

    When visits are registered, pull tasks are created to track the visitors. The pull tasks sit patiently in the queue until they are processed in aggregate periodically. Until that happens, the top visitors table stays static. These tasks can be processed in a number of ways: periodically by a cron or Cloud Scheduler job, a separate App Engine backend service, explicitly by a user (via browser or command-line HTTP request), event-triggered Cloud Function, etc. In the tutorial, we issue a curl request to the app's endpoint to process the enqueued tasks. When all tasks have completed, the table then reflects any changes to the current top visitors and their visit counts:

    Screen grab of processed pull tasks updated in the top visitors table
    Processed pull tasks update the top visitors table

    Below is some pseudocode representing the core part of the app that was altered to add Task Queue pull task usage, namely a new data model class, VisitorCount, to track visitor counts, enqueuing a (pull) task to update visitor counts when registering individual visits in store_visit(), and most importantly, a new function fetch_counts(), accessible via /log, to process enqueued tasks and update overall visitor counts. The bolded lines represent the new or altered code.

    Adding App Engine Task Queue pull task usage to sample app showing 'Before'[Module 1] on the left and 'After' [Module 18] with altered code on the right
    Adding App Engine Task Queue pull task usage to sample app

    Wrap-up

    This "migration" is comprised of adding Task Queue pull task usage to support tracking visitor counts to the Module 1 baseline app and arrives at the finish line with the Module 18 app. To get hands-on experience doing it yourself, do the codelab by hand and follow along with the video. Then you'll be ready to upgrade to Cloud Pub/Sub should you choose to do so.

    In Fall 2021, the App Engine team extended support of many of the bundled services to 2nd generation runtimes (that have a 1st generation runtime), meaning you are no longer required to migrate pull tasks to Pub/Sub when porting your app to Python 3. You can continue using Task Queue in your Python 3 app so long as you retrofit the code to access bundled services from next-generation runtimes.

    If you do want to move to Pub/Sub, see Module 19, including its codelab. All Serverless Migration Station content (codelabs, videos, and source code) are available at its open source repo. While we're initially focusing on Python users, the Cloud team is covering other runtimes soon, so stay tuned. Also check out other videos in the broader Serverless Expeditions series.

    Extending support for App Engine bundled services (Module 17)

    Posted by Wesley Chun (@wescpy), Developer Advocate, Google Cloud

    Background

    App Engine initially launched in 2008, providing a suite of bundled services making it convenient for applications to access a database (Datastore), caching service (Memcache), independent task execution (Task Queue), Google Sign-In authentication (Users), or large "blob" storage (Blobstore), or other companion services. However, apps leveraging those services can only run their apps on App Engine.

    To increase app portability and help Google move towards its goal of having the most open cloud on the market, App Engine launched its 2nd-generation service in 2018, initially removing those legacy services. The newer platform allows developers to upgrade apps to the latest language runtimes, such as moving from Python 2 to 3 or Java 8 to 11 (and today, Java 17). One of the major drawbacks to the 1st-generation runtimes is that they're customized, proprietary, and restrictive in what you can use or can't.

    Instead, the 2nd-generation platform uses open source runtimes, meaning ability to follow standard development practices, use common/known idioms, and have fewer restrictions of 3rd-party libraries, and obviating the need to copy or "vendor" them with your code. Unfortunately, to use these newer runtimes, migrating away from App Engine services were required because while you could upgrade language releases, there was no access to bundled services, breaking apps or requiring complete rewrites, making it a showstopper for many users.

    Due to their popularity and the desire to ease the upgrade process for customers, the App Engine team restored access to most (but not all) of those services in Fall 2021. Today's Serverless Migration Station video demonstrates how to continue usage of bundled services available to Python 3 developers.

    Showing App Engine users how to use bundled services on Python 3


    Performing the upgrade

    Modernizing the typical Python 2 App Engine app looks something like this:
    1. Migrate from the webapp2 framework (not available in Python 3)
    2. Port from Python 2 to 3, preserve use of bundled services
    3. Optional migration to Cloud standalone or similar 3rd-party services

    The first step is to move to a standard Python web framework like Flask, Django, Pyramid, etc. Below is some pseudocode from Migration Module 1 demonstrating how to migrate from webapp2 to Flask:

    codeblocks for porting Python 2 sample app from webapp2 to Flask
    Step 1: Port Python 2 sample app from webapp2 to Flask

    The key changes are bolded in the above code snippets. Notice how the App Engine NDB code [the Visit class definition plus store_visit() and fetch_visits() functions] are unaffected by this web framework migration. The full webapp2 code sample can be found in the Module 0 repo folder while the completed migration to Flask sample is located in the Module 1 repo folder.

    After your app has ported frameworks, you're free to upgrade to Python 3 while preserving access to the bundled services if your app uses any. Below is pseudocode demonstrating how to upgrade the same sample app to Python 3 as well as the code changes needed to continue to use App Engine NDB:

    codeblocks for porting sample app to Python 3, preserving use of NDB bundled service
    Step 2: Port sample app to Python 3, preserving use of NDB bundled service

    The original app was designed to work under both Python 2 and 3 interpreters, so no language changes were required in this case. We added an import of the new App Engine SDK followed by the key update wrapping the WSGI object so the app can access the bundled services. As before, the key updates are bolded. Some updates to configuration are also required, and those are outlined in the documentation and the (Module 17) codelab.

    The NDB code is also left untouched in this migration. Not all of the bundled services feature such a hands-free migration, and we hope to cover some of the more complex ones ahead in Module 22. Java, PHP, and Go users have it even better, requiring fewer or no code changes at all. The Python 2 Flask sample is located in the Module 1 repo folder, and the resulting Python 3 app can be found in the Module 1b repo folder.

    The immediate benefit of step two is the ability to upgrade to a more current version of language runtime. This leaves the third step of migrating off the bundled services as optional, especially if you plan on staying on App Engine for the long-term.


    Additional options

    If you decide to migrate off the bundled services, you can do so on your own timeline. It should be a consideration should you ever want to move to modern serverless platforms such as Cloud Functions or Cloud Run, to lower-level platforms because you want more control, like GKE, our managed Kubernetes service, or Compute Engine VMs.

    Step three is also where the rest of the Serverless Migration Station content may be useful:

    *code samples and codelabs available; videos forthcoming

    As far as moving to modern serverless platforms, if you want to break apart a large App Engine app into multiple microservices, consider Cloud Functions. If your organization has added containerization as part of your software development workflow, consider Cloud Run. It's suitable for apps if you're familiar with containers and Docker, but even if you or your team don't have that experience, Cloud Buildpacks can do the heavy lifting for you. Here are the relevant migration modules to explore:


      Wrap-up

      Early App Engine users appreciate the convenience of the platform's bundled services, and after listening to user feedback, adding them back to 2nd-generation runtimes is another way we can help developers modernize their apps. Whether upgrading to newer language runtimes to stay on App Engine and continue to use its bundled services, migrating to Cloud standalone products, or shifting to other serverless platforms, the Google Cloud team aims to provide the tools to help streamline your modernization efforts.

      All Serverless Migration Station content (codelabs, videos, source code [when available]) can be accessed at its open source repo. While our content initially focuses on Python users, the Cloud team is working on covering other language runtimes, so stay tuned. Today's video features a special guest to provide a teaser of what to expect for Java. For additional video content, check out the broader Serverless Expeditions series.

      Migrating from App Engine Memcache to Cloud Memorystore (Module 13)

      Posted by Wesley Chun (@wescpy), Developer Advocate, Google Cloud

      Introduction and background

      The previous Module 12 episode of the Serverless Migration Station video series demonstrated how to add App Engine Memcache usage to an existing app that has transitioned from the webapp2 framework to Flask. Today's Module 13 episode continues its modernization by demonstrating how to migrate that app from Memcache to Cloud Memorystore. Moving from legacy APIs to standalone Cloud services makes apps more portable and provides an easier transition from Python 2 to 3. It also makes it possible to shift to other Cloud compute platforms should that be desired or advantageous. Developers benefit from upgrading to modern language releases and gain added flexibility in application-hosting options.

      While App Engine Memcache provides a basic, low-overhead, serverless caching service, Cloud Memorystore "takes it to the next level" as a standalone product. Rather than a proprietary caching engine, Cloud Memorystore gives users the option to select from a pair of open source engines, Memcached or Redis, each of which provides additional features unavailable from App Engine Memcache. Cloud Memorystore is typically more cost efficient at-scale, offers high availability, provides automatic backups, etc. On top of this, one Memorystore instance can be used across many applications as well as incorporates improvements to memory handling, configuration tuning, etc., gained from experience managing a huge fleet of Redis and Memcached instances.

      While Memcached is more similar to Memcache in usage/features, Redis has a much richer set of data structures that enable powerful application functionality if utilized. Redis has also been recognized as the most loved database by developers in StackOverflow's annual developers survey, and it's a great skill to pick up. For these reasons, we chose Redis as the caching engine for our sample app. However, if your apps' usage of App Engine Memcache is deeper or more complex, a migration to Cloud Memorystore for Memcached may be a better option as a closer analog to Memcache.

      Migrating to Cloud Memorystore for Redis featured video

      Performing the migration

      The sample application registers individual web page "visits," storing visitor information such as IP address and user agent. In the original app, the most recent visits are cached into Memcache for an hour and used for display if the same user continuously refreshes their browser during this period; caching is a one way to counter this abuse. New visitors or cache expiration results new visits as well as updating the cache with the most recent visits. Such functionality must be preserved when migrating to Cloud Memorystore for Redis.

      Below is pseudocode representing the core part of the app that saves new visits and queries for the most recent visits. Before, you can see how the most recent visits are cached into Memcache. After completing the migration, the underlying caching infrastructure has been swapped out in favor of Memorystore (via language-specific Redis client libraries). In this migration, we chose Redis version 5.0, and we recommend the latest versions, 5.0 and 6.x at the time of this writing, as the newest releases feature additional performance benefits, fixes to improve availability, and so on. In the code snippets below, notice how the calls between both caching systems are nearly identical. The bolded lines represent the migration-affected code managing the cached data.

      Switching from App Engine Memcache to Cloud Memorystore for Redis

      Wrap-up

      The migration covered begins with the Module 12 sample app ("START"). Migrating the caching system to Cloud Memorystore and other requisite updates results in the Module 13 sample app ("FINISH") along with an optional port to Python 3. To practice this migration on your own to help prepare for your own migrations, follow the codelab to do it by-hand while following along in the video.

      While the code migration demonstrated seems straightforward, the most critical change is that Cloud Memorystore requires dedicated server instances. For this reason, a Serverless VPC connector is also needed to connect your App Engine app to those Memorystore instances, requiring more dedicated servers. Furthermore, neither Cloud Memorystore nor Cloud VPC are free services, and neither has an "Always free" tier quota. Before moving forward this migration, check the pricing documentation for Cloud Memorystore for Redis and Serverless VPC access to determine cost considerations before making a commitment.

      One key development that may affect your decision: In Fall 2021, the App Engine team extended support of many of the legacy bundled services like Memcache to next-generation runtimes, meaning you are no longer required to migrate to Cloud Memorystore when porting your app to Python 3. You can continue using Memcache even when upgrading to 3.x so long as you retrofit your code to access bundled services from next-generation runtimes.

      A move to Cloud Memorystore and today's migration techniques will be here if and when you decide this is the direction you want to take for your App Engine apps. All Serverless Migration Station content (codelabs, videos, source code [when available]) can be accessed at its open source repo. While our content initially focuses on Python users, we plan to cover other language runtimes, so stay tuned. For additional video content, check out our broader Serverless Expeditions series.

      How to use App Engine Memcache in Flask apps (Module 12)

      Posted by Wesley Chun

      Background

      In our ongoing Serverless Migration Station series aimed at helping developers modernize their serverless applications, one of the key objectives for Google App Engine developers is to upgrade to the latest language runtimes, such as from Python 2 to 3 or Java 8 to 17. Another objective is to help developers learn how to move away from App Engine legacy APIs (now called "bundled services") to Cloud standalone equivalent services. Once this has been accomplished, apps are much more portable, making them flexible enough to:

      In today's Module 12 video, we're going to start our journey by implementing App Engine's Memcache bundled service, setting us up for our next move to a more complete in-cloud caching service, Cloud Memorystore. Most apps typically rely on some database, and in many situations, they can benefit from a caching layer to reduce the number of queries and improve response latency. In the video, we add use of Memcache to a Python 2 app that has already migrated web frameworks from webapp2 to Flask, providing greater portability and execution options. More importantly, it paves the way for an eventual 3.x upgrade because the Python 3 App Engine runtime does not support webapp2. We'll cover both the 3.x and Cloud Memorystore ports next in Module 13.

      Got an older app needing an update? We can help with that.

      Adding use of Memcache

      The sample application registers individual web page "visits," storing visitor information such as the IP address and user agent. In the original app, these values are stored immediately, and then the most recent visits are queried to display in the browser. If the same user continuously refreshes their browser, each refresh constitutes a new visit. To discourage this type of abuse, we cache the same user's visit for an hour, returning the same cached list of most recent visits unless a new visitor arrives or an hour has elapsed since their initial visit.

      Below is pseudocode representing the core part of the app that saves new visits and queries for the most recent visits. Before, you can see how each visit is registered. After the update, the app attempts to fetch these visits from the cache. If cached results are available and "fresh" (within the hour), they're used immediately, but if cache is empty, or a new visitor arrives, the current visit is stored as before, and this latest collection of visits is cached for an hour. The bolded lines represent the new code that manages the cached data.

      Adding App Engine Memcache usage to sample app

      Wrap-up

      Today's "migration" began with the Module 1 sample app. We added a Memcache-based caching layer and arrived at the finish line with the Module 12 sample app. To practice this on your own, follow the codelab doing it by-hand while following the video. The Module 12 app will then be ready to upgrade to Cloud Memorystore should you choose to do so.

      In Fall 2021, the App Engine team extended support of many of the bundled services to next-generation runtimes, meaning you are no longer required to migrate to Cloud Memorystore when porting your app to Python 3. You can continue using Memcache in your Python 3 app so long as you retrofit the code to access bundled services from next-generation runtimes.

      If you do want to move to Cloud Memorystore, stay tuned for the Module 13 video or try its codelab to get a sneak peek. All Serverless Migration Station content (codelabs, videos, source code [when available]) can be accessed at its open source repo. While our content initially focuses on Python users, we hope to one day cover other language runtimes, so stay tuned. For additional video content, check out our broader Serverless Expeditions series.

      Migrating App Engine push queues to Cloud Tasks

      Posted by Wesley Chun (@wescpy), Developer Advocate, Google Cloud

      Banner image that shows the Cloud Task logo

      Introduction

      The previous Module 7 episode of Serverless Migration Station gave developers an idea of how App Engine push tasks work and how to implement their use in an existing App Engine ndb Flask app. In this Module 8 episode, we migrate this app from the App Engine Datastore (ndb) and Task Queue (taskqueue) APIs to Cloud NDB and Cloud Tasks. This makes your app more portable and provides a smoother transition from Python 2 to 3. The same principle applies to upgrading other legacy App Engine apps from Java 8 to 11, PHP 5 to 7, and up to Go 1.12 or newer.

      Over the years, many of the original App Engine services such as Datastore, Memcache, and Blobstore, have matured to become their own standalone products, for example, Cloud Datastore, Cloud Memorystore, and Cloud Storage, respectively. The same is true for App Engine Task Queues, whose functionality has been split out to Cloud Tasks (push queues) and Cloud Pub/Sub (pull queues), now accessible to developers and applications outside of App Engine.

      Migrating App Engine push queues to Cloud Tasks video

      Migrating to Cloud NDB and Cloud Tasks

      The key updates being made to the application:

      1. Add support for Google Cloud client libraries in the app's configuration
      2. Switch from App Engine APIs to their standalone Cloud equivalents
      3. Make required library adjustments, e.g., add use of Cloud NDB context manager
      4. Complete additional setup for Cloud Tasks
      5. Make minor updates to the task handler itself

      The bulk of the updates are in #3 and #4 above, and those are reflected in the following "diff"s for the main application file:

      Screenshot shows primary differences in code when switching to Cloud NDB & Cloud Tasks

      Primary differences switching to Cloud NDB & Cloud Tasks

      With these changes implemented, the web app works identically to that of the Module 7 sample, but both the database and task queue functionality have been completely swapped to using the standalone/unbundled Cloud NDB and Cloud Tasks libraries… congratulations!

      Next steps

      To do this exercise yourself, check out our corresponding codelab which leads you step-by-step through the process. You can use this in addition to the video, which can provide guidance. You can also review the push tasks migration guide for more information. Arriving at a fully-functioning Module 8 app featuring Cloud Tasks sets the stage for a larger migration ahead in Module 9. We've accomplished the most important step here, that is, getting off of the original App Engine legacy bundled services/APIs. The Module 9 migration from Python 2 to 3 and Cloud NDB to Cloud Firestore, plus the upgrade to the latest version of the Cloud Tasks client library are all fairly optional, but they represent a good opportunity to perform a medium-sized migration.

      All migration modules, their videos (when available), codelab tutorials, and source code, can be found in the migration repo. While the content focuses initially on Python users, we will cover other legacy runtimes soon so stay tuned.

      How to use App Engine push queues in Flask apps

      Posted by Wesley Chun (@wescpy), Developer Advocate, Google Cloud

      Banner image that shows the Cloud Task logo

      Introduction

      Since its original launch in 2008, many of the core Google App Engine services such as Datastore, Memcache, and Blobstore, have matured to become their own standalone products: for example, Cloud Datastore, Cloud Memorystore, and Cloud Storage, respectively. The same is true for App Engine Task Queues with Cloud Tasks. Today's Module 7 episode of Serverless Migration Station reviews how App Engine push tasks work, by adding this feature to an existing App Engine ndb Flask app.

      App Engine push queues in Flask apps video

      That app is where we left off at the end of Module 1, migrating its web framework from App Engine webapp2 to Flask. The app registers web page visits, creating a Datastore Entity for each. After a new record is created, the ten most recent visits are displayed to the end-user. If the app only shows the latest visits, there is no reason to keep older visits, so the Module 7 exercise adds a push task that deletes all visits older than the oldest one shown. Tasks execute asynchronously outside the normal application flow.

      Key updates

      The following are the changes being made to the application:

      1. Add use of App Engine Task Queues (taskqueue) API
      2. Determine oldest visit displayed, logging and saving that timestamp
      3. Create task to delete old visits
      4. Update web page template to display timestamp threshold
      5. Log how many and which visits (by Entity ID) are deleted

      Except for #4 which occurs in the HTML template file, these updates are reflected in the "diff"s for the main application file:

      Screenshot of App Engine push tasks application source code differences

      Adding App Engine push tasks application source code differences

      With these changes implemented, the web app now shows the end-user which visits will be deleted by the new push task:

      Screenshot of VisitMe example showing last ten site visits. A red circle around older visits being deleted

      Sample application output

      Next steps

      To do this exercise yourself, check out our corresponding codelab which leads you step-by-step through the process. You can use this in addition to the video, which can provide guidance. You can also review the push queue documentation for more information. Arriving at a fully-functioning Module 7 app featuring App Engine push tasks sets the stage for migrating it to Cloud Tasks (and Cloud NDB) ahead in Module 8.

      All migration modules, their videos (when available), codelab tutorials, and source code, can be found in the migration repo. While the content focuses initially on Python users, we will cover other legacy runtimes soon so stay tuned.

      Exploring serverless with a nebulous app: Deploy the same app to App Engine, Cloud Functions, or Cloud Run

      Posted by Wesley Chun (@wescpy), Developer Advocate, Google Cloud

      Banner image that shows the App Engine, Cloud Functions, and Cloud Run logos

      Introduction

      Google Cloud offers three distinct ways of running your code or application in a serverless way, each serving different use cases. Google App Engine, our first Cloud product, was created to give users the ability to deploy source-based web applications or mobile backends directly to the cloud without the need of thinking about servers or scaling. Cloud Functions came later for scenarios where you may not have an entire app, great for one-off utility functions or event-driven microservices. Cloud Run is our latest fully-managed serverless product that gives developers the flexibility of containers along with the convenience of serverless.

      As all are serverless compute platforms, users recognize they share some similarities along with clear differences, and often, they ask:

      1. How different is deploying code to App Engine, Cloud Functions, or Cloud Run?
      2. Is it challenging to move from one to another if I feel the other may better fit my needs?

      We're going to answer these questions today by sharing a unique application with you, one that can be deployed to all three platforms without changing any application code. All of the necessary changes are done in configuration.

      More motivation

      Another challenge for developers can be trying to learn how to use another Cloud product, such as this request, paraphrased from a user:

      1. I have a Google App Engine app
      2. I want to call the Cloud Translation API from that app

      Sounds simple enough. This user went straight to the App Engine and Translation API documentation where they were able to get started with the App Engine Quickstart to get their app up and going, then found the Translation API setup page and started looking into permissions needed to access the API. However, they got stuck at the Identity and Access Management (IAM) page on roles, being overwhelmed at all the options but no clear path forward. In light of this, let's add a third question to preceding pair outlined earlier:

      1. How do you access Cloud APIs from a Cloud serverless platform?
      Without knowing what that user was going to build, let's just implement a barebones translator, an "MVP" (minimally viable product) version of a simple "My Google Translate" Python Flask app using the Translation API, one of Google Cloud's AI/ML "building block" APIs. These APIs are backed by pre-trained machine learning models, giving developers with little or no background in AI/ML the ability to leverage the benefits of machine learning with only API calls.

      The application

      The app consists of a simple web page prompting the user for a phrase to translate from English to Spanish. The translated results along with the original phrase are presented along with an empty form for a follow-up translation if desired. While the majority of this app's deployments are in Python 3, there are still many users working on upgrading from Python 2, so some of those deployments are available to help with migration planning. Taking this into account, this app can be deployed (at least) eight different ways:
      1. Local (or hosted) Flask server (Python 2)
      2. Local (or hosted) Flask server (Python 3)
      3. Google App Engine (Python 2)
      4. Google App Engine (Python 3)
      5. Google Cloud Functions (Python 3)
      6. Google Cloud Run (Python 2 via Docker)
      7. Google Cloud Run (Python 3 via Docker)
      8. Google Cloud Run (Python 3 via Cloud Buildpacks)
      The following is a brief glance at the files and which configurations they're for: Screenshot of Nebulous serverless sample app files

      Nebulous serverless sample app files

      Diving straight into the application, let's look at its primary function, translate():
      @app.route('/', methods=['GET', 'POST'])
      def translate(gcf_request=None):
      local_request = gcf_request if gcf_request else request
      text = translated = None
      if local_request.method == 'POST':
      text = local_request.form['text'].strip()
      if text:
      data = {
      'contents': [text],
      'parent': PARENT,
      'target_language_code': TARGET[0],
      }
      rsp = TRANSLATE.translate_text(request=data)
      translated = rsp.translations[0].translated_text
      context = {
      'orig': {'text': text, 'lc': SOURCE},
      'trans': {'text': translated, 'lc': TARGET},
      }
      return render_template('index.html', **context)

      Core component (translate()) of sample application


      Some key app components:
      • Upon an initial request (GET), an HTML template is rendered featuring a simple form with an empty text field for the text to translate.
      • The form POSTs back to the app, and in this case, grabs the text to translate, sends the request to the Translation API, receives and displays the results to the user along with an empty form for another translation.
      • There is a special "ifdef" for Cloud Functions near the top to receive a request object because a web framework isn't used like you'd have with App Engine or Cloud Run, so Cloud Functions provides one for this reason.
      The app runs identically whether running locally or deployed to App Engine, Cloud Functions, or Cloud Run. The magic is all in the configuration. The requirements.txt file* is used in all configurations, whether to install third-party packages locally, or to direct the Cloud Build system to automatically install those libraries during deployment. Beyond requirements.txt, things start to differ:
      1. App Engine has an app.yaml file and possibly an appengine_config.py file.
      2. Cloud Run has either a Dockerfile (Docker) or Procfile (Cloud Buildpacks), and possibly a service.yaml file.
      3. Cloud Functions, the "simplest" of the three, has no configuration outside of a package requirements file (requirements.txt, package.json, etc.).
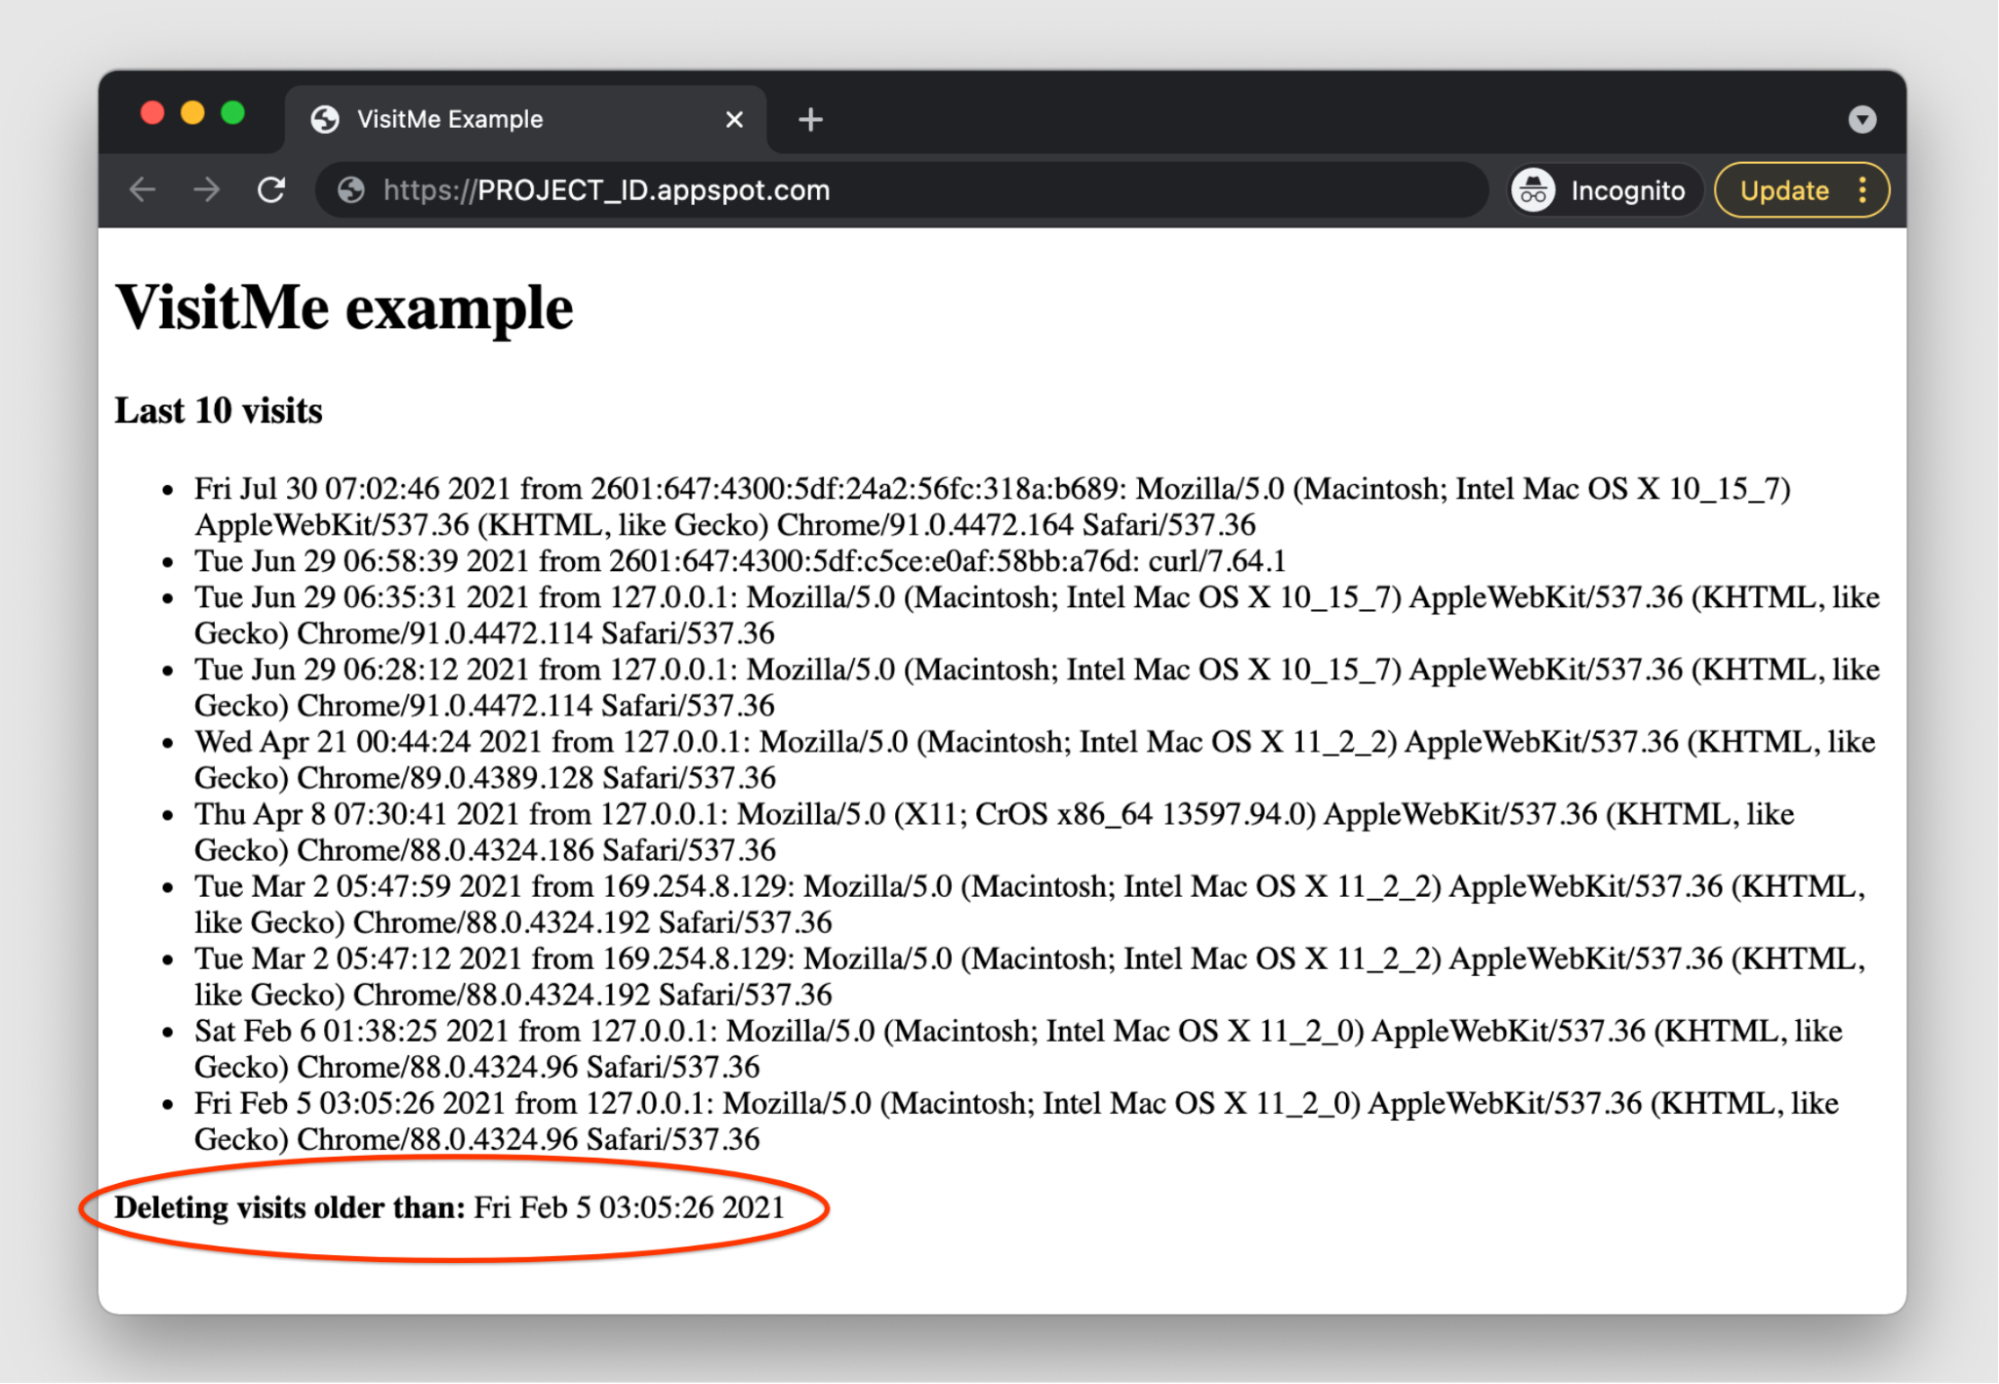
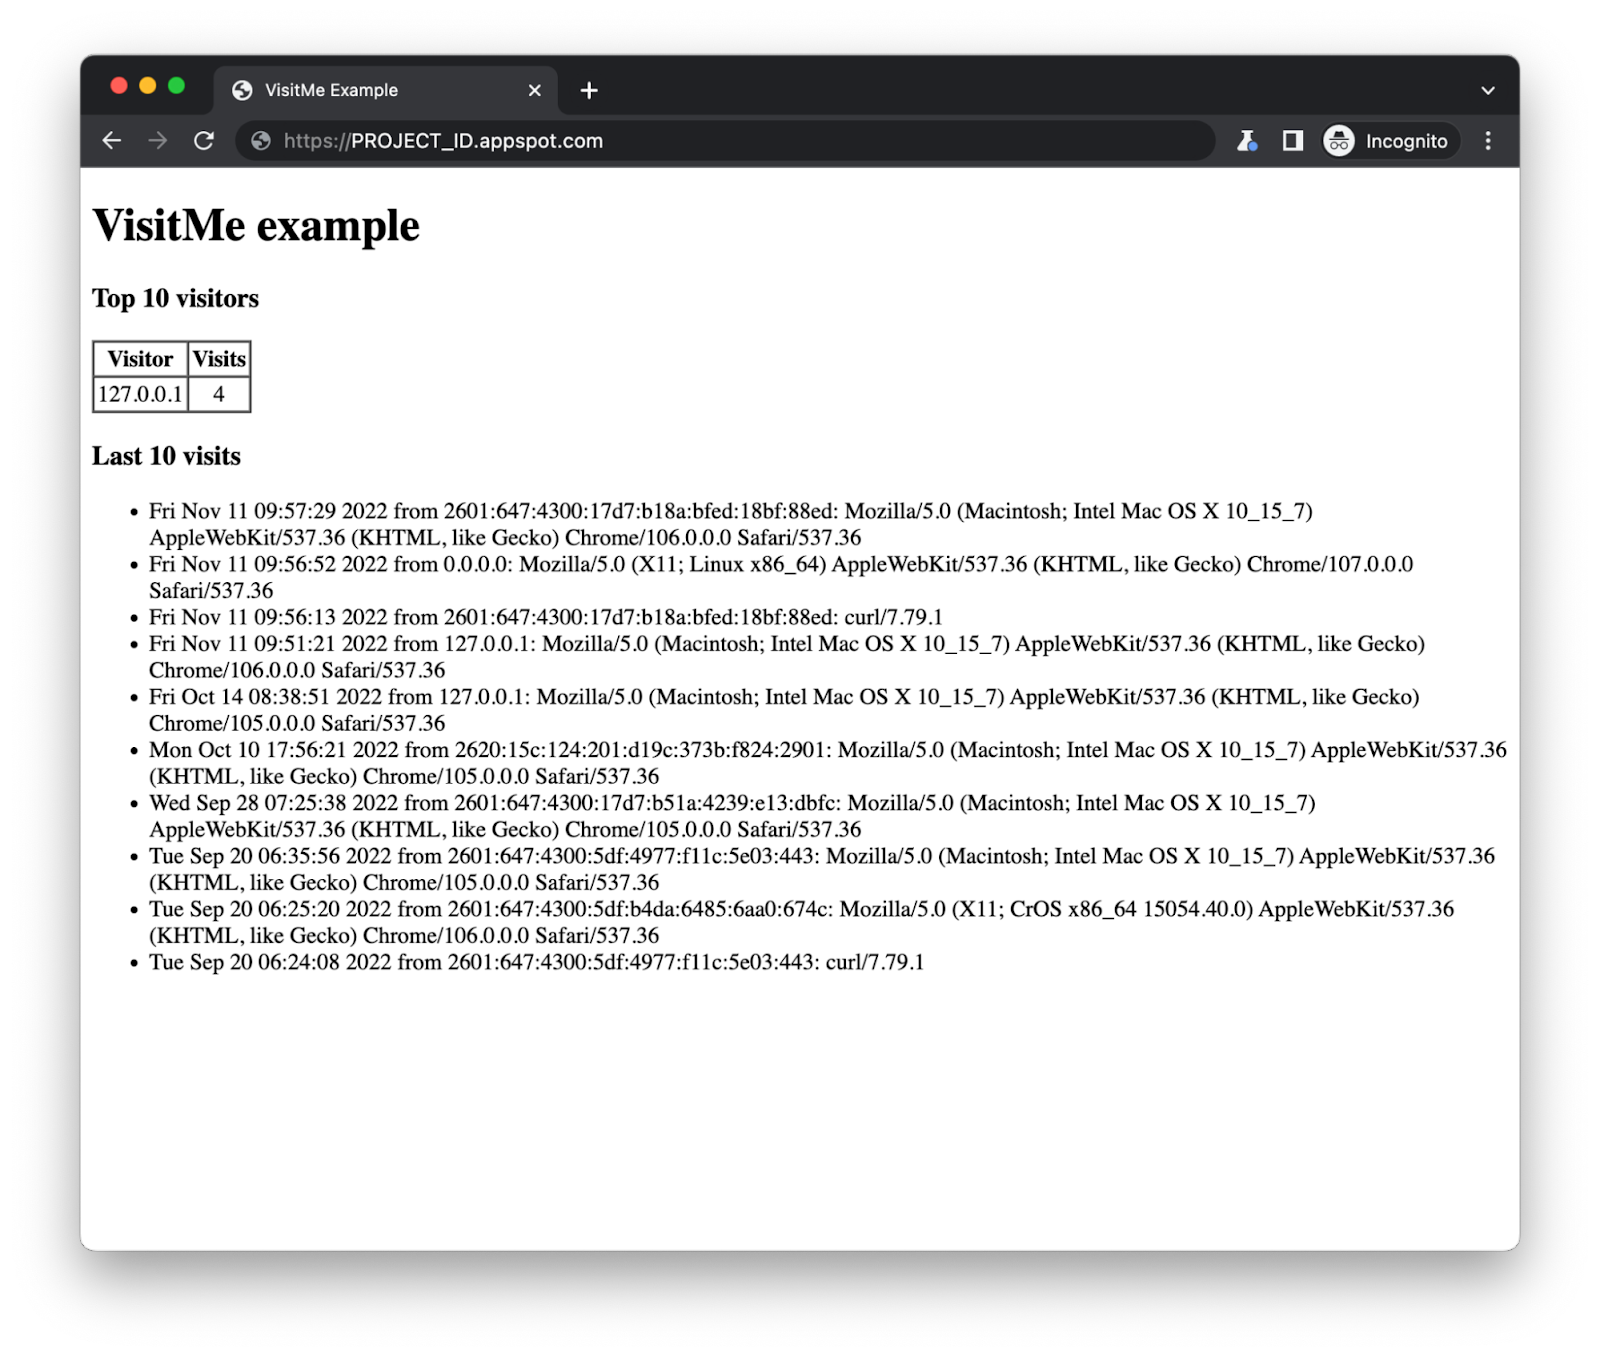
      The following is what you should expect to see after completing one translation request: Screenshot of My Google Translate (1990s Edition) in Incognito Window

      "My Google Translate" MVP app (Cloud Run edition)

      Next steps

      The sample app can be run locally or on your own hosting server, but now you also know how to deploy it to each of Cloud's serverless platforms and what those subtle differences are. You also have a sense of the differences between each platform as well as what it takes to switch from one to another. For example, if your organization is moving to implement containerization into your software development workflow, you can migrate your existing App Engine apps to Cloud Run using Docker or using Cloud Buildpacks if you don't want to think about containers or Dockerfiles. Lastly, you now know how to access Cloud APIs from these platforms. Lastly, you now know how to access Cloud APIs from these platforms.

      The user described earlier was overwhelmed at all the IAM roles and options available because this type of detail is required to provide the most security options for accessing Cloud services, but when prototyping, the fastest on-ramp is to use the default service account that comes with Cloud serverless platforms. These help you get that prototype working while allowing you to learn more about IAM roles and required permissions. Once you've progressed far enough to consider deploying to production, you can then follow the best practice of "least privileges" and create your own (user-managed) service accounts with the minimal permissions required so your application functions properly.

      To dive in, the code and codelabs (free, self-paced, hands-on tutorials) for each deployment are available in its open source repository. An active Google Cloud billing account is required to deploy this application to each of our serverless platforms even though you can do all of them without incurring charges. More information can be found in the "Cost" section of the repo's README. We hope this sample app teaches you more about the similarities and differences between our plaforms, shows you how you can "shift" applications comfortably between them, and provides a light introduction to another Cloud API. Also check out my colleague's post featuring similar content for Node.js.
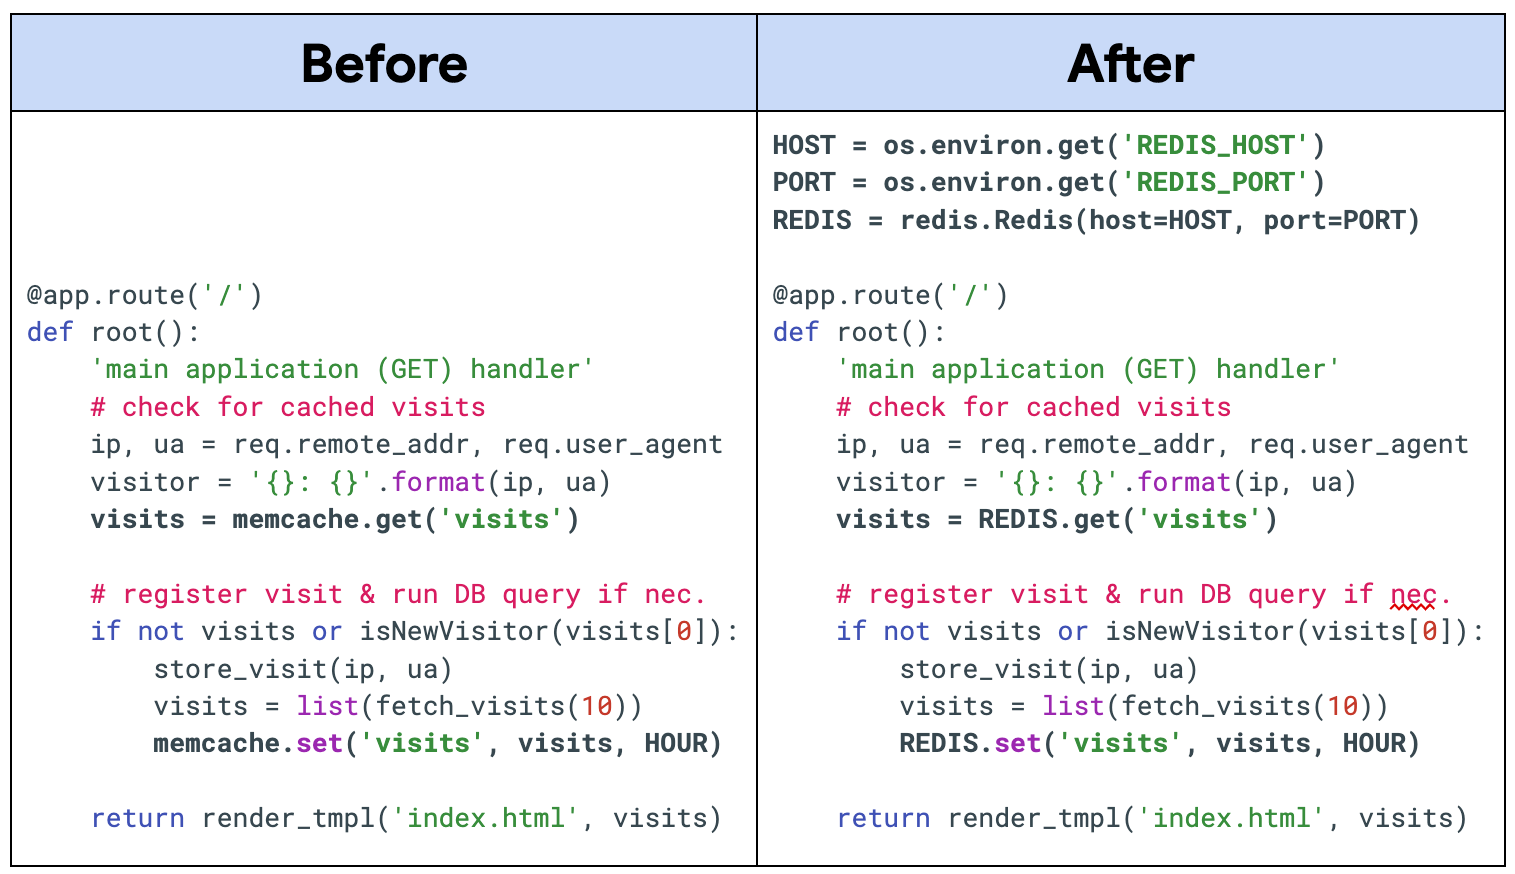
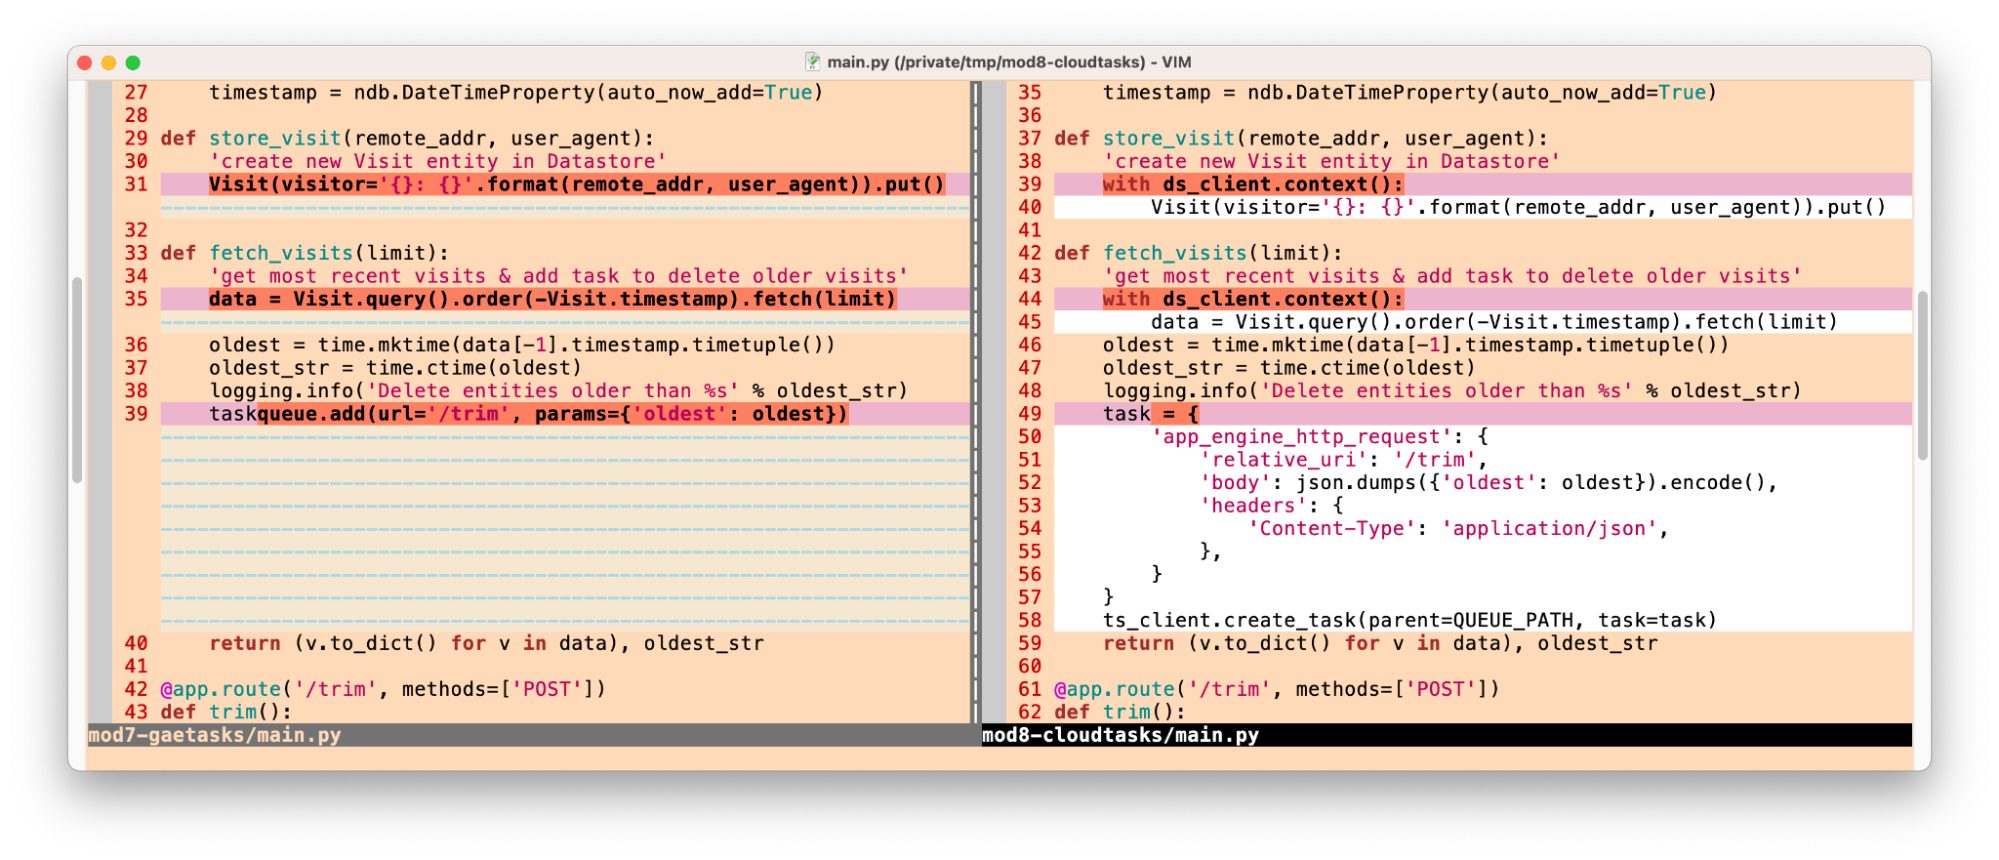
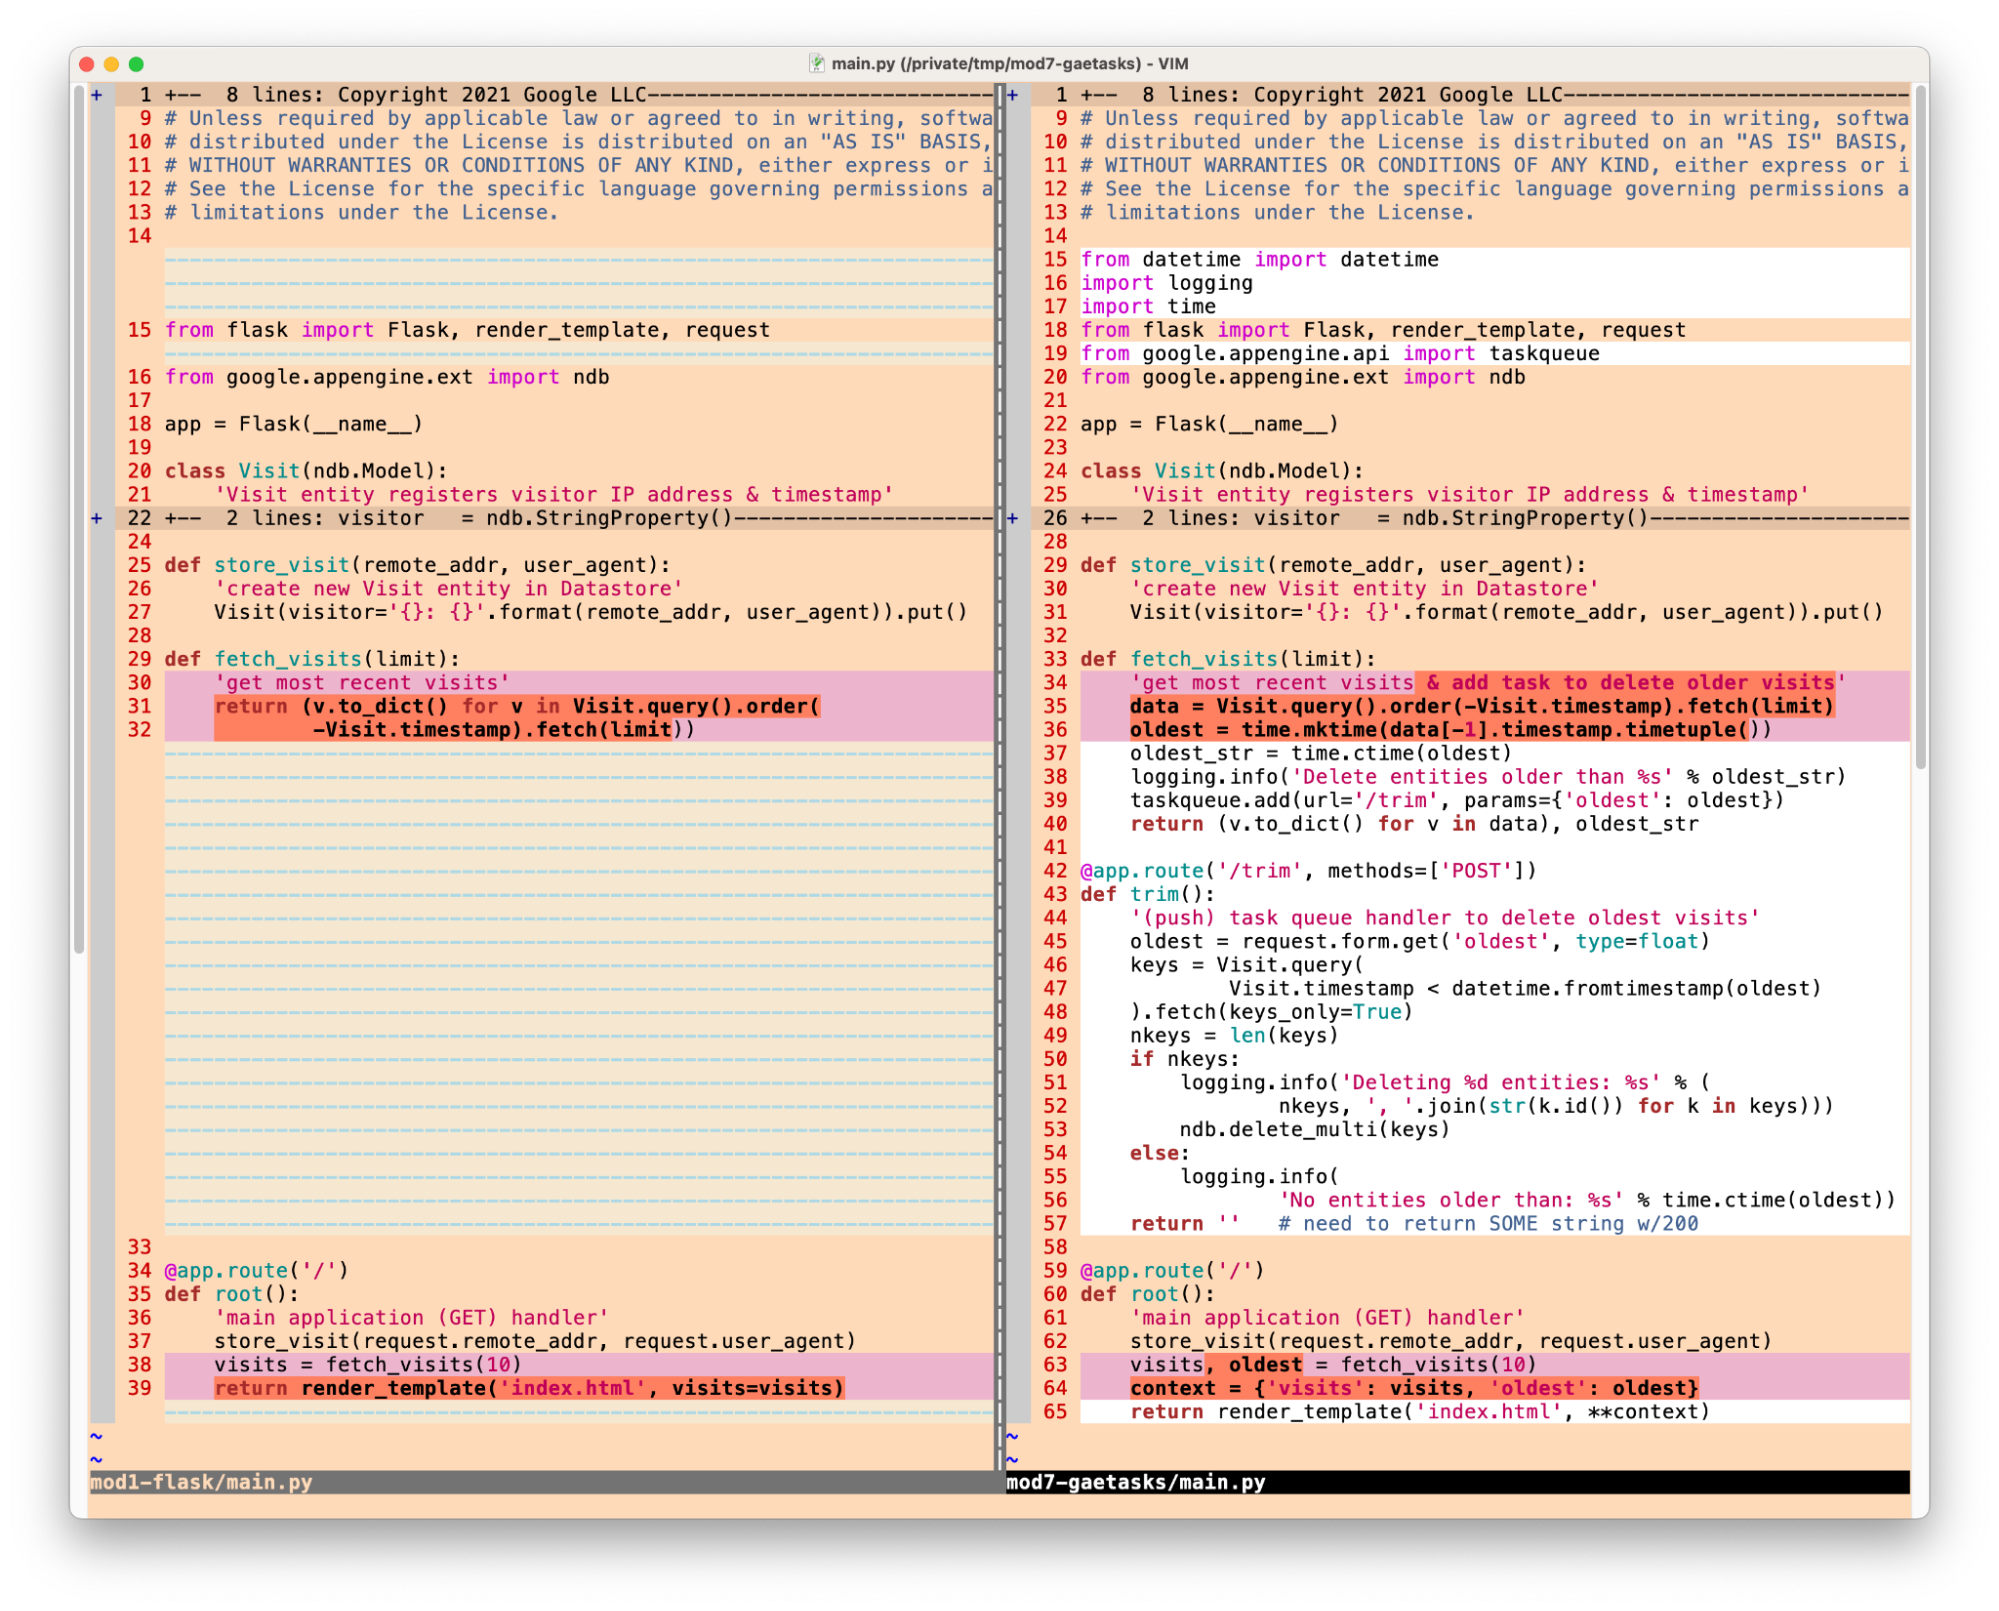