Looking at a landmark and not sure what it is? Interested in learning more about a movie as you stroll by the poster? With Google Lens and your Google Assistant, you now have a helpful sidekick to tell you more about what’s around you, right on your Pixel.
When we introduced the new Pixel 2 last month, we talked about how Google Lens builds on Google’s advancements in computer vision and machine learning. When you combine that with the Google Assistant, which is built on many of the same technologies, you can get quick help with what you see. That means that you can learn more about what’s in front of you—in real time—by selecting the Google Lens icon and tapping on what you’re interested in.
Here are the key ways your Assistant and Google Lens can help you today:
Text: Save information from business cards, follow URLs, call phone numbers and navigate to addresses.
Landmarks: Explore a new city like a pro with your Assistant to help you recognize landmarks and learn about their history.
Art, books and movies: Learn more about a movie, from the trailer to reviews, right from the poster. Look up a book to see the rating and a short synopsis. Become a museum guru by quickly looking up an artist’s info and more. You can even add events, like the movie release date or gallery opening, to your calendar right from Google Lens.
Barcodes: Quickly look up products by barcode, or scan QR codes, all with your Assistant.
Google Lens in the Assistant will be rolling out to all Pixel phones set to English in the U.S., U.K., Australia, Canada, India and Singapore over the coming weeks. Once you get the update, go to your Google Assistant on your phone and tap the Google Lens icon in the bottom right corner.
We can’t wait to see how Google Lens helps you explore the world around you, with the help of your Google Assistant. And don’t forget, Google Lens is also available in Google Photos, so even after you take a picture, you can continue to explore and get more information about what’s in your photo.
Posted by Ibrahim Badr, Associate Product Manager, Google Assistant
Suhani Vora is a bioengineer, aspiring (and self-taught) machine learning expert, SNES Super Mario World ninja, and Google AI Resident. This means that she’s part of a 12-month research training program designed to jumpstart a career in machine learning. Residents, who are paired with Google AI mentors to work on research projects according to their interests, apply machine learning to their expertise in various backgrounds—from computer science to epidemiology.
I caught up with Suhani to hear more about her work as an AI Resident, her typical day, and how AI can help transform the field of genomics.
Phing: How did you get into machine learning research?
Suhani: During graduate school, I worked on engineering CRISPR/Cas9 systems, which enable a wide range of research on genomes. And though I was working with the most efficient tools available for genome editing, I knew we could make progress even faster.
One important factor was our limited ability to predict what novel biological designs would work. Each design cycle, we were only using very small amounts of previously collected data and relied on individual interpretation of that data to make design decisions in the lab.
By failing to incorporate more powerful computational methods to make use of big data and aid in the design process, it was affecting our ability to make progress quickly. Knowing that machine learning methods would greatly accelerate the speed of scientific discovery, I decided to work on finding ways to apply machine learning to my own field of genetic engineering.
I reached out to researchers in the field, asking how best to get started. A Googler I knew suggested I take the machine learning course by Andrew Ng on Coursera (could not recommend it more highly), so I did that. I’ve never had more fun learning! I had also started auditing an ML course at MIT, and reading papers on deep learning applications to problems in genomics. Ultimately, I took the plunge and and ended up joining the Residency program after finishing grad school.
Tell us about your role at Google, and what you’re working on right now.
I’m a cross-disciplinary deep learning researcher—I research, code, and experiment with deep learning models to explore their applicability to problems in genomics.
In the same way that we use machine learning models to predict the objects are present in an image (think: searching for your dogs in Google Photos), I research ways we can build neural networks to automatically predict the properties of a DNA sequence. This has all kinds of applications, like predicting whether a DNA mutation will cause cancer, or is benign.
What’s a typical day like for you?
On any given day, I’m writing code to process new genomics data, or creating a neural network in TensorFlow to model the data. Right now, a lot of my time is spent troubleshooting such models.
I also spend time chatting with fellow Residents, or a member of the TensorFlow team, to get their expertise on the experiments or code I’m writing. This could include a meeting with my two mentors, Mark DePristo and Quoc Le, top researchers in the field of machine learning who regularly provide invaluable guidance for developing the neural network models I’m interested in.
IMG_20171109_134038.png
Suhani heads to the whiteboard.
IMG_20171109_133246.png
Just a normal day writing code to process new genomics data, or creating (and troubleshooting…) a neural network in TensorFlow to model the data.
IMG_20171109_132940.png
Selfie with her mentors, Mark DePristo and Quoc Le
IMG_20171109_135458.png
Eating lunch at her favorite Google cafe.
What do you like most about the AI Residency program? About working at Google?
I like the freedom to pursue topics of our interest, combined with the strong support network we have to get things done. Google is a really positive work environment, and I feel set up to succeed. In a different environment I wouldn’t have the chance to work with a world-class researcher in computational genomics like Mark, AND Quoc, one of the world’s leading machine learning researchers, at time same time and place. It’s pretty mind-blowing.
What kind of background do you need to work in machine learning?
We have such a wide array of backgrounds among our AI Residents! The only real common thread I see is a very strong desire to work on machine learning, or to apply machine learning to a particular problem of choice. I think having a strong background in linear algebra, statistics, computer science, and perhaps modeling makes things easier—but these skills are also now accessible to almost anyone with an interest, through MOOCs!
What kinds of problems do you think that AI can help solve for the world?
Ultimately, it really just depends how creative we are in figuring out what AI can do for us. Current deep learning methods have become state of the art for image recognition tasks, such as automatically detecting pets or scenes in images, and natural language processing, like translating from Chinese to English. I’m excited to see the next wave of applications in areas such as speech recognition, robotic handling, and medicine.
Interested in the AI Residency? Check out submission details and apply for the 2018 program on our Careers site.
Posted by Michael Ringgaard, Software Engineer and Rahul Gupta, Research Scientist
Until recently, most practical natural language understanding (NLU) systems used a pipeline of analysis stages, from part-of-speech tagging and dependency parsing to steps that computed a semantic representation of the input text. While this facilitated easy modularization of different analysis stages, errors in earlier stages would have cascading effects in later stages and the final representation, and the intermediate stage outputs might not be relevant on their own. For example, a typical pipeline might perform the task of dependency parsing in an early stage and the task of coreference resolution towards the end. If one was only interested in the output of coreference resolution, it would be affected by cascading effects of any errors during dependency parsing.
Today we are announcing SLING, an experimental system for parsing natural language text directly into a representation of its meaning as a semantic frame graph. The output frame graph directly captures the semantic annotations of interest to the user, while avoiding the pitfalls of pipelined systems by not running any intermediate stages, additionally preventing unnecessary computation. SLING uses a special-purpose recurrent neural network model to compute the output representation of input text through incremental editing operations on the frame graph. The frame graph, in turn, is flexible enough to capture many semantic tasks of interest (more on this below). SLING's parser is trained using only the input words, bypassing the need for producing any intermediate annotations (e.g. dependency parses).
SLING provides fast parsing at inference time by providing (a) an efficient and scalable frame store implementation and (b) a JIT compiler that generates efficient code to execute the recurrent neural network. Although SLING is experimental, it achieves a parsing speed of >2,500 tokens/second on a desktop CPU, thanks to its efficient frame store and neural network compiler. SLING is implemented in C++ and it is available for download on GitHub. The entire system is described in detail in a technical report as well.
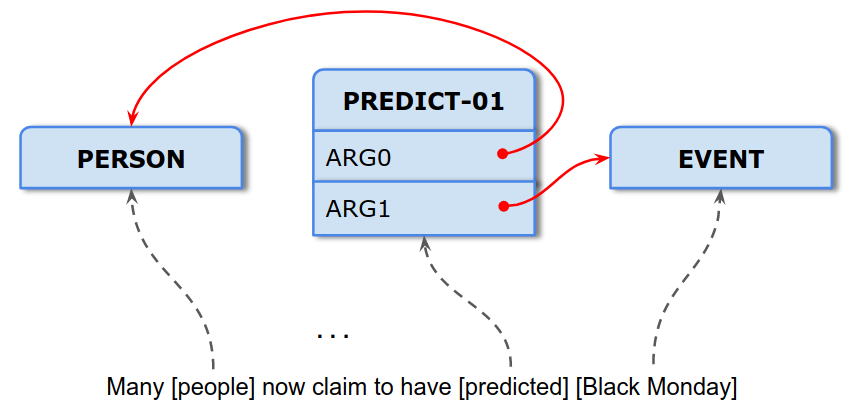
Frame Semantic Parsing Frame Semantics [1] represents the meaning of text — such as a sentence — as a set of formal statements. Each formal statement is called a frame, which can be seen as a unit of knowledge or meaning, that also contains interactions with concepts or other frames typically associated with it. SLING organizes each frame as a list of slots, where each slot has a name (role) and a value which could be a literal or a link to another frame. As an example, consider the sentence:
“Many people now claim to have predicted Black Monday.”
The figure below illustrates SLING recognizing mentions of entities (e.g. people, places, or events), measurements (e.g. dates or distances), and other concepts (e.g. verbs), and placing them in the correct semantic roles for the verbs in the input. The word predicted evokes the most dominant sense of the verb "predict", denoted as a PREDICT-01 frame. Additionally, this frame also has interactions (slots) with who made the prediction (denoted via the ARG0 slot, which points to the PERSON frame for people) and what was being predicted (denoted via ARG1, which links to the EVENT frame for Black Monday). Frame semantic parsing is the task of producing a directed graph of such frames linked through slots.
Although the example above is fairly simple, frame graphs are powerful enough to model a variety of complex semantic annotation tasks. For starters, frames provide a convenient way to bring together language-internal and external information types (e.g. knowledge bases). This can then be used to address complex language understanding problems such as reference, metaphor, metonymy, and perspective. The frame graphs for these tasks only differ in the inventory of frame types, roles, and any linking constraints.
SLING SLING trains a recurrent neural network by optimizing for the semantic frames of interest. The internal learned representations in the network’s hidden layers replace the hand-crafted feature combinations and intermediate representations in pipelined systems. Internally, SLING uses an encoder-decoder architecture where each input word is encoded into a vector using simple lexical features like the raw word, its suffix(es), punctuation etc. The decoder uses that representation, along with recurrent features from its own history, to compute a sequence of transitions that update the frame graph to obtain the intended frame semantic representation of the input sentence. SLING trains its model using TensorFlow and DRAGNN.
The animation below shows how frames and roles are incrementally added to the under-construction frame graph using individual transitions. As discussed earlier with our simple example sentence, SLING connects the VERB and EVENT frames using the role ARG1, signifying that the EVENT frame is the concept being predicted. The EVOKE transition evokes a frame of a specified type from the next few tokens in the text (e.g. EVENT from Black Monday). Similarly, the CONNECT transition links two existing frames with a specified role. When the input is exhausted and the last transition (denoted as STOP) is executed, the frame graph is deemed as complete and returned to the user, who can inspect the graph to get the semantic meaning behind the sentence.
One key aspect of our transition system is the presence of a small fixed-size attention buffer of frames that represents the most recent frames to be evoked or modified, shown with the orange boxes in the figure above. This buffer captures the intuition that we tend to remember knowledge that was recently evoked, referred to, or enhanced. If a frame is no longer in use, it eventually gets flushed out of this buffer as new frames come into picture. We found this simple mechanism to be surprisingly effective at capturing a large fraction of inter-frame links. Next Steps The illustrative experiment above is just a launchpad for research in semantic parsing for tasks such as knowledge extraction, resolving complex references, and dialog understanding. The SLING release on Github comes with a pre-trained model for the task we illustrated, as well as examples and recipes to train your own parser on either the supplied synthetic data or your own data. We hope the community finds SLING useful and we look forward to engaging conversations about applying and extending SLING to other semantic parsing tasks.
Acknowledgements The research described in this post was done by Michael Ringgaard, Rahul Gupta, and Fernando Pereira. We thank the Tensorflow and DRAGNN teams for open-sourcing their packages, and various colleagues at DRAGNN who helped us with multiple aspects of SLING's training setup.
1 Charles J. Fillmore. 1982. Frame semantics. Linguistics in the Morning Calm, pages 111–138.↩
Editor’s note: TensorFlow, our open source machine learning library, is just that—open to anyone. Companies, nonprofits, researchers and developers have used TensorFlow in some pretty cool ways, and we’re sharing those stories here on Keyword. Here’s one of them.
Quill.org was founded by a group of educators and technologists to help students become better writers and critical thinkers. Before beginning development, they researched hundreds of studies on writing education and found a common theme—students had a hard time grasping the difference between a run-on sentence and a fragment. So the Quill team developed a tool to help students identify the different parts of a sentence, with a focus on real-time feedback.
Using the Quill tool, students complete a variety of exercises, including joining sentences, writing complex sentences, and explaining their use and understanding of grammar. The tool relies on a huge depository of sentence fragments, which Quill finds, recognizes and compiles using TensorFlow, Google's open source machine learning library. TensorFlow technology is the backbone of the tool and can accurately detect if a student’s answers are correct. After completing the exercises, each student gets a customized explanation of incorrect responses, and the tool learns from each answer to create an individualized testing plan focused on areas of difficulty. Here's an example of how it works:
More than 200,000 students—62 percent from low-income schools—have used Quill. They’ve collectively answered 20 million exercises, and Quill’s quick, personalized writing instruction has helped them master writing standards across the Common Core curriculum.
Teachers have also benefitted from introducing Quill in their classrooms. Each teacher has access to a customized portal, allowing them to see an individual student’s progress. Plus, by using machine learning, teachers have been spared hundreds of hours of manual grading. Laura, a teacher at Caswell Elementary School in California said, "Quill has been a wonderful tool for my third graders, many of whom are second language learners. We especially love the immediate feedback provided after each practice; it has definitely made us pay closer attention to detail.”
Quill’s most recent update is a “multiplayer” feature, allowing students to interact with each other in the tool. They can see their peers’ responses, which fosters spirited classroom discussions and collaboration, and helps students learn from each other.
While students aren’t using quills (or even pens!) anymore, strong writing skills are as important as ever. And with the help of machine learning, Quill makes it fun and engaging to develop those skills.
Posted by Sujith Ravi, Research Scientist, Google Expander Team
Earlier this year, we launched Android Wear 2.0 which featured the first "on-device" machine learning technology for smart messaging. This enabled cloud-based technologies like Smart Reply, previously available in Gmail, Inbox and Allo, to be used directly within any application for the first time, including third-party messaging apps, without ever having to connect to the cloud. So you can respond to incoming chat messages on the go, directly from your smartwatch.
Today, we announce TensorFlow Lite, TensorFlow’s lightweight solution for mobile and embedded devices. This framework is optimized for low-latency inference of machine learning models, with a focus on small memory footprint and fast performance. As part of the library, we have also released an on-device conversational model and a demo app that provides an example of a natural language application powered by TensorFlow Lite, in order to make it easier for developers and researchers to build new machine intelligence features powered by on-device inference. This model generates reply suggestions to input conversational chat messages, with efficient inference that can be easily plugged in to your chat application to power on-device conversational intelligence.
The on-device conversational model we have released uses a new ML architecture for training compact neural networks (as well as other machine learning models) based on a joint optimization framework, originally presented in ProjectionNet: Learning Efficient On-Device Deep Networks Using Neural Projections. This architecture can run efficiently on mobile devices with limited computing power and memory, by using efficient “projection” operations that transform any input to a compact bit vector representation — similar inputs are projected to nearby vectors that are dense or sparse depending on type of projection. For example, the messages “hey, how's it going?” and “How's it going buddy?”, might be projected to the same vector representation.
Using this idea, the conversational model combines these efficient operations at low computation and memory footprint. We trained this on-device model end-to-end using an ML framework that jointly trains two types of models — a compact projection model (as described above) combined with a trainer model. The two models are trained in a joint fashion, where the projection model learns from the trainer model — the trainer is characteristic of an expert and modeled using larger and more complex ML architectures, whereas the projection model resembles a student that learns from the expert. During training, we can also stack other techniques such as quantization or distillation to achieve further compression or selectively optimize certain portions of the objective function. Once trained, the smaller projection model is able to be used directly for inference on device.
For inference, the trained projection model is compiled into a set of TensorFlow Lite operations that have been optimized for fast execution on mobile platforms and executed directly on device. The TensorFlow Lite inference graph for the on-device conversational model is shown here.
TensorFlow Lite execution for the On-Device Conversational Model.
The open-source conversational model released today (along with code) was trained end-to-end using the joint ML architecture described above. Today’s release also includes a demo app, so you can easily download and try out one-touch smart replies on your mobile device. The architecture enables easy configuration for model size and prediction quality based on application needs. You can find a list of sample messages where this model does well here. The system can also fall back to suggesting replies from a fixed set that was learned and compiled from popular response intents observed in chat conversations. The underlying model is different from the ones Google uses for Smart Reply responses in its apps1.
Beyond Conversational Models Interestingly, the ML architecture described above permits flexible choices for the underlying model. We also designed the architecture to be compatible with different machine learning approaches — for example, when used with TensorFlow deep learning, we learn a lightweight neural network (ProjectionNet) for the underlying model, whereas a different architecture (ProjectionGraph) represents the model using a graph framework instead of a neural network.
The joint framework can also be used to train lightweight on-device models for other tasks using different ML modeling architectures. As an example, we derived a ProjectionNet architecture that uses a complex feed-forward or recurrent architecture (like LSTM) for the trainer model coupled with a simple projection architecture comprised of dynamic projection operations and a few, narrow fully-connected layers. The whole architecture is trained end-to-end using backpropagation in TensorFlow and once trained, the compact ProjectionNet is directly used for inference. Using this method, we have successfully trained tiny ProjectionNet models that achieve significant reduction in model sizes (up to several orders of magnitude reduction) and high performance with respect to accuracy on multiple visual and language classification tasks (a few examples here). Similarly, we trained other lightweight models using our graph learning framework, even in semi-supervised settings.
ML architecture for training on-device models: ProjectionNet trained using deep learning (left), and ProjectionGraph trained using graph learning (right).
We will continue to improve and release updated TensorFlow Lite models in open-source. We think that the released model (as well as future models) learned using these ML architectures may be reused for many natural language and computer vision applications or plugged into existing apps for enabling machine intelligence. We hope that the machine learning and natural language processing communities will be able to build on these to address new problems and use-cases we have not yet conceived.
Acknowledgments Yicheng Fan and Gaurav Nemade contributed immensely to this effort. Special thanks to Rajat Monga, Andre Hentz, Andrew Selle, Sarah Sirajuddin, and Anitha Vijayakumar from the TensorFlow team; Robin Dua, Patrick McGregor, Andrei Broder, Andrew Tomkins and the Google Expander team.
1 The released on-device model was trained to optimize for small size and low latency applications on mobile phones and wearables. Smart Reply predictions in Google apps, however are generated using larger, more complex models. In production systems, we also use multiple classifiers that are trained to detect inappropriate content and apply further filtering and tuning to optimize user experience and quality levels. We recommend that developers using the open-source TensorFlow Lite version also follow such practices for their end applications.↩
Posted by Chia-Kai Liang, Senior Staff Software Engineer and Fuhao Shi, Android Camera Team
One of the most important aspects of current smartphones is easily capturing and sharing videos. With the Pixel 2 and Pixel 2 XL smartphones, the videos you capture are smoother and clearer than ever before, thanks to our Fused Video Stabilization technique based on both optical image stabilization (OIS) and electronic image stabilization (EIS). Fused Video Stabilization delivers highly stable footage with minimal artifacts, and the Pixel 2 is currently rated as the leader in DxO's video ranking (also earning the highest overall rating for a smartphone camera). But how does it work?
A key principle in videography is keeping the camera motion smooth and steady. A stable video is free of the distraction, so the viewer can focus on the subject of interest. But, videos taken with smartphones are subject to many conditions that make taking a high-quality video a significant challenge:
Camera Shake Most people hold their mobile phones in their hands to record videos - you pull the phone from your pocket, record the video, and the video is ready to share right after recording. However, that means your videos shake as much as your hands do -- and they shake a lot! Moreover, if you are walking or running while recording, the camera motion can make videos almost unwatchable: Motion Blur If the camera or the subject moves during exposure, the resulting photo or video will appear blurry. Even if we stabilize the motion in between consecutive frames, the motion blur in each individual frame cannot be easily restored in practice, especially on a mobile device. One typical video artifact due to motion blur is sharpness inconsistency: the video may rapidly alternate between blurry and sharp, which is very distracting even after the video is stabilized: Rolling Shutter The CMOS image sensor collects one row of pixels, or “scanline”, at a time, and it takes tens of milliseconds to goes from the top scanline to the bottom. Therefore, anything moving during this period can appear distorted. This is called the rolling shutter distortion. Even if you have a steady hand, the rolling shutter distortion will appear when you move quickly:
A simulated rendering of a video with global (left) and rolling (right) shutter.
Focus Breathing When there are objects of varying distance in a video, the angle of view can change significantly due to objects “jumping” in and out of the foreground. As result, everything shrinks or expands like the video below, which professionals call “breathing”: A good stabilization system should address all of these issues: the video should look sharp, the motion should be smooth, and the rolling shutter and focus breathing should be corrected.
Many professionals mount the camera on a mechanical stabilizer to entirely isolate hand motion. These devices actively sense and compensate for the camera’s movement to remove all unwanted motions. However, they are usually expensive and cumbersome; you wouldn’t want to carry one every day. There are also handheld gimbal mounts available for mobile phones. However, they are usually larger than the phone itself, and you have to put the phone on it before start recording. You’d need to do it fast before the interesting moment vanishes.
Optical Image Stabilization (OIS) is the most well-known method for suppression of handshake artifacts. Typically, in mobile camera modules with OIS, the lens is suspended in the middle of the module by a number of springs and electromagnets are used to move the lens within its enclosure. The lens module actively senses and compensates for handshake motion at very high speeds. Because OIS responds to motion rapidly, it can greatly suppress the handshake blur. However, the range of correctable motion is fairly limited (usually around 1-2 degrees), which is not enough to correct the unwanted motions between consecutive video frames, or to correct excessive motion blur during walking. Moveover, OIS cannot correct some kinds of motions, such as in-plane rotation. Sometimes it can even introduce a “jello” artifact:
The video is taken by Pixel 2 with only OIS enabled. You can see the frame center is stabilized, but the boundaries have some jello-like artifacts.
Electronic Image Stabilization (EIS) analyzes the camera motion, filters out the unwanted parts, and synthesizes a new video by transforming each frame. The final stabilization quality depends on the algorithm design and implementation optimization of these stages. In general, software-based EIS is more flexible than OIS so it can correct larger and more kinds of motions. However, EIS has some common limitations. First, to prevent undefined regions in the synthesized frame, it needs to reduce the field of view or resolution. Second, compared to OIS or an external stabilizer, EIS requires more computation, which is a limited resource on mobile phones.
Making a Better Video: Fused Video Stabilization With Fused Video Stabilization, both OIS and EIS are enabled simultaneously during video recording to address all the issues mentioned above. Our solution has three processing stages as shown in the system diagram below. The first processing stage, motion analysis, extracts the gyroscope signal, the OIS motion, and other properties to estimate the camera motion precisely. Then, the motion filtering stage combines machine learning and signal processing to predict a person’s intention in moving the camera. Finally, in the frame synthesis stage, we model and remove the rolling shutter and focus breathing distortion. With Fused Video Stabilization, the videos from Pixel 2 have less motion blur and look more natural. The solution is efficient enough to run in all video modes, such as 60fps or 4K recording.
Motion Analysis In the motion analysis stage, we use the phone’s high-speed gyroscope to estimate the rotational component of the hand motion (roll, pitch, and yaw). By sensing the motion at 200 Hz, we have dense motion vectors for each scanline, enough to model the rolling shutter distortion. We also measure lens motions that are not sensed by the gyroscope, including both the focus adjustment (z) and the OIS movement (x and y) at high speed. Because we need high temporal precision to model the rolling shutter effect, we carefully optimize the system to ensure perfect timestamp alignment between the CMOS image sensor, the gyroscope, and the lens motion readouts. A misalignment of merely a few milliseconds can introduce noticeable jittering artifact:
Left: The stabilized video of a “running” motion with a 3ms timing error. Note the occasional jittering. Right: The stabilized video with correct timestamps. The bottom right corner shows the original shaky video.
Motion Filtering The motion filtering stage takes the real camera motion from motion analysis and creates the stabilized virtual camera motion. Note that we push the incoming frames into a queue to defer the processing. This enables us to lookahead at future camera motions, using machine learning to accurately predict the user’s intention. Lookahead filtering is not feasible for OIS or any mechanical stabilizers, which can only react to previous or present motions. We will discuss more about this below.
Frame Synthesis At the final stage, we derive how the frame is transformed based on the real and virtual camera motions. To handle the rolling shutter distortion, we use multiple transformations for each frame. We split the the input frame into a mesh and warp each part separately:
Left: The input video with mesh overlay. Right: The warped frame, and the red rectangle is the final stabilized output. Note how the non-rigid warping corrects the rolling shutter distortion.
Lookahead Motion Filtering One key feature in the Fused Video Stabilization is our new lookahead filtering algorithm. It analyzes future motions to recognize the user-intended motion patterns, and creates a smooth virtual camera motion. The lookahead filtering has multiple stages to incrementally improve the virtual camera motion for each frame. In the first step, a Gaussian filtering is applied on the real camera motions of both past and future to obtain a smoothed camera motion:
Left: The input unstabilized video. Right: The smoothed result after Gaussian filtering.
You’ll notice that it’s still not very stable. To further improve the quality, we trained a model to extract intentional motions from the noisy real camera motions. We then apply additional filters given the predicted motion. For example, if we predict the camera is panning horizontally, we would reject more vertical motions. The result is shown below.
Left: The Gaussian filtered result. Right: Our lookahead result. We predict that the user is panning to the right, and suppress more vertical motions.
In practice, the process above does not guarantee there is no undefined “bad” regions, which can appear when the virtual camera is too stabilized and the warped frame falls outside the original field of view. We predict the likelihood of this issue in the next couple frames and adjust the virtual camera motion to get the final result.
Left: Our lookahead result. The undefined area at the bottom-left are shown in cyan. Right: The final result with the bad region removed.
As we mentioned earlier, even with OIS enabled, sometimes the motions are too large and cause motion blur in a single frame. When EIS is further applied to further smooth the camera motion, the motion blur leads to distracting sharpness variations:
Left: Pixel 2 with OIS only. Right: Pixel 2 with the basic Fused Video Stabilization. Note that sharpness variation around the “Exit” label.
This is a very common problem in EIS solutions. To address this issue, we exploit the “masking” property in the human visual system. Motion blur usually blurs the frame along a specific direction, and if the overall frame motion follows that direction, the human eye will not notice it. Instead, our brain treats the blur as a natural part of the motion, and masks it away from our perception.
With the high-frequency gyroscope and OIS signals, we can accurately estimate the motion blur for each frame. We compute where the camera pointed to at both the beginning and end of exposure, and the movement in-between is the motion blur. After that, we apply a machine learning algorithm (trained on a set of videos with and without motion blur) to map the motion blurs in past and future frames to the amount of real camera motion we want to keep, and blend the weighted real camera motion with the virtual one. As you can see below, with the motion blur masking, the distracting sharpness variation is greatly reduced and the camera motion is still stabilized.
Left: Pixel 2 with the basic Fused Video Stabilization. Right: The full Fused Video Stabilization solution with motion blur masking.
Results We have seen many amazing videos from Pixel 2 with Fused Video Stabilization. Here are some for you to check out:
Videos taken by two Pixel 2 phones mounted on a single hand grip. Fused Video Stabilization is disabled in the left one.
Videos taken by two Pixel 2 phones mounting on a single hand grip. Fused Video Stabilization is disabled in the left one. Note that the videographer jumped together with the subject.
Fused Video Stabilization combines the best of OIS and EIS, shows great results in camera motion smoothing and motion blur reduction, and corrects both rolling shutter and focus breathing. With Fused Video Stabilization on the Pixel 2 and Pixel 2 XL, you no longer have to carefully place the phone before recording, hold it firmly over the entire recording session, or carry a gimbal mount everywhere. The recorded video will always be stable, sharp, and ready to share.
Acknowledgements Fused Video Stabilization is a large-scale effort across multiple teams in Google, including the camera algorithm team, sensor algorithm team, camera hardware team, and sensor hardware team.
From reinventing your smartphone to helping you play rock-paper-scissors, AI is changing the way we use technology today. And while we hear about all the new things we’re able to do thanks to machine learning, we don’t always hear about the people shaping machine learning itself. Who are they? What inspired them to get into the field? And what do they geek out about when it comes to AI?
To answer some of these questions, we went behind the scenes with the Google Brain team, a research group that’s part of Google AI. The Brain team works on deep learning research, a sub-field of machine learning focused on neural networks. For the non-researchers among us, a neural network is a kind of machine learning model that uses raw forms of data to understand patterns and concepts. Neural networks tackle difficult problems in computer vision, speech recognition, language understanding, and many other areas.
You can experience some of the Brain team’s work for yourself by using products like Google Photos or Translate, or by trying out our open-source machine learning framework, TensorFlow. The team also does general research in the field of AI and explores how to apply this technology to new spaces like healthcare, robotics, and even music and art.
Watch below to hear more from the team about the basics of machine learning, puzzles, and one researcher’s hope for using AI as her back-up band.
To learn more about the Brain team, check out g.co/brain, or take a look at the team’s recent Reddit AMA ( "Ask Me Anything"), as well as their AMA from 2016.
Posted by Posted by Chris Olston, Research Scientist, and Noah Fiedel, Software Engineer, TensorFlow Serving
Since initially open-sourcing TensorFlow Serving in February 2016, we’ve made some major enhancements. Let’s take a look back at where we started, review our progress, and share where we are headed next.
Before TensorFlow Serving, users of TensorFlow inside Google had to create their own serving system from scratch. Although serving might appear easy at first, one-off serving solutions quickly grow in complexity. Machine Learning (ML) serving systems need to support model versioning (for model updates with a rollback option) and multiple models (for experimentation via A/B testing), while ensuring that concurrent models achieve high throughput on hardware accelerators (GPUs and TPUs) with low latency. So we set out to create a single, general TensorFlow Serving software stack.
We decided to make it open-sourceable from the get-go, and development started in September 2015. Within a few months, we created the initial end-to-end working system and our open-source release in February 2016.
Over the past year and half, with the help of our users and partners inside and outside our company, TensorFlow Serving has advanced performance, best practices, and standards:
Out-of-the-box optimized serving and customizability: We now offer a pre-built canonical serving binary, optimized for modern CPUs with AVX, so developers don't need to assemble their own binary from our libraries unless they have exotic needs. At the same time, we added a registry-based framework, allowing our libraries to be used for custom (or even non-TensorFlow) serving scenarios.
Multi-model serving: Going from one model to multiple concurrently-served models presents several performance obstacles. We serve multiple models smoothly by (1) loading in isolated thread pools to avoid incurring latency spikes on other models taking traffic; (2) accelerating initial loading of all models in parallel upon server start-up; (3) multi-model batch interleaving to multiplex hardware accelerators (GPUs/TPUs).
Standardized model format: We added SavedModel to TensorFlow 1.0, giving the community a single standard model format that works across training and serving.
Easy-to-use inference APIs: We released easy-to-use APIs for common inference tasks (classification, regression) that we know work for a wide swathe of our applications. To support more advanced use-cases we support a lower-level tensor-based API (predict) and a new multi-inference API that enables multi-task modeling.
All of our work has been informed by close collaborations with: (a) Google’s ML SRE team, which helps ensure we are robust and meet internal SLAs; (b) other Google machine learning infrastructure teams including ads serving and TFX; (c) application teams such as Google Play; (d) our partners at the UC Berkeley RISE Lab, who explore complementary research problems with the Clipper serving system; (e) our open-source user base and contributors.
TensorFlow Serving is currently handling tens of millions of inferences per second for 1100+ of our own projects including Google’s Cloud ML Prediction. Our core serving code is available to all via our open-source releases.
Looking forward, our work is far from done and we are exploring several avenues of innovation. Today we are excited to share early progress in two experimental areas:
Granular batching: A key technique we employ to achieve high throughput on specialized hardware (GPUs and TPUs) is "batching": processing multiple examples jointly for efficiency. We are developing technology and best practices to improve batching to: (a) enable batching to target just the GPU/TPU portion of the computation, for maximum efficiency; (b) enable batching within recursive neural networks, used to process sequence data e.g. text and event sequences. We are experimenting with batching arbitrary sub-graphs using the Batch/Unbatch op pair.
Distributed model serving: We are looking at model sharding techniques as a means of handling models that are too large to fit on one server node or sharing sub-models in a memory-efficient way. We recently launched a 1TB+ model in production with good results, and hope to open-source this capability soon.
Thanks again to all of our users and partners who have contributed feedback, code and ideas. Join the project at: github.com/tensorflow/serving.
The 20th century brought about incredible changes to the way we work and live. There was the combustion engine, the telephone, the assembly line and, of course, the Internet. Today artificial intelligence and machine learning is expected to bring similarly profound changes. And Canada stands poised to lead the world into this new era.
Imagine you could take a picture of a mole on your arm and your smartphone could assist your dermatologist in diagnosing if it’s malignant. This is not science fiction, it’s a system Vancouver's MetaOptima is developing today - and it’s powered by artificial intelligence.
From diagnosing cancer to reducing data centre energy consumption, artificial intelligence offers a new tool for tackling real-world challenges. Today, at Google Canada’s annual Go North summit, we’re bringing together AI leaders from across Canada and around the world to help Canadian industry better understand the vast potential of this technology to transform their business, shape future innovations and improve our world.
Follow along on Twitter @GoogleCanada or tune-in to the Go North livestream (starting at 9am ET) featuring Canadian Prime Minister Justin Trudeau; Google Chairman, Eric Schmidt; founder of DeepMind, Demis Hassabis; OpenAI’s Shivon Zilis; YouTuber Taryn Southern who uses AI to compose music; Geoffrey Hinton and many more including the founder of MetaOptima, Dr. Maryam Sadeghi. Go North will explore Canada’s success in building the superclusters of investment and innovation that have sprung up around the work of Yoshua Bengio in Montreal, Geoffrey Hinton in Toronto and Rich Sutton in Edmonton -- global leaders whose research underpins many of the advances we’re seeing in AI today. The conference will highlight the amazing advancements happening here in Canada and the opportunity for businesses to leverage the country’s rich research pedigree and to unlock the potential of AI. When it comes to artificial intelligence, Canada is having a moment - and we’ll seize it at Go North.
Posted by Sabrina Geremia, Google Canada Country Director