Tag Archives: Computational Photography

DynIBaR: Space-time view synthesis from videos of dynamic scenes

A mobile phone’s camera is a powerful tool for capturing everyday moments. However, capturing a dynamic scene using a single camera is fundamentally limited. For instance, if we wanted to adjust the camera motion or timing of a recorded video (e.g., to freeze time while sweeping the camera around to highlight a dramatic moment), we would typically need an expensive Hollywood setup with a synchronized camera rig. Would it be possible to achieve similar effects solely from a video captured using a mobile phone’s camera, without a Hollywood budget?

In “DynIBaR: Neural Dynamic Image-Based Rendering”, a best paper honorable mention at CVPR 2023, we describe a new method that generates photorealistic free-viewpoint renderings from a single video of a complex, dynamic scene. Neural Dynamic Image-Based Rendering (DynIBaR) can be used to generate a range of video effects, such as “bullet time” effects (where time is paused and the camera is moved at a normal speed around a scene), video stabilization, depth of field, and slow motion, from a single video taken with a phone’s camera. We demonstrate that DynIBaR significantly advances video rendering of complex moving scenes, opening the door to new kinds of video editing applications. We have also released the code on the DynIBaR project page, so you can try it out yourself.


Given an in-the-wild video of a complex, dynamic scene, DynIBaR can freeze time while allowing the camera to continue to move freely through the scene.


Background

The last few years have seen tremendous progress in computer vision techniques that use neural radiance fields (NeRFs) to reconstruct and render static (non-moving) 3D scenes. However, most of the videos people capture with their mobile devices depict moving objects, such as people, pets, and cars. These moving scenes lead to a much more challenging 4D (3D + time) scene reconstruction problem that cannot be solved using standard view synthesis methods.


Standard view synthesis methods output blurry, inaccurate renderings when applied to videos of dynamic scenes.

Other recent methods tackle view synthesis for dynamic scenes using space-time neural radiance fields (i.e., Dynamic NeRFs), but such approaches still exhibit inherent limitations that prevent their application to casually captured, in-the-wild videos. In particular, they struggle to render high-quality novel views from videos featuring long time duration, uncontrolled camera paths and complex object motion.

The key pitfall is that they store a complicated, moving scene in a single data structure. In particular, they encode scenes in the weights of a multilayer perceptron (MLP) neural network. MLPs can approximate any function — in this case, a function that maps a 4D space-time point (x, y, z, t) to an RGB color and density that we can use in rendering images of a scene. However, the capacity of this MLP (defined by the number of parameters in its neural network) must increase according to the video length and scene complexity, and thus, training such models on in-the-wild videos can be computationally intractable. As a result, we get blurry, inaccurate renderings like those produced by DVS and NSFF (shown below). DynIBaR avoids creating such large scene models by adopting a different rendering paradigm.


DynIBaR (bottom row) significantly improves rendering quality compared to prior dynamic view synthesis methods (top row) for videos of complex dynamic scenes. Prior methods produce blurry renderings because they need to store the entire moving scene in an MLP data structure.


Image-based rendering (IBR)

A key insight behind DynIBaR is that we don’t actually need to store all of the scene contents in a video in a giant MLP. Instead, we directly use pixel data from nearby input video frames to render new views. DynIBaR builds on an image-based rendering (IBR) method called IBRNet that was designed for view synthesis for static scenes. IBR methods recognize that a new target view of a scene should be very similar to nearby source images, and therefore synthesize the target by dynamically selecting and warping pixels from the nearby source frames, rather than reconstructing the whole scene in advance. IBRNet, in particular, learns to blend nearby images together to recreate new views of a scene within a volumetric rendering framework.


DynIBaR: Extending IBR to complex, dynamic videos

To extend IBR to dynamic scenes, we need to take scene motion into account during rendering. Therefore, as part of reconstructing an input video, we solve for the motion of every 3D point, where we represent scene motion using a motion trajectory field encoded by an MLP. Unlike prior dynamic NeRF methods that store the entire scene appearance and geometry in an MLP, we only store motion, a signal that is more smooth and sparse, and use the input video frames to determine everything else needed to render new views.

We optimize DynIBaR for a given video by taking each input video frame, rendering rays to form a 2D image using volume rendering (as in NeRF), and comparing that rendered image to the input frame. That is, our optimized representation should be able to perfectly reconstruct the input video.

We illustrate how DynIBaR renders images of dynamic scenes. For simplicity, we show a 2D world, as seen from above. (a) A set of input source views (triangular camera frusta) observe a cube moving through the scene (animated square). Each camera is labeled with its timestamp (t-2, t-1, etc). (b) To render a view from camera at time t, DynIBaR shoots a virtual ray through each pixel (blue line), and computes colors and opacities for sample points along that ray. To compute those properties, DyniBaR projects those samples into other views via multi-view geometry, but first, we must compensate for the estimated motion of each point (dashed red line). (c) Using this estimated motion, DynIBaR moves each point in 3D to the relevant time before projecting it into the corresponding source camera, to sample colors for use in rendering. DynIBaR optimizes the motion of each scene point as part of learning how to synthesize new views of the scene.

However, reconstructing and deriving new views for a complex, moving scene is a highly ill-posed problem, since there are many solutions that can explain the input video — for instance, it might create disconnected 3D representations for each time step. Therefore, optimizing DynIBaR to reconstruct the input video alone is insufficient. To obtain high-quality results, we also introduce several other techniques, including a method called cross-time rendering. Cross-time rendering refers to the use of the state of our 4D representation at one time instant to render images from a different time instant, which encourages the 4D representation to be coherent over time. To further improve rendering fidelity, we automatically factorize the scene into two components, a static one and a dynamic one, modeled by time-invariant and time-varying scene representations respectively.


Creating video effects

DynIBaR enables various video effects. We show several examples below.


Video stabilization

We use a shaky, handheld input video to compare DynIBaR’s video stabilization performance to existing 2D video stabilization and dynamic NeRF methods, including FuSta, DIFRINT, HyperNeRF, and NSFF. We demonstrate that DynIBaR produces smoother outputs with higher rendering fidelity and fewer artifacts (e.g., flickering or blurry results). In particular, FuSta yields residual camera shake, DIFRINT produces flicker around object boundaries, and HyperNeRF and NSFF produce blurry results.


Simultaneous view synthesis and slow motion

DynIBaR can perform view synthesis in both space and time simultaneously, producing smooth 3D cinematic effects. Below, we demonstrate that DynIBaR can take video inputs and produce smooth 5X slow-motion videos rendered using novel camera paths.


Video bokeh

DynIBaR can also generate high-quality video bokeh by synthesizing videos with dynamically changing depth of field. Given an all-in-focus input video, DynIBar can generate high-quality output videos with varying out-of-focus regions that call attention to moving (e.g., the running person and dog) and static content (e.g., trees and buildings) in the scene.


Conclusion

DynIBaR is a leap forward in our ability to render complex moving scenes from new camera paths. While it currently involves per-video optimization, we envision faster versions that can be deployed on in-the-wild videos to enable new kinds of effects for consumer video editing using mobile devices.


Acknowledgements

DynIBaR is the result of a collaboration between researchers at Google Research and Cornell University. The key contributors to the work presented in this post include Zhengqi Li, Qianqian Wang, Forrester Cole, Richard Tucker, and Noah Snavely.

Source: Google AI Blog


Reconstructing indoor spaces with NeRF

When choosing a venue, we often find ourselves with questions like the following: Does this restaurant have the right vibe for a date? Is there good outdoor seating? Are there enough screens to watch the game? While photos and videos may partially answer questions like these, they are no substitute for feeling like you’re there, even when visiting in person isn't an option.

Immersive experiences that are interactive, photorealistic, and multi-dimensional stand to bridge this gap and recreate the feel and vibe of a space, empowering users to naturally and intuitively find the information they need. To help with this, Google Maps launched Immersive View, which uses advances in machine learning (ML) and computer vision to fuse billions of Street View and aerial images to create a rich, digital model of the world. Beyond that, it layers helpful information on top, like the weather, traffic, and how busy a place is. Immersive View provides indoor views of restaurants, cafes, and other venues to give users a virtual up-close look that can help them confidently decide where to go.

Today we describe the work put into delivering these indoor views in Immersive View. We build on neural radiance fields (NeRF), a state-of-the-art approach for fusing photos to produce a realistic, multi-dimensional reconstruction within a neural network. We describe our pipeline for creation of NeRFs, which includes custom photo capture of the space using DSLR cameras, image processing and scene reproduction. We take advantage of Alphabet’s recent advances in the field to design a method matching or outperforming the prior state-of-the-art in visual fidelity. These models are then embedded as interactive 360° videos following curated flight paths, enabling them to be available on smartphones.


The reconstruction of The Seafood Bar in Amsterdam in Immersive View.


From photos to NeRFs

At the core of our work is NeRF, a recently-developed method for 3D reconstruction and novel view synthesis. Given a collection of photos describing a scene, NeRF distills these photos into a neural field, which can then be used to render photos from viewpoints not present in the original collection.

While NeRF largely solves the challenge of reconstruction, a user-facing product based on real-world data brings a wide variety of challenges to the table. For example, reconstruction quality and user experience should remain consistent across venues, from dimly-lit bars to sidewalk cafes to hotel restaurants. At the same time, privacy should be respected and any potentially personally identifiable information should be removed. Importantly, scenes should be captured consistently and efficiently, reliably resulting in high-quality reconstructions while minimizing the effort needed to capture the necessary photographs. Finally, the same natural experience should be available to all mobile users, regardless of the device on hand.


The Immersive View indoor reconstruction pipeline.


Capture & preprocessing

The first step to producing a high-quality NeRF is the careful capture of a scene: a dense collection of photos from which 3D geometry and color can be derived. To obtain the best possible reconstruction quality, every surface should be observed from multiple different directions. The more information a model has about an object’s surface, the better it will be in discovering the object’s shape and the way it interacts with lights.

In addition, NeRF models place further assumptions on the camera and the scene itself. For example, most of the camera’s properties, such as white balance and aperture, are assumed to be fixed throughout the capture. Likewise, the scene itself is assumed to be frozen in time: lighting changes and movement should be avoided. This must be balanced with practical concerns, including the time needed for the capture, available lighting, equipment weight, and privacy. In partnership with professional photographers, we developed a strategy for quickly and reliably capturing venue photos using DSLR cameras within only an hour timeframe. This approach has been used for all of our NeRF reconstructions to date.

Once the capture is uploaded to our system, processing begins. As photos may inadvertently contain sensitive information, we automatically scan and blur personally identifiable content. We then apply a structure-from-motion pipeline to solve for each photo's camera parameters: its position and orientation relative to other photos, along with lens properties like focal length. These parameters associate each pixel with a point and a direction in 3D space and constitute a key signal in the NeRF reconstruction process.


NeRF reconstruction

Unlike many ML models, a new NeRF model is trained from scratch on each captured location. To obtain the best possible reconstruction quality within a target compute budget, we incorporate features from a variety of published works on NeRF developed at Alphabet. Some of these include:

  • We build on mip-NeRF 360, one of the best-performing NeRF models to date. While more computationally intensive than Nvidia's widely-used Instant NGP, we find the mip-NeRF 360 consistently produces fewer artifacts and higher reconstruction quality.
  • We incorporate the low-dimensional generative latent optimization (GLO) vectors introduced in NeRF in the Wild as an auxiliary input to the model’s radiance network. These are learned real-valued latent vectors that embed appearance information for each image. By assigning each image in its own latent vector, the model can capture phenomena such as lighting changes without resorting to cloudy geometry, a common artifact in casual NeRF captures.
  • We also incorporate exposure conditioning as introduced in Block-NeRF. Unlike GLO vectors, which are uninterpretable model parameters, exposure is directly derived from a photo's metadata and fed as an additional input to the model’s radiance network. This offers two major benefits: it opens up the possibility of varying ISO and provides a method for controlling an image’s brightness at inference time. We find both properties invaluable for capturing and reconstructing dimly-lit venues.

We train each NeRF model on TPU or GPU accelerators, which provide different trade-off points. As with all Google products, we continue to search for new ways to improve, from reducing compute requirements to improving reconstruction quality.


A side-by-side comparison of our method and a mip-NeRF 360 baseline.


A scalable user experience

Once a NeRF is trained, we have the ability to produce new photos of a scene from any viewpoint and camera lens we choose. Our goal is to deliver a meaningful and helpful user experience: not only the reconstructions themselves, but guided, interactive tours that give users the freedom to naturally explore spaces from the comfort of their smartphones.

To this end, we designed a controllable 360° video player that emulates flying through an indoor space along a predefined path, allowing the user to freely look around and travel forward or backwards. As the first Google product exploring this new technology, 360° videos were chosen as the format to deliver the generated content for a few reasons.

On the technical side, real-time inference and baked representations are still resource intensive on a per-client basis (either on device or cloud computed), and relying on them would limit the number of users able to access this experience. By using videos, we are able to scale the storage and delivery of videos to all users by taking advantage of the same video management and serving infrastructure used by YouTube. On the operations side, videos give us clearer editorial control over the exploration experience and are easier to inspect for quality in large volumes.

While we had considered capturing the space with a 360° camera directly, using a NeRF to reconstruct and render the space has several advantages. A virtual camera can fly anywhere in space, including over obstacles and through windows, and can use any desired camera lens. The camera path can also be edited post-hoc for smoothness and speed, unlike a live recording. A NeRF capture also does not require the use of specialized camera hardware.

Our 360° videos are rendered by ray casting through each pixel of a virtual, spherical camera and compositing the visible elements of the scene. Each video follows a smooth path defined by a sequence of keyframe photos taken by the photographer during capture. The position of the camera for each picture is computed during structure-from-motion, and the sequence of pictures is smoothly interpolated into a flight path.

To keep speed consistent across different venues, we calibrate the distances for each by capturing pairs of images, each of which is 3 meters apart. By knowing measurements in the space, we scale the generated model, and render all videos at a natural velocity.

The final experience is surfaced to the user within Immersive View: the user can seamlessly fly into restaurants and other indoor venues and discover the space by flying through the photorealistic 360° videos.


Open research questions

We believe that this feature is the first step of many in a journey towards universally accessible, AI-powered, immersive experiences. From a NeRF research perspective, more questions remain open. Some of these include:

  1. Enhancing reconstructions with scene segmentation, adding semantic information to the scenes that could make scenes, for example, searchable and easier to navigate.
  2. Adapting NeRF to outdoor photo collections, in addition to indoor. In doing so, we'd unlock similar experiences to every corner of the world and change how users could experience the outdoor world.
  3. Enabling real-time, interactive 3D exploration through neural-rendering on-device.


Reconstruction of an outdoor scene with a NeRF model trained on Street View panoramas.

As we continue to grow, we look forward to engaging with and contributing to the community to build the next generation of immersive experiences.


Acknowledgments

This work is a collaboration across multiple teams at Google. Contributors to the project include Jon Barron, Julius Beres, Daniel Duckworth, Roman Dudko, Magdalena Filak, Mike Harm, Peter Hedman, Claudio Martella, Ben Mildenhall, Cardin Moffett, Etienne Pot, Konstantinos Rematas, Yves Sallat, Marcos Seefelder, Lilyana Sirakovat, Sven Tresp and Peter Zhizhin.

Also, we’d like to extend our thanks to Luke Barrington, Daniel Filip, Tom Funkhouser, Charles Goran, Pramod Gupta, Mario Lučić, Isalo Montacute and Dan Thomasset for valuable feedback and suggestions.

Source: Google AI Blog


Infinite Nature: Generating 3D Flythroughs from Still Photos

We live in a world of great natural beauty — of majestic mountains, dramatic seascapes, and serene forests. Imagine seeing this beauty as a bird does, flying past richly detailed, three-dimensional landscapes. Can computers learn to synthesize this kind of visual experience? Such a capability would allow for new kinds of content for games and virtual reality experiences: for instance, relaxing within an immersive flythrough of an infinite nature scene. But existing methods that synthesize new views from images tend to allow for only limited camera motion.

In a research effort we call Infinite Nature, we show that computers can learn to generate such rich 3D experiences simply by viewing nature videos and photographs. Our latest work on this theme, InfiniteNature-Zero (presented at ECCV 2022) can produce high-resolution, high-quality flythroughs starting from a single seed image, using a system trained only on still photographs, a breakthrough capability not seen before. We call the underlying research problem perpetual view generation: given a single input view of a scene, how can we synthesize a photorealistic set of output views corresponding to an arbitrarily long, user-controlled 3D path through that scene? Perpetual view generation is very challenging because the system must generate new content on the other side of large landmarks (e.g., mountains), and render that new content with high realism and in high resolution.


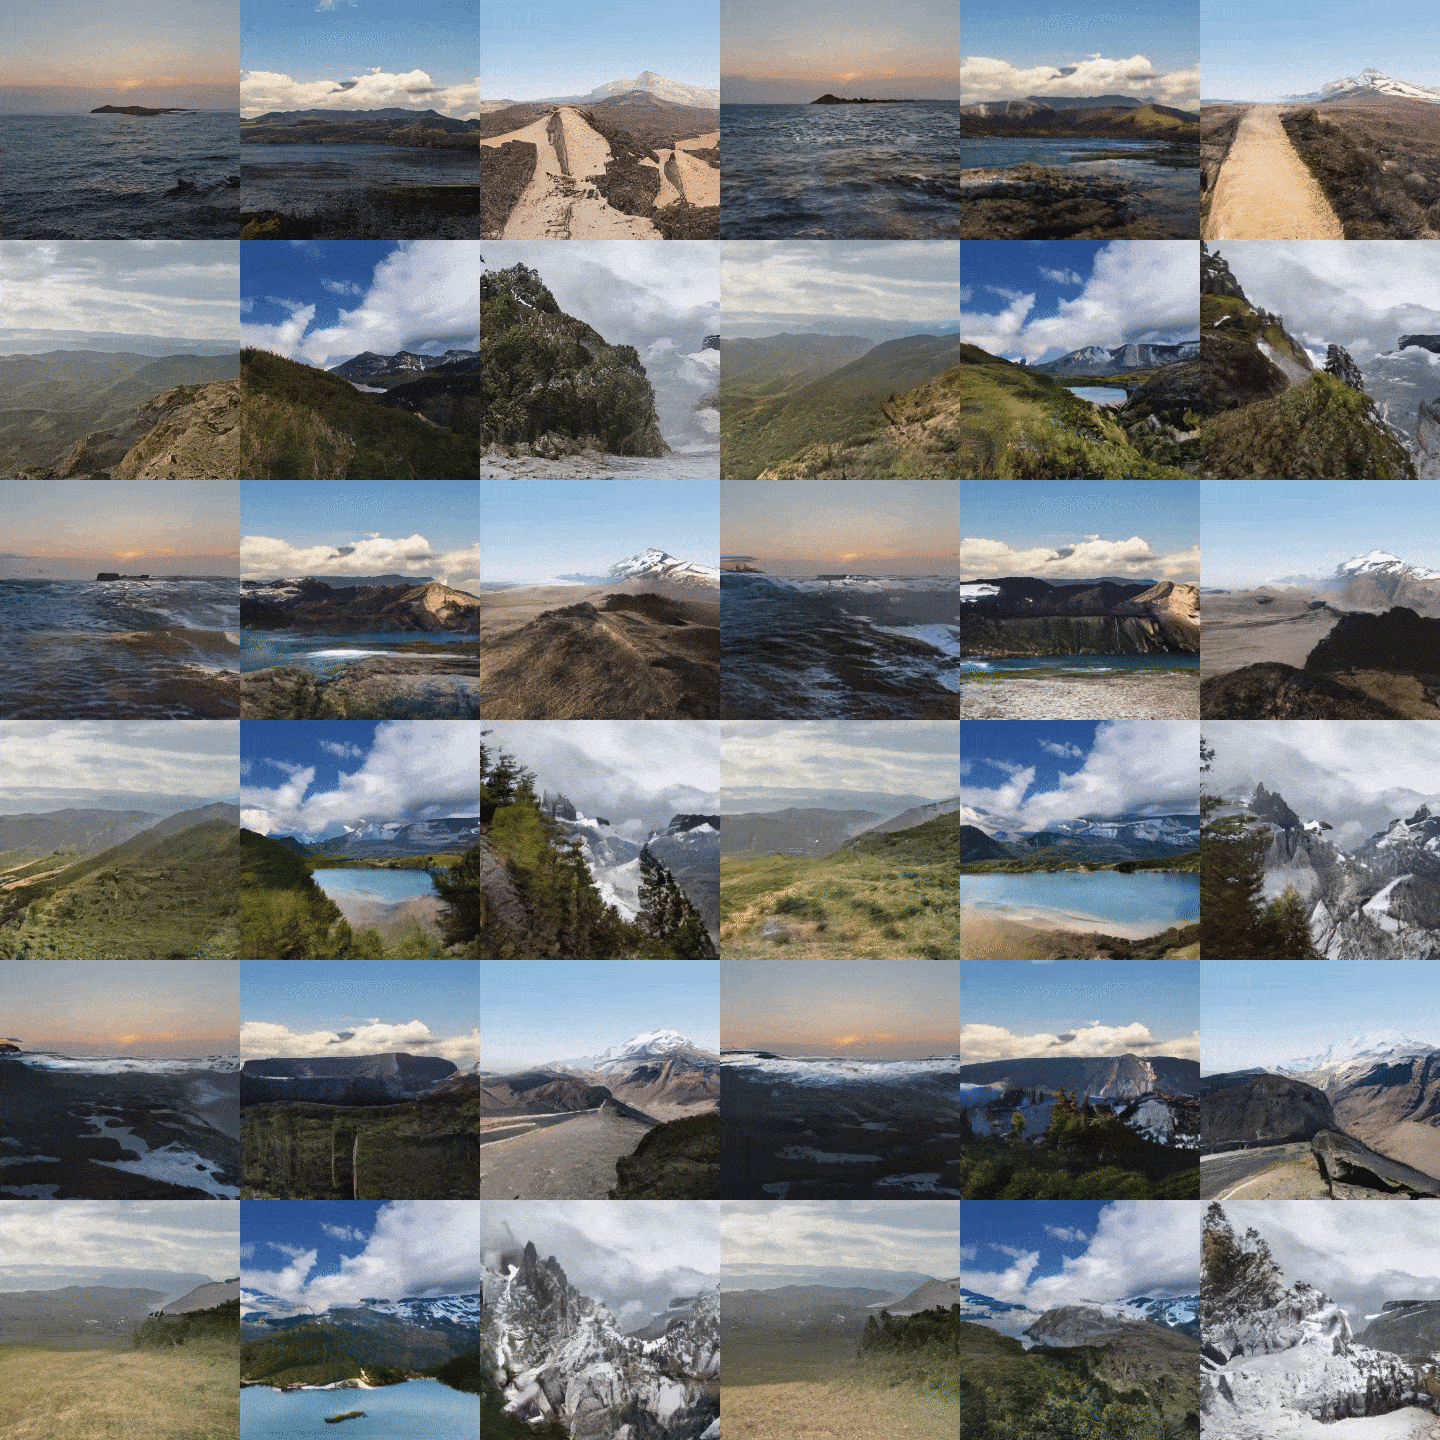
Example flythrough generated with InfiniteNature-Zero. It takes a single input image of a natural scene and synthesizes a long camera path flying into that scene, generating new scene content as it goes.

Background: Learning 3D Flythroughs from Videos

To establish the basics of how such a system could work, we’ll describe our first version, “Infinite Nature: Perpetual View Generation of Natural Scenes from a Single Image” (presented at ICCV 2021). In that work we explored a “learn from video” approach, where we collected a set of online videos captured from drones flying along coastlines, with the idea that we could learn to synthesize new flythroughs that resemble these real videos. This set of online videos is called the Aerial Coastline Imagery Dataset (ACID). In order to learn how to synthesize scenes that respond dynamically to any desired 3D camera path, however, we couldn’t simply treat these videos as raw collections of pixels; we also had to compute their underlying 3D geometry, including the camera position at each frame.

The basic idea is that we learn to generate flythroughs step-by-step. Given a starting view, like the first image in the figure below, we first compute a depth map using single-image depth prediction methods. We then use that depth map to render the image forward to a new camera viewpoint, shown in the middle, resulting in a new image and depth map from that new viewpoint.

However, this intermediate image has some problems — it has holes where we can see behind objects into regions that weren’t visible in the starting image. It is also blurry, because we are now closer to objects, but are stretching the pixels from the previous frame to render these now-larger objects.

To handle these problems, we learn a neural image refinement network that takes this low-quality intermediate image and outputs a complete, high-quality image and corresponding depth map. These steps can then be repeated, with this synthesized image as the new starting point. Because we refine both the image and the depth map, this process can be iterated as many times as desired — the system automatically learns to generate new scenery, like mountains, islands, and oceans, as the camera moves further into the scene.

Our Infinite Nature methods take an input view and its corresponding depth map (left). Using this depth map, the system renders the input image to a new desired viewpoint (center). This intermediate image has problems, such as missing pixels revealed behind foreground content (shown in magenta). We learn a deep network that refines this image to produce a new high-quality image (right). This process can be repeated to produce a long trajectory of views. We thus call this approach “render-refine-repeat”.

We train this render-refine-repeat synthesis approach using the ACID dataset. In particular, we sample a video from the dataset and then a frame from that video. We then use this method to render several new views moving into the scene along the same camera trajectory as the ground truth video, as shown in the figure below, and compare these rendered frames to the corresponding ground truth video frames to derive a training signal. We also include an adversarial setup that tries to distinguish synthesized frames from real images, encouraging the generated imagery to appear more realistic.

Infinite Nature can synthesize views corresponding to any camera trajectory. During training, we run our system for T steps to generate T views along a camera trajectory calculated from a training video sequence, then compare the resulting synthesized views to the ground truth ones. In the figure, each camera viewpoint is generated from the previous one by performing a warp operation R, followed by the neural refinement operation gθ.

The resulting system can generate compelling flythroughs, as featured on the project webpage, along with a “flight simulator” Colab demo. Unlike prior methods on video synthesis, this method allows the user to interactively control the camera and can generate much longer camera paths.


InfiniteNature-Zero: Learning Flythroughs from Still Photos

One problem with this first approach is that video is difficult to work with as training data. High-quality video with the right kind of camera motion is challenging to find, and the aesthetic quality of an individual video frame generally cannot compare to that of an intentionally captured nature photograph. Therefore, in “InfiniteNature-Zero: Learning Perpetual View Generation of Natural Scenes from Single Images”, we build on the render-refine-repeat strategy above, but devise a way to learn perpetual view synthesis from collections of still photos — no videos needed. We call this method InfiniteNature-Zero because it learns from “zero” videos. At first, this might seem like an impossible task — how can we train a model to generate video flythroughs of scenes when all it’s ever seen are isolated photos?

To solve this problem, we had the key insight that if we take an image and render a camera path that forms a cycle — that is, where the path loops back such that the last image is from the same viewpoint as the first — then we know that the last synthesized image along this path should be the same as the input image. Such cycle consistency provides a training constraint that helps the model learn to fill in missing regions and increase image resolution during each step of view generation.

However, training with these camera cycles is insufficient for generating long and stable view sequences, so as in our original work, we include an adversarial strategy that considers long, non-cyclic camera paths, like the one shown in the figure above. In particular, if we render T frames from a starting frame, we optimize our render-refine-repeat model such that a discriminator network can’t tell which was the starting frame and which was the final synthesized frame. Finally, we add a component trained to generate high-quality sky regions to increase the perceived realism of the results.

With these insights, we trained InfiniteNature-Zero on collections of landscape photos, which are available in large quantities online. Several resulting videos are shown below — these demonstrate beautiful, diverse natural scenery that can be explored along arbitrarily long camera paths. Compared to our prior work — and to prior video synthesis methods — these results exhibit significant improvements in quality and diversity of content (details available in the paper).


Several nature flythroughs generated by InfiniteNature-Zero from single starting photos.

Conclusion

There are a number of exciting future directions for this work. For instance, our methods currently synthesize scene content based only on the previous frame and its depth map; there is no persistent underlying 3D representation. Our work points towards future algorithms that can generate complete, photorealistic, and consistent 3D worlds.


Acknowledgements

Infinite Nature and InfiniteNature-Zero are the result of a collaboration between researchers at Google Research, UC Berkeley, and Cornell University. The key contributors to the work represented in this post include Angjoo Kanazawa, Andrew Liu, Richard Tucker, Zhengqi Li, Noah Snavely, Qianqian Wang, Varun Jampani, and Ameesh Makadia.

Source: Google AI Blog


MUSIQ: Assessing Image Aesthetic and Technical Quality with Multi-scale Transformers

Understanding the aesthetic and technical quality of images is important for providing a better user visual experience. Image quality assessment (IQA) uses models to build a bridge between an image and a user's subjective perception of its quality. In the deep learning era, many IQA approaches, such as NIMA, have achieved success by leveraging the power of convolutional neural networks (CNNs). However, CNN-based IQA models are often constrained by the fixed-size input requirement in batch training, i.e., the input images need to be resized or cropped to a fixed size shape. This preprocessing is problematic for IQA because images can have very different aspect ratios and resolutions. Resizing and cropping can impact image composition or introduce distortions, thus changing the quality of the image.

In CNN-based models, images need to be resized or cropped to a fixed shape for batch training. However, such preprocessing can alter the image aspect ratio and composition, thus impacting image quality. Original image used under CC BY 2.0 license.

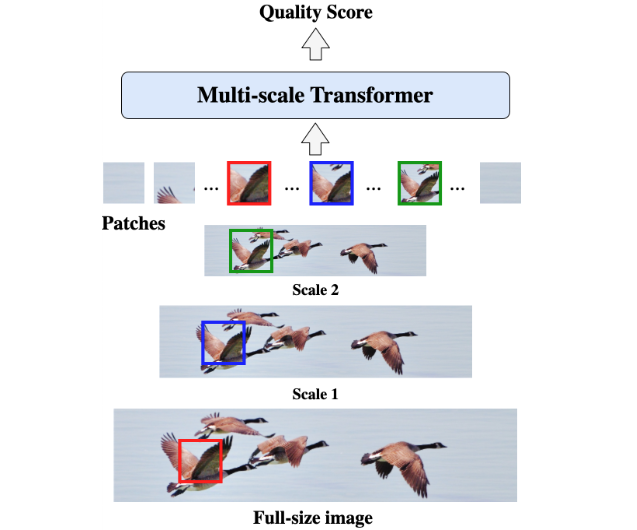
In “MUSIQ: Multi-scale Image Quality Transformer”, published at ICCV 2021, we propose a patch-based multi-scale image quality transformer (MUSIQ) to bypass the CNN constraints on fixed input size and predict the image quality effectively on native-resolution images. The MUSIQ model supports the processing of full-size image inputs with varying aspect ratios and resolutions and allows multi-scale feature extraction to capture image quality at different granularities. To support positional encoding in the multi-scale representation, we propose a novel hash-based 2D spatial embedding combined with an embedding that captures the image scaling. We apply MUSIQ on four large-scale IQA datasets, demonstrating consistent state-of-the-art results across three technical quality datasets (PaQ-2-PiQ, KonIQ-10k, and SPAQ) and comparable performance to that of state-of-the-art models on the aesthetic quality dataset AVA.

The patch-based MUSIQ model can process the full-size image and extract multi-scale features, which better aligns with a person’s typical visual response.

In the following figure, we show a sample of images, their MUSIQ score, and their mean opinion score (MOS) from multiple human raters in the brackets. The range of the score is from 0 to 100, with 100 being the highest perceived quality. As we can see from the figure, MUSIQ predicts high scores for images with high aesthetic quality and high technical quality, and it predicts low scores for images that are not aesthetically pleasing (low aesthetic quality) or that contain visible distortions (low technical quality).

High quality
76.10 [74.36] 69.29 [70.92]
   
Low aesthetics quality
55.37 [53.18] 32.50 [35.47]
   
Low technical quality
14.93 [14.38] 15.24 [11.86]
Predicted MUSIQ score (and ground truth) on images from the KonIQ-10k dataset. Top: MUSIQ predicts high scores for high quality images. Middle: MUSIQ predicts low scores for images with low aesthetic quality, such as images with poor composition or lighting. Bottom: MUSIQ predicts low scores for images with low technical quality, such as images with visible distortion artifacts (e.g., blurry, noisy).

The Multi-scale Image Quality Transformer
MUSIQ tackles the challenge of learning IQA on full-size images. Unlike CNN-models that are often constrained to fixed resolution, MUSIQ can handle inputs with arbitrary aspect ratios and resolutions.

To accomplish this, we first make a multi-scale representation of the input image, containing the native resolution image and its resized variants. To preserve the image composition, we maintain its aspect ratio during resizing. After obtaining the pyramid of images, we then partition the images at different scales into fixed-size patches that are fed into the model.

Illustration of the multi-scale image representation in MUSIQ.

Since patches are from images of varying resolutions, we need to effectively encode the multi-aspect-ratio multi-scale input into a sequence of tokens, capturing both the pixel, spatial, and scale information. To achieve this, we design three encoding components in MUSIQ, including: 1) a patch encoding module to encode patches extracted from the multi-scale representation; 2) a novel hash-based spatial embedding module to encode the 2D spatial position for each patch; and 3) a learnable scale embedding to encode different scales. In this way, we can effectively encode the multi-scale input as a sequence of tokens, serving as the input to the Transformer encoder.

To predict the final image quality score, we use the standard approach of prepending an additional learnable “classification token” (CLS). The CLS token state at the output of the Transformer encoder serves as the final image representation. We then add a fully connected layer on top to predict the IQS. The figure below provides an overview of the MUSIQ model.

Overview of MUSIQ. The multi-scale multi-resolution input will be encoded by three components: the scale embedding (SCE), the hash-based 2D spatial embedding (HSE), and the multi-scale patch embedding (MPE).

Since MUSIQ only changes the input encoding, it is compatible with any Transformer variants. To demonstrate the effectiveness of the proposed method, in our experiments we use the classic Transformer with a relatively lightweight setting so that the model size is comparable to ResNet-50.

Benchmark and Evaluation
To evaluate MUSIQ, we run experiments on multiple large-scale IQA datasets. On each dataset, we report the Spearman’s rank correlation coefficient (SRCC) and Pearson linear correlation coefficient (PLCC) between our model prediction and the human evaluators’ mean opinion score. SRCC and PLCC are correlation metrics ranging from -1 to 1. Higher PLCC and SRCC means better alignment between model prediction and human evaluation. The graph below shows that MUSIQ outperforms other methods on PaQ-2-PiQ, KonIQ-10k, and SPAQ.

Performance comparison of MUSIQ and previous state-of-the-art (SOTA) methods on four large-scale IQA datasets. On each dataset we compare the Spearman’s rank correlation coefficient (SRCC) and Pearson linear correlation coefficient (PLCC) of model prediction and ground truth.

Notably, the PaQ-2-PiQ test set is entirely composed of large pictures having at least one dimension exceeding 640 pixels. This is very challenging for traditional deep learning approaches, which require resizing. MUSIQ can outperform previous methods by a large margin on the full-size test set, which verifies its robustness and effectiveness.

It is also worth mentioning that previous CNN-based methods often required sampling as many as 20 crops for each image during testing. This kind of multi-crop ensemble is a way to mitigate the fixed shape constraint in the CNN models. But since each crop is only a sub-view of the whole image, the ensemble is still an approximate approach. Moreover, CNN-based methods both add additional inference cost for every crop and, because they sample different crops, they can introduce randomness in the result. In contrast, because MUSIQ takes the full-size image as input, it can directly learn the best aggregation of information across the full image and it only needs to run the inference once.

To further verify that the MUSIQ model captures different information at different scales, we visualize the attention weights on each image at different scales.

Attention visualization from the output tokens to the multi-scale representation, including the original resolution image and two proportionally resized images. Brighter areas indicate higher attention, which means that those areas are more important for the model output. Images for illustration are taken from the AVA dataset.

We observe that MUSIQ tends to focus on more detailed areas in the full, high-resolution images and on more global areas on the resized ones. For example, for the flower photo above, the model’s attention on the original image is focusing on the pedal details, and the attention shifts to the buds at lower resolutions. This shows that the model learns to capture image quality at different granularities.

Conclusion
We propose a multi-scale image quality transformer (MUSIQ), which can handle full-size image input with varying resolutions and aspect ratios. By transforming the input image to a multi-scale representation with both global and local views, the model can capture the image quality at different granularities. Although MUSIQ is designed for IQA, it can be applied to other scenarios where task labels are sensitive to image resolution and aspect ratio. The MUSIQ model and checkpoints are available at our GitHub repository.

Acknowledgements
This work is made possible through a collaboration spanning several teams across Google. We’d like to acknowledge contributions from Qifei Wang, Yilin Wang and Peyman Milanfar.

Source: Google AI Blog


Large Motion Frame Interpolation

Frame interpolation is the process of synthesizing in-between images from a given set of images. The technique is often used for temporal up-sampling to increase the refresh rate of videos or to create slow motion effects. Nowadays, with digital cameras and smartphones, we often take several photos within a few seconds to capture the best picture. Interpolating between these “near-duplicate” photos can lead to engaging videos that reveal scene motion, often delivering an even more pleasing sense of the moment than the original photos.

Frame interpolation between consecutive video frames, which often have small motion, has been studied extensively. Unlike videos, however, the temporal spacing between near-duplicate photos can be several seconds, with commensurately large in-between motion, which is a major failing point of existing frame interpolation methods. Recent methods attempt to handle large motion by training on datasets with extreme motion, albeit with limited effectiveness on smaller motions.

In “FILM: Frame Interpolation for Large Motion”, published at ECCV 2022, we present a method to create high quality slow-motion videos from near-duplicate photos. FILM is a new neural network architecture that achieves state-of-the-art results in large motion, while also handling smaller motions well.

FILM interpolating between two near-duplicate photos to create a slow motion video.

FILM Model Overview
The FILM model takes two images as input and outputs a middle image. At inference time, we recursively invoke the model to output in-between images. FILM has three components: (1) A feature extractor that summarizes each input image with deep multi-scale (pyramid) features; (2) a bi-directional motion estimator that computes pixel-wise motion (i.e., flows) at each pyramid level; and (3) a fusion module that outputs the final interpolated image. We train FILM on regular video frame triplets, with the middle frame serving as the ground-truth for supervision.

A standard feature pyramid extraction on two input images. Features are processed at each level by a series of convolutions, which are then downsampled to half the spatial resolution and passed as input to the deeper level.

Scale-Agnostic Feature Extraction
Large motion is typically handled with hierarchical motion estimation using multi-resolution feature pyramids (shown above). However, this method struggles with small and fast-moving objects because they can disappear at the deepest pyramid levels. In addition, there are far fewer available pixels to derive supervision at the deepest level.

To overcome these limitations, we adopt a feature extractor that shares weights across scales to create a “scale-agnostic” feature pyramid. This feature extractor (1) allows the use of a shared motion estimator across pyramid levels (next section) by equating large motion at shallow levels with small motion at deeper levels, and (2) creates a compact network with fewer weights.

Specifically, given two input images, we first create an image pyramid by successively downsampling each image. Next, we use a shared U-Net convolutional encoder to extract a smaller feature pyramid from each image pyramid level (columns in the figure below). As the third and final step, we construct a scale-agnostic feature pyramid by horizontally concatenating features from different convolution layers that have the same spatial dimensions. Note that from the third level onwards, the feature stack is constructed with the same set of shared convolution weights (shown in the same color). This ensures that all features are similar, which allows us to continue to share weights in the subsequent motion estimator. The figure below depicts this process using four pyramid levels, but in practice, we use seven.

Bi-directional Flow Estimation
After feature extraction, FILM performs pyramid-based residual flow estimation to compute the flows from the yet-to-be-predicted middle image to the two inputs. The flow estimation is done once for each input, starting from the deepest level, using a stack of convolutions. We estimate the flow at a given level by adding a residual correction to the upsampled estimate from the next deeper level. This approach takes the following as its input: (1) the features from the first input at that level, and (2) the features of the second input after it is warped with the upsampled estimate. The same convolution weights are shared across all levels, except for the two finest levels.

Shared weights allow the interpretation of small motions at deeper levels to be the same as large motions at shallow levels, boosting the number of pixels available for large motion supervision. Additionally, shared weights not only enable the training of powerful models that may reach a higher peak signal-to-noise ratio (PSNR), but are also needed to enable models to fit into GPU memory for practical applications.

The impact of weight sharing on image quality. Left: no sharing, Right: sharing. For this ablation we used a smaller version of our model (called FILM-med in the paper) because the full model without weight sharing would diverge as the regularization benefit of weight sharing was lost.

Fusion and Frame Generation
Once the bi-directional flows are estimated, we warp the two feature pyramids into alignment. We obtain a concatenated feature pyramid by stacking, at each pyramid level, the two aligned feature maps, the bi-directional flows and the input images. Finally, a U-Net decoder synthesizes the interpolated output image from the aligned and stacked feature pyramid.

FILM Architecture. FEATURE EXTRACTION: we extract scale-agnostic features. The features with matching colors are extracted using shared weights. FLOW ESTIMATION: we compute bi-directional flows using shared weights across the deeper pyramid levels and warp the features into alignment. FUSION: A U-Net decoder outputs the final interpolated frame.

Loss Functions
During training, we supervise FILM by combining three losses. First, we use the absolute L1 difference between the predicted and ground-truth frames to capture the motion between input images. However, this produces blurry images when used alone. Second, we use perceptual loss to improve image fidelity. This minimizes the L1 difference between the ImageNet pre-trained VGG-19 features extracted from the predicted and ground truth frames. Third, we use Style loss to minimize the L2 difference between the Gram matrix of the ImageNet pre-trained VGG-19 features. The Style loss enables the network to produce sharp images and realistic inpaintings of large pre-occluded regions. Finally, the losses are combined with weights empirically selected such that each loss contributes equally to the total loss.

Shown below, the combined loss greatly improves sharpness and image fidelity when compared to training FILM with L1 loss and VGG losses. The combined loss maintains the sharpness of the tree leaves.

FILM’s combined loss functions. L1 loss (left), L1 plus VGG loss (middle), and Style loss (right), showing significant sharpness improvements (green box).

Image and Video Results
We evaluate FILM on an internal near-duplicate photos dataset that exhibits large scene motion. Additionally, we compare FILM to recent frame interpolation methods: SoftSplat and ABME. FILM performs favorably when interpolating across large motion. Even in the presence of motion as large as 100 pixels, FILM generates sharp images consistent with the inputs.

Frame interpolation with SoftSplat (left), ABME (middle) and FILM (right) showing favorable image quality and temporal consistency.
Large motion interpolation. Top: 64x slow motion video. Bottom (left to right): The two input images blended, SoftSplat interpolation, ABME interpolation, and FILM interpolation. FILM captures the dog’s face while maintaining the background details.

Conclusion
We introduce FILM, a large motion frame interpolation neural network. At its core, FILM adopts a scale-agnostic feature pyramid that shares weights across scales, which allows us to build a “scale-agnostic” bi-directional motion estimator that learns from frames with normal motion and generalizes well to frames with large motion. To handle wide disocclusions caused by large scene motion, we supervise FILM by matching the Gram matrix of ImageNet pre-trained VGG-19 features, which results in realistic inpainting and crisp images. FILM performs favorably on large motion, while also handling small and medium motions well, and generates temporally smooth high quality videos.

Try It Out Yourself
You can try out FILM on your photos using the source code, which is now publicly available.

Acknowledgements
We would like to thank Eric Tabellion, Deqing Sun, Caroline Pantofaru, Brian Curless for their contributions. We thank Marc Comino Trinidad for his contributions on the scale-agnostic feature extractor, Orly Liba and Charles Herrmann for feedback on the text, Jamie Aspinall for the imagery in the paper, Dominik Kaeser, Yael Pritch, Michael Nechyba, William T. Freeman, David Salesin, Catherine Wah, and Ira Kemelmacher-Shlizerman for support. Thanks to Tom Small for creating the animated diagram in this post.

Source: Google AI Blog


Accurate Alpha Matting for Portrait Mode Selfies on Pixel 6

Image matting is the process of extracting a precise alpha matte that separates foreground and background objects in an image. This technique has been traditionally used in the filmmaking and photography industry for image and video editing purposes, e.g., background replacement, synthetic bokeh and other visual effects. Image matting assumes that an image is a composite of foreground and background images, and hence, the intensity of each pixel is a linear combination of the foreground and the background.

In the case of traditional image segmentation, the image is segmented in a binary manner, in which a pixel either belongs to the foreground or background. This type of segmentation, however, is unable to deal with natural scenes that contain fine details, e.g., hair and fur, which require estimating a transparency value for each pixel of the foreground object.

Alpha mattes, unlike segmentation masks, are usually extremely precise, preserving strand-level hair details and accurate foreground boundaries. While recent deep learning techniques have shown their potential in image matting, many challenges remain, such as generation of accurate ground truth alpha mattes, improving generalization on in-the-wild images and performing inference on mobile devices treating high-resolution images.

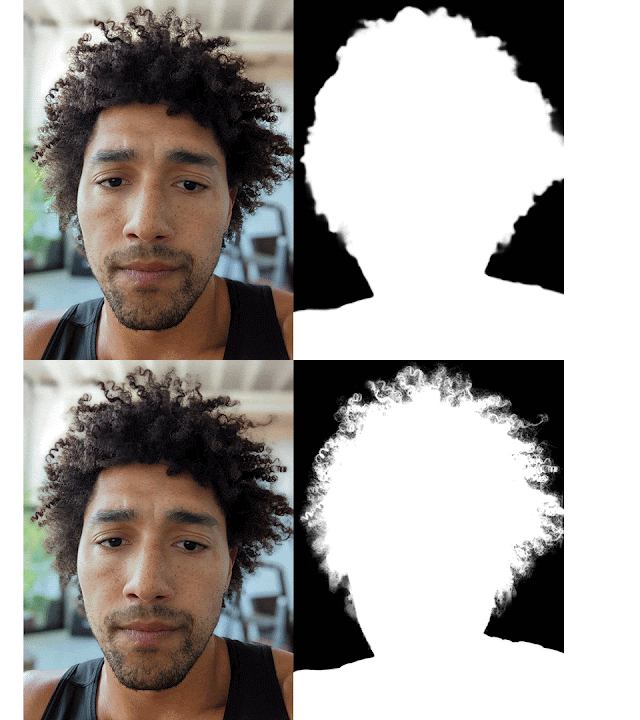
With the Pixel 6, we have significantly improved the appearance of selfies taken in Portrait Mode by introducing a new approach to estimate a high-resolution and accurate alpha matte from a selfie image. When synthesizing the depth-of-field effect, the usage of the alpha matte allows us to extract a more accurate silhouette of the photographed subject and have a better foreground-background separation. This allows users with a wide variety of hairstyles to take great-looking Portrait Mode shots using the selfie camera. In this post, we describe the technology we used to achieve this improvement and discuss how we tackled the challenges mentioned above.

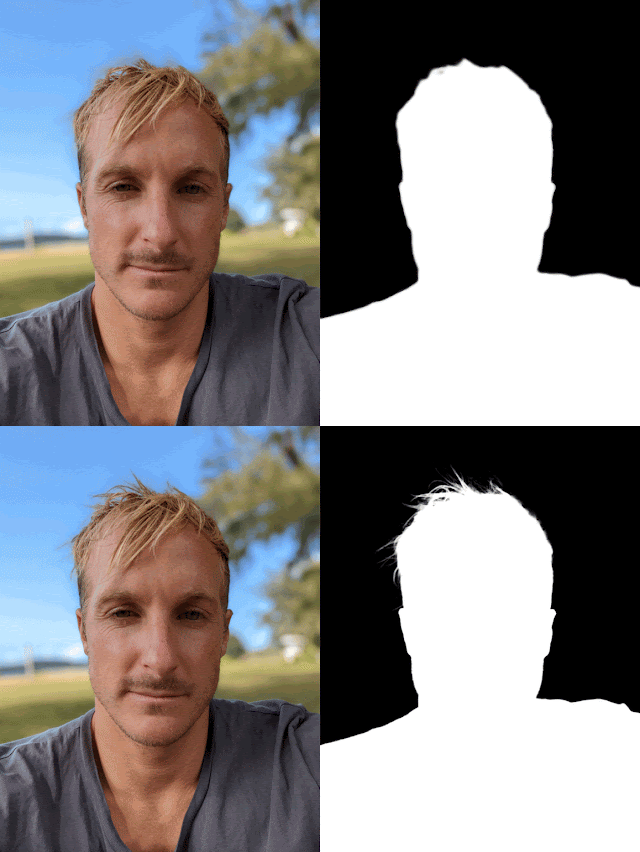
Portrait Mode effect on a selfie shot using a low-resolution and coarse alpha matte compared to using the new high-quality alpha matte.

Portrait Matting
In designing Portrait Matting, we trained a fully convolutional neural network consisting of a sequence of encoder-decoder blocks to progressively estimate a high-quality alpha matte. We concatenate the input RGB image together with a coarse alpha matte (generated using a low-resolution person segmenter) that is passed as an input to the network. The new Portrait Matting model uses a MobileNetV3 backbone and a shallow (i.e., having a low number of layers) decoder to first predict a refined low-resolution alpha matte that operates on a low-resolution image. Then we use a shallow encoder-decoder and a series of residual blocks to process a high-resolution image and the refined alpha matte from the previous step. The shallow encoder-decoder relies more on lower-level features than the previous MobileNetV3 backbone, focusing on high-resolution structural features to predict final transparency values for each pixel. In this way, the model is able to refine an initial foreground alpha matte and accurately extract very fine details like hair strands. The proposed neural network architecture efficiently runs on Pixel 6 using Tensorflow Lite.

The network predicts a high-quality alpha matte from a color image and an initial coarse alpha matte. We use a MobileNetV3 backbone and a shallow decoder to first predict a refined low-resolution alpha matte. Then we use a shallow encoder-decoder and a series of residual blocks to further refine the initially estimated alpha matte.

Most recent deep learning work for image matting relies on manually annotated per-pixel alpha mattes used to separate the foreground from the background that are generated with image editing tools or green screens. This process is tedious and does not scale for the generation of large datasets. Also, it often produces inaccurate alpha mattes and foreground images that are contaminated (e.g., by reflected light from the background, or “green spill”). Moreover, this does nothing to ensure that the lighting on the subject appears consistent with the lighting in the new background environment.

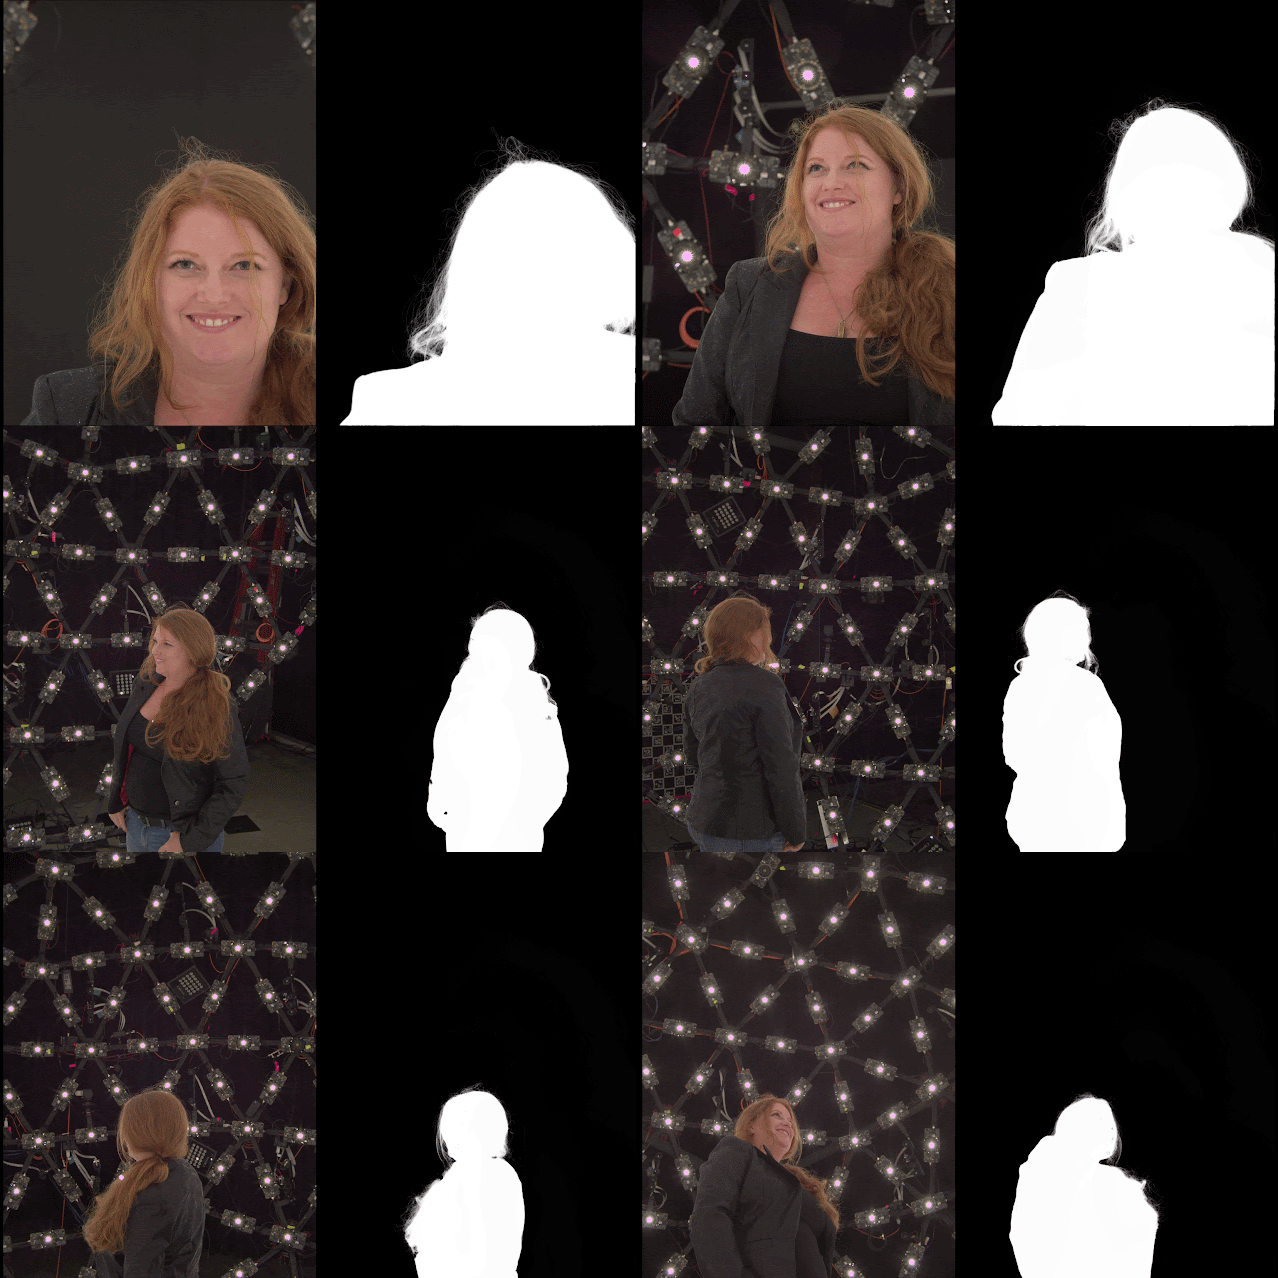
To address these challenges, Portrait Matting is trained using a high-quality dataset generated using a custom volumetric capture system, Light Stage. Compared with previous datasets, this is more realistic, as relighting allows the illumination of the foreground subject to match the background. Additionally, we supervise the training of the model using pseudo–ground truth alpha mattes from in-the-wild images to improve model generalization, explained below. This ground truth data generation process is one of the key components of this work.

Ground Truth Data Generation
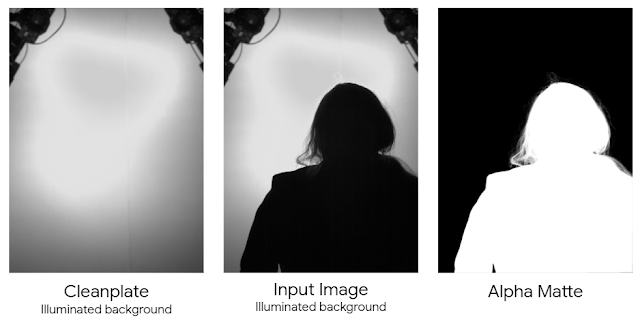
To generate accurate ground truth data, Light Stage produces near-photorealistic models of people using a geodesic sphere outfitted with 331 custom color LED lights, an array of high-resolution cameras, and a set of custom high-resolution depth sensors. Together with Light Stage data, we compute accurate alpha mattes using time-multiplexed lights and a previously recorded “clean plate”. This technique is also known as ratio matting.

This method works by recording an image of the subject silhouetted against an illuminated background as one of the lighting conditions. In addition, we capture a clean plate of the illuminated background. The silhouetted image, divided by the clean plate image, provides a ground truth alpha matte.

Then, we extrapolate the recorded alpha mattes to all the camera viewpoints in Light Stage using a deep learning–based matting network that leverages captured clean plates as an input. This approach allows us to extend the alpha mattes computation to unconstrained backgrounds without the need for specialized time-multiplexed lighting or a clean background. This deep learning architecture was solely trained using ground truth mattes generated using the ratio matting approach.

Computed alpha mattes from all camera viewpoints at the Light Stage.

Leveraging the reflectance field for each subject and the alpha matte generated with our ground truth matte generation system, we can relight each portrait using a given HDR lighting environment. We composite these relit subjects into backgrounds corresponding to the target illumination following the alpha blending equation. The background images are then generated from the HDR panoramas by positioning a virtual camera at the center and ray-tracing into the panorama from the camera’s center of projection. We ensure that the projected view into the panorama matches its orientation as used for relighting. We use virtual cameras with different focal lengths to simulate the different fields-of-view of consumer cameras. This pipeline produces realistic composites by handling matting, relighting, and compositing in one system, which we then use to train the Portrait Matting model.

Composited images on different backgrounds (high-resolution HDR maps) using ground truth generated alpha mattes.

Training Supervision Using In-the-Wild Portraits
To bridge the gap between portraits generated using Light Stage and in-the-wild portraits, we created a pipeline to automatically annotate in-the-wild photos generating pseudo–ground truth alpha mattes. For this purpose, we leveraged the Deep Matting model proposed in Total Relighting to create an ensemble of models that computes multiple high-resolution alpha mattes from in-the-wild images. We ran this pipeline on an extensive dataset of portrait photos captured in-house using Pixel phones. Additionally, during this process we performed test-time augmentation by doing inference on input images at different scales and rotations, and finally aggregating per-pixel alpha values across all estimated alpha mattes.

Generated alpha mattes are visually evaluated with respect to the input RGB image. The alpha mattes that are perceptually correct, i.e., following the subject's silhouette and fine details (e.g., hair), are added to the training set. During training, both datasets are sampled using different weights. Using the proposed supervision strategy exposes the model to a larger variety of scenes and human poses, improving its predictions on photos in the wild (model generalization).

Estimated pseudo–ground truth alpha mattes using an ensemble of Deep Matting models and test-time augmentation.

Portrait Mode Selfies
The Portrait Mode effect is particularly sensitive to errors around the subject boundary (see image below). For example, errors caused by the usage of a coarse alpha matte keep sharp focus on background regions near the subject boundaries or hair area. The usage of a high-quality alpha matte allows us to extract a more accurate silhouette of the photographed subject and improve foreground-background separation.

Try It Out Yourself
We have made front-facing camera Portrait Mode on the Pixel 6 better by improving alpha matte quality, resulting in fewer errors in the final rendered image and by improving the look of the blurred background around the hair region and subject boundary. Additionally, our ML model uses diverse training datasets that cover a wide variety of skin tones and hair styles. You can try this improved version of Portrait Mode by taking a selfie shot with the new Pixel 6 phones.

Portrait Mode effect on a selfie shot using a coarse alpha matte compared to using the new high quality alpha matte.

Acknowledgments
This work wouldn’t have been possible without Sergio Orts Escolano, Jana Ehmann, Sean Fanello, Christoph Rhemann, Junlan Yang, Andy Hsu, Hossam Isack, Rohit Pandey, David Aguilar, Yi Jinn, Christian Hane, Jay Busch, Cynthia Herrera, Matt Whalen, Philip Davidson, Jonathan Taylor, Peter Lincoln, Geoff Harvey, Nisha Masharani, Alexander Schiffhauer, Chloe LeGendre, Paul Debevec, Sofien Bouaziz, Adarsh Kowdle, Thabo Beeler, Chia-Kai Liang and Shahram Izadi. Special thanks to our photographers James Adamson, Christopher Farro and Cort Muller who took numerous test photographs for us.


Source: Google AI Blog


Introducing Omnimattes: A New Approach to Matte Generation using Layered Neural Rendering

Image and video editing operations often rely on accurate mattes — images that define a separation between foreground and background. While recent computer vision techniques can produce high-quality mattes for natural images and videos, allowing real-world applications such as generating synthetic depth-of-field, editing and synthesising images, or removing backgrounds from images, one fundamental piece is missing: the various scene effects that the subject may generate, like shadows, reflections, or smoke, are typically overlooked.

In “Omnimatte: Associating Objects and Their Effects in Video”, presented at CVPR 2021, we describe a new approach to matte generation that leverages layered neural rendering to separate a video into layers called omnimattes that include not only the subjects but also all of the effects related to them in the scene. Whereas a typical state-of-the-art segmentation model extracts masks for the subjects in a scene, for example, a person and a dog, the method proposed here can isolate and extract additional details associated with the subjects, such as shadows cast on the ground.

A state-of-the-art segmentation network (e.g., MaskRCNN) takes an input video (left) and produces plausible masks for people and animals (middle), but misses their associated effects. Our method produces mattes that include not only the subjects, but their shadows as well (right; individual channels for person and dog visualized as blue and green).

Also unlike segmentation masks, omnimattes can capture partially-transparent, soft effects such as reflections, splashes, or tire smoke. Like conventional mattes, omnimattes are RGBA images that can be manipulated using widely-available image or video editing tools, and can be used wherever conventional mattes are used, for example, to insert text into a video underneath a smoke trail.

Layered Decomposition of Video
To generate omnimattes, we split the input video into a set of layers: one for each moving subject, and one additional layer for stationary background objects. In the example below, there is one layer for the person, one for the dog, and one for the background. When merged together using conventional alpha blending, these layers reproduce the input video.

Besides reproducing the video, the decomposition must capture the correct effects in each layer. For example, if the person’s shadow appears in the dog’s layer, the merged layers would still reproduce the input video, but inserting an additional element between the person and dog would produce an obvious error. The challenge is to find a decomposition where each subject’s layer captures only that subject’s effects, producing a true omnimatte.

Our solution is to apply our previously developed layered neural rendering approach to train a convolutional neural network (CNN) to map the subject’s segmentation mask and a background noise image into an omnimatte. Due to their structure, CNNs are naturally inclined to learn correlations between image effects, and the stronger the correlation between the effects, the easier for the CNN to learn. In the above video, for example, the spatial relationships between the person and their shadow, and the dog and its shadow, remain similar as they walk from right to left. The relationships change more (hence, the correlations are weaker) between the person and the dog’s shadow, or the dog and the person’s shadow. The CNN learns the stronger correlations first, leading to the correct decomposition.

The omnimatte system is shown in detail below. In a preprocess, the user chooses the subjects and specifies a layer for each. A segmentation mask for each subject is extracted using an off-the-shelf segmentation network, such as MaskRCNN, and camera transformations relative to the background are found using standard camera stabilization tools. A random noise image is defined in the background reference frame and sampled using the camera transformations to produce per-frame noise images. The noise images provide image features that are random but consistently track the background over time, providing a natural input for the CNN to learn to reconstruct the background colors.

The rendering CNN takes as input the segmentation mask and the per-frame noise images and produces the RGB color images and alpha maps, which capture the transparency of each layer. These outputs are merged using conventional alpha-blending to produce the output frame. The CNN is trained from scratch to reconstruct the input frames by finding and associating the effects not captured in a mask (e.g., shadows, reflections or smoke) with the given foreground layer, and to ensure the subject’s alpha roughly includes the segmentation mask. To make sure the foreground layers only capture the foreground elements and none of the stationary background, a sparsity loss is also applied on the foreground alpha.

A new rendering network is trained for each video. Because the network is only required to reconstruct the single input video, it is able to capture fine structures and fast motion in addition to separating the effects of each subject, as seen below. In the walking example, the omnimatte includes the shadow cast on the slats of the park bench. In the tennis example, the thin shadow and even the tennis ball are captured. In the soccer example, the shadow of the player and the ball are decomposed into their proper layers (with a slight error when the player’s foot is occluded by the ball).

This basic model already works well, but one can improve the results by augmenting the input of the CNN with additional buffers such as optical flow or texture coordinates.

Applications
Once the omnimattes are generated, how can they be used? As shown above, we can remove objects, simply by removing their layer from the composition. We can also duplicate objects, by repeating their layer in the composition. In the example below, the video has been “unwrapped” into a panorama, and the horse duplicated several times to produce a stroboscopic photograph effect. Note that the shadow that the horse casts on the ground and onto the obstacle is correctly captured.

A more subtle, but powerful application is to retime the subjects. Manipulation of time is widely used in film, but usually requires separate shots for each subject and a controlled filming environment. A decomposition into omnimattes makes retiming effects possible for everyday videos using only post-processing, simply by independently changing the playback rate of each layer. Since the omnimattes are standard RGBA images, this retiming edit can be done using conventional video editing software.

The video below is decomposed into three layers, one for each child. The children’s initial, unsynchronized jumps are aligned by simply adjusting the playback rate of their layers, producing realistic retiming for the splashes and reflections in the water.

In the original video (left), each child jumps at a different time. After editing (right), everyone jumps together.

It’s important to consider that any novel technique for manipulating images should be developed and applied responsibly, as it could be misused to produce fake or misleading information. Our technique was developed in accordance with our AI Principles and only allows rearrangement of content already present in the video, but even simple rearrangement can significantly alter the effect of a video, as shown in these examples. Researchers should be aware of these risks.

Future Work
There are a number of exciting directions to improve the quality of the omnimattes. On a practical level, this system currently only supports backgrounds that can be modeled as panoramas, where the position of the camera is fixed. When the camera position moves, the panorama model cannot accurately capture the entire background, and some background elements may clutter the foreground layers (sometimes visible in the above figures). Handling fully general camera motion, such as walking through a room or down a street, would require a 3D background model. Reconstruction of 3D scenes in the presence of moving objects and effects is still a difficult research challenge, but one that has seen promising recent progress.

On a theoretical level, the ability of CNNs to learn correlations is powerful, but still somewhat mysterious, and does not always lead to the expected layer decomposition. While our system allows for manual editing when the automatic result is imperfect, a better solution would be to fully understand the capabilities and limitations of CNNs to learn image correlations. Such an understanding could lead to improved denoising, inpainting, and many other video editing applications besides layer decomposition.

Acknowledgements
Erika Lu, from the University of Oxford, developed the omnimatte system during two internships at Google, in collaboration with Google researchers Forrester Cole, Tali Dekel, Michael Rubinstein, William T. Freeman and David Salesin, and University of Oxford researchers Weidi Xie and Andrew Zisserman.

Thank you to the friends and families of the authors who agreed to appear in the example videos. The “horse jump low”, “lucia”, and “tennis” videos are from the DAVIS 2016 dataset. The soccer video is used by permission from Online Soccer Skills. The car drift video was licensed from Shutterstock.

Source: Google AI Blog


Take All Your Pictures to the Cleaners, with Google Photos Noise and Blur Reduction

Despite recent leaps in imaging technology, especially on mobile devices, image noise and limited sharpness remain two of the most important levers for improving the visual quality of a photograph. These are particularly relevant when taking pictures in poor light conditions, where cameras may compensate by increasing the ISO or slowing the shutter speed, thereby exacerbating the presence of noise and, at times, increasing image blur. Noise can be associated with the particle nature of light (shot noise) or be introduced by electronic components during the readout process (read noise). The captured noisy signal is then processed by the camera image processor (ISP) and later may be further enhanced, amplified, or distorted by a photographic editing process. Image blur can be caused by a wide variety of phenomena, from inadvertent camera shake during capture, an incorrect setting of the camera’s focus (automatic or not), or due to the finite lens aperture, sensor resolution or the camera’s image processing.

It is far easier to minimize the effects of noise and blur within a camera pipeline, where details of the sensor, optical hardware and software blocks are understood. However, when presented with an image produced from an arbitrary (possibly unknown) camera, improving noise and sharpness becomes much more challenging due to the lack of detailed knowledge and access to the internal parameters of the camera. In most situations, these two problems are intrinsically related: noise reduction tends to eliminate fine structures along with unwanted details, while blur reduction seeks to boost structures and fine details. This interconnectedness increases the difficulty of developing image enhancement techniques that are computationally efficient to run on mobile devices.

Today, we present a new approach for camera-agnostic estimation and elimination of noise and blur that can improve the quality of most images. We developed a pull-push denoising algorithm that is paired with a deblurring method, called polyblur. Both of these components are designed to maximize computational efficiency, so users can successfully enhance the quality of a multi-megapixel image in milliseconds on a mobile device. These noise and blur reduction strategies are critical components of the recent Google Photos editor updates, which includes “Denoise” and “Sharpen” tools that enable users to enhance images that may have been captured under less than ideal conditions, or with older devices that may have had more noisy sensors or less sharp optics.

A demonstration of the “Denoise” and “Sharpen” tools now available in the Google Photos editor.

How Noisy is An Image?
In order to accurately process a photographic image and successfully reduce the unwanted effects of noise and blur, it is vitally important to first characterize the types and levels of noise and blur found in the image. So, a camera-agnostic approach for noise reduction begins by formulating a method to gauge the strength of noise at the pixel level from any given image, regardless of the device that created it. The noise level is modeled as a function of the brightness of the underlying pixel. That is, for each possible brightness level, the model estimates a corresponding noise level in a manner agnostic to either the actual source of the noise or the processing pipeline.

To estimate this brightness-based noise level, we sample a number of small patches across the image and measure the noise level within each patch, after roughly removing any underlying structure in the image. This process is repeated at multiple scales, making it robust to artifacts that may arise from compression, image resizing, or other non-linear camera processing operations.

The two segments on the left illustrate signal-dependent noise present in the input image (center). The noise is more prominent in the bottom, darker crop and is unrelated to the underlying structure, but rather to the light level. Such image segments are sampled and processed to generate the spatially-varying noise map (right) where red indicates more noise is present.

Reducing Noise Selectively with a Pull-Push Method
We take advantage of self-similarity of patches across the image to denoise with high fidelity. The general principle behind such so-called “non-local” denoising is that noisy pixels can be denoised by averaging pixels with similar local structure. However, these approaches typically incur high computational costs because they require a brute force search for pixels with similar local structure, making them impractical for on-device use. In our “pull-push” approach1, the algorithmic complexity is decoupled from the size of filter footprints thanks to effective information propagation across spatial scales.

The first step in pull-push is to build an image pyramid (i.e., multiscale representation) in which each successive level is generated recursively by a “pull” filter (analogous to downsampling). This filter uses a per-pixel weighting scheme to selectively combine existing noisy pixels together based on their patch similarities and estimated noise, thus reducing the noise at each successive, “coarser” level. Pixels at coarser levels (i.e., with lower resolution) pull and aggregate only compatible pixels from higher resolution, “finer” levels. In addition to this, each merged pixel in the coarser layers also includes an estimated reliability measure computed from the similarity weights used to generate it. Thus, merged pixels provide a simple per-pixel, per-level characterization of the image and its local statistics. By efficiently propagating this information through each level (i.e., each spatial scale), we are able to track a model of the neighborhood statistics for increasingly larger regions in a multiscale manner.

After the pull stage is evaluated to the coarsest level, the “push” stage fuses the results, starting from the coarsest level and generating finer levels iteratively. At a given scale, the push stage generates “filtered” pixels following a process similar to that of the pull stage, but going from coarse to finer levels. The pixels at each level are fused with those of coarser levels by doing a weighted average of same-level pixels along with coarser-level filtered pixels using the respective reliability weights. This enables us to reduce pixel noise while preserving local structure, because only average reliable information is included. This selective filtering and reliability (i.e. information) multiscale propagation is what makes push-pull different from existing frameworks.
This series of images shows how filtering progresses through the pull-push process. Coarser level pixels pull and aggregate only compatible pixels from finer levels, as opposed to the traditional multiscale approaches using a fixed (non-data dependent) kernel. Notice how the noise is reduced throughout the stages.

The pull-push approach has a low computational cost, because the algorithm to selectively filter similar pixels over a very large neighborhood has a complexity that is only linear with the number of image pixels. In practice, the quality of this denoising approach is comparable to traditional non-local methods with much larger kernel footprints, but operates at a fraction of the computational cost.

Image enhanced using the pull-push denoising method.

How Blurry Is an Image?
An image with poor sharpness can be thought of as being a more pristine latent image that was operated on by a blur kernel. So, if one can identify the blur kernel, it can be used to reduce the effect. This is referred to as “deblurring”, i.e., the removal or reduction of an undesired blur effect induced by a particular kernel on a particular image. In contrast, “sharpening” refers to applying a sharpening filter, built from scratch and without reference to any particular image or blur kernel. Typical sharpening filters are also, in general, local operations that do not take account of any other information from other parts of the image, whereas deblurring algorithms estimate the blur from the whole image. Unlike arbitrary sharpening, which can result in worse image quality when applied to an image that is already sharp, deblurring a sharp image with a blur kernel accurately estimated from the image itself will have very little effect.

We specifically target relatively mild blur, as this scenario is more technically tractable, more computationally efficient, and produces consistent results. We model the blur kernel as an anisotropic (elliptical) Gaussian kernel, specified by three parameters that control the strength, direction and aspect ratio of the blur.

Gaussian blur model and example blur kernels. Each row of the plot on the right represents possible combinations of σ0, ρ and θ. We show three different σ0 values with three different ρ values for each.

Computing and removing blur without noticeable delay for the user requires an algorithm that is much more computationally efficient than existing approaches, which typically cannot be executed on a mobile device. We rely on an intriguing empirical observation: the maximal value of the image gradient across all directions at any point in a sharp image follows a particular distribution. Finding the maximum gradient value is efficient, and can yield a reliable estimate of the strength of the blur in the given direction. With this information in hand, we can directly recover the parameters that characterize the blur.

Polyblur: Removing Blur by Re-blurring
To recover the sharp image given the estimated blur, we would (in theory) need to solve a numerically unstable inverse problem (i.e., deblurring). The inversion problem grows exponentially more unstable with the strength of the blur. As such, we target the case of mild blur removal. That is, we assume that the image at hand is not so blurry as to be beyond practical repair. This enables a more practical approach — by carefully combining different re-applications of an operator we can approximate its inverse.

Mild blur, as shown in these examples, can be effectively removed by combining multiple applications of the estimated blur.

This means, rather counterintuitively, that we can deblur an image by re-blurring it several times with the estimated blur kernel. Each application of the (estimated) blur corresponds to a first order polynomial, and the repeated applications (adding or subtracting) correspond to higher order terms in a polynomial. A key aspect of this approach, which we call polyblur, is that it is very fast, because it only requires a few applications of the blur itself. This allows it to operate on megapixel images in a fraction of a second on a typical mobile device. The degree of the polynomial and its coefficients are set to invert the blur without boosting noise and other unwanted artifacts.

The deblurred image is generated by adding and subtracting multiple re-applications of the estimated blur (polyblur).

Integration with Google Photos
The innovations described here have been integrated and made available to users in the Google Photos image editor in two new adjustment sliders called “Denoise” and “Sharpen”. These features allow users to improve the quality of everyday images, from any capture device. The features often complement each other, allowing both denoising to reduce unwanted artifacts, and sharpening to bring clarity to the image subjects. Try using this pair of tools in tandem in your images for best results. To learn more about the details of the work described here, check out our papers on polyblur and pull-push denoising. To see some examples of the effect of our denoising and sharpening up close, have a look at the images in this album.

Acknowledgements
The authors gratefully acknowledge the contributions of Ignacio Garcia-Dorado, Ryan Campbell, Damien Kelly, Peyman Milanfar, and John Isidoro. We are also thankful for support and feedback from Navin Sarma, Zachary Senzer, Brandon Ruffin, and Michael Milne.


1 The original pull-push algorithm was developed as an efficient scattered data interpolation method to estimate and fill in the missing pixels in an image where only a subset of the pixels are specified. Here, we extend its methodology and present a data-dependent multiscale algorithm for denoising images efficiently. 

Source: Google AI Blog


HDR+ with Bracketing on Pixel Phones

We're continuously working to improve the Pixel — making it more helpful, more capable, and more fun — with regular updates, such as the recent V8.2 update to the Camera app. One such improvement (launched on Pixel 5 and Pixel 4a 5G in October) is a feature that operates “under the hood”, HDR+ with Bracketing. This feature works by merging images taken with different exposure times to improve image quality (especially in shadows), resulting in more natural colors, improved details and texture, and reduced noise.

Why Are HDR Scenes Hard to Capture?
The original HDR+ burst photography system is the engine behind high-quality mobile photography, which captures a rapid series of deliberately underexposed images, then combines and renders them in a way that preserves detail across the range of tones. But this system had one limitation: scenes with high dynamic range (HDR) like the one below were noisy in the shadows because all images captured are underexposed.

The same photo using HDR+ (red outline) and HDR+ with Bracketing (green outline). While the characteristic HDR+ look remains the same, bracketing improves image quality, especially in shadows, with more natural colors, improved details and texture, and reduced noise.

Capturing HDR scenes is difficult because of the physical constraints of image sensors combined with limited signal in the shadows. We can correctly expose either the shadows or the highlights, but not both at the same time.

The same scene shot with different exposure settings and tonemapped to similar overall brightness. Left/Top: Exposure set for the highlights. The bright blue sky is preserved, but the shadows are very noisy. Right/Bottom: Exposure set for the shadows. Noise in the shadows is reduced, but the sky is clipped (white).

Photographers sometimes work around these limitations by taking two different exposures and combining them. This approach, known as exposure bracketing, can deliver the best of both worlds, but it is time-consuming to do by hand. It is also challenging in computational photography because it requires:

  1. Capturing additional long exposure frames while maintaining the fast, predictable capture experience of the Pixel camera.
  2. Taking advantage of long exposure frames while avoiding ghosting artifacts caused by motion between frames.

To avoid these challenges, the original HDR+ system used a different approach to handle high dynamic range scenes.

The Limits of HDR+
The capture strategy used by HDR+ is based on underexposure, which avoids loss of detail in the highlights. While this strategy comes at the expense of noise in the shadows, HDR+ offsets the increased noise through the use of burst photography.

Using bursts to improve image quality. HDR+ starts from a burst of full-resolution raw images (left). Depending on conditions, between 2 and 15 images are aligned and merged into a computational raw image (middle). The merged image has reduced noise and increased dynamic range, leading to a higher quality final result (right).

This approach works well for scenes with moderate dynamic range, but breaks down for HDR scenes. To understand why, we need to take a closer look at how two types of noise get into an image.

Noise in Burst Photography
One important type of noise is called shot noise, which depends only on the total amount of light captured — the sum of N frames, each with E seconds of exposure time has the same amount of shot noise as a single frame exposed for N × E seconds. If this were the only type of noise present in captured images, burst photography would be as efficient as taking longer exposures. Unfortunately, a second type of noise, read noise, is introduced by the sensor every time a frame is captured. Read noise doesn’t depend on the amount of light captured but instead depends on the number of frames taken — that is, with each frame taken, an additional fixed amount of read noise is added.

This is why using burst photography to reduce total noise isn’t as efficient as simply taking longer exposures: taking multiple frames can reduce the effect of shot noise, but will also increase read noise. Even though read noise increases with the number of frames, it is still possible to reduce the overall noisiness with burst photography, but it becomes less efficient. If one were to break a long exposure into N shorter exposures, the ratio of signal to noise in the final image would be lower because of the additional read noise. In this case, to get back to the signal-to-noise ratio in the single long exposure, one would need to merge N2 short-exposure frames. In the example below, if a long exposure were divided into 12 short exposures, we'd have to capture 144 (12 × 12) short frames to match the signal-to-noise ratio in the shadows! Capturing and processing this many frames would be much more time consuming — burst capture and processing could take over a minute and result in a poor user experience. Instead, with bracketing one can capture both short and long exposures — combining highlight protection and noise reduction.

Left: The result of merging 12 short-exposure frames in Night Sight mode. Right: A single frame whose exposure time is 12 times longer than an individual short exposure. The longer exposure has significantly less noise in the shadows but sacrifices the highlights.

Solving with Bracketing
While the challenges of bracketing prevented the original HDR+ system from using it, incremental improvements since then, plus a recent concentrated effort, have made it possible in the Camera app. To start, adding bracketing to HDR+ required redesigning the capture strategy. Capturing is complicated by zero shutter lag (ZSL), which underpins the fast capture experience on Pixel. With ZSL, the frames displayed in the viewfinder before the shutter press are the frames we use for HDR+ burst merging. For bracketing, we capture an additional long exposure frame after the shutter press, which is not shown in the viewfinder. Note that holding the camera still for half a second after the shutter press to accommodate the long exposure can help improve image quality, even with a typical amount of handshake.

Capture strategy. Top: The original HDR+ method captures short exposures before the shutter press, six in this example. Bottom: HDR+ with Bracketing captures five short exposures before the shutter press and one long exposure after the shutter press.

For Night Sight, the capture strategy isn't constrained by the viewfinder — because all frames are captured after the shutter press while the viewfinder is stopped, this mode easily accommodates capturing longer exposure frames. In this case, we capture three long exposures to further reduce noise.

Capture strategy for Night Sight. Top: The original Night Sight captured 15 short exposure frames. Bottom: Night Sight with bracketing captures 12 short and 3 long exposures.

The Merging Algorithm
When merging bracketed shots, we choose one of the short frames as the reference frame to avoid potentially clipped highlights and motion blur. All other frames are aligned to this frame before they are merged. This introduces a challenge — for complex scene motion or occluded regions, it is impossible to find exactly matching regions and a naïve merge algorithm would produce ghosting artifacts in these cases.

Left: Ghosting artifacts are visible around the silhouette of a moving person, when deghosting is disabled.
Right: Robust merging produces a clean image.

To address this, we designed a new spatial merge algorithm, similar to the one used for Super Res Zoom, that decides per pixel whether image content should be merged or not. This deghosting is more complicated for frames with different exposures. Long exposure frames have different noise characteristics, clipped highlights, and different amounts of motion blur, which makes comparisons with the short exposure reference frame more difficult. In addition, ghosting artifacts are more visible in bracketed shots, because noise that would otherwise mask these errors is reduced. Despite those challenges, our algorithm is as robust to these issues as the original HDR+ and Super Res Zoom and doesn’t produce ghosting artifacts. At the same time, it merges images 40% faster than its predecessors. Because it merges RAW images early in the photographic pipeline, we were able to achieve all of those benefits while keeping the rest of processing and the signature HDR+ look unchanged. Furthermore, users who prefer to use computational RAW images can take advantage of those image quality and performance improvements.

Bracketing on Pixel
HDR+ with Bracketing is available to users of Pixel 4a (5G) and 5 in the default camera, as well as in Night Sight and Portrait modes. For users of Pixel 4 and 4a, the Google Camera app supports bracketing in Night Sight mode. No user interaction is needed to activate HDR+ with Bracketing — depending on the dynamic range of the scene, and the presence of motion, HDR+ with bracketing chooses the best exposures to maximize image quality (examples).

Acknowledgements
HDR+ with Bracketing is the result of a collaboration across several teams at Google. The project would not have been possible without the joint efforts of Sam Hasinoff, Dillon Sharlet, Kiran Murthy, Mike Milne, Andy Radin, Nicholas Wilson, Navin Sarma‎, Gabriel Nava, Emily To, Sushil Nath, Alexander Schiffhauer, Isaac Reynolds, Bill Strathearn, Marius Renn, Alex Hong, Jose Ricardo Lima, Bob Hung, Ying Chen Lou, Joy Hsu, Blade Chiu, David Massoud, Jean Hsu, Ellie Yang, and Marc Levoy.

Source: Google AI Blog