Instagram’s early adoption of Ultra HDR transforms user experience in only 3 months

Posted by Mayuri Khinvasara Khabya – Developer Relations Engineer, Google; in partnership with Bismark Ito - Android Developer, Rex Jin - Android Developer and Bei Yi - Partner Engineering

Meta’s Instagram is one of the world's most popular social networking apps that helps people connect, find communities, and grow their businesses in new and innovative ways. Since its release in 2010, photographers and creators alike have embraced the platform, making it a go-to hub of artistic expression and creativity.

Instagram developers saw an opportunity to build a richer media experience by becoming an early adopter of Ultra HDR image format, a new feature introduced with Android 14. With its adoption of Ultra HDR, Instagram completely transformed and improved its user experience in just 3 months.

Enhancing Instagram photo quality with Ultra HDR

The development team wanted to be an early adopter of Ultra HDR because photos and videos are Instagram's most important form of interaction and expression, and improving image quality aligns with Meta’s goal of connecting people, communities, and businesses. “Android rapidly adopts the latest media technology so that we can bring the benefits to users,” said Rex Jin, an Android developer on the Instagram Media Platform team.

Instagram developers started implementing Ultra HDR in late September 2023. Ultra HDR images store more information about light intensity for more detailed highlights, shadows, and crisper colors. It also enables capturing, editing, sharing, and viewing HDR photos, a significant improvement over standard dynamic range (SDR) photos while still being backward compatible. Users can seamlessly post, view, edit, and apply filters to Ultra HDR photos without compromising image quality.

Since the update, Instagram has seen a large surge in Ultra HDR photo uploads. Users have also embraced their new ability to edit up to 10 Ultra HDR images simultaneously and share photos that retain the full color and dynamic camera capture range. Instagram’s pioneering integration of Ultra HDR earned industry-wide recognition and praise when it was announced at Samsung Unpacked and in a Pixel Feature Drop.

Image sharing is how Instagram started and we want to ensure we always provide the best and greatest image quality to users and creators. — Bei Yi,, partner engineering at Meta

Pioneering Ultra HDR integrations

Being early adopters of Android 14 meant working with beta versions of the operating system and addressing the challenges associated with implementing a brand-new feature that’s never been tested publicly. For example, Instagram developers needed to find innovative solutions to handle the expanded color space and larger file sizes of Ultra HDR images while maintaining compatibility with Instagram's diverse editing features and filters.

The team found solutions during the development process by using code examples for HDR photo capture and rendering. Instagram also partnered with Google's Android Camera & Media team to address the challenges of displaying Ultra HDR images, share its developer experience, and provide feedback during integration. The partnership helped speed up the integrations, and the feedback shared was implemented faster.

“With Android being an open source project, we can build more optimized media solutions with better performance on Instagram,” said Bismark Ito, an Android developer at Instagram. “I feel accomplished when I find a creative solution that works on a range of devices with different hardware capabilities.”

UI image of an uploaded Instagram post that was taken using Ultra HDR

Building for the future with Android 15

Ultra HDR has significantly enhanced Instagram’s photo-sharing experience, and Meta is already planning to expand support to more devices and add future image and video quality improvements. With the upcoming Android 15 release, the company plans to explore new APIs and features that amplify its mission of connecting people, communities, and businesses.

As the Ultra HDR development process showed, being the first to adopt a new feature involves navigating new challenges to give users the best possible experience. However, collaborating with Google teams and Android’s open source community can help make the process smoother.

Get started

Learn how to revolutionize your app’s user experience with Ultra HDR images.

The Recorder app on Pixel sees a 24% boost in engagement with Gemini Nano-powered feature

Posted by Terence Zhang – Developer Relations Engineer and Kristi Bradford - Product Manager

Google Pixel’s Recorder app allows people to record, transcribe, save, and share audio. To make it easier for users to manage and revisit their recordings, Recorder’s developers turned to Gemini Nano, a powerful on-device large language model (LLM). This integration introduces an AI-powered audio summarization feature to help users more easily find the right recordings and quickly grasp key points.

Earlier this month, Gemini Nano got a power boost with the introduction of the new Gemini Nano with Multimodality model. The Recorder app is already leveraging this upgrade to summarize longer voice recordings, with improved processing for grammar and nuance.

Meeting user needs with on-device AI

Recorder developers initially experimented with a cloud-based solution, achieving impressive levels of performance and quality. However, to prioritize accessibility and privacy for their users, they sought an on-device solution. The development of Gemini Nano presented a perfect opportunity to build the concise audio summaries users were looking for, all while keeping data processing on the device.

Gemini Nano is Google’s most efficient model for on-device tasks. “Having the LLM on-device is beneficial to users because it provides them with more privacy, less latency, and it works wherever they need since there’s no internet required,” said Kristi Bradford, the product manager for Pixel’s essential apps.

To achieve better results, Recorder also fine-tuned the model using data that matches its use case. This is done using low order rank adaptation (LoRA), which enables Gemini Nano to consistently output three-bullet point descriptions of the transcript that include any speaker names, key takeaways, and themes.

AICore, an Android system service that centralizes runtime, delivery, and critical safety components for LLMs, significantly streamlined Recorder's adoption of Gemini Nano. The availability of a developer SDK for running GenAI workloads allowed the team to build the transcription summary feature in just four months, with only four developers. This efficiency was achieved by eliminating the need for maintaining in-house models.

Since its release, Recorder users have been using the new AI-powered summarization feature averaging 2 to 5 times daily, and the number of overall saved recordings increased by 24%. This feature has contributed to a significant increase in app engagement and user retention overall. The Recorder team also noted that feedback about the new feature has been positive, with many users citing the time the new AI-powered summarization feature saves them.

“We were surprised by how truly capable the model was… before and after LoRA tuning.” — Kristi Bradford, product manager for Pixel’s essential apps

The next big evolution: Gemini Nano with multimodality

Recorder developers also implemented the latest Gemini Nano model, known as Gemini Nano with multimodality, to further improve its summarization feature on Pixel 9 devices. The new model is significantly larger than the previous one on Pixel 8 devices, and it’s more capable, accurate, and scalable. The new model also has expanded token support that lets Recorder summarize much longer transcripts than before. Gemini Nano with multimodality is currently only available on Pixel 9 devices.

Integrating Gemini Nano with multimodality required another round of fine-tuning. However, Recorder developers were able to use the original Gemini Nano model's fine-tuning dataset as a foundation, streamlining the development process.

To fully leverage the new model's capabilities, Recorder developers expanded their dataset with support for longer voice recordings, implemented refined evaluation methods, and established launch criteria metrics focused on grammar and nuance. The inclusion of grammar as a new metric for assessing inference quality was made possible solely by the enhanced capabilities of Gemini Nano with Multimodality.

UI example

Doing more with on-device AI

“Given the novelty of GenAI, the whole team had fun learning how to use it,” said Kristi. “Now, we’re empowered to push the boundaries of what we can accomplish while meeting emerging user needs and opportunities. It’s truly brought a new level of creativity to problem-solving and experimentation. We’ve already demoed at least two more GenAI features that help people get time back internally for early feedback, and we’re excited about the possibilities ahead.”

Get started

Learn more about how to bring the benefits of on-device AI with Gemini Nano to your apps.

#TheAndroidShow: diving into the latest from Made by Google, including wearables, Foldable, Gemini and more!

Posted by Anirudh Dewani, Director – Android Developer Relations

We just dropped our summer episode of #TheAndroidShow, on YouTube and on developer.android.com, where we unpacked all of the goodies coming out of this month’s Made by Google event and what you as Android developers need to know. With two new Wear OS 5 watches, we show you how to get building for the wrist. And with the latest foldable from Google, the Pixel 9 Pro Fold, we show how you can leverage out of the box APIs and multi-window experiences to make your apps adaptive for this new form factor.

Building for Pixel 9 Pro Fold with Adaptive UIs

With foldables like the Pixel 9 Pro Fold, users have options for how to engage and multitask based on the display they are using and the folded state of their device. Building apps that adapt based on screen size and device postures allows you to scale your UI for mobile, foldables, tablets and beyond. You can read more about how to get started building for devices like the Pixel 9 Pro Fold, or learn more about building for large screens.

Preparing for Pixel Watch 3: Wear OS 5 and Larger Displays

With Pixel Watch 3 ringing in the stable release of Wear OS 5, there’s never been a better time to prepare your app for the behavior changes from Wear OS 5 and larger screen sizes from Pixel. We covered how to get started building for wearables like Pixel Watch 3, and you can learn more about building for Wear OS 3.

Gemini Nano, with multi-modality

We also took you behind the scenes with Gemini Nano with multimodality, Google’s latest model for on-device AI. Gemini Nano, the smallest version of the Gemini model family, can be executed on-device on capable Android devices including the latest Pixel 9. We caught up with the team to hear more about how the Pixel Recorder team used Gemini Nano to summarize users’ transcripts of audio recordings, with data remaining on-device.

And some voices from Android devs like you!

Across the show, we heard from some amazing developers building excellent apps, across devices. Like Rex Jin and Bismark Ito, Android Developers at Meta: they told us how the team at Instagram was able to add Ultra HDR in less than three months, dramatically improving the user experience. Later, SAP told us how within 5 minutes, they integrated NavigationSuiteScaffold, swiftly adapting their navigation UI to different window sizes. And AllTrails told us they are seeing 60% higher monthly retention from Wear OS users… pretty impressive!


Have an idea for our next episode of #TheAndroidShow? It’s your conversation with the broader community, and #TheAndroidShow is your conversation with the Android developer community, this time hosted by Huyen Tue Dao and John Zoeller. You'll hear the latest from the developers and engineers who build Android. You can watch the full show on YouTube Comment start and on developer.android.com/events/show!

“Take notes for me” in Google Meet is now available

What’s changing

Today, we’re pleased to announce that “take notes for me” will begin rolling out to Google Meet for select Google Workspace customers. “Take notes for me” is an AI-powered feature in Google Meet that automatically takes notes, allowing you to focus on discussion, collaboration, and presentation during your meetings. After the meeting, the notes document is attached to the calendar event where participants internal to your organization can access them. At launch, this feature will be available when using Google Meet on a computer or laptop, and meetings must be conducted in spoken English.

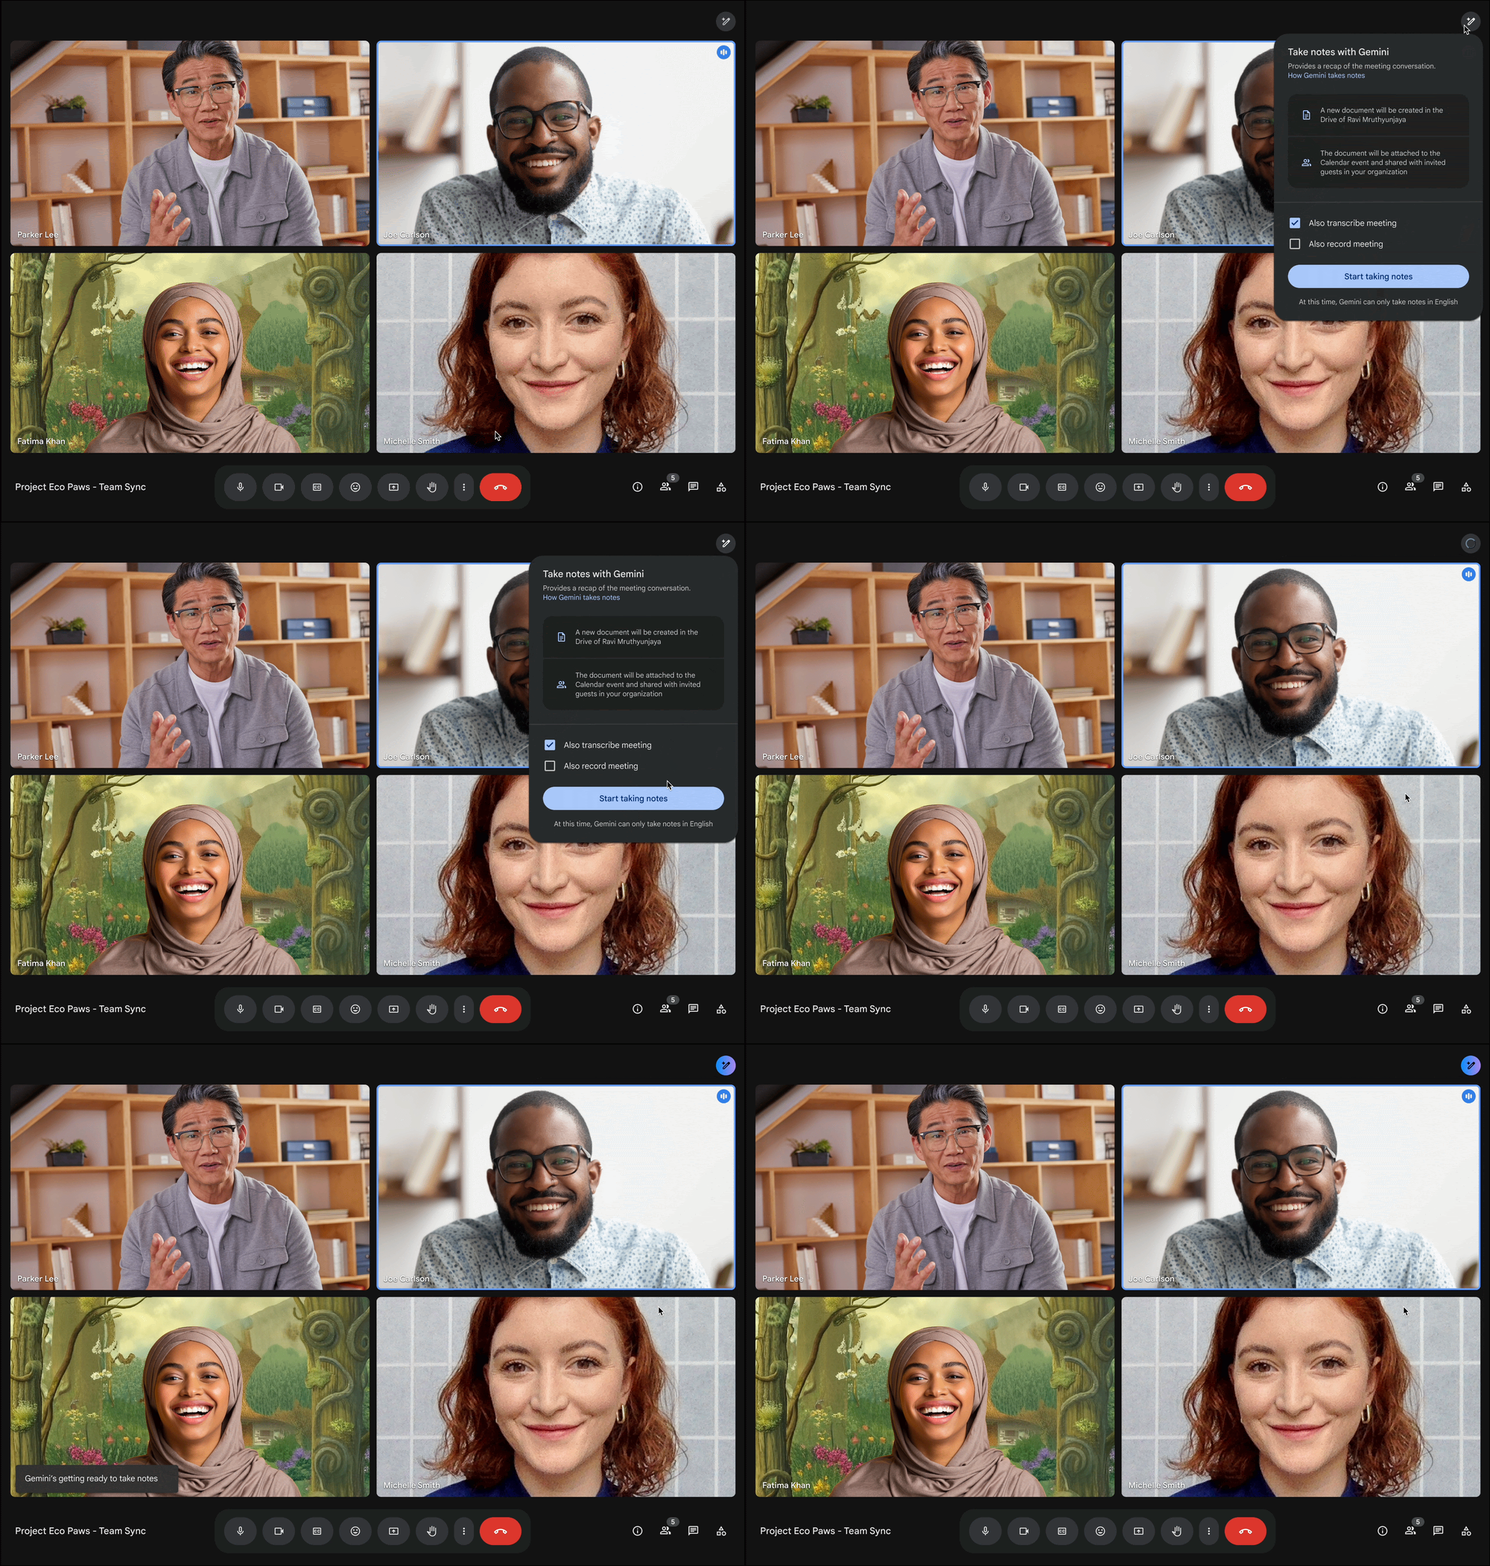
Select the pencil icon in the top right corner of the screen to start taking meeting notes.

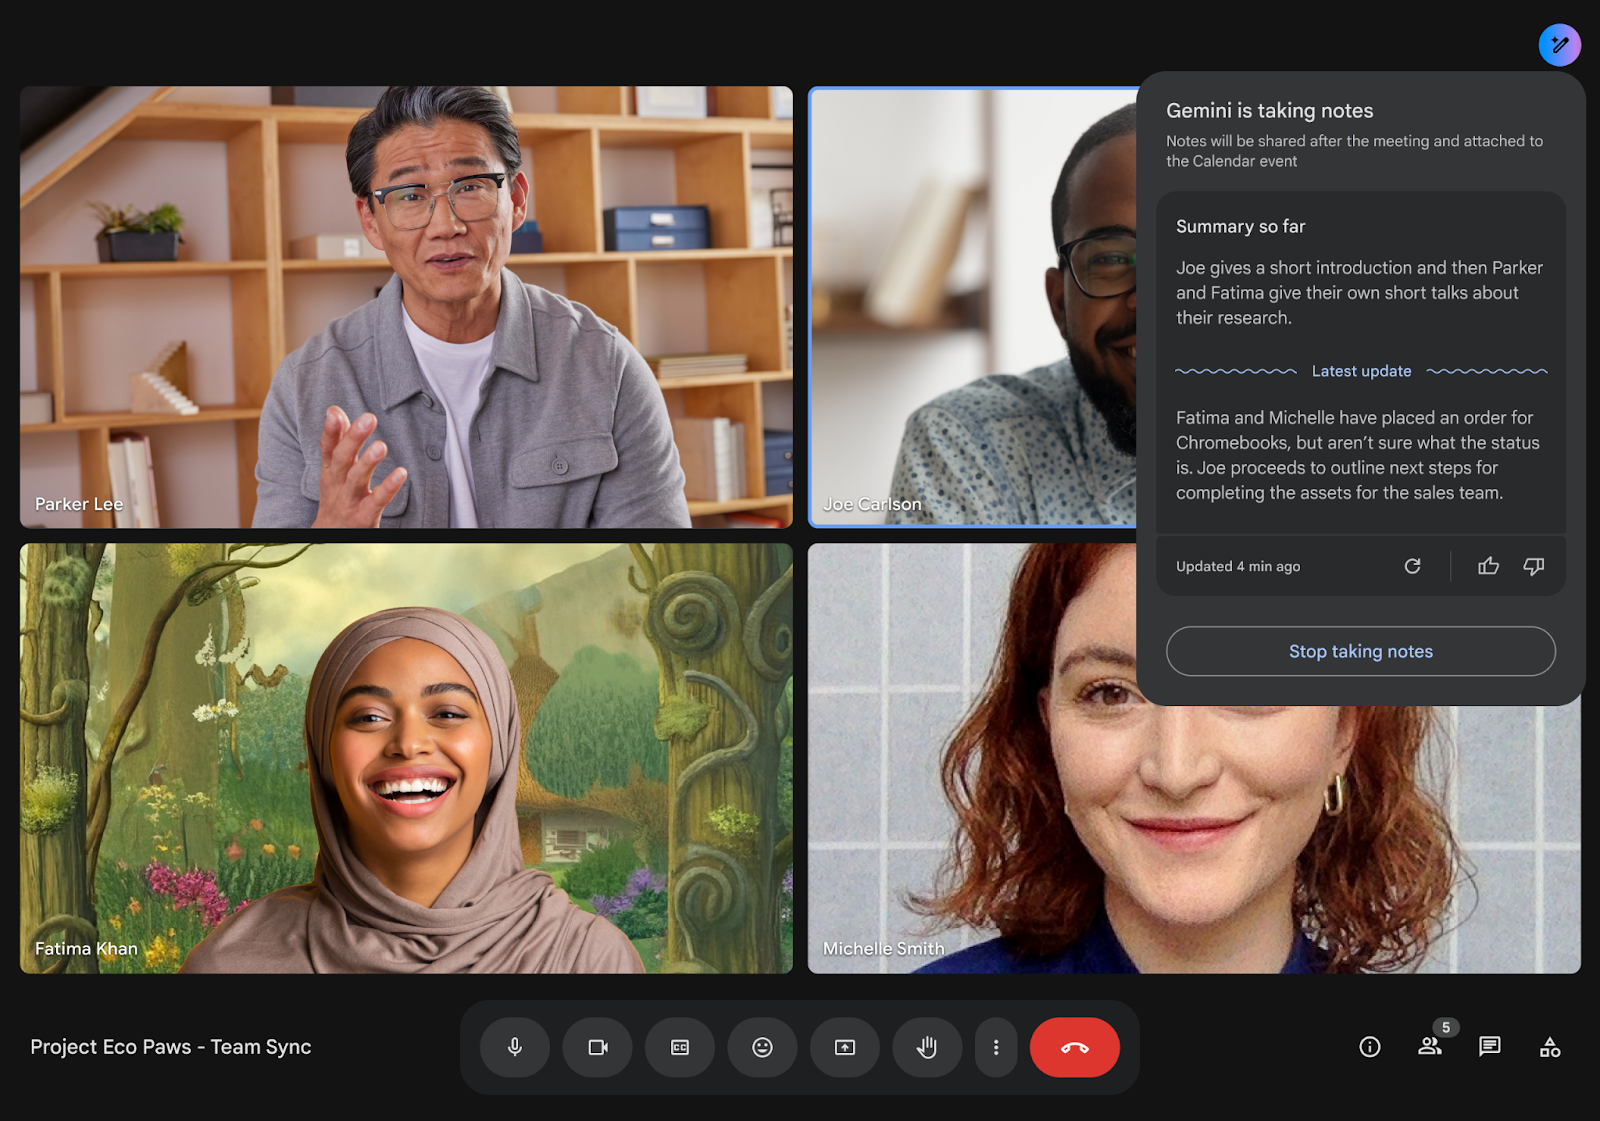
All meeting participants will see a blue pencil icon on their screen and a notification that notes are being taken. They can click on the pencil to see the meeting notes taken so far.

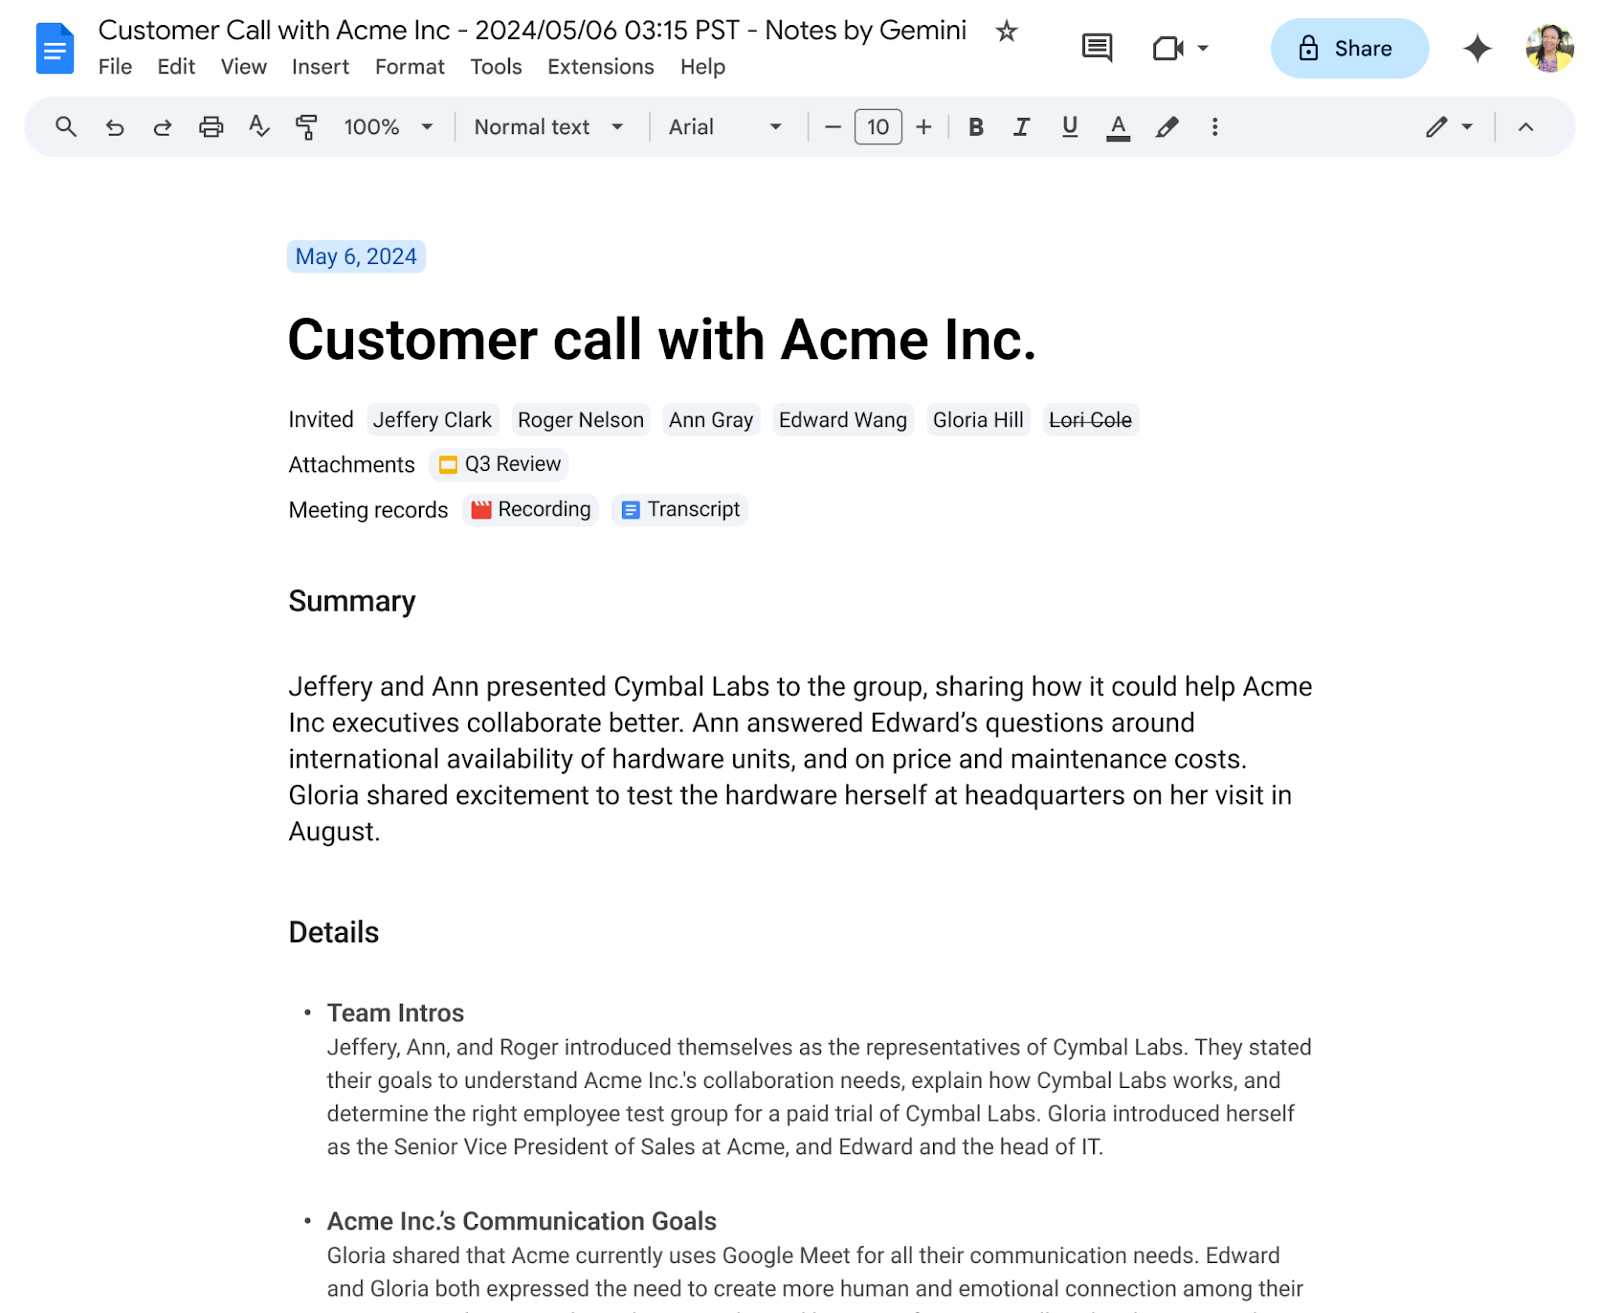
After the meeting ends, the meeting organizer and whoever turned on the feature will receive an email with a link to the generated meeting notes document. The notes document will also be attached to the calendar event, where internal meeting participants can access it.


Who’s impacted

Admins and end users


Why you’d use it 

It can be challenging to stay on top of and engaged with meeting discussions while also trying to keep a record of the meeting and subsequent follow-ups. This is where “take notes for me” can help. When turned on, the feature will do the following:

  • Automatically capture meeting notes in Google Docs and save it to the Google Drive of the meeting owner.
  • Catch you up during the meeting with “summary so far” if you join late.
  • Send an email with a link to the recap after the meeting. This email goes to the meeting organizer and whoever turned on the feature. 

This will help you be more present and engaged during your meetings, while still ensuring important information is captured for record-keeping and follow-up. If users also turn on meeting recordings and transcripts, those will be linked within the notes document.


Additional details

Notes documents will be stored in the meeting owner’s drive folder and will follow the Meet retention policy that your organization has configured. If you are currently testing this feature in Workspace Labs and Alpha, your experience will change from respecting the Drive retention policy to respecting the Meet retention policy. 


Getting started

  • Admins: Take notes for me will be ON by default and can be configured at the OU and Group level. Visit the Help Center to learn more about allowing Google Meet AI to take notes for my users.
    Apps > Google Workspace > Google Meet > Gemini Settings > Gemini AI note-takingApps > Google Workspace > Google Meet > Gemini Settings > Gemini AI note-taking

Rollout pace

Availability

Available for Google Workspace customers with these add-ons:
  • Gemini Enterprise 
  • Gemini Education Premium
  • AI Meetings & Messaging


Upload additional types of documents to Gemini (gemini.google.com) for insights and analysis

What’s changing 

Beginning today, Google Workspace users with a Gemini Business, Enterprise, Education or Education Premium license can now upload a variety of files from Google Drive or locally from your device into Gemini (gemini.google.com): 
  • Document and text files, such as TXT, DOC, DOCX, PDF, RTF, DOT, DOTX, HWP, HWPX and Google Docs 
  • Data Files, such as XLS, XLSX, CSV, TSV and Google Sheets 
Gemini can use uploaded files to gain context and analyze your content. In turn, this can help enhance your understanding, research, and writing through summarization of complex subject matter, identification of trends and insights, and recommendations for improving writing and document organization. Uploading a document can also help give you more personalized and relevant responses. 
Gemini document uploads


Additional details 

  • At this time, Context-Aware Access (CAA) for files uploaded from Google Drive isn’t supported. Context-Aware Access gives you control over which apps a user can access based on their context, such as whether their device complies with your IT policy. Learn more about Context-Aware Access.
  • Uploading files from Google Drive honors access control settings for files within Drive, meaning users can only upload files that they own or have been shared with them. 
  • File upload is not available to Google Workspace users accessing Gemini as an additional Google service.
  • Users with a Gemini for Google Workspace license who access Gemini as a core service are subject to the Google Workspace Terms of Service or Google Workspace for Education Terms of Service (for education institutions). When users use Gemini as a core service, their chats and uploaded files won't be reviewed by human reviews or otherwise used to improve generative AI models. 

Getting started 

Rollout pace 

Availability

Available for Google Workspace customers with 
  • Gemini Business, Enterprise, Education, Education Premium add-on 

Resources 

Reply to emails in Gmail faster on Android devices

What’s changing 

We’re making it easier to respond to emails in the Gmail app on your Android device with a new quick reply experience. 

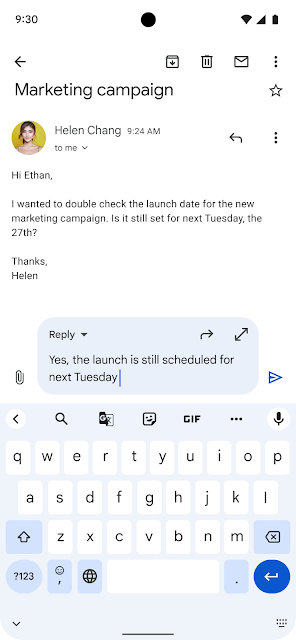
Previously, there were only options to Reply, Reply all or Forward a message when in the conversation view of an email on your Gmail app. Upon selecting one of those options, you’d be directed to a full screen compose view to send your reply. 

Starting today, you can reply to emails directly from the bottom of the conversation, without opening a new screen, making it easier to reference the email you’re replying to. We know this new option is best for quick, lightweight responses, so for longer, more formal responses, you can simply expand the text box to access more formatting options. 

respond to emails in the Gmail app on your Android device with a new quick reply experience


Additional details 

This feature will be available on iOS devices later this year. 


Getting started 

  • Admins: There is no admin control for this feature. 
  • End users: Using the Gmail app on your Android device, open an email > click into the text box at the bottom > type your reply > tap the send icon. Clicking the “Expand to full screen” icon allows you to switch to the full screen compose view. Visit the Help Center to learn more about replying to messages in Gmail.

Rollout pace 

Workspace Customers: 

Users with personal Google accounts and Workspace Individual Subscribers: 
  • This feature is available now. 

Availability

  • Available to all Google Workspace customers, Google Workspace Individual subscribers, and users with personal Google accounts 

Resources 

Business Starter customers will soon have access to shared drives

What’s changing

Last year, we announced that we’re updating the storage model in Business Starter from per-user storage to pooled storage. Today, we’re excited to share that organizations with Business Starter will officially have access to shared drives starting mid-September. 


With this change, Business Starter users will be able to create shared drives and add members, files, and folders. Please note that certain admin-level and security controls—like the ability to control access to the items in a shared drive—will not be included in the fundamental version of shared drives for Business Starter. 


Who’s impacted 

Admins and end users 


Why it’s important 

Part of empowering our customers to do their best work means reducing the friction around file sharing and collaboration. Shared drives are a key tool for collaboration—users can store, search, and access their team's files instantly. Additionally, they offer benefits such as: 
  • Easy discoverability: Less time spent requesting access to files and searching for relevant documents with all of your team’s files in one place. 
  • Files are forever: All content stays put — even when collaborators or team members leave, your content won’t. 
  • Easy collaboration: Every member of a shared drive can explore and collaborate in the same files. You can also add users outside your team or organization. 
  • Accessible anywhere: Regardless of location or device, you can always access the files you need most.

Additional details

When shared drives are made available to Business Starter customers, all users will be able to create shared drives by default. If this default behavior is undesired, admins can update their settings before Business Starter users gain access to the feature starting on September 23, 2024. To restrict this, go to the Admin console > Menu > Apps > Google Workspace > Drive and Docs > Sharing settings > Shared drive creation > turn on “Prevent users in [domain] from creating new shared drives.” 


Getting started 

  • Admins: 
    • When shared drives are available to Business Starter, admins can use the Admin console to: 
      • Add and remove members 
      • Change access level of members 
      • Restrict moving content externally 
    • The following features aren't available for shared drives in Business Starter: 
      • Admins cannot set default settings
      • Business Starter users cannot change settings 
    • Visit the Help Center to learn how to set up shared drives for your organization and then allow users to create shared drives. If you need more storage for your organization, consider purchasing additional pooled storage or upgrading your Google Workspace edition to a plan with more storage.
      • Note: Resold customers should contact their reseller to purchase more storage or upgrade their edition. 
  • End users: Visit the Help Center to learn more about shared drives.

Rollout pace 

Admin setting: 
Shared drives enabled by default

Availability 

  • This update impacts Google Workspace Business Starter customers. 

Resources 

Stay connected with mesh extenders

At GFiber, we are committed to providing you with a great internet experience at every point in the network, both outside and inside your home. You should have access to quality internet anywhere in your home, not just in certain areas. Having a strong Wi-Fi signal throughout your home is important for seamless browsing, streaming, gaming, and working. If you’ve ever dealt with dead zones or slow speeds, you know the struggle. Mesh extenders can be a game changer by boosting your signal and expanding your coverage. Let's dive into what they are, how they work, and why you might need one. (For GFiber customers, our plans come with GFiber Wi-Fi 6E Mesh Extenders included at no extra cost.) 

Thumbnail

How Mesh Extenders work

Mesh extenders strengthen your home network by capturing the Wi-Fi signal from your router and sharing it in hard-to-reach spots. They create additional access points in your home, expanding your network’s reach. This is especially helpful when your router’s signal can’t cover every room or area, which can happen for many reasons, like if you have thicker walls, several floors or the home is more spread out.

Setting up your mesh extenders

A mesh extender can be added to your network in just a few simple steps 

  • Connect the mesh extender’s adapter to a power source.
  • Connect the mesh extender to the router using the ethernet cables. 
  • Wait for the blinking white status light to turn green on the mesh extender. (The green status color means the mesh extender is now paired to your router). 
The GFiber App can also help you pair the router and mesh extender, easily find the best spot for your mesh extenders and also check your mesh extender’s internet connectivity, speed, and coverage with the app’s Network Health feature. If eligible (not all routers are compatible) to use Network Health, you can tap on “Show my network’s health” and it will run a test and score the spot either excellent, good, or poor. If the signal isn’t quite as strong as you’d like it to be, you can adjust the extender’s position for optimal coverage.

Placement matters


Once the mesh extender is connected to the network, you need to find the perfect spot for your mesh extender, which is key to a strong Wi-Fi signal. The sweet spot is usually halfway between your router and the area with poor Wi-Fi coverage. 

Start by placing the first mesh extender no more than one or two rooms away from the router and close to the area with weak coverage, ideally 5-10 feet high and away from obstructions like walls and furniture. Pro Tip: Placing the extender in the dead zone won’t work, since the mesh extender needs a strong signal from the Router to be effective. 

If you have a large home with multiple dead spots, you can add additional mesh extenders. Remember, thick walls and materials like concrete and metal can interfere with the signal, so place your mesh extenders carefully. 

Some additional things to consider 

Each extender adds to the network’s workload. While mesh extenders are generally better than traditional repeaters, too many Mesh Extenders close to each other can actually slow your Wi-Fi down and lead to lag, interference, and other annoying issues. Plus, managing a large number of extenders can be a headache if you need to troubleshoot issues or tweak your network settings.

Also, you’ll need to make sure your mesh extenders are compatible with your router. For GFiber customers using the GFiber provided router, the included mesh extenders will work with your system, but you can also use your own compatible multi-gig router. Just make sure you get mesh extenders that are compatible with your particular router.

Mesh extenders are a great way to expand your home’s Wi-Fi coverage and performance by eliminating dead zones and improving your online experience.  If you’d like more information or still have questions, head over to our GFiber Help page or contact us.

Posted by Ishan Patel, Product Manager