Category Archives: Android Developers Blog

An Open Handset Alliance Project

11 Weeks of Android: Android Developer Tools

Posted by Jamal Eason, Product Manager, Android

11 Weeks of Android, Week 7 with badge

This blog post is part of a weekly series for #11WeeksOfAndroid. For each of the #11WeeksOfAndroid, we’re diving into a key area so you don’t miss anything. This week, we spotlighted Android Developer Tools; here’s a look at what you should know.

The big news

During the 11 weeks of Android, we launched a range of developer tool updates in Android Studio. As of today, you can find version 4.0 of Android Studio on the stable release channel, version 4.1 on the beta channel, and the very latest features of version 4.2 on the canary channel. The focus across each of these versions is a balance of app productivity and delivery of a high quality product that you can rely on for app development. For each day of this past week we highlighted improvements and tips in the key points of your development flow from app design, coding, deployment, build, app testing with the emulator, to app performance profiling. This blog highlights the content that we released during the Android Developer Tools week of 11 Weeks of Android.

What to watch and read

To see an overview of what is new in Android Developer Tools across the recent releases of Android Studio, check out this video from the #Android11 Beta launch which includes an exciting and in-depth demo.

What’s New in Android Development Tools

Design

At the beginning of the week we had a day of content focused on app design tools for developers. To start, watch this overview video of the latest updates in design tools:

What’s new in Design Tools

We also posted two in-depth blog posts for the design tools day:

  • Introducing the Motion Editor - provides a quick tour of the new Motion Editor and how to use the latest features to create animations for your app.

To debug your layouts, watch our video on the updates to the layout inspector:

Debugging UI issues with Layout Inspector

And lastly for design tools, we released a video about the latest developments for Jetpack Compose Design tools:

What's new in Compose Design Tools

Coding & Deployment

During the week, we posted tips and tricks to improve your coding experience and app deployment flow in Android Studio. Check out the following social media channels to review the latest postings:

  • @androidstudio - the Twitter channel for the official IDE for Android app development.
  • @androiddev - delivers news and announcements for developers from the Android team at Google

We also shared a new video on how to use the new database inspector in Android Studio:

Database Inspector

Additionally, you will find an updated blog on the development tools we have in place for Jetpack Hilt:

Build

In the middle of the week, we released four blogs posts around the build system in Android developer tools, which included:

  • Configuration Caching deep dive - a technical explanation on this new preview feature from Gradle and how to try it out in your project to speed up your builds.
  • Shrinking Your App with R8 - provides an overview of the features available in R8, the reduction in code size you might expect, and show how to enable these features in R8.

Android Emulator

On top of sharing a series of best practices and tips on social media about using the Android Emulator during the week, you can also a full summary in the following in-depth article:

Performance Profilers

We know improving app performance is critical for a great user experience. Therefore, we ended the week with a day on performance profilers content. To start, we posted a video about System Trace and how you can use it to troubleshoot app performance issues:

Troubleshooting app performance issues with System Trace in Android Studio

Plus, we published a blog post on C++ memory profiling:

Learning path

If you’re looking for an easy way to pick up the highlights of this week, check out the Developer Tools pathway. A pathway is an ordered tutorial that allows users to complete a pre-defined module that culminates in a quiz. It includes videos and blog posts. A virtual badge is awarded to each user who passes the quiz. Test your knowledge of key takeaways about Developer Tools to earn a limited edition badge.

Key takeaways

Thank you for tuning in and learning about the latest in Android Development tools. Thanks to all of you who chatted with us during the Reddit AMA this week. Throughout this past week, we showcased features that can be found either in the latest stable release or the canary release channel of Android Studio. If you want to try out what you learned this week, download Android Studio today.

Below, you will find a quick listing of where you will find each of the major features. Note, that features in non-stable versions may not land in a particular version until they have reached our quality bar:

Features found in Android Studio 4.0 (Stable Channel)

  • Motion Editor
  • Layout Inspector
  • Layout Validation
  • Custom View Preview
  • CPU Profiler Update
  • R8 Rules Editing
  • Build Analyzer
  • Dynamic Feature Dependency
  • Clangd support
  • Intellij 2019.3

Features found in Android Studio 4.1 (Beta Channel)

  • Database Inspector
  • Dependency Injection Tools
  • Faster Apply Changes
  • Gradle Configuration Caching (Preview)
  • Custom View Preview
  • Android Emulator in IDE
  • Instrumentation Testing
  • Profiler UI Updates
  • Native Memory Profiling
  • System Trace 2.0
  • New Gradle API
  • MLKit & TFLite Model Import
  • Intellij 2020.1

Features found in Android Studio 4.2 + (Canary Channel)

  • Compose Interactive Preview
  • Compose Animation Visualization
  • Compose Deploy to Device
  • Sample Data API for Compose
  • Compose Editing Support
  • Test Failure Retention
  • Android Emulator- 5G Connectivity and Foldable Support
  • Intellij 2020.2 - coming soon

Resources

You can find the entire playlist of #11WeeksOfAndroid video content here, and learn more about each week here. We’ll continue to spotlight new areas each week, so keep an eye out and follow us on Twitter and YouTube. Thanks so much for letting us be a part of this experience with you!
Introducing the Motion Editor

Posted by Scott Swarthout, Product Manager

We spoke with the Android developer community and learned that animations are important for making UIs more intuitive and memorable. However, we also heard that adding complex animation to Android apps has been a difficult task.To address this problem, we created a powerful set of APIs with Motion Layout and a corresponding tool – Motion Editor, that when combined make it easier to build pixel-perfect animations. This blog is a quick tour of the new Motion Editor and how to use the latest features during your animation development. Additionally today, you can now watch a new video series specifically created to teach you about the various APIs included with MotionLayout. Watch here.

Motion Editor is a visual design editor for the MotionLayout layout type, making it easier to create and preview animations. We just released the stable version Motion Editor in Android Studio 4.0 and we already see many developers using it to build animations.

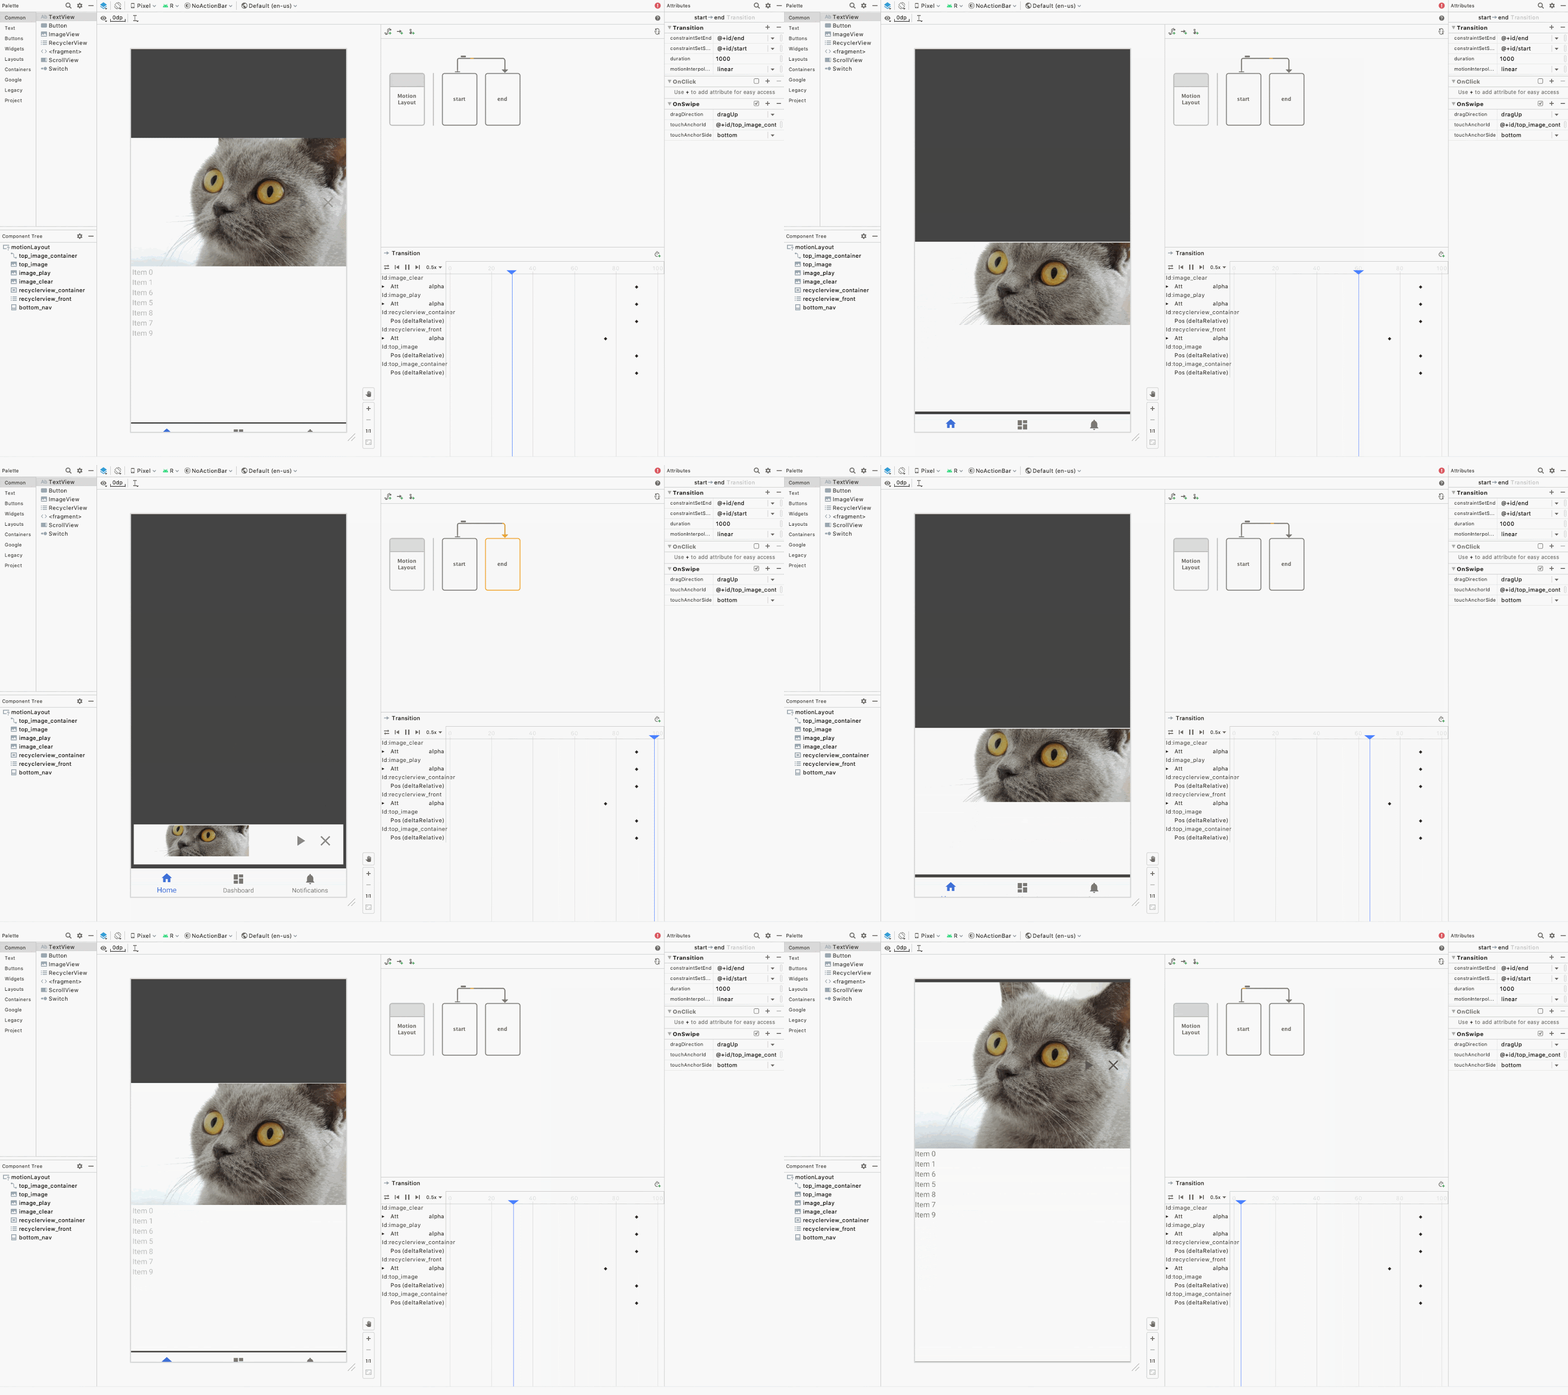
Animation running in the Motion Editor

The Motion Editor is an extension of Android Studio’s layout editor, and automatically opens when you select the Design or Split view on an XML file containing a MotionLayout. From there, you can edit your layout and Motion Scene files using the familiar interactive tools of the Layout Editor as well as preview your animations right from the Android Studio preview pane.

Motion Editor

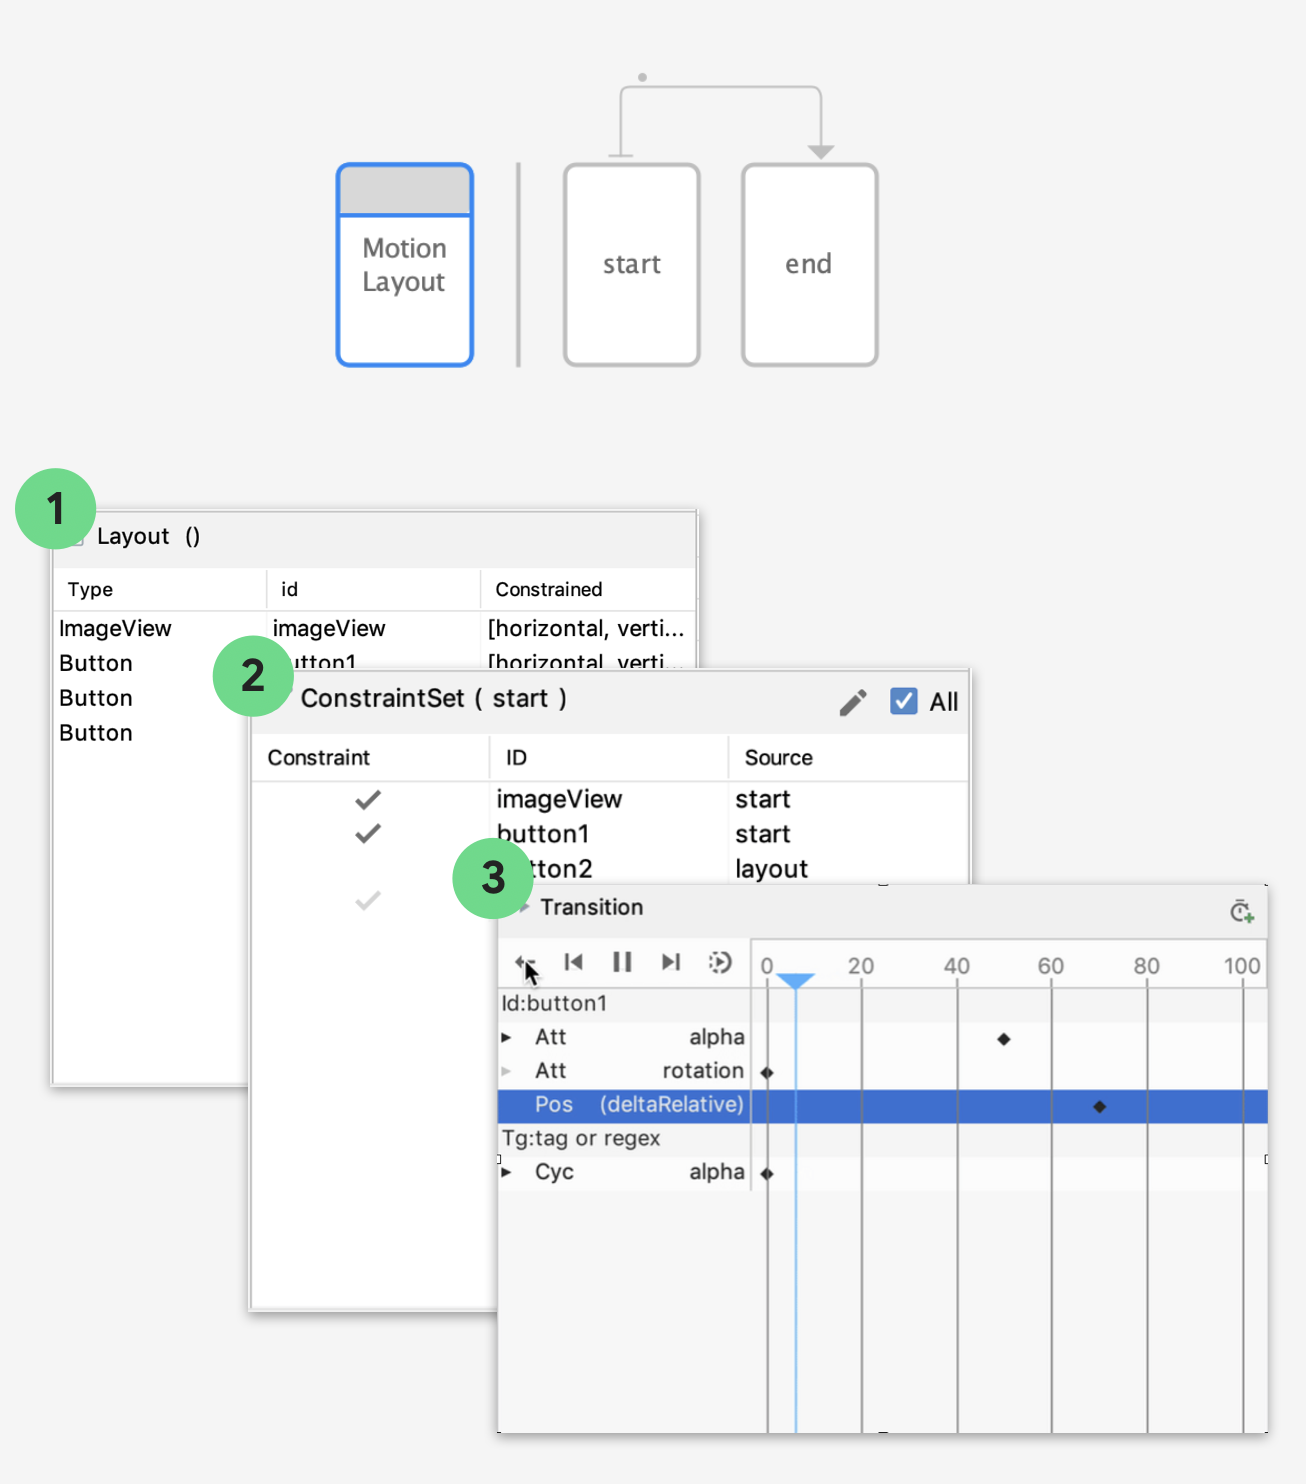
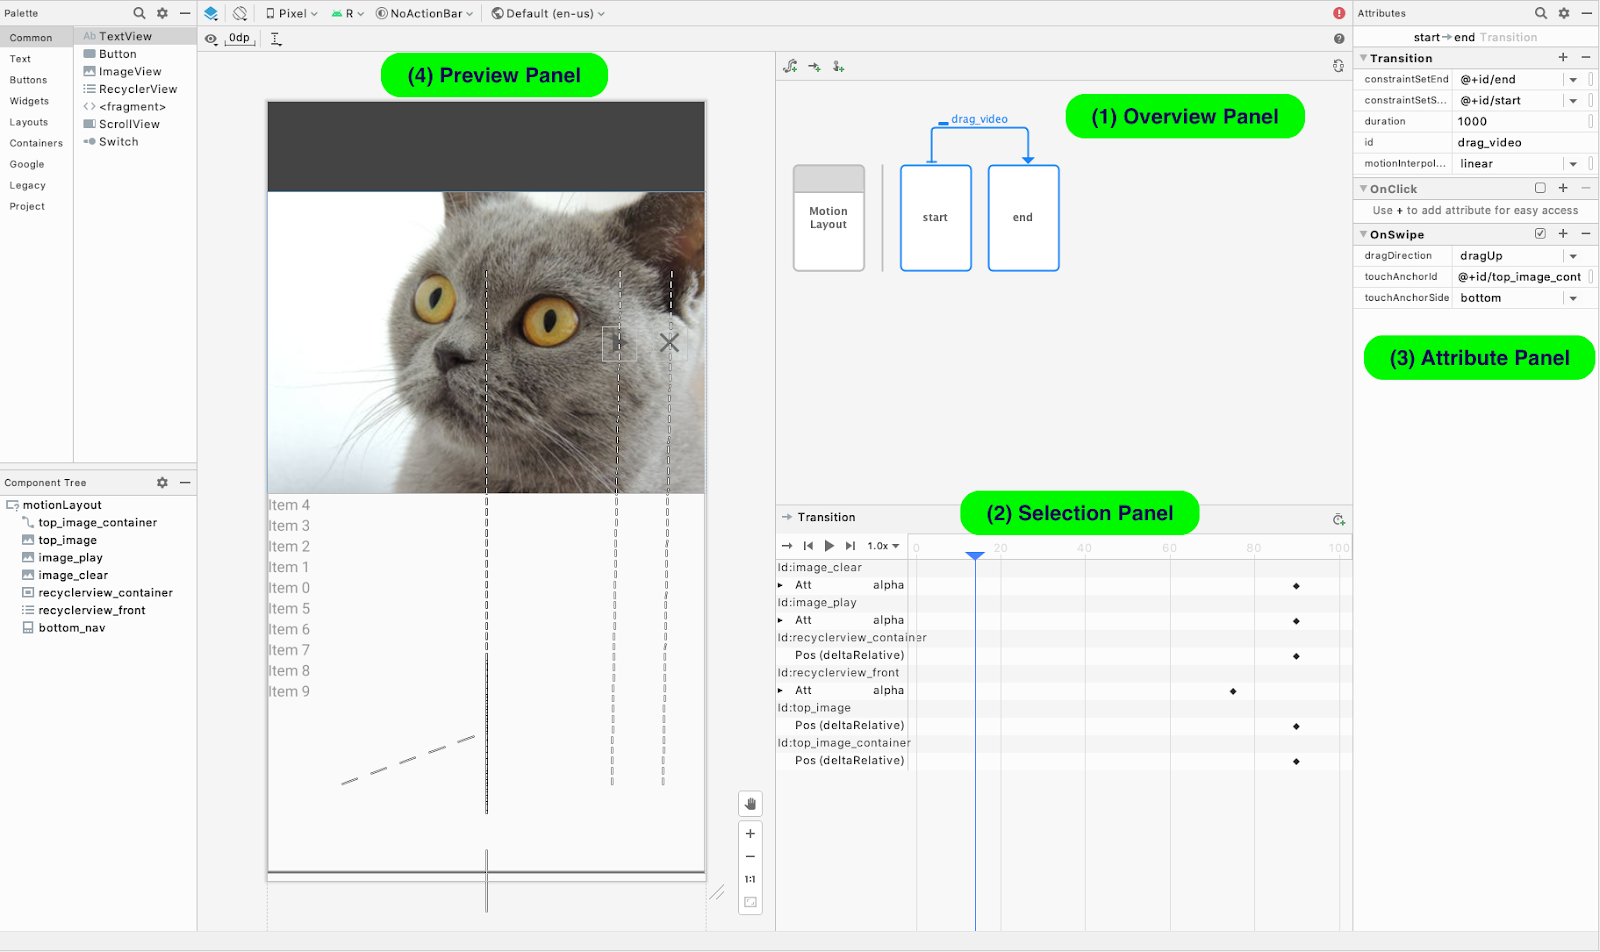
The Motion Editor is broken up into several panels which we will describe in this article. The main panels are: Overview, Selection, Attribute, and Preview.

The Motion Editor has four main panels


Overview panel

MotionLayout helps you animate layout changes, which you specify as transitions between ConstraintSets. The Motion Editor helps you visualize these states with the Overview panel. To edit constraints in a ConstraintSet, click on the corresponding box in the Overview panel.

MotionLayout Scene with two ConstraintSets, start and end, and a Transition between them


Selection panel

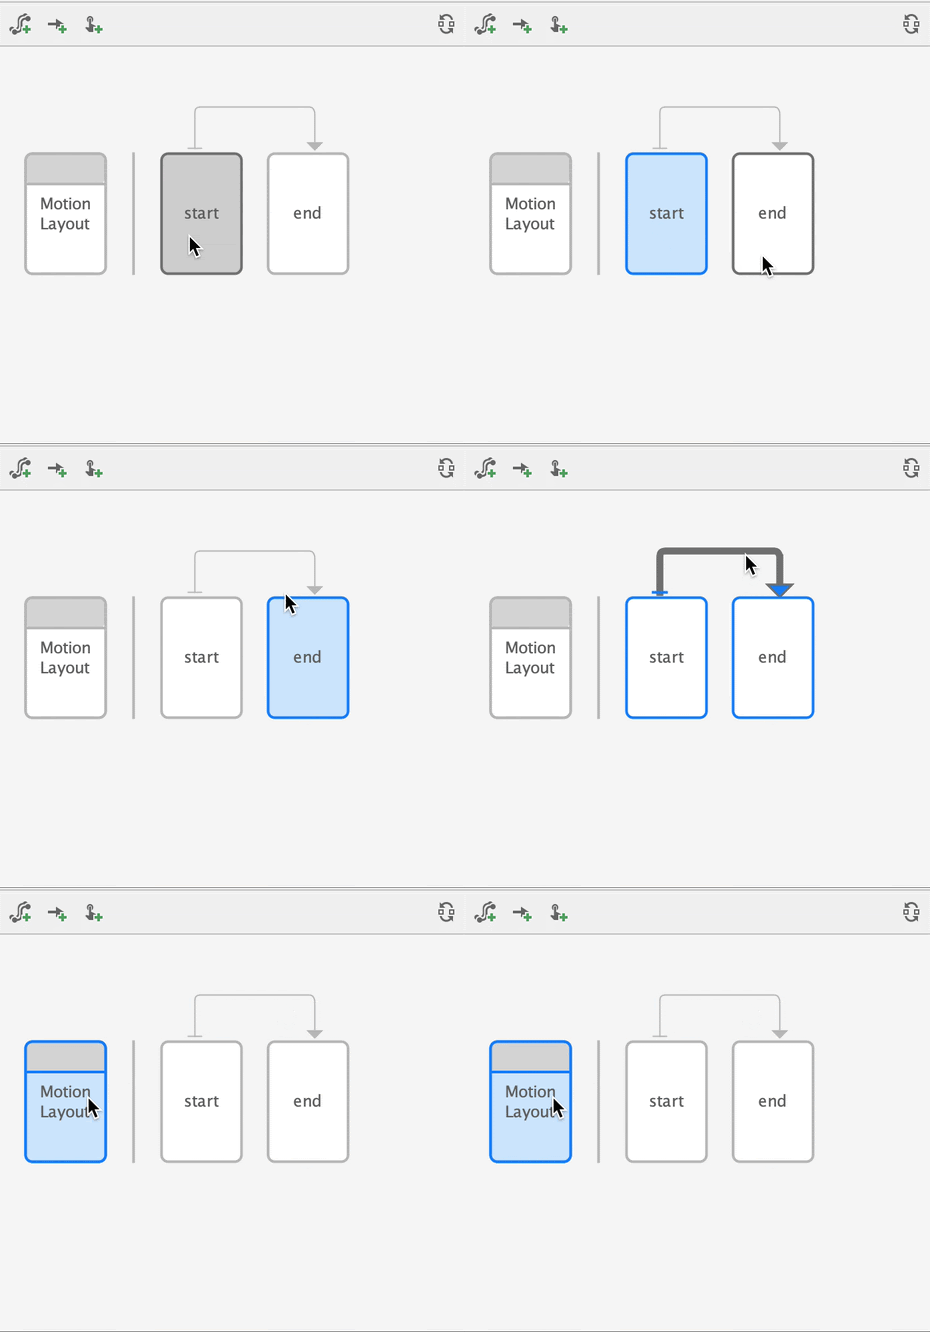
The Selection panel provides detailed controls based on the state of the Overview panel. It has three modes:

  1. Motion Layout selected
  2. ConstraintSet selected
  3. Transition selected

The selection panel has three modes depending on the state of the Overview panel

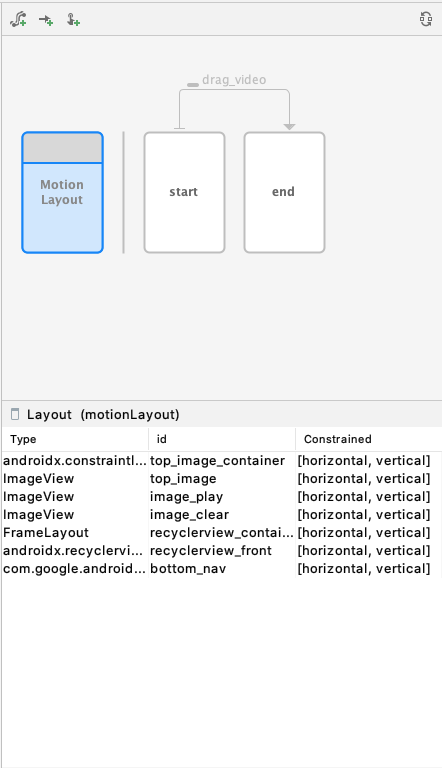
MotionLayout selected

The Motion Editor supports editing of the base Motion Layout. When Motion Layout is selected in the Overview panel, you can select components to see if they are properly constrained.

Check if components are properly constrained with the Selection panel

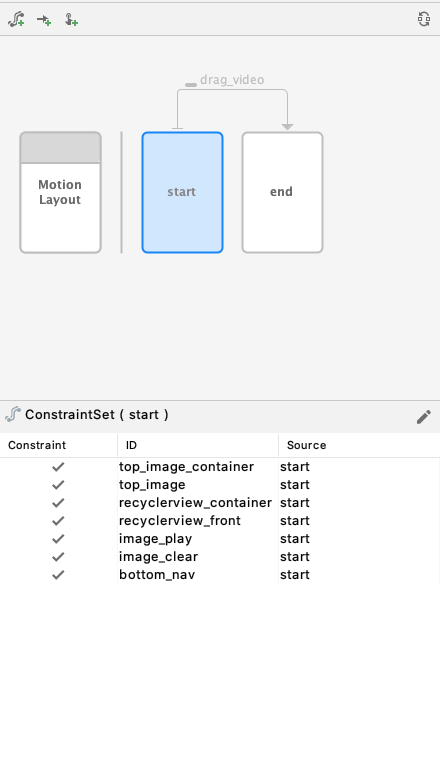
ConstraintSet selected

When a ConstraintSet is selected, the Selection panel displays the list of components and a checkmark to indicate if the component is constrained in this ConstraintSet.

Select components to be included in the ConstraintSet


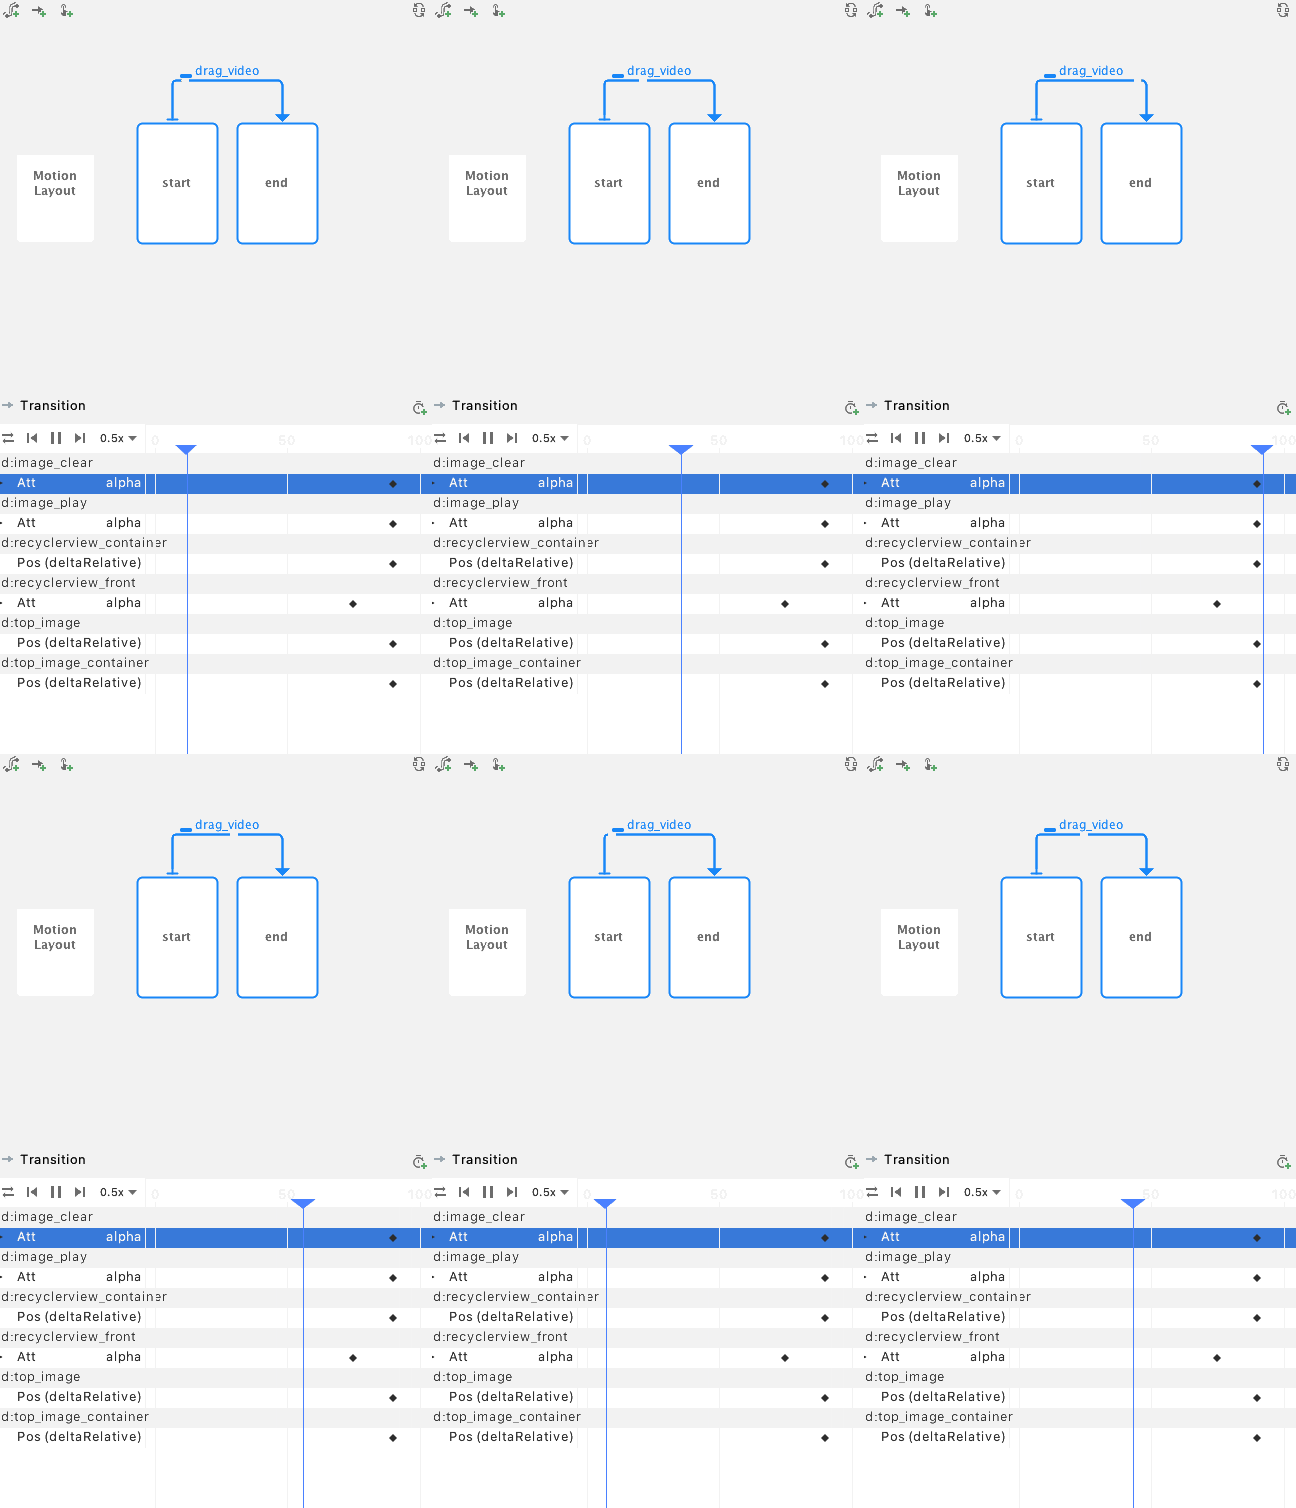
Transition selected

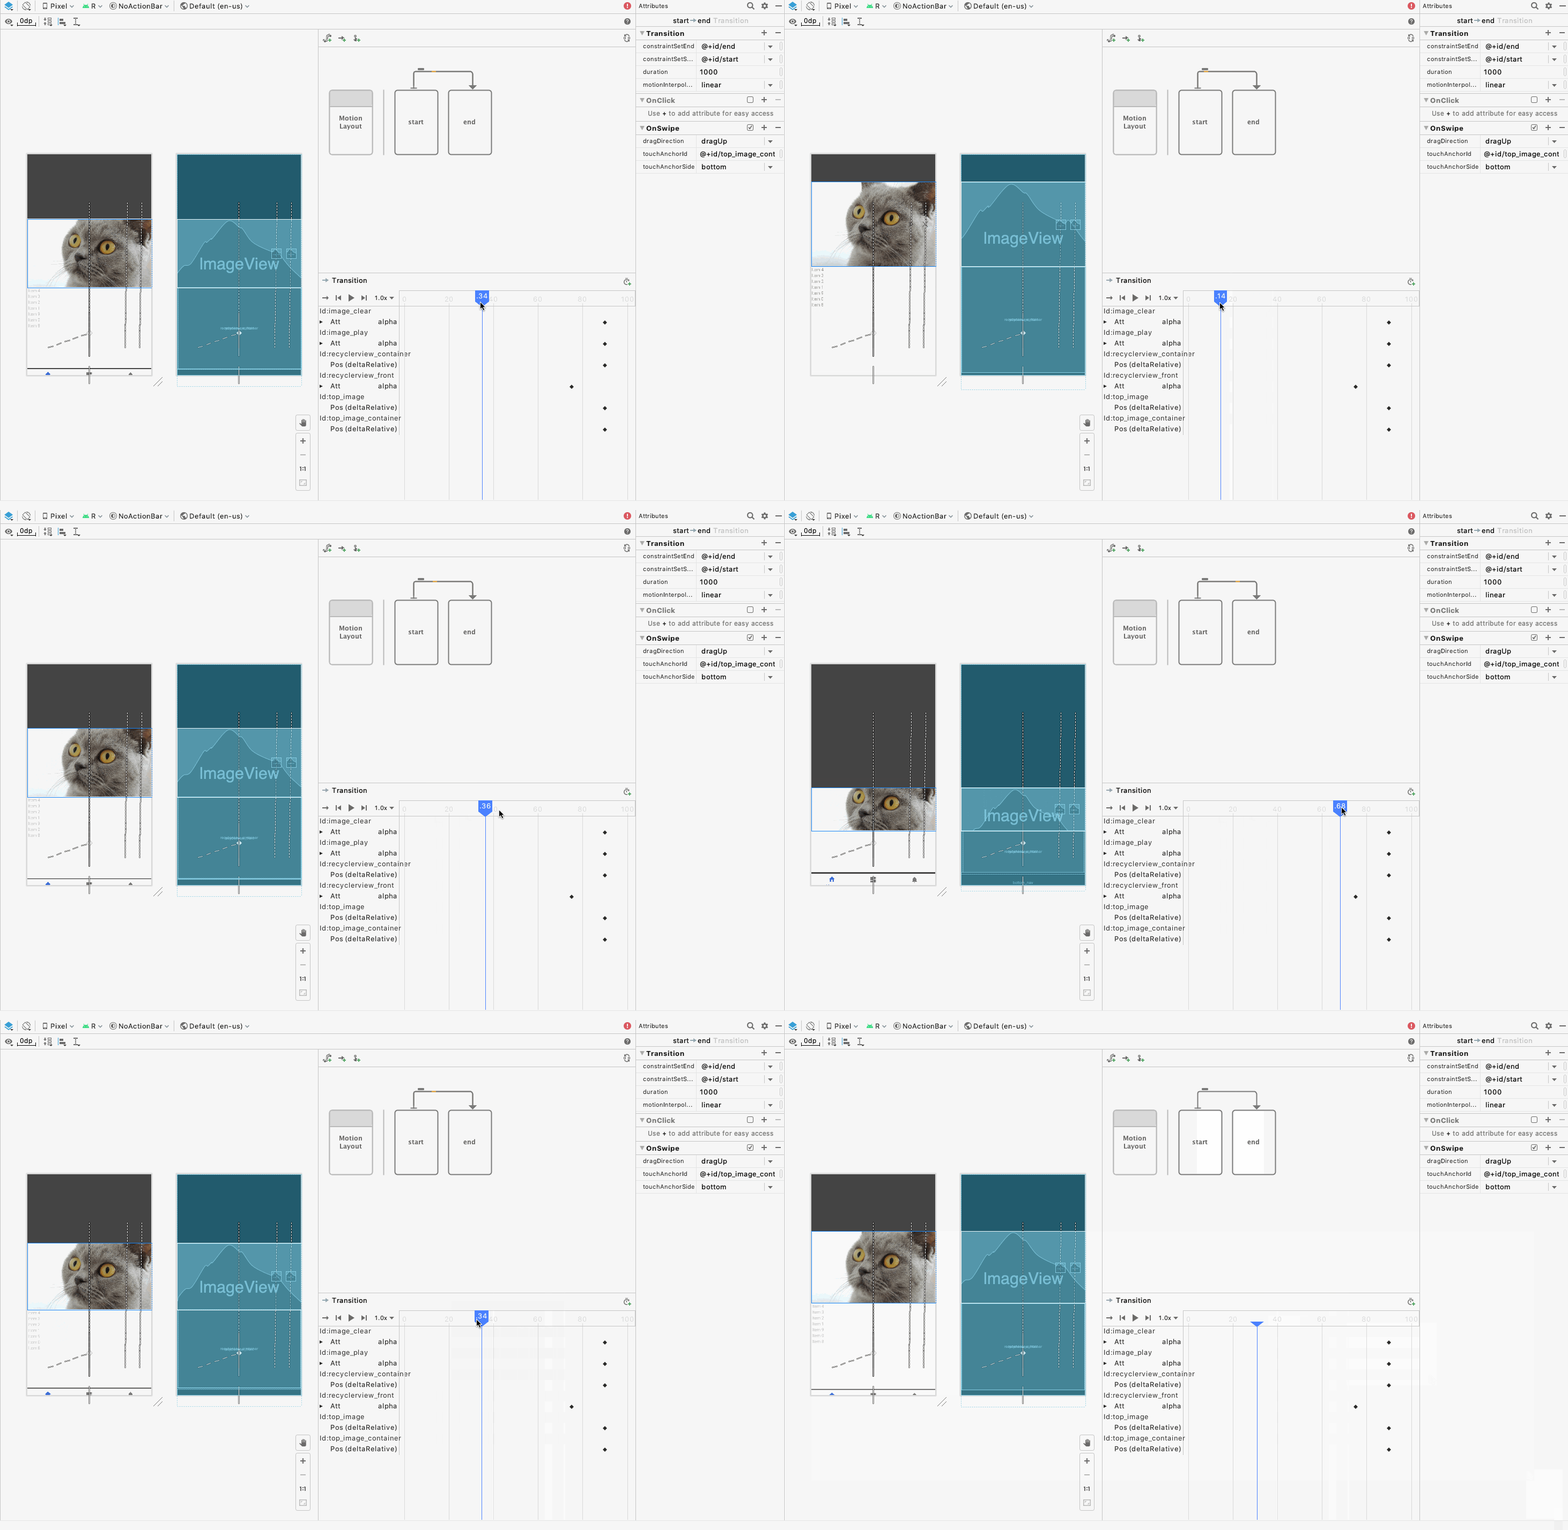
When a transition is selected, you can control the playback of the animation with the animation toolbar. When an animation is selected, click Play ▶️ above the timeline to preview the animation.

Preview animations on the Motion Editor timeline

Keyframes

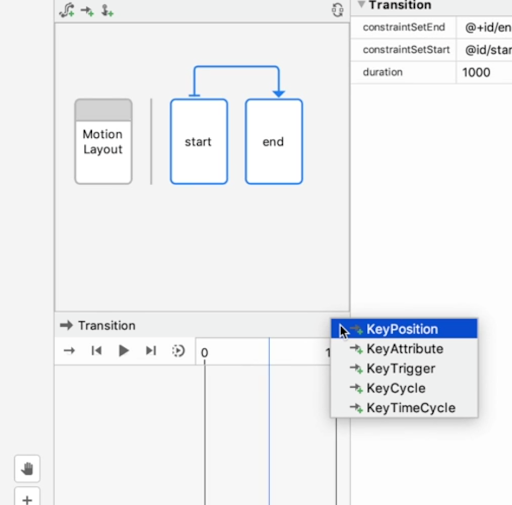
Sometimes you want to modify the path a view takes during an animation. To do this, MotionLayout uses keyframes. We build keyframe editing into the editor to make it easy to tweak animations. To create a new keyframe, click on the new keyframe icon in the top right of the selection panel. This action opens a dialog where you can set attributes for the keyframe. To edit a keyframe, click on the diamond ◆ icon to open the KeyFrame attribute panel.

Create keyframes with the selection panel


Attribute panel

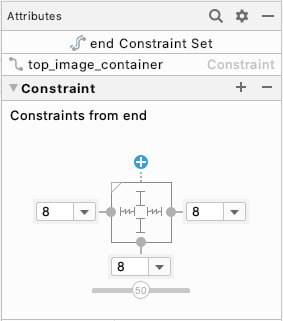
Creating animations in MotionLayout involves editing lots of view parameters, so we brought the Attribute panel from the Layout Editor into the Motion Editor. The Attribute panel includes handy visualizations for Constraints as well as all the attributes set on each view in the Motion Scene file.

Constraint visualization in the Attribute panel

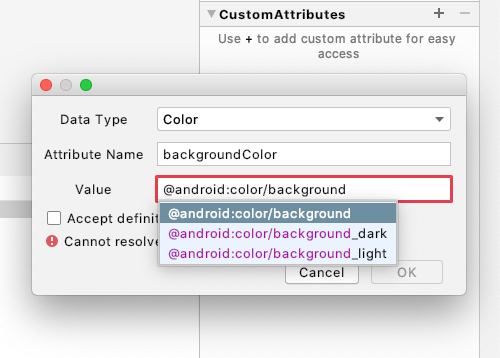
The Attribute panel is also where you can create custom attributes. You use custom attributes when you want to animate view properties that are not part of the ConstraintLayout or MotionLayout APIs, such as backgroundColor. We made it easy to create custom attributes with autocomplete and input validation for all view properties.

Preview panel

We wanted to make it easy to quickly edit and get immediate feedback when working on animations, so you can view animations right from the Preview panel. Now you don’t have to recompile and redeploy your app every time you want to make a small tweak to your animation.

We also added a number of features to the Preview panel to make it easier to understand how views are animating. You can preview animations with the Design view and Blueprint view to get a clearer idea of how your views are moving with fewer visual distractions.


We also added visualizations for the paths views take across the screen, including markers for keyframes. We hope these features make it easier to parse complex transitions and simplify the creation experience.


The Motion Editor is available in Android Studio 4.0, give it a try and let us know what you think! We are eager to see what the community builds with MotionLayout and the Motion Editor. The Android Studio team is constantly gathering feedback to improve the experience of using our tools, so if you have any ideas for new features or run into any issues using these tools, please file a bug.

The code used in this example, along with several other MotionLayout examples, are available on our GitHub sample page, found here.

For more information on MotionLayout, see the following links:

The winners of the Google Play Indie Games Festival are…

Posted by Leticia Lago, Head of Developer Marketing, EMEA

We wrapped up the Indie Games Festivals in Europe, Japan, and South Korea. You can now check out the three winners and Top 10 finalists from each of the contests.

Indie

The Google Play Indie Games Festival celebrates the creativity and innovation that small games developers bring to the Play Store.

We shortlisted 20 finalists for each contest after receiving hundreds of submissions. The finalists were to showcase their art at events in Warsaw, Tokyo, and Seoul. However, this year’s unprecedented events saw the finalists presenting to jury members online. The juries then deliberated to select the winners.

Winning developers receive prize packages designed to help them grow their business on Android and Google Play. Each package offers promotions on the Google Play Store, consultations with members of the Google Play team, Google hardware, promotion campaigns, and more.

Join us in congratulating the developers and try out their games.

Europe

Image

(In alphabetical order)

Cookies Must Die by Rebel Twins (Poland)

inbento by Afterburn (Poland)

The White Door by Rusty Lake (Netherlands)

The other finalist to make the Top 10 as selected by the jury members are, in alphabetical order:

top

60 Parsecs! by Robot Gentleman (Poland)

Alien Escape by KORION Interactive (Germany)

Alt-Frequencies by Accidental Queens (France)

Doors: Awakening by Big Loop Studios (Bulgaria)

My Diggy Dog 2 by King Bird Games (Russia)

Traffix by WebAvenue Unipessoal Lda (Portugal)

Void Tyrant by Quite Fresh Ltd. (United Kingdom)


Japan

winners

(In alphabetical order)

GIGAFALL by Shiki Game Studio

METBOY! by REBUILD GAMES

Wasurenaide, otona ni natte mo by GAGEX Co.,Ltd.

The other final list to make the Top 10 as selected by the jury members are, in alphabetical order:

top
Boku to hakubutsukan by oridio Inc.

GummyShooter by simatten

Home Fighter by hap Inc.

MonsterTrader by Mitsuhiro Okada

Snowman Story by Odencat

World for Two by Seventh rank

Zelle by Odencat


South Korea

winners

(In alphabetical order)

Heroes Restaurant by Team Tapas

Magic Survival by LEME

Project Mars by Moontm

The other finalist to make the Top 10 as selected by the online audience and the jury are, in alphabetical order:

Top

CAT THE DJ by CATSBY STUDIO

Dust by I-eye studio

Extreme Football by 9M Interactive

Great Sword by olivecrow

QV by izzle

Sand Shark: The Boy and The Sea by GABANGMAN STUDIO

Sword Master Story by CodeCAT

Congratulations to all the winners! And thanks to everyone who entered.


How useful did you find this blog post?

11 Weeks of Android: Jetpack

Posted by Diana Wong, Product Manager, Android Jetpack

Android Jetpack Week 6 banner

This blog post is part of a weekly series for #11WeeksOfAndroid. For each of the #11WeeksOfAndroid, we’re diving into a key area so you don’t miss anything.This week, we spotlighted Jetpack; here’s a look at what you should know.

The big news

In 2018, we launched Android Jetpack as a suite of libraries to help developers follow best practices, reduce boilerplate code, and write code that works consistently across Android versions and devices. We are excited about the growth we’ve seen and the incredible feedback that developers like you have shared with us. 47% of the top 1000 apps use 2 or more Jetpack libraries, not including core libraries like AppCompat or Lifecycle. Our work over the past year has been about making the basics easy for Android developers, so that you can focus on the code you care about. We have released many updates to our existing libraries as well as new libraries to help make building high-quality apps easier.

What to watch

We have also been busy pushing out many updates over the past year!

For an overall look at what’s new in Jetpack, be sure to check out our talk from #Android11 Beta launch:

It’s a quick fly-by introducing many of the updates to our libraries, with pointers on how to get started.

This week, we’ve also done deep dives into major releases like Hilt, including cheat sheets to help you get started, and how we migrated our own samples to use Hilt for dependency injection. Less boilerplate = more fun.

Paging 3.0 is one of our first libraries written Kotlin-first and based on coroutines. The Paging library adds the features you asked for like better error handling, easier list transformations like map or filter, and support for common features like list separators, headers, and footers. We added RxJava, LiveData and ListenableFutures support and backwards compatibility with Paging 2, so it’s easier to migrate.

Using the Camera in your app? CameraX is in Beta and helps developers manage edge cases across different devices and OS versions, so that you don’t have to.

This year, we've made several major improvements with the release of Navigation 2.3, which allows you to navigate between different screens of your app with ease while also allowing you to follow Android UI principles. Let us navigate you through them all here:

Spotlight on Permissions

In Android 11, we continued our work to give users even more control over sensitive permissions. At the same time, it's very important to us that we make it as easy as possible for you as developers to build for Android. With the changes in privacy over the past several releases, Android Jetpack is making it easier for your app to work with Permissions. Now there are type-safe contracts for common intents and more via new ActivityResult APIs. These changes simplify how you request permissions, and we’ll continue to work on making permissions easier in the future. Find out more in this post.

Learning path

Take a look at our new Learning pathway for an easy way to go through all the highlights from this week. It’s an ordered tutorial which guides you through our new content, culminating in a quiz. Bonus: You earn a bright and shiny Jetpack badge to be saved to your Google Developer Profile. In addition to the learning pathway, we’ve also got a new library explorer to make it simple to find more about Jetpack libraries you might be looking for and their latest updates.

Key takeaways

Best practices are baked into Jetpack libraries, giving opinionated guidance to make it easier for you to build a higher-quality Android app. We’ve released new features to Navigation and Workmanager, updates to increase the stability of CameraX, added robustness for Biometrics, and more. We’ve also launched new libraries, like our collaboration with Dagger for Hilt and a new library to help improve app startup. Your feedback is important to us; so give these libraries a shot, tell us what you think, and help us improve them!

Resources

You can find the entire playlist of #11WeeksOfAndroid video content here, and learn more about each week here. We’ll continue to spotlight new areas each week, so keep an eye out and follow us on Twitter and YouTube. Thanks so much for letting us be a part of this experience with you!
Improving inter-activity communication with Jetpack ActivityResult

Posted by Yacine Rezgui, Developer Advocate

Whether you're requesting a permission, selecting a file from the system file manager, or expecting data from a 3rd party app, passing data between activities is a core element in inter-process communication on Android. We’ve recently released the new ActivityResult APIs to help handle these activity results.

Previously, to get results from started activities, apps needed to implement an onActivityResult() method in their activities and fragments, check which requestCode a result is referring to, verify that the requestCode is OK, and finally inspect its result data or extended data.

This leads to complicated code, and it doesn’t provide a type-safe interface for expected arguments when sending or receiving data from an activity.

What are the ActivityResult APIs?

The ActivityResult APIs were added to the Jetpack activity and fragment libraries, making it easier to get results from activities by providing type-safe contracts. These contracts define expected input and result types for common actions like taking a picture or requesting a permission, while also providing a way to create your own contracts.

The ActivityResult APIs provide components for registering for an activity result, launching a request, and handling its result once it is returned by the system. You can also receive the activity result in a separate class from where the activity is launched and still rely on the type-safe contracts.

How to use it

To demonstrate how to use the ActivityResult APIs, let’s go over an example where we’re opening a document.

First, you need to add the following dependencies to your gradle file:

repositories {
    google()
    maven()
}

dependencies {
  implementation "androidx.activity:activity:1.2.0-alpha02"
  implementation "androidx.activity:fragment:1.3.0-alpha02"
}

You need to register a callback along with the contract that defines its input and output types.

In this context, GetContent() refers to the ACTION_GET_DOCUMENT intent, and is one of the default contracts already defined in the Activity library. You can find the complete list of contracts here.

val getContent = registerForActivityResult(GetContent()) { uri: Uri? ->
    // Handle the returned Uri
}

Now we need to launch our activity using the returned launcher. As you can set a mime type filter when listing the selectable files, GetContent.launch() will accept a string as a parameter:

val getContent = registerForActivityResult(GetContent()) { uri: Uri? ->
    // Handle the returned Uri
}

override fun onCreate(savedInstanceState: Bundle?) {
    // ...

    val selectButton = findViewById<Button>(R.id.select_button)

    selectButton.setOnClickListener {
        // Pass in the mime type you'd like to allow the user to select
        // as the input
        getContent.launch("image/*")
    }
}

Once an image has been selected and you return to your activity, your registered callback will be executed with the expected results. As you saw through the code snippets, ActivityResult brings an easier developer experience when dealing with results from activities.

Start using Activity 1.2.0-alpha02 and Fragment 1.3.0-alpha02 for a type-safe way to handle your intent results with the new ActivityResult APIs.

Let us know what you think and how we can make it better by providing feedback on the issue tracker.