Tag Archives: Android Architecture

Google Drive cut code and development time in half with Jetpack Compose and new architecture

Posted by Nick Butcher – Product Manager for Jetpack Compose, and Florina Muntenescu – Developer Relations Engineer

As one of the world’s most popular cloud-based storage services, Google Drive lets people do more than just store their files online. With Drive, users can synchronize, share, search, edit, and even pin specified files and content for safe and secure offline use.

Recently, Drive’s developers revamped the application’s home screen to provide a more seamless experience across devices, matching updates made to Google Drive’s web version. However, the app’s previous architecture and codebase would’ve prevented the team from completing the updates in a timely manner.

Instead of struggling with the app’s previous tech stack to implement the update, the Drive team rebuilt the home page from the ground up using Android’s recommended architecture and Jetpack Compose, Android’s modern declarative toolkit for creating native UI.

Compose, combined with architecture improvements, cut our development time nearly in half.” — Dale Hawkins, Senior software engineer and tech lead at Google Drive

Experimenting with Kotlin and Compose

The Drive team experimented with Kotlin — which the Compose toolkit is built with — for several months before planning the app’s home screen rebuild. Drive’s developers liked Kotlin’s improved syntax and null enforcement, making it easier to produce code.

“We had been using RxJava, but started looking into replacing that with coroutines,” said Dale Hawkins, the features team lead for Google Drive. “This led to a more natural alignment between coroutines and Jetpack Compose. After a deep dive into Compose, we came away with a clear understanding of how Compose has numerous benefits over the Views-based approach.”

Following the Kotlin exploration, Dale experimented with Jetpack Compose. “I was pleased with how easy it was to build the UI using Compose. So I continued the experiment after that week,” said Dale. “I eventually rewrote the feature using Compose.”

Using Compose

Shortly after experimenting with Jetpack Compose, the Drive team decided to use it to completely rebuild the app’s home screen UI.

“We wanted to make some major changes to match the ones being done for the web version, but that project had a several-month head start. We wanted to release the Android version shortly after the web changes went live to ensure our users have a seamless Google Drive experience across devices,” said Dale.

The Drive team's experimentation and testing with Jetpack Compose showed that the new toolkit was powerful and reliable and that it would enable them to move faster. With this in mind, the Drive team decided to step away from their old codebase and embrace Jetpack Compose for the app’s home screen update. Not only would it be quicker and easier, but it would also better prepare the team to easily make future UI changes.

Using Android’s guidance for architecture

Before going all-in with Jetpack Compose, Drive developers wanted to restructure the application by implementing a completely new app architecture. Drive developers followed Android’s official architecture guidance to apply structural changes, paving the way for the new Kotlin codebase.

“The recommended architecture reinforces good separation between layers,” said Quintin Knudsen, an Android engineer for Google Drive. “We work in a highly dynamic environment and need to be able to adjust to any app changes. Using well-defined and independent layers helps isolate any changes or UI requirements. The recommendations from Android offered sound ways to structure the layers.” With a clear separation between the app’s data and UI layers, developers could work in parallel to significantly speed up testing and development.

Drive developers also relied on Mappers and UseCases when creating the new architecture. These patterns allowed them to create flexible code that is easier to manage. They also exposed flows from their ViewModels to make the UI respond immediately to any data changes, making it much simpler to implement and understand UI updates.

Less code, faster development

With the app’s newly improved architecture and Jetpack Compose, the Drive team was able to develop the app’s new home screen in less than half the time that they expected. They also implemented the new code and finished quality assurance testing nearly seven weeks ahead of schedule.

“Thanks to Compose, we had the groundwork done within a couple of weeks. We delivered a great implementation over a month ahead of schedule, and it’s been praised by product, UX, and even other engineering teams,” said Dale.

Despite having fewer features, the original home screen required over 12,000 lines of code. The new Compose-based home screen has many new features and only required 5,100 lines of code—a 57% reduction. Having less code makes it much easier for developers to maintain the app and implement any updates.

Testing the new UI in Jetpack Compose also required significantly less code. Before Compose, Drive developers used roughly 9,000 lines of code to test about 62% of the UI. With Compose, it took only 2,200 lines to test over 80% of the new UI.

The original home screen required over 12,000 lines of code. The Compose-based home screen only required 5,100 lines of code. That’s a 57% reduction.” — Dale Hawkins, Senior software engineer and tech lead at Google Drive

Looking forward

A new and improved app architecture paired with Jetpack Compose allowed Drive developers to rebuild the app’s home screen UI faster and easier than they could’ve imagined. The Drive team plans to expand its use of Compose within the application for things like supporting large dynamic displays and text resizing.

“As we work on new projects, we’re taking the opportunity to update older UI code to make use of our new architecture and Compose. The new code will be objectively better and features will be easier to write, test, and maintain,” said Dale.

Get started

Improve app architecture using Android’s official architecture guidance and optimize your UI development with Jetpack Compose.

11 Weeks of Android: Jetpack

Posted by Diana Wong, Product Manager, Android Jetpack

Android Jetpack Week 6 banner

This blog post is part of a weekly series for #11WeeksOfAndroid. For each of the #11WeeksOfAndroid, we’re diving into a key area so you don’t miss anything.This week, we spotlighted Jetpack; here’s a look at what you should know.

The big news

In 2018, we launched Android Jetpack as a suite of libraries to help developers follow best practices, reduce boilerplate code, and write code that works consistently across Android versions and devices. We are excited about the growth we’ve seen and the incredible feedback that developers like you have shared with us. 47% of the top 1000 apps use 2 or more Jetpack libraries, not including core libraries like AppCompat or Lifecycle. Our work over the past year has been about making the basics easy for Android developers, so that you can focus on the code you care about. We have released many updates to our existing libraries as well as new libraries to help make building high-quality apps easier.

What to watch

We have also been busy pushing out many updates over the past year!

For an overall look at what’s new in Jetpack, be sure to check out our talk from #Android11 Beta launch:

It’s a quick fly-by introducing many of the updates to our libraries, with pointers on how to get started.

This week, we’ve also done deep dives into major releases like Hilt, including cheat sheets to help you get started, and how we migrated our own samples to use Hilt for dependency injection. Less boilerplate = more fun.

Paging 3.0 is one of our first libraries written Kotlin-first and based on coroutines. The Paging library adds the features you asked for like better error handling, easier list transformations like map or filter, and support for common features like list separators, headers, and footers. We added RxJava, LiveData and ListenableFutures support and backwards compatibility with Paging 2, so it’s easier to migrate.

Using the Camera in your app? CameraX is in Beta and helps developers manage edge cases across different devices and OS versions, so that you don’t have to.

This year, we've made several major improvements with the release of Navigation 2.3, which allows you to navigate between different screens of your app with ease while also allowing you to follow Android UI principles. Let us navigate you through them all here:

Spotlight on Permissions

In Android 11, we continued our work to give users even more control over sensitive permissions. At the same time, it's very important to us that we make it as easy as possible for you as developers to build for Android. With the changes in privacy over the past several releases, Android Jetpack is making it easier for your app to work with Permissions. Now there are type-safe contracts for common intents and more via new ActivityResult APIs. These changes simplify how you request permissions, and we’ll continue to work on making permissions easier in the future. Find out more in this post.

Learning path

Take a look at our new Learning pathway for an easy way to go through all the highlights from this week. It’s an ordered tutorial which guides you through our new content, culminating in a quiz. Bonus: You earn a bright and shiny Jetpack badge to be saved to your Google Developer Profile. In addition to the learning pathway, we’ve also got a new library explorer to make it simple to find more about Jetpack libraries you might be looking for and their latest updates.

Key takeaways

Best practices are baked into Jetpack libraries, giving opinionated guidance to make it easier for you to build a higher-quality Android app. We’ve released new features to Navigation and Workmanager, updates to increase the stability of CameraX, added robustness for Biometrics, and more. We’ve also launched new libraries, like our collaboration with Dagger for Hilt and a new library to help improve app startup. Your feedback is important to us; so give these libraries a shot, tell us what you think, and help us improve them!

Resources

You can find the entire playlist of #11WeeksOfAndroid video content here, and learn more about each week here. We’ll continue to spotlight new areas each week, so keep an eye out and follow us on Twitter and YouTube. Thanks so much for letting us be a part of this experience with you!

Getting on the same page with Paging 3

Posted by Florina Muntenescu, Android Developer Advocate

Android graphic

Getting on the same page with Paging 3

The Paging library enables you to load large sets of data gradually and gracefully, reducing network usage and system resources. You told us that the Paging 2.0 API was not enough - that you wanted easier error handling, more flexibility to implement list transformations like map or filter, and support for list separators, headers, and footers. So we launched Paging 3.0 (now in alpha02), a complete rewrite of the library using Kotlin coroutines (still supporting Java users) and offering the features you asked for.

Paging 3 highlights

The Paging 3 API provides support for common functionality that you would otherwise need to implement yourself when loading data in pages:

  • Keeps track of the keys to be used for retrieving the next and previous page.
  • Automatically requests the correct next page when the user scrolls to the end of the loaded data.
  • Ensures that multiple requests aren’t triggered at the same time.
  • Tracks loading state and allows you to display it in a RecyclerView list item or elsewhere in your UI, and provides easy retry functionality for failed loads.
  • Enables common operations like map or filter on the list to be displayed, independently of whether you’re using Flow, LiveData, or RxJava Flowable or Observable.
  • Provides an easy way of implementing list separators.
  • Simplifies data caching, ensuring that you’re not executing data transformations at every configuration change.

We also made several Paging 3 components backwards compatible with Paging 2.0; so if you already use Paging in your app, you can migrate incrementally.

Adopting Paging 3 in your app

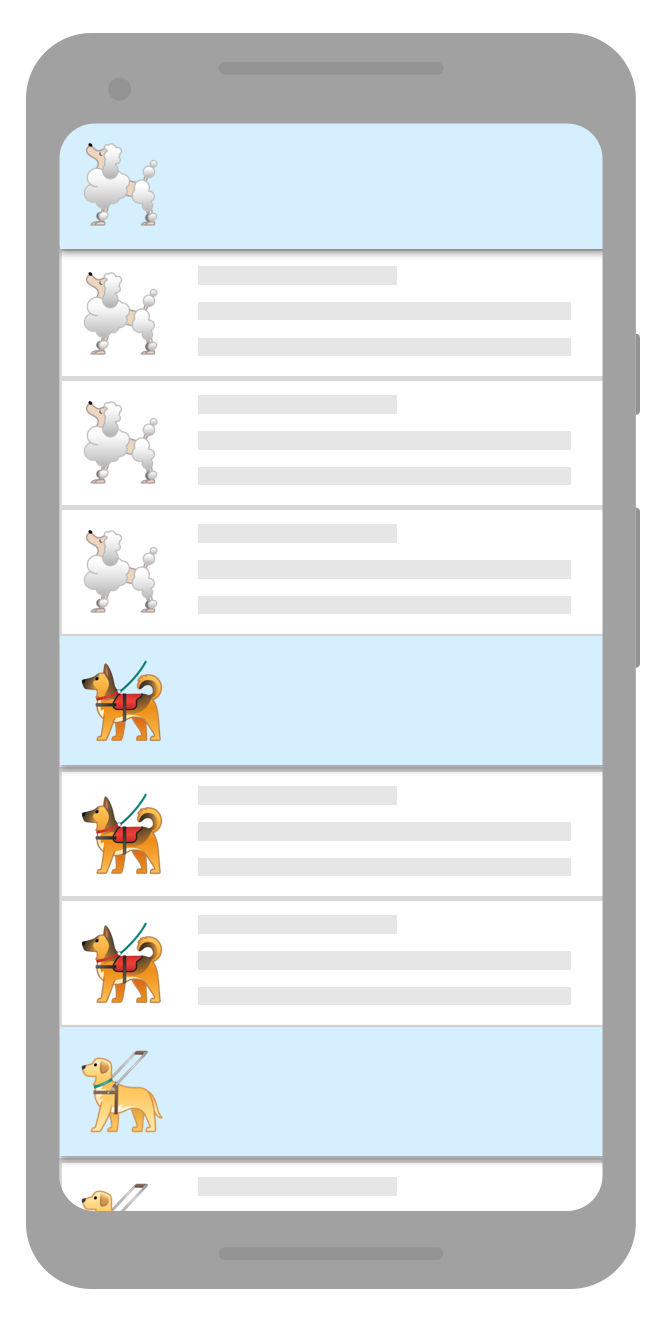
Let’s say that we’re implementing an app that displays all the good doggos. We get the doggos from a GoodDoggos API that supports index-based pagination. Let’s go over the Paging components we need to implement and how they fit into your app architecture. The following examples will be in Kotlin, using coroutines. For examples in the Java programming language using LiveData/RxJava, check out the documentation.

The Paging library integrates directly into the recommended Android app architecture in each layer of your app:

Paging components

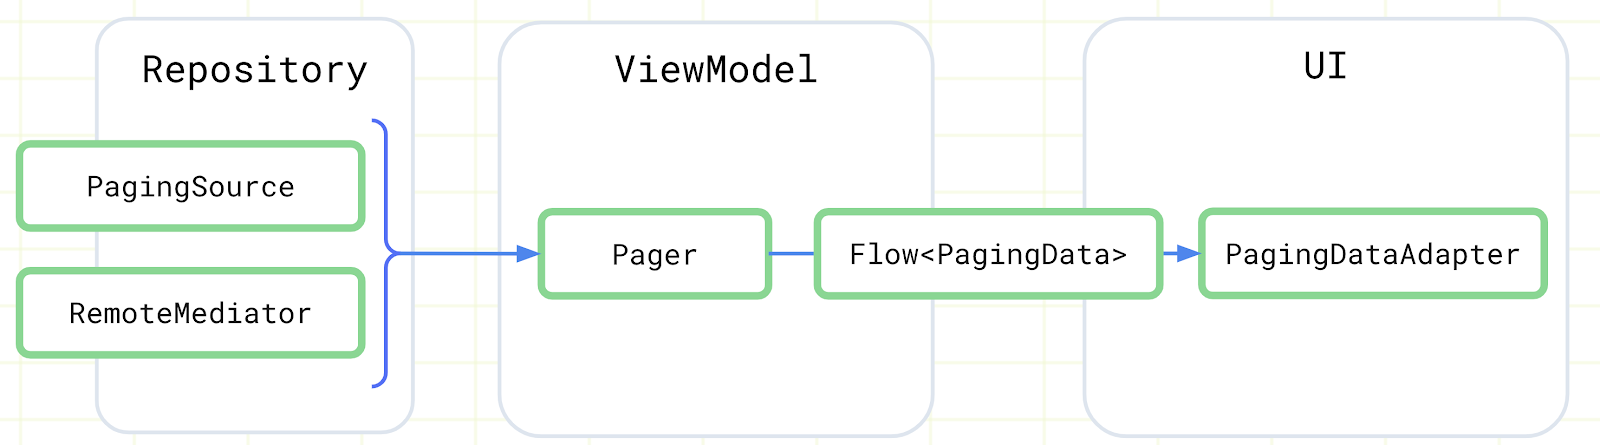
Paging components and their integration in the app architecture"

Defining the data source

Depending on where you’re loading data from, implement only a PagingSource or a PagingSource and a RemoteMediator:

  • If you’re loading data from a single source, like network, local database, a file, etc, implement the PagingSource (if you’re using Room, it implements the PagingSource for you starting in Room 2.3.0-alpha).
  • If you’re loading data from a layered source, like a network data source with a local database cache, implement the RemoteMediator to merge the two sources and a PagingSource for the local database cache.

PagingSource

A PagingSource defines the source of paging data and how to retrieve data from that single source. The PagingSource should be part of the repository layer. Implement load() to retrieve paged data from your data source and return the loaded data together with information about next and previous keys. This is a suspend function, so you can call other suspend functions here, such as the network call:

class DoggosRemotePagingSource(
    val backend: GoodDoggosService
) : PagingSource<Int, Dog>() {
  override suspend fun load(
    params: LoadParams<Int>
  ): LoadResult<Int, Dog> {
    try {
      // Load page 1 if undefined.
      val nextPageNumber = params.key ?: 1
      val response = backend.getDoggos(nextPageNumber)
      return LoadResult.Page(
        data = response.doggos,
        prevKey = null, // Only paging forward.
        nextKey = response.nextPageNumber + 1
      )
    } catch (e: Exception) {
        // Handle errors in this block
        return LoadResult.Error(exception)
    }
  }
}

PagingData and Pager

The container for paginated data is called PagingData. A new instance of PagingData is created every time your data is refreshed. To build a stream of PagingData create a Pager instance, using a PagingConfig configuration object and a function that tells the Pager how to get an instance of your PagingSource implementation.

In your ViewModel you construct the Pager object and expose a Flow<PagingData> to the UI. Flow<PagingData> has a handy cachedIn() method that makes the data stream shareable and allows you to cache the content of a Flow<PagingData> in a CoroutineScope. That way if you implement any transformations on the data stream, they will not be triggered again each time you collect the flow after Activity recreation. The caching should be done as close to the UI layer as possible, but not in the UI layer, as we want to make sure it persists beyond configuration change. The best place for this would be in a ViewModel, using the viewModelScope:

val doggosPagingFlow = Pager(PagingConfig(pageSize = 10)) {
  DogRemotePagingSource(goodDoggosService)
}.flow.cachedIn(viewModelScope)

PagingDataAdapter

To connect a RecyclerView to the PagingData, implement a PagingDataAdapter:

class DogAdapter(diffCallback: DiffUtil.ItemCallback<Dog>) :
  PagingDataAdapter<Dog, DogViewHolder>(diffCallback) {
  override fun onCreateViewHolder(
    parent: ViewGroup,
    viewType: Int
  ): DogViewHolder {
    return DogViewHolder(parent)
  }

  override fun onBindViewHolder(holder: DogViewHolder, position: Int) {
    val item = getItem(position)
    if(item == null) {
      holder.bindPlaceholder()
    } else {
      holder.bind(item)
    }
  }
}

Then, in your Activity/Fragment you’ll have to collect the Flow<PagingData> and submit it to the PagingDataAdapter. This is what the implementation would look like in an Activity onCreate():

val viewModel by viewModels<DoggosViewModel>()

val pagingAdapter = DogAdapter(DogComparator)
val recyclerView = findViewById<RecyclerView>(R.id.recycler_view)
recyclerView.adapter = pagingAdapter

lifecycleScope.launch {
  viewModel.doggosPagingFlow.collectLatest { pagingData ->
    pagingAdapter.submitData(pagingData)
  }
}

Paged data transformations

A filtered list

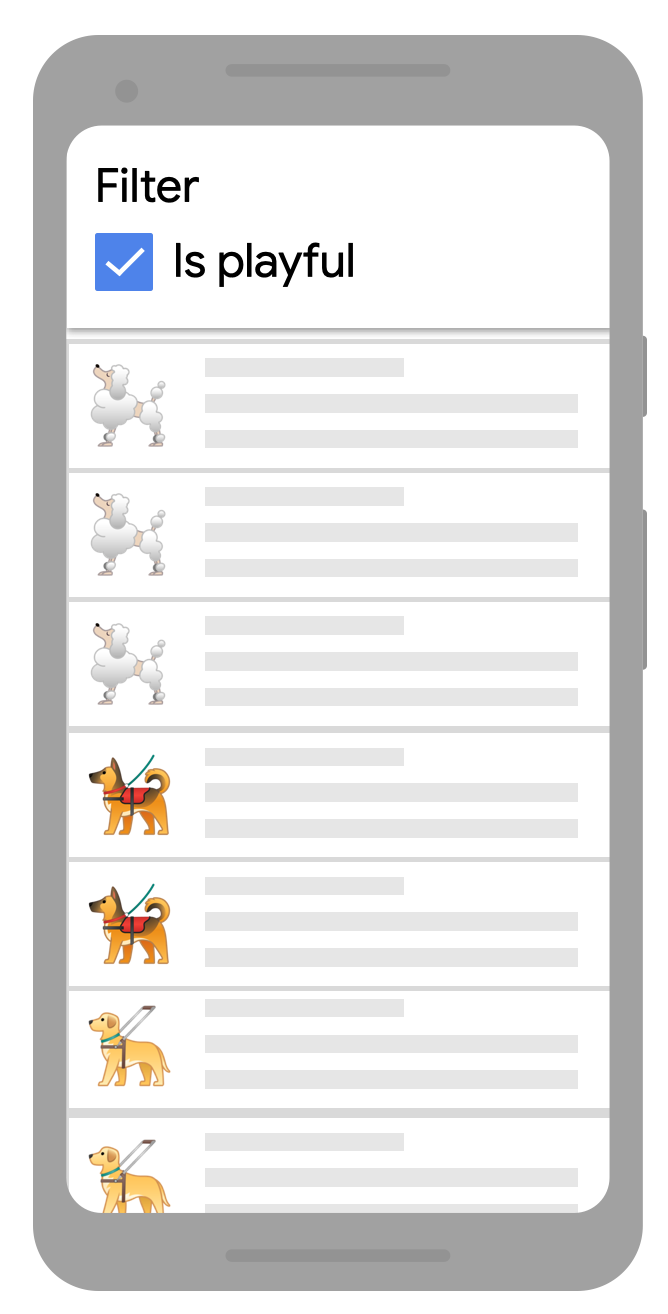
Displaying a filtered list

Transforming PagingData streams is very similar to the way you would any other data stream. For example, if we only want to display playful doggos from our Flow<PagingData<Dog>> we would need to map the Flow object and then filter the PagingData:

doggosPagingFlow.map { pagingData ->
        pagingData.filter { dog -> dog.isPlayful }
    }
list with separators

List with separators

Adding list separators is also a paged data transformation where we transform the PagingData to insert separator objects into the list. For example, we can insert letter separators for our doggos’ names. When using separators, you will need to implement your own UI model class that supports the new separator items. To modify your PagingData to add separators, you will use the insertSeparators transformation:

pager.flow.map { pagingData: PagingData<Dog> ->
  pagingData.map { doggo ->
    // Convert items in stream to UiModel.DogModel.
    UiModel.DogModel(doggo)
  }
  .insertSeparators<UiModel.DogModel, UiModel> { before: Dog, after: Dog ->
      return if(after == null) {
          // we're at the end of the list
          null
      }  
      if (before == null || before.breed != after.breed) {
          // breed above and below different, show separator
          UiModel.SeparatorItem(after.breed)
       } else {
           // no separator
           null
       }
    }
  }
}.cachedIn(viewModelScope)

Just as before, we're using cachedIn right before the UI layer. This ensures that loaded data and the results of any transformations can be cached and reused after a configuration change.

Advanced Paging work with RemoteMediator

If you’re paging data from a layered source, you should implement a RemoteMediator. For example, in the implementation of this class you need to request data from the network and save it in the database. The load() method will be triggered whenever there is no more data in the database to be displayed. Based on the PagingState and the LoadType we can construct the next page request.

It’s your responsibility to define how the previous and next remote page keys are constructed and retained as the Paging library doesn’t know what your API looks like. For example, you can associate remote keys to every item you receive from the network and save them in the database.

override suspend fun load(loadType: LoadType, state: PagingState<Int, Dog>): MediatorResult {

   val page = ... // computed based on loadType and state

   try {
       val doggos = backend.getDoggos(page)
       doggosDatabase.doggosDao().insertAll(doggos)
       
       val endOfPaginationReached = emails.isEmpty()
       return MediatorResult.Success(endOfPaginationReached = endOfPaginationReached)
   } catch (exception: Exception) {
       return MediatorResult.Error(exception)
   } 
}

When you’re loading data from the network and saving it to the database, the database is the source of truth for the data displayed on the screen. This means that the UI will be displaying data from your database, so you’ll have to implement a PagingSource for your database. If you’re using Room, you’ll just need to add a new query in your DAO that returns a PagingSource:

@Query("SELECT * FROM doggos")
fun getDoggos(): PagingSource<Int, Dog>

The Pager implementation changes slightly in this case, as you need to pass the RemoteMediator instance as well:

val pagingSourceFactory = { database.doggosDao().getDoggos() }

return Pager(
     config = PagingConfig(pageSize = NETWORK_PAGE_SIZE),
     remoteMediator = DoggosRemoteMediator(service, database),
     pagingSourceFactory = pagingSourceFactory
).flow

Check out the docs to find out more about working with RemoteMediator. For a complete implementation of RemoteMediator in an app, check out step 15 of the Paging codelab and the accompanying code.


We’ve designed the Paging 3 library to help you accommodate both simple and complex uses of Paging. It makes it easier to work with large sets of data whether it’s being loaded from the network, a database, in-memory cache, or some combination of these sources. The library is built on coroutines and Flow, making it easy to call suspend functions and work with streams of data.

As Paging 3 is still in alpha, we need your help to make it better! To get started, find out more about Paging in our documentation and try it out by taking our codelab or checking out the sample. Then, let us know how we can improve the library by creating issues on the Issue Tracker.