Tag Archives: cloud

Assess the security of Cloud deployments with InSpec for GCP

InSpec-GCP version 1.0 is now generally available, and two new Chef InSpec™ profiles have been released under an open source software license. The InSpec profiles contain controls for the GCP Center for Internet Security (CIS) Benchmark version 1.1.0 and the Payment Card Industry Data Security Standard (PCI DSS) version 3.2.1.

The Cloud Security Challenge

Developers are embracing automated continuous integration and continuous delivery (CI/CD), committing many application and infrastructure changes frequently. But centralized security teams can't review every application and infrastructure change. Those teams might have to block deployments (which decreases velocity and undermines continuous delivery) or review changes in production, where misconfigurations are more harmful and changes are more expensive.

Security reviews need to "shift left,” earlier in the software development lifecycle. Security teams likewise need to shift their own efforts to defining policies and providing tools to automate how compliance is verified. When developers adopt these tools, security and compliance checks become part of CI/CD, in a similar fashion to unit, functional, and integration tests, and thus become a normal part of the development workflow. Empowering developers to participate in this process means organizations can achieve continuous compliance. This also reinforces the mindset that security is everyone's responsibility.

What is InSpec

InSpec is a popular DevSecOps framework that checks the configuration state of resources in virtual machines and containers, on cloud providers such as GCP, AWS, and Azure. InSpec's lightweight nature, approachable domain-specific language, and extensibility make it a valuable tool for:
  • Expressing compliance policies as code
  • Enabling development teams to add tests that assess their applications' compliance with security policies before pushing changes to build and release pipelines
  • Automating compliance verification in CI/CD pipelines and as part of the release process
  • Unifying compliance assessments across multiple cloud providers and on-premises environments

InSpec for GCP and compliance profiles

The InSpec GCP resource pack 1.0 provides a consistent way to audit GCP resources. This release unifies the user experience by adding consistent behavior between resources and documentation for available fields. This resource pack also adds support for GCP endpoints that let you audit fields that are in beta (for example, GKE cluster pod security policy configuration).

You can use the GCP CIS Benchmark and the PCI DSS InSpec profiles to assess compliance with CIS and PCI DSS policies. CIS Benchmarks are configuration guides used by governments, businesses, industry, and academia. We strongly recommend configuring the workloads to meet or exceed these standards. PCI DSS is required for all organizations that accept or process credit card payments. The Terraform PCI Starter, coupled with the PCI InSpec profile, allows deployment of PCI-compliant environments and verifies their ongoing compliance.

This work is released under an open source license and we look forward to your feedback and contributions.

Validating PCI DSS and CIS compliance in infrastructure build pipelines

You can use InSpec to validate infrastructure deployments for compliance with standards such as PCI DSS and CIS. An automated validation process of new builds is important to detect insecure and non-compliant configurations as early as possible while minimizing the impact on developer agility.

With Cloud Build you can create CI pipelines for infrastructure-as-code deployments. You can run InSpec as an additional build step against resources in the GCP project to detect compliance violations in the target infrastructure. While this method doesn't prevent non-compliant build configurations, it does detect compliance issues, fail the build execution, and log the error in Cloud Logging. Cloud Build publishes build messages to a Cloud Pub/Sub topic, which can trigger a Cloud Function to integrate with appropriate alerting systems in case of a failed build. To prevent non-compliant infrastructure in a production environment, run the pipeline in a staging environment before promoting the content to production.

Here is an example pipeline definition for Cloud Build, using InSpec, to validate a project against the PCI guidelines. To run the PCI profile from a container inside a Cloud Build pipeline, clone the Git repository Payment Card Industry Data Security Standard (PCI DSS) version 3.2.1, build the Docker container from the root directory of the repository using the Dockerfile, and push the image to the Google Container Registry. The Cloud Build pipeline will store InSpec reports in a predefined bucket in json and html formats.

Here's an example for executing the PCI DSS InSpec profile as a step in a Cloud Build pipeline:

#...Previous execution steps
#
    - id: 'Run PCI Profile on in-scope project'
        waitFor: ['Write InSpec input file']
        name: gcr.io/${_GCR_PROJECT_ID}/inspec-gcp-pci-profile:v3.2.1-3
        entrypoint: '/bin/sh'
args:
    - '-c'
    - |
        inspec exec /share/. -t gcp:// \
        --input-file /workspace/inputs.yml \
        --reporter cli json:/workspace/pci_report.json \
        html:/workspace/pci_report.html | tee out.json


Note that in this example a previous execution step writes all required input parameters into the file /workspace/inputs.yml to make them available to the InSpec run. A CI/CD pipeline has been implemented for the PCI-GKE-Blueprint using Cloud Build and can be referenced as an example.

Try it yourself

Ready to try InSpec? Use this Cloud Shell Walkthrough to quickly install InSpec in your Cloud Shell instance and scan infrastructure in your GCP projects against the CIS Benchmark:


Chances are that in the walkthrough the InSpec scan detected some misconfigurations in your project.

As a developer of the project, you now know how to quickly scan your deployments, and you can begin to learn more about configuring your resources securely. Our Cloud Foundation Toolkit provides Terraform and Deployment Manager templates for best-practice configurations of your projects and underlying resources.

Most large organizations have platform teams that can adopt our Cloud Foundation Toolkit templates, which automate well-configured resource provisioning, and make those available to their developers. These organizations can also include InSpec testing steps in their CI/CD pipelines to provide early feedback to developers and to prevent misconfigured resources from getting released to Production.

By Bakh Inamov – Security and Compliance Specialist Engineer, Sam Levenick – Software Engineer, and Konrad Schieban – Infrastructure Cloud Consultant

Cloud Spanner Emulator Reaches 1.0 Milestone!

The Cloud Spanner emulator provides application developers with the full set of APIs, including the full breadth of SQL and DDL features that can be run locally for prototyping, development and testing. This offline emulator is free and improves developer productivity for customers. Today, we are happy to announce that Cloud Spanner emulator is generally available (GA) with support for Partitioned APIs, Cloud Spanner client libraries, and SQL features.

Since Cloud Spanner emulator’s beta launch in April, 2020, we have seen strong adoption of the local emulator from customers of Cloud Spanner. Several new and existing customers adopted the emulator in their development & continuous test pipelines. They noticed significant improvements in developer productivity, speed of test execution, and error-free applications deployed to production. We also added several features in this release based on the valuable feedback we received from beta users. The full list of features is documented in the GitHub readme.

Partition APIs

When reading or querying large amounts of data from Cloud Spanner, it can be useful to divide the query into smaller pieces, or partitions, and use multiple machines to fetch the partitions in parallel. The emulator now supports Partition Read, Partition Query, and Partition DML APIs.

Cloud Spanner client libraries

With the GA launch, the latest versions of all the Cloud Spanner client libraries support the emulator. We have added support for C#, Node.js, PHP, Python, Ruby client libraries and the Cloud Spanner JDBC driver. This is in addition to C++, Go and Java client libraries that were already supported with the beta launch. Be sure to check out the minimum version for each of the client libraries that support the emulator.

Use the Getting Started guides to try the emulator with the client library of your choice.

SQL features

Emulator now supports the full set of SQL features provided by Cloud Spanner. Some of the notable additions being support for SQL functions JSON_VALUE, JSON_QUERY, CEILING, POWER, CHARACTER_LENGTH, and FORMAT. We now also support untyped parameter bindings in SQL statements which are used by our client libraries written in languages with dynamic typing e.g., Python, PHP, Node.js and Ruby.

Using Emulator in CI/CD pipelines

You may now point the majority of your existing CI/CD to the Cloud Spanner emulator instead of a real Cloud Spanner instance brought up on GCP. This will save you both cost and time, since an emulator instance comes up instantly and is free to use!

What’s even better is that you can bring up multiple instances in a single execution of the emulator, and of course multiple databases. Thus, tests that interact with a Cloud Spanner database can now run in parallel since each of them can have their own database, making tests hermetic. This can reduce flakiness in unit tests and reduce the number of bugs that can make their way to continuous integration tests or to production.

In case your existing CI/CD architecture assumes the existence of a Cloud Spanner test instance and/or test database against which the tests run, you can achieve similar functionality with the emulator as well. Note that the emulator doesn’t come up with a default instance or a default database as we expect users to create instances and databases as required in their tests for hermeticity as explained above. Below are two examples of how you can bring up an emulator with a default instance or database: 1) By using a docker image or 2) Programmatically.

Starting Emulator from Docker

The emulator can be started using Docker on Linux, MacOS, and Windows. As a prerequisite, you would need to install Docker on your system. To bring up an emulator with a default database/instance, you can execute a shell script in your docker file to do so. Such a script would make RPC calls to CreateInstance and CreateDatabase after bringing up the emulator server. You can also look at this example on how to put this together when using docker.
Run Emulator Programmatically

You can bring up the emulator binary in the same process as your test program. Then you can then create a default instance/database in your ‘Setup’ and clean up the same when the tests are over. Note that the exact procedure for bringing up an ‘in-process’ service may vary with the client library language and platform of your choice.

Other alternatives to start the emulator, including pre-built linux binaries, are listed here.
Try it now

Learn more about Google Cloud Spanner emulator and try it out now.

By Asheesh Agrawal, Google Open Source

Java zPages for OpenTelemetry

What is OpenTelemetry?

OpenTelemetry is an open source project aimed at improving the observability of our applications. It is a collection of cloud monitoring libraries and services for capturing distributed traces and metrics and integrates naturally with external observability tools, such as Prometheus and Zipkin. As of now, OpenTelemetry is in its beta stage and supports a few different languages.

What are zPages?

zPages are a set of dynamically generated HTML web pages that display trace and metrics data from the running application. The term zPages was coined at Google, where similar pages are used to view basic diagnostic data from a particular host or service. For our project, we built the Java /tracez and /traceconfigz zPages, which focus on collecting and displaying trace spans.

TraceZ

The /tracez zPage displays span data from the instrumented application. Spans are split into two groups: spans that are still running and spans that have completed.

TraceConfigZ

The /traceconfigz zPage displays the currently active tracing configuration and allows users to change the tracing parameters. Examples of such parameters include the sampling probability and the maximum number of attributes.

Using the zPages

This section describes how to start and use the Java zPages.

Add the dependencies to your project

First, you need to add OpenTelemetry as a dependency to your Java application.

Maven

For Maven, add the following to your pom.xml file:
<dependencies>
    <dependency>
        <groupId>io.opentelemetry</groupId>
        <artifactId>opentelemetry-api</artifactId>
        <version>0.7.0</version>
    </dependency>
    <dependency>
        <groupId>io.opentelemetry</groupId>
        <artifactId>opentelemetry-sdk</artifactId>
        <version>0.7.0</version>
    </dependency>
    <dependency>
        <groupId>io.opentelemetry</groupId>
        <artifactId>opentelemetry-sdk-extension-    zpages</artifactId>
        <version>0.7.0</version>
    </dependency>
</dependencies>

Gradle

For Gradle, add the following to your build.gradle dependencies:
implementation 'io.opentelemetry:opentelemetry-api:0.7.0'
implementation 'io.opentelemetry:opentelemetry-sdk:0.7.0'
implementation 'io.opentelemetry:opentelemetry-sdk-extension-zpages:0.7.0'

Register the zPages

To set-up the zPages, simply call startHttpServerAndRegisterAllPages(int port) from the ZPageServer class in your main function:
import io.opentelemetry.sdk.extensions.zpages.ZPageServer;

public class MyMainClass {
    public static void main(String[] args) throws Exception {
        ZPageServer.startHttpServerAndRegisterAllPages(8080);
        // ... do work
    }
}
Note that the package com.sun.net.httpserver is required to use the default zPages setup. Please make sure your version of the JDK includes this package if you plan to use the default server.

Alternatively, you can call registerAllPagesToHttpServer(HttpServer server) to register the zPages to a shared server:
import io.opentelemetry.sdk.extensions.zpages.ZPageServer;

public class MyMainClass {
    public static void main(String[] args) throws Exception {
        HttpServer server = HttpServer.create(new                     InetSocketAddress(8000), 10);
        ZPageServer.registerAllPagesToHttpServer(server);
        server.start();
        // ... do work
    }
}

Access the zPages

View all available zPages on the index page

The index page (at /) lists all available zPages with a link and description.


View trace spans on the /tracez zPage

The /tracez zPage displays information about running and completed spans, with completed spans further organized into latency and error buckets. The data is aggregated into a summary-level table:


You can click on each of the counts in the table cells to access the corresponding span details. For example, here are the details of the ChildSpan latency sample (row 1, col 4):


View and update the tracing configuration on the /traceconfigz zPage.

The /traceconfigz zPage provides an interface for users to modify the current tracing parameters:


Design

This section goes into the underlying design of our code.

Frontend


The frontend consists of two main parts: HttpHandler and HttpServer. The HttpHandler is responsible for rendering the HTML content, with each zPage implementing its own ZPageHandler. The HttpServer, on the other hand, is responsible for listening to incoming requests, obtaining the requested data, and then invoking the aforementioned ZPageHandlers. The HttpServer class from com.sun.net is used to construct the default server and to handle http requests on different routes.

Backend


The backend consists of two components as well: SpanProcessor and DataAggregator. The SpanProcessor watches the lifecycle of each span, invoking functions each time a span starts or ends. The DataAggregator, on the other hand, restructures the data from the SpanProcessor into an accessible format for the frontend to display. The class constructor requires a TracezSpanProcessor instance, so that the TracezDataAggregator class can access the spans collected by a specific TracezSpanProcessor. The frontend only needs to call functions in the DataAggregator to obtain information required for the web page.

Conclusion

We hope that this blog post has given you a little insight into the development and use cases of OpenTelemetry’s Java zPages. The zPages themselves are lightweight performance monitoring tools that allow users to troubleshoot and better understand their applications. Once OpenTelemetry is officially released, we hope that you try out and use the /tracez and /traceconfigz zPages!

By William Hu and Terry Wang – Software Engineering Interns, Core Compute Observability

Sip a cup of Java 11 for your Cloud Functions

Posted by Guillaume Laforge, Developer Advocate for Google Cloud

With the beta of the new Java 11 runtime for Google Cloud Functions, Java developers can now write their functions using the Java programming language (a language often used in enterprises) in addition to Node.js, Go, or Python. Cloud Functions allow you to run bits of code locally or in the cloud, without provisioning or managing servers: Deploy your code, and let the platform handle scaling up and down for you. Just focus on your code: handle incoming HTTP requests or respond to some cloud events, like messages coming from Cloud Pub/Sub or new files uploaded in Cloud Storage buckets.

In this article, let’s focus on what functions look like, how you can write portable functions, how to run and debug them locally or deploy them in the cloud or on-premises, thanks to the Functions Framework, an open source library that runs your functions. But you will also learn about third-party frameworks that you might be familiar with, that also let you create functions using common programming paradigms.

The shape of your functions

There are two types of functions: HTTP functions, and background functions. HTTP functions respond to incoming HTTP requests, whereas background functions react to cloud-related events.

The Java Functions Framework provides an API that you can use to author your functions, as well as an invoker which can be called to run your functions locally on your machine, or anywhere with a Java 11 environment.

To get started with this API, you will need to add a dependency in your build files. If you use Maven, add the following dependency tag in pom.xml:

<dependency>
<groupId>com.google.cloud.functions</groupId>
<artifactId>functions-framework-api</artifactId>
<version>1.0.1</version>
<scope>provided</scope>
</dependency>

If you are using Gradle, add this dependency declaration in build.gradle:

compileOnly("com.google.cloud.functions:functions-framework-api")

Responding to HTTP requests

A Java function that receives an incoming HTTP request implements the HttpFunction interface:

import com.google.cloud.functions.*;
import java.io.*;

public class Example implements HttpFunction {
@Override
public void service(HttpRequest request, HttpResponse response)
throws IOException {
var writer = response.getWriter();
writer.write("Hello developers!");
}
}

The service() method provides an HttpRequest and an HttpResponse object. From the request, you can get information about the HTTP headers, the payload body, or the request parameters. It’s also possible to handle multipart requests. With the response, you can set a status code or headers, define a body payload and a content-type.

Responding to cloud events

Background functions respond to events coming from the cloud, like new Pub/Sub messages, Cloud Storage file updates, or new or updated data in Cloud Firestore. There are actually two ways to implement such functions, either by dealing with the JSON payloads representing those events, or by taking advantage of object marshalling thanks to the Gson library, which takes care of the parsing transparently for the developer.

With a RawBackgroundFunction, the responsibility is on you to handle the incoming cloud event JSON-encoded payload. You receive a JSON string, so you are free to parse it however you like, with your JSON parser of your choice:

import com.google.cloud.functions.Context;
import com.google.cloud.functions.RawBackgroundFunction;

public class RawFunction implements RawBackgroundFunction {
@Override
public void accept(String json, Context context) {
...
}
}

But you also have the option to write a BackgroundFunction which uses Gson for unmarshalling a JSON representation into a Java class (a POJO, Plain-Old-Java-Object) representing that payload. To that end, you have to provide the POJO as a generic argument:

import com.google.cloud.functions.Context;
import com.google.cloud.functions.BackgroundFunction;

public class PubSubFunction implements BackgroundFunction<PubSubMsg> {
@Override
public void accept(PubSubMsg msg, Context context) {
System.out.println("Received message ID: " + msg.messageId);
}
}

public class PubSubMsg {
String data;
Map<String, String> attributes;
String messageId;
String publishTime;
}

The Context parameter contains various metadata fields like timestamps, the type of events, and other attributes.

Which type of background function should you use? It depends on the control you need to have on the incoming payload, or if the Gson unmarshalling doesn’t fully fit your needs. But having the unmarshalling covered by the framework definitely streamlines the writing of your function.

Running your function locally

Coding is always great, but seeing your code actually running is even more rewarding. The Functions Framework comes with the API we used above, but also with an invoker tool that you can use to run functions locally. For improving developer productivity, having a direct and local feedback loop on your own computer makes it much more comfortable than deploying in the cloud for each change you make to your code.

With Maven

If you’re building your functions with Maven, you can install the Function Maven plugin in your pom.xml:

<plugin>
<groupId>com.google.cloud.functions</groupId>
<artifactId>function-maven-plugin</artifactId>
<version>0.9.2</version>
<configuration>
<functionTarget>com.example.Example</functionTarget>
</configuration>
</plugin>

On the command-line, you can then run:

$ mvn function:run

You can pass extra parameters like --target to define a different function to run (in case your project contains several functions), --port to specify the port to listen to, or --classpath to explicitly set the classpath needed by the function to run. These are the parameters of the underlying Invoker class. However, to set these parameters via the Maven plugin, you’ll have to pass properties with -Drun.functionTarget=com.example.Example and -Drun.port.

With Gradle

With Gradle, there is no dedicated plugin, but it’s easy to configure build.gradle to let you run functions.

First, define a dedicated configuration for the invoker:

configurations { 
invoker
}

In the dependencies, add the Invoker library:

dependencies {
invoker 'com.google.cloud.functions.invoker:java-function-invoker:1.0.0-beta1'
}

And then, create a new task to run the Invoker:

tasks.register("runFunction", JavaExec) {
main = 'com.google.cloud.functions.invoker.runner.Invoker'
classpath(configurations.invoker)
inputs.files(configurations.runtimeClasspath,
sourceSets.main.output)
args('--target',
project.findProperty('runFunction.target') ?:
'com.example.Example',
'--port',
project.findProperty('runFunction.port') ?: 8080
)
doFirst {
args('--classpath', files(configurations.runtimeClasspath,
sourceSets.main.output).asPath)
}
}

By default, the above launches the function com.example.Example on port 8080, but you can override those on the command-line, when running gradle or the gradle wrapper:

$ gradle runFunction -PrunFunction.target=com.example.HelloWorld \
-PrunFunction.port=8080

Running elsewhere, making your functions portable

What’s interesting about the Functions Framework is that you are not tied to the Cloud Functions platform for deploying your functions. As long as, in your target environment, you can run your functions with the Invoker class, you can run your functions on Cloud Run, on Google Kubernetes Engine, on Knative environments, on other clouds when you can run Java, or more generally on any servers on-premises. It makes your functions highly portable between environments. But let’s have a closer look at deployment now.

Deploying your functions

You can deploy functions with the Maven plugin as well, with various parameters to tweak for defining regions, memory size, etc. But here, we’ll focus on using the cloud SDK, with its gcloud command-line, to deploy our functions.

For example, to deploy an HTTP function, you would type:

$ gcloud functions deploy exampleFn \
--region europe-west1 \
--trigger-http \
--allow-unauthenticated \
--runtime java11 \
--entry-point com.example.Example \
--memory 512MB

For a background function that would be notified of new messages on a Pub/Sub topic, you would launch:

$ gcloud functions deploy exampleFn \
--region europe-west1 \
--trigger-topic msg-topic \
--runtime java11 \
--entry-point com.example.PubSubFunction \
--memory 512MB

Note that deployments come in two flavors as well, although the above commands are the same: functions are deployed from source with a pom.xml and built in Google Cloud, but when using a build tool other than Maven, you can also use the same command to deploy a pre-compiled JAR that contains your function implementation. Of course, you’ll have to create that JAR first.

What about other languages and frameworks?

So far, we looked at Java and the plain Functions Framework, but you can definitely use alternative JVM languages such as Apache Groovy, Kotlin, or Scala, and third-party frameworks that integrate with Cloud Functions like Micronaut and Spring Boot!

Pretty Groovy functions

Without covering all those combinations, let’s have a look at two examples. What would an HTTP function look like in Groovy?

The first step will be to add Apache Groovy as a dependency in your pom.xml:

<dependency>
<groupId>org.codehaus.groovy</groupId>
<artifactId>groovy-all</artifactId>
<version>3.0.4</version>
<type>pom</type>
</dependency>

You will also need the GMaven compiler plugin to compile the Groovy code:

<plugin>
<groupId>org.codehaus.gmavenplus</groupId>
<artifactId>gmavenplus-plugin</artifactId>
<version>1.9.0</version>
<executions>
<execution>
<goals>
<goal>addSources</goal>
<goal>addTestSources</goal>
<goal>compile</goal>
<goal>compileTests</goal>
</goals>
</execution>
</executions>
</plugin>

When writing the function code, just use Groovy instead of Java:

import com.google.cloud.functions.*

class HelloWorldFunction implements HttpFunction {
void service(HttpRequest request, HttpResponse response) {
response.writer.write "Hello Groovy World!"
}
}

The same explanations regarding running your function locally or deploying it still applies: the Java platform is pretty open to alternative languages too! And the Cloud Functions builder will happily build your Groovy code in the cloud, since Maven lets you compile this code thanks to the Groovy library.

Micronaut functions

Third-party frameworks also offer a dedicated Cloud Functions integration. Let’s have a look at Micronaut.

Micronaut is a “modern, JVM-based, full-stack framework for building modular, easily testable microservice and serverless applications”, as explained on its website. It supports the notion of serverless functions, web apps and microservices, and has a dedicated integration for Google Cloud Functions.

In addition to being a very efficient framework with super fast startup times (which is important, to avoid long cold starts on serverless services), what’s interesting about using Micronaut is that you can use Micronaut’s own programming model, including Dependency Injection, annotation-driven bean declaration, etc.

For HTTP functions, you can use the framework’s own @Controller / @Get annotations, instead of the Functions Framework’s own interfaces. So for example, a Micronaut HTTP function would look like:

import io.micronaut.http.annotation.*;

@Controller("/hello")
public class HelloController {

@Get(uri="/", produces="text/plain")
public String index() {
return "Example Response";
}
}

This is the standard way in Micronaut to define a Web microservice, but it transparently builds upon the Functions Framework to run this service as a Cloud Function. Furthermore, this programming model offered by Micronaut is portable across other environments, since Micronaut runs in many different contexts.

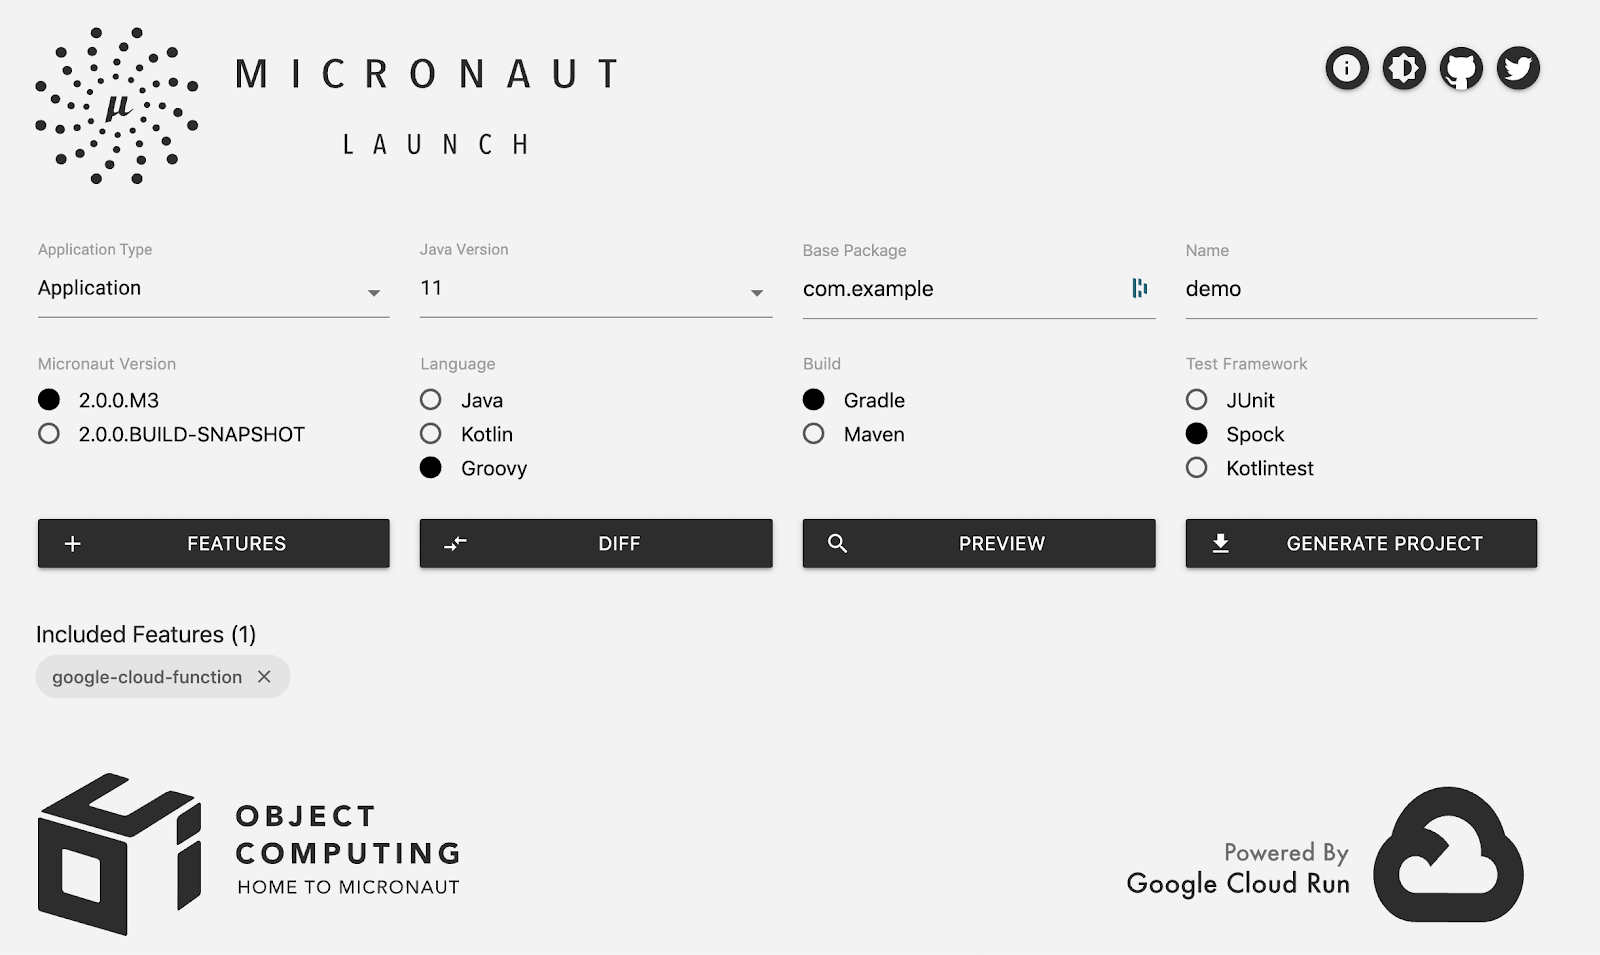
Last but not least, if you are using the Micronaut Launch project (hosted on Cloud Run) which allows you to scaffold new projects easily (from the command-line or from a nice UI), you can opt for adding the google-cloud-function support module, and even choose your favorite language, build tool, or testing framework:

Micronaut Launch

Be sure to check out the documentation for the Micronaut Cloud Functions support, and Spring Cloud Function support.

What’s next?

Now it’s your turn to try Cloud Functions for Java 11 today, with your favorite JVM language or third-party frameworks. Read the getting started guide, and try this for free with Google Cloud Platform free trial. Explore Cloud Functions’ features and use cases, take a look at the quickstarts, perhaps even contribute to the open source Functions Framework. And we’re looking forward to seeing what functions you’re going to build on this platform!

Strengthen your cloud skills with Google Cloud training

Posted by Yuri Grinshteyn, Site Reliability Engineer

We know many of you are looking for ways to keep learning and connecting with other developers virtually right now, and we want to help. Below you can check out our top on-demand Google Cloud training webinars and resources where you can take hands-on labs and learn, at no charge, more about everything from the basics of Google Cloud to more advanced topics like building robust cloud architecture.

Starting with the basics

You can tune in from May 19-20 to watch instructors in Cloud OnBoard break down what it takes to migrate to Google Cloud and explain the basics of the Google Kubernetes Engine, a managed, production-ready environment for running containerized applications. After the sessions, you’ll have a chance to test what you’ve learned by participating in hands-on labs and challenges with the Cloud Hero Online Challenge. Missed the live recording on May 19-20? No worries! You can view it on-demand starting May 21 and still participate in hands-on labs.

Gaining more hands-on experience and a deeper understanding of Google Cloud products

Ready to gain more hands-on cloud experience and deeper product knowledge? We have webinars where Googlers will walk you through more hands-on labs on Qwiklabs and share product tips and tricks.

If you’re interested in big data and machine learning, you can do a lab I recorded in the Baseline: Data, ML, AI webinar to get more experience using tools like Big Query, Cloud Speech API, and Cloud ML Engine. You can also learn how to use BigQuery and other Google tools to draw insights and visualize data from the public health data sets Google released to support the COVID-19 research process in our Data science for public health: Working with public COVID-19 datasets webinar.

Getting role-based training and preparing for certification

For those of you who are already cloud professionals, our top webinars this year so far are Professional Cloud DevOps and Professional Cloud Architect.

You can learn how to improve the way you build software delivery pipelines, deploy and monitor services, and manage incidents in the DevOps webinar. The Cloud Architect webinar will discuss how to ensure you’re designing, developing, and managing effective solutions.

Both webinars will also help prepare you to earn Google Cloud certifications. If you’d like to learn more about the certification program, you can attend our on-demand webinar Why Certify? Everything to know about Google Cloud Certification.

More no-cost resources to check out

We’re also offering our extensive catalog of Google Cloud on-demand training courses on Pluralsight and Qwiklabs at no cost when you sign up by May 31, 20201. You can learn how to prototype an app, build prediction models, and more—at your own pace by registering here.

We hope these webinars and resources help you continue learning new skills and stay connected with the broader Google developer community.

1. Your 30-days access to these Google Cloud training courses at no cost starts when you enroll for your courses. These offers are valid until May 31, 2020. After your 30-days, you will incur charges on Pluralsight; for Qwiklabs, you will need to purchase credits to continue taking labs.

The Tekton Pipelines Beta release

Tekton is a powerful and flexible open-source framework for creating CI/CD systems, allowing developers to build, test, and deploy across cloud providers and on-premise systems. The project recently released its Beta, which creates higher levels of stability by bringing the best features into the Pipelines Beta and brings more trust between the users and the features.


Tekton is used for infrastructure development on top of Kubernetes; it provides an open source framework for creating CI/CD systems, easily allowing developers to build, test, and deploy applications across applications.

With the new Beta functionality, users can rest assured that Beta features will not be removed, and that there will be a 9-month window dedicated to finding solutions for incompatible API changes. Since many in the Tekton community are using Tekton Pipelines to run APIs, this new release helps guarantee that any new developments on top of Tekton are reliable and optimized for best performance, with a budget of several months to make any necessary adjustments.

As platform builders require a stable API and feature set, the Beta launch includes Tasks, ClusterTasks and TaskRuns, Pipelines and PipelineRuns, to provide a foundation that users can rely on. Google created working groups in conjunction with other contributors from various companies to drive the Beta release. The team continues to churn out new Pipeline features towards a GA launch at the end of the year, while also focussing on bringing other components like metadata storage, Triggers, and the Catalog to Beta.


While initially starting as part of the Knative project from Google, in collaboration with developers from other organizations, Tekton was donated to the Continuous Delivery Foundation (CDF) in early 2019. Tekton’s initial design for the interface was even inspired by the Cloud Build API—and to this day—Google remains heavily involved in the commitment to develop Tekton, by participating in the governing board, and staffing a dedicated team invested in the success of this project. These characteristics make Tekton a prime example of a collaboration in open source.

Since its launch in February 2019, Tekton has had 3712 pull requests from 262 contributors across 39 companies spanning 16 countries. Many widely used projects across the open source industry are built on Tekton:
  • Puppet Project Nebula
  • Jenkins X
  • Red Hat OpenShift Pipelines
  • IBM Cloud Continuous Delivery
  • Kabanero – open source project led by IBM
  • Rio – open source project led by Rancher
  • Kf – open source project led by Google
Interested in trying out Tekton yourself? To install Tekton in your own kubernetes cluster (1.15 or newer), use kubectl to install the latest Tekton release:

kubectl apply -f
https://storage.googleapis.com/tekton-releases/pipeline/latest/release.yaml

You can jump right in by saving this Task to a file called task.yaml:

apiVersion: tekton.dev/v1beta1
kind: Task
metadata:
  name: hello-world
spec:
  steps:
  - image: ubuntu
    script: |
      echo "hello world"


Tasks are one of the most important building blocks of Tekton! Head over to tektoncd/catalog for more examples of reusable Tasks.

To run the hello-world Task, first apply it to your cluster with kubectl:

kubectl apply -f task.yaml

The easiest way to start running our Task is to use the Tekton command line tool, tkn. Install tkn using the right method for your OS, and you can run your Task with:

tkn task start hello-world --showlog

That’s just a taste of Tekton! At tekton.dev/try the community is hard at work adding interactive tutorials that let you try Tekton in a virtual environment. And you can dump straight into the docs at tekton.dev/docs and join the Tekton community at github.com/tektoncd/community.

Congratulations to all the contributors who made this Beta release possible!

By Radha Jhatakia and Christie Wilson, Google Open Source

Cloud Spanner Emulator

After Cloud Spanner’s launch in 2017, there has been huge customer adoption across several different industries and verticals. With this growth, we have built a large community of application developers using Cloud Spanner. To make the service even more accessible and open to the broader developer community, we are introducing an offline emulator for the Cloud Spanner service. The Cloud Spanner emulator is intended to reduce application development cost and improve developer productivity for the customers.

The Cloud Spanner emulator provides application developers with the full set of APIs, including the breadth of SQL and DDL features that could be run locally for prototyping, development and testing. This open source emulator will provide application developers with the transparency and agility to customize the tool for their application use.

This blog introduces the Cloud Spanner emulator and will guide you through installation and use of the emulator with the existing Cloud Spanner CLI and client libraries.

What is Cloud Spanner Emulator?

The emulator provides a local, in-memory, high-fidelity emulator of the Cloud Spanner service. You can use the emulator to prototype, develop and hermetically test your application locally and in your integration test environments.

Because the emulator stores data in-memory, it will not persist data across runs. The emulator is intended to help you use Cloud Spanner for local development and testing (not for production deployments); However, once your application is working with the emulator, you can proceed to end-to-end testing of your application by simply changing the Cloud Spanner endpoint configuration.

Supported Features

The Cloud Spanner emulator exposes the complete set of Cloud Spanner APIs including instances, databases, SQL, DML, DDL, sessions, and transaction semantics. Support for querying schema metadata for a database is available via Information Schema. Both gRPC and REST APIs are supported and can be used with the existing client libraries, OSS JDBC driver as well as the Cloud SDK. The emulator is supported natively on Linux, and requires Docker on MacOS and Windows platforms. To ease the development and testing of an application, IDEs like IntelliJ and Eclipse can be configured to directly communicate with the Cloud Spanner emulator endpoint.

The emulator is not built for production scale and performance, and therefore should not be used for load testing or production traffic. Application developers can use the emulator for iterative development, and to implement and run unit and integration tests.

A detailed list of features and limitations is provided on Cloud Spanner emulator README. The emulator is currently (as of April 2020) in beta release and will be continuously enhanced for feature and API parity with Cloud Spanner service.

Using the Cloud Spanner Emulator

This section describes using the existing Cloud Spanner CLI and client libraries to interact with the emulator.

Before You Start

Starting the emulator locally

The emulator can be started using Docker or using the Cloud SDK CLI on Linux, MacOS and Windows. In either case, MacOS and Windows would require an installation of docker.

Docker

$ docker pull gcr.io/cloud-spanner-emulator/emulator
$ docker run -p 9010:9010 -p 9020:9020 gcr.io/cloud-spanner-emulator/emulator

Note: The first port is the gRPC port and the second port is the REST port.

Cloud SDK CLI

$ gcloud components update beta
$ gcloud beta emulators spanner start
Other alternatives to start the emulator, including pre-built linux binaries, are listed here.

Setup Cloud Spanner Project & Instance

Configure Cloud Spanner endpoint, project and disable authentication:
$ gcloud config configurations create emulator
$ gcloud config set auth/disable_credentials true
$ gcloud config set project test-project
$ gcloud config set api_endpoint_overrides/spanner http://localhost:9020/
Note:
To switch back to the default config:
`$ gcloud config configurations activate default`
To switch back to the emulator config:
`$ gcloud config configurations activate emulator`

Verify gCloud is working with the Cloud Spanner Emulator.
$ gcloud spanner instance-configs list

NAME               DISPLAY_NAME
emulator-config    Emulator Instance Config
Create a Cloud Spanner Instance
$ gcloud spanner instances create test-instance --config=emulator-config --description="Test Instance" --nodes=1

Using Cloud Spanner Client Libraries

With the beta lunch, the latest versions of Java, Go and C++ Cloud Spanner client libraries are supported to interact with the emulator. Use the Getting Started guides to try the emulator.

Prerequisite: Setup Cloud Spanner Project and Instance from step above.

This is an example of running the Java client library with the emulator:
# Configure emulator endpoint
$ export SPANNER_EMULATOR_HOST="localhost:9010"

# Cloning java sample of client library.
$ git clone https://github.com/GoogleCloudPlatform/java-docs-samples && cd java-docs-samples/spanner/cloud-client

$ mvn package

# Create database
$ java -jar target/spanner-google-cloud-samples-jar-with-dependencies.jar \
    createdatabase test-instance example-db


# Write
$ java -jar target/spanner-google-cloud-samples-jar-with-dependencies.jar \
    write test-instance example-db


# Query
$ java -jar target/spanner-google-cloud-samples-jar-with-dependencies.jar \
    query test-instance example-db
Follow the rest of the sample for Java client library using the Getting Started Guide.

Using the Cloud SDK CLI

Prerequisite: Setup Cloud Spanner Project and Instance from step above.

Configure emulator endpoint

$ gcloud config configurations activate emulator
Create a database

$ gcloud spanner databases create test-database --instance test-instance --ddl "CREATE TABLE TestTable (Key INT64, Value STRING(MAX)) PRIMARY KEY (Key)"
Write into database
$ gcloud spanner rows insert --table=TestTable --database=test-database --instance=test-instance --data=Key=1,Value=TestValue1
Read from database
$ gcloud spanner databases execute-sql test-database --instance test-instance --sql "select * from TestTable"

Using the open source command-line tool spanner-cli

Prerequisite: Setup Cloud Spanner Project, Instance and Database from step above.

Follow examples for an interactive prompt to Cloud Spanner database with spanner-cli.
# Configure emulator endpoint
$ export SPANNER_EMULATOR_HOST="localhost:9010"

$ go get github.com/cloudspannerecosystem/spanner-cli
$ go run github.com/cloudspannerecosystem/spanner-cli -p test-project -i test-instance -d test-database

spanner> INSERT INTO TestTable (Key, Value) VALUES (2, "TestValue2"), (3, "TestValue3");
Query OK, 2 rows affected

spanner> SELECT * FROM TestTable ORDER BY Key ASC;

+-----+----------------+
| Key | Value |
+-----+----------------+
| 2 | TestValue2 |
| 3 | TestValue3 |
+-----+----------------+
2 rows in set

spanner> exit;

Conclusion

Cloud Spanner emulator reduces application development cost and improves developer productivity for Cloud Spanner customers. We plan to continue building and supporting customer requested features and you can follow Cloud Spanner emulator on GitHub for more updates.

By Sneha Shah, Google Open Source

Automate & Extend with Apps Script (Google Cloud for Student Developers)

Posted by Wesley Chun (@wescpy), Developer Advocate, Google Cloud


In the previous episode of our new Google Cloud for Student Developers video series, we introduced G Suite REST APIs, showing how to enhance your applications by integrating with Gmail, Drive, Calendar, Docs, Sheets, and Slides. However, not all developers prefer the lower-level style of programming requiring the use of HTTP, OAuth2, and processing the request-response cycle of API usage. Building apps that access Google technologies is open to everyone at any level, not just advanced software engineers.

Enhancing career readiness of non-engineering majors helps make our services more inclusive and helps democratize API functionality to a broader audience. For the budding data scientist, business analyst, DevOps staff, or other technical professionals who don't code every day as part of their profession, Google Apps Script was made just for you. Rather than thinking about development stacks, HTTP, or authorization, you access Google APIs with objects.

This video blends a standard "Hello World" example with various use cases where Apps Script shines, including cases of automation, add-ons that extend the functionality of G Suite editors like Docs, Sheets, and Slides, accessing other Google or online services, and custom functions for Google Sheets—the ability to add new spreadsheet functions.

One featured example demonstrates the power to reach multiple Google technologies in an expressive way: lots of work, not much code. What may surprise readers is that this entire app, written by a colleague years ago, is comprised of just 4 lines of code:

function sendMap() {
var sheet = SpreadsheetApp.getActiveSheet();
var address = sheet.getRange('A1').getValue();
var map = Maps.newStaticMap().addMarker(address);
GmailApp.sendEmail('[email protected]',
'Map', 'See below.', {attachments:[map]});
}

Apps Script shields its users from the complexities of authorization and "API service endpoints." Developers only need an object to interface with a service; in this case, SpreadsheetApp to access Google Sheets, and similarly, Maps for Google Maps plus GmailApp for Gmail. Viewers can build this sample line-by-line with its corresponding codelab (a self-paced, hands-on tutorial). This example helps student (and professional) developers...

  1. Build something useful that can be extended into much more
  2. Learn how to accomplish several tasks without a lot of code
  3. Imagine what else is possible with G Suite developer tools

For further exploration, check out this video as well as this one which introduces Apps Script and presents the same code sample with more details. (Note the second video emails the map's link, but the app has been updated to attach it instead; the code has been updated everywhere else.) You may also access the code at its open source repository. If that's not enough, learn about other ways you can use Apps Script from its video library. Finally, stay tuned for the next pair of episodes which will cover full sample apps, one with G Suite REST APIs, and another with Apps Script.

We look forward to seeing what you build with Google Cloud.

Advance your career with the Google Africa Certifications Scholarships

Posted by William Florance, Global Head, Developer Training Programs

Building upon our pledge to provide mobile developer training to 100,000 Africans to develop world class apps, today we are pleased to announce the next round of Google Africa Certification Scholarships aimed at helping developers become certified on Google’s Android, Web, and Cloud technologies.

This year, we are offering 30,000 additional scholarship opportunities and 1,000 grants for the Google Associate Android Developer, Mobile Web Specialist, and Associate Cloud Engineer certifications. The scholarship program will be delivered by our partners, Pluralsight and Andela, through an intensive learning curriculum designed to prepare motivated learners for entry-level and intermediate roles as software developers. Interested students in Africa can learn more about the Google Africa Certifications Scholarships and apply here

According to World Bank, Africa is on track to have the largest working-age population (1.1 billion) by 2034. Today’s announcement marks a transition from inspiring new developers to preparing them for the jobs of tomorrow. Google’s developer certifications are performance-based. They are developed around a job-task analysis which test learners for skills that employers expect developers to have.

As announced during Sundar Pichai - Google CEO’s visit to Nigeria in 2017, our continued initiatives focused on digital skills training, education and economic opportunity, and support for African developers and startups, demonstrate our commitment to help advance a healthy and vibrant ecosystem. By providing support for training and certifications we will help bridge the unemployment gap on the continent through increasing the number of employable software developers.

Although Google’s developer certifications are relatively new, we have already seen evidence that becoming certified can make a meaningful difference to developers and employers. Adaobi Frank - a graduate of the Associate Android Developer certification - got a better job that paid ten times more than her previous salary after completing her certification. Her interview was expedited as her employer was convinced that she was great for the role after she mentioned that she was certified. Now, she's got a job that helps provide for her family - see her video here. Through our efforts this year, we want to help many more developers like Ada and support the growth of startups and technology companies throughout Africa.

Follow this link to learn more about the scholarships and apply.