Category Archives: Google Developers Blog

News and insights on Google platforms, tools and events

Share your #DevFest18 story!

Posted by Erica Hanson, Developer Communities Program Manager

Over 80 countries are planning a DevFest this year!

Our GDG community is very excited as they aim to connect with 100,000 developers at 500 DevFests around the world to learn, share and build new things.

Most recently, GDG Nairobi hosted the largest developer festival in Kenya. On September 22nd, DevFest Nairobi engaged 1,200+ developers, from 26+ African countries, with 37% women in attendance! They had 44 sessions, 4 tracks and 11 codelabs facilitated by 5 GDEs (Google Developer Experts) among other notable speakers. The energy was so great, #DevFestNairobi was trending on Twitter that day!

GDG Tokyo held their third annual DevFest this year on September 1st, engaging with over 1,000 developers! GDG Tokyo hosted 42 sessions, 6 tracks and 35 codelabs by partnering with 14 communities specializing in technology including 3 women-led communities (DroidGirls, GTUG Girls, and XR Jyoshibu).

Share your story!

Our community is interested in hearing about what you learned at DevFest. Use #DevFestStories and #DevFest18 on social media. We would love to re-share some of your stories here on the Google Developers blog and Twitter! Check out a few great examples below.

Learn more about DevFest 2018 here and find a DevFest event near you here.

GDGs are local groups of developers interested in Google products and APIs. Each GDG group can host a variety of technical activities for developers - from just a few people getting together to watch the latest Google Developers videos, to large gatherings with demos, tech talks, or hackathons. Learn more about GDG here.

Follow us on Twitter and YouTube.

Four tips for building great transactional experiences for the Google Assistant

Posted by Mikhail Turilin, Product Manager, Actions on Google

Building engaging Actions for the Google Assistant is just the first step in your journey for delivering a great experience for your users. We also understand how important it is for many of you to get compensated for your hard work by enabling quick, hands-free transactional experiences through the Google Assistant.

Let's take a look at some of the best practices you should consider when adding transactions to your Actions!

1. Use Google Sign-In for the Assistant

Traditional account linking requires the user to open a web browser and manually log in to a merchant's website. This can lead to higher abandonment rates for a couple of reasons:

  1. Users need to enter username and password, which they often can't remember
  2. Even if the user started the conversation on Google Home, they will have to use a mobile phone to log in to the merchant web site

Our new Google Sign-In for the Assistant flow solves this problem. By implementing this authentication flow, your users will only need to tap twice on the screen to link their accounts or create a new account on your website. Connecting individual user profiles to your Actions gives you an opportunity to personalize your customer experience based on your existing relationship with a user.

And if you already have a loyalty program in place, users can accrue points and access discounts with account linking with OAuth and Google Sign-In.

Head over to our step-by-step guide to learn how to incorporate Google Sign-In.

2. Simplify the order process with a re-ordering flow

Most people prefer to use the Google Assistant quickly, whether they're at home and or on the go. So if you're a merchant, you should look for opportunities to simplify the ordering process.

Choosing a product from a list of many dozens of items takes a really long time. That's why many consumers enjoy the ability to quickly reorder items when shopping online. Implementing reordering with Google Assistant provides an opportunity to solve both problems at the same time.

Reordering is based on the history to previous purchases. You will need to implement account linking to identify returning users. Once the account is linked, connect the order history on your backend and present the choices to the user.

Just Eat, an online food ordering and delivery service in the UK, focuses on reordering as one of their core flows because they expect their customers to use the Google Assistant to reorder their favorite meals.

3. Use Google Pay for a more seamless checkout

Once a user has decided they're ready to make a purchase, it's important to provide a quick checkout experience. To help, we've expanded payment options for transactions to include Google Pay, a fast, simple way to pay online, in stores, and in the Google Assistant.

Google Pay reduces customer friction during checkout because it's already connected to users' Google accounts. Users don't need to go back and forth between the Google Assistant and your website to add a payment method. Instead, users can share the payment method that they have on file with Google Pay.

Best of all, it's simple to integrate – just follow the instructions in our transactions docs.

4. Support voice-only Actions on the Google Home

At I/O, we announced that voice-only transactions for Google Home are now supported in the US, UK, Canada, Germany, France, Australia, and Japan. A completely hands-free experience will give users more ways to complete transactions with your Actions.

Here are a few things to keep in mind when designing your transactions for voice-only surfaces:

  • Build easy-to-follow dialogue because users won't see dialogue or suggestion chips available on phones.
  • Avoid inducing choice paralysis. Focus on a few simple choices based on customer preferences collected during their previous orders.
  • Localize your transactional experiences for new regions – learn more here.
  • Don't forget to enable your transactions to work on smart speakers in the console.

Learn more tips in our Conversation Design Guidelines.

As we expand support for transactions in new countries and on new Google Assistant surfaces, now is the perfect time to make sure your transactional experiences are designed with users in mind so you can increase conversion and minimize drop-off.

Make money from your Actions, create better user experiences

Posted by Tarun Jain, Group PM, Actions on Google

The Google Assistant helps you get things done across the devices you have at your side throughout your day--a bedside smart speaker, your mobile device while on the go, or even your kitchen Smart Display when winding down in the evening.

One of the common questions we get from developers is: how do I create a seamless path for users to complete purchases across all these types of devices? We also get asked by developers: how can I better personalize my experience for users on the Assistant with privacy in mind?

Today, we're making these easier for developers with support for digital goods and subscriptions, and Google Sign-in for the Assistant. We're also giving the Google Assistant a complete makeover on mobile phones, enabling developers to create even more visually rich integrations.

Start earning money with premium experiences for your users

While we've offered transactions for physical goods for some time, starting today, you will also be able to offer digital goods, including one time purchases like upgrades--expansion packs or new levels, for example--and even recurring subscriptions directly within your Action.

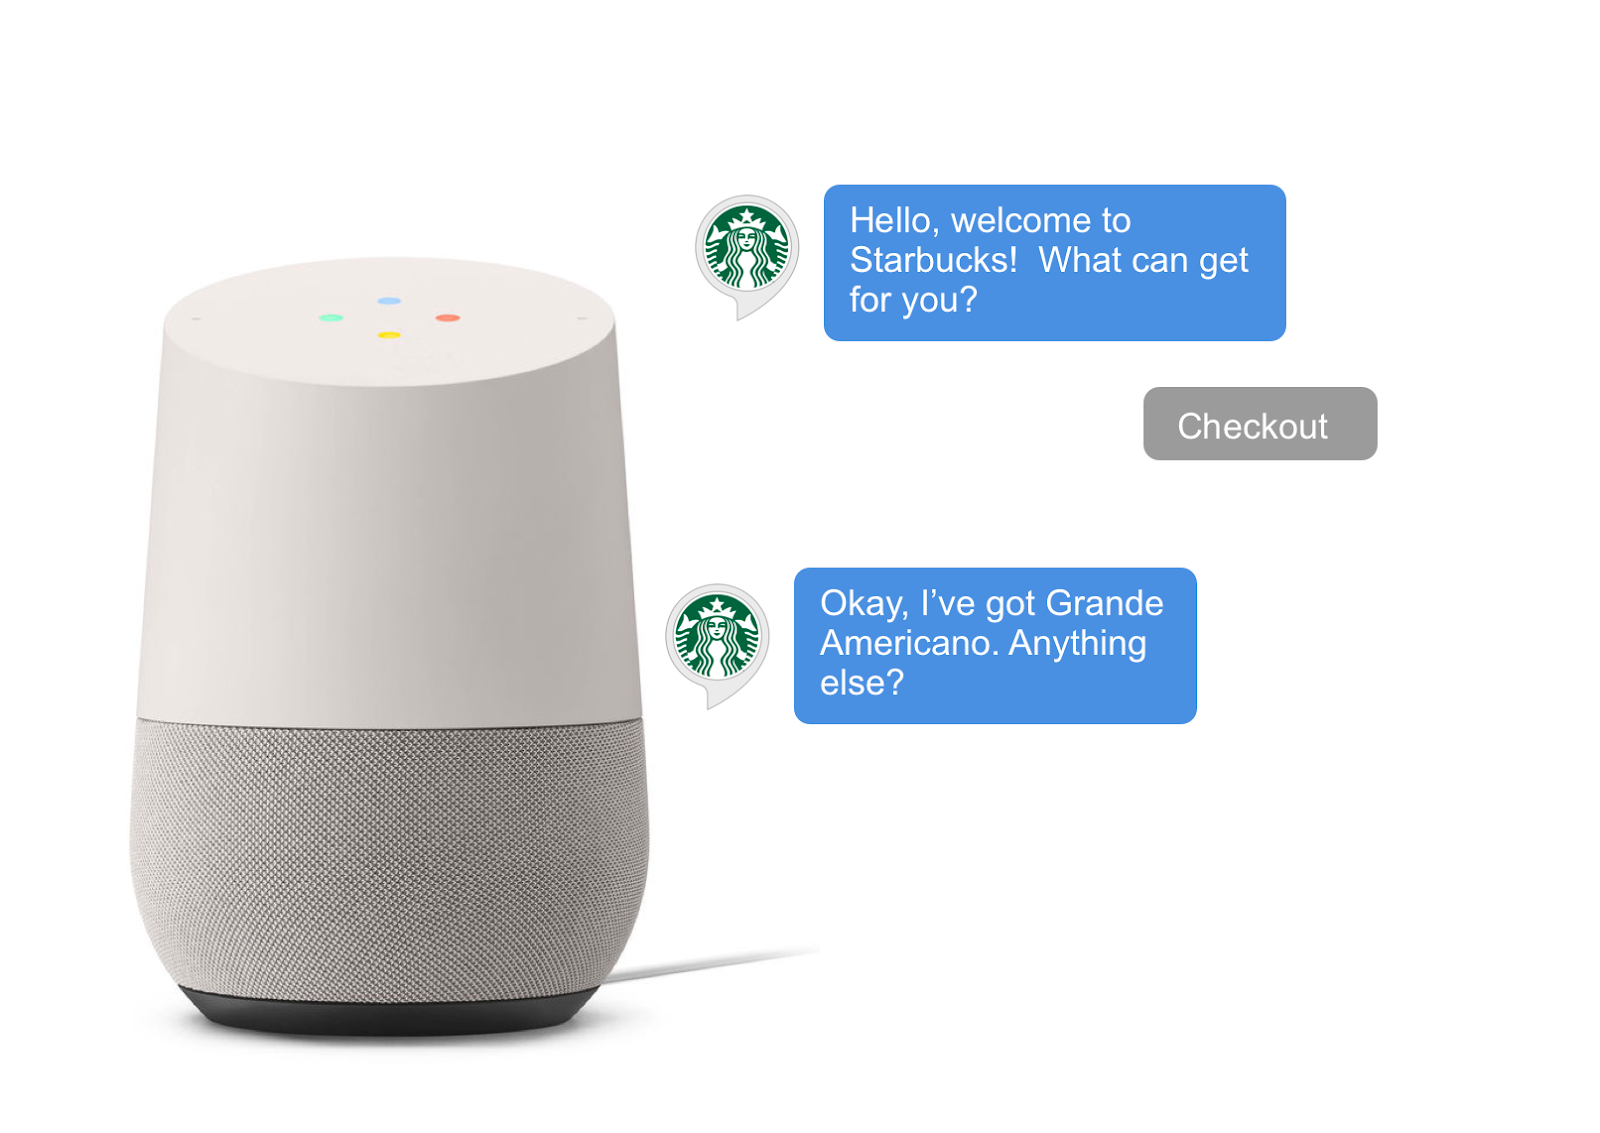
Starting today, users can complete these transactions while in conversation with your Action through speakers, phones, and Smart Displays.This will be supported in the U.S. to start, with more locales coming soon.

Headspace, for example, now offers Android users an option to subscribe to their plans, meaning users can purchase a subscription and immediately see an upgraded experience while talking to their Action. Try it for yourself, by telling your Google Assistant, "meditate with Headspace"

Volley added digital goods to their role-playing game Castle Master so users could enhance their experience by purchasing upgrades. Try it yourself, by asking your Google Assistant to, "play Castle Master."

You can also ensure a seamless premium experience as users move between your Android app and Action for Assistant by letting users access their digital goods across their relationship with you, regardless of where the purchase originated. You can manage your digital goods for both your app and your Action in one place, in the Play Console.

Simplified account linking and user personalization

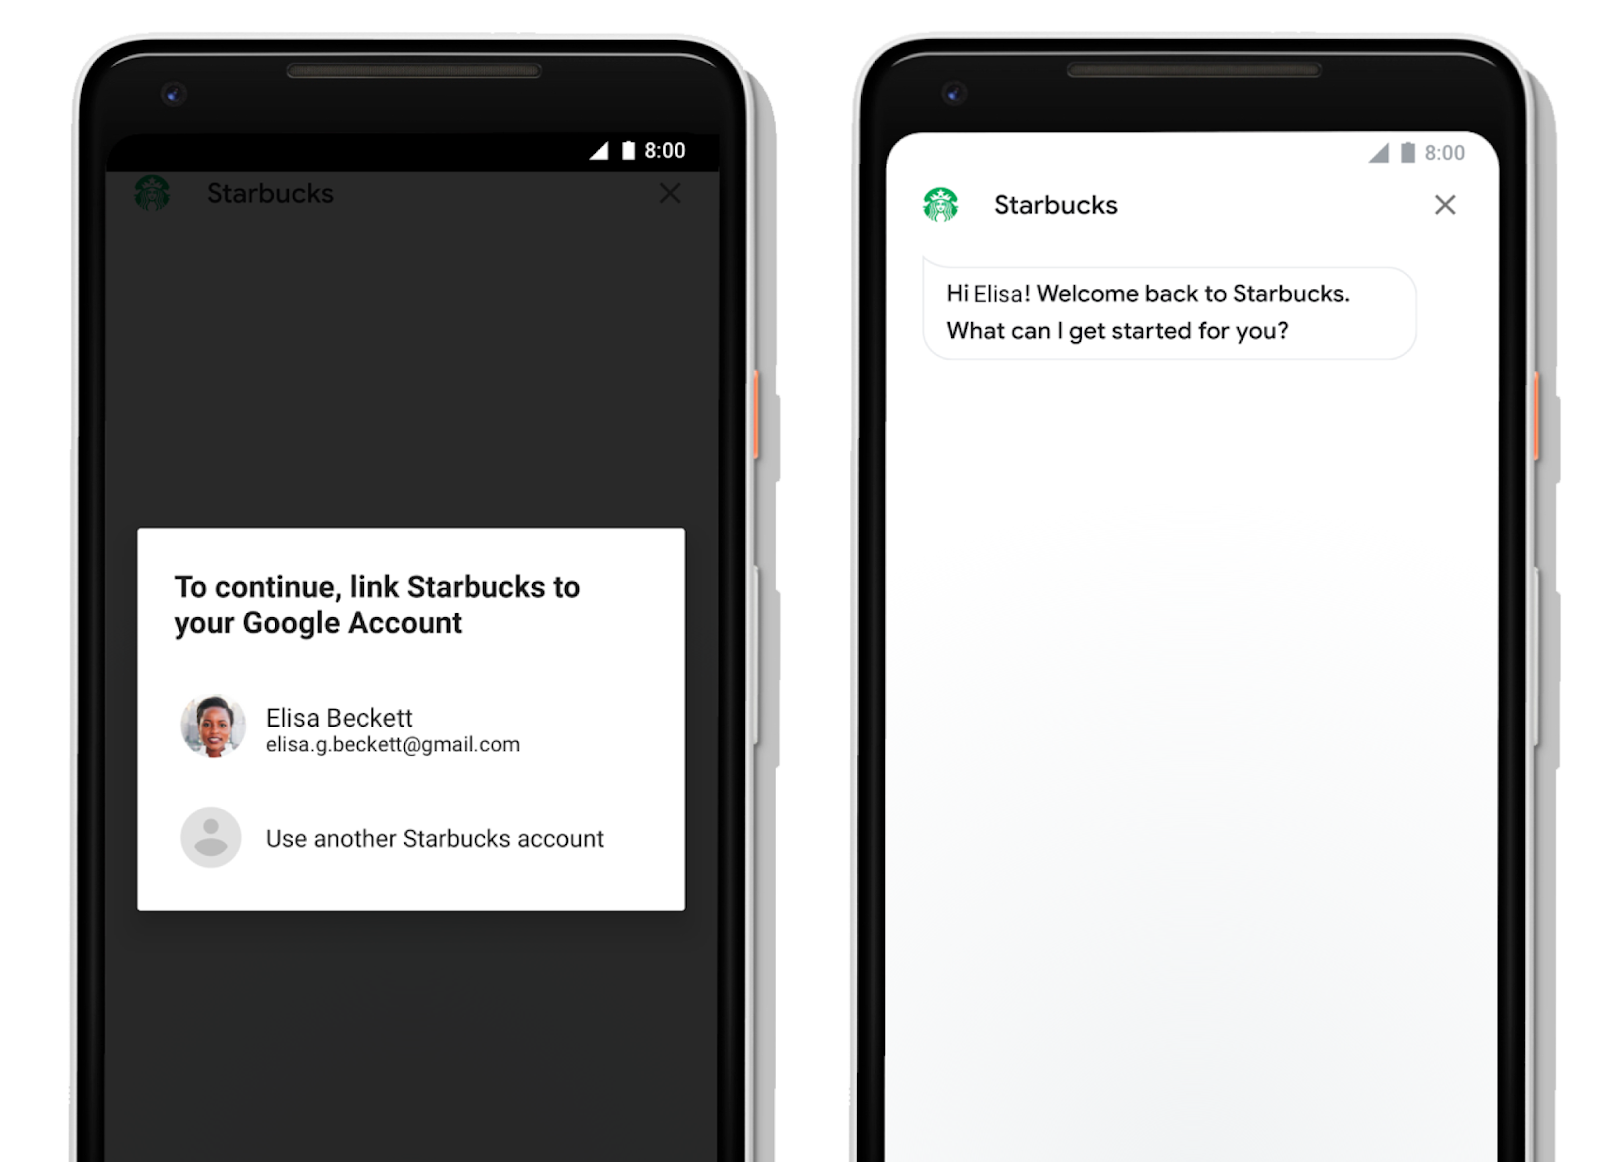
Once your users have access to a premium experience with digital goods, you will want to make sure your Action remembers them. To help with that, we're also introducing Google Sign-In for the Assistant, a secure authentication method that simplifies account linking for your users and reduces user drop off for login. Google Sign-In provides the most convenient way to log in, with just a few taps. With Google Sign-In users can even just use their voice to login and link accounts on smart speakers with the Assistant.

In the past, account linking could be a frustrating experience for your users; having to manually type a username and password--or worse, create a new account--breaks the natural conversational flow. With Google Sign-In, users can now create a new account with just a tap or confirmation through their voice. Most users can even link to their existing accounts with your service using their verified email address.

For developers, Google Sign-In also makes it easier to support login and personalize your Action for users. Previously, developers needed to build an account system and support OAuth-based account linking in order to personalize their Action. Now, you have the option to use Google Sign-In to support login for any user with a Google account.

Starbucks added Google Sign-In for the Assistant to enable users of their Action to access their Starbucks RewardsTM accounts and earn stars for their purchases. Since adding Google Sign-In for the Assistant, they've seen login conversion nearly double for their users versus their previous implementation that required manual account entry.

Check out our guide on the different authentication options available to you, to understand which best meets your needs.

A new visual experience for the phone

Today, we're launching the first major makeover for the Google Assistant on phones, bringing a richer, more interactive interface to the devices we carry with us throughout the day.

Since the Google Assistant made its debut, we've noticed that nearly half of all interactions with the Assistant today include both voice and touch. With this redesign, we're making the Assistant more visually assistive for users, combining voice with touch in a way that gives users the right controls in the right situations.

For developers, we've also made it easy to bring great multimodal experiences to life on the phone and other Assistant-enabled devices with screens, including Smart Displays. This presents a new opportunity to express your brand through richer visuals and with greater real estate in your Action.

To get started, you can now add rich responses to customize your Action for visual interfaces. With rich responses you can build visually engaging Actions for your users with a set of plug-and-play visual components for different types of content. If you've already added rich responses to your Action, these will work automatically on the new mobile redesign. Be sure to also check out our guidance on how and when to use visuals in your Action.

Below you can find some examples of the ways some partners and developers have already started to make use of rich responses to provide more visually interactive experiences for Assistant users on phones.

You can try these yourself by asking your Google Assistant to, "order my usual from Starbucks," "ask H&M Home to give inspiration for my kitchen," "ask Fitstar to workout," or "ask Food Network for chicken recipes."

Ready to get building? Check out our documentation on how to add digital goods and Google Sign-In for Assistant to create premium and personalized experiences for your users across devices.

To improve your visual experience for phone users, check out our conversation design site, our documentation on different surfaces, and our documentation and sample on how you can use rich responses to build with visual components. You can also test and debug your different types of voice, visual, and multimodal experiences in the Actions simulator.

Good luck building, and please continue to share your ideas and feedback with us. Don't forget that once you publish your first Action you can join our community program* and receive your exclusive Google Assistant t-shirt and up to $200 of monthly Google Cloud credit.


*Some countries are not eligible to participate in the developer community program, please review the terms and conditions

Start a new .page today

Posted by Ben Fried, VP, CIO, & Chief Domains Enthusiast

Today we're announcing .page, the newest top-level domain (TLD) from Google Registry.

A TLD is the last part of a domain name, like .com in "google.com" or .google in "blog.google". The .page TLD is a new opportunity for anyone to build an online presence. Whether you're writing a blog, getting your business online, or promoting your latest project, .page makes it simple and more secure to get the word out about the unique things you do.

Check out 10 interesting things some people and businesses are already doing on .page:

  1. Ellen.Page is the website of Academy Award®-nominated actress and producer Ellen Page that will spotlight LGBTQ culture and social causes.
  2. Home.Page is a project by the digital media artist Aaron Koblin, who is creating a living collection of hand-drawn houses from people across the world. Enjoy free art daily and help bring real people home by supporting revolving bail.
  3. ChristophNiemann.Page is the virtual exhibition space of illustrator, graphic designer, and author Christoph Niemann.
  4. Web.Page is a collaboration between a group of designers and developers who will offer a monthly online magazine with design techniques, strategies, and inspiration.
  5. CareerXO.Page by Geek Girl Careers is a personality assessment designed to help women find tech careers they love.
  6. TurnThe.Page by Insurance Lounge offers advice about the transition from career to retirement.
  7. WordAsImage.Page is a project by designer Ji Lee that explores the visualizations of words through typography.
  8. Membrane.Page by Synder Filtration is an educational website about spiral-wound nanofiltration, ultrafiltration, and microfiltration membrane elements and systems.
  9. TV.Page is a SaaS company that provides shoppable video technology for e-commerce, social media, and retail stores.
  10. Navlekha.Page was created by Navlekhā, a Google initiative that helps Indian publishers get their content online with free authoring tools, guidance, and a .page domain for the first 3 years. Since the initiative debuted at Google for India, publishers are creating articles within minutes. And Navlekhā plans to bring 135,000 publishers online over the next 5 years.

Security is a top priority for Google Registry's domains. To help keep your information safe, all .page websites require an SSL certificate, which helps keep connections to your domain secure and helps protect against things like ad malware and tracking injections. Both .page and .app, which we launched in May, will help move the web to an HTTPS-everywhere future.

.page domains are available now through the Early Access Program. For an extra fee, you'll have the chance to get the perfect .page domain name from participating registrar partners before standard registrations become available on October 9th. For more details about registering your domain, check out get.page. We're looking forward to seeing what you'll build on .page!

Google Fonts launches Japanese support

Posted by the Google Fonts team

The Google Fonts catalog now includes Japanese web fonts. Since shipping Korean in February, we have been working to optimize the font slicing system and extend it to support Japanese. The optimization efforts proved fruitful—Korean users now transfer on average over 30% fewer bytes than our previous best solution. This type of on-going optimization is a major goal of Google Fonts.

Japanese presents many of the same core challenges as Korean:

  1. Very large character set
  2. Visually complex letterforms
  3. A complex writing system: Japanese uses several distinct scripts (explained well by Wikipedia)
  4. More character interactions: Line layout features (e.g. kerning, positioning, substitution) break when they involve characters that are split across different slices

The impact of the large character set made up of complex glyph contours is multiplicative, resulting in very large font files. Meanwhile, the complex writing system and character interactions forced us to refine our analysis process.

To begin supporting Japanese, we gathered character frequency data from millions of Japanese webpages and analyzed them to inform how to slice the fonts. Users download only the slices they need for a page, typically avoiding the majority of the font. Over time, as they visit more pages and cache more slices, their experience becomes ever faster. This approach is compatible with many scripts because it is based on observations of real-world usage.

Frequency of the popular Japanese and Korean characters on the web

As shown above, Korean and Japanese have a relatively small set of characters that are used extremely frequently, and a very long tail of rarely used characters. On any given page most of the characters will be from the high frequency part, often with a few rarer characters mixed in.

We tried fancier segmentation strategies, but the most performant method for Korean turned out to be simple:

  1. Put the 2,000 most popular characters in a slice
  2. Put the next 1,000 most popular characters in another slice
  3. Sort the remaining characters by Unicode codepoint number and divide them into 100 equally sized slices

A user of Google Fonts viewing a webpage will download only the slices needed for the characters on the page. This yielded great results, as clients downloaded 88% fewer bytes than a naive strategy of sending the whole font. While brainstorming how to make things even faster, we had a bit of a eureka moment, realizing that:

  1. The core features we rely on to efficiently deliver sliced fonts are unicode-range and woff2
  2. Browsers that support unicode-range and woff2 also support HTTP/2
  3. HTTP/2 enables the concurrent delivery of many small files

In combination, these features mean we no longer have to worry about queuing delays as we would have under HTTP/1.1, and therefore we can do much more fine-grained slicing.

Our analyses of the Japanese and Korean web shows most pages tend to use mostly common characters, plus a few rarer ones. To optimize for this, we tested a variety of finer-grained strategies on the common characters for both languages.

We concluded that the following is the best strategy for Korean, with clients downloading 38% fewer bytes than our previous best strategy:

  1. Take the 2,000 most popular Korean characters, sort by frequency, and put them into 20 equally sized slices
  2. Sort the remaining characters by Unicode codepoint number, and divide them into 100 equally sized slices

For Japanese, we found that segmenting the first 3,000 characters into 20 slices was best, resulting in clients downloading 80% fewer bytes than they would if we just sent the whole font. Having sufficiently reduced transfer sizes, we now feel confident in offering Japanese web fonts for the first time!

Now that both Japanese and Korean are live on Google Fonts, we have even more ideas for further optimization—and we will continue to ship updates to make things faster for our users. We are also looking forward to future collaborations with the W3C to develop new web standards and go beyond what is possible with today's technologies (learn more here).

PS - Google Fonts is hiring :)

Introducing new APIs to improve augmented reality development with ARCore

Posted by Clayton Wilkinson, Developer Platforms Engineer

Today, we're releasing updates to ARCore, Google's platform for building augmented reality experiences, and to Sceneform, the 3D rendering library for building AR applications on Android. These updates include algorithm improvements that will let your apps consume less memory and CPU usage during longer sessions. They also include new functionality that give you more flexibility over content management.

Here's what we added:

Supporting runtime glTF loading in Sceneform

Sceneform will now include an API to enable apps to load gITF models at runtime. You'll no longer need to convert the gITF files to SFB format before rendering. This will be particularly useful for apps that have a large number of gITF models (like shopping experiences).

To take advantage of this new function -- and load models from the cloud or local storage at runtime -- use RenderableSource as the source when building a ModelRenderable.

 private static final String GLTF_ASSET = "https://github.com/KhronosGroup/glTF-Sample-Models/raw/master/2.0/Duck/glTF/Duck.gltf";

// When you build a Renderable, Sceneform loads its resources in the background while returning
// a CompletableFuture. Call thenAccept(), handle(), or check isDone() before calling get().
ModelRenderable.builder()
.setSource(this, RenderableSource.builder().setSource(
this,
Uri.parse(GLTF_ASSET),
RenderableSource.SourceType.GLTF2).build())
.setRegistryId(GLTF_ASSET)
.build()
.thenAccept(renderable -> duckRenderable = renderable)
.exceptionally(
throwable -> {
Toast toast =
Toast.makeText(this, "Unable to load renderable", Toast.LENGTH_LONG);
toast.setGravity(Gravity.CENTER, 0, 0);
toast.show();
return null;
});

Publishing the Sceneform UX Library's source code

Sceneform has a UX library of common elements like plane detection and object transformation. Instead of recreating these elements from scratch every time you build an app, you can save precious development time by taking them from the library. But what if you need to tailor these elements to your specific app needs? Today we're publishing the source code of the UX library so you can customize whichever elements you need.

An example of interactive object transformation, powered by an element in the Sceneform UX Library.

Adding point cloud IDs to ARCore

Several developers have told us that when it comes to point clouds, they'd like to be able to associate points between frames. Why? Because when a point is present in multiple frames, it is more likely to be part of a solid, stable structure rather than an object in motion.

To make this possible, we're adding an API to ARCore that will assign IDs to each individual dot in a point cloud.

These new point IDs have the following elements:

  • Each ID is unique. Therefore, when the same value shows up in more than one frame, you know that it's associated with the same point.
  • Points that go out of view are lost forever. Even if that physical region comes back into view, a point will be assigned a new ID.

New devices

Last but not least, we continue to add ARCore support to more devices so your AR experiences can reach more users across more surfaces. These include smartphones as well as -- for the first time -- a Chrome OS device, the Acer Chromebook Tab 10.

Where to find us

You can get the latest information about ARCore and Sceneform on https://developers.google.com/ar/develop

Ready to try out the samples or have issues, then visit our projects hosted on GitHub:

Code that final mile: from big data analysis to slide presentation

Posted by Wesley Chun (@wescpy), Developer Advocate, Google Cloud

Google Cloud Platform (GCP) provides infrastructure, serverless products, and APIs that help you build, innovate, and scale. G Suite provides a collection of productivity tools, developer APIs, extensibility frameworks and low-code platforms that let you integrate with G Suite applications, data, and users. While each solution is compelling on its own, users can get more power and flexibility by leveraging both together.

In the latest episode of the G Suite Dev Show, I'll show you one example of how you can take advantage of powerful GCP tools right from G Suite applications. BigQuery, for example, can help you surface valuable insight from massive amounts of data. However, regardless of "the tech" you use, you still have to justify and present your findings to management, right? You've already completed the big data analysis part, so why not go that final mile and tap into G Suite for its strengths? In the sample app covered in the video, we show you how to go from big data analysis all the way to an "exec-ready" presentation.

The sample application is meant to give you an idea of what's possible. While the video walks through the code a bit more, let's give all of you a high-level overview here. Google Apps Script is a G Suite serverless development platform that provides straightforward access to G Suite APIs as well as some GCP tools such as BigQuery. The first part of our app, the runQuery() function, issues a query to BigQuery from Apps Script then connects to Google Sheets to store the results into a new Sheet (note we left out CONSTANT variable definitions for brevity):

function runQuery() {
// make BigQuery request
var request = {query: BQ_QUERY};
var queryResults = BigQuery.Jobs.query(request, PROJECT_ID);
var jobId = queryResults.jobReference.jobId;
queryResults = BigQuery.Jobs.getQueryResults(PROJECT_ID, jobId);
var rows = queryResults.rows;

// put results into a 2D array
var data = new Array(rows.length);
for (var i = 0; i < rows.length; i++) {
var cols = rows[i].f;
data[i] = new Array(cols.length);
for (var j = 0; j < cols.length; j++) {
data[i][j] = cols[j].v;
}
}

// put array data into new Sheet
var spreadsheet = SpreadsheetApp.create(QUERY_NAME);
var sheet = spreadsheet.getActiveSheet();
var headers = queryResults.schema.fields;
sheet.appendRow(headers); // header row
sheet.getRange(START_ROW, START_COL,
rows.length, headers.length).setValues(data);

// return Sheet object for later use
return spreadsheet;
}

It returns a handle to the new Google Sheet which we can then pass on to the next component: using Google Sheets to generate a Chart from the BigQuery data. Again leaving out the CONSTANTs, we have the 2nd part of our app, the createColumnChart() function:

function createColumnChart(spreadsheet) {
// create & put chart on 1st Sheet
var sheet = spreadsheet.getSheets()[0];
var chart = sheet.newChart()
.setChartType(Charts.ChartType.COLUMN)
.addRange(sheet.getRange(START_CELL + ':' + END_CELL))
.setPosition(START_ROW, START_COL, OFFSET, OFFSET)
.build();
sheet.insertChart(chart);

// return Chart object for later use
return chart;
}

The chart is returned by createColumnChart() so we can use that plus the Sheets object to build the desired slide presentation from Apps Script with Google Slides in the 3rd part of our app, the createSlidePresentation() function:

function createSlidePresentation(spreadsheet, chart) {
// create new deck & add title+subtitle
var deck = SlidesApp.create(QUERY_NAME);
var [title, subtitle] = deck.getSlides()[0].getPageElements();
title.asShape().getText().setText(QUERY_NAME);
subtitle.asShape().getText().setText('via GCP and G Suite APIs:\n' +
'Google Apps Script, BigQuery, Sheets, Slides');

// add new slide and insert empty table
var tableSlide = deck.appendSlide(SlidesApp.PredefinedLayout.BLANK);
var sheetValues = spreadsheet.getSheets()[0].getRange(
START_CELL + ':' + END_CELL).getValues();
var table = tableSlide.insertTable(sheetValues.length, sheetValues[0].length);

// populate table with data in Sheets
for (var i = 0; i < sheetValues.length; i++) {
for (var j = 0; j < sheetValues[0].length; j++) {
table.getCell(i, j).getText().setText(String(sheetValues[i][j]));
}
}

// add new slide and add Sheets chart to it
var chartSlide = deck.appendSlide(SlidesApp.PredefinedLayout.BLANK);
chartSlide.insertSheetsChart(chart);

// return Presentation object for later use
return deck;
}

Finally, we need a driver application that calls all three one after another, the createColumnChart() function:

function createBigQueryPresentation() {
var spreadsheet = runQuery();
var chart = createColumnChart(spreadsheet);
var deck = createSlidePresentation(spreadsheet, chart);
}

We left out some detail in the code above but hope this pseudocode helps kickstart your own project. Seeking a guided tutorial to building this app one step-at-a-time? Do our codelab at g.co/codelabs/bigquery-sheets-slides. Alternatively, go see all the code by hitting our GitHub repo at github.com/googlecodelabs/bigquery-sheets-slides. After executing the app successfully, you'll see the fruits of your big data analysis captured in a presentable way in a Google Slides deck:

This isn't the end of the story as this is just one example of how you can leverage both platforms from Google Cloud. In fact, this was one of two sample apps featured in our Cloud NEXT '18 session this summer exploring interoperability between GCP & G Suite which you can watch here:

Stay tuned as more examples are coming. We hope these videos plus the codelab inspire you to build on your own ideas.

New experimental features for Daydream

Posted by Jonathan Huang, Senior Product Manager, Google AR/VR

Since we first launched Daydream, developers have responded by creating virtual reality (VR) experiences that are entertaining, educational and useful. Today, we're announcing a new set of experimental features for developers to use on the Lenovo Mirage Solo—our standalone Daydream headset—to continue to push the platform forward. Here's what's coming:

Experimental 6DoF Controllers

First, we're adding APIs to support positional controller tracking with six degrees of freedom—or 6DoF—to the Mirage Solo. With 6DoF tracking, you can move your hands more naturally in VR, just like you would in the physical world. To date, this type of experience has been limited to expensive PC-based VR with external tracking.

We've also created experimental 6DoF controllers that use a unique optical tracking system to help developers start building with 6DoF features on the Mirage Solo. Instead of using expensive external cameras and sensors that have to be carefully calibrated, our system uses machine learning and off-the-shelf parts to accurately estimate the 3D position and orientation of the controllers. We're excited about this approach because it can reduce the need for expensive hardware and make 6DoF experiences more accessible to more people.

We've already put these experimental controllers in the hands of a few developers and we're excited for more developers to start testing them soon.

Experimental 6DoF controllers

See-Through Mode

We're also introducing what we call see-through mode, which gives you the ability to see what's right in front of you in the physical world while you're wearing your VR headset.

See-through mode takes advantage of our WorldSense technology, which was built to provide accurate, low latency tracking. And, because the tracking cameras on the Mirage Solo are positioned at approximately eye-distance apart, you also get precise depth perception. The result is a see-through mode good enough to let you play ping pong with your headset on.

Playing ping pong with see-through mode on the Mirage Solo.

The combination of see-through mode and the Mirage Solo's tracking technology also opens up the door for developers to blend the digital and physical worlds in new ways by building Augmented Reality (AR) prototypes. Imagine, for example, an interior designer being able to plan a new layout for a room by adding virtual chairs, tables and decorations on top of the actual space.

Experimental app using objects from Poly, see-through mode and 6DoF Controllers to design a space in our office.

Smartphone Android Apps in VR

Finally, we're introducing the capability to open any smartphone Android app on your Daydream device, so you can use your favorite games, tools and more in VR. For example, you can play the popular indie game Mini Metro on a virtual big screen, so you have more space to view and plan your own intricate public transit system.

Playing Mini Metro on a virtual big screen in VR.

With support for Android Apps in VR, developers will be able to add Daydream VR support to their existing 2D applications without having to start from scratch. The Chrome team re-used the existing 2D interfaces for Chrome Browser Sync, settings and more to provide a feature-rich browsing experience in Daydream.

The Chrome app on Daydream uses the 2D settings within VR.

Try These Features

We've really loved building with these tools and can't wait to see what you do with them. See-through mode and Android Apps in VR will be available for all developers to try soon.

If you're a developer in the U.S., click here to learn more and apply now for an experimental 6DoF controller developer kit.

Flutter Release Preview 2: Pixel-Perfect on iOS

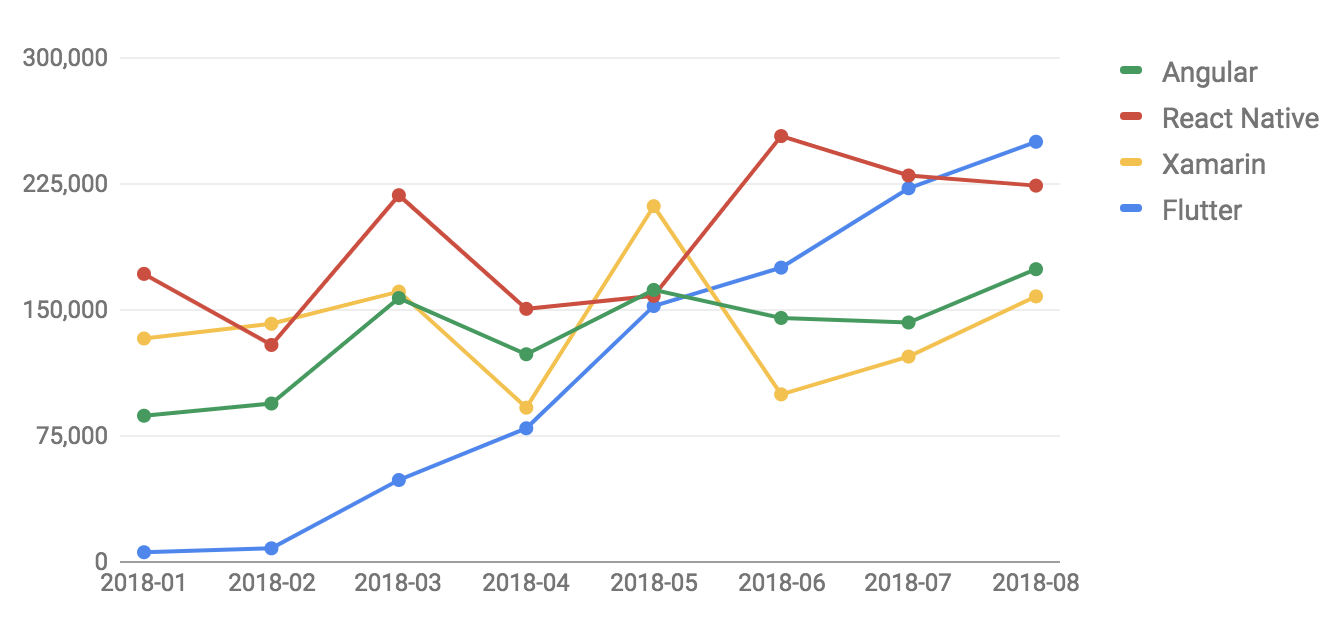
Posted by the Flutter Team at Google

Flutter is Google's new mobile app toolkit for crafting beautiful native interfaces on iOS and Android in record time. Today, during the keynote of Google Developer Days in Shanghai, we are announcing Flutter Release Preview 2: our last major milestone before Flutter 1.0.

This release continues the work of completing core scenarios and improving quality, beginning with our initial beta release in February through to the availability of our first Release Preview earlier this summer. The team is now fully focused on completing our 1.0 release.

What's New in Release Preview 2

The theme for this release is pixel-perfect iOS apps. While we designed Flutter with highly brand-driven, tailored experiences in mind, we heard feedback from some of you who wanted to build applications that closely follow the Apple interface guidelines. So in this release we've greatly expanded our support for the "Cupertino" themed controls in Flutter, with an extensive library of widgets and classes that make it easier than ever to build with iOS in mind.

A reproduction of the iOS Settings home page, built with Flutter

Here are a few of the new iOS-themed widgets added in Flutter Release Preview 2:

And more have been updated, too:

As ever, the Flutter documentation is the place to go for detailed information on the Cupertino* classes. (Note that at the time of writing, we were still working to add some of these new Cupertino widgets to the visual widget catalog).

We've made progress to complete other scenarios also. Taking a look under the hood, support has been added for executing Dart code in the background, even while the application is suspended. Plugin authors can take advantage of this to create new plugins that execute code upon an event being triggered, such as the firing of a timer, or the receipt of a location update. For a more detailed introduction, read this Medium article, which demonstrates how to use background execution to create a geofencing plugin.

Another improvement is a reduction of up to 30% in our application package size on both Android and iOS. Our minimal Flutter app on Android now weighs in at just 4.7MB when built in release mode, a savings of 2MB since we started the effort — and we're continuing to identify further potential optimizations. (Note that while the improvements affect both iOS and Android, you may see different results on iOS because of how iOS packages are built).

Growing Momentum

As many new developers continue to discover Flutter, we're humbled to note that Flutter is now one of the top 50 active software repositories on GitHub:

We declared Flutter "production ready" at Google I/O this year; with Flutter getting ever closer to the stable 1.0 release, many new Flutter applications are being released, with thousands of Flutter-based apps already appearing in the Apple and Google Play stores. These include some of the largest applications on the planet by usage, such as Alibaba (Android, iOS), Tencent Now (Android, iOS), and Google Ads (Android, iOS). Here's a video on how Alibaba used Flutter to build their Xianyu app (Android, iOS), currently used by over 50 million customers in China:

We take customer satisfaction seriously and regularly survey our users. We promised to share the results back with the community, and our most recent survey shows that 92% of developers are satisfied or very satisfied with Flutter and would recommend Flutter to others. When it comes to fast development and beautiful UIs, 79% found Flutter extremely helpful or very helpful in both reaching their maximum engineering velocity and implementing an ideal UI. And 82% of Flutter developers are satisfied or very satisfied with the Dart programming language, which recently celebrated hitting the release milestone for Dart 2.

Flutter's strong community growth can be felt in other ways, too. On StackOverflow, we see fast growing interest in Flutter, with lots of new questions being posted, answered and viewed, as this chart shows:

Number of StackOverflow question views tagged with each of four popular UI frameworks over time

Flutter has been open source from day one. That's by design. Our goal is to be transparent about our progress and encourage contributions from individuals and other companies who share our desire to see beautiful user experiences on all platforms.

Getting Started

How do you upgrade to Flutter Release Preview 2? If you're on the beta channel already, it just takes one command:

$ flutter upgrade

You can check that you have Release Preview 2 installed by running flutter --version from the command line. If you have version 0.8.2 or later, you have everything described in this post.

If you haven't tried Flutter yet, now is the perfect time, and flutter.io has all the details to download Flutter and get started with your first app.

When you're ready, there's a whole ecosystem of example apps and code snippets to help you get going. You can find samples from the Flutter team in the flutter/samples repo on GitHub, covering things like how to use Material and Cupertino, approaches for deserializing data encoded in JSON, and more. There's also a curated list of samples that links out to some of the best examples created by the Flutter community.

You can also learn and stay up to date with Flutter through our hands-on videos, newsletters, community articles and developer shows. There are discussion groups, chat rooms, community support, and a weekly online hangout available to you to help you along the way as you build your application. Release Preview 2 is our last release preview. Next stop: 1.0!

Build new experiences with the Google Photos Library API

Posted by Jan-Felix Schmakeit, Google Photos Developer Lead

As we shared in May, people create and consume photos and videos in many different ways, and we think it should be easier to do more with the photos people take, across more of the apps and devices we all use. That's why we created the Google Photos Library API: to give you the ability to build photo and video experiences in your products that are smarter, faster, and more helpful.

After a successful developer preview over the past few months, the Google Photos Library API is now generally available. If you want to build and test your own experience, you can visit our developer documentation to get started. You can also express your interest in joining the Google Photos partner program if you are planning a larger integration.

Here's a quick overview of the Google Photos Library API and what you can do:

Whether you're a mobile, web, or backend developer, you can use this REST API to utilize the best of Google Photos and help people connect, upload, and share from inside your app. We are also launching client libraries in multiple languages that will help you get started quicker.

Users have to authorize requests through the API, so they are always in the driver's seat. Here are a few things you can help your users do:

  • Easily find photos, based on
    • what's in the photo
    • when it was taken
    • attributes like media format
  • Upload directly to their photo library or an album
  • Organize albums and add titles and locations
  • Use shared albums to easily transfer and collaborate

Putting machine learning to work in your app is simple too. You can use smart filters, like content categories, to narrow down or exclude certain types of photos and videos and make it easier for your users to find the ones they're looking for.

Thanks to everyone who provided feedback throughout our developer preview, your contributions helped make the API better. You can read our release notes to follow along with any new releases of our API. And, if you've been using the Picasa Web Albums API, here's a migration guide that will help you move to the Google Photos Library API.