Field Programmable Gate Arrays (FPGAs) have been around for decades and historically, the development of their specific toolchains happened in separate ecosystems that were driven by the vendors themselves. This has changed in recent years with the development of vendor-neutral open source toolchains, but this has revealed a new problem: the need for an abstraction layer to describe and define FPGA architectures through a standard format.
FPGA toolchains are not trivial, but roughly speaking, you can divide the process of “compiling” FPGA-targeted code in a Hardware Description Language (HDL) into three stages: synthesis, place and route, and bitstream generation. A standard format provides a common description of the architectures and serves as a bridge between the open source and closed proprietary tools responsible for various parts of the process.This includes the open source Yosys for synthesis, VtR and nextpnr for place and route, and vendor tooling from Xilinx, Intel, Lattice, QuickLogic, etc.
The introduction of a common format enables a shared methodology where specific building blocks are interchangeable. With that in mind, Google and
Antmicro started the
FPGA Interchange format project, providing a unified framework to lower the entry barriers for developers to swiftly move from one tool to another. In collaboration, Antmicro and other CHIPS Alliance members are developing the Interchange format definition and related tools aiming to become a development standard that the FPGA industry needs.
Components
The Interchange format provides three key descriptions to describe an FPGA and to interact with the various tools involved:
- Device resources: defines the FPGA internal structure and the technological cell libraries describing FPGA logic blocks (basic blocks like flip-flops and complex like DSP cells).
- Logical netlist: post-synthesized netlist compatible with the Interchange.
- Physical netlist: collection of all placement locations and physical routing of the nets and resources produced by the place and route tool.
A challenge behind the creation of a standard format lies in the definition of the line between generalization and specificity of an FPGA architecture. By focusing on the only architecture type in mainstream use on the market today, namely island-based (also called tile-based) FPGAs, the standard reaches a level of universality and conciseness, which makes it easy to work with, adopt, and implement.
How it works
As previously mentioned, the FPGA Interchange format aims at lowering the barriers and building bridges between different place and route tools that can read and write using the same convention.
To achieve this, Antmicro and Google chose
nextpnr as the first place and route tool to adopt the Interchange format. In the past few months, Antmicro extended nextpnr with FPGA Interchange format capabilities to place and route basic designs for the Xilinx 7-series and Lattice Nexus FPGA families.
To achieve initial support for Xilinx devices, the vendor’s own interesting
RapidWright framework has also been introduced to the flow in collaboration with Xilinx’s research team. It is specifically used to write the device database in the Interchange format, consisting of all the device information.
Additionally, RapidWright can read and write the physical netlists to generate design checkpoint files that can be opened in Xilinx’s Vivado tool.
Example flow
The default open source flow for Xilinx devices uses Yosys to synthesize the design and VPR or nextpnr for place and route. The last step, bitstream generation, uses the open source FPGA Assembly
FASM format to generate the file used for programming the FPGA. VPR supported this format natively, and nextpnr has been extended to support it as a part of the interchange format support work.

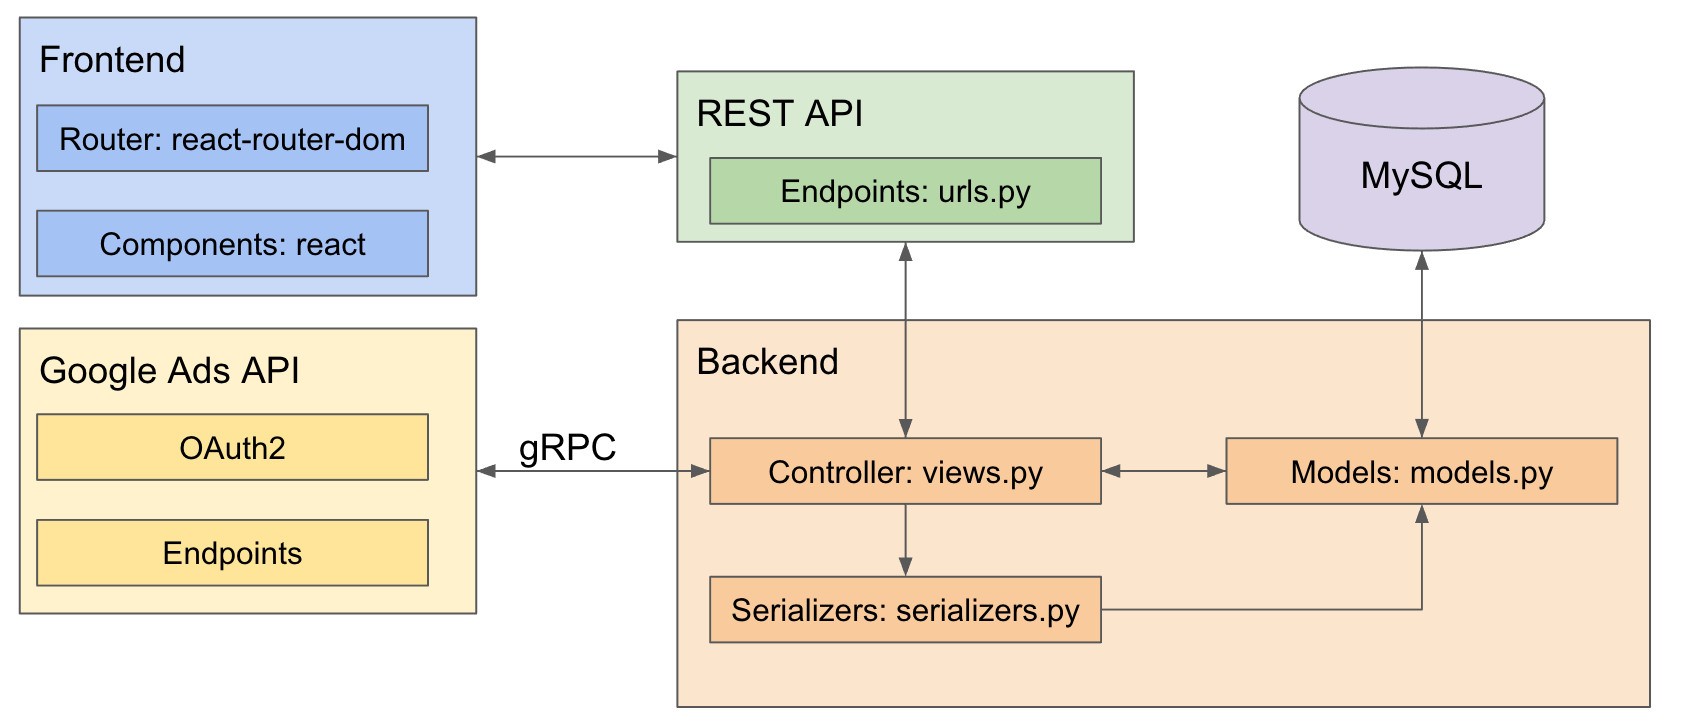
Now, by using the interchange format, you can create your flow from building blocks with the possibility to use a different tool (either open source or proprietary) for each step. A sample which illustrates this mix-and-match nature of interchange-capable tooling may look as depicted in the diagram above.
For processing any design, you need the FPGA device description files. These are generated in the following matter:
- RapidWright generates the device description in the Interchange format.
- The device description is translated by a dedicated script into the data-format suitable for nextpnr. The script will be eventually integrated into nextpnr enabling it to read the interchange format device description natively.
The device description has to be generated only once, and will normally be distributed with the toolchain installation package so that the user will not have to bother with this part. With the device architecture in place, a digital design can be processed with the toolchain.
This flow example shows how the Interchange creates a bridge between an open source flow with Yosys and nextpnr, and a closed source one using Vivado, demonstrating the possibility of interchanging tools thanks to a shared format.
To push forward the adoption of the format, the effort was recently onboarded into
CHIPS Alliance, whose goal is to build an open source ASIC/FPGA ecosystem—including cores, I/O IPs, interconnect standards as well as digital and analog tooling—to radically transform the ASIC/FPGA design landscape.
Apart from allowing various existing tools to interoperate and share development efforts today, the Interchange format is a natural addition to the CHIPS Alliance in that it opens up smart ways to rapidly design and prototype new FPGA architectures, reduce the iteration times to implement, or add support to a place and route tool for a new architecture.
To further the collaboration around the Interchange Format,
Xilinx has just joined the CHIPS Alliance to participate in the newly established FPGA workgroup of the Alliance which will include this and other FPGA-related projects that CHIPS Alliance is hosting.
Plans for the coming months
Besides nextpnr, there are other open source place and route tools slated to adopt the Interchange format as well, such as the Versatile Place and Route (VPR) from the
Verilog-to-Routing project (VtR).
VtR can be used to place and route designs on FPGAs such as the Xilinx 7-series and QuickLogic’s eFPGA. This can only be done using the VPR data model and device description for now as it doesn’t support the Interchange format.
Antmicro is now implementing native support of the format within VPR, therefore enabling the use of place and route using different tools interchangeably; e.g. jumping from VPR placement output to nextpnr routing, allowing for faster improvements in algorithms.
Those benefits will extend to not only VPR and nextpnr, but to any other closed source tools, or new open source ones that adopt and implement the Interchange format.
Having a standard Interchange format at the tooling developers’ disposal lowers the barriers to developing new open source tools in this area. As example use cases, it enables new approaches to partial dynamic reconfiguration and the exploration of different place and route algorithms.
Customers will benefit from a wider range of flexible and customizable tools and ultimately get more control over their products. Antmicro provides end-to-end custom FPGA services, which involve reusable open source IP blocks, fast and reconfigurable SoCs, innovative tooling, and helping customers adopt the latest advances in software-driven FPGA development methodologies.
By Alessandro Comodi and Tom Michalak – Antmicro