We're continuously working to improve the Pixel — making it more helpful, more capable, and more fun — with regular updates, such as the recent V8.2 update to the Camera app. One such improvement (launched on Pixel 5 and Pixel 4a 5G in October) is a feature that operates “under the hood”, HDR+ with Bracketing. This feature works by merging images taken with different exposure times to improve image quality (especially in shadows), resulting in more natural colors, improved details and texture, and reduced noise.
Why Are HDR Scenes Hard to Capture?
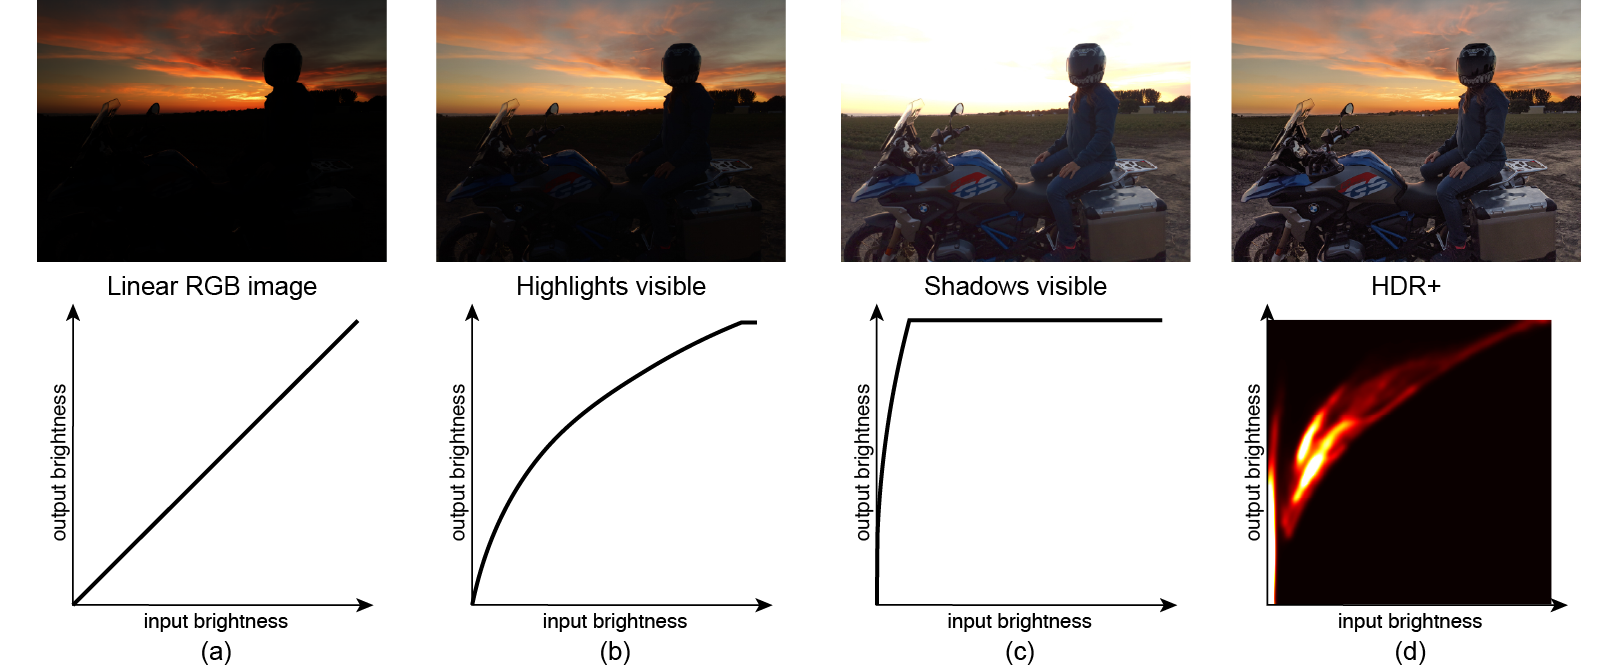
The original HDR+ burst photography system is the engine behind high-quality mobile photography, which captures a rapid series of deliberately underexposed images, then combines and renders them in a way that preserves detail across the range of tones. But this system had one limitation: scenes with high dynamic range (HDR) like the one below were noisy in the shadows because all images captured are underexposed.
 |
| The same photo using HDR+ (red outline) and HDR+ with Bracketing (green outline). While the characteristic HDR+ look remains the same, bracketing improves image quality, especially in shadows, with more natural colors, improved details and texture, and reduced noise. |
Capturing HDR scenes is difficult because of the physical constraints of image sensors combined with limited signal in the shadows. We can correctly expose either the shadows or the highlights, but not both at the same time.
 |
| The same scene shot with different exposure settings and tonemapped to similar overall brightness. Left/Top: Exposure set for the highlights. The bright blue sky is preserved, but the shadows are very noisy. Right/Bottom: Exposure set for the shadows. Noise in the shadows is reduced, but the sky is clipped (white). |
Photographers sometimes work around these limitations by taking two different exposures and combining them. This approach, known as exposure bracketing, can deliver the best of both worlds, but it is time-consuming to do by hand. It is also challenging in computational photography because it requires:
- Capturing additional long exposure frames while maintaining the fast, predictable capture experience of the Pixel camera.
- Taking advantage of long exposure frames while avoiding ghosting artifacts caused by motion between frames.
To avoid these challenges, the original HDR+ system used a different approach to handle high dynamic range scenes.
The Limits of HDR+
The capture strategy used by HDR+ is based on underexposure, which avoids loss of detail in the highlights. While this strategy comes at the expense of noise in the shadows, HDR+ offsets the increased noise through the use of burst photography.
 |
| Using bursts to improve image quality. HDR+ starts from a burst of full-resolution raw images (left). Depending on conditions, between 2 and 15 images are aligned and merged into a computational raw image (middle). The merged image has reduced noise and increased dynamic range, leading to a higher quality final result (right). |
This approach works well for scenes with moderate dynamic range, but breaks down for HDR scenes. To understand why, we need to take a closer look at how two types of noise get into an image.
Noise in Burst Photography
One important type of noise is called shot noise, which depends only on the total amount of light captured — the sum of N frames, each with E seconds of exposure time has the same amount of shot noise as a single frame exposed for N × E seconds. If this were the only type of noise present in captured images, burst photography would be as efficient as taking longer exposures. Unfortunately, a second type of noise, read noise, is introduced by the sensor every time a frame is captured. Read noise doesn’t depend on the amount of light captured but instead depends on the number of frames taken — that is, with each frame taken, an additional fixed amount of read noise is added.
This is why using burst photography to reduce total noise isn’t as efficient as simply taking longer exposures: taking multiple frames can reduce the effect of shot noise, but will also increase read noise. Even though read noise increases with the number of frames, it is still possible to reduce the overall noisiness with burst photography, but it becomes less efficient. If one were to break a long exposure into N shorter exposures, the ratio of signal to noise in the final image would be lower because of the additional read noise. In this case, to get back to the signal-to-noise ratio in the single long exposure, one would need to merge N2 short-exposure frames. In the example below, if a long exposure were divided into 12 short exposures, we'd have to capture 144 (12 × 12) short frames to match the signal-to-noise ratio in the shadows! Capturing and processing this many frames would be much more time consuming — burst capture and processing could take over a minute and result in a poor user experience. Instead, with bracketing one can capture both short and long exposures — combining highlight protection and noise reduction.
 |
| Left: The result of merging 12 short-exposure frames in Night Sight mode. Right: A single frame whose exposure time is 12 times longer than an individual short exposure. The longer exposure has significantly less noise in the shadows but sacrifices the highlights. |
Solving with Bracketing
While the challenges of bracketing prevented the original HDR+ system from using it, incremental improvements since then, plus a recent concentrated effort, have made it possible in the Camera app. To start, adding bracketing to HDR+ required redesigning the capture strategy. Capturing is complicated by zero shutter lag (ZSL), which underpins the fast capture experience on Pixel. With ZSL, the frames displayed in the viewfinder before the shutter press are the frames we use for HDR+ burst merging. For bracketing, we capture an additional long exposure frame after the shutter press, which is not shown in the viewfinder. Note that holding the camera still for half a second after the shutter press to accommodate the long exposure can help improve image quality, even with a typical amount of handshake.
 |
| Capture strategy. Top: The original HDR+ method captures short exposures before the shutter press, six in this example. Bottom: HDR+ with Bracketing captures five short exposures before the shutter press and one long exposure after the shutter press. |
For Night Sight, the capture strategy isn't constrained by the viewfinder — because all frames are captured after the shutter press while the viewfinder is stopped, this mode easily accommodates capturing longer exposure frames. In this case, we capture three long exposures to further reduce noise.
 |
| Capture strategy for Night Sight. Top: The original Night Sight captured 15 short exposure frames. Bottom: Night Sight with bracketing captures 12 short and 3 long exposures. |
The Merging Algorithm
When merging bracketed shots, we choose one of the short frames as the reference frame to avoid potentially clipped highlights and motion blur. All other frames are aligned to this frame before they are merged. This introduces a challenge — for complex scene motion or occluded regions, it is impossible to find exactly matching regions and a naïve merge algorithm would produce ghosting artifacts in these cases.
 |
| Left: Ghosting artifacts are visible around the silhouette of a moving person, when deghosting is disabled. Right: Robust merging produces a clean image. |
To address this, we designed a new spatial merge algorithm, similar to the one used for Super Res Zoom, that decides per pixel whether image content should be merged or not. This deghosting is more complicated for frames with different exposures. Long exposure frames have different noise characteristics, clipped highlights, and different amounts of motion blur, which makes comparisons with the short exposure reference frame more difficult. In addition, ghosting artifacts are more visible in bracketed shots, because noise that would otherwise mask these errors is reduced. Despite those challenges, our algorithm is as robust to these issues as the original HDR+ and Super Res Zoom and doesn’t produce ghosting artifacts. At the same time, it merges images 40% faster than its predecessors. Because it merges RAW images early in the photographic pipeline, we were able to achieve all of those benefits while keeping the rest of processing and the signature HDR+ look unchanged. Furthermore, users who prefer to use computational RAW images can take advantage of those image quality and performance improvements.
Bracketing on Pixel
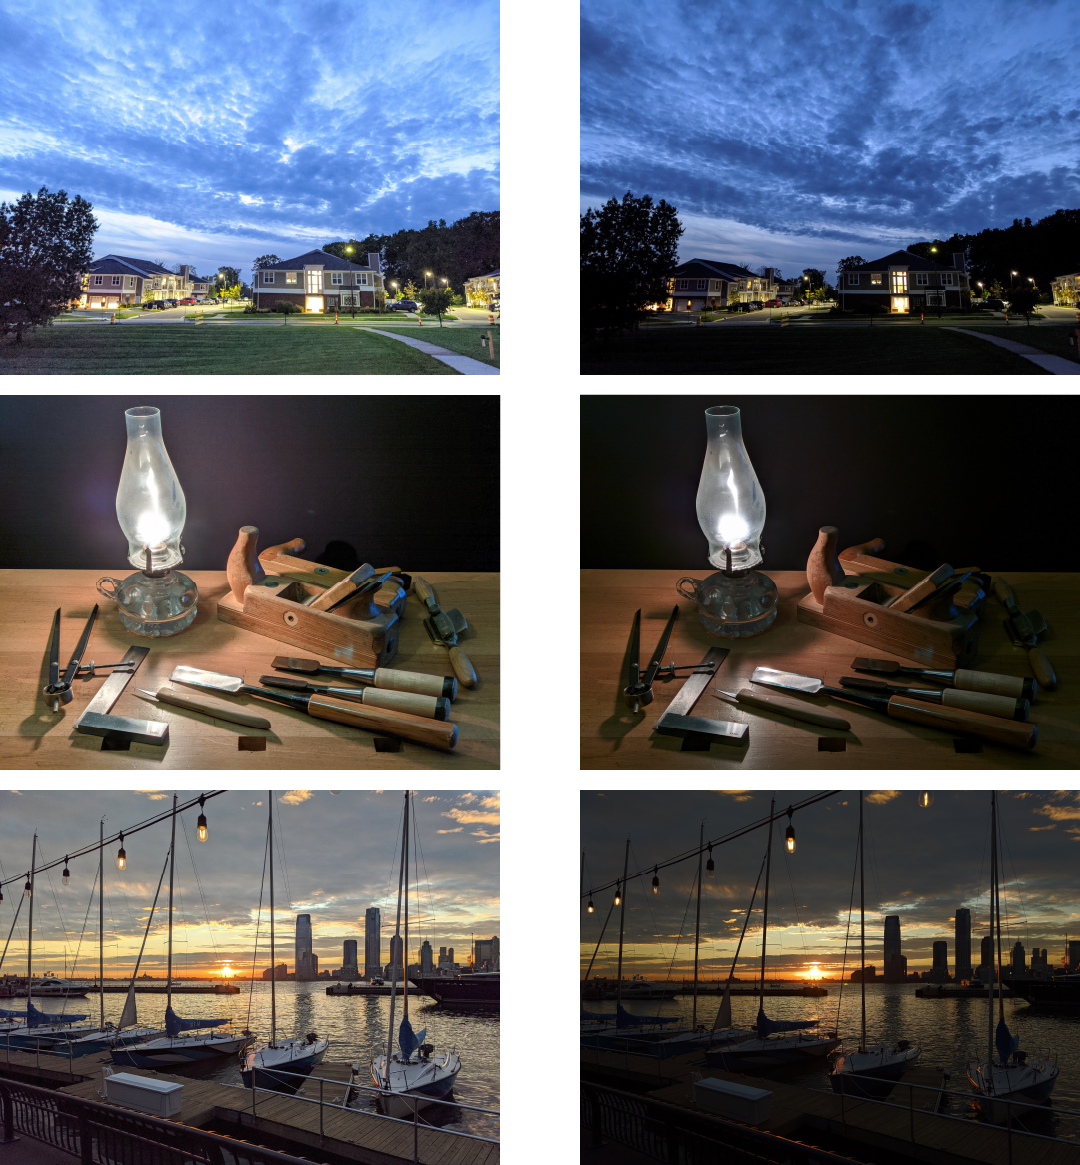
HDR+ with Bracketing is available to users of Pixel 4a (5G) and 5 in the default camera, as well as in Night Sight and Portrait modes. For users of Pixel 4 and 4a, the Google Camera app supports bracketing in Night Sight mode. No user interaction is needed to activate HDR+ with Bracketing — depending on the dynamic range of the scene, and the presence of motion, HDR+ with bracketing chooses the best exposures to maximize image quality (examples).
Acknowledgements
HDR+ with Bracketing is the result of a collaboration across several teams at Google. The project would not have been possible without the joint efforts of Sam Hasinoff, Dillon Sharlet, Kiran Murthy, Mike Milne, Andy Radin, Nicholas Wilson, Navin Sarma, Gabriel Nava, Emily To, Sushil Nath, Alexander Schiffhauer, Isaac Reynolds, Bill Strathearn, Marius Renn, Alex Hong, Jose Ricardo Lima, Bob Hung, Ying Chen Lou, Joy Hsu, Blade Chiu, David Massoud, Jean Hsu, Ellie Yang, and Marc Levoy.