 Posted by Matthew McCullough – VP of Product Management, Android Developer
The first beta of Android 16 is now available, which means it's time to open the experience up to both developers and early adopters. You can now enroll any supported Pixel device here to get this and future Android Beta updates over-the-air.
This build includes support for the future of app adaptivity, Live Updates, the Advanced Professional Video format, and more. We’re looking forward to hearing what you think, and thank you in advance for your continued help in making Android a platform that works for everyone.
Android adaptive apps
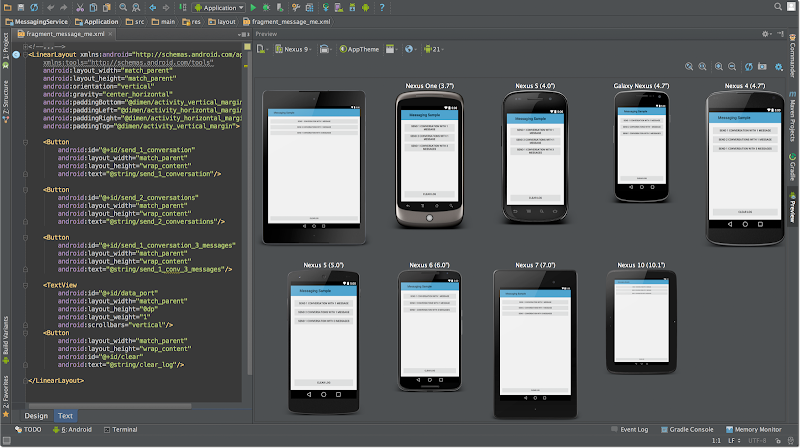
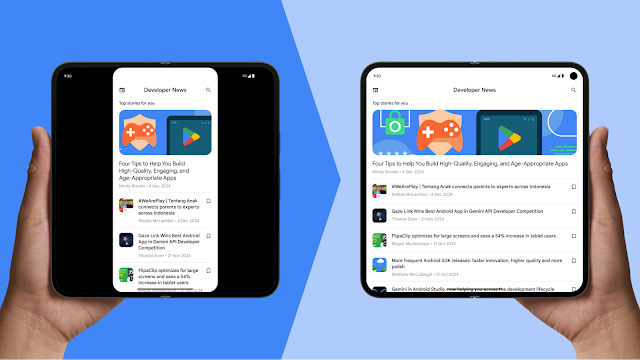
Users expect apps to work seamlessly on all their devices, regardless of display size and form factor. To that end, Android 16 is phasing out the ability for apps to restrict screen orientation and resizability on large screens. This is similar to features OEMs have added over the last several years to large screen devices to allow users to run apps at any window size and aspect ratio.
On screens larger than 600dp wide, apps that target API level 36 will have app windows that resize; you should check your apps to ensure your existing UIs scale seamlessly, working well across portrait and landscape aspect ratios. We're providing frameworks, tooling, and libraries to help.
Key changes:
Timeline:
Live Updates
Live Updates are a new class of notifications that help users monitor and quickly access important ongoing activities.
The new ProgressStyle notification template provides a consistent user experience for Live Updates, helping you build for these progress-centric user journeys: rideshare, delivery, and navigation. It includes support for custom icons for the start, end, and current progress tracking, segments and points, user journey states, milestones, and more.
ProgressStyle notifications are suggested only for ride sharing, food delivery, and navigation use cases.
@Override
protected Notification getNotification() {
   return new Notification.Builder(mContext, CHANNEL_ID)
      .setSmallIcon(R.drawable.ic_app_icon)
      .setContentTitle("Ride requested")
      .setContentText("Looking for nearby drivers")
      .setStyle(
          new Notification.ProgressStyle()
          .addProgressSegment(
              new Notification.ProgressStyle.Segment(100)
                  .setColor(COLOR_ORANGE)
           ).setProgressIndeterminate(true)
      ).build();
}
Camera and media updates
Android 16 advances support for the playback, creation, and editing of high-quality media, a critical use case for social and productivity apps.
Advanced Professional Video
Android 16 introduces support for the Advanced Professional Video (APV) codec which is designed to be used for professional level high quality video recording and post production.
The APV codec standard has the following features:
- Perceptually lossless video quality (close to raw video quality)
- Low complexity and high throughput intra-frame-only coding (without pixel domain prediction) to better support editing workflows
- Support for high bit-rate range up to a few Gbps for 2K, 4K and 8K resolution content, enabled by a lightweight entropy coding scheme
- Frame tiling for immersive content and for enabling parallel encoding and decoding
- Support for various chroma sampling formats and bit-depths
- Support for multiple decoding and re-encoding without severe visual quality degradation
- Support multi-view video and auxiliary video like depth, alpha, and preview
- Support for HDR10/10+ and user-defined metadata
A reference implementation of APV is provided through the OpenAPV project. Android 16 will implement support for the APV 422-10 Profile that provides YUV 422 color sampling along with 10-bit encoding and for target bitrates of up to 2Gbps.
Camera night mode scene detection
To help your app know when to switch to and from a night mode camera session, Android 16 adds EXTENSION_NIGHT_MODE_INDICATOR. If supported, it's available in the CaptureResult within Camera2.
This is the API we briefly mentioned as coming soon in the "How Instagram enabled users to take stunning low light photos" blogpost. That post is a practical guide on how to implement night mode together with a case study that links higher-quality, in-app, night mode photos with an increase in the number of photos shared from the in-app camera.
Vertical Text
Android 16 adds low-level support for rendering and measuring text vertically to provide foundational vertical writing support for library developers. This is particularly useful for languages like Japanese that commonly use vertical writing systems. A new flag, VERTICAL_TEXT_FLAG, has been added to the Paint class. When this flag is set using Paint.setFlags, Paint’s text measurement APIs will report vertical advances instead of horizontal advances, and Canvas will draw text vertically.
Note: Current high level text APIs, such as Text in Jetpack Compose, TextView, Layout classes and their subclasses do not support vertical writing systems, and do not support using the VERTICAL_TEXT_FLAG.
val text = "「春は、曙。」"
Box(Modifier
  .padding(innerPadding)
  .background(Color.White)
  .fillMaxSize()
  .drawWithContent {
     drawIntoCanvas { canvas ->
       val paint = Paint().apply {
         textSize = 64.sp.toPx()
       }
       // Draw text vertically
       paint.flags = paint.flags or VERTICAL_TEXT_FLAG
       val height = paint.measureText(text)
       canvas.nativeCanvas.drawText(
         text, 0, text.length, size.width / 2, (size.height - height) / 2, paint
       )
     }
  })
{}
Accessibility
Android 16 adds new accessibility APIs to help you bring your app to every user.
Supplemental descriptions
When an accessibility service describes a ViewGroup, it combines content labels from its child views. If you provide a contentDescription for the ViewGroup, accessibility services assume you are also overriding the content of non-focusable child views. This can be problematic if you want to label things like a drop down (e.g. "Font Family") while preserving the current selection for accessibility (e.g. "Roboto"). Android 16 adds setSupplementalDescription so you can provide text that provides information about a ViewGroup without overriding information from its children.
Required form fields
Android 16 adds setFieldRequired to AccessibilityNodeInfo so apps can tell an accessibility service that input to a form field is required. This is an important scenario for users filling out many types of forms, even things as simple as a required terms and conditions checkbox, helping users to consistently identify and quickly navigate between required fields.
Generic ranging APIs
Android 16 includes the new RangingManager, which provides ways to determine the distance and angle on supported hardware between the local device and a remote device. RangingManager supports the usage of a variety of ranging technologies such as BLE channel sounding, BLE RSSI-based ranging, Ultra-Wideband, and WiFi round trip time.
Behavior changes
With every Android release, we seek to make the platform more efficient and robust, balancing the needs of your apps against things like system performance and battery life. This can result in behavior changes that impact compatibility.
ART internal changes
Code that leverages internal structures of the Android Runtime (ART) may not work correctly on devices running Android 16 along with earlier Android versions that update the ART module through Google Play system updates. These structures are changing in ways that help improve the Android Runtime's (ART's) performance.
Impacted apps will need to be updated. Relying on internal structures can always lead to compatibility problems, but it's particularly important to avoid relying on code (or libraries containing code) that leverages internal ART structures, since ART changes aren't tied to the platform version the device is running on; they go out to over a billion devices through Google Play system updates.
For more information, see the Android 16 changes affecting all apps and the restrictions on non-SDK interfaces.
Migration or opt-out required for predictive back
For apps targeting Android 16 or higher and running on an Android 16 or higher device, the predictive back system animations (back-to-home, cross-task, and cross-activity) are enabled by default. Additionally, the deprecated onBackPressed is not called and KeyEvent.KEYCODE_BACK is no longer dispatched.
If your app intercepts the back event and you haven't migrated to predictive back yet, update your app to use supported back navigation APIs or temporarily opt out by setting the android:enableOnBackInvokedCallback attribute to false in the <application> or <activity> tag of your app’s AndroidManifest.xml file.
Predictive back support for 3-button navigation
Android 16 brings predictive back support to 3-button navigation for apps that have properly migrated to predictive back. Long-pressing the back button initiates a predictive back animation, giving users a preview of where the back button takes them.
This behavior applies across all areas of the system that support predictive back animations, including the system animations (back-to-home, cross-task, and cross-activity).
Fixed rate work scheduling optimization
Prior to targeting Android 16, when scheduleAtFixedRate missed a task execution due to being outside a valid process lifecycle, all missed executions will immediately execute when app returns to a valid lifecycle.
When targeting Android 16, at most one missed execution of scheduleAtFixedRate will be immediately executed when the app returns to a valid lifecycle. This behavior change is expected to improve app performance. Please test the behavior to ensure your application is not impacted. You can also test by using the app compatibility framework and enabling the STPE_SKIP_MULTIPLE_MISSED_PERIODIC_TASKS compat flag.
Ordered broadcast priority scope no longer global
In Android 16, broadcast delivery order using the android:priority attribute or IntentFilter#setPriority() across different processes will not be guaranteed. Broadcast priorities for ordered broadcasts will only be respected within the same application process rather than across all system processes.
Additionally, broadcast priorities will be automatically confined to the range (SYSTEM_LOW_PRIORITY + 1, SYSTEM_HIGH_PRIORITY - 1).
Your application may be impacted if it does either of the following:
1. Your application has declared multiple processes that have set broadcast receiver priorities for the same intent.
2. Your application process interacts with other processes and has expectations around receiving a broadcast intent in a certain order.
If the processes need to coordinate with each other, they should communicate using other coordination channels.
Gemini Extensions
Samsung just launched new Gemini Extensions on the S25 series, demonstrating new ways Android apps can integrate with the power of Gemini. We're working to make this functionality available on even more form factors.
This preview is for the next major release of Android with a planned launch in Q2 of 2025 and we plan to have another release with new developer APIs in Q4. The Q2 major release will be the only release in 2025 to include planned behavior changes that could affect apps. The Q4 minor release will pick up feature updates, optimizations, and bug fixes; it will not include any app-impacting behavior changes.

We'll continue to have quarterly Android releases. The Q1 and Q3 updates, which will land in-between the Q2 and Q4 API releases, will provide incremental updates to ensure continuous quality. We’re putting additional energy into working with our device partners to bring the Q2 release to as many devices as possible.
There’s no change to the target API level requirements and the associated dates for apps in Google Play; our plans are for one annual requirement each year, tied to the major API level.
How to get ready
In addition to performing compatibility testing on this next major release, make sure that you're compiling your apps against the new SDK, and use the compatibility framework to enable targetSdkVersion-gated behavior changes as they become available for early testing.
App compatibility

The Android 16 Preview program runs from November 2024 until the final public release in Q2 of 2025. At key development milestones, we'll deliver updates for your development and testing environments. Each update includes SDK tools, system images, emulators, API reference, and API diffs. We'll highlight critical APIs as they are ready to test in the preview program in blogs and on the Android 16 developer website.
We’re targeting March of 2025 for our Platform Stability milestone. At this milestone, we’ll deliver final SDK/NDK APIs and also final internal APIs and app-facing system behaviors. From that time you’ll have several months before the final release to complete your testing. The release timeline details are here.
Get started with Android 16
Now that we've entered the beta phase, you can enroll any supported Pixel device to get this and future Android Beta updates over-the-air. If you don’t have a Pixel device, you can use the 64-bit system images with the Android Emulator in Android Studio.
If you are currently on Android 16 Developer Preview 2 or are already in the Android Beta program, you will be offered an over-the-air update to Beta 1.
If you are in Android 25Q1 Beta and would like to take the final stable release of 25Q1 and exit Beta, you need to ignore the over-the-air update to 25Q2 Beta 1 and wait for the release of 25Q1.
We're looking for your feedback so please report issues and submit feature requests on the feedback page. The earlier we get your feedback, the more we can include in our work on the final release.
For the best development experience with Android 16, we recommend that you use the latest preview of Android Studio (Meerkat). Once you’re set up, here are some of the things you should do:
- Compile against the new SDK, test in CI environments, and report any issues in our tracker on the feedback page.
- Test your current app for compatibility, learn whether your app is affected by changes in Android 16, and install your app onto a device or emulator running Android 16 and extensively test it.
We’ll update the preview/beta system images and SDK regularly throughout the Android 16 release cycle. Once you’ve installed a beta build, you’ll automatically get future updates over-the-air for all later previews and Betas.
For complete information, visit the Android 16 developer site.
 Posted by

 Posted by

 Posted by Maru Ahues Bouza – Director, Product Management

 Posted by John Zoeller – Developer Relations Engineer, and Caroline Vander Wilt – Group Product Manager


 Posted by Caren Chang – Developer Relations Engineer

 Posted by Steven Jenkins – Product Manager, Android Studio

 Posted by Nevin Mital - Developer Relations Engineer, Android Media

 Posted by Caren Chang- Android Developer Relations Engineer

 Posted by Kristina Simakova – Engineering Manager

