Tag Archives: Testing

Google Ads API Video Roundup – Feb 2023

The Google Ads Developers Channel is your source for release notes, best practices, new feature integrations, code walkthroughs, and video tutorials. Check out some of the recently released and popular videos and playlists below, and remember to subscribe to our channel to stay up to date with the latest video content.

Performance Max for Developers [New Series]

In this series, we navigate the entire developer journey of creating standard Performance Max campaigns and Performance Max campaigns for online sales with a product feed. We discuss how to think about Performance Max as compared with other campaign types and walk through the process of creating Performance Max campaigns conceptually. In addition, we explore several implementation options with the use of the new Performance Max Interactive Guide, which you can use to easily follow along and jumpstart your integration.

Five episodes have been published with an additional three more on the way. Subscribe to our channel to be notified when new episodes are released.

Testing Your Integration [New Series]

In the first two episodes of this miniseries, we begin to look at testing with the Google Ads API. In the introductory episode, we discuss Google Ads test accounts and test account alternatives. In the second episode, we demonstrate test account usage in practice. Subscribe to our channel to be notified when the next episode about testing best practices becomes available.

Campaign Primary Status [New Video]

The Google Ads API introduced two new fields on the campaign resource in v12, called primary_status and primary_status_reason. In this video, we discuss how they can help you understand what is going on with your campaigns and how to optimize their serving.

Meet the Team [New Episodes]

Check out the two new episodes in our Meet the Team series to catch in-depth discussions with Eric Schwelm, who is a Software Engineer and Tech Lead on the Google Ads API, and Carolyn Chou, who is a Product Manager working on Performance Max campaigns in the Google Ads API.


For additional topics, including Release Notes, Authentication and Authorization and Working with REST, check out the Google Ads Developers YouTube channel.

As always, feel free to reach out to us with any questions via the Google Ads API forum or at [email protected].

TestParameterInjector gets JUnit5 support

In March 2021, we announced the open source release of TestParameterInjector: A parameterized test runner for JUnit4 (see GitHub page).

Over a year later, the Google-internal usage of TestParameterInjector has continued to rapidly grow, and is now by far the most popular parameterized test framework.
Graph of the different parameterized test frameworks in Google
Guava's philosophy frames it nicely: "When trying to estimate the ubiquity of a feature, we frequently use the Google internal code base as a reference." We also believe that TestParameterInjector usage in Google is a decent proxy for its utility elsewhere.

As you can see on the graph above, not only did TestParameterInjector reduce the usage of the other frameworks, but it also caused a drastic increase of the total amount of parameterized tests. This suggests that TestParameterInjector reduced the threshold for parameterizing a regular unit test and Googlers are more actively using this tool to improve the quality of their tests.

JUnit5 (Jupiter) support

At Google, we use JUnit4 exclusively, but some developers outside of Google have moved on to JUnit5 (Jupiter). For those users, we have now expanded the scope of TestParameterInjector.

We've kept the API the same as much as possible:

// **************** JUnit4 **************** //

@RunWith(TestParameterInjector.class)

public class MyTest {


  @TestParameter boolean isDryRun;


  @Test public void test1(@TestParameter boolean enableFlag) { ... }


  @Test public void test2(@TestParameter MyEnum myEnum) { ... }


  enum MyEnum { VALUE_A, VALUE_B, VALUE_C }

}


// **************** JUnit5 (Jupiter) **************** //

class MyTest {


  @TestParameter boolean isDryRun;


  @TestParameterInjectorTest

  void test1(@TestParameter boolean enableFlag) {

    // This method is run 4 times for all combinations of isDryRun and enableFlag

  }


  @TestParameterInjectorTest

  void test2(@TestParameter MyEnum myEnum) {

    // This method is run 6 times for all combinations of isDryRun and myEnum

  }


  enum MyEnum { VALUE_A, VALUE_B, VALUE_C }

}

The only differences are that @RunWith / @ExtendWith are not necessary and that every test method needs a @TestParameterInjectorTest annotation.

The other features of TestParameterInjector work in a similar way with Jupiter:

class MyTest {


  // **************** Defining sets of parameters **************** //

  @TestParameterInjectorTest

  @TestParameters(customName = "teenager", value = "{age: 17, expectIsAdult: false}")

  @TestParameters(customName = "young adult", value = "{age: 22, expectIsAdult: true}")

  void personIsAdult_success(int age, boolean expectIsAdult) {

    assertThat(personIsAdult(age)).isEqualTo(expectIsAdult);

  }


  // **************** Dynamic parameter generation **************** //

  @TestParameterInjectorTest

  void matchesAllOf_throwsOnNull(

      @TestParameter(valuesProvider = CharMatcherProvider.class) CharMatcher charMatcher) {

    assertThrows(NullPointerException.class, () -> charMatcher.matchesAllOf(null));

  }


  private static final class CharMatcherProvider implements TestParameterValuesProvider {

    @Override

    public List<CharMatcher> provideValues() {

      return ImmutableList.of(

          CharMatcher.any(), CharMatcher.ascii(), CharMatcher.whitespace());

    }

  }

}

Other things we've been working on

Custom names for @TestParameters
When running a the following parameterized test:

@Test

@TestParameters("{age: 17, expectIsAdult: false}")

@TestParameters("{age: 22, expectIsAdult: true}")

public void withRepeatedAnnotation(int age, boolean expectIsAdult){ ... }

the generated test names will be:

MyTest#withRepeatedAnnotation[{age: 17, expectIsAdult: false}]

MyTest#withRepeatedAnnotation[{age: 22, expectIsAdult: true}]

This is fine for small parameter sets, but when the number of @TestParameters or parameters within the YAML string gets large, it quickly becomes hard to figure out what each parameter set is supposed to represent.

For those cases, we added the option to add customName:

@Test

@TestParameters(customName = "teenager", value = "{age: 17, expectIsAdult: false}")

@TestParameters(customName = "young adult", value = "{age: 22, expectIsAdult: true}")

public void personIsAdult(int age, boolean expectIsAdult){...}

To allow this API change, we had to allow @TestParameters to be used in a different way: The original way of specifying @TestParameters sets was to specify them as a list of YAML strings inside a single @TestParameters annotation. We considered multiple options of specifying the custom name inside of these YAML strings, such as a magic 
_name key and an extra YAML mapping layer where the keys would be the test names. But we eventually settled on the aforementioned API, which makes @TestParameters a repeated annotation because it results in the least complex code and clearly separates the different parameter sets.

It should be noted that the original API (list of YAML strings in single annotation) still works, but it is now discouraged in favor of multiple @TestParameters annotations with a single YAML string, even when customName isn't used. The main arguments for this recommendation are:
  • Consistency with the customName case, which needs a single YAML string per @TestParameters annotation
  • We believe it structures the list of parameters (especially when it's long) in a more structured way

Integration with RobolectricTestRunner

Recently, we've managed to internally make a version of RobolectricTestRunner that supports TestParameterInjector annotations. There is a significant amount of work left to open source this, and we are now considering when and how to do this.

Learn more

Our GitHub README provides an overview of the framework. Let us know on GitHub if you have any questions, comments, or feature requests!

By Jens Nyman – TestParameterInjector

Write better tests with the new testing guidance

Posted by Jose Alcérreca, Android Developer Relations Engineer

Blue illustration with Android phone 

As apps increase in functionality and complexity, manually testing them to verify behavior becomes tedious, expensive, or impossible. Modern apps, even simple ones, require you to verify an ever-growing list of test points such as UI flows, localization, or database migrations. Having a QA team whose job is to manually verify that the app works is an option, but fixing bugs at that stage is expensive. The sooner you fix a problem in the development process the better.

Automating tests is the best approach to catching bugs early. Automated testing (from now on, testing) is a broad domain and Android offers many tools and libraries that can overlap. For this reason, beginners often find testing challenging.

In response to this feedback, and to accommodate for Compose and new architecture guidelines, we revamped two testing sections on d.android.com:

Training

Firstly, there is the new Testing training, which includes the fundamentals of testing in Android with two new articles: What to test, an opinionated guide for beginners, and a detailed guide on Test doubles.

Faking dependencies in unit tests

Faking dependencies in unit tests


After providing an overview of the theory, the guide focuses on practical examples of the two main types of tests.

What’s New in Scalable Automated Testing

Posted by Arif Sukoco, Android Studio Engineering Manager (@GoogArif) & Jolanda Verhoef, Developer Relations Engineer (@Lojanda)

dark blue background with three different devices showing the same screen: phone , tablet, and watch

We know it can be challenging to run Android instrumented tests at scale, especially when you have a big test suite that you want to run against a variety of Android device profiles.

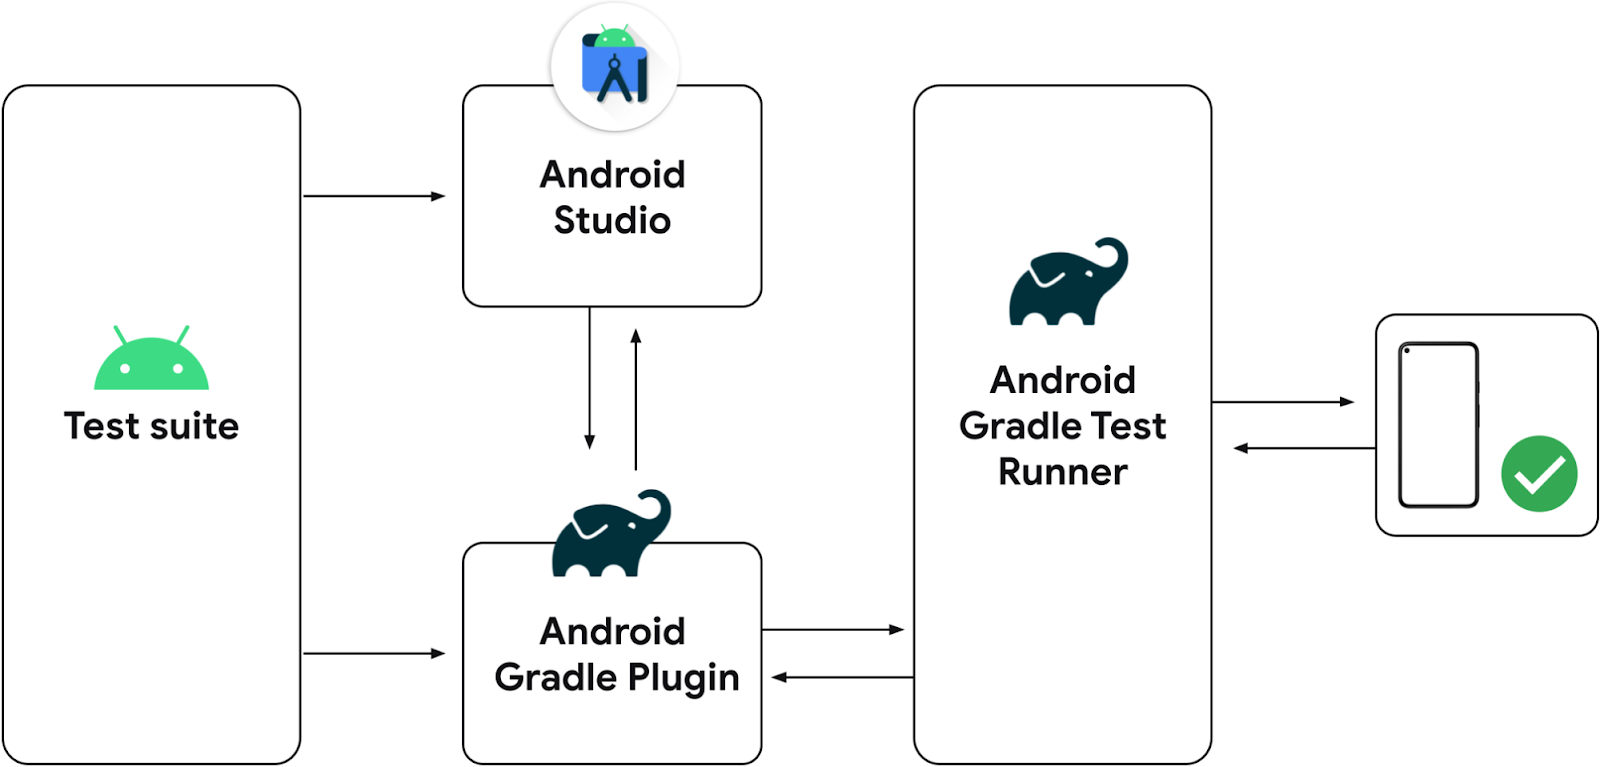
At I/O 2021 we first introduced Unified Test Platform or UTP. UTP allows us to build testing features for Android instrumented tests such as running instrumented tests from Android Studio through Gradle, and Gradle Managed Devices (GMD). GMD allows you to define a set of virtual devices in build.gradle, and let Gradle manage them by spinning them up before each instrumented test run, and tearing them down afterwards. In the latest version of Android Gradle Plugin 7.2.0, we are introducing more features on top of GMD to help scale tests across multiple Android virtual devices in parallel.


Sharding

The first feature we are introducing is sharding on top of GMD. Sharding is a common technique used in test runners where the test runner splits up the tests into multiple groups, or shards, and runs them in parallel. With the ability to spin up multiple emulator instances in GMD, sharding is an obvious next step to make GMD a more scalable solution for large test suites.

When you enable sharding for GMD and specify the desired number of shards, it will automatically spin up that number of managed devices for you. For example, the sample below configures a Gradle Managed Devices called pixel2 in your build.gradle:


android {
  testOptions {
    devices {
      pixel2 (com.android.build.api.dsl.ManagedVirtualDevice) {
        device = "Pixel 2"
        apiLevel = 30
        systemImageSource = "google"
        abi = "x86"
      }
    }
  }
}

Let’s say you have 4 instrumented tests in your test suite. You can pass an experimental property to Gradle to specify how many shards you want to divide your tests in. The following command splits the test run into two shards:

class com.example.myapplicationExampleInstrumentedTests

 ./gradlew -Pandroid.experimental.androidTest.numManagedDeviceShards=2 pixel2DebugAndroidTest

Invoking Gradle this way will tell GMD to spin up 2 instances of pixel2, and split the running of your 4 instrumented tests between those 2 emulated devices. In the Gradle output, you will see ​​"Starting 2 tests on pixel2_0", and "Starting 2 tests on pixel2_1".

As seen in this example, sharding through GMD spins up multiple identical virtual devices. If you apply sharding and have more than one device defined in build.gradle, GMD will spin up multiple instances of each virtual device.

The HTML format output of your test run report will be generated in app/build/reports/androidTests/managedDevice/pixel2. This report will contain the combined test results from all the shards.

You can also load the test results from each shard to Android Studio by selecting Run > Import Tests From File from the menu and loading the protobuf output files app/build/outputs/androidTest-results/managedDevice/pixel2/shard_1/test-result.pb and app/build/outputs/androidTest-results/managedDevice/pixel2/shard_2/test-result.pb.

It’s worth remembering that when sharding your tests, there is always a tradeoff between the extra resources and time required to spin up additional emulator instances, and the savings in test running time. As such, it is more useful when you have larger test suites to run.

Also please note that currently GMD doesn’t support running tests for test-only modules yet, and there are known flakiness issues when running on cloud hosted CI servers.


Slimmer Emulator System Images

When running multiple emulator instances at the same time, your limited server’s computing resources could become an issue.

One of the ways to improve this is by slimming down the Android emulator system image to create a new type of device that’s optimized for running automated tests. The Automated Test Device (ATD) system image is designed to consume less CPU and memory by removing components that normally do not affect the running of your app’s instrumented tests, such as the SystemUI, Settings app, bundled apps like Gmail, Google Maps, etc., and some other components. Please read the release notes for more information about the ATD system image.

The ATD system images have hardware rendering disabled by default. This helps with another common source of slow-running test suites. Often, when running instrumented tests on an emulator, access to the host’s GPU for graphics hardware acceleration is not available. In this case, the emulator will choose to use software graphics acceleration, which is much more CPU intensive. Nearly all functionalities still work as expected with hardware rendering off, with the notable exception of screenshots. If you need to take screenshots in your test, we recommend taking a look at the new AndroidX Test Screenshot APIs which will dynamically enable hardware rendering in order to take a screenshot. Please take a look at the examples for how to use these APIs.

To use ATD, first make sure you have downloaded the latest version of the Android emulator from the Canary channel (version 30.9.2 or newer). To download this emulator, go to Appearance & Behavior > System Settings > Updates and set the IDE updates dropdown to “Canary Channel”.

Next, you need to specify an ATD system image in your GMD configuration:


android {
  testOptions {
    devices {
      pixel2 (com.android.build.api.dsl.ManagedVirtualDevice) {
        device = "Pixel 2"
        apiLevel = 30
        systemImageSource = "aosp-atd" // Or "google-atd" if you need
                                       // access to Google APIs
        abi = "x86" // Or "arm64-v8a" if you are on an Apple M1 machine
      }
    }
  }
}

You can now run tests from the Gradle command line just like you would with GMD as before, including with sharding enabled. The only thing you need to add for now is to let Gradle know you are referring to a system image in the Canary channel.


./gradlew -Pandroid.sdk.channel=3
-Pandroid.experimental.androidTest.numManagedDeviceShards=2
pixel2DebugAndroidTest

Test running time improvement using ATD might vary, depending on your machine configuration. In our tests, comparing ATD and non-ATD system images running on a Linux machine with Intel Xeon CPU and 64GB of RAM, we saw 33% shorter test running time when using ATD, while on a 2020 Macbook Pro with Intel i9 processor and 32GB of RAM, we saw 55% improvement.

We’re really excited about these new features, and we hope they can allow you to better scale out your instrumented tests. Please try them out and let us know what you think! Follow us -- the Android Studio development team ‐ on Twitter and on Medium.

Introducing TestParameterInjector: A JUnit4 parameterized test runner

 When writing unit tests, you may want to run the same or a very similar test for different inputs or input/output pairs. In Java, as in most programming languages, the best way to do this is by using a parameterized test framework.

JUnit4 has a number of such frameworks available, such as junit.runners.Parameterized and JUnitParams. A couple of years ago, a few Google engineers found the existing frameworks lacking in functionality and simplicity, and decided to create their own alternative. After a lot of tweaks, fixes, and feature additions based on feedback from clients all over Google, we arrived at what TestParameterInjector is today.

As can be seen in the graph below, TestParameterInjector is now the most used framework for new tests in the Google codebase:

Graph of the different parameterized test frameworks in Google

How does TestParameterInjector work?

The TestParameterInjector exposes two annotations: @TestParameter and @TestParameters. The following code snippet shows how the former works:


@RunWith(TestParameterInjector.class)

public class MyTest {


  @TestParameter boolean isDryRun;


  @Test public void test1(@TestParameter boolean enableFlag) {

    // This method is run 4 times for all combinations of isDryRun and enableFlag

  }


  @Test public void test2(@TestParameter MyEnum myEnum) {

    // This method is run 6 times for all combinations of isDryRun and myEnum

  }


  enum MyEnum { VALUE_A, VALUE_B, VALUE_C }

}


Annotated fields (such as isDryRun) will cause each test method to run for all possible values while annotated method parameters (such as enableFlag) will only impact that test method. Note that the generated test names will typically be helpful but concise, for example: MyTest#test2[isDryRun=true, VALUE_A].

The other annotation, @TestParameters, can be seen at work in this snippet:

@RunWith(TestParameterInjector.class)

public class MyTest {


  @Test

  @TestParameters({

    "{age: 17, expectIsAdult: false}",

    "{age: 22, expectIsAdult: true}",

  })

  public void personIsAdult(int age, boolean expectIsAdult) {

    // This method is run 2 times

  }

}


In contrast to the first example, which tests all combinations, a @TestParameters-annotated method runs once for each test case specified.

How does TestParameterInjector compare to other frameworks?

To our knowledge, the table below summarizes the features of the different frameworks in use at Google:

TestParameterInjector

junit.runners. Parameterized

JUnitParams

Burst

DataProvider

Jukito

Theories

Documentation

GitHub

GitHub

GitHub

GitHub

GitHub

GitHub

junit.org

Supports field injection


Supports parameter injection


Considers sets of parameters correlated or orthogonal

both are supported

correlated

correlated

orthogonal

correlated

orthogon

al

orthogonal

Refactor friendly

(✓)


Learn more

Our GitHub README at https://github.com/google/TestParameterInjector gives an overview of the possibilities of this framework. Let us know on GitHub if you have any questions, comments, or feature requests!

By Jens Nyman, TestParameterInjector team

1Parameters are considered dependent. You specify explicit combinations to be run.
2Parameters are considered independent. The framework will run all possible combinations of parameters

Truth 1.0: Fluent Assertions for Java and Android Tests

Software testing is important—and sometimes frustrating. The frustration can come from working on innately hard domains, like concurrency, but too often it comes from a thousand small cuts:
assertEquals("Message has been sent", getString(notification, EXTRA_BIG_TEXT));
assertTrue(
    getString(notification, EXTRA_TEXT)
        .contains("Kurt Kluever <[email protected]>"));
The two assertions above test almost the same thing, but they are structured differently. The difference in structure makes it hard to identify the difference in what's being tested.
A better way to structure these assertions is to use a fluent API:
assertThat(getString(notification, EXTRA_BIG_TEXT))
    .isEqualTo("Message has been sent");
assertThat(getString(notification, EXTRA_TEXT))
    .contains("Kurt Kluever <[email protected]>");
A fluent API naturally leads to other advantages:
  • IDE autocompletion can suggest assertions that fit the value under test, including rich operations like containsExactly(permission.SEND_SMS, permission.READ_SMS).
  • Failure messages can include the value under test and the expected result. Contrast this with the assertTrue call above, which lacks a failure message entirely.
Google's fluent assertion library for Java and Android is Truth. We're happy to announce that we've released Truth 1.0, which stabilizes our API after years of fine-tuning.


Truth started in 2011 as a Googler's personal open source project. Later, it was donated back to Google and cultivated by the Java Core Libraries team, the people who bring you Guava.
You might already be familiar with assertion libraries like Hamcrest and AssertJ, which provide similar features. We've designed Truth to have a simpler API and more readable failure messages. For example, here's a failure message from AssertJ:
java.lang.AssertionError:
Expecting:
  <[year: 2019
month: 7
day: 15
]>
to contain exactly in any order:
  <[year: 2019
month: 6
day: 30
]>
elements not found:
  <[year: 2019
month: 6
day: 30
]>
and elements not expected:
  <[year: 2019
month: 7
day: 15
]>
And here's the equivalent message from Truth:
value of:
    iterable.onlyElement()
expected:
    year: 2019
    month: 6
    day: 30

but was:
    year: 2019
    month: 7
    day: 15
For more details, read our comparison of the libraries, and try Truth for yourself.

Also, if you're developing for Android, try AndroidX Test. It includes Truth extensions that make assertions even easier to write and failure messages even clearer:
assertThat(notification).extras().string(EXTRA_BIG_TEXT)
    .isEqualTo("Message has been sent");
assertThat(notification).extras().string(EXTRA_TEXT)
    .contains("Kurt Kluever <[email protected]>");
Coming soon: Kotlin users of Truth can look forward to Kotlin-specific enhancements.
By Chris Povirk, Java Core Libraries

Security Crawl Maze: An Open Source Tool to Test Web Security Crawlers

Scanning modern web applications for security vulnerabilities can be a difficult task, especially if they are built with Javascript frameworks, which is why crawlers have to use a multi-stage crawling approach to discover all the resources on modern websites.

Living in the times of dynamically changing specifications and the constant appearance of new frameworks, we often have to adjust our crawlers so that they are able to discover new ways in which developers can link resources from their applications. The issue we face in such situations is measuring if changes to crawling logic improve the effectiveness. While working on replacing a crawler for a web security scanner that has been in use for a number of years, we found we needed a universal test bed, both to test our current capabilities and to discover cases that are currently missed. Inspired by Firing Range, today we’re announcing the open-source release of Security Crawl Maze – a universal test bed for web security crawlers.

Security Crawl Maze is a simple Python application built with the Flask framework that contains a wide variety of cases for ways in which a web based application can link other resources on the Web. We also provide a Dockerfile which allows you to build a docker image and deploy it to an environment of your choice. While the initial release is covering the most important cases for HTTP crawling, it’s a subset of what we want to achieve in the near future. You’ll soon be able to test whether your crawler is able to discover known files (robots.txt, sitemap.xml, etc…) or crawl modern single page applications written with the most popular JS frameworks (Angular, Polymer, etc.).

Security crawlers are mostly interested in code coverage, not in content coverage, which means the deduplication logic has to be different. This is why we plan to add cases which allow for testing if your crawler deduplicates URLs correctly (e.g. blog posts, e-commerce). If you believe there is something else, feel free to add a test case for it – it’s super simple! Code is available on GitHub and through a public deployed version.

We hope that others will find it helpful in evaluating the capabilities of their crawlers, and we certainly welcome any contributions and feedback from the broader security research community.

By Maciej Trzos, Information Security Engineer

iOS Accessibility Scanner Framework

At Google, we are committed to accessibility and are constantly looking for ways to improve our development process to discover, debug and fix accessibility issues. Today we are excited to announce a new open source project: Accessibility Scanner for iOS (or GSCXScanner as we lovingly call it). This is a developer tool that can assist in locating and fixing accessibility issues while an app is being developed.

App development can be a time consuming process, especially when it involves human testers. Sometimes, as in the case with accessibility testing, they are necessary. A developer can write automated tests to perform some accessibility checks, but GSCXScanner takes this one step further. When a new feature is being developed, often there are several iterations of code changes, building, launching and trying out the new feature. It is faster and easier to fix accessibility issues with the feature if they can be detected during this phase when the developer is working with the new feature.

GSCXScanner lives in your app process and can perform accessibility checks on the UI currently on the screen simply with the touch of a button. The scanner’s UI which is overlaid on the app can be moved around so you can use your app normally and trigger a scan only when you need it. Also, it uses GTXiLib, a library of iOS accessibility checks to scan your app, and you can author your own GTX checks and have them run along with scanner’s default checks.

Using the scanner does not eliminate the need for manual testing or automated tests, these are must haves for delivering quality products. But GCSXScanner can speed up the development process by showing issues in app during development.

Help us improve GSCXScanner by suggesting a feature or better yet, writing one.

By Sid Janga, Central Accessibility Team

Open sourcing ClusterFuzz

Fuzzing is an automated method for detecting bugs in software that works by feeding unexpected inputs to a target program. It is effective at finding memory corruption bugs, which often have serious security implications. Manually finding these issues is both difficult and time consuming, and bugs often slip through despite rigorous code review practices. For software projects written in an unsafe language such as C or C++, fuzzing is a crucial part of ensuring their security and stability.

In order for fuzzing to be truly effective, it must be continuous, done at scale, and integrated into the development process of a software project. To provide these features for Chrome, we wrote ClusterFuzz, a fuzzing infrastructure running on over 25,000 cores. Two years ago, we began offering ClusterFuzz as a free service to open source projects through OSS-Fuzz.

Today, we’re announcing that ClusterFuzz is now open source and available for anyone to use.


We developed ClusterFuzz over eight years to fit seamlessly into developer workflows, and to make it dead simple to find bugs and get them fixed. ClusterFuzz provides end-to-end automation, from bug detection, to triage (accurate deduplication, bisection), to bug reporting, and finally to automatic closure of bug reports.

ClusterFuzz has found more than 16,000 bugs in Chrome and more than 11,000 bugs in over 160 open source projects integrated with OSS-Fuzz. It is an integral part of the development process of Chrome and many other open source projects. ClusterFuzz is often able to detect bugs hours after they are introduced and verify the fix within a day.

Check out our GitHub repository. You can try ClusterFuzz locally by following these instructions. In production, ClusterFuzz depends on some key Google Cloud Platform services, but you can use your own compute cluster. We welcome your contributions and look forward to any suggestions to help improve and extend this infrastructure. Through open sourcing ClusterFuzz, we hope to encourage all software developers to integrate fuzzing into their workflows.

By Abhishek Arya, Oliver Chang, Max Moroz, Martin Barbella and Jonathan Metzman, ClusterFuzz team

Verifying your Google Assistant media action integrations on Android

Posted by Nevin Mital, Partner Developer Relations
The Media Controller Test (MCT) app is a powerful tool that allows you to test the intricacies of media playback on Android, and it's just gotten even more useful. Media experiences including voice interactions via the Google Assistant on Android phones, cars, TVs, and headphones, are powered by Android MediaSession APIs. This tool will help you verify your integrations. We've now added a new verification testing framework that can be used to help automate your QA testing.

The MCT is meant to be used in conjunction with an app that implements media APIs, such as the Universal Android Music Player. The MCT surfaces information about the media app's MediaController, such as the PlaybackState and Metadata, and can be used to test inter-app media controls.

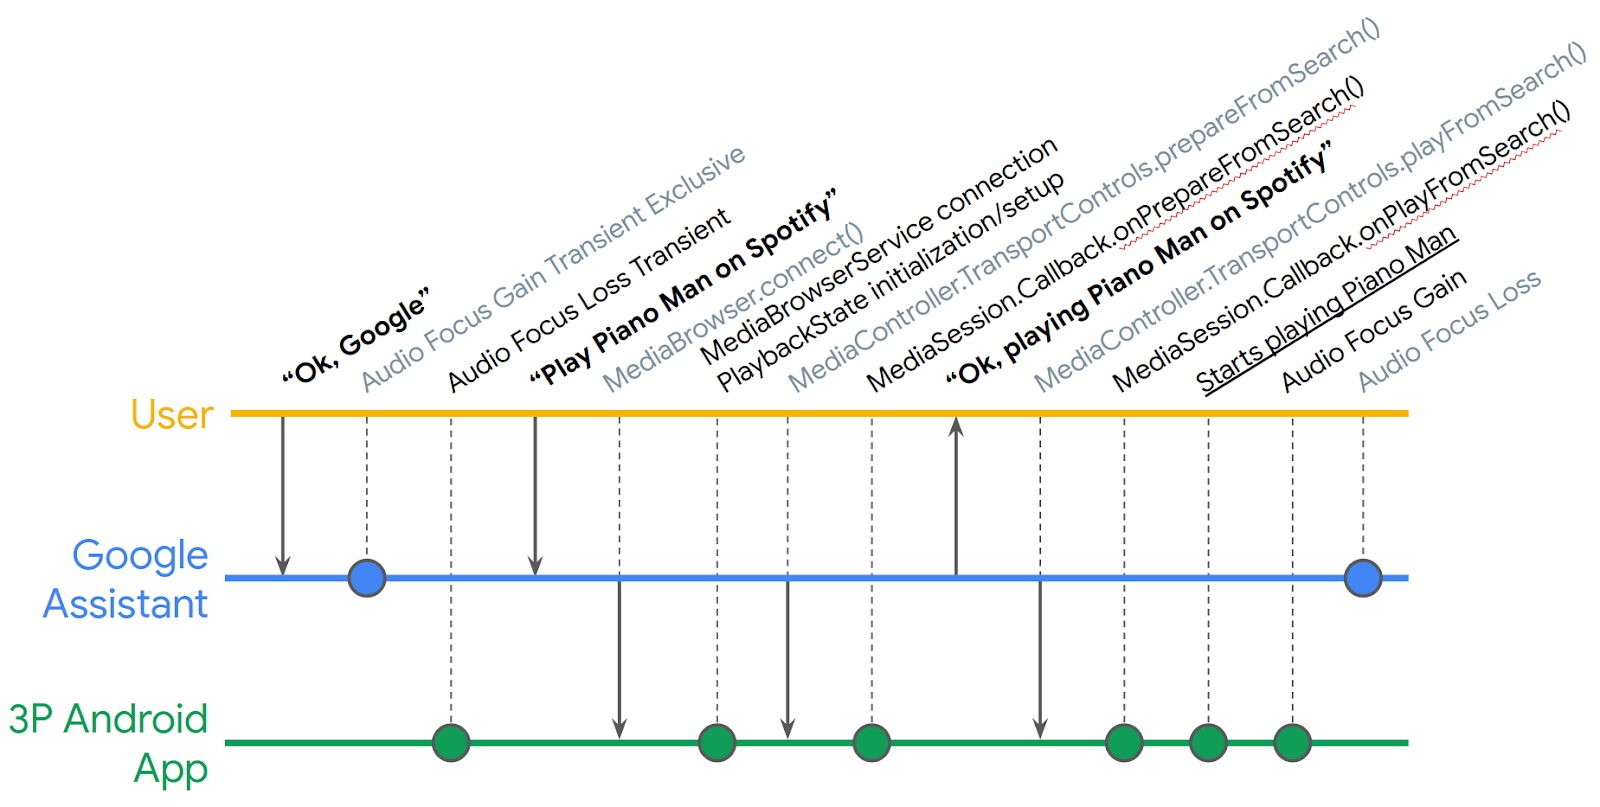
The Media Action Lifecycle can be complex to follow; even in a simple Play From Search request, there are many intermediate steps (simplified timeline depicted below) where something could go wrong. The MCT can be used to help highlight any inconsistencies in how your music app handles MediaController TransportControl requests.

Timeline of the interaction between the User, the Google Assistant, and the third party Android App for a Play From Search request.

Previously, using the MCT required a lot of manual interaction and monitoring. The new verification testing framework offers one-click tests that you can run to ensure that your media app responds correctly to a playback request.

Running a verification test

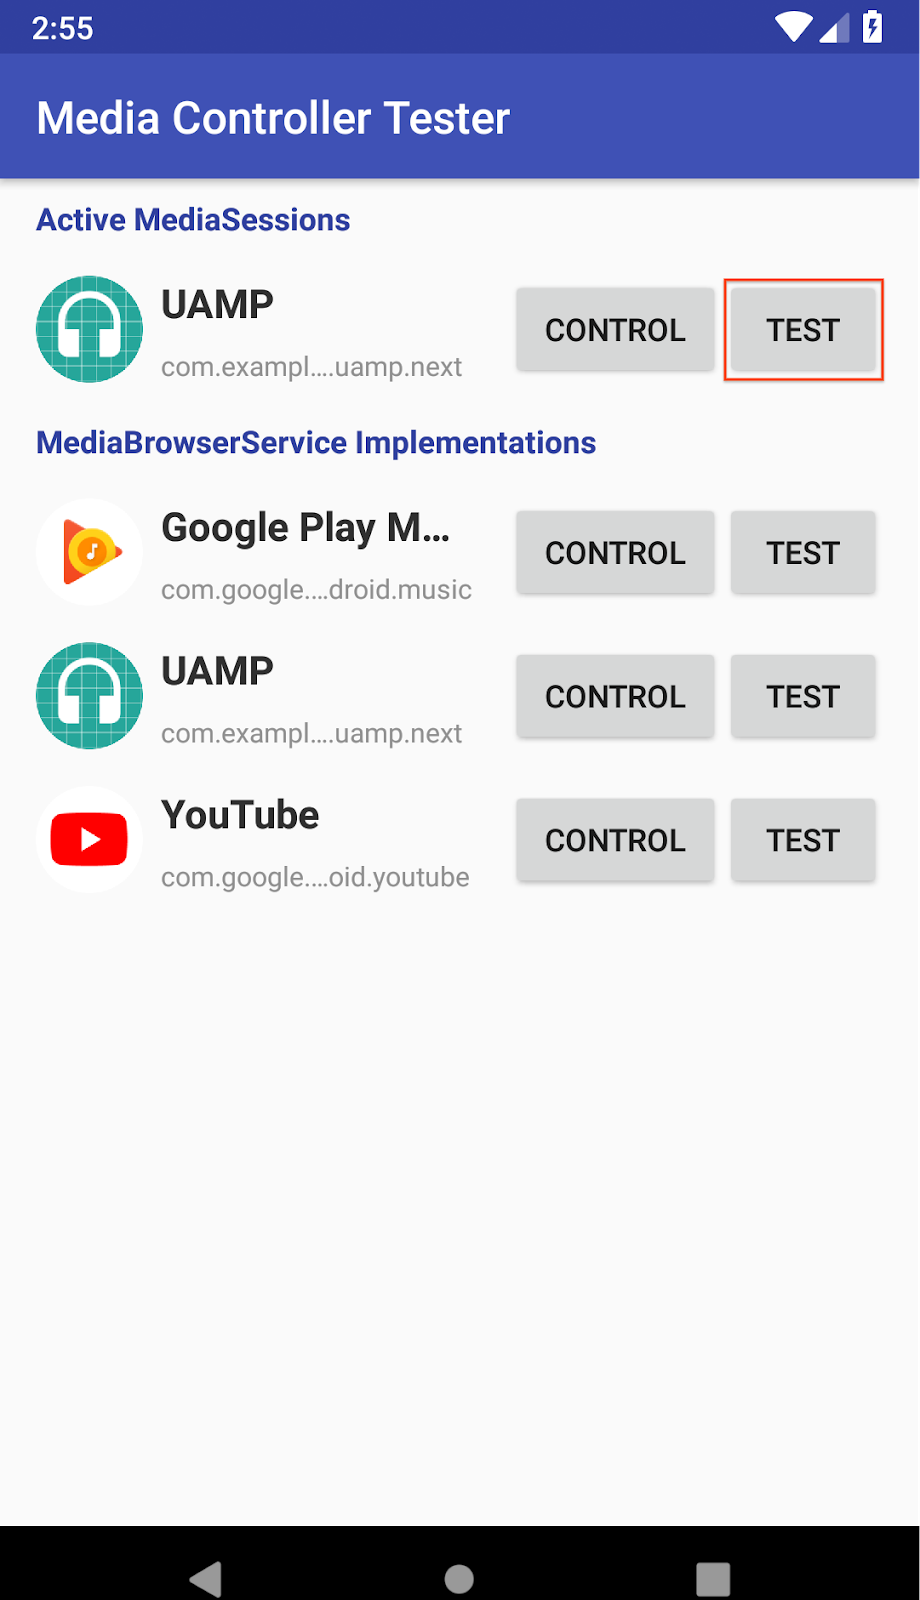
To access the new verification tests in the MCT, click the Test button next to your desired media app.

MCT Screenshot of launch screen; contains a list of installed media apps, with an option to go to either the Control or Test view for each.

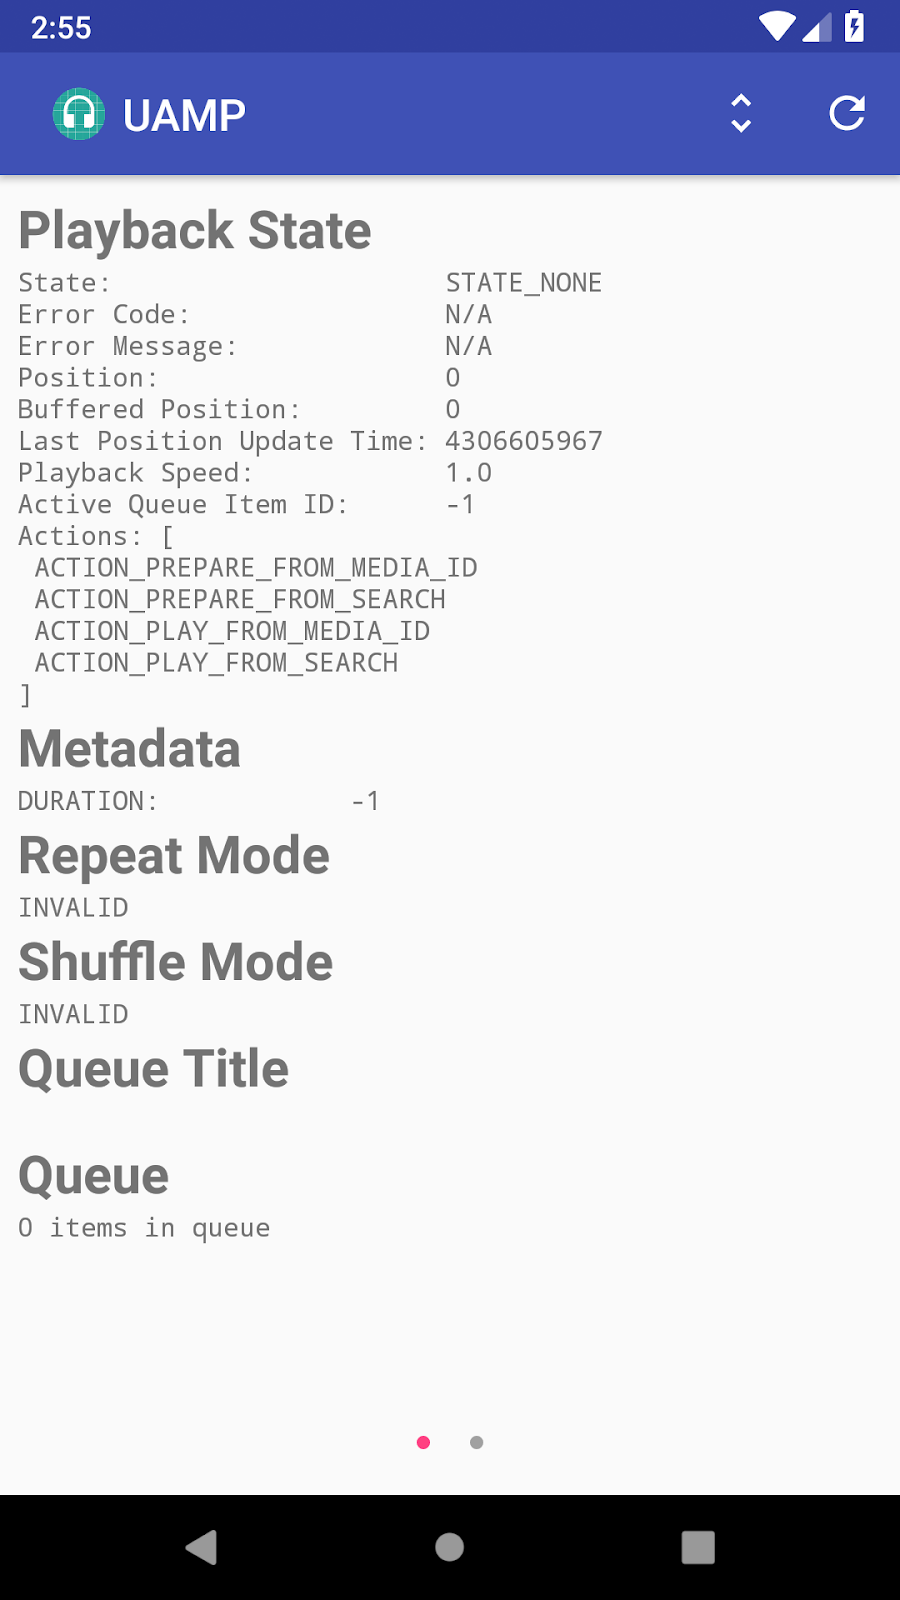
The next screen shows you detailed information about the MediaController, for example the PlaybackState, Metadata, and Queue. There are two buttons on the toolbar in the top right: the button on the left toggles between parsable and formatted logs, and the button on the right refreshes this view to display the most current information.

MCT Screenshot of the left screen in the Testing view for UAMP; contains information about the Media Controller's Playback State, Metadata, Repeat Mode, Shuffle Mode, and Queue.

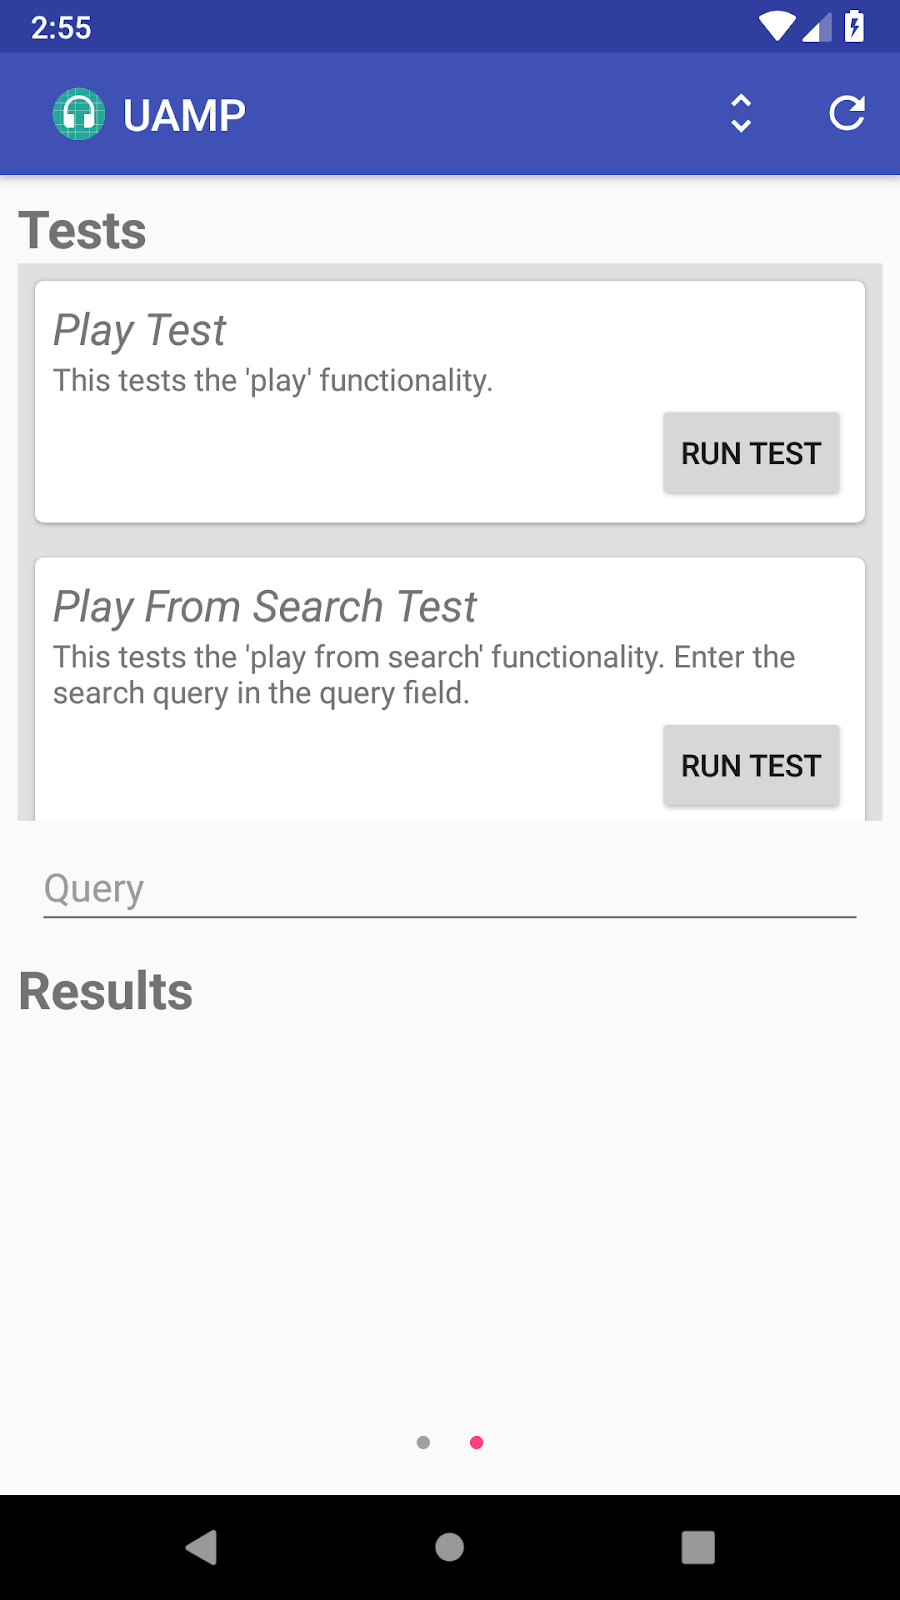
By swiping to the left, you arrive at the verification tests view, where you can see a scrollable list of defined tests, a text field to enter a query for tests that require one, and a section to display the results of the test.

MCT Screenshot of the right screen in the Testing view for UAMP; contains a list of tests, a query text field, and a results display section.

As an example, to run the Play From Search Test, you can enter a search query into the text field then hit the Run Test button. Looks like the test succeeded!

MCT Screenshot of the right screen in the Testing view for UAMP; the Play From Search test was run with the query 'Memories' and ended successfully.

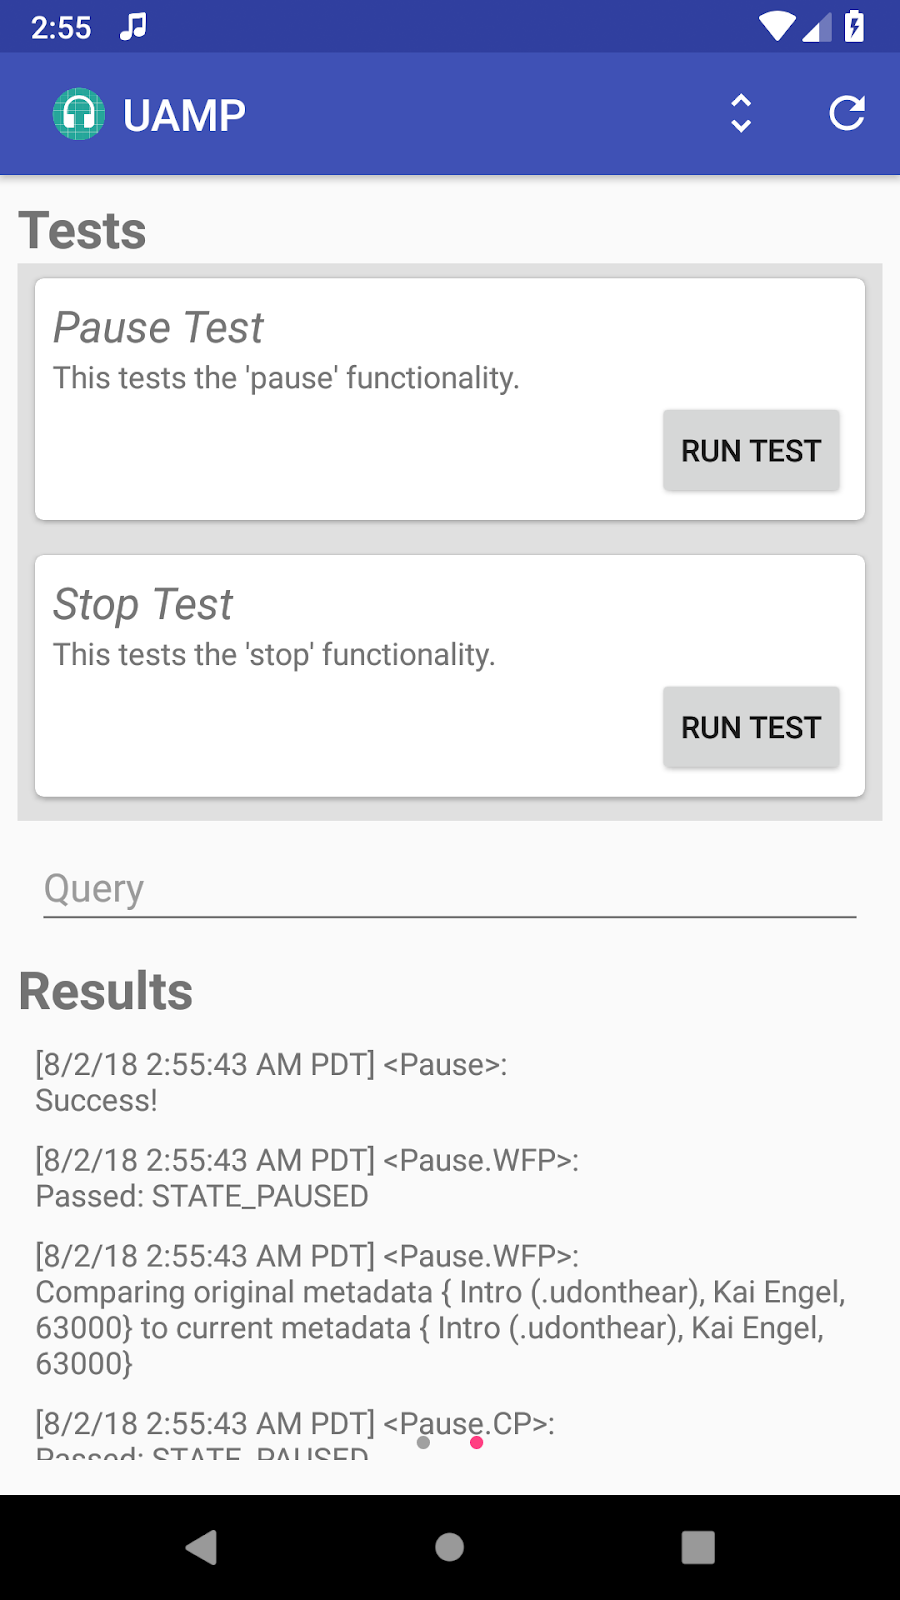
Below are examples of the Pause Test (left) and Seek To test (right).

MCT Screenshot of the right screen in the Testing view for UAMP; a Pause test was run successfully. MCT Screenshot of the right screen in the Testing view for UAMP; a Seek To test was run successfully.

Android TV

The MCT now also works on Android TV! For your media app to work with the Android TV version of the MCT, your media app must have a MediaBrowserService implementation. Please see here for more details on how to do this.

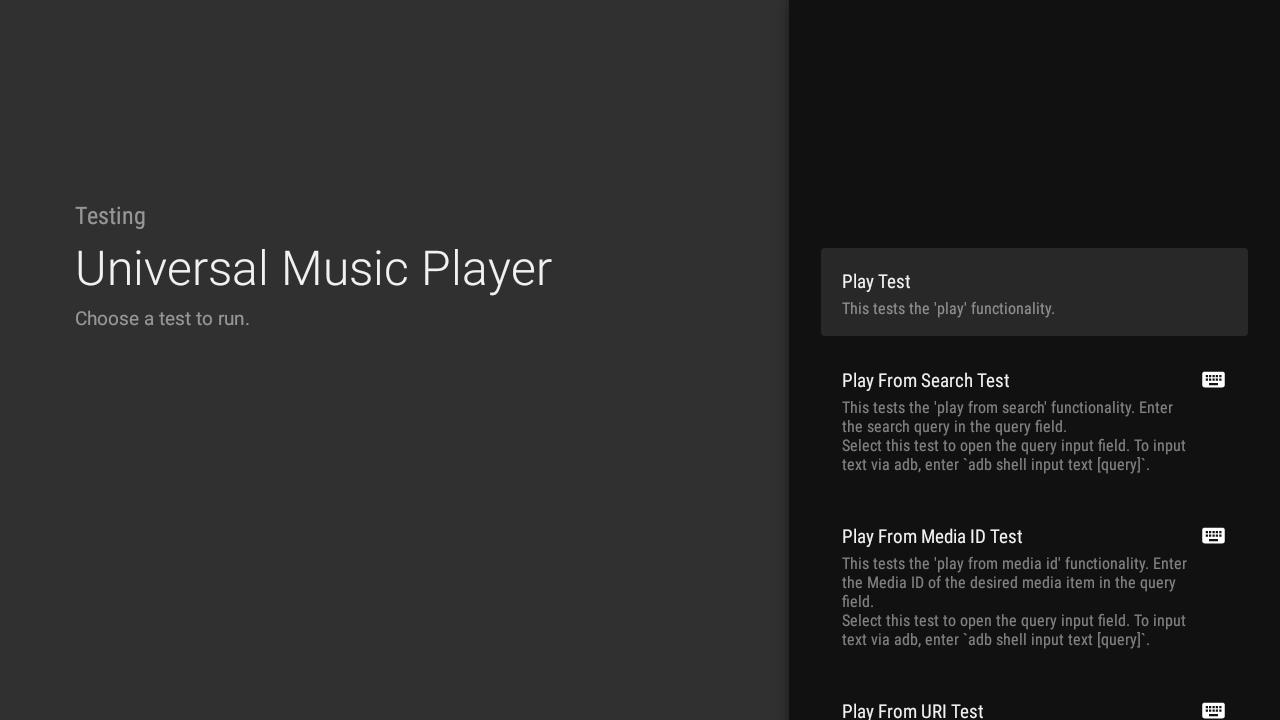
On launching the MCT on Android TV, you will see a list of installed media apps. Note that an app will only appear in this list if it implements the MediaBrowserService.

Android TV MCT Screenshot of the launch screen; contains a list of installed media apps that implement the MediaBrowserService.

Selecting an app will take you to the testing screen, which will display a list of verification tests on the right.

Android TV MCT Screenshot of the testing screen; contains a list of tests on the right side.

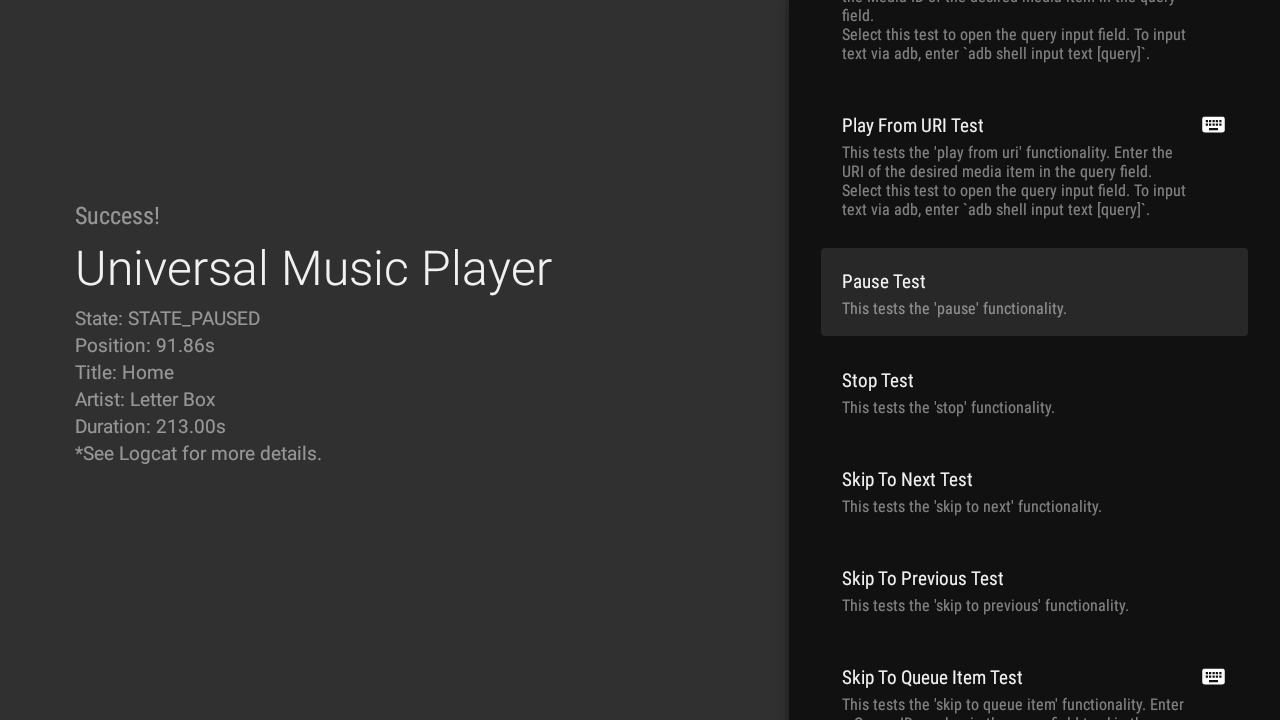
Running a test will populate the left side of the screen with selected MediaController information. For more details, please check the MCT logs in Logcat.

Android TV MCT Screenshot of the testing screen; the Pause test was run successfully and the left side of the screen now displays selected MediaController information.

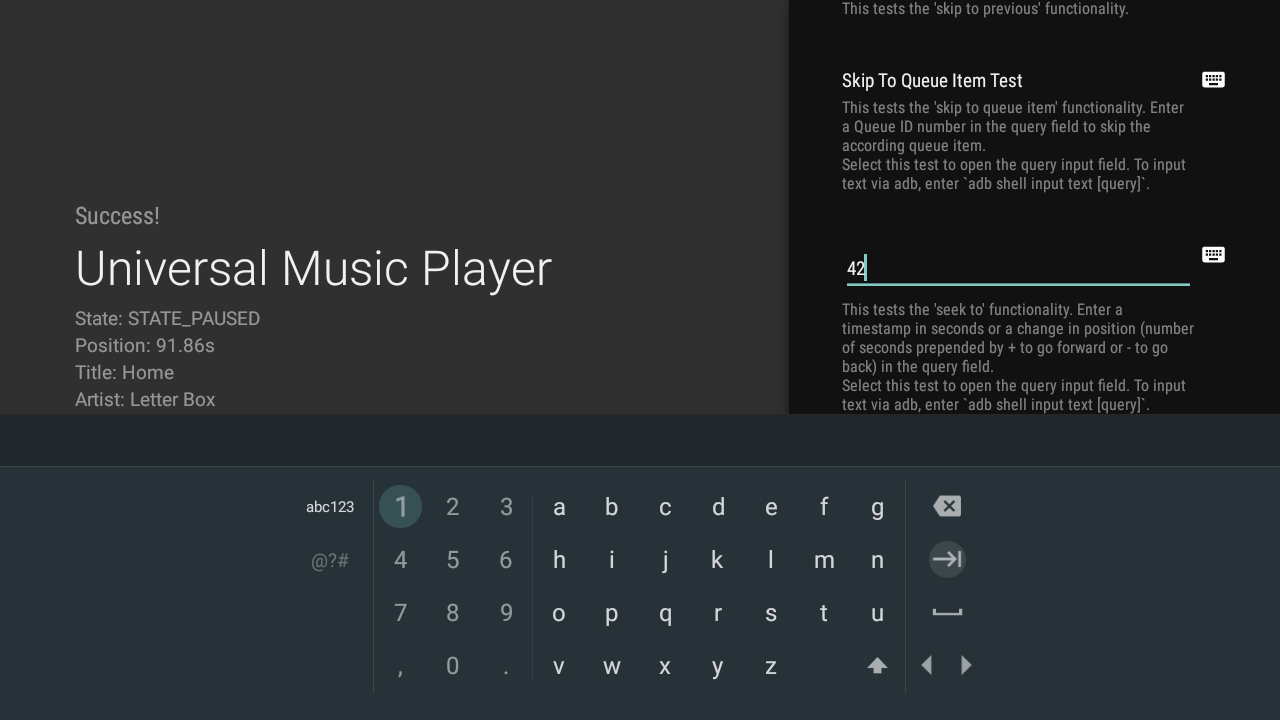
Tests that require a query are marked with a keyboard icon. Clicking on one of these tests will open an input field for the query. Upon hitting Enter, the test will run.

Android TV MCT Screenshot of the testing screen; clicking on the Seek To test opened an input field for the query.

To make text input easier, you can also use the ADB command:

adb shell input text [query]

Note that '%s' will add a space between words. For example, the command adb shell input text hello%sworld will add the text "hello world" to the input field.

What's next

The MCT currently includes simple single-media-action tests for the following requests:

  • Play
  • Play From Search
  • Play From Media ID
  • Play From URI
  • Pause
  • Stop
  • Skip To Next
  • Skip To Previous
  • Skip To Queue Item
  • Seek To

For a technical deep dive on how the tests are structured and how to add more tests, visit the MCT GitHub Wiki. We'd love for you to submit pull requests with more tests that you think are useful to have and for any bug fixes. Please make sure to review the contributions process for more information.

Check out the latest updates on GitHub!