Tag Archives: latest

Develop watch faces with the stable Jetpack Watch Face library

Posted by Alex Vanyo, Developer Relations Engineer

Illustration of tan hand showing a watch

Watch faces are one of the most visible ways that people express themselves on their smartwatches, and they’re one of the best ways to display your brand to your users.

Watch Face Studio from Samsung is a great tool for creating watch faces without writing any code. For developers who want more fine-tuned control, we've recently launched the Jetpack Watch Face library written from the ground up in Kotlin.

The stable release of the Jetpack Watch Face library includes all functionality from the Wearable Support Library and many new features that make it easier to support customization on the smartwatch and on the system companion app on mobile, including:

  • Watch face styling which persists across both the watch and phone (with no need for your own database or companion app).
  • Support for a WYSIWYG watch face configuration UI on the phone.
  • Smaller, separate libraries (that only include what you need).
  • Battery improvements through encouraging good battery usage patterns out of the box, such as automatically reducing the interactive frame rate when battery is low.
  • New screenshot APIs so users can see previews of their watch face changes in real time on both the watch and phone.

If you are still using the Wearable Support Library, we strongly encourage migrating to the new Jetpack libraries to take advantage of the new APIs and upcoming features and bug fixes.


Below is an example of configuring a watch face from the phone with no code written on or for the phone.

GIF showing how to edit a watch face using the Galaxy Wearable mobile companion app

Editing a watch face using the Galaxy Wearable mobile companion app


If you use the Jetpack Watch Face library to save your watch face configuration options, the values are synced with the mobile companion app. That is, all the cross-device communication is handled for you.

The mobile app will automatically present those options to the user in a simple, intuitive user interface where they change them to whatever works best for their style. It also includes previews that update in real time.

Let’s dive into the API with an overview of the most important components for creating a custom watch face!


WatchFaceService

A subclass of WatchFaceService forms the entry point of any Jetpack watch face. Implementing a WatchFaceService requires creating 3 objects: A UserStyleSchema, a ComplicationSlotsManager, and a WatchFace:

Diagram showing the 3 main parts of a WatchFaceService

Diagram showing the 3 main parts of a WatchFaceService

These 3 objects are specified by overriding 3 abstract methods from WatchFaceService:

class CustomWatchFaceService : WatchFaceService() {

    /**
     * The specification of settings the watch face supports.
     * This is similar to a database schema.
     */
    override fun createUserStyleSchema(): UserStyleSchema = // ...

    /**
     * The complication slot configuration for the watchface.
     */
    override fun createComplicationSlotsManager(
        currentUserStyleRepository: CurrentUserStyleRepository
    ): ComplicationSlotsManager = // ...

    /**
     * The watch face itself, which includes the renderer for drawing.
     */ 
    override suspend fun createWatchFace(
        surfaceHolder: SurfaceHolder,
        watchState: WatchState,
        complicationSlotsManager: ComplicationSlotsManager,
        currentUserStyleRepository: CurrentUserStyleRepository
    ): WatchFace = // ...

}

Let’s take a more detailed look at each one of these in turn, and some of the other classes that the library creates on your behalf.


UserStyleSchema

The UserStyleSchema defines the primary information source for a Jetpack watch face. The UserStyleSchema should contain a list of all customization settings available to the user, as well as information about what those options do and what the default option is. These settings can be boolean flags, lists, ranges, and more.

By providing this schema, the library will automatically keep track of changes to settings by the user, either through the mobile companion app on a connected phone or via changes made on the smartwatch in a custom editor activity.

    override fun createUserStyleSchema(): UserStyleSchema =
        UserStyleSchema(
            listOf(
                // Allows user to change the color styles of the watch face
                UserStyleSetting.ListUserStyleSetting(
                    UserStyleSetting.Id(COLOR_STYLE_SETTING),
                    // ...
                ),
                // Allows user to toggle on/off the hour pips (dashes around the outer edge of the watch
                UserStyleSetting.BooleanUserStyleSetting(
                    UserStyleSetting.Id(DRAW_HOUR_PIPS_STYLE_SETTING),
                    // ...
                ),
                // Allows user to change the length of the minute hand
                UserStyleSetting.DoubleRangeUserStyleSetting(
                    UserStyleSetting.Id(WATCH_HAND_LENGTH_STYLE_SETTING),
                    // ...
                )
            )
        )

CurrentUserStyleRepository

The current user style can be observed via the ​​CurrentUserStyleRepository, which is created by the library based on the UserStyleSchema.

It gives you a UserStyle which is just a Map with keys based on the settings defined in the schema:

Map<UserStyleSetting, UserStyleSetting.Option>

As the user’s preferences change, a MutableStateFlow of UserStyle will emit the latest selected options for all of the settings defined in the UserStyleSchema.

currentUserStyleRepository.userStyle.collect { newUserStyle ->
    // Update configuration based on user style
}

CurrentUserStyleRepository

Complications allow a watch face to display additional information from other apps on the watch, such as events, health data, or the day.

The ComplicationSlotsManager defines how many complications a watch face supports, and where they are positioned on the screen. To support changing the location or number of complications, the ComplicationSlotsManager also uses the ​​CurrentUserStyleRepository.

    override fun createComplicationSlotsManager(
        currentUserStyleRepository: CurrentUserStyleRepository
    ): ComplicationSlotsManager {
        val defaultCanvasComplicationFactory =
            CanvasComplicationFactory { watchState, listener ->
                // ...
            }
    
        val leftComplicationSlot = ComplicationSlot.createRoundRectComplicationSlotBuilder(
            id = 100,
            canvasComplicationFactory = defaultCanvasComplicationFactory,
            // ...
        )
            .setDefaultDataSourceType(ComplicationType.SHORT_TEXT)
            .build()
    
        val rightComplicationSlot = ComplicationSlot.createRoundRectComplicationSlotBuilder(
            id = 101,
            canvasComplicationFactory = defaultCanvasComplicationFactory,
            // ...
        )
            .setDefaultDataSourceType(ComplicationType.SHORT_TEXT)
            .build()

        return ComplicationSlotsManager(
            listOf(leftComplicationSlot, rightComplicationSlot),
            currentUserStyleRepository
        )
    }

WatchFace

The WatchFace describes the type of watch face and how to draw it.

A WatchFace can be specified as digital or analog and can optionally have a tap listener for when the user taps on the watch face.

Most importantly, a WatchFace specifies a Renderer, which actually renders the watch face:

    override suspend fun createWatchFace(
        surfaceHolder: SurfaceHolder,
        watchState: WatchState,
        complicationSlotsManager: ComplicationSlotsManager,
        currentUserStyleRepository: CurrentUserStyleRepository
    ): WatchFace = WatchFace(
        watchFaceType = WatchFaceType.ANALOG,
        renderer = // ...
    )

Renderer

The prettiest part of a watch face! Every watch face will create a custom subclass of a renderer that implements everything needed to actually draw the watch face to a canvas.

The renderer is in charge of combining the UserStyle (the map from ​​CurrentUserStyleRepository), the complication information from ComplicationSlotsManager, the current time, and other state information to render the watch face.

class CustomCanvasRenderer(
    private val context: Context,
    surfaceHolder: SurfaceHolder,
    watchState: WatchState,
    private val complicationSlotsManager: ComplicationSlotsManager,
    currentUserStyleRepository: CurrentUserStyleRepository,
    canvasType: Int
) : Renderer.CanvasRenderer(
    surfaceHolder = surfaceHolder,
    currentUserStyleRepository = currentUserStyleRepository,
    watchState = watchState,
    canvasType = canvasType,
    interactiveDrawModeUpdateDelayMillis = 16L
) {
    override fun render(canvas: Canvas, bounds: Rect, zonedDateTime: ZonedDateTime) {
        // Draw into the canvas!
    }

    override fun renderHighlightLayer(canvas: Canvas, bounds: Rect, zonedDateTime: ZonedDateTime) {
        // Draw into the canvas!
    }
}

EditorSession

In addition to the system WYSIWYG editor on the phone, we strongly encourage supporting configuration on the smartwatch to allow the user to customize their watch face without requiring a companion device.

To support this, a watch face can provide a configuration Activity and allow the user to change settings using an EditorSession returned from EditorSession.createOnWatchEditorSession. As the user makes changes, calling EditorSession.renderWatchFaceToBitmap provides a live preview of the watch face in the editor Activity.

To see how the whole puzzle fits together to tell the time, check out the watchface sample on GitHub. To learn more about developing for Wear OS, check out the developer website.

#AndroidDevSummit ‘21: 3 things to know for Modern Android Development

Posted by Florina Muntenescu, Developer Relations Engineer

From updates to Jetpack libraries, more guidance on using Kotlin coroutines and Flow in your android app and new versions of Android Studio, here are the top 3 things you should know:

#1 Jetpack feature updates

We’ve been working to add the features you’ve been asking us for in a lot of Jetpack libraries, here are a few highlights:

  • Navigation brings multiple backstacks support—no code update needed, just make sure you use the latest version.
  • WorkManager, our recommended solution for persistent work, makes it easier to handle Android 12 background restrictions, adding support for expedited jobs
  • Room adds auto-migration and multi-map relations.
  • DataStore, our coroutines based replacement for SharedPreferences, has reached 1.0.
  • Macrobenchmark, a tool to measure and improve startup and frame performance, added simplified and more accurate frame timing, and compatibility back to Android M

But if you want to deep dive, you should really check out: WorkManager - back to the foreground - where you’ll learn all about the latest APIs and features.

#2 Kotlin and Flow usage

Coroutines are the recommended solution for asynchronous work and Kotlin Flow is the obvious choice for managing streams of data in Android apps. To learn how to use Flows in practice, check out this Android Dev Summit session:

The talk also covers important things like how to stop collecting from the UI when it’s not needed, using the newly stable lifecycle-aware coroutines APIs: repeatOnLifecycle and flowWithLifecycle.

#3 Android Studio and LiveEdit for Jetpack Compose

In the Android Studio world, Arctic Fox is stable, Bumblebee is in Beta and Chipmunk is in Canary, all of them bringing a bunch of new features for Jetpack Compose and Material You, developer productivity and 12L and large screens.

The What’s new in Android Studio talk is a must see, especially the sneak peek demo of LiveEdit. LiveEdit is a generalization of live editing of literals, where you get to edit more general scenarios than just constants and strings: you can comment out parts of the UI, reorder composable calls and see the result on the phone in milliseconds. But, we want to make sure that this feature is really right before we include it in Android Studio, so stay tuned for it in the next releases.

You want more? Then sit back, relax and watch the full Modern Android Development playlist.

#Android Developer Summit: 3 things to know for Large Screens on Android!

Posted by Clara Bayarri, Engineering Manager

This year’s Android Dev Summit brought a lot of updates related to Large Screen development for Android, the 12L feature drop on foldables and tablets - a set of features optimising Android 12 for large screens, better developer tools and updates to Google Play purpose-built for large screens. Here are the top 3 things you should know:


#1: The 12L feature drop for large screens

12L makes Android 12 even better on Large Screen devices, with a bunch of new refined UI across surfaces such as notifications and the lock screen. The most important announcements for developers included

  • A renewed emphasis on multitasking. This means all apps can now enter split screen mode, regardless of whether they are resizeable or not.
  • New improvements to compatibility mode
  • New Activity Embedding APIs that allow you to show multiple activities side by side, making it easier to build large screen optimized layouts in existing apps

To find out more about what’s new, check out the What’s new for large screens and foldables video and developer.android.com/12L .


#2: Making it easier to build for Large Screens

Android has supported Large Screens for a long time, but we announced several new tools to help you scale up your app’s UI to larger form factors.

  • New Material Design Guidance targeted at large screens, including a definition of common layout patterns prevalent in the ecosystem to help inspire your app’s design
  • Window Size Classes, a new framework of breakpoints designed to represent the most common form factors in the ecosystem you should design and develop for
  • Updates to SlidingPaneLayout, the View component for 2 pane layouts, to support Navigation
  • New Compose APIs that make developing adaptive and responsive UI very simple, including Navigation Rail support
  • Android Studio reference devices, a new set of device profiles that represent the widest range possible of devices in the ecosystem to test for
  • Visual Lint brought to Android Studio Layout Validation to detect issues with large screen layouts
  • A brand new Resizeable Emulator that can quickly toggle between the reference devices

Learn more about all these items in the Building Android UIs for Any Screen Size and Design beautiful apps on foldables and large screens talks, and check out the latest Large Screen guide and Build adaptive layouts in Compose guide for more. You can also check out Best practices for video apps on foldable devices and Spotify Across Screens for examples on how apps are making this journey.


#3: Google Play updates for Large Screens

To help users find the best apps on tablets, foldables and ChromeOS devices, we’ve got new changes in Play to recommend apps optimized for the large screen. This includes new checks to assess app quality, so we can feature large screen optimized apps and update search rankings to show the best possible apps for these devices. We will also be introducing large screen specific app ratings, so users will be able to rate how your app works on their large screen devices.

You can find all of this year’s Android Dev Summit talks related to Large Screens in this playlist, and the full list of announcements for Large Screens in our blog post.

Improving App Startup: Lessons from the Facebook App

Posted by the Google and Facebook teams. Authored by Kateryna Semenova from the Google Android team and Tim Trueman, Steven Harris, Subramanian Ramaswamy from the Facebook team.

Brown hand holding a stopwatch.

Introduction

Improving app startup time is not a trivial task and requires a deep understanding of things that affect it. This year, the Google Android team and the Facebook app team have been working together on metrics and sharing approaches to improve app startup. Google Android’s public documentation has a lot of information on app startup optimization. In addition to that we want to share how it applies to the Facebook app and what helped them to improve app startup.

There are now more than 2.9 billion people using Facebook every month. Facebook helps give people the power to build community and bring the world closer together. It is a place for people to share life’s moments, discover and discuss what’s happening, connect and nurture relationships, and help work together to build economic opportunity.

Facebook app developers are committed to ensure that people have the best possible experience and that the app works seamlessly on every device, in any country, and within different network conditions. Working together, the Google Android team and Facebook team aligned on metrics definition for app startup and best practices and shared them in this article.


Where to start

Start by measuring your startup times. This will let you know how good your user’s startup experience is, track any regressions, as well as how much to invest on improving it. At the end of the day, your startup times need to be tied to user satisfaction or engagement or user-base growth in order to prioritize your investments.

Android defines two metrics to measure app startup times: Time-To-Full-Display (TTFD) and Time-To-Initial-Display (TTID). While you can further split it into cold/warm startup times, this post will not disambiguate between them - Facebook's approach is to measure and optimize the startup time that’s experienced across all users interacting with the app (some of them will be cold, some warm).


Time-To-Full-Display

TTFD captures the time when your app has completed rendering and is ready for user interaction and consumption, perhaps including content from disk or the network. This can take a while on slow networks and can depend on what surface your users land on. Thus, it may also be helpful to show something right away and let users see progress is still happening, which brings us to TTID…


Time-To-Initial-Display

TTID captures the time for your app to draw its background, navigation, any fast-loading local content, placeholders for slower local content or content coming from the network. TTID should be when users can navigate around and get to where they want to go.

Don’t change too much: One thing to watch out for is visually shifting your app’s content between TTID and TTFD, like showing cached content then snapping it away once network content comes in. This can be jarring and frustrating for users, so make sure your TTID draws enough meaningful content to show users as much as possible of what to expect for TTFD.


Focus on user success

Your users are coming to your app for content that might take a while to load, and you want to deliver that content to them as quickly as you can.

Facebook app developers focus on a metric based on Time To Full Display (TTFD), including all content and images, because that represents the full experience of what users came to the app for. If a network call for content or an image takes a long time or fails, developers want to know so that they can improve the entire start to finish startup experience.


What’s a good target for TTID and TTFD?

Facebook’s startup metric is the percentage of app starts that they consider “bad,” which is any start that either has a TTFD longer than 2.5 seconds OR any part of startup that is unsuccessful (e.g. an image fails to load or the app crashes). Facebook focuses on driving this percentage of bad starts down either by improving successful starts that take longer than 2.5 seconds, or by fixing issues causing unsuccessful starts. 2.5 seconds was chosen based on research that showed this was meaningful to Facebook users (this also matches the Largest Contentful Paint (LCP) metric in the Web Vitals recommendations for web sites).

Including the full experience, especially of any network calls to fetch recent content, can make your TTFD startup metrics seem really slow compared to TTID. This is actually a good thing! It represents the real experience people have with your app. Improvements you make to this may drive increased usage and perception of your app’s performance for your users like it has at Facebook.

Measuring TTFD can be tricky depending on your app. If it’s too hard, it’s fine to start with Time To Initial Display (TTID). That may miss the performance of loading some of your content if you have placeholders or images, but it’s good to start somewhere even if it’s just a subset of what your users see interacting with your app every day.


Instrumenting TTID

In Android 4.4 (API level 19) and higher, logcat provides a “Displayed” value capturing the time elapsed between launching the process and the completion of drawing the first frame of the corresponding activity on the screen.

The reported log line looks similar to the following example:

ActivityManager: Displayed com.android.myexample/.StartupTiming: +3s534ms

Instrumenting TTFD

To instrument TTFD, call reportFullyDrawn() in your Activity after all your content is on screen. Be sure to include any content that replaces placeholders, as well as any images you render (be sure to count when the image itself is displayed, not just its placeholder). Once you instrument calling reportFullyDrawn(), you can see it in logcat:

ActivityManager: Fully drawn {package}/.MainActivity: +1s54ms

Recommendations From Facebook App Developers

Facebook app developers have been optimizing the app for billions of users across a multitude of devices, platforms and countries for many years. This section shares some of the key lessons that Facebook app developers applied to optimize their app startup.

  • Understand first, then optimize - Once you’ve defined a good startup metric, instrumenting it in your app can allow you to understand and prioritize improving your startup performance to deliver a better experience for your users. By starting with instrumentation, you can prove there is an opportunity, you can identify where to focus your efforts, and you can see how much you’ve improved things as you start optimizing.
  • Fix crashes first - After you’ve instrumented your starts, make sure your app starts reliably. Crashes during startup are the most frustrating and quickest way to get users to abandon your app; measure and address these first.
  • Don’t forget about functional reliability - Also, don’t forget about functional reliability: did your app show some content quickly, but fail to load all content or take a long time to load images? Your app may be starting fast, but failing to function as a customer wants (e.g., if tapping a button doesn’t work) - this worsens the customer experience.
  • Aim for consistency - Inconsistent performance is more frustrating than consistent but slower than average startup performance. Take a look at the long tail of your starts and see if there are any fixes or ways to mitigate these slow starts. Don’t forget to look at your offline and lossy network startup performance starts.
  • Parallelize work - Most modern phones have at least 4 CPU cores, so there's room to multitask! Don’t block the main thread unless you have to. Move I/O and non-critical paths work off the main thread.
  • Be lazy - Once you’ve got a reliable and consistent startup, take a look through everything you’re doing to display your first visible screen of content—is there any work in there that’s not necessary? Remove, delay, or move to the background any work that’s not directly related to a startup experience until after the app has started (but be careful to watch your app’s responsiveness as a counter-metric). Try to keep your app’s onCreate() as lightweight as possible.You can also benefit from using the Jetpack App Startup library to initialize components at application startup. When doing so, make sure to still load all the required modules for the starting activity, and don’t introduce flickers where the lazily-loaded modules become available.
  • Show progress, but don’t shift the UI too much - Try not to shift what’s presented to users around too much during startup. It’s frustrating to try to tap on something, only to have it change and do the wrong thing. This is similar to the Cumulative Layout Shift (CLS) concept from web vitals.For network-based loads with indeterminate durations, dismiss the splash screen and show placeholders for asynchronous loading. Consider applying subtle animations to the content area that reflect the loading state. Make sure that the loaded content structure matches the skeleton structure as closely as possible, to allow for a smooth transition once the content is loaded.
  • Cache it - When a user opens your app for the first time, you can show loading indicators for some UI elements. The next time a user comes to your app, you can show this cached content while you load more recent content. Ever seen your FB feed update after your app is loaded as we fetch updated content from the network? Cutting network time out of your startup, if you can, is a great way to speed things up and introduce a more consistent startup performance experience. However, showing cached content may not always be the best approach as the next point suggests, and this is why it is important to measure what works better for the customer.
  • Go fast & slow - Slightly slower, fresh & relevant content may be better than fast stale content. Showing fresh content to your users may be more valuable than starting up super fast only to refresh the content soon after startup. Evaluate whether it’s better to optimize for showing fresh content as quickly as possible with a timeout for showing stale content if the network is slow, or to just show what’s available immediately if the network is offline.
  • Consistent session start surface - You may find it helpful to reset users to your main content after your app is in the background for a long time. Devices can keep your app in memory for a long time.
  • Look at the inner workings - Trace and actually look at what’s executing during startup or attach a debugger—you might be surprised what you find! Once you’ve got a good understanding of the critical path for your starts, you can efficiently optimize your app’s performance. Invest in your biggest opportunities because you’ll know where they are.
  • Make it easy to do the right thing - Sometimes developers use bad patterns and architecture because there are too many ways to do things. Don’t be afraid to consolidate the patterns used in your app, and optimize them so it’s easy to pick how to complete a task and for that task to be performant. A good example of this would be eager code execution patterns. If you’re running code for content that appears after the first full screen draw, you’re by definition hurting performance. Lazy code execution is a good pattern. Only run code eagerly when it is blocking the critical path for your startup.

Recommendations From Google Android Team

Google Android team’s recommendations to measure and optimize app startup are available in the public docs: App startup time. This section summarizes some of the key points that ties into Facebook’s recommendations above that all Android app developers should consider.

  • TTID and TTFD are important metrics for app startup. Google Android ranks apps with TTID in the Play Console. TTFD is a super-set of TTID, so any improvements in TTID should apply to both metrics.
  • Call reportFullyDrawn() to report TTFD and to let the system know that your activity is finished rendering. To improve app startup, the Android system adjusts optimizations to prioritize work that happens before reportFullyDrawn() is called. Calling this method when your app is in fully usable state will improve your app startup time. Every application should be using this API! And don’t forget to measure it.
  • Monitoring your app's technical performance with Android vitals will help you improve your app startup. Using the Play Console, you can view data to help you understand and improve your app's startup time and more.
  • We know a bug in production is much more expensive to fix compared to a fix at development time. The same applies to performance as well. Setup your application for measuring app startup early with local performance tests by using Jetpack Macrobenchmark: Startup.
  • Instrumenting is key to understanding and optimizing startup as we’ve discussed above. Android offers system tracing that can help to dig deep and diagnose app startup problems.
  • The Jetpack App startup library provides a straightforward, performant way to initialize components at application startup. Both library developers and app developers can use this library to streamline startup sequences and explicitly set the order of initialization. You can use this library to set which components load at what points during startup.
  • A typical issue that affects app startup is doing too much during initialization - for example, inflating large or complex layouts, blocking screen drawing, loading and decoding bitmaps, garbage collection, etc.

Recap

This article captures some key measures of startup and best practices to improve startup experience that helps drive user engagement and adoption for the Facebook Android app. It also shares metrics, libraries and tools recommended by the Google Android team. Any Android app stands to benefit from applying some of the strategies described in the document. Measure and make your app startup delightful and fast for your users!

#AndroidDevSummit: Jetpack Compose now with Material You

Posted by Nick Butcher Developer Relations Engineer


The Android Dev Summit last month brought a number of exciting updates to Jetpack Compose, including that Material You, Google's new design language, is now available in Compose. In case you missed it, here's a recap of all the announcements.


New Releases: Jetpack Compose 1.1 beta and compose-material3

We released Jetpack Compose 1.1 beta. This means that new APIs in 1.1 are now stable, offering new functionality and performance improvements. 1.1 includes new features like improved focus handling & touch target sizing or `ImageVector` caching and support for Android 12 stretch overscroll. Compose 1.1 also graduates a number of previously experimental APIs to stable and supports newer versions of Kotlin. We've already updated our samples, codelabs and Accompanist library to work with Compose 1.1.

We released compose-material3. This is a brand new artifact for building Material You UIs with Jetpack Compose. It offers updated components and color system, including support for dynamic color, creating a personalized color palette from a user's wallpaper. This is our first alpha so we welcome your feedback as we continue to add features and iterate on the APIs. Check out the new m3.material.io website to learn more about Material Design 3 and find tools to help you design & build with dynamic color, like the Material Theme Builder.


More Guidance & Documentation for Jetpack Compose

We released a ton of talks about Jetpack Compose, providing deep dives into layout, animation and state, showed how to use Compose across Wear OS, homescreen widgets and Large Screens and held 3 code-alongs; live coding your first Compose app, migrating an existing app or using compose on Wear OS. Finally we held a panel discussion, answering your burning questions about Jetpack Compose and Material.

We also expanded the Compose documentation, including new guides on the Phases of Jetpack Compose, Building Adaptive Layouts and expanded theming guidance including guidance for Material 3.


Tooling updates in Android Studio Bumblebee

At ADS, Android Studio Bumblebee entered Beta, bringing richer support for Jetpack Compose including:

Android Studio Chipmunk canaries also introduced a new template for Compose (and View based) Material 3 applications.

New Project launch webpage

Handoff

Lastly, we gave a sneak peak of some new tooling for design handoff, enabling you to export components designed in Figma to generate idiomatic Jetpack Compose code. You can iterate on the designs and pull in new changes, and safely edit the generated code. We're looking for a small group of teams to work directly with, so go sign up.

Jetpack Compose is stable and ready for production. We’ve been thrilled to see tens of thousands of apps start using Jetpack Compose in production and we continue to build our roadmap of features to enable you to use Compose to create excellent apps, across devices.

What’s new for Android developers at #AndroidDevSummit’21

Sagar Kamdar, VP of Product Management

Android Dev Summit graphic with laptop, watch and phone

The app experiences that you as developers build help people around the world in ways we couldn’t have imagined, and at Android Dev Summit, happening over the next two days, we’ll talk about that spirit - focusing on the user, understanding their needs, and then building experiences to delight them. We just wrapped up the keynote, and over the next two days, we’ll focus on an important theme for Android: helping you build excellent apps, across devices. First on updates to our modern Android development offering to help you stay more productive so you can focus on building great applications, and then helping you extend those apps across devices to all form factors. And as a big part of this, we’re introducing the 12L feature drop on foldables and tablets - a set of features optimising Android 12 for large screens - read on to learn more!

Excellent apps: bringing Material You to Jetpack Compose

When it comes to helping you build excellent apps, our expanding collection of development tools, APIs, language, and distribution technologies–Modern Android Development, MAD for short–are your partners to help you stay more productive. And we’ve got a number of new features across MAD to help you be productive and create better apps, starting with one of our biggest announcements: the introduction of Material You and its radical new design vision into Jetpack Compose, Android's modern toolkit for building native UI.

Material You, introduced in Android 12 earlier this year at Google I/O, focuses on delivering experiences that are personal for every style, accessible for every need, and adaptive for every screen. We’re releasing the first alpha of Compose Material 3, which offers Material Design 3 styled components and theme, enabling Material You personalization features like dynamic color. We’re also releasing the first beta version of Jetpack Compose 1.1 with features like stretch overscroll for Android 12, improved touch-target sizing, experimental lazy layout animations, and more. Jetpack Compose is stable and ready for use in production and we continue to add the features you need to make it fast and easy to build Android UI across all form factors, with new support for Wear OS and for building homescreen widgets.

GIF showing Compose Material 3

Jetpack: more features to help you create excellent apps

Beyond Compose, Jetpack continues to add the features you’ve been asking us for. Navigation adds multiple backstacks support. WorkManager, our recommended solution for persistent work, makes it easier to handle Android 12 background restrictions, adding support for expedited jobs. Room adds auto-migration and multi-map relations. DataStore, our recommended replacement for SharedPreferences, has reached 1.0 and Macrobenchmark, a tool to measure and improve startup and frame performance, added simplified and more accurate frame timing, and compatibility back to Android M.

Building across devices

We also have updates to help you build across Android form factors. Learn more about how being available across different Android devices and form factors is helping Spotify achieve their mission of connecting billions of fans with millions of creators.

Introducing 12L, an OS designed for large screens, together with new tools

Large screens have seen some incredible momentum: a 92% Year-over-Year growth in Chrome OS, making it the fastest growing desktop OS in the world, a 20% growth in tablet sales in the last year and a 2.5x growth in foldables sales, the newest and most innovate form factor…altogether those represent over 250M active large screen Android devices - and Android is giving you an OS to match. And we’ve got some… *large* news to *unfold* here: a developer preview of an upcoming feature drop for Android 12, with updates added JUST for large screens; we call it 12L. With 12L we’ve optimised and polished the system UI for large screens, made multitasking more powerful and intuitive, and improved our compatibility support for apps so they look better right out of the box. You can try the new large-screen features today as part of the 12L developer preview. Check out what is in 12L and how we’re making it easier to build for large screens here.

GIF showing maps being used on Large Screen device

Watch out for Wear OS

Many developers have created helpful experiences for the latest version of Wear OS which launched earlier this year, and we're looking forward to richer, more immersive app experiences like what we’re seeing from Strava, Spotify, and Calm. Jetpack Compose makes building UIs so much faster and easier - so we’re bringing Compose support to Wear OS. Compose for Wear OS is now in developer preview, with new samples and documentation to help you get started. The ​​Tiles API, now in Beta, provides predictable, glanceable access to information and quick actions. We’ve also partnered with Samsung to make it easier to design watch faces. Watch Face Studio, created by Samsung, allows you to produce your own watch faces without any coding, so watch you see..is watch you get. You can read more about all of the Wear OS news here.

Google Play: More features and investments to help you grow your business

We’ve invested in more ways to power your business growth on Google Play. To strengthen user trust, we’ve introduced the Data safety section to highlight your privacy practices and the Play Integrity API to make sure your app installs are always genuine. We’ve also invested in more tools and features to help boost your app quality and recently updated our programs so that 99% of developers qualify for a service fee of 15% or less. To learn more, check out our blog post or watch the full session.

#AndroidDevSummit kicks off now!

We just dropped over 30 technical sessions, which you can watch here at your own pace. And over the next two days, we have a lot more live content for you to enjoy - including your opportunity to get your burning #AskAndroid questions answered by the team who built Android on topics like Modern Android Development, Large Screens, or Compose with Material You. Plus, we’ll also be hosting live Android Code-Alongs, where you can tune in to watch Android experts as they code, tackle programming challenges, and answer your questions live across Jetpack Compose and Compose for Wear OS. You can check out the full agenda with timings here. While we can’t wait for the opportunity to connect with you in person soon, we’re excited to engage with you remotely over the next two days. Enjoy your #AndroidDevSummit!

12L and new Android APIs and tools for large screens

Posted by Dave Burke, VP of Engineering

image shows four devices illustrating 12L and new Android APIs and tools for large screens

There are over a quarter billion large screen devices running Android across tablets, foldables, and ChromeOS devices. In just the last 12 months we’ve seen nearly 100 million new Android tablet activations–a 20% year-over-year growth, while ChromeOS, now the fastest growing desktop platform, grew by 92%. We’ve also seen Foldable devices on the rise, with year on year growth of over 265%! All told, there are over 250 million active large screen devices running Android. With all of the momentum, we’re continuing to invest in making Android an even better OS on these devices, for users and developers.

So today at Android Dev Summit, we announced a feature drop for Android 12 that is purpose-built for large screens, we’re calling it 12L, along with new APIs, tools, and guidance to make it easier to build for large screens. We also talked about changes we’re making to Google Play to help users discover your large-screen optimized apps more easily. Read on to see what’s new for large screens on Android!

Previewing 12L: A feature drop for large screens

Today we're bringing you a developer preview of 12L, our upcoming feature drop that makes Android 12 even better on large screens. With the preview, you can try the new large screen features, optimize your apps, and let us know your feedback.

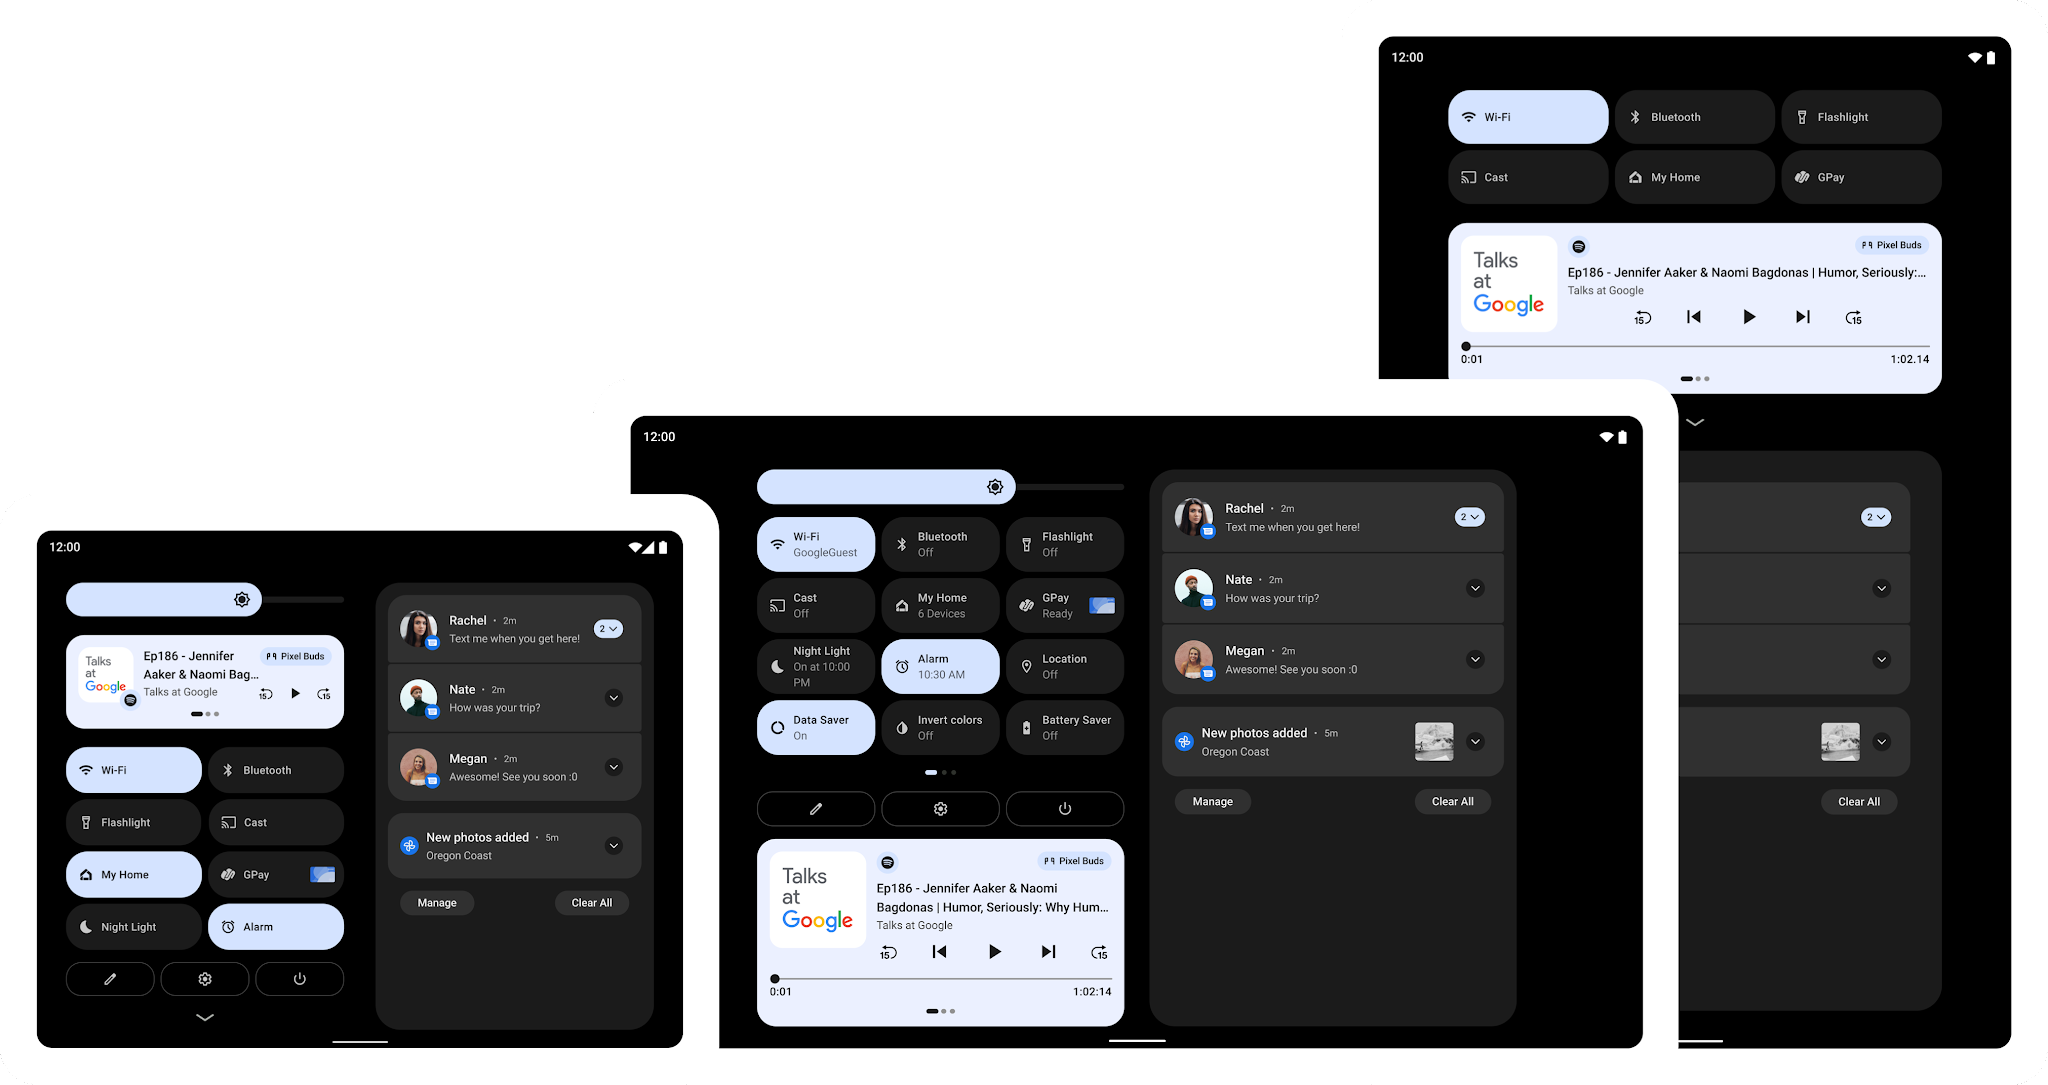
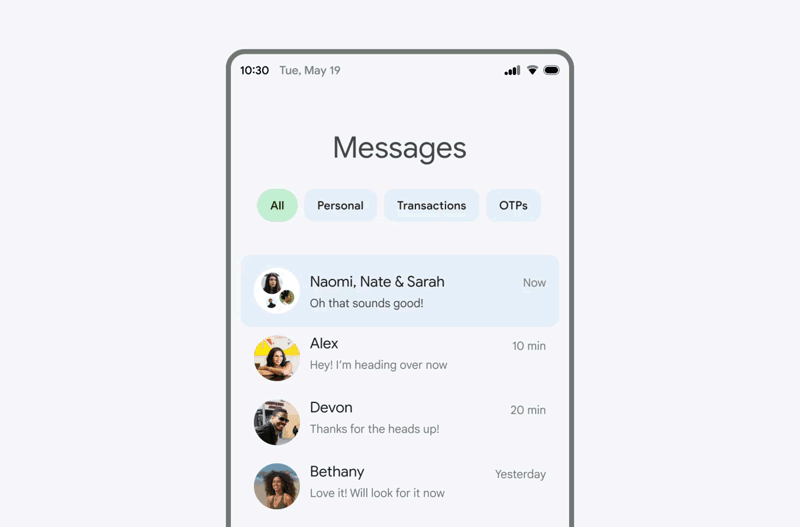
In 12L we’ve refined the UI on large screens across notifications, quick settings, lockscreen, overview, home screen, and more. For example, on screens above 600dp, the notification shade, lockscreen, and other system surfaces use a new two-column layout to take advantage of the screen area. System apps are also optimized.

image shows a phone with two-column layouts

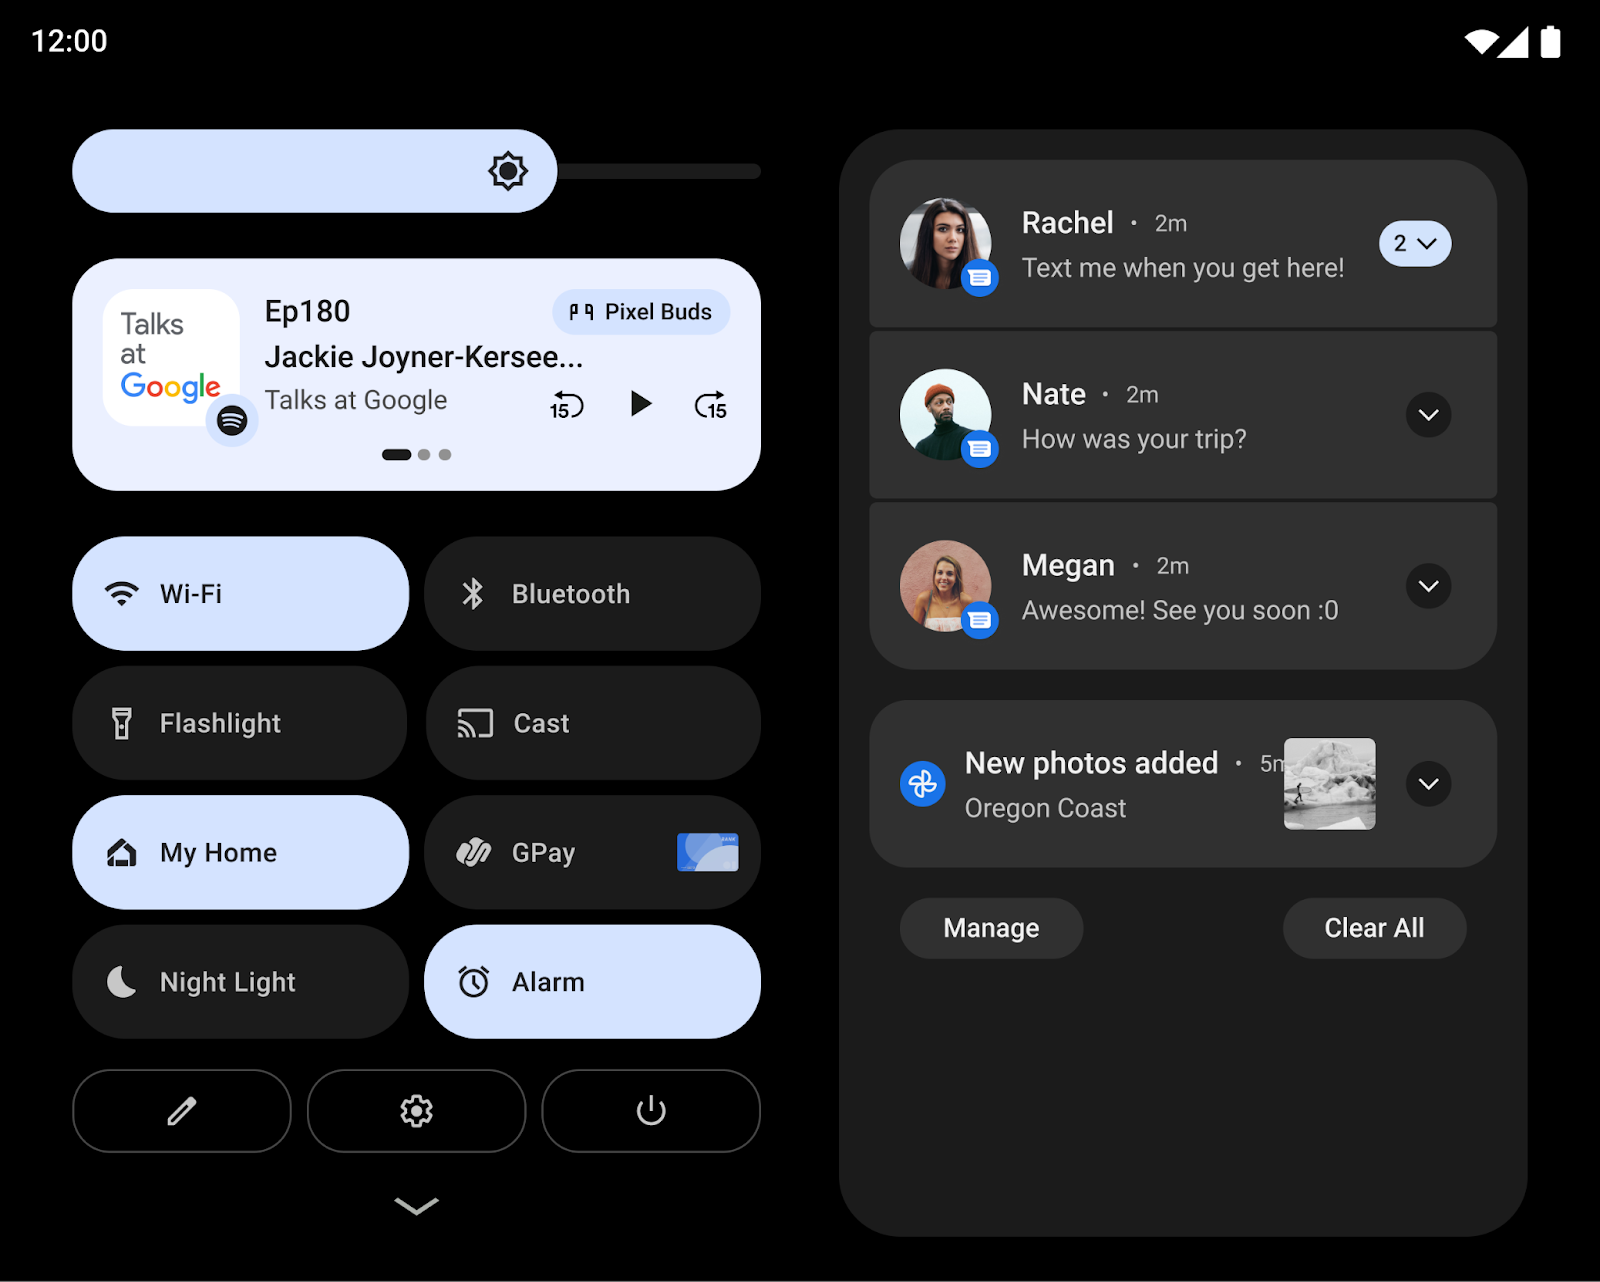
Two-column layouts show more and are easier to use

We’ve also made multitasking more powerful and intuitive - 12L includes a new taskbar on large screens that lets users instantly switch to favorite apps on the fly. The taskbar also makes split-screen mode more discoverable than ever - just drag-and-drop from the taskbar to run an app in split-screen mode. To make split-screen mode a better experience in Android 12 and later, we’re helping users by automatically enabling all apps to enter split screen mode, regardless whether the apps are resizable.

GIF image shows maps and web brower on the screen at the same time

Drag and drop apps into split-screen mode

Last, we’ve improved compatibility mode with visual and stability improvements to offer a better letterboxing experience for users and help apps look better by default. We’ve made letterboxing easily customizable by device manufacturers, who can now set custom letterbox colors or treatments, adjust the position of the inset window, apply custom rounded corners, and more.

We plan to release the 12L feature drop early next year, in time for the next wave of Android 12 tablets and foldables. We’re already working with our OEM partners to bring these features to their large screen devices - watch for the developer preview of 12L coming soon to the Lenovo P12 Pro. With the features coming to devices in the few months ahead, now is a great time to optimize your apps for large screens.

For developers, we highly recommend checking out how your apps work in split screen mode with windows of various sizes. If you haven’t optimized your app yet, see how it looks in different orientations and try the new compatibility mode changes if they apply. Along with the large screen features, 12L also includes a handful of new APIs for developers, along with a new API level. We’ve been careful not to introduce any breaking changes for your apps, so we won’t require apps to target 12L to meet Google Play requirements.

To get started with 12L, download the 12L Android Emulator system images and tools from the latest preview release of Android Studio. Review the features and changes to learn about areas to test in your apps, and see preview overview for the timeline and release details. You can report issues and requests here, and as always, we appreciate your feedback!

12L is for phones, too, but since most of the new features won’t be visible on smaller screens, for now we’re keeping the focus on tablets, foldables, and ChromeOS devices. Later in the preview we plan to open up Android Beta enrollments for Pixel devices. For details, visit developer.android.com/12L.

Making it easier to build for large screens

It's time to start designing fully adaptive apps to fit any screen, and now we're making it even easier. To help you get ready for these changes in the OS and Play, along with the developer preview we're releasing updates to our APIs, tools and guidance.

Design with large screen patterns in mind

The first step to supporting adaptive UI is designing your app to behave nicely on both a small and a larger screen. We’ve been working on new Material Design guidance that will help you scale your app’s UI across all screens. The guidance covers common layout patterns prevalent in the ecosystem that will help inspire and kick-start your efforts.

Image shows four Adaptive UI patterns in the Material Design guidelines

Adaptive UI patterns in the Material Design guidelines

Build responsive UIs with new navigation components

To provide the best possible navigation experience to your users, you should provide a navigation UI that is tailored to the Window Size Class of the user’s device. The recommended navigation patterns include using a navigation bar for compact screens and a navigation rail for medium-width device classes and larger (600dp+). For expanded-width devices, there are several ideas on larger screen layouts within our newly released Material Design guidance such as a List/Detail structure that can be implemented, using SlidingPaneLayout. Check out our guidance on how to implement navigation for adaptive UIs in Views and Compose.

While updating the navigation pattern and using a SlidingPaneLayout is a great way to apply a large screen optimized layout to an existing application with fragments, we know many of you have applications based on multiple activities. For those apps, the new activity embedding APIs released in Jetpack WindowManager 1.0 beta 03 make it easy to support new UI paradigms, such as a TwoPane view. We’re working on updating SlidingPaneLayout to support those APIs - look for an update in the coming months.

Use Compose to make it easier to respond to screen changes

Jetpack Compose makes it easier to build for large screens and diverse layouts. If you’re starting to adopt Compose, it’s a great time to optimize for large screens along the way.

Compose is a declarative UI toolkit; all UI is described in code, and it is easy to make decisions at runtime of how it should adapt to the available size. This makes Compose especially great for developing adaptive UI, as it is very easy to handle UI changes across different screen sizes or components. The Build adaptive layouts in Compose guide covers the basics of what you need to know.

Use WindowManager APIs to build responsive UIs

The Jetpack WindowManger library provides a backward-compatible way to work with windows in your app and build responsive UI for all devices. Here’s what’s new.

Activity embedding

Activity embedding lets you take advantage of the extra display area of large screens by showing multiple activities at once, such as for the List-Detail pattern, and it requires little or no refactoring of your app. You determine how your app displays its activities—side by side or stacked—by creating an XML configuration file or making Jetpack WindowManager API calls. The system handles the rest, determining the presentation based on the configuration you’ve created.

Activity embedding works seamlessly on foldable devices, stacking and unstacking activities as the device folds and unfolds. If your app uses multiple activities, activity embedding can enhance your user experience on large screen devices. Try the activity embedding APIs in Jetpack WindowManager 1.0 Beta 03 and later releases. More here.

GIF shows activity embedding with Jetpack WindowManager

Activity embedding with Jetpack WindowManager

Use Window size classes to help detect the size of your window

Window Size Classes are a set of opinionated viewport breakpoints for you to design, develop and test resizable application layouts against. The Window Size Class breakpoints have been split into three categories: compact, medium, and expanded. They have been designed specifically to balance layout simplicity with the flexibility to optimize your app for the most unique use cases, while representing a large proportion of devices in the ecosystem. The WindowSizeClass APIs will be coming soon in Jetpack WindowManager 1.1 and will make it easier to build responsive UIs. More here.

Image compares the width of Window Size Classes by showing compact, medium, and expanded views

Window Size Classes in Jetpack WindowManager

Make your app fold-aware

WindowManager also provides a common API surface for different window features, like folds and hinges. When your app is fold aware, the content in the window can be adapted to avoid folds and hinges, or to take advantage of them and use them as natural separators. Learn how you can make your app fold aware in this guide.

Building and testing for large screens with Android Studio

Reference Devices

Since Android apps should be built to respond and adapt to all devices and categories, we’re introducing Reference Devices across Android Studio in many tools where you design, develop and test UI and layout. The four reference devices represent phones, large foldable inner displays, tablets, and desktops. We’ve designed these after analyzing market data to represent either popular devices or rapidly growing segments. They also enable you to ensure your app works across popular breakpoint combinations with the new WindowSizeClass breakpoints, to ensure your app covers as many use cases as possible.

Image shows reference device definitions for a tablet, phone, foldable, and desktop sizes

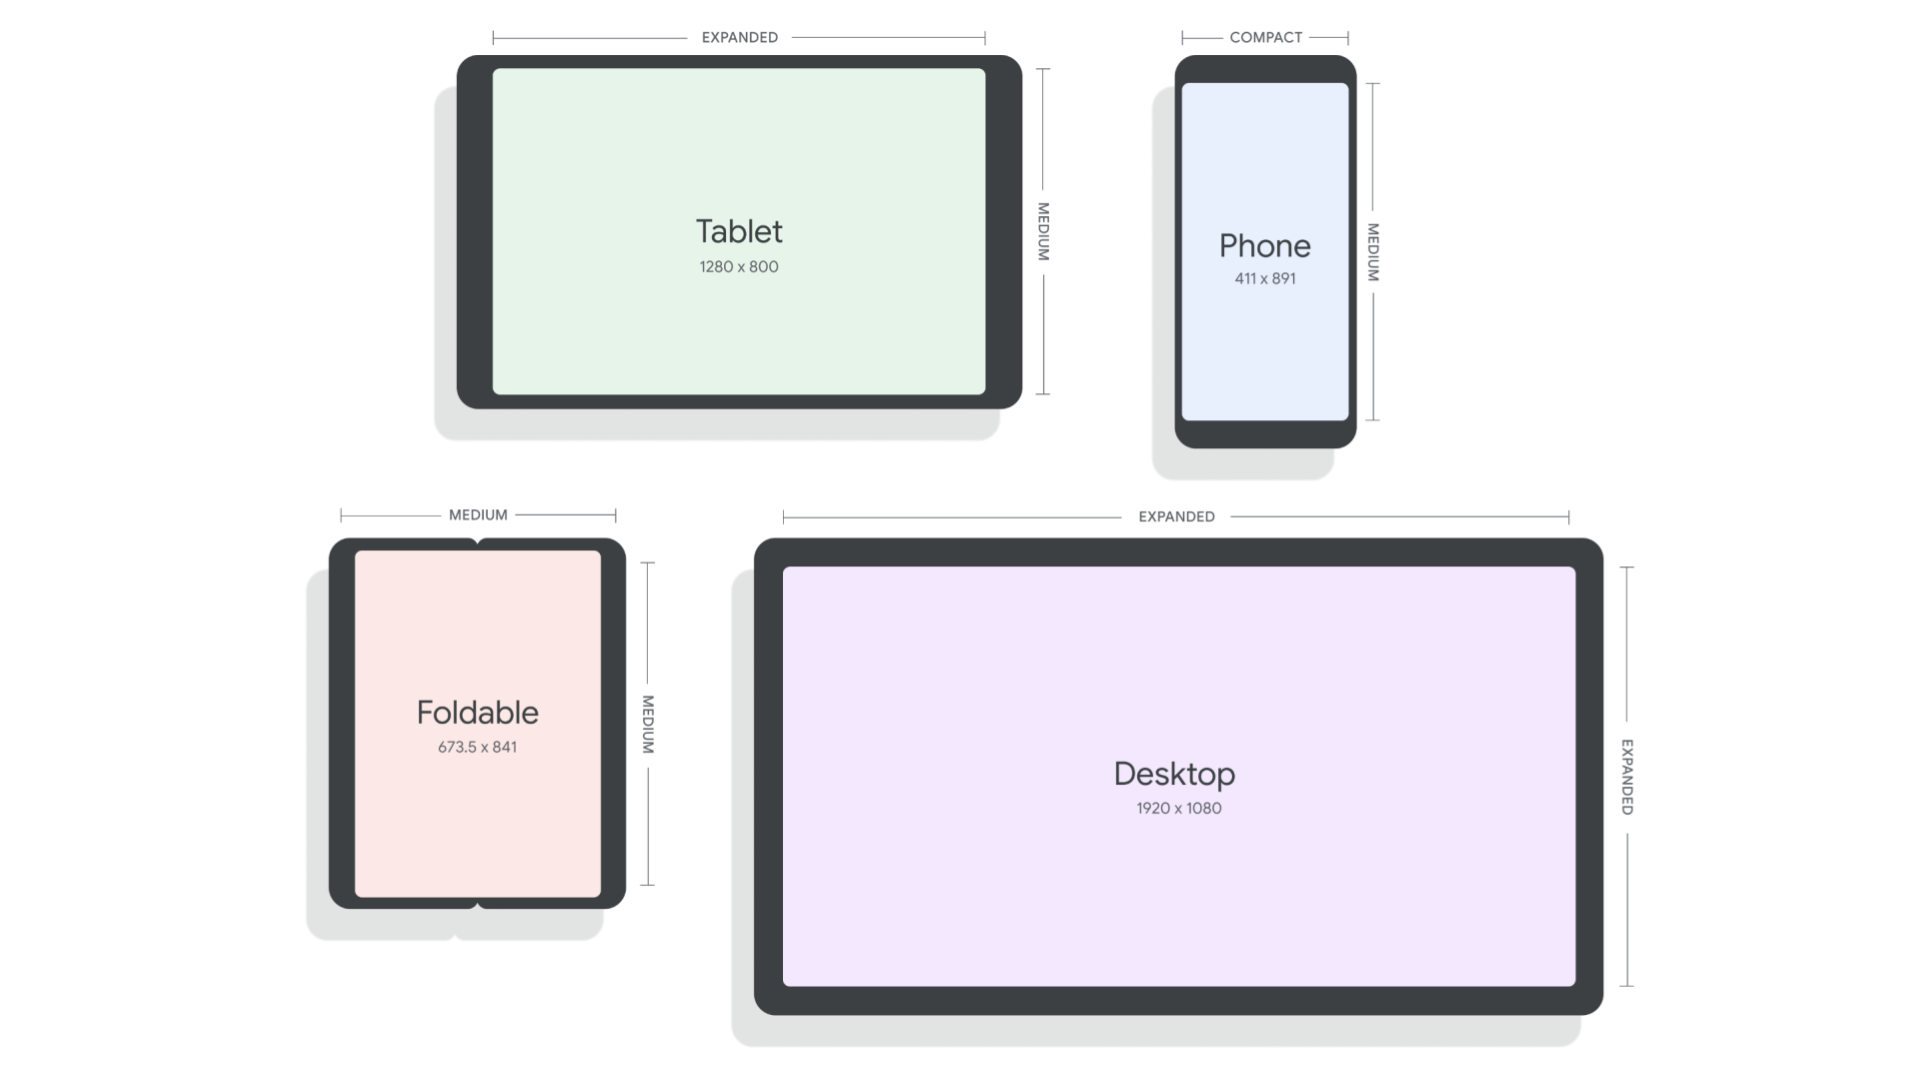
Reference Device definitions

Layout validation

If you’re not sure where to get started adapting your UI for large screens, the first thing you can do is use new tools to identify potential issues impacting large screen devices. In Android Studio Chipmunk, we’re working on a new visual linting tool to proactively surface UI warnings and suggestions in Layout Validation, including which reference devices are impacted.

Image shows layout validation panel. The panel shows phone, foldable, tablet, and desktop sizes

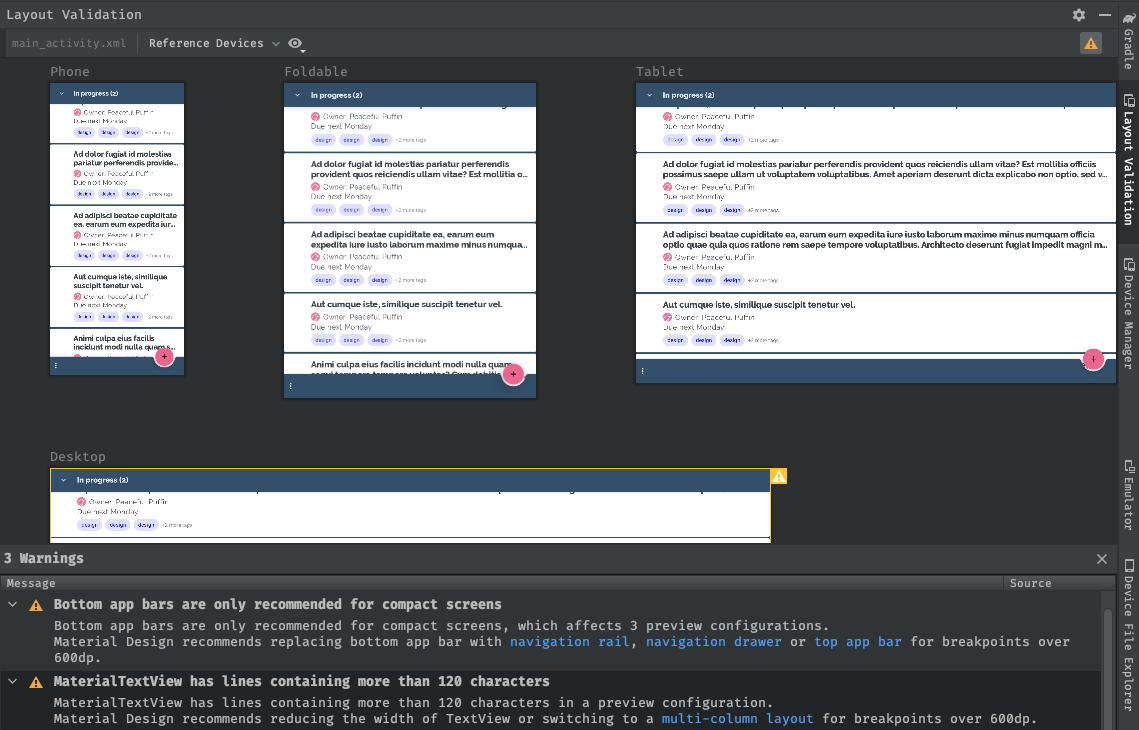
Layout validation tool with Reference Device classes

Resizable emulator

To test your app at runtime, we can use the new resizable emulator configuration that comes with Android Studio Chipmunk. The resizable emulator lets you quickly toggle between the four reference devices - phone, foldable, tablet, and desktop. This makes it easier to validate your layout at design time and test the behavior at runtime, both using the same reference devices. To create a new Resizable emulator, use the Device Manager in Android Studio to create a new Virtual Device and select the Resizable device definition with the Android 12L (Sv2) system image.

GIF shows the processs to create a new Resizable emulator

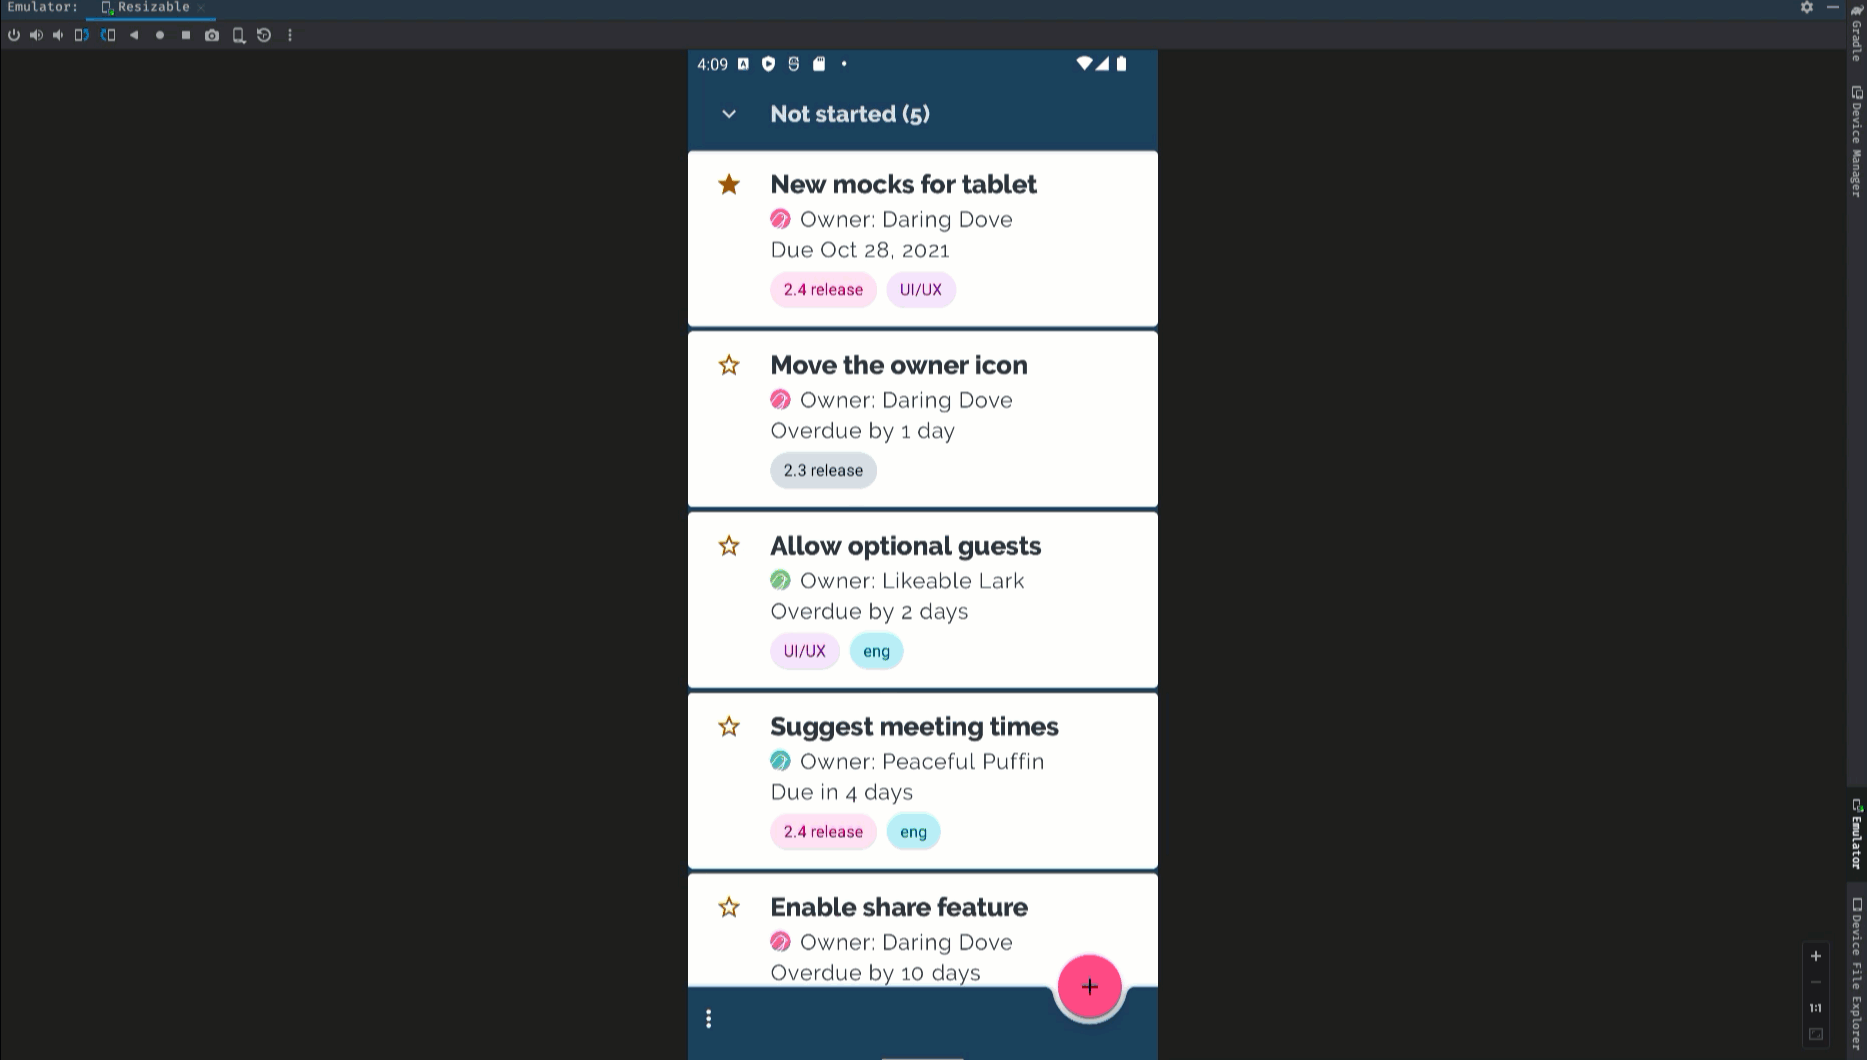
Resizable Android Emulator

Changes to Google Play on large screens

To make it easier for people to find the best app experiences on their tablets, foldables, and ChromeOS devices, we're making changes in Play to highlight apps that are optimized for their devices.

We’re adding new checks to assess each app’s quality against our large screen app quality guidelines to ensure that we surface the best possible apps on those devices. For apps that are not optimized for large screens, we’ll start warning large screen users with a notice on the app’s Play Store listing page.

We'll also be introducing large screen specific app ratings, as announced earlier this year, so users will be able to rate how your app works on their large screen devices. These changes are coming next year, so we're giving you advanced notice to get your apps ready!

Also, make sure to check out our post that highlights how we are evolving our business model to address developer needs in Google Play.


Learn more!

To help you get started with building for large screens and foldables, no matter whether you’re using Views or Compose, we’ve got you covered! We’re launching new and updated guidance on how to support different screen sizes both in a new and in an existing app, how to implement navigation for both Views and Compose, how to take advantage of foldable devices and more. Check them out in the large screens guides section for Views support or in the Compose guides section.

Nothing speaks louder than code - we updated the following samples to support responsive UIs:

For some hands-on work, check out our Support foldable and dual-screen devices with Jetpack WindowManager updated codelab.

Google Play updates from #AndroidDevSummit

Posted by Alex Musil, Director of Product, Google Play

illustrated graphic of orange hands holding a phone with the Google Play logo. There are other icons in the image like a coin and charts

At this year’s Android Developer Summit, we shared new features we’ve been building to help power your growth on our platform, including enhancements to trust and safety, tools to boost your app quality and improve monetization, some updates for games, and an exciting new app marketing certificate.

Watch the whole session below, or keep reading for the highlights.


Evolving our business model to address developer needs

We've made important changes to ensure all types of businesses can be successful on Google Play. We now have multiple programs designed to support our app ecosystem with 99% of developers qualifying for a service fee of 15% or less.

Recently, we announced that starting January 1, 2022, we’re decreasing the service fee for all subscriptions on Google Play from 30% to 15%. Additionally, we're making changes to the Play Media Experience program, where ebooks and on-demand music streaming services will now be eligible for service fees as low as 10%.

For more information about our service fees, please see our FAQs.


Improvements to trust and safety

Earlier this year, we shared details about the upcoming Data safety section in the Play Store, which will let users know what type of data your app collects and shares and how that data is used. By giving you a way to showcase your approach to privacy and security, we’re not only building trust, we’re helping users make informed decisions about the apps they install and use.

Users will see the new Data safety section in the Play Store starting in February 2022. You have until April 2022 before your apps must have this section completed and approved, but we encourage you to fill out the required Data Safety form in Play Console now. For more information, including guidance on how to fill out the form, watch our “Get prepared for the Data safety section” session.

We regularly update our policies to make Google Play a safe and trustworthy experience. Check out our Policy Center or this PolicyBytes video for new announcements from this week. You can also join our policy webinars and send in your questions, available for multiple regions (Global, India, Japan, or Korea).

Another way that we’re protecting both you and our users is by investing in new developer tools that help you protect your apps and games from abuse and attack, so you can ensure your users have the experience you intend. The new Play Integrity API will let you determine if you’re interacting with your genuine app binary, installed by Google Play, and running on a genuine Android device that’s powered by Google Play services. If not, you can decide how best to introduce additional friction and reduce the risk to your app.

The Play Integrity API will be rolling out to all developers over the next few months. To learn more, watch our “Play Integrity API” session and express interest in early access.


More ways to improve app quality

We've released several updates to help you improve the performance of your app.

First, we’re making it easier for you to be alerted to and fix new issues with improvements to Android vitals. Your most recent data is now more visible to help you see issues right away, and we’ve added trends, filters, and app version information to help you identify the source of the issue quickly.

We also recently launched a new tool in Play Console called Reach and devices to help you understand which features or fixes would help you reach the most users on Google Play. By understanding your user and issue distribution, you can make better decisions about which specs to build for, where to launch, and what to test to make the biggest impact.

We’re making changes to the way users evaluate your app quality, too. One of the most important ways that users assess your app is by checking your ratings and reviews. That’s why starting in November, users on phones will start to see ratings specific to their registered country. Then, in early 2022, users will see ratings specific to the device that they’re on, including form factors such as tablets, Chromebooks, and wearables. You can preview your location-specific and device-specific ratings in Play Console now, and we encourage you to check them out so you have time to make any app quality improvements you need before the new ratings go into effect in the Play Store.


Updates to help you monetize your app

To help you better monetize your apps and games, we continue to invest in modernizing our platform, including updates to the Billing Library. Billing Library version 3, which was announced June 2020, includes new ways for users to pay, subscription promotion capabilities, purchase attribution for games, and improvements to purchase reliability and security. As a reminder, all updates to existing apps must use Billing Library version 3 or newer by November 1, 2021. Learn more about updating to Billing Library version 3 or newer — which requires few updates to your code — in the release notes.

We’re also excited to announce a new feature in the Billing Library: in-app messaging. Today, subscription users who go into payment decline often aren’t aware of it, or experience too much friction to fix their payment. That’s why we’ve launched a new API that can detect whether a user is in payment decline and show a helpful message right in your app, so the user can immediately fix the payment without leaving the app to go to the Play Store. Best of all, the integration is super easy — just a single line of code. On average, our early-access partners saw a 99% improvement in subscription recovery and spend for users who saw the message. In-app messaging will be available in the next Billing Library release, so stay tuned for more information.


Seamless gaming experiences

The updated sign-in API for Play Games Services, which drastically simplifies the sign-in implementation, is now in early access. The new SDK makes for a one-line implementation.

We’ve also simplified the setup for users, combining the Google Play Games install and profile creation in one step. This allows users to get back to their game more quickly, even when they don’t have Play Games installed. We’re also streamlining the process of opting in to auto-sign-in for an even smoother experience for returning users.

But that’s not all. Because needing to have the Google Play Games app installed is creating friction for some users, starting in 2022, Play Games Services will no longer require this installation. This change will allow 2 billion users to sign in to your Play Games Services-enabled games with a zero-touch experience. More details are coming soon. You can express your interest in the early access program on our developer site.


Industry-recognized app marketing certificate

Last but not least, we also announced the launch of the Google Play Store Listing Certificate. This new program is designed to help app marketers demonstrate their proficiency and skills in Play Store listing best practices.

To get certified, app marketers can take online training that will help you best tell your app or game’s story on Google Play. You’ll learn key skills that will help you drive growth through high-quality and policy-compliant store listings. After the training, take the exam to get an industry-recognized certificate.

We hope you take advantage of all these new features and programs to grow your businesses on Google Play. Please continue sharing your feedback so we can build the tools you need to power your growth. Thank you for being part of the Google Play community.


How useful did you find this blog post?

Google Play logo

Driving app and career growth with Google Play Academy’s Store Listing Certificate

Posted by Eric McCleve, Google Play Academy Programs Lead

Illustration of a black woman with short hair holding a tablet with Google Play Academy Store Listing Certificate logo in the middle of the image

At Google Play, our goal is to help developers and marketers reach and resonate with over 2 Billion users who visit our platform every month looking for high quality content and services. Having a great store listing experience can be a huge benefit in helping achieve user acquisition goals for your app or game.

To help you get the most out of our store listing tools and features, we’re excited to announce a new Store Listing Certificate on Google Play Academy. The certificate is designed for both learners who have an app or game on Google Play and want to improve its store listing, or aspiring app makers who want to build in-demand mobile marketing skills. The training and exam cover:

  • The mobile marketer's role in creating a store listing
  • Common store listing policy violations to avoid
  • Telling your story with your store listing assets
  • Tools to help you grow your app
  • How to market to a global audience

How it works

Watch this video to learn more about the training and exam certificate


To get certified, you can take online training on Google Play Academy and learn best practices to help you best tell your app or game’s story. You’ll learn key skills that will help you drive growth through high-quality and policy-compliant store listings. After the training, take the exam to get an industry-recognized certificate. You will also be invited to join Google Developer Certification Directory, a network of Google certified developers.

Mohamed Kamara, founder of InovCares, a health startup that modernizes healthcare for women, learned app store listing best practices from Google Play Academy.

Hear Mo explain how Google Play Academy’s training helped him better tell his app’s story on Google Play


Get certified!

Start training and get certified. Happy learning!


How useful did you find this blog post?

Google Play logo

Introducing Jetpack Media3

Posted by Don Turner, Developer Relations Engineer

Blue background with a dark blue tablet illustration. The Android Jetpack logo is flying across the screen

Introducing Jetpack Media3

Today, we're launching the first alpha of Jetpack Media3. It's a collection of support libraries for media playback, including ExoPlayer. This article will explain why we created Media3, what it contains, and how it can simplify your app architecture.


Why another media API?

We have several existing media APIs: Jetpack Media also known as MediaCompat, Jetpack Media2, and ExoPlayer. These libraries were developed with different goals, and have several areas of overlapping functionality.

For example, ExoPlayer and Media2 both contain UI components, and MediaCompat and Media2 contain classes for handling media sessions.

It can be challenging to decide which library to use for a given use case, and objects from different libraries are often not compatible, requiring adapters or connecting code. Media3 removes these challenges by providing a single set of libraries which work well together.

To create Media3 we:

  • Identified the common areas of functionality in our existing media libraries, including UI, playback and media session handling.
  • Refined and merged the best parts.
  • Created a common Player interface for all "player-like" objects (more on this later).

What's in the box

Media3 contains many libraries. The ones most relevant for simple media playback are shown below.


Library name

Purpose

Useful classes for playback

media3-exoplayer

Objects for playing video and audio, provided by ExoPlayer. 

SimpleExoPlayer for simple playback use cases

media3-ui

Views for displaying media playback controls, content, and metadata. 

StyledPlayerView displays audio and video content from a Player

media3-session

Objects for creating and interacting with a media session.

MediaSession for advertising what you're playing

MediaLibraryService for advertising your content library


A common Player

Our existing media APIs have a lot of objects which accept playback commands, like "play," "pause," and "skip". Identifying these "player-like" objects and ensuring that they implement a common Player interface was one of the biggest undertakings in the development of Media3.

We've updated, enhanced, and streamlined the Player interface from ExoPlayer to act as the common Player interface for Media3.

Classes such as MediaController and MediaSession that previously contained references to other "player-like" objects have been updated to reference the new player.

This is useful when communicating with UI components. Both ExoPlayer and MediaController now implement Player, so either one of them can be used to communicate with StyledPlayerView or other UI components.

Diagram showing how MediaController and ExoPlayer implement the Player interface and can be used to communicate with UI components, like StyledPlayerView

Diagram showing how MediaController and ExoPlayer implement the Player interface and can be used to communicate with UI components, like StyledPlayerView


Simplified architecture

Using this Player interface avoids the need for connecting components, allowing for less code and a simpler app architecture.

In particular, this makes working with media sessions easier. Instead of using the MediaSessionConnector extension, or writing your own "player to media session" connector, you can create a MediaSession using a Player, like this:

player = ExoPlayer.Builder(context).build()
session = MediaSession.Builder(context, player).build()

Now your media session will automatically reflect the state of your player, and any commands sent to your media session will be automatically forwarded to your player. All that in just two lines of code!

Providing a content library

If your app needs to expose its content library to other apps, like Android Auto, use MediaLibraryService, rather than a MediaBrowserService from MediaCompat.

You'll then create a MediaLibrarySession and implement a MediaLibrarySessionCallback whose methods will be called by the browsing app to obtain your content tree.

Diagram showing how MediaLibraryService can be used to expose a content library

Diagram showing how MediaLibraryService can be used to expose a content library


Easier updates

One of the key benefits of using Jetpack libraries is API stability. If you use symbols that are part of the stable API, you generally don't need to update your code to use a new release of that library within the same major version.

In Media3, some of the most commonly used objects are marked as stable, including the Player API and media session classes.

Most of ExoPlayer's API surface is marked as unstable.

Diagram showing stable and unstable areas of the Media3 API

Diagram showing stable and unstable areas of the Media3 API


To use an unstable method or class you'll need to add the OptIn annotation before using it.

@androidx.annotation.OptIn(UnstableApi::class)
private fun initializeExoPlayer() {
  // ...
}

If your project uses a lot of unstable methods it may be more convenient to add this suppression to your project-wide lint.xml.

<issue id="UnsafeOptInUsageError">
  <ignore
      regexp='\(markerClass = androidx\.media3\.UnstableApi\.class\)'/>
</issue>

Just because part of an API is marked as unstable doesn't mean that the API is unreliable or that you shouldn't use it - it's just a way of informing you that it might change in the future.


Getting started

Media3 is released today in alpha and we'd love you to try it out.

One of the best ways to do this is to check out the demo app, which shows how to play video and audio, and integrate with a media session.

You can add the Media3 dependencies to your app by adding the following artifacts to your build.gradle:

implementation 'androidx.media3:media3-ui:1.0.0-alpha01'
implementation 'androidx.media3:media3-exoplayer:1.0.0-alpha01'
implementation 'androidx.media3:media3-session:1.0.0-alpha01'

If you have feedback or run into problems, please file an issue. We'd really love to hear from you.

For more information check out the “What's next for AndroidX Media and ExoPlayer” talk from Android Dev Summit 2021 and the Media3 release notes.