Tag Archives: Google Apps

Google I/O session recap: how to build custom apps with App Maker


Every company has workflows and processes that are unique to its business, customers and employees. Often, these are captured manually within large spreadsheets or ad-hoc databases with macros and scripts. But what if they could be turned into custom business apps instead? Apps that provide useful UIs and distinct user roles, while helping to minimize data entry errors and increase productivity?

This year at Google I/O, I shared reasons why businesses should use App Maker—our low-code, application development tool that lets companies quickly build custom apps in G Suite. Check it out here:


And for those who’d like more detail, here is a recap of my presentation.

Closing enterprise “app gaps” with App Maker 

“App gaps” are a reality for most companies, even those that embrace major SaaS products. Think about the edge cases that aren’t addressed with a standard CRM offering like conducting territory planning or tracking asset performance.

We experienced similar gaps at Google. A few years ago, our HR recruiters were overwhelmed with the thousands of monthly interviews that each generated lengthy feedback reports from multiple interviewers. This volume made it difficult for hiring committees to calibrate candidates and make timely decisions, and resulted in delayed responses. To fix this, our IT team decided to build an app by cobbling elements from our own infrastructure.

Over time, more app requests came in from other parts of Google, so we created App Maker. What started as a handful of apps within Google, evolved into nearly 400 internal apps used by thousands. Plus, the majority of these apps were built by non-engineers outside of IT.

Today, App Maker gives software engineers and citizen developers—like business analysts or coding enthusiasts—the ability to quickly build and deploy apps to get around their workflow challenges.

How does it work? 

App Maker makes it easy to build apps in days, not months, because of its easy data-binding and drag-and-drop UI design. You can also integrate your apps with various data sources, Google services or APIs to cover broad legacy assets. Any app you create is also a part of Drive in G Suite so your data never leaves your domain.

Here’s how to build an App Maker app in three steps:
  1. Define your data models, by importing existing Google Sheets to App Maker, connecting to Google Cloud SQL instances, or manually defining custom objects field by field.
  2. Build your UI by adding pre-built components like data entry forms, report templates and easily create event triggers and application flows. 
  3. Optionally, add open source HTML, CSS and JavaScript to run on the client UI and on the app server, implementing custom functionality that’s not provided out-of-the-box.
App Maker is currently in Early Adopter Program (EAP) for every G Suite Business customer. To get started, apply here.

Ideas to get started 

By now you’re probably wondering what you can build. Well, based on our customers’ experience, here are some good starting points:
  • If you have a large Sheet with more than a handful of users updating it regularly: Sheets usually have an underlying workflow. An App Maker app will provide a better UI for it—showing the workflow visually, prompting for actions and eliminating data entry errors. 
  • If you perform recurring bulk operations in Calendar or Gmail: Say an employee joins or leaves a department, you can build an App Maker app to generate the appropriate bulk-operations in a few clicks. 
  • If your company is already using Apps Script and BigQuery: This means you’ve already invested in customizing workflows. App Maker can increase the velocity of developing custom apps.
Go build your apps with App Maker in G Suite—sign up for the EAP today.

Updating developer identity guidelines and registration processes to protect users


Last week, we took immediate action to protect users from a phishing attack that attempted to abuse the OAuth authorization infrastructure.

Today, we’re supplementing those efforts to help prevent these types of issues in the future. These changes may add some friction and require more time before you are able to publish your web application, so we recommend that you plan your work accordingly.

Updating app identity guidelines 

As our Google API user data policy states, apps must not mislead users. For example, app names should be unique to your application and should not copy others'.

To further enforce this policy, we are updating our app publishing process, our risk assessment systems, and our user-facing consent page in order to better detect spoofed or misleading application identities. You may see an error message as you’re registering new applications or modifying existing application attributes in the Google API Console, Firebase Console, or Apps Script editor as a result of this change.

New review processes and restrictions on web apps requesting user data 

We have also enhanced our risk assessment for new web applications that request user data.

Based on this risk assessment, some web applications will require a manual review. Until the review is complete, users will not be able to approve the data permissions, and we will display an error message instead of the permissions consent page. You can request a review during the testing phase in order to open the app to the public. We will try to process those reviews in 3-7 business days. In the future, we will enable review requests during the registration phase as well.

You can continue to use your app for testing purposes before it is approved by logging in with an account registered as an owner/editor of that project in the Google API Console. This will enable you to add additional testers, as well as initiate the review process.

We also recommend developers review our earlier post outlining their responsibilities when requesting access to user data from their applications. Our teams will continue our constant efforts to support a powerful, useful developer ecosystem that keeps users and their data safe.

Create quizzes in Google Forms with Apps Script


Last year, we launched Quizzes in Google Forms to help teachers and students take assessment to scale. Using Quizzes, teachers are able to automate testing and give feedback to students faster by having Forms check responses against correct answers automatically. Today, we are making that functionality available to developers by extending the Google Apps Script Forms Service. With this feature, you can create and customize quizzes programmatically with Apps Script.

More specifically:
  • Create quizzes 
  • Assign point values and correct answers for questions 
  • Implement custom grading schemes 
Let’s take a look at an example use case and relevant code snippet.

Creating an auto-graded question 

Multiple choice, checkbox and dropdown questions can be auto-graded, which means students can see their grades immediately upon submission. This is done by designating which options are the correct answer. Teachers can also set automatic feedback to show correct or incorrect responses, as well as assign point values to the question.

Here is the Apps Script code that lets you create the quiz above:
function createGradedCheckboxQuestionWithAutofeedback() {
// Make sure the form is a quiz.
var form = FormApp.getActiveForm();
form.setIsQuiz(true);

// Make a 10 point question and set feedback on it
var item = FormApp.getActiveForm().addCheckboxItem();
item.setTitle("What flavors are in neapolitan ice cream?");
item.setPoints(10);
// chocolate, vanilla, and strawberry are the correct answers
item.setChoices([
item.createChoice("chocolate", true),
item.createChoice("vanilla", true),
item.createChoice("rum raisin", false),
item.createChoice("strawberry", true),
item.createChoice("mint", false)
]);
// If the respondent answers correctly, they'll see this feedback when they view
//scores.
var correctFeedback = FormApp.createFeedback()
.setText("You're an ice cream expert!")
.build();
item.setFeedbackForCorrect(correctFeedback);

// If they respond incorrectly, they'll see this feedback with helpful links to
//read more about ice cream.
var incorrectFeedback = FormApp.createFeedback()
.setText("Sorry, wrong answer")
.addLink(
"https://en.wikipedia.org/wiki/Neapolitan_ice_cream",
"Read more")
.build();
item.setFeedbackForIncorrect(incorrectFeedback);
}
For more details on what you can build with the Apps Script Forms Service, review the documentation, ask questions on Stack Overflow or in the G+ community, and let us know what else you’d like to see using the new public issue tracker for Apps Script.

Using field masks with update requests to Google APIs

Originally posted on the G Suite Developers Blog
Posted by Wesley Chun (@wescpy), Developer Advocate, G Suite

We recently demonstrated how to use field masks to limit the amount of data that comes back via response payloads from read (GET) calls to Google APIs. Today, we'll focus on a different use case for field masks: update requests.

In this scenario, field masks serve a different, but similar purpose—they still filter, but function more like bitmasks by controlling which API fields to update. The following video walks through several examples of update field mask usage with both the Google Sheets and Slides APIs. Check it out.


In the sample JSON payload below, note the request to set the cells’ bold attribute to true (per the cell directive below), then notice that the field mask (fields) practically mirrors the request:

{
"repeatCell": {
"range": {
"endRowIndex": 1
},
"cell": {
"userEnteredFormat": {
"textFormat": {
"bold": true
}
}
},
"fields": "userEnteredFormat/textFormat/bold",
}
}

Now, you might think, "is that redundant?" Above, we highlighted that it takes two parts: 1) the request provides the data for the desired changes, and 2) the field mask states what should be updated, such as the userEnteredFormat/textFormat/bold attribute for all the cells in the first row. To more clearly illustrate this, let's add something else to the mask like italics so that it has both bold and italic fields:

        "fields": "userEnteredFormat/textFormat(bold,italic)"
However, while both elements are in the field mask, we've only provided the update data for bold. There's no data for italic setting specified in the request body. In this case, italics for all cells will be reset, meaning if the cells were originally italicized, those italics will be removed after this API request completes. And vice versa, if the cells were not italicized to begin with, they'll stay that way. This feature gives developers the ability to undo or reset any prior settings on affected range of cells. Check out the video for more examples and tips for using field masks for update requests.

To learn more about using field masks for partial response in API payloads, check out this video and the first post in this two-part series. For one of the most comprehensive write-ups on both (read and update) use cases, see the guide in the Google Slides API documentation. Happy field-masking!

Using field masks with update requests to Google APIs


We recently demonstrated how to use field masks to limit the amount of data that comes back via response payloads from read (GET) calls to Google APIs. Today, we’ll focus on a different use case for field masks: update requests.

In this scenario, field masks serve a different, but similar purpose—they still filter, but function more like bitmasks by controlling which API fields to update. The following video walks through several examples of update field mask usage with both the Google Sheets and Slides APIs. Check it out.
2
In the sample JSON payload below, note the request to set the cells' bold attribute to true (per the cell directive below), then notice that the field mask (fields) practically mirrors the request:
{
"repeatCell": {
"range": {
"endRowIndex": 1
},
"cell": {
"userEnteredFormat": {
"textFormat": {
"bold": true
}
}
},
"fields": "userEnteredFormat/textFormat/bold",
}
}
Now, you might think, “is that redundant?” Above, we highlighted that it takes two parts: 1) the request provides the data for the desired changes, and 2) the field mask states what should be updated, such as the userEnteredFormat/textFormat/bold attribute for all the cells in the first row. To more clearly illustrate this, let’s add something else to the mask like italics. Here, the updated field mask now has both bold and italic fields:
"fields": "userEnteredFormat/textFormat(bold,italic)"

However, while both elements are in the field mask, we’ve only provided the update data for bold. There’s no data for italic setting specified in the request body. In this case, for all cells will be reset, meaning if the cells were originally italicized, those italics will be removed after this API request completes. And vice versa, if the cells were not italicized to begin with, they’ll stay that way. This feature gives developers the ability to undo or reset any prior settings on affected range of cells. Check out the video for more examples and tips for using field masks for update requests.

To learn more about using field masks for partial response in API payloads, check out this video and the first post in this two-part series. For one of the most comprehensive write-ups on both (read and update) use cases, see the guide in the Google Slides API documentation.  Happy field-masking!

Using Google Sheets filters in Add-ons with Google Apps Script


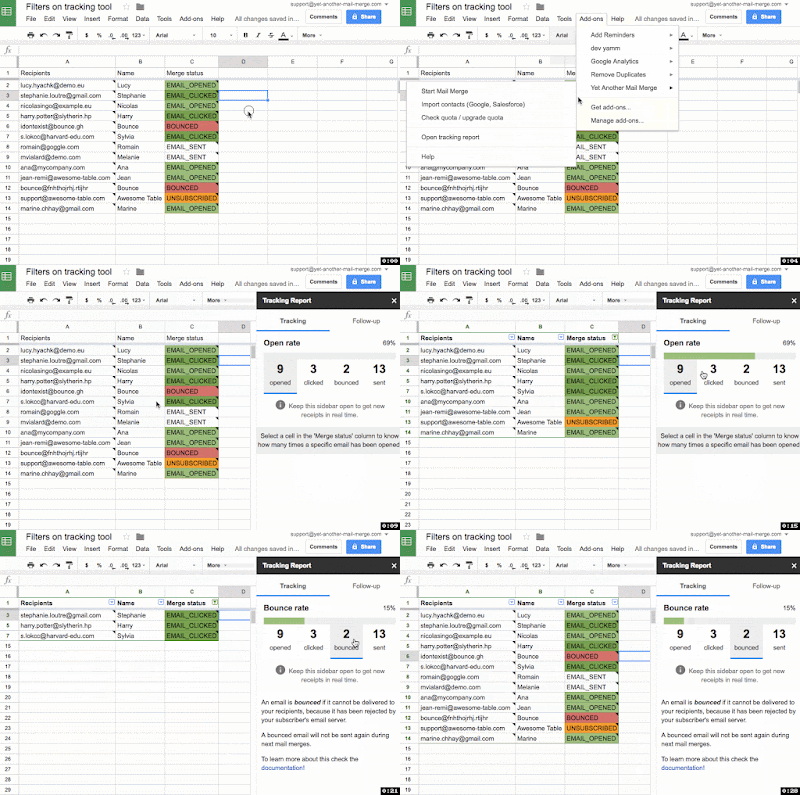
Developers using Google Apps Script can now access the richer feature set of the updated Google Sheets API with the recent launch of the Advanced Sheets Service. One key benefit of using an advanced service vs. native Apps Script objects, is that developers can access current API features (without having to wait for native support to come along). For example, the advanced service allows developers to access Sheets filters which make Add-ons more engaging.

Filter functionality 

With the Sheets API, developers can already get filtered rows or set new filters on Sheets data. With the Advanced Sheet Service, developers can now have their Add-ons respect those filters and apply new filters to modify what data is visible in the Sheets UI. Plus, with any of the Apps Script advanced services, you can easily access the Sheets and other Google APIs without using the UrlFetch service nor managing the authorization flow that you’d otherwise have to perform if using the REST API directly. The snippet below will return the indexes of the filtered rows in a given Sheet. Note that it is also possible to retrieve the list of rows hidden manually, using the "hide row" menu item in Google Sheets, as indicated in the API documentation. In the code sample here, we’re only exposing rows hidden by filter.

 function getIndexesOfFilteredRows(ssId, sheetId) {
var hiddenRows = [];

// limit what's returned from the API
var fields = "sheets(data(rowMetadata(hiddenByFilter)),properties/sheetId)";
var sheets = Sheets.Spreadsheets.get(ssId, {fields: fields}).sheets;

for (var i = 0; i < sheets.length; i++) {
if (sheets[i].properties.sheetId == sheetId) {
var data = sheets[i].data;
var rows = data[0].rowMetadata;
for (var j = 0; j < rows.length; j++) {
if (rows[j].hiddenByFilter) hiddenRows.push(j);
}
}
}
return hiddenRows;
The fields parameter in the code snippet limits what's returned in the Sheets API response, requesting only the values that matter to your app. For more information, check out this page in the Sheets API doc or this recent video on field masks.

See how some Add-ons use filtering 

There are a number of Add-ons that use advanced filtering in Sheets. Here are some good examples:
  • Yet Another Mail Merge: this Add-on helps users send email campaigns from a spreadsheet and is built to process only the filtered rows of a Sheet. Let's say you have a list of people who are registered for an event, but you've only accepted some of these registrants and need to send an email confirmation. With Yet Another Mail Merge and the updated API, you can filter out people you don't approve to attend and the Add-ons skips them without sending confirmations.
  • Sankey Snip and Chord Snip: these Add-ons helps users create special chart types that aren't available in the Google Sheets UI. When respecting filters is enabled with these Add-ons, the charts will dynamically visualize filtered data. Check out the example below from the Chord Snip Add-on.
Of course the API also provides the ability to add, update or delete filters on a Sheet. This is useful if you want to quickly display rows with a specific status to your users. One example would be if you built a workflow approval Add-on. You can show the user rows that are waiting for approval. The snippet below applies the requested filter on a given Sheet—the API documentation describes a standard basic filter object:

function setSheetBasicFilter(ssId, BasicFilterSettings) {
//requests is an array of batchrequests, here we only use setBasicFilter
var requests = [
{
"setBasicFilter": {
"filter": BasicFilterSettings
}
}
];
Sheets.Spreadsheets.batchUpdate({'requests': requests}, ssId);
}

Yet Another Mail Merge, as many mass-mailing tools do, keeps track of all emails sent, opened and clicked. A tracking report is available in the spreadsheet sidebar, and clicking on the number of emails opened will automatically apply a filter to display only the matching rows—all rows with the status “opened.”

Now, you can determine filters applied in a Sheet directly through the Sheets API or through Apps Script apps and Add-ons using the Advanced Sheets Service, and continue to build the best experience for your users.

About the Authors 

Romain Vialard is a Google Developer Expert. After some years spent as a G Suite consultant, he is now focused on products for G Suite and Google Apps users, including add-ons such as Yet Another Mail Merge and Form Publisher.

Bruce Mcpherson is a Google Developer Expert, an independent consultant, blogger and author of Going GAS, Google Apps Script for Beginners, and Google Apps Script for Developers.

New Google Drive metrics now accessible from Reports API


You might have read that we launched new metrics in the Admin SDK Reports API to help you gain reliable, easily-validated perspectives about users within your domain. Today, we're building on these features by giving administrators and developers even greater visibility into how files are shared both inside and outside of domain. These changes include:
  1. New metrics to supplement the set of metrics we launched last year 
  2. New visibility information for audit events 
  3. Deprecation of existing metrics from the Reports API

New Metrics

We’ve created a new set of metrics to complete the set we launched last year. With these new metrics you can:
  • Gain insight into the visibility of files and their sharing state, which is useful for security and reporting. This will replace these older metrics:
    num_docs_internally_visible, num_docs_externally_visible, num_docs_shared_outside_domain.
  • Report on product adoption within your domain with summary statistics about groups of users (collaborators, viewers, creators and sharers). Take advantage of key adoption metrics such as 1-, 7-, and 30-day active users for Google Drive, Docs, Sheets, Slides, Forms, Drawings and more. 
  • Simplify your calculation of “what has changed” in your domain using delta metrics which pre-calculate changes in visibility and items owned.

New Visibility Information 

Now, new visibility information is attached to every audit event which helps you quickly identify the permission change events that lead to files being shared differently both within and outside your domain. Learn more.

Deprecating Existing Metrics 

While we’re aware of the need to have reliable and timely data about your domain’s users and files on Google Drive, Drive’s data and infrastructure has grown considerably, requiring us to make some difficult technical tradeoffs regarding metrics. As a result, today marks the beginning of a 12-month deprecation timeline that will retire these existing metrics from the Reports API and eventually the Admin Console. These metrics will no longer be available starting May 14, 2018.

To get started using the Reports API and see all the different types of metrics you can report on for your domain, check out the official documentation. We hope you find these features useful in your reporting.

Updates to end user consent for 3rd-party apps and Single Sign-on providers


At Google, we're mindful of keeping our users’ data and account information secure. So whether you're writing an app that requires access to user data or helping your users change their passwords, we’ll keep you up-to-date on policy changes, and now today, when it comes to consent and 3rd-party applications. Starting April 5, 2017, if you’re an application developer or a 3rd-party Single Sign-On (SSO) provider, your G Suite users may encounter a redirect when they authenticate with your identity service to make it clear to users which account they’re authenticating as well as the permissions they’re granting to applications.

These changes will occur on these platforms:
  • Google and 3rd-party applications on iOS
  • Mobile browsers on iOS and Android
  • Web browsers (Chrome, Firefox and other modern browsers)
Note that Android applications that use the standard authentication libraries are already prompting users to select appropriate account information, so they’re not impacted by these changes.

More visibility with new permission requests for your application

It’s important that your users are presented with account information and credential consent, and apps should make this process easy and clear. One new change that you may now see is that only non-standard permission requests will be presented in the secondary consent screen in your application. 

Currently when an application requests permissions, all of them are displayed together. However, users should have greater visibility into permissions being requested beyond the standard “email address” and “profile” consent. By clicking to select their account, a user consents to these core permissions. The secondary consent screen will appear only if additional permissions are requested by the application.

Only non-standard permissions will be presented in the secondary consent screen that the user must approve. 
Along with these changes, your application name will be more visible to users, and they can click-through to get your contact information. We recommend application developers use a public-facing email address so that users can quickly contact you for support or assistance. For more details, check out this developer guide.

If your application may also be used by G Suite customers that employ a 3rd-party Single Sign-On (SSO) service, we recommend that you utilize the hd and/or login_hint parameters, if applicable. Even with the changes to the 3rd-party SSO auth flow, these parameters will be respected if provided. You can review the OpenID Connect page in the documentation for more information.

Changes coming for 3rd-party SSO redirection

G Suite users may also notice redirection when signing into 3rd-party SSO providers. If no accounts are signed in, the user must confirm the account after signing in to the 3rd-party SSO provider to ensure that they’re signed in with the correct G Suite account:
The end user who has just signed in with one Google account should select that account as confirmation. 
As mentioned, by clicking to the select their account, a user is opting into “email address” and “profile” consent. Once the user consents to any additional non-standard permissions that may be requested, they will be redirected back to your application.

If the user is already signed in to one or more accounts that match the hd hint, the Account Chooser will display all of the accounts and require the user to select the appropriate G Suite account before being redirected to the 3rd-party SSO provider then back to your application:
A user who is signed into several Google accounts will be required to choose the appropriate account.

See updates starting April 2017

These changes will help your users understand their permissions more clearly across all platforms, whether they’re using Google or a 3rd-party SSO provider for authentication. We’ve started to roll out the new interstitial page on iOS devices, and changes for browsers will begin to roll out starting April 5, 2017.

Using field masks with Google APIs for partial response


When you write applications using Google APIs (not just G Suite ones, but most Google APIs including YouTube or Google Cloud Platform APIs), it's important to be mindful of the data that’s returned in the response payloads from API calls. If you're not, your apps are likely getting back much more data than they need which can affect the performance of your apps whether on mobile or a server backend.

That's why most Google APIs allow you to only filter the data you need from response payloads with field masks. To get you comfortable with field masks, we’ve put together a video to demonstrate their use with various Google APIs: With field masks, you can specify exactly what fields an API should return in its response payload by providing a fields or part parameter in your calls. And once the API knows what you want, it will likely spend less time assembling your response too. Here’s an example Python call to fetch your sender addresses using the Gmail API (if GMAIL is your service endpoint):
     addresses = GMAIL.users().settings().sendAs().list(
userId='me'
).execute().get('sendAs')

Whether you’re using a Client Library (as our Python call) or using HTTP directly with GET https://www.googleapis.com/gmail/v1/users/userId/settings/sendAs, this is the payload you get back from the API:
     {
"sendAs": [{
"sendAsEmail": string,
"displayName": string,
"replyToAddress": string,
"signature": string,
"isPrimary": boolean,
"isDefault": boolean,
"treatAsAlias": boolean,
"smtpMsa": {
"host": string,
"port": integer,
"username": string,
"password": string,
"securityMode": string
},
"verificationStatus": string
}, ...]
}

The sendAs array gives you everything you need to know about each of your sender addresses. Did you know you can change a user’s email signature using the Gmail API without all of the data from above? You only need one field, or at most two: sendAsEmail and perhaps the isPrimary flag. By specifying a field mask with just those names from the sendAs attribute, you can cut out all those unneeded fields. Check it out here in Python with the field mask bolded for emphasis (versus the sample code above that doesn’t filter):
     addresses = GMAIL.users().settings().sendAs().list(
userId='me', fields='sendAs(sendAsEmail,isPrimary)'
).execute().get('sendAs')
Field masks filter our unnecessary data from Google API call responses.

In part two of this video series (coming soon), we’ll show you a different use case for field masks...for update API calls. We’ll also provide some usage tips and demonstrate how field masks can be used in both read and update calls, how both types of calls are discrete, and how in some cases, you may use both as part of a single API call. Stay tuned!

To learn more about using field masks for partial response in API payloads, check out this section of the Client Library docs. For one of the most comprehensive write-ups on both (read and update) use cases, see the guide in the Google Slides API documentation.

A new issue tracker for G Suite developers

Originally Posted on the G Suite Developers Blog
Posted by Ryan Roth, Developer Programs Engineer & Wesley Chun, Developer Advocate, G Suite

You may have read recently that the Google Cloud Platform team upgraded to Issue Tracker, the same system that Google uses internally. This allows for improved collaboration between all of us and all of you. Issues you file will have better exposure internally, and you get improved transparency in terms of seeing the issues we're actively working on. Starting today, G Suite developers will also have a new issue tracker to which we've already migrated existing issues from previous systems.

Whether it's a bug that you've found, or if you wish to submit a favorite feature request, the new issue tracker is here for you. Heads up, you need to be logged in with your Google credentials to view or update issues in the tracker.


The new issue tracker for G Suite developers.

Each G Suite API and developer tool has its own "component" number that you can search. For your convenience, below is the entire list. You may browse for issues relevant to the Google APIs that you're using, or click on the convenience links to report an issue or request a new/missing feature:
To get started, take a look at the documentation pages, as well as the FAQ. For more details, be sure to check out the Google Cloud Platform announcement, too. We look forward to working more closely with all of you soon!