Tag Archives: developers

With Google Maps APIs, Toyota Europe keeps teen drivers safe and sound


Editor’s note: Today’s post is from Christophe Hardy, Toyota Motor Europe’s Manager of Social Business. He’ll explain how Toyota used Google Maps APIs to build an Android app to keep teen drivers safe.


It’s a milestone that teenagers celebrate and parents fear: getting that first driver’s license. For teens, a license means freedom and a gateway to adulthood. For parents, it means worrying about their kid’s safety, with no way to make sure they’re doing the right thing behind the wheel.


We know that the risk of motor vehicle crashes is higher among 16-19-year-olds than any other age group, and that speeding and using smartphones are two of the main main causes. So as part of Toyota's efforts to eliminate accidents and fatalities, we worked with Molamil and MapsPeople to build Safe and Sound, an Android app for European teen drivers. It takes a lighthearted but effective approach to help young drivers stay focused on speed limits and the rules of the road, not on their cellphones. And it can be used by anyone, not just Toyota owners.


One way Safe and Sound combats speeding and distracted driving is by using music. Before parents turn over their car keys, parents and teens download and run the app to set it up. The app syncs with Spotify, and uses the Google Maps Roads API to monitor a teen’s driving behavior. If Safe and Sound determines the teen is speeding, it’ll override the teen’s music with a Spotify playlist specifically chosen by the parent—and the teen can’t turn it off. As any parent knows, parents and kids don’t always agree on music. And there’s nothing less cool to a teen than being forced to listen to folk ballads or ‘70s soft rock. (The embarrassment doubles if their friends are in the car.) The parents’ playlist turns off and switches back to the teen’s only when the teen drives at the speed limit.


The app also helps prevent distracted driving. When it detects the car is moving above nine miles an hour, it switches on a “do not disturb” mode that blocks social media notifications, incoming and outgoing texts, and phone calls. If the teen touches the phone, the app will detect that too, and play the parents' Spotify playlist until the teen removes his or her hand. At the end of the drive, Safe and Sound alerts parents to how many times their teen exceeded the speed limit or touched the phone. Parents can also tap a link in the app that displays the route the teen drove in Google Maps.


Google Maps provided us the ideal platform for building Safe and Sound. It has accurate, up-to-date and comprehensive map data, including road speed limits. The documentation is great, which made using the Google Maps Roads API simple. It also scales to handle millions of users, an important consideration as we roll out the app to more of Europe.


Safe and Sound is currently available in English throughout the continent, with a Spanish version launching soon in Spain, and a Dutch and French version coming to Belgium. And we’re looking to localize Safe and Sound into even more languages.


We hope Safe and Sound helps keep more teens safe, and brings more parents peace of mind. Plus, there’s never been a better use for that playlist of yacht rock classics.

With Google Maps APIs, Toyota Europe keeps teen drivers safe and sound


Editor’s note: Today’s post is from Christophe Hardy, Toyota Motor Europe’s Manager of Social Business. He’ll explain how Toyota used Google Maps APIs to build an Android app to keep teen drivers safe.

It’s a milestone that teenagers celebrate and parents fear: getting that first driver’s license. For teens, a license means freedom and a gateway to adulthood. For parents, it means worrying about their kid’s safety, with no way to make sure they’re doing the right thing behind the wheel.

We know that the risk of motor vehicle crashes is higher among 16-19-year-olds than any other age group, and that speeding and using smartphones are two of the main main causes. So as part of Toyota's efforts to eliminate accidents and fatalities, we worked with Molamil and MapsPeople to build Safe and Sound, an Android app for European teen drivers. It takes a lighthearted but effective approach to help young drivers stay focused on speed limits and the rules of the road, not on their cellphones. And it can be used by anyone, not just Toyota owners.

One way Safe and Sound combats speeding and distracted driving is by using music. Before parents turn over their car keys, parents and teens download and run the app to set it up. The app syncs with Spotify, and uses the Google Maps Roads API to monitor a teen’s driving behavior. If Safe and Sound determines the teen is speeding, it’ll override the teen’s music with a Spotify playlist specifically chosen by the parent—and the teen can’t turn it off. As any parent knows, parents and kids don’t always agree on music. And there’s nothing less cool to a teen than being forced to listen to folk ballads or ‘70s soft rock. (The embarrassment doubles if their friends are in the car.) The parents’ playlist turns off and switches back to the teen’s only when the teen drives at the speed limit.

The app also helps prevent distracted driving. When it detects the car is moving above nine miles an hour, it switches on a “do not disturb” mode that blocks social media notifications, incoming and outgoing texts, and phone calls. If the teen touches the phone, the app will detect that too, and play the parents' Spotify playlist until the teen removes his or her hand. At the end of the drive, Safe and Sound alerts parents to how many times their teen exceeded the speed limit or touched the phone. Parents can also tap a link in the app that displays the route the teen drove in Google Maps.

Google Maps provided us the ideal platform for building Safe and Sound. It has accurate, up-to-date and comprehensive map data, including road speed limits. The documentation is great, which made using the Google Maps Roads API simple. It also scales to handle millions of users, an important consideration as we roll out the app to more of Europe.

Safe and Sound is currently available in English throughout the continent, with a Spanish version launching soon in Spain, and a Dutch and French version coming to Belgium. And we’re looking to localize Safe and Sound into even more languages.

We hope Safe and Sound helps keep more teens safe, and brings more parents peace of mind. Plus, there’s never been a better use for that playlist of yacht rock classics.
Committed to storage APIs, retiring Realtime API


We launched Google Realtime API in 2013 to help developers build collaborative apps using familiar JSON-based data models, while leaving the complexities of real-time synchronization to the API. Since then, we've developed other fast, flexible cloud-based storage solutions like Google Cloud SQL and Google Cloud Firestore. As a result, we’ve decided to deprecate Realtime API in favor of these new, powerful solutions.

We’re investing heavily in Google Cloud Platform, as well as Firebase—our mobile development platform—to help developers build scalable, performant applications. While these solutions aren't a direct analog to the Drive Realtime API, we're confident they can meet most of your needs:
  • Google Cloud SQL: Fully-managed database service that makes it easy to set up, maintain, manage, and administer your relational PostgreSQL and MySQL databases in the cloud. 
  • Firebase Realtime Database: Cloud-hosted NoSQL database that lets you store and sync data between your users in real-time. 
  • Cloud Firestore: We recently announced Cloud Firestore to help developers build responsive apps that work regardless of network latency or Internet connectivity. If you're curious about Firebase Realtime Database vs. Cloud Firestore, we've got you covered.
Existing Realtime API client applications will continue to work normally until December 11, 2018, but we are no longer accepting new clients of the API. After the API is decommissioned, to facilitate migration, we will continue to provide a mechanism for applications to access document contents as JSON.

More specific deprecation timelines 

We know developers and partners have come to rely on Realtime API and that migration may be a significant effort. We hope that the deprecation timelines summarized below allow for a smooth transition.


November 28, 2017
Realtime API is no longer available for new projects.1
December 11, 2018
Realtime API documents become read-only, and attempts to modify document contents using the API fail.
January 15, 2019
Realtime API is shut down, but a JSON export API remains available.
1 Projects which accessed the Realtime API prior to November 28, 2017 (including your projects listed below) will continue to function as before. All other projects, including new projects, will be blocked from accessing the Realtime API.

Migration tips 

Applications using the Realtime API will need to migrate to another data store. Our migration guide provides instructions on how to export Realtime document data and also how that data can be imported into Google Cloud Firestore. After Realtime API is shut down, we will continue to provide a means for exporting Realtime document contents as JSON.

Additional information and support 

You can read more about the deprecation in our documentation. If you have questions that aren’t answered there, see the support page for how to get help.

Getting your Android app ready for Autofill

Posted by Wojtek Kalicinski, Android Developer Advocate, Akshay Kannan, Product Manager for Android Authentication, and Felipe Leme, Software Engineer on Android Frameworks

Starting in Oreo, Autofill makes it easy for users to provide credit cards, logins, addresses, and other information to apps. Forms in your apps can now be filled automatically, and your users no longer have to remember complicated passwords or type the same bits of information more than once.

Users can choose from multiple Autofill services (similar to keyboards today). By default, we include Autofill with Google, but users can also select any third party Autofill app of their choice. Users can manage this from Settings->System->Languages>Advanced->Autofill service.

What's available today

Today, Autofill with Google supports filing credit cards, addresses, logins, names, and phone numbers. When logging in or creating an account for the first time, Autofill also allows users to save the new credentials to their account. If you use WebViews in your app, which many apps do for logins and other screens, your users can now also benefit from Autofill support, as long as they have Chrome 61 or later installed.

The Autofill API is open for anyone to implement a service. We are actively working with 1Password, Dashlane, Keeper, and LastPass to help them with their implementations towards becoming certified on Android. We will be certifying password managers and adding them to a curated section in the Play Store, which the "Add service" button in settings will link to. If you are a password manager and would like to be certified, please get in touch.

What you need to do as a developer

As an app developer, there are a few simple things you can do to take advantage of this new functionality and make sure that it works in your apps:

Test your app and annotate your views if needed

In many cases, Autofill may work in your app without any effort. But to ensure consistent behavior, we recommend providing explicit hints to tell the framework about the contents of your field. You can do this using either the android:autofillHints attribute or the setAutofillHints() method.

Similarly, with WebViews in your apps, you can use HTML Autocomplete Attributes to provide hints about fields. Autofill will work in WebViews as long as you have Chrome 61 or later installed on your device. Even if your app is using custom views, you can also define the metadata that allows autofill to work.

For views where Autofill does not make sense, such as a Captcha or a message compose box, you can explicitly mark the view as IMPORTANT_FOR_AUTOFILL_NO (or IMPORTANT_FOR_AUTOFILL_NO_EXCLUDE_DESCENDANTS in the root of a view hierarchy). Use this field responsibly, and remember that users can always bypass this by long pressing an EditText and selecting "Autofill" in the overflow menu.

Affiliate your website and mobile app

Autofill with Google can seamlessly share logins across websites and mobile apps ‒ passwords saved through Chrome can also be provided to native apps. But in order for this to work, as an app developer, you must explicitly declare the association between your website with your mobile app. This involves 2 steps:

Step 1: Host a JSON file at yourdomain.com/.well-known/assetlinks.json

If you've used technologies like App Links or Google Smart Lock before, you might have heard about the Digital Asset Links (DAL) file. It's a JSON file placed under a well known location in your website that lets you make public, verifiable statements about other apps or websites.

You should follow the Smart Lock for Passwords guide for information about how to create and host the DAL file correctly on your server. Even though Smart Lock is a more advanced way of signing users into your app, our Autofill service uses the same infrastructure to verify app-website associations. What's more, because DAL files are public, third-party Autofill service developers can also use the association information to secure their implementations.

Step 2: Update your App's Manifest with the same information

Once again, follow the Smart Lock for Passwords guide to do this, under "Declare the association in the Android app."

You'll need to update your app's manifest file with an asset_statements resource, which links to the URL where your assetlinks.json file is hosted. Once that's done, you'll need to submit your updated app to the Play Store, and fill out the Affiliation Submission Form for the association to go live.

When using Android Studio 3.0, the App Links Assistant can generate all of this for you. When you open the DAL generator tool (Tools -> App Links Assistant -> Open Digital Asset Links File Generator), simply make sure you enable the new checkbox labeled "Support sharing credentials between the app and website".

Then, click on "Generate Digital Asset Links file", and copy the preview content to the DAL file hosted on your server and in your app. Please remember to verify that the selected domain names and certificates are correct.

Future work

It's still very early days for Autofill in Android. We are continuing to make some major investments going forward to improve the experience, whether you use Autofill with Google or a third party password manager.

Some of our key areas of investment include:

  1. Autofill with Google: We want to provide a great experience out of the box, so we include Autofill with Google with all Oreo devices. We're constantly improving our field detection and data quality, as well as expanding our support for saving more types of data.
  2. WebView support: We introduced initial support for filling WebViews in Chrome 61, and we'll be continuing to test, harden, and make improvements to this integration over time, so if your app uses WebViews you'll still be able to benefit from this functionality.
  3. Third party app support: We are working with the ecosystem to make sure that apps work as intended with the Autofill framework. We urge you as developers to give your app a spin on Android Oreo and make sure that things work as expected with Autofill enabled. For more info, see our full documentation on the Autofill Framework.

If you encounter any issues or have any suggestions for how we can make this better for you, please send us feedback.

Start building apps for the Indian Google Assistant

https://lh3.googleusercontent.com/1h4wgmQMUKoeQGlNSAhXpnSUf6EuKvvX_l4mTRBkeaUvCBYjdhs_w5jyn1UkEBC1PyCeTppO86xfcFEm5RoEGtXiVysq8nWNM6RWsw1aTqEHYwkOFiJBCIs7YRDbuHbKNrDafj0D
Whether you’re searching for a great restaurant for biryani, mapping your travels or helping the kids with their homework, your Google Assistant is always ready to help. You can ask about your day or your commute, explore your favorite topics, and get answers to hundreds of small and big questions during your day. But to be truly successful, your Google Assistant should be able to connect you across the apps and services in your life. So starting today, developers and companies can build apps to engage with Indian users through Actions on Google, the developer platform for the Google Assistant. And as a user, you’ll soon be able to access more of your favorite services and content straight through your Google Assistant.
For anyone who wants to build for the Assistant, resources such as developer tools, documentation and a simulator are available on the Actions on Google developer website, making it easy to create, test and deploy apps. Eligible developers will also be invited to join the Google Assistant Developer Community Program to get support for their efforts.


Now that we’re launching the ability for everyone to create apps on the Google Assistant, Indians will soon have easy and fast access to all types of apps. Once an app works with the Assistant, you can just tell your Assistant to connect you with the app of your choice with a simple voice command – whether it’s on eligible Android phones or iPhones. And the best thing? You won’t need to install anything extra, we’ll connect you straight with the app you’d like to interact with. For example, just say “Ok Google, talk to….” to fire up an app.


Stay tuned as local Indian apps rollout soon, and dive in today by trying one of the many apps already available.  

We hope that this growing platform will give more Indians the help they need, at home or on-the-go – from the morning rush hour to the weekend unwind. Together with developers from Kashmir to Kanyakumari, we look forward to exploring and delivering these new possibilities for the Indian Google Assistant.


Posted by Brad Abrams, Group Product Manager, Google Assistant

Gmail add-ons framework now available to all developers


Email remains at the heart of how companies operate. That’s why earlier this year, we previewed Gmail Add-ons—a way to help businesses speed up workflows. Since then, we’ve seen partners build awesome applications, and beginning today, we’re extending the Gmail add-on preview to include all developers. Now anyone can start building a Gmail add-on.

Gmail Add-ons let you integrate your app into Gmail and extend Gmail to handle quick actions. They are built using native UI context cards that can include simple text dialogs, images, links, buttons and forms. The add-on appears when relevant, and the user is just a click away from your app's rich and integrated functionality.

Gmail Add-ons are easy to create. You only have to write code once for your add-on to work on both web and mobile, and you can choose from a rich palette of widgets to craft a custom UI. Create an add-on that contextually surfaces cards based on the content of a message. Check out this video to see how we created an add-on to collate email receipts and expedite expense reporting.

Per the video, you can see that there are three components to the app’s core functionality. The first component is getContextualAddOn()—this is the entry point for all Gmail Add-ons where data is compiled to build the card and render it within the Gmail UI. Since the add-on is processing expense reports from email receipts in your inbox, the createExpensesCard()parses the relevant data from the message and presents them in a form so your users can confirm or update values before submitting. Finally, submitForm() takes the data and writes a new row in an “expenses” spreadsheet in Google Sheets, which you can edit and tweak, and submit for approval to your boss.

Check out the documentation to get started with Gmail Add-ons, or if you want to see what it's like to build an add-on, go to the codelab to build ExpenseIt step-by-step. While you can't publish your add-on just yet, you can fill out this form to get notified when publishing is opened. We can’t wait to see what Gmail Add-ons you build!

[Q&A] Behind the scenes with Lucidchart: building new diagramming add-on in Google Slides


You might have seen that we recently announced new Google Slides add-ons. We worked closely with several technology partners to build these new add-on solutions to help speed up workflows. 

One partner, Lucidchart, worked closely with Google to create a new integration that brings added diagramming functionality to Slides. We sat down with Tim Winchester, engineering lead at Lucidchart, to learn more about how his team built the new Lucidchart add-on for Slides.

Tell us about the Google Slides add-on you built for Lucidchart. 

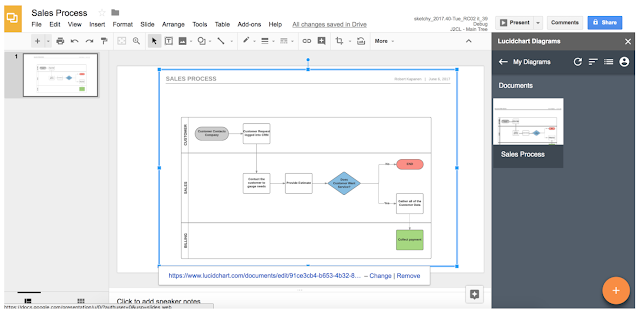
We built it as a sidebar add-on that allows users to insert diagrams directly into Google Slides from within Slides (instead of having to export diagrams from Lucidchart). You can also create a new Lucidchart diagram from within Slides, and simply select “Back to Slides” once you’re finished creating your diagram in the Lucidchart editor. You can modify an existing diagram by clicking “Edit” within Slides. This option will direct you to the Lucidchart editor so you can revise as needed. Once you’ve finished revising, or any time you know a diagram has been updated in Lucidchart, select the refresh button from the Lucidchart Diagrams sidebar.

What prompted you to create your add-on? 

Specifically, how did you envision your add-on would improve user experience? Lucidchart is a visual communication platform, but we know our users sometimes need to have their diagrams available in other places. One of the most popular uses for Lucidchart is in presentations, so an add-on for Slides was a natural fit.

Tell us about how you built your solution. 

Since we already had existing add-ons for Docs and Sheets, this project was less about building from scratch and more about adapting what we already had, then doing rewrites as needed. We started by abstracting app-specific functionality of our existing add-ons into a pluggable IntegratedApp interface. We then implemented the interface for Slides using the new SlidesApp API. Once we had reached feature parity, we created a few new additions, such as a “Refresh All Inserted Diagrams” button, which users could find more easily than a top bar menu entry.


At the same time, the Lucidchart add-on was undergoing a major UI overhaul, which was the most challenging and time-intensive part of the project. Because we liked the results of the UI update in Slides, we refactored the add-on code to make it more generalizable, then ported it back to our Docs and Sheets add-ons.

Did anything surprise you during the build? 

As a security measure, the sidebar iframe can only render elements within its borders, so we couldn’t simply throw a <div> into the center of the screen in client code. Instead, we had to fire an event that the Apps Script backend would handle to create a modal dialog, using printing scriptlets to add whatever data we needed into the dialog’s HTML. Thus, any JS object sent from the sidebar to a modal has to be serialized and deserialized in the process, which means that the sidebar cannot directly detect any events emitted by the modal.

Do you have any code snippets that you can share? 

Because we have multiple Google Apps Script add-ons that share lots of functionality, it was very useful to concentrate app-specific code and strings into a wrapper object (called IntegratedApp), which we then referenced elsewhere in the codebase instead of calling SlidesApp directly. So, in the click handler for the insert button, instead of writing this...
SlidesApp.getActivePresentation()
.getSelection()
.getCurrentPage()
.insertImage(image);

...we write this.
IntegratedApp.insertImage(image);

And then we keep the app-specific implementation in our IntegratedApp object (abridged for clarity):
var IntegratedApp = {
// direct mapping to function
createAddonMenu: SlidesApp.getUi().createAddonMenu.bind(SlidesApp.getUi()),

// wrapper to create consistent behavior across apps
insertImage: function(image) {
return SlidesApp.getActivePresentation()
.getSelection()
.getCurrentPage()
.insertImage(image);
},

// app-specific strings
phrases: {
docType: 'Slide',
name: 'Google Slides',
nameWithDocType: 'Google Slides Presentation'
}
};

This technique allows us to keep the same UI code and business logic across apps; we only need to change the implementation of the IntegratedApp object. So in Sheets (for example), our IntegratedApp.insertImage() function becomes:
insertImage: function(image) {
var sheet = SpreadsheetApp.getActiveSheet();
var cell = sheet.getActiveCell();

sheet.insertImage(image, cell.getColumn(), cell.getRow());
}

What advice would you give other developers looking to build similar add-ons? 

If you are planning to develop multiple similar add-ons that mainly differ in the G Suite app with which they integrate, you should find this technique of reducing the overall code amount by isolating duplicative code immensely useful.

After completing the first add-on, creating another add-on for a new G Suite app is just a matter of updating a new copy of IntegratedApp to work with the new app; the rest of the codebase can be commonly shared. In our case, it means that the updated UI was easily added to our Docs and Sheets add-on after we completed the Slides add-on.

Learn more about how you can create your own Slides add-ons or choose from a number of publicly available APIs to customize your G Suite applications. If you’re interested in becoming a Google Cloud technology partner, you can also join our partnership program.

Now anyone can explore machine learning, no coding required

From helping you find your favorite dog photos, to helping farmers in Japan sort cucumbers, machine learning is changing the way people use code to solve problems. But how does machine learning actually work? We wanted to make it easier for people who are curious about this technology to learn more about it. So we created Teachable Machine, a simple experiment that lets you teach a machine using your camera—live in the browser, no coding required.

Teachable Machine is built with a new library called deeplearn.js, which makes it easier for any web developer to get into machine learning by training and running neural nets right in the browser. We’ve also open sourced the code to help inspire others to make new experiments.

Check it out at g.co/teachablemachine.

Source: Education


Generating Google Slides from images using Apps Script


Today, we announced a collection of exciting new features in Google Slides—among these is support for Google Apps Script. Now you can use Apps Script for Slides to programmatically create and modify Slides, plus customize menus, dialog boxes and sidebars in the user interface.

Programming presentations with Apps Script

Presentations have come a long way—from casting hand shadows over fires in caves to advances in lighting technology (magic lanterns) to, eventually, (in)famous 35mm slide shows of your Uncle Bob's endless summer vacation. More recently, we have presentation software—like Slides—and developers have been able to write applications to create or update them. This is made even easier with the new Apps Script support for Google Slides. In the latest G Suite Dev Show episode, we demo this new service, walking you through a short example that automatically creates a slideshow from a collection of images.
To keep things simple, the chosen images are already available online, accessible by URL. For each image, a new (blank) slide is added then the image is inserted. The key to this script are two lines of JavaScript (given an existing presentation and a link to each image):

var slide = presentation.appendSlide(SlidesApp.PredefinedLayout.BLANK);
var image = slide.insertImage(link);

The first line of code adds a new slide while the other inserts an image on the new slide. Both lines are repeated for each image in the collection. While this initial, rudimentary solution works, the slide presentation created doesn't exactly fit the bill. It turns out that adding a few more lines make the application much more useful. See the video for all the details.

Getting started 

To get started, check the documentation to learn more about Apps Scripts for Slides, or check out the Translate and Progress Bar sample Add-ons. If you want to dig deeper into the code sample from our video, take a look at the corresponding tutorial. And, if you love watching videos, check out our Apps Script video library or other G Suite Dev Show episodes. If you wish to build applications with Slides outside of the Apps Script environment and want to use your own development tools, you can do so with the Slides (REST) API—check out its documentation and video library.

With all these options, we look forward to seeing the applications you build with Google Slides!