Originally posted on Google Apps Developers blog
Posted by Matt Hessinger, Project Specialist, Google Apps Script
Welcome to our 100th blog post on Apps Script! It’s amazing how far we’ve come from our first post back in 2010. We started out highlighting some of the simple ways that you could develop with the Apps platform. Today, we’re sharing tips and best practices for developing more complex Apps Script solutions by pointing out some community contributions.
Apps Script and modern development
The Apps Script editor does not allow you to use your own source code management tool, making it a challenge to collaborate with other developers. Managing development, test, and production versions of a project becomes very tedious. What if you could have the best of both worlds — the powerful integration with Google’s platform that Apps Script offers, along with the development tooling and best practices that you use every day? Now, you can.
npm install -g node-google-apps-script
This project, “node-google-apps-script”, is a Node.js based command-line interface (CLI) that uses Google Drive API to update Apps Script project from the command line. You can view the node package on the NPM site, and also view the GitHub repo. Both links have usage instructions. This tool was created by Dan Thareja, with additional features added by Matt Condon.
Before using the tool, take a look at the Apps Script Importing and Exporting Projects page. There are a few things that you should be aware of as you plan out your development process. There are also a few best practices that you can employ to take full advantage of developing in this approach.
There is a sample project that demonstrates some of the practices described in this post: click here to view that code on GitHub. To get all of the Apps Script samples, including this import/export development example:
git clone https://github.com/google/google-apps-script-samples.gitThe sample is in the “import_export_development” subdirectory.
Your standalone Apps Script projects live in Google Drive. If you use a command-line interface (CLI) tool like the one linked above, you can work in your favorite editor, and commit and sync code to your chosen repository. You can add tasks in your task runner to push code up to one or more Apps Script projects, conditionally including or excluding code for different environments, checking coding style, linting, minifying, etc. You can more easily create and push UI-related files to a file host outside of Apps Script, which could be useful if those same files are used in other apps you are building.
Typical development tools, integrated with Apps Script via the Drive APIApps Script Project Lifecycle Best-practices
In addition to the information on the Importing and Exporting Projects page, here are a few things to consider:
- Your local file set is the master. If you add, delete or rename files locally, the next upload with either of the linked tools will automatically make the Apps Script project reflect your local file set.
- You can name local files whatever you want. You just need to then append “.html” to any client-side “.js” or “.css” in a file staging task before uploading to your project. The tool referenced above treats any “.js” files that you stage for upload as Apps Script server script files (“.gs” in the editor). It treats any “.html” that you stage as “client” code that you’ll access via the HtmlService. This means that you can develop server scripts as JavaScript, with the “.js” extension, so that your local tools recognize JavaScript syntax. While developing, client-side code (i.e., code that you need to interact with via the HtmlService) can be “.html”, “.js”, or “.css”, allowing your editor to provide the right syntax highlighting and validation experience.
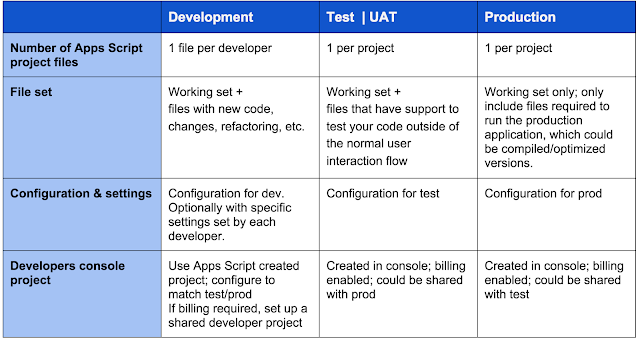
Over and above the editing experience, the biggest improvements you get by working outside the script editor is that you are no longer locked into working in just one Apps Script project. You can much more easily collaborate as a team, with individual developers having their own working Apps Script projects, while also having more controlled test, user acceptance and production versions, each with more process and security. Beyond just the consistency with other normal project practices, there are a few Apps Script specific ways you can leverage this multi-environment approach.
If you are going to use this approach, here are three best practices to consider:
- Use specific configuration values for “local” development.
- Build test methods that can run standalone.
- Include dependencies for development and testing.
Best practice: Use specific configuration values for “local” development.
The provided sample shows a simple example of how a base configuration class could allow a developer to inject their local values for their own debugging and testing. In this case, the developer also added the annotation @NotOnlyCurrentDoc, which tells Apps Script that they need the full scope for Drive API access. In this project, the “production” deployment has the annotation @OnlyCurrentDoc, which leads to the OAuth scope that is limited to the document associated with script running as Sheets, Docs, or Forms add-on. If you add a standard file pattern to the source project’s “ignore” file, these developer-specific files will never get into the actual codebase.
Benefits for your project — Production can have more limited OAuth scopes, while a developer can use broader access during development. Developers can also have their own personal configuration settings to support their individual development efforts.
Best practice: Build test methods that can run standalone.
While there is no current way to trigger tests in an automated way, you still may want to author unit tests that validate specific functions within your projects. You’ll also likely have specific configuration values for testing. Once again, none of these files should make it into a production deployment. You can even use the Apps Script Execution API to drive those tests from a test runner!
Benefits for your project — You can author test functions, and keep them separate from the production Apps Script file. This slims down your production Apps Script project, and keeps the correct OAuth scopes that are needed for production users.
Best practice: Include dependencies for development and testing.
If you are developing an add-on for Sheets or Docs, and you expect to have an “active” item on the SpreadsheetApp. However when you are developing or testing, you may be running your Apps Script without an “active” context. If you need to develop in this mode, you can wrap the call to get the current active item in a method that also can determine what mode you are running in. This would allow your development or test instance to inject the ID of an “active” document to use for testing, while delegating to the getActive* result when running in a real context.
Benefits for your project — You can integrate better unit testing methodologies into your projects, even if the end deployment state dependents on resources that aren’t typically available when debugging.
Wrapping up
You now have the option to use your own development and source management tools. While you still do need to use the Apps Script editor in your application’s lifecycle — to publish as a web app or add-on, configure advanced services, etc. — taking this step will help you get the most out of the power of the Apps Script platform. Remember to check out Apps Script on the Google Developers site to get more information and samples for your Apps Script development.
If you happen to use python tools on the command line to facilitate your team’s build process, you can check out Joe Stump's python-gas-cli. You can view the package info here or the GitHub repo where you’ll also find usage instructions.
Here are some additional reference links related to this post:


