Transitions in Material Design apps provide visual continuity. As the user navigates the app, views in the app change state. Motion and transformation reinforce the idea that interfaces are tangible, connecting common elements from one view to the next.
This post aims to provide guidelines and implementation for a specific continuous transition between Android Fragments. We will demonstrate how to implement a transition from an image in a RecyclerView into an image in a ViewPager and back, using 'Shared Elements' to determine which views participate in the transition and how. We will also handle the tricky case of transitioning back to the grid after paging to an item that was previously offscreen.
This is the result we are aiming for:
If you wish to skip the explanation and go straight to the code, you can find it here.
What are shared elements?
A shared element transition determines how views that are present in two fragments transition between them. For example, an image that is displayed on an ImageView on both Fragment A and Fragment B transitions from A to B when B becomes visible.
There are numerous previously published examples which explain how shared elements work and how to implement a basic Fragment transition. This post will skip most of the basics and will walk through the specifics on how to create a working transition into a ViewPager and back. However, if you'd like to learn more about transitions, I recommend starting by reading about transitions at the Android's developers website, and take the time to watch this 2016 Google I/O presentation.
The challenges
Shared Element mapping
We would like to support a seamless back and forth transition. This includes a transition from the grid to the pager, and then a transition back to the relevant image, even when the user paged to a different image.
To do so, we will need to find a way to dynamically remap the shared elements in order to provide the Android's transition system what it needs to do its magic!
Delayed loading
Shared element transitions are powerful, but can be tricky when dealing with elements that need to be loaded before we can transition to them. The transition may simply not work as expected when views at the target fragment are not laid out and ready.
In this project, there are two areas where a loading time affects the shared element transition:
- It takes a few milliseconds for the
ViewPagerto load its internal fragments. Additionally, it takes time to load an image into the displayed pager fragment (may even include a download time for the asset). - The
RecyclerViewalso faces a similar delay when loading the images into its views.
Demo app design
Basic structure
Before we dive into the juicy transitions, here is a little bit about how the demo app is structured.
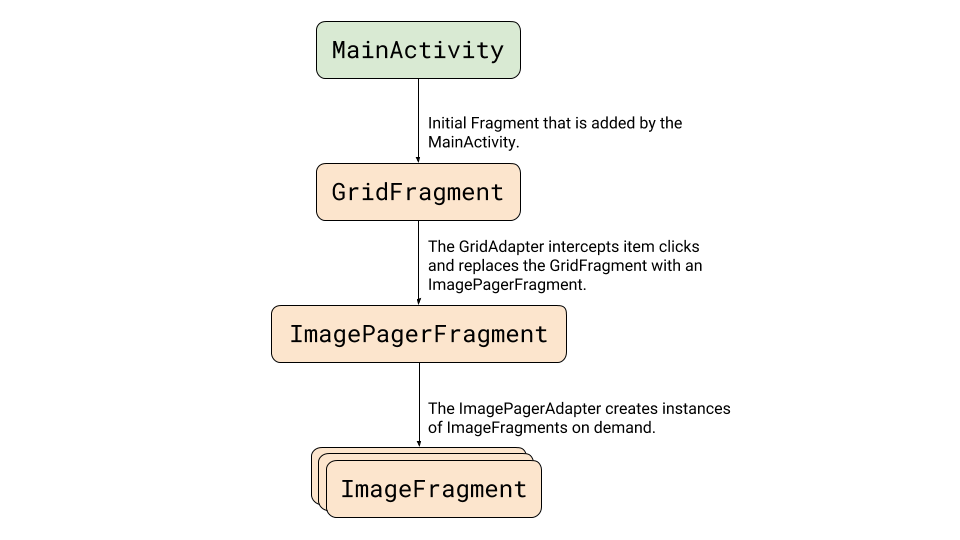
The MainActivity loads a GridFragment to present a RecyclerView of images. The RecyclerView adapter loads the image items (a constant array that is defined at the ImageData class), and manages the onClick events by replacing the displayed GridFragment with an ImagePagerFragment.
The ImagePagerFragment adapter loads the nested ImageFragments to display the individual images when paging happens.
Note: The demo app implementation uses Glide, which loads images into views asynchronously. The images in the demo app are bundled with it. However, you may easily convert the ImageData class to hold URL strings that point to online images.
Coordinating a selected/displayed position
To communicate the selected image position between the fragments, we will use the MainActivity as a place to store the position.
When an item is clicked, or when a page is changed, the MainActivity is updated with the relevant item's position.
The stored position is later used in several places:
- When determining which page to show in the
ViewPager. - When navigating back to the grid and auto-scrolling to the position to make sure it's visible.
- And of course, when hooking up the transitions callbacks, as we'll see in the next section.
Setting up the transitions
As mentioned above, we will need to find a way to dynamically remap the shared elements in order to give the transition system what it needs to do its magic.
Using a static mapping by setting up transitionName attributes for the image views at the XML will not work, as we are dealing with an arbitrary amount of views that share the same layout (e.g. views inflated by the RecyclerView adapter, or views inflated by the ImageFragment).
To accomplish this, we'll use some of what the transition system provides us:
- We set a transition name on the image views by calling
setTransitionName. This will identify the view with a unique name for the transition.setTransitionNameis called when binding a view at the grid'sRecyclerViewadapter, andonCreateViewat theImageFragment. In both locations, we use the unique image resource as a name to identify the view. - We set up
SharedElementCallbacksto interceptonMapSharedElementsand adjust the mapping of the shared element names to views. This will be done when exiting theGridFragmentand when entering theImagePagerFragment.
Setting the FragmentManager transaction
The first thing we set up to initiate a transition for a fragment replacement is at the FragmentManager transaction preparation. We need to inform the system that we have a shared element transition.
fragment.getFragmentManager()
   .beginTransaction()
   .setReorderingAllowed(true) // setAllowOptimization before 26.1.0
   .addSharedElement(imageView, imageView.getTransitionName())
   .replace(R.id.fragment_container,
        new ImagePagerFragment(),
        ImagePagerFragment.class.getSimpleName())
   .addToBackStack(null)
   .commit();
The setReorderingAllowed is set to true. It will reorder the state changes of fragments to allow for better shared element transitions. Added fragments will have onCreate(Bundle) called before replaced fragments have onDestroy() called, allowing the shared view to get created and laid out before the transition starts.
Image transition
To define how the image transitions when it animates to its new location, we set up a TransitionSet in an XML file and load it at the ImagePagerFragment.
<ImagePagerFragment.java>
Transition transition =
   TransitionInflater.from(getContext())
       .inflateTransition(R.transition.image_shared_element_transition);
setSharedElementEnterTransition(transition);
<image_shared_element_transition.xml>
<?xml version="1.0" encoding="utf-8"?>
<transitionSet
   xmlns:android="http://schemas.android.com/apk/res/android"
   android:duration="375"
   android:interpolator="@android:interpolator/fast_out_slow_in"
   android:transitionOrdering="together">
 <changeClipBounds/>
 <changeTransform/>
 <changeBounds/>
</transitionSet>
Adjusting the shared element mapping
We'll start by adjusting the shared element mapping when leaving the GridFragment. For that, we will call the setExitSharedElementCallback() and provide it with a SharedElementCallback which will map the element names to the views we'd like to include in the transition.
It's important to note that this callback will be called while exiting the Fragment when the fragment-transaction occurs, and while re-entering the Fragment when it's popped out of the backstack (on back navigation). We will use this behavior to remap the shared view and adjust the transition to handle cases where the view is changed after paging the images.
In this specific case, we are only interested in a single ImageView transition from the grid to the fragment the view-pager holds, so the mapping only needs to be adjusted for the first named element received at the onMapSharedElements callback.
<GridFragment.java>
setExitSharedElementCallback(
   new SharedElementCallback() {
     @Override
     public void onMapSharedElements(
         List<String> names, Map<String, View> sharedElements) {
       // Locate the ViewHolder for the clicked position.
       RecyclerView.ViewHolder selectedViewHolder = recyclerView
           .findViewHolderForAdapterPosition(MainActivity.currentPosition);
       if (selectedViewHolder == null || selectedViewHolder.itemView == null) {
         return;
       }

       // Map the first shared element name to the child ImageView.
       sharedElements
           .put(names.get(0),
                selectedViewHolder.itemView.findViewById(R.id.card_image));
     }
   });
We also need to adjust the shared element mapping when entering the ImagePagerFragment. For that, we will call the setEnterSharedElementCallback().
<ImagePagerFragment.java>
setEnterSharedElementCallback(
   new SharedElementCallback() {
     @Override
     public void onMapSharedElements(
         List<String> names, Map<String, View> sharedElements) {
          // Locate the image view at the primary fragment (the ImageFragment
          // that is currently visible). To locate the fragment, call
          // instantiateItem with the selection position.
          // At this stage, the method will simply return the fragment at the
          // position and will not create a new one.
       Fragment currentFragment = (Fragment) viewPager.getAdapter()
           .instantiateItem(viewPager, MainActivity.currentPosition);
       View view = currentFragment.getView();
       if (view == null) {
         return;
       }

       // Map the first shared element name to the child ImageView.
       sharedElements.put(names.get(0), view.findViewById(R.id.image));
     }
   });
Postponing the transition
The images we would like to transition are loaded into the grid and the pager and take time to load. To make it work properly, we will need to postpone the transition until the participating views are ready (e.g. laid out and loaded with the image data).
To do so, we call a postponeEnterTransition() in our fragments' onCreateView(), and once the image is loaded, we start the transition by calling startPostponedEnterTransition().
Note: postpone is called for both the grid and the pager fragments to support both forward and backward transitions when navigating the app.
Since we are using Glide to load the images, we set up listeners that trigger the enter transition when images are loaded.
This is done in two places:
- When an
ImageFragmentimage is loaded, a call is made to its parentImagePagerFragmentto start the transition. - When transitioning back to the grid, a start transition is called after the "selected" image is loaded.
Here is how the ImageFragment loads an image and notifies its parent when it's ready.
Note that the postponeEnterTransition is made at the the ImagePagerFragment, while the startPostponeEnterTransition is called from the child ImageFragment that is created by the pager.
<ImageFragment.java>
Glide.with(this)
   .load(arguments.getInt(KEY_IMAGE_RES)) // Load the image resource
   .listener(new RequestListener<Drawable>() {
     @Override
     public boolean onLoadFailed(@Nullable GlideException e, Object model,
         Target<Drawable> target, boolean isFirstResource) {
       getParentFragment().startPostponedEnterTransition();
       return false;
     }

     @Override
     public boolean onResourceReady(Drawable resource, Object model,
         Target<Drawable> target, DataSource dataSource, boolean isFirstResource) {
       getParentFragment().startPostponedEnterTransition();
       return false;
     }
   })
   .into((ImageView) view.findViewById(R.id.image));
As you may have noticed, we also call to start the postponed transition when the loading fails. This is important to prevent the UI from hanging during failure.
Final touches
To make our transitions even smoother, we would like to fade out the grid items when the image transitions to the pager view.
To do that, we create a TransitionSet that is applied as an exit transition for the GridFragment.
<GridFragment.java>
setExitTransition(TransitionInflater.from(getContext())
   .inflateTransition(R.transition.grid_exit_transition));
<grid_exit_transition.xml>
<?xml version="1.0" encoding="utf-8"?>
<transitionSet xmlns:android="http://schemas.android.com/apk/res/android"
   android:duration="375"
   android:interpolator="@android:interpolator/fast_out_slow_in"
   android:startDelay="25">
 <fade>
   <targets android:targetId="@id/card_view"/>
 </fade>
</transitionSet>
This is what the transition looks like after this exit transition is set up:

As you may have noticed, the transition is still not completely polished with this setup. The fade animation is running for all the grid's card views, including the card that holds the image that transitions to the pager.
To fix it, we exclude the clicked card from the exit transition before commiting the fragment transaction at the GridAdapter.
// The 'view' is the card view that was clicked to initiate the transition.
((TransitionSet) fragment.getExitTransition()).excludeTarget(view, true);
After this change, the animation looks much better (the clicked card doesn't fade out as part of the exit transition, while the rest of the cards fade out):

As a final touch, we set up the GridFragment to scroll and reveal the card we transition to when navigating back from the pager (done at the onViewCreated):
<GridFragment.java>
recyclerView.addOnLayoutChangeListener(
   new OnLayoutChangeListener() {
      @Override
      public void onLayoutChange(View view,
                int left,
                int top,
                int right,
                int bottom,
                int oldLeft,
                int oldTop,
                int oldRight,
                int oldBottom) {
         recyclerView.removeOnLayoutChangeListener(this);
         final RecyclerView.LayoutManager layoutManager =
            recyclerView.getLayoutManager();
         View viewAtPosition =
            layoutManager.findViewByPosition(MainActivity.currentPosition);
         // Scroll to position if the view for the current position is null (not
         // currently part of layout manager children), or it's not completely
         // visible.
         if (viewAtPosition == null
             || layoutManager.isViewPartiallyVisible(viewAtPosition, false, true)){
            recyclerView.post(()
               -> layoutManager.scrollToPosition(MainActivity.currentPosition));
         }
     }
});
Wrapping up
In this article, we implemented a smooth transition from a RecyclerView to a ViewPager and back.
We showed how to postpone a transition and start it after the views are ready. We also implemented shared element remapping to get the transition going when shared views are changing dynamically while navigating the app.
These changes transformed our app's fragment transitions to provide better visual continuity as users interact with it.
The code for the demo app can be found here.