Tag Archives: java

TestParameterInjector gets JUnit5 support

In March 2021, we announced the open source release of TestParameterInjector: A parameterized test runner for JUnit4 (see GitHub page).

Over a year later, the Google-internal usage of TestParameterInjector has continued to rapidly grow, and is now by far the most popular parameterized test framework.
Graph of the different parameterized test frameworks in Google
Guava's philosophy frames it nicely: "When trying to estimate the ubiquity of a feature, we frequently use the Google internal code base as a reference." We also believe that TestParameterInjector usage in Google is a decent proxy for its utility elsewhere.

As you can see on the graph above, not only did TestParameterInjector reduce the usage of the other frameworks, but it also caused a drastic increase of the total amount of parameterized tests. This suggests that TestParameterInjector reduced the threshold for parameterizing a regular unit test and Googlers are more actively using this tool to improve the quality of their tests.

JUnit5 (Jupiter) support

At Google, we use JUnit4 exclusively, but some developers outside of Google have moved on to JUnit5 (Jupiter). For those users, we have now expanded the scope of TestParameterInjector.

We've kept the API the same as much as possible:

// **************** JUnit4 **************** //

@RunWith(TestParameterInjector.class)

public class MyTest {


  @TestParameter boolean isDryRun;


  @Test public void test1(@TestParameter boolean enableFlag) { ... }


  @Test public void test2(@TestParameter MyEnum myEnum) { ... }


  enum MyEnum { VALUE_A, VALUE_B, VALUE_C }

}


// **************** JUnit5 (Jupiter) **************** //

class MyTest {


  @TestParameter boolean isDryRun;


  @TestParameterInjectorTest

  void test1(@TestParameter boolean enableFlag) {

    // This method is run 4 times for all combinations of isDryRun and enableFlag

  }


  @TestParameterInjectorTest

  void test2(@TestParameter MyEnum myEnum) {

    // This method is run 6 times for all combinations of isDryRun and myEnum

  }


  enum MyEnum { VALUE_A, VALUE_B, VALUE_C }

}

The only differences are that @RunWith / @ExtendWith are not necessary and that every test method needs a @TestParameterInjectorTest annotation.

The other features of TestParameterInjector work in a similar way with Jupiter:

class MyTest {


  // **************** Defining sets of parameters **************** //

  @TestParameterInjectorTest

  @TestParameters(customName = "teenager", value = "{age: 17, expectIsAdult: false}")

  @TestParameters(customName = "young adult", value = "{age: 22, expectIsAdult: true}")

  void personIsAdult_success(int age, boolean expectIsAdult) {

    assertThat(personIsAdult(age)).isEqualTo(expectIsAdult);

  }


  // **************** Dynamic parameter generation **************** //

  @TestParameterInjectorTest

  void matchesAllOf_throwsOnNull(

      @TestParameter(valuesProvider = CharMatcherProvider.class) CharMatcher charMatcher) {

    assertThrows(NullPointerException.class, () -> charMatcher.matchesAllOf(null));

  }


  private static final class CharMatcherProvider implements TestParameterValuesProvider {

    @Override

    public List<CharMatcher> provideValues() {

      return ImmutableList.of(

          CharMatcher.any(), CharMatcher.ascii(), CharMatcher.whitespace());

    }

  }

}

Other things we've been working on

Custom names for @TestParameters
When running a the following parameterized test:

@Test

@TestParameters("{age: 17, expectIsAdult: false}")

@TestParameters("{age: 22, expectIsAdult: true}")

public void withRepeatedAnnotation(int age, boolean expectIsAdult){ ... }

the generated test names will be:

MyTest#withRepeatedAnnotation[{age: 17, expectIsAdult: false}]

MyTest#withRepeatedAnnotation[{age: 22, expectIsAdult: true}]

This is fine for small parameter sets, but when the number of @TestParameters or parameters within the YAML string gets large, it quickly becomes hard to figure out what each parameter set is supposed to represent.

For those cases, we added the option to add customName:

@Test

@TestParameters(customName = "teenager", value = "{age: 17, expectIsAdult: false}")

@TestParameters(customName = "young adult", value = "{age: 22, expectIsAdult: true}")

public void personIsAdult(int age, boolean expectIsAdult){...}

To allow this API change, we had to allow @TestParameters to be used in a different way: The original way of specifying @TestParameters sets was to specify them as a list of YAML strings inside a single @TestParameters annotation. We considered multiple options of specifying the custom name inside of these YAML strings, such as a magic 
_name key and an extra YAML mapping layer where the keys would be the test names. But we eventually settled on the aforementioned API, which makes @TestParameters a repeated annotation because it results in the least complex code and clearly separates the different parameter sets.

It should be noted that the original API (list of YAML strings in single annotation) still works, but it is now discouraged in favor of multiple @TestParameters annotations with a single YAML string, even when customName isn't used. The main arguments for this recommendation are:
  • Consistency with the customName case, which needs a single YAML string per @TestParameters annotation
  • We believe it structures the list of parameters (especially when it's long) in a more structured way

Integration with RobolectricTestRunner

Recently, we've managed to internally make a version of RobolectricTestRunner that supports TestParameterInjector annotations. There is a significant amount of work left to open source this, and we are now considering when and how to do this.

Learn more

Our GitHub README provides an overview of the framework. Let us know on GitHub if you have any questions, comments, or feature requests!

By Jens Nyman – TestParameterInjector

Introducing TestParameterInjector: A JUnit4 parameterized test runner

 When writing unit tests, you may want to run the same or a very similar test for different inputs or input/output pairs. In Java, as in most programming languages, the best way to do this is by using a parameterized test framework.

JUnit4 has a number of such frameworks available, such as junit.runners.Parameterized and JUnitParams. A couple of years ago, a few Google engineers found the existing frameworks lacking in functionality and simplicity, and decided to create their own alternative. After a lot of tweaks, fixes, and feature additions based on feedback from clients all over Google, we arrived at what TestParameterInjector is today.

As can be seen in the graph below, TestParameterInjector is now the most used framework for new tests in the Google codebase:

Graph of the different parameterized test frameworks in Google

How does TestParameterInjector work?

The TestParameterInjector exposes two annotations: @TestParameter and @TestParameters. The following code snippet shows how the former works:


@RunWith(TestParameterInjector.class)

public class MyTest {


  @TestParameter boolean isDryRun;


  @Test public void test1(@TestParameter boolean enableFlag) {

    // This method is run 4 times for all combinations of isDryRun and enableFlag

  }


  @Test public void test2(@TestParameter MyEnum myEnum) {

    // This method is run 6 times for all combinations of isDryRun and myEnum

  }


  enum MyEnum { VALUE_A, VALUE_B, VALUE_C }

}


Annotated fields (such as isDryRun) will cause each test method to run for all possible values while annotated method parameters (such as enableFlag) will only impact that test method. Note that the generated test names will typically be helpful but concise, for example: MyTest#test2[isDryRun=true, VALUE_A].

The other annotation, @TestParameters, can be seen at work in this snippet:

@RunWith(TestParameterInjector.class)

public class MyTest {


  @Test

  @TestParameters({

    "{age: 17, expectIsAdult: false}",

    "{age: 22, expectIsAdult: true}",

  })

  public void personIsAdult(int age, boolean expectIsAdult) {

    // This method is run 2 times

  }

}


In contrast to the first example, which tests all combinations, a @TestParameters-annotated method runs once for each test case specified.

How does TestParameterInjector compare to other frameworks?

To our knowledge, the table below summarizes the features of the different frameworks in use at Google:

TestParameterInjector

junit.runners. Parameterized

JUnitParams

Burst

DataProvider

Jukito

Theories

Documentation

GitHub

GitHub

GitHub

GitHub

GitHub

GitHub

junit.org

Supports field injection


Supports parameter injection


Considers sets of parameters correlated or orthogonal

both are supported

correlated

correlated

orthogonal

correlated

orthogon

al

orthogonal

Refactor friendly

(✓)


Learn more

Our GitHub README at https://github.com/google/TestParameterInjector gives an overview of the possibilities of this framework. Let us know on GitHub if you have any questions, comments, or feature requests!

By Jens Nyman, TestParameterInjector team

1Parameters are considered dependent. You specify explicit combinations to be run.
2Parameters are considered independent. The framework will run all possible combinations of parameters

Java zPages for OpenTelemetry

What is OpenTelemetry?

OpenTelemetry is an open source project aimed at improving the observability of our applications. It is a collection of cloud monitoring libraries and services for capturing distributed traces and metrics and integrates naturally with external observability tools, such as Prometheus and Zipkin. As of now, OpenTelemetry is in its beta stage and supports a few different languages.

What are zPages?

zPages are a set of dynamically generated HTML web pages that display trace and metrics data from the running application. The term zPages was coined at Google, where similar pages are used to view basic diagnostic data from a particular host or service. For our project, we built the Java /tracez and /traceconfigz zPages, which focus on collecting and displaying trace spans.

TraceZ

The /tracez zPage displays span data from the instrumented application. Spans are split into two groups: spans that are still running and spans that have completed.

TraceConfigZ

The /traceconfigz zPage displays the currently active tracing configuration and allows users to change the tracing parameters. Examples of such parameters include the sampling probability and the maximum number of attributes.

Using the zPages

This section describes how to start and use the Java zPages.

Add the dependencies to your project

First, you need to add OpenTelemetry as a dependency to your Java application.

Maven

For Maven, add the following to your pom.xml file:
<dependencies>
    <dependency>
        <groupId>io.opentelemetry</groupId>
        <artifactId>opentelemetry-api</artifactId>
        <version>0.7.0</version>
    </dependency>
    <dependency>
        <groupId>io.opentelemetry</groupId>
        <artifactId>opentelemetry-sdk</artifactId>
        <version>0.7.0</version>
    </dependency>
    <dependency>
        <groupId>io.opentelemetry</groupId>
        <artifactId>opentelemetry-sdk-extension-    zpages</artifactId>
        <version>0.7.0</version>
    </dependency>
</dependencies>

Gradle

For Gradle, add the following to your build.gradle dependencies:
implementation 'io.opentelemetry:opentelemetry-api:0.7.0'
implementation 'io.opentelemetry:opentelemetry-sdk:0.7.0'
implementation 'io.opentelemetry:opentelemetry-sdk-extension-zpages:0.7.0'

Register the zPages

To set-up the zPages, simply call startHttpServerAndRegisterAllPages(int port) from the ZPageServer class in your main function:
import io.opentelemetry.sdk.extensions.zpages.ZPageServer;

public class MyMainClass {
    public static void main(String[] args) throws Exception {
        ZPageServer.startHttpServerAndRegisterAllPages(8080);
        // ... do work
    }
}
Note that the package com.sun.net.httpserver is required to use the default zPages setup. Please make sure your version of the JDK includes this package if you plan to use the default server.

Alternatively, you can call registerAllPagesToHttpServer(HttpServer server) to register the zPages to a shared server:
import io.opentelemetry.sdk.extensions.zpages.ZPageServer;

public class MyMainClass {
    public static void main(String[] args) throws Exception {
        HttpServer server = HttpServer.create(new                     InetSocketAddress(8000), 10);
        ZPageServer.registerAllPagesToHttpServer(server);
        server.start();
        // ... do work
    }
}

Access the zPages

View all available zPages on the index page

The index page (at /) lists all available zPages with a link and description.


View trace spans on the /tracez zPage

The /tracez zPage displays information about running and completed spans, with completed spans further organized into latency and error buckets. The data is aggregated into a summary-level table:


You can click on each of the counts in the table cells to access the corresponding span details. For example, here are the details of the ChildSpan latency sample (row 1, col 4):


View and update the tracing configuration on the /traceconfigz zPage.

The /traceconfigz zPage provides an interface for users to modify the current tracing parameters:


Design

This section goes into the underlying design of our code.

Frontend


The frontend consists of two main parts: HttpHandler and HttpServer. The HttpHandler is responsible for rendering the HTML content, with each zPage implementing its own ZPageHandler. The HttpServer, on the other hand, is responsible for listening to incoming requests, obtaining the requested data, and then invoking the aforementioned ZPageHandlers. The HttpServer class from com.sun.net is used to construct the default server and to handle http requests on different routes.

Backend


The backend consists of two components as well: SpanProcessor and DataAggregator. The SpanProcessor watches the lifecycle of each span, invoking functions each time a span starts or ends. The DataAggregator, on the other hand, restructures the data from the SpanProcessor into an accessible format for the frontend to display. The class constructor requires a TracezSpanProcessor instance, so that the TracezDataAggregator class can access the spans collected by a specific TracezSpanProcessor. The frontend only needs to call functions in the DataAggregator to obtain information required for the web page.

Conclusion

We hope that this blog post has given you a little insight into the development and use cases of OpenTelemetry’s Java zPages. The zPages themselves are lightweight performance monitoring tools that allow users to troubleshoot and better understand their applications. Once OpenTelemetry is officially released, we hope that you try out and use the /tracez and /traceconfigz zPages!

By William Hu and Terry Wang – Software Engineering Interns, Core Compute Observability

Sip a cup of Java 11 for your Cloud Functions

Posted by Guillaume Laforge, Developer Advocate for Google Cloud

With the beta of the new Java 11 runtime for Google Cloud Functions, Java developers can now write their functions using the Java programming language (a language often used in enterprises) in addition to Node.js, Go, or Python. Cloud Functions allow you to run bits of code locally or in the cloud, without provisioning or managing servers: Deploy your code, and let the platform handle scaling up and down for you. Just focus on your code: handle incoming HTTP requests or respond to some cloud events, like messages coming from Cloud Pub/Sub or new files uploaded in Cloud Storage buckets.

In this article, let’s focus on what functions look like, how you can write portable functions, how to run and debug them locally or deploy them in the cloud or on-premises, thanks to the Functions Framework, an open source library that runs your functions. But you will also learn about third-party frameworks that you might be familiar with, that also let you create functions using common programming paradigms.

The shape of your functions

There are two types of functions: HTTP functions, and background functions. HTTP functions respond to incoming HTTP requests, whereas background functions react to cloud-related events.

The Java Functions Framework provides an API that you can use to author your functions, as well as an invoker which can be called to run your functions locally on your machine, or anywhere with a Java 11 environment.

To get started with this API, you will need to add a dependency in your build files. If you use Maven, add the following dependency tag in pom.xml:

<dependency>
<groupId>com.google.cloud.functions</groupId>
<artifactId>functions-framework-api</artifactId>
<version>1.0.1</version>
<scope>provided</scope>
</dependency>

If you are using Gradle, add this dependency declaration in build.gradle:

compileOnly("com.google.cloud.functions:functions-framework-api")

Responding to HTTP requests

A Java function that receives an incoming HTTP request implements the HttpFunction interface:

import com.google.cloud.functions.*;
import java.io.*;

public class Example implements HttpFunction {
@Override
public void service(HttpRequest request, HttpResponse response)
throws IOException {
var writer = response.getWriter();
writer.write("Hello developers!");
}
}

The service() method provides an HttpRequest and an HttpResponse object. From the request, you can get information about the HTTP headers, the payload body, or the request parameters. It’s also possible to handle multipart requests. With the response, you can set a status code or headers, define a body payload and a content-type.

Responding to cloud events

Background functions respond to events coming from the cloud, like new Pub/Sub messages, Cloud Storage file updates, or new or updated data in Cloud Firestore. There are actually two ways to implement such functions, either by dealing with the JSON payloads representing those events, or by taking advantage of object marshalling thanks to the Gson library, which takes care of the parsing transparently for the developer.

With a RawBackgroundFunction, the responsibility is on you to handle the incoming cloud event JSON-encoded payload. You receive a JSON string, so you are free to parse it however you like, with your JSON parser of your choice:

import com.google.cloud.functions.Context;
import com.google.cloud.functions.RawBackgroundFunction;

public class RawFunction implements RawBackgroundFunction {
@Override
public void accept(String json, Context context) {
...
}
}

But you also have the option to write a BackgroundFunction which uses Gson for unmarshalling a JSON representation into a Java class (a POJO, Plain-Old-Java-Object) representing that payload. To that end, you have to provide the POJO as a generic argument:

import com.google.cloud.functions.Context;
import com.google.cloud.functions.BackgroundFunction;

public class PubSubFunction implements BackgroundFunction<PubSubMsg> {
@Override
public void accept(PubSubMsg msg, Context context) {
System.out.println("Received message ID: " + msg.messageId);
}
}

public class PubSubMsg {
String data;
Map<String, String> attributes;
String messageId;
String publishTime;
}

The Context parameter contains various metadata fields like timestamps, the type of events, and other attributes.

Which type of background function should you use? It depends on the control you need to have on the incoming payload, or if the Gson unmarshalling doesn’t fully fit your needs. But having the unmarshalling covered by the framework definitely streamlines the writing of your function.

Running your function locally

Coding is always great, but seeing your code actually running is even more rewarding. The Functions Framework comes with the API we used above, but also with an invoker tool that you can use to run functions locally. For improving developer productivity, having a direct and local feedback loop on your own computer makes it much more comfortable than deploying in the cloud for each change you make to your code.

With Maven

If you’re building your functions with Maven, you can install the Function Maven plugin in your pom.xml:

<plugin>
<groupId>com.google.cloud.functions</groupId>
<artifactId>function-maven-plugin</artifactId>
<version>0.9.2</version>
<configuration>
<functionTarget>com.example.Example</functionTarget>
</configuration>
</plugin>

On the command-line, you can then run:

$ mvn function:run

You can pass extra parameters like --target to define a different function to run (in case your project contains several functions), --port to specify the port to listen to, or --classpath to explicitly set the classpath needed by the function to run. These are the parameters of the underlying Invoker class. However, to set these parameters via the Maven plugin, you’ll have to pass properties with -Drun.functionTarget=com.example.Example and -Drun.port.

With Gradle

With Gradle, there is no dedicated plugin, but it’s easy to configure build.gradle to let you run functions.

First, define a dedicated configuration for the invoker:

configurations { 
invoker
}

In the dependencies, add the Invoker library:

dependencies {
invoker 'com.google.cloud.functions.invoker:java-function-invoker:1.0.0-beta1'
}

And then, create a new task to run the Invoker:

tasks.register("runFunction", JavaExec) {
main = 'com.google.cloud.functions.invoker.runner.Invoker'
classpath(configurations.invoker)
inputs.files(configurations.runtimeClasspath,
sourceSets.main.output)
args('--target',
project.findProperty('runFunction.target') ?:
'com.example.Example',
'--port',
project.findProperty('runFunction.port') ?: 8080
)
doFirst {
args('--classpath', files(configurations.runtimeClasspath,
sourceSets.main.output).asPath)
}
}

By default, the above launches the function com.example.Example on port 8080, but you can override those on the command-line, when running gradle or the gradle wrapper:

$ gradle runFunction -PrunFunction.target=com.example.HelloWorld \
-PrunFunction.port=8080

Running elsewhere, making your functions portable

What’s interesting about the Functions Framework is that you are not tied to the Cloud Functions platform for deploying your functions. As long as, in your target environment, you can run your functions with the Invoker class, you can run your functions on Cloud Run, on Google Kubernetes Engine, on Knative environments, on other clouds when you can run Java, or more generally on any servers on-premises. It makes your functions highly portable between environments. But let’s have a closer look at deployment now.

Deploying your functions

You can deploy functions with the Maven plugin as well, with various parameters to tweak for defining regions, memory size, etc. But here, we’ll focus on using the cloud SDK, with its gcloud command-line, to deploy our functions.

For example, to deploy an HTTP function, you would type:

$ gcloud functions deploy exampleFn \
--region europe-west1 \
--trigger-http \
--allow-unauthenticated \
--runtime java11 \
--entry-point com.example.Example \
--memory 512MB

For a background function that would be notified of new messages on a Pub/Sub topic, you would launch:

$ gcloud functions deploy exampleFn \
--region europe-west1 \
--trigger-topic msg-topic \
--runtime java11 \
--entry-point com.example.PubSubFunction \
--memory 512MB

Note that deployments come in two flavors as well, although the above commands are the same: functions are deployed from source with a pom.xml and built in Google Cloud, but when using a build tool other than Maven, you can also use the same command to deploy a pre-compiled JAR that contains your function implementation. Of course, you’ll have to create that JAR first.

What about other languages and frameworks?

So far, we looked at Java and the plain Functions Framework, but you can definitely use alternative JVM languages such as Apache Groovy, Kotlin, or Scala, and third-party frameworks that integrate with Cloud Functions like Micronaut and Spring Boot!

Pretty Groovy functions

Without covering all those combinations, let’s have a look at two examples. What would an HTTP function look like in Groovy?

The first step will be to add Apache Groovy as a dependency in your pom.xml:

<dependency>
<groupId>org.codehaus.groovy</groupId>
<artifactId>groovy-all</artifactId>
<version>3.0.4</version>
<type>pom</type>
</dependency>

You will also need the GMaven compiler plugin to compile the Groovy code:

<plugin>
<groupId>org.codehaus.gmavenplus</groupId>
<artifactId>gmavenplus-plugin</artifactId>
<version>1.9.0</version>
<executions>
<execution>
<goals>
<goal>addSources</goal>
<goal>addTestSources</goal>
<goal>compile</goal>
<goal>compileTests</goal>
</goals>
</execution>
</executions>
</plugin>

When writing the function code, just use Groovy instead of Java:

import com.google.cloud.functions.*

class HelloWorldFunction implements HttpFunction {
void service(HttpRequest request, HttpResponse response) {
response.writer.write "Hello Groovy World!"
}
}

The same explanations regarding running your function locally or deploying it still applies: the Java platform is pretty open to alternative languages too! And the Cloud Functions builder will happily build your Groovy code in the cloud, since Maven lets you compile this code thanks to the Groovy library.

Micronaut functions

Third-party frameworks also offer a dedicated Cloud Functions integration. Let’s have a look at Micronaut.

Micronaut is a “modern, JVM-based, full-stack framework for building modular, easily testable microservice and serverless applications”, as explained on its website. It supports the notion of serverless functions, web apps and microservices, and has a dedicated integration for Google Cloud Functions.

In addition to being a very efficient framework with super fast startup times (which is important, to avoid long cold starts on serverless services), what’s interesting about using Micronaut is that you can use Micronaut’s own programming model, including Dependency Injection, annotation-driven bean declaration, etc.

For HTTP functions, you can use the framework’s own @Controller / @Get annotations, instead of the Functions Framework’s own interfaces. So for example, a Micronaut HTTP function would look like:

import io.micronaut.http.annotation.*;

@Controller("/hello")
public class HelloController {

@Get(uri="/", produces="text/plain")
public String index() {
return "Example Response";
}
}

This is the standard way in Micronaut to define a Web microservice, but it transparently builds upon the Functions Framework to run this service as a Cloud Function. Furthermore, this programming model offered by Micronaut is portable across other environments, since Micronaut runs in many different contexts.

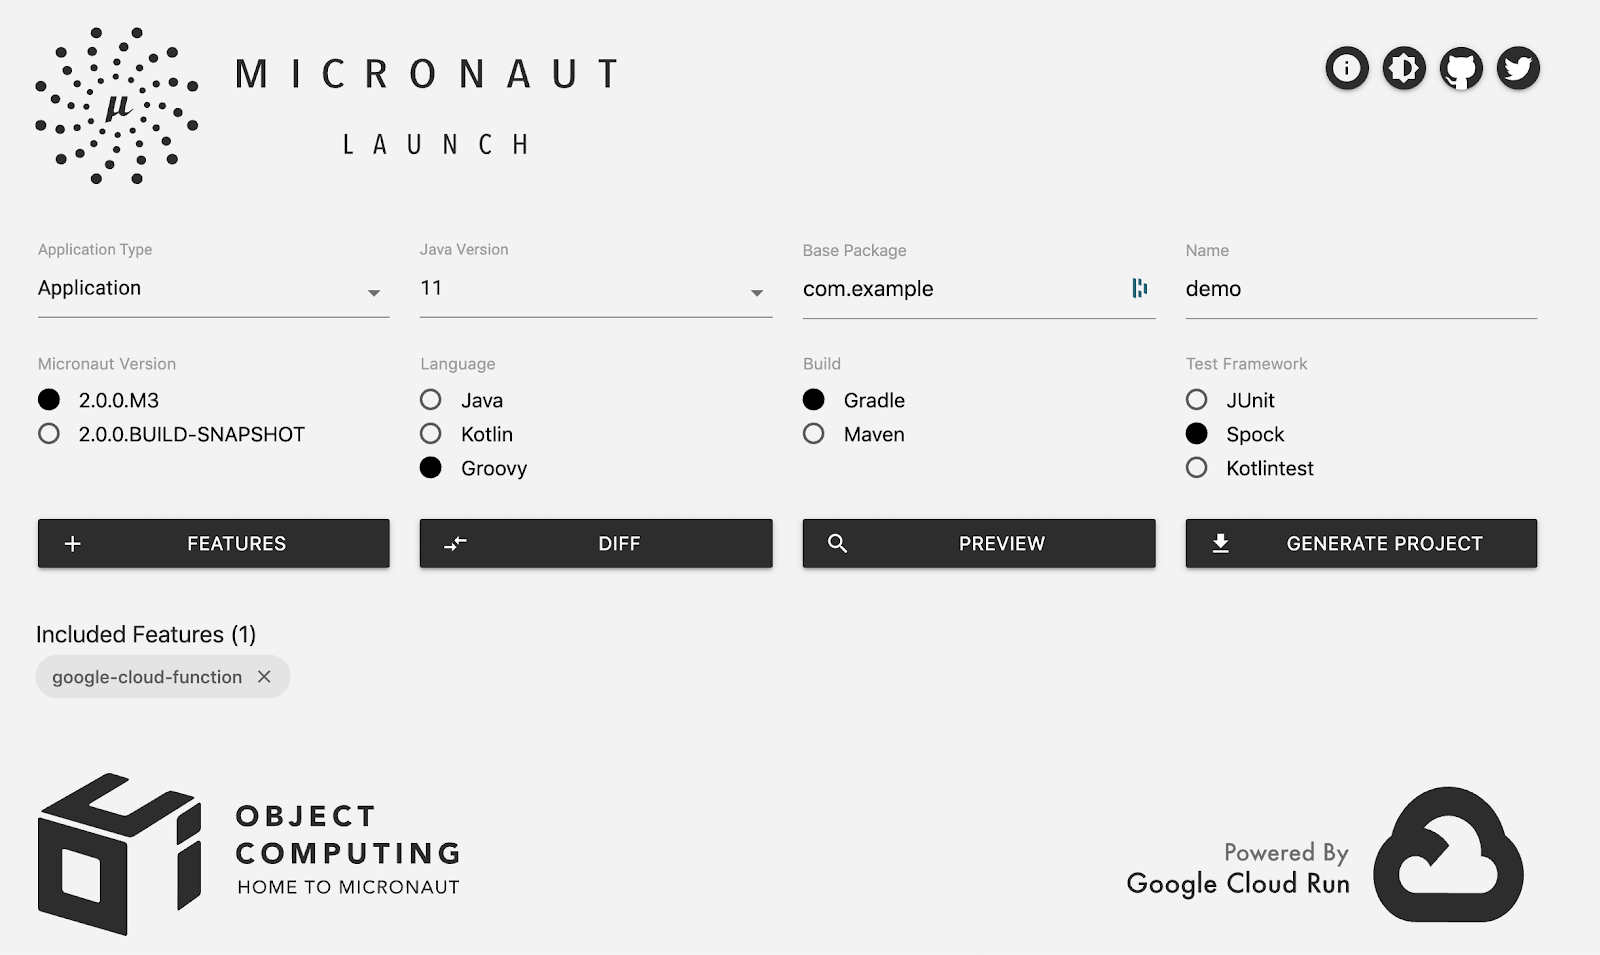
Last but not least, if you are using the Micronaut Launch project (hosted on Cloud Run) which allows you to scaffold new projects easily (from the command-line or from a nice UI), you can opt for adding the google-cloud-function support module, and even choose your favorite language, build tool, or testing framework:

Micronaut Launch

Be sure to check out the documentation for the Micronaut Cloud Functions support, and Spring Cloud Function support.

What’s next?

Now it’s your turn to try Cloud Functions for Java 11 today, with your favorite JVM language or third-party frameworks. Read the getting started guide, and try this for free with Google Cloud Platform free trial. Explore Cloud Functions’ features and use cases, take a look at the quickstarts, perhaps even contribute to the open source Functions Framework. And we’re looking forward to seeing what functions you’re going to build on this platform!

Truth 1.0: Fluent Assertions for Java and Android Tests

Software testing is important—and sometimes frustrating. The frustration can come from working on innately hard domains, like concurrency, but too often it comes from a thousand small cuts:
assertEquals("Message has been sent", getString(notification, EXTRA_BIG_TEXT));
assertTrue(
    getString(notification, EXTRA_TEXT)
        .contains("Kurt Kluever <[email protected]>"));
The two assertions above test almost the same thing, but they are structured differently. The difference in structure makes it hard to identify the difference in what's being tested.
A better way to structure these assertions is to use a fluent API:
assertThat(getString(notification, EXTRA_BIG_TEXT))
    .isEqualTo("Message has been sent");
assertThat(getString(notification, EXTRA_TEXT))
    .contains("Kurt Kluever <[email protected]>");
A fluent API naturally leads to other advantages:
  • IDE autocompletion can suggest assertions that fit the value under test, including rich operations like containsExactly(permission.SEND_SMS, permission.READ_SMS).
  • Failure messages can include the value under test and the expected result. Contrast this with the assertTrue call above, which lacks a failure message entirely.
Google's fluent assertion library for Java and Android is Truth. We're happy to announce that we've released Truth 1.0, which stabilizes our API after years of fine-tuning.


Truth started in 2011 as a Googler's personal open source project. Later, it was donated back to Google and cultivated by the Java Core Libraries team, the people who bring you Guava.
You might already be familiar with assertion libraries like Hamcrest and AssertJ, which provide similar features. We've designed Truth to have a simpler API and more readable failure messages. For example, here's a failure message from AssertJ:
java.lang.AssertionError:
Expecting:
  <[year: 2019
month: 7
day: 15
]>
to contain exactly in any order:
  <[year: 2019
month: 6
day: 30
]>
elements not found:
  <[year: 2019
month: 6
day: 30
]>
and elements not expected:
  <[year: 2019
month: 7
day: 15
]>
And here's the equivalent message from Truth:
value of:
    iterable.onlyElement()
expected:
    year: 2019
    month: 6
    day: 30

but was:
    year: 2019
    month: 7
    day: 15
For more details, read our comparison of the libraries, and try Truth for yourself.

Also, if you're developing for Android, try AndroidX Test. It includes Truth extensions that make assertions even easier to write and failure messages even clearer:
assertThat(notification).extras().string(EXTRA_BIG_TEXT)
    .isEqualTo("Message has been sent");
assertThat(notification).extras().string(EXTRA_TEXT)
    .contains("Kurt Kluever <[email protected]>");
Coming soon: Kotlin users of Truth can look forward to Kotlin-specific enhancements.
By Chris Povirk, Java Core Libraries

Java 8 Language Features Support Update

Posted by James Lau, Product Manager

Yesterday, we released Android Studio 2.4 Preview 6. Java 8 language features are now supported by the Android build system in the javac/dx compilation path. Android Studio's Gradle plugin now desugars Java 8 class files to Java 7-compatible class files, so you can use lambdas, method references and other features of Java 8.

For those of you who tried the Jack compiler, we now support the same set of Java 8 language features but with faster build speed. You can use Java 8 language features together with tools that rely on bytecode, including Instant Run. Using libraries written with Java 8 is also supported.

We first added Java 8 desugaring in Android Studio 2.4 Preview 4. Preview 6 includes important bug fixes related to Java 8 language features support. Many of these fixes were made in response to bug reports you filed. We really appreciate your help in improving Android development tools for the community!

It's easy to try using Java 8 language features in your Android project. Just download Android Studio 2.4 Preview 6, and update your project's target and source compatibility to Java version 1.8. You can find more information in our preview documentation.

Happy lambda'ing!

Operation Rosehub

Twelve months ago, a team of 50 Google employees used GitHub to patch the “Apache Commons Collections Deserialization Vulnerability” (or the “Mad Gadget vulnerability” as we call it) in thousands of open source projects. We recently learned why our efforts were so important.

The San Francisco Municipal Transportation Agency had their software systems encrypted and shut down by an avaricious hacker. The hacker used that very same vulnerability, according to reports of the incident. He demanded a Bitcoin ransom from the government. He threatened to leak the private data he stole from San Francisco’s citizens if his ransom wasn’t paid. This was an attack on our most critical public infrastructure; infrastructure which underpins the economy of a major US city.

Mad Gadget is one of the most pernicious vulnerabilities we’ve seen. By merely existing on the Java classpath, seven “gadget” classes in Apache Commons Collections (versions 3.0, 3.1, 3.2, 3.2.1, and 4.0) make object deserialization for the entire JVM process turing complete with an exec function. Since many business applications use object deserialization to send messages across the network, it would be like hiring a bank teller who was trained to hand over all the money in the vault if asked to do so politely, and then entrusting that teller with the key. The only thing that would keep a bank safe in such a circumstance is that most people wouldn’t consider asking such a question.

The announcement of Mad Gadget triggered the cambrian explosion of enterprise security disclosures. Oracle, Cisco, Red Hat, Jenkins, VMWare, IBM, Intel, Adobe, HP and SolarWinds all formally disclosed that they had been impacted by this issue.

But unlike big businesses, open source projects don’t have people on staff to read security advisories all day and instead rely on volunteers to keep them informed. It wasn’t until five months later that a Google employee noticed several prominent open source libraries had not yet heard the bad news. Those projects were still depending on vulnerable versions of Collections. So back in March 2016, she started sending pull requests to those projects updating their code. This was easy to do and usually only required a single line change. With the help of GitHub’s GUI, any individual can make such changes to anyone’s codebase in under a minute. Given how relatively easy the changes seemed, she recruited more colleagues at Google to help the cause. As more work was completed, it was apparent that the problem was bigger than we had initially realized.

For instance, when patching projects like the Spring Framework, it was clear we weren’t just patching Spring but also patching every project that depended on Spring. We were furthermore patching all the projects that depended on those projects and so forth. But even once those users upgraded, they could still be impacted by other dependencies introducing the vulnerable version of Collections. To make matters worse, build systems like Maven can not be relied upon to evict old versions.

This was when we realized the particularly viral nature of Mad Gadget. We came to the conclusion that, in order to improve the health of the global software ecosystem, the old version of Collections should be removed from as many codebases as possible.

We used BigQuery to assess the damage. It allowed us to write a SQL query with regular expressions that searched all the public code on GitHub in a couple minutes.

SELECT pop, repo_name, path
FROM (SELECT F.id as id, repo_name, path
FROM (SELECT id, repo_name, path
FROM [bigquery-public-data:github_repos.files]
WHERE path LIKE '%pom.xml') AS F
JOIN (SELECT id
FROM (SELECT id,content
FROM [bigquery-public-data:github_repos.contents]
WHERE NOT binary)
WHERE content CONTAINS 'commons-collections<')
WHERE content CONTAINS '>3.2.1<') AS C
ON F.id = C.id) AS V
JOIN (SELECT difference.new_sha1 AS id,
COUNT(repo_name) WITHIN RECORD AS pop
FROM FLATTEN([bigquery-public-data:github_repos.commits], difference.new_sha1)) AS P
ON V.id = P.id
ORDER BY pop DESC;


We were alarmed when we discovered 2,600 unique open source projects that still directly referenced insecure versions of Collections. Internally at Google, we have a tool called Rosie that allows developers to make large scale changes to codebases owned by hundreds of different teams. But no such tool existed for GitHub. So we recruited even more engineers from around Google to patch the world’s code the hard way.

Ultimately, security rests within the hands of each developer. However we felt that the severity of the vulnerability and its presence in thousands of open source projects were extenuating circumstances. We recognized that the industry best practices had failed. Action was needed to keep the open source community safe. So rather than simply posting a security advisory asking everyone to address the vulnerability, we formed a task force to update their code for them. That initiative was called Operation Rosehub.

Operation Rosehub was organized from the bottom-up on company-wide mailing lists. Employees volunteered and patches were sent out in a matter of weeks. There was no mandate from management to do this—yet management was supportive. They were happy to see employees spontaneously self-organizing to put their 20% time to good use. Some of those managers even participated themselves.

Patches were sent to many projects, avoiding threats to public security for years to come. However, we were only able to patch open source projects on GitHub that directly referenced vulnerable versions of Collections. Perhaps if the SF Muni software systems had been open source, we would have been able to bring Mad Gadget to their attention too.

Going forward, we believe the best thing to do is to build awareness. We want to draw attention to the fact that the tools now exist for fixing software on a massive scale, and that it works best when that software is open.

In this case, the open source dataset on BigQuery allowed us to identify projects that still needed to be patched. When a vulnerability is discovered, any motivated team or individual who wants to help improve the security of our infrastructure can use these tools to do just that.

By Justine Tunney, Software Engineer on TensorFlow

We’d like to recognize the following people for their contributions to Operation Rosehub: Laetitia Baudoin, Chris Blume, Sven Blumenstein, James Bogosian, Phil Bordelon, Andrew Brampton, Joshua Bruning, Sergio Campamá, Kasey Carrothers, Martin Cochran, Ian Flanigan, Frank Fort, Joshua French, Christian Gils, Christian Gruber, Erik Haugen, Andrew Heiderscheit, David Kernan, Glenn Lewis, Roberto Lublinerman, Stefano Maggiolo, Remigiusz Modrzejewski, Kristian Monsen, Will Morrison, Bharadwaj Parthasarathy, Shawn Pearce, Sebastian Porst, Rodrigo Queiro, Parth Shukla, Max Sills, Josh Simmons, Stephan Somogyi, Benjamin Specht, Ben Stewart, Pascal Terjan, Justine Tunney, Daniel Van Derveer, Shannon VanWagner, and Jennifer Winer.

Get ready for Javascript “Promises” with Google and Udacity

Sarah Clark, Program Manager, Google Developer Training

Front-end web developers face challenges when using common “asynchronous” requests. These requests, such as fetching a URL or reading a file, often lead to complicated code, especially when performing multiple actions in a row. How can we make this easier for developers?

Javascript Promises are a new tool that simplifies asynchronous code, converting a tangle of callbacks and event handlers into simple, straightforward code such as: fetch(url).then(decodeJSON).then(addToPage)...

Promises are used by many new web standards, including Service Worker, the Fetch API, Quota Management, Font Load Events,Web MIDI, and Streams.


We’ve just opened up a online course on Promises, built in collaboration with Udacity. This brief course, which you can finish in about a day, walks you through building an “Exoplanet Explorer” app that reads and displays live data using Promises. You’ll also learn to use the Fetch API and finally kiss XMLHttpRequest goodbye!

This short course is a prerequisite for most of the Senior Web Developer Nanodegree. Whether you are in the paid Nanodegree program or taking the course for free, won’t you come learn to make your code simpler and more reliable today?

Advanced Development Process with Apps Script

Originally posted on Google Apps Developers blog

Posted by Matt Hessinger, Project Specialist, Google Apps Script

Welcome to our 100th blog post on Apps Script! It’s amazing how far we’ve come from our first post back in 2010. We started out highlighting some of the simple ways that you could develop with the Apps platform. Today, we’re sharing tips and best practices for developing more complex Apps Script solutions by pointing out some community contributions.

Apps Script and modern development

The Apps Script editor does not allow you to use your own source code management tool, making it a challenge to collaborate with other developers. Managing development, test, and production versions of a project becomes very tedious. What if you could have the best of both worlds — the powerful integration with Google’s platform that Apps Script offers, along with the development tooling and best practices that you use every day? Now, you can.

npm install -g node-google-apps-script

This project, “node-google-apps-script”, is a Node.js based command-line interface (CLI) that uses Google Drive API to update Apps Script project from the command line. You can view the node package on the NPM site, and also view the GitHub repo. Both links have usage instructions. This tool was created by Dan Thareja, with additional features added by Matt Condon.

Before using the tool, take a look at the Apps Script Importing and Exporting Projects page. There are a few things that you should be aware of as you plan out your development process. There are also a few best practices that you can employ to take full advantage of developing in this approach.

There is a sample project that demonstrates some of the practices described in this post: click here to view that code on GitHub. To get all of the Apps Script samples, including this import/export development example:

git clone https://github.com/google/google-apps-script-samples.git
The sample is in the “import_export_development” subdirectory.

Your standalone Apps Script projects live in Google Drive. If you use a command-line interface (CLI) tool like the one linked above, you can work in your favorite editor, and commit and sync code to your chosen repository. You can add tasks in your task runner to push code up to one or more Apps Script projects, conditionally including or excluding code for different environments, checking coding style, linting, minifying, etc. You can more easily create and push UI-related files to a file host outside of Apps Script, which could be useful if those same files are used in other apps you are building.


Typical development tools, integrated with Apps Script via the Drive API

Apps Script Project Lifecycle Best-practices

In addition to the information on the Importing and Exporting Projects page, here are a few things to consider:

  • Your local file set is the master. If you add, delete or rename files locally, the next upload with either of the linked tools will automatically make the Apps Script project reflect your local file set.
  • You can name local files whatever you want. You just need to then append “.html” to any client-side “.js” or “.css” in a file staging task before uploading to your project. The tool referenced above treats any “.js” files that you stage for upload as Apps Script server script files (“.gs” in the editor). It treats any “.html” that you stage as “client” code that you’ll access via the HtmlService. This means that you can develop server scripts as JavaScript, with the “.js” extension, so that your local tools recognize JavaScript syntax. While developing, client-side code (i.e., code that you need to interact with via the HtmlService) can be “.html”, “.js”, or “.css”, allowing your editor to provide the right syntax highlighting and validation experience.

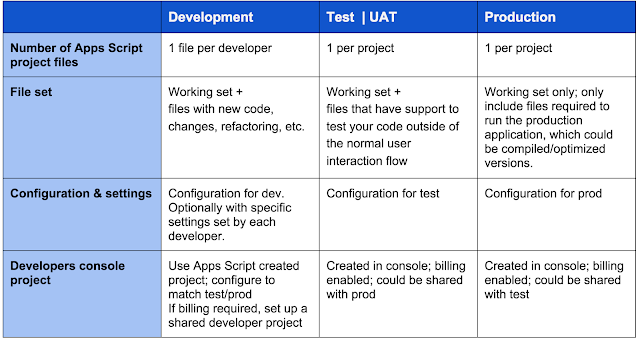
Over and above the editing experience, the biggest improvements you get by working outside the script editor is that you are no longer locked into working in just one Apps Script project. You can much more easily collaborate as a team, with individual developers having their own working Apps Script projects, while also having more controlled test, user acceptance and production versions, each with more process and security. Beyond just the consistency with other normal project practices, there are a few Apps Script specific ways you can leverage this multi-environment approach.


If you are going to use this approach, here are three best practices to consider:

  • Use specific configuration values for “local” development.
  • Build test methods that can run standalone.
  • Include dependencies for development and testing.

Best practice: Use specific configuration values for “local” development.

The provided sample shows a simple example of how a base configuration class could allow a developer to inject their local values for their own debugging and testing. In this case, the developer also added the annotation @NotOnlyCurrentDoc, which tells Apps Script that they need the full scope for Drive API access. In this project, the “production” deployment has the annotation @OnlyCurrentDoc, which leads to the OAuth scope that is limited to the document associated with script running as Sheets, Docs, or Forms add-on. If you add a standard file pattern to the source project’s “ignore” file, these developer-specific files will never get into the actual codebase.

Benefits for your project — Production can have more limited OAuth scopes, while a developer can use broader access during development. Developers can also have their own personal configuration settings to support their individual development efforts.

Best practice: Build test methods that can run standalone.

While there is no current way to trigger tests in an automated way, you still may want to author unit tests that validate specific functions within your projects. You’ll also likely have specific configuration values for testing. Once again, none of these files should make it into a production deployment. You can even use the Apps Script Execution API to drive those tests from a test runner!

Benefits for your project — You can author test functions, and keep them separate from the production Apps Script file. This slims down your production Apps Script project, and keeps the correct OAuth scopes that are needed for production users.

Best practice: Include dependencies for development and testing.

If you are developing an add-on for Sheets or Docs, and you expect to have an “active” item on the SpreadsheetApp. However when you are developing or testing, you may be running your Apps Script without an “active” context. If you need to develop in this mode, you can wrap the call to get the current active item in a method that also can determine what mode you are running in. This would allow your development or test instance to inject the ID of an “active” document to use for testing, while delegating to the getActive* result when running in a real context.

Benefits for your project — You can integrate better unit testing methodologies into your projects, even if the end deployment state dependents on resources that aren’t typically available when debugging.

Wrapping up

You now have the option to use your own development and source management tools. While you still do need to use the Apps Script editor in your application’s lifecycle — to publish as a web app or add-on, configure advanced services, etc. — taking this step will help you get the most out of the power of the Apps Script platform. Remember to check out Apps Script on the Google Developers site to get more information and samples for your Apps Script development.

If you happen to use python tools on the command line to facilitate your team’s build process, you can check out Joe Stump's python-gas-cli. You can view the package info here or the GitHub repo where you’ll also find usage instructions.

Here are some additional reference links related to this post: