Tag Archives: Docker

Optimizing gVisor filesystems with Directfs

gVisor is a sandboxing technology that provides a secure environment for running untrusted code. In our previous blog post, we discussed how gVisor performance improves with a root filesystem overlay. In this post, we'll dive into another filesystem optimization that was recently launched: directfs. It gives gVisor’s application kernel (the Sentry) secure direct access to the container filesystem, avoiding expensive round trips to the filesystem gofer.

Origins of the Gofer

gVisor is used internally at Google to run a variety of services and workloads. One of the challenges we faced while building gVisor was providing remote filesystem access securely to the sandbox. gVisor’s strict security model and defense in depth approach assumes that the sandbox may get compromised because it shares the same execution context as the untrusted application. Hence the sandbox cannot be given sensitive keys and credentials to access Google-internal remote filesystems.

To address this challenge, we added a trusted filesystem proxy called a "gofer". The gofer runs outside the sandbox, and provides a secure interface for untrusted containers to access such remote filesystems. For architectural simplicity, gofers were also used to serve local filesystems as well as remote.

Gofer process intermediates filesystem operations

Isolating the Container Filesystem in runsc

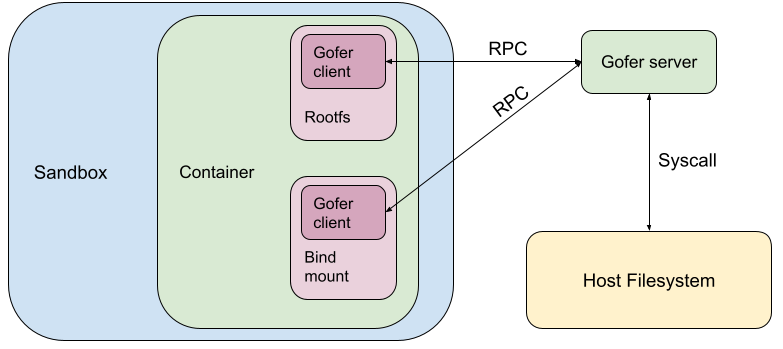
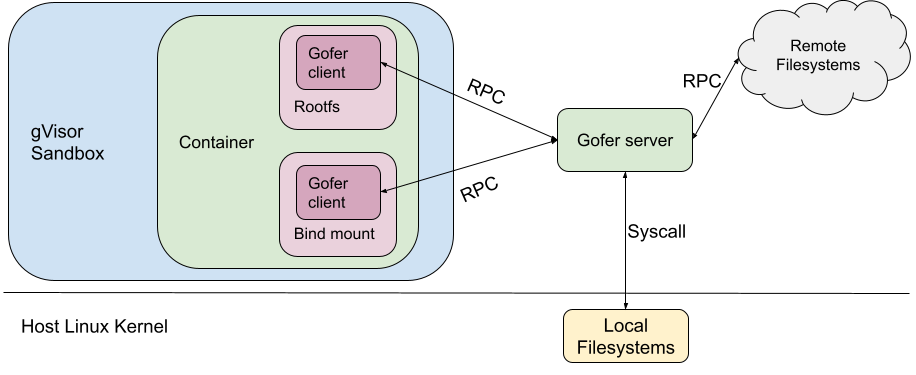
When gVisor was open sourced as runsc, the same gofer model was copied over to maintain the same security guarantees. runsc was configured to start one gofer process per container which serves the container filesystem to the sandbox over a predetermined protocol (now LISAFS). However, a gofer adds a layer of indirection with significant overhead.

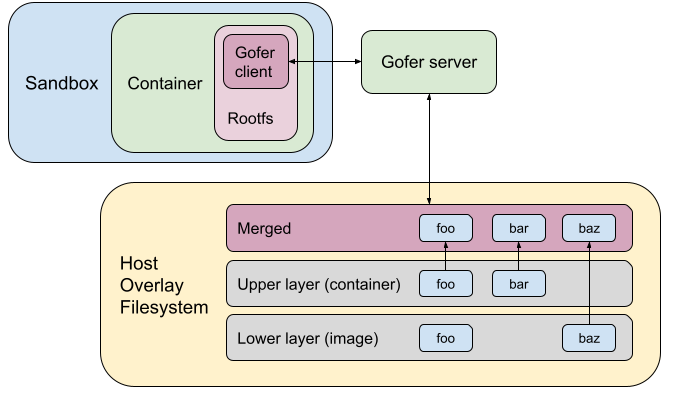
This gofer model (built for remote filesystems) brings very few advantages for the runsc use-case, where all the filesystems served by the gofer (like rootfs and bind mounts) are mounted locally on the host. The gofer directly accesses them using filesystem syscalls.

Linux provides some security primitives to effectively isolate local filesystems. These include, mount namespaces, pivot_root and detached bind mounts1. Directfs is a new filesystem access mode that uses these primitives to expose the container filesystem to the sandbox in a secure manner. The sandbox’s view of the filesystem tree is limited to just the container filesystem. The sandbox process is not given access to anything mounted on the broader host filesystem. Even if the sandbox gets compromised, these mechanisms provide additional barriers to prevent broader system compromise.

Directfs

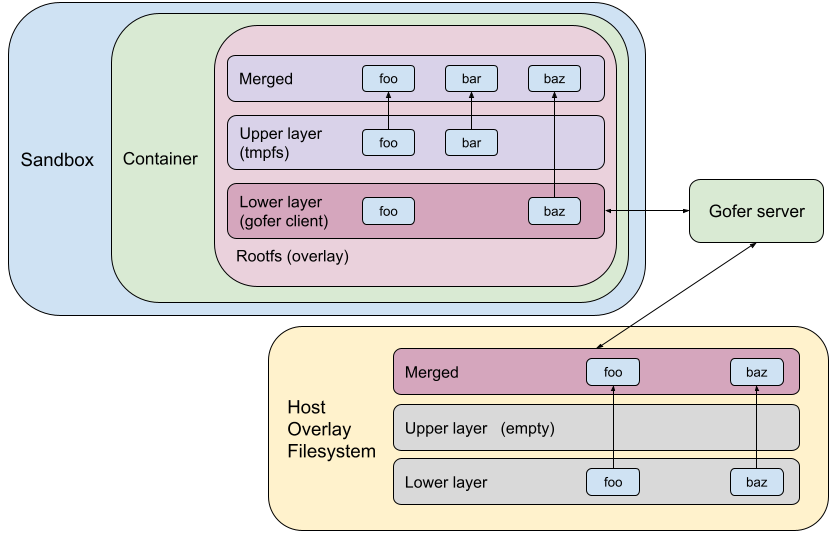
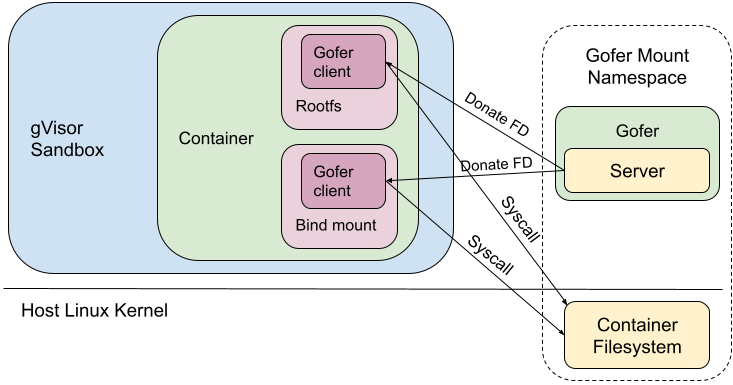
In directfs mode, the gofer still exists as a cooperative process outside the sandbox. As usual, the gofer enters a new mount namespace, sets up appropriate bind mounts to create the container filesystem in a new directory and then pivot_root(2)s into that directory. Similarly, the sandbox process enters new user and mount namespaces and then pivot_root(2)s into an empty directory to ensure it cannot access anything via path traversal. But instead of making RPCs to the gofer to access the container filesystem, the sandbox requests the gofer to provide file descriptors to all the mount points via SCM_RIGHTS messages. The sandbox then directly makes file-descriptor-relative syscalls (e.g. fstatat(2), openat(2), mkdirat(2), etc) to perform filesystem operations.

Sandbox directly accesses container filesystem with directfs

Earlier when the gofer performed all filesystem operations, we could deny all these syscalls in the sandbox process using seccomp. But with directfs enabled, the sandbox process's seccomp filters need to allow the usage of these syscalls. Most notably, the sandbox can now make openat(2) syscalls (which allow path traversal), but with certain restrictions: O_NOFOLLOW is required, no access to procfs and no directory FDs from the host. We also had to give the sandbox the same privileges as the gofer (for example CAP_DAC_OVERRIDE and CAP_DAC_READ_SEARCH), so it can perform the same filesystem operations.

It is noteworthy that only the trusted gofer provides FDs (of the container filesystem) to the sandbox. The sandbox cannot walk backwards (using ‘..’) or follow a malicious symlink to escape out of the container filesystem. In effect, we've decreased our dependence on the syscall filters to catch bad behavior, but correspondingly increased our dependence on Linux's filesystem isolation protections.

Performance

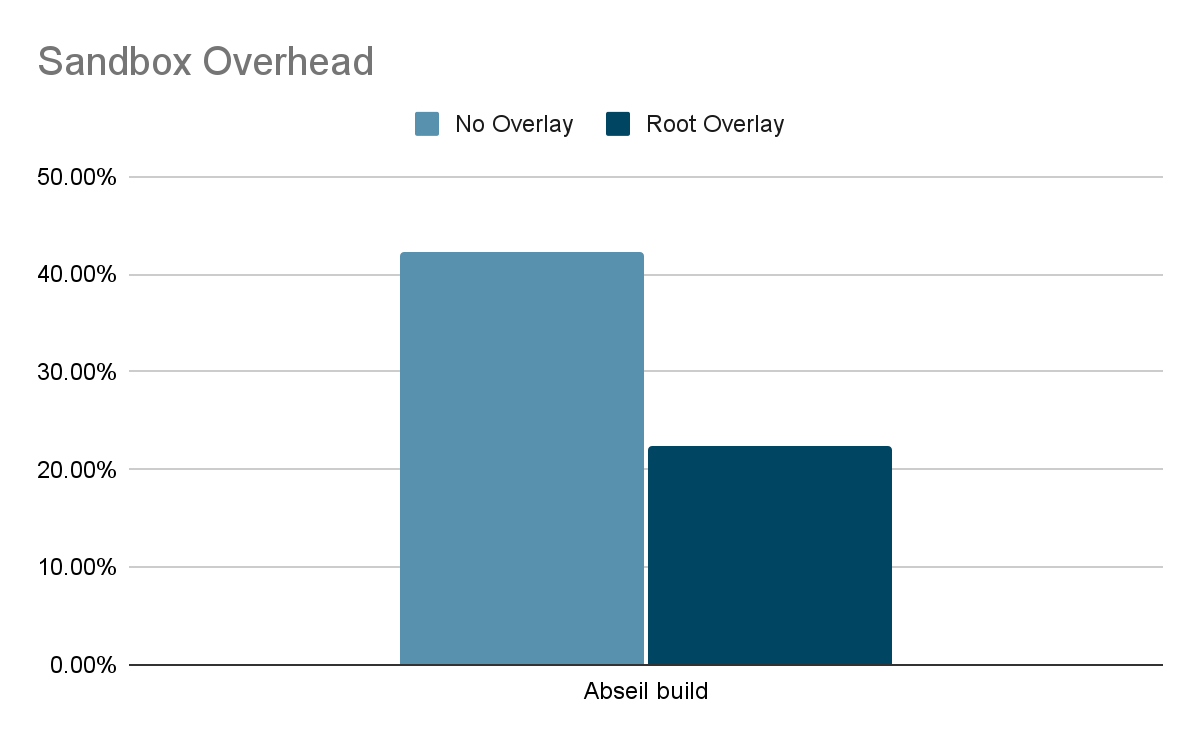
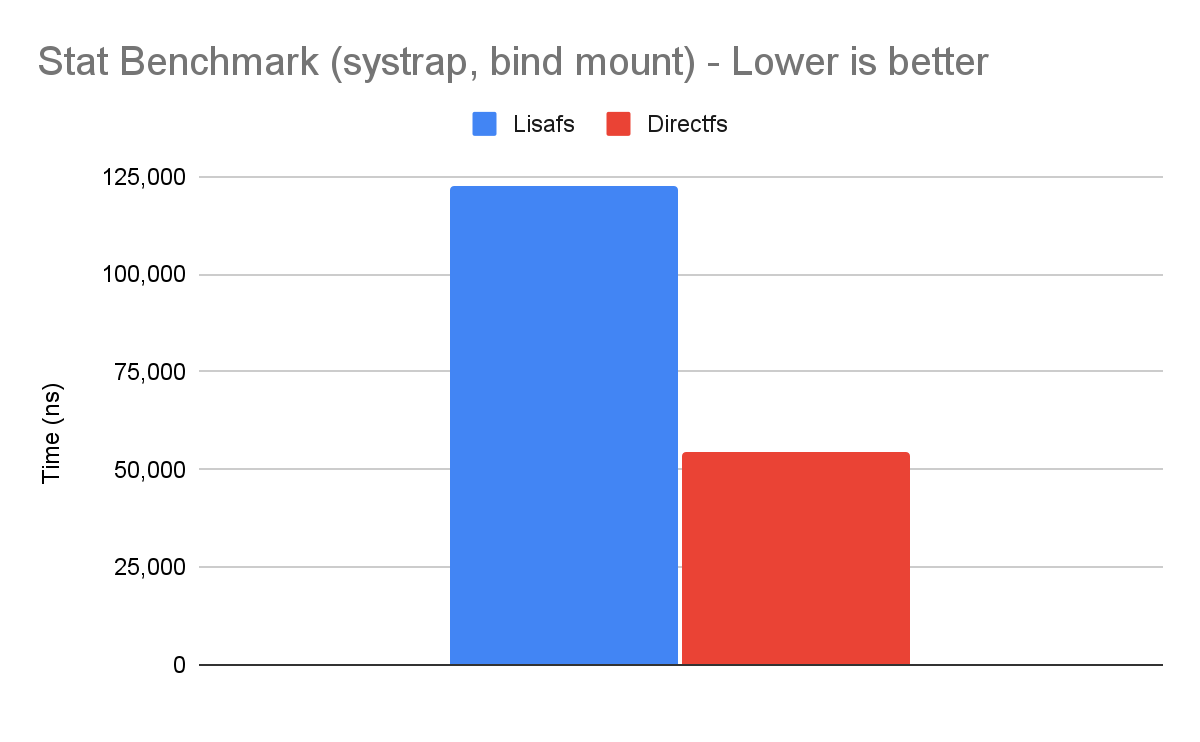
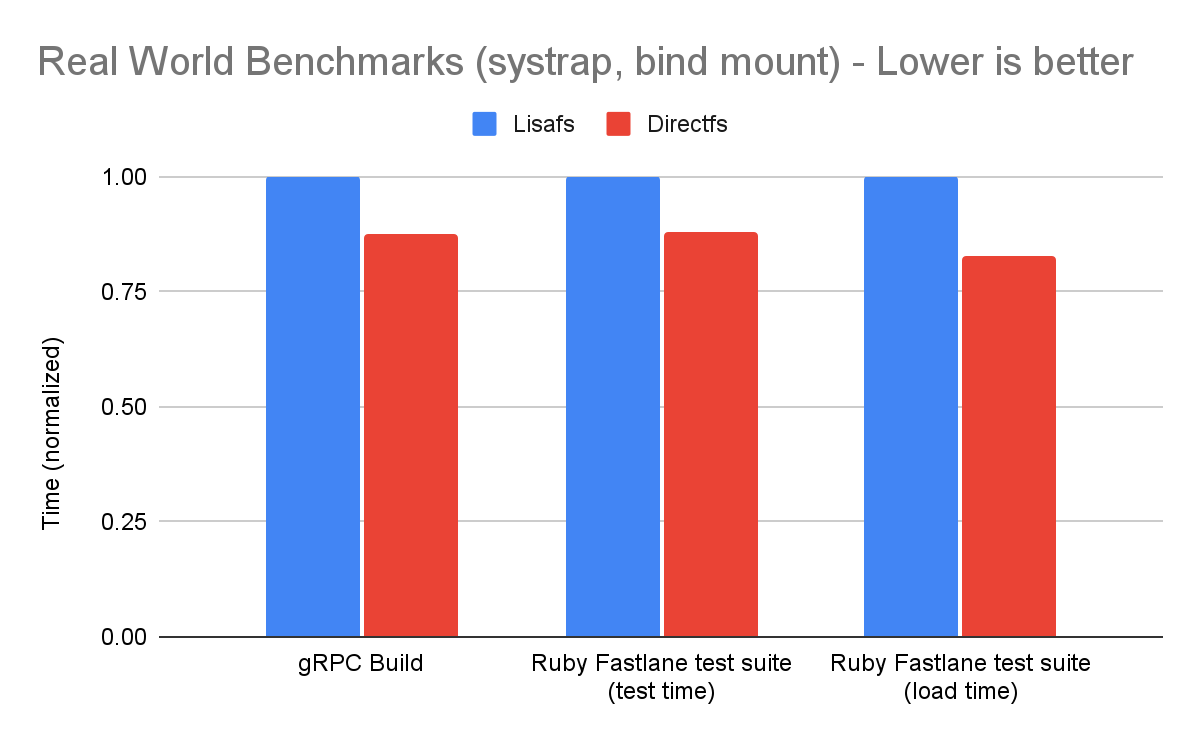
Making RPCs to the gofer for every filesystem operation adds a lot of overhead to runsc. Hence, avoiding gofer round trips significantly improves performance. Let's find out what this means for some of our benchmarks. We will run the benchmarks using our newly released systrap platform on bind mounts (as opposed to rootfs). This would simulate more realistic use cases because bind mounts are extensively used while configuring filesystems in containers. Bind mounts also do not have an overlay (like the rootfs mount), so all operations go through goferfs / directfs mount.

Let's first look at our stat micro-benchmark, which repeatedly calls stat(2) on a file.

Stat benchmark improvement with directfs
The stat(2) syscall is more than 2x faster! However, since this is not representative of real-world applications, we should not extrapolate these results. So let's look at some real-world benchmarks.
Stat benchmark improvement with directfs
We see a 12% reduction in the absolute time to run these workloads and 17% reduction in Ruby load time!

Conclusion

The gofer model in runsc was overly restrictive for accessing host files. We were able to leverage existing filesystem isolation mechanisms in Linux to bypass the gofer without compromising security. Directfs significantly improves performance for certain workloads. This is part of our ongoing efforts to improve gVisor performance. You can learn more about gVisor at gvisor.dev. You can also use gVisor in GKE with GKE Sandbox. Happy sandboxing!


1Detached bind mounts can be created by first creating a bind mount using mount(MS_BIND) and then detaching it from the filesystem tree using umount(MNT_DETACH).


By Ayush Ranjan, Software Engineer – Google

gVisor improves performance with root filesystem overlay

Overview

Container technology is an integral part of modern application ecosystems, making container security an increasingly important topic. Since containers are often used to run untrusted, potentially malicious code it is imperative to secure the host machine from the container.

A container's security depends on its security boundaries, such as user namespaces (which isolate security-related identifiers and attributes), seccomp rules (which restrict the syscalls available), and Linux Security Module configuration. Popular container management products like Docker and Kubernetes relax these and other security boundaries to increase usability, which means that users need additional container security tools to provide a much stronger isolation boundary between the container and the host.

The gVisor open source project, developed by Google, provides an OCI compatible container runtime called runsc. It is used in production at Google to run untrusted workloads securely. Runsc (run sandbox container) is compatible with Docker and Kubernetes and runs containers in a gVisor sandbox. gVisor sandbox has an application kernel, written in Golang, that implements a substantial portion of the Linux system call interface. All application syscalls are intercepted by the sandbox and handled in the user space kernel.

Although gVisor does not introduce large fixed overheads, sandboxing does add some performance overhead to certain workloads. gVisor has made several improvements recently that help containerized applications run faster inside the sandbox, including an improvement to the container root filesystem, which we will dive deeper into.

Costly Filesystem Access in gVisor

gVisor uses a trusted filesystem proxy process (“gofer”) to access the filesystem on behalf of the sandbox. The sandbox process is considered untrusted in gVisor’s security model. As a result, it is not given direct access to the container filesystem and its seccomp filters do not allow filesystem syscalls.

In gVisor, the container rootfs and bind mounts are configured to be served by a gofer.

Gofer mounts configuration in gVisor

When the container needs to perform a filesystem operation, it makes an RPC to the gofer which makes host system calls and services the RPC. This is quite expensive due to:

  1. RPC cost: This is the cost of communicating with the gofer process, including process scheduling, message serialization and IPC system calls.
    • To ameliorate this, gVisor recently developed a purpose-built protocol called LISAFS which is much more efficient than its predecessor.
    • gVisor is also experimenting with giving the sandbox direct access to the container filesystem in a secure manner. This would essentially nullify RPC costs as it avoids the gofer being in the critical path of filesystem operations.
  2. Syscall cost: This is the cost of making the host syscall which actually accesses/modifies the container filesystem. Syscalls are expensive, because they perform context switches into the kernel and back into userspace.
    • To help with this, gVisor heavily caches the filesystem tree in memory. So operations like stat(2) on cached files are serviced quickly. But other operations like mkdir(2) or rename(2) still need to make host syscalls.

Container Root Filesystem

In Docker and Kubernetes, the container’s root filesystem (rootfs) is based on the filesystem packaged with the image. The image’s filesystem is immutable. Any change a container makes to the rootfs is stored separately and is destroyed with the container. This way, the image’s filesystem can be shared efficiently with all containers running the same image. This is different from bind mounts, which allow containers to access the bound host filesystem tree. Changes to bind mounts are always propagated to the host and persist after the container exits.

Docker and Kubernetes both use the overlay filesystem by default to configure container rootfs. Overlayfs mounts are composed of one upper layer and multiple lower layers. The overlay filesystem presents a merged view of all these filesystem layers at its mount location and ensures that lower layers are read-only while all changes are held in the upper layer. The lower layer(s) constitute the “image layer” and the upper layer is the “container layer”. When the container is destroyed, the upper layer mount is destroyed as well, discarding the root filesystem changes the container may have made. Docker’s overlayfs driver documentation has a good explanation.

Rootfs Configuration Before

Let’s consider an example where the image has files foo and baz. The container overwrites foo and creates a new file bar. The diagram below shows how the root filesystem used to be configured in gVisor earlier. We used to go through the gofer and access/mutate the overlaid directory on the host. It also shows the state of the host overlay filesystem.

Rootfs configuration in gVisor earlier

Opportunity! Sandbox Internal Overlay

Given that the upper layer is destroyed with the container and that it is expensive to access/mutate a host filesystem from the sandbox, why keep the upper layer on the host at all? Instead we can move the upper layer into the sandbox.

The idea is to overlay the rootfs using a sandbox-internal overlay mount. We can use a tmpfs upper (container) layer and a read-only lower layer served by the gofer client. Any changes to rootfs would be held in tmpfs (in-memory). Accessing/mutating the upper layer would not require any gofer RPCs or syscalls to the host. This really speeds up filesystem operations on the upper layer, which contains newly created or copied-up files and directories.

Using the same example as above, the following diagram shows what the rootfs configuration would look like using a sandbox-internal overlay.

Rootfs configuration in gVisor with internal overlay

Host-Backed Overlay

The tmpfs mount by default will use the sandbox process’s memory to back all the file data in the mount. This can cause sandbox memory usage to blow up and exhaust the container’s memory limits, so it’s important to store all file data from tmpfs upper layer on disk. We need to have a tmpfs-backing “filestore” on the host filesystem. Using the example from above, this filestore on the host will store file data for foo and bar.

This would essentially flatten all regular files in tmpfs into one host file. The sandbox can mmap(2) the filestore into its address space. This allows it to access and mutate the filestore very efficiently, without incurring gofer RPCs or syscalls overheads.

Self-Backed Overlay

In Kubernetes, you can set local ephemeral storage limits. The upper layer of the rootfs overlay (writeable container layer) on the host contributes towards this limit. The kubelet enforces this limit by traversing the entire upper layerstat(2)-ing all files and summing up their stat.st_blocks*block_size. If we move the upper layer into the sandbox, then the host upper layer is empty and the kubelet will not be able to enforce these limits.

To address this issue, we introduced “self-backed” overlays, which create the filestore in the host upper layer. This way, when the kubelet scans the host upper layer, the filestore will be detected and its stat.st_blocks should be representative of the total file usage in the sandbox-internal upper layer. It is also important to hide this filestore from the containerized application to avoid confusing it. We do so by creating a whiteout in the sandbox-internal upper layer, which blocks this file from appearing in the merged directory.

The following diagram shows what rootfs configuration would finally look like today in gVisor.

Rootfs configuration in gVisor with self-backed internal overlay

Performance Gains

Let’s look at some filesystem-intensive workloads to see how rootfs overlay impacts performance. These benchmarks were run on a gLinux desktop with KVM platform.

Micro Benchmark

Linux Test Project provides a fsstress binary. This program performs a large number of filesystem operations concurrently, creating and modifying a large filesystem tree of all sorts of files. We ran this program on the container's root filesystem. The exact usage was:

sh -c "mkdir /test && time fsstress -d /test -n 500 -p 20 -s 1680153482 -X -l 10"

You can use the -v flag (verbose mode) to see what filesystem operations are being performed.

The results were astounding! Rootfs overlay reduced the time to run this fsstress program from 262.79 seconds to 3.18 seconds! However, note that such microbenchmarks are not representative of real-world applications and we should not extrapolate these results to real-world performance.

Real-world Benchmark

Build jobs are very filesystem intensive workloads. They read a lot of source files, compile and write out binaries and object files. Let’s consider building the abseil-cpp project with bazel. Bazel performs a lot of filesystem operations in rootfs; in bazel’s cache located at ~/.cache/bazel/.

This is representative of the real-world because many other applications also use the container root filesystem as scratch space due to the handy property that it disappears on container exit. To make this more realistic, the abseil-cpp repo was attached to the container using a bind mount, which does not have an overlay.

When measuring performance, we care about reducing the sandboxing overhead and bringing gVisor performance as close as possible to unsandboxed performance. Sandboxing overhead can be calculated using the formula overhead = (s-n)/n where ‘s’ is the amount of time taken to run a workload inside gVisor sandbox and ‘n’ is the time taken to run the same workload natively (unsandboxed). The following graph shows that rootfs overlay halved the sandboxing overhead for abseil build!

The impact of rootfs overlay on sandboxing overhead for abseil build

Conclusion

Rootfs overlay in gVisor substantially improves performance for many filesystem-intensive workloads, so that developers no longer have to make large tradeoffs between performance and security. We recently made this optimization the default in runsc. This is part of our ongoing efforts to improve gVisor performance. You can learn more about gVisor at gvisor.dev. You can also use gVisor in GKE with GKE Sandbox. Happy sandboxing!

An easier way to move your App Engine apps to Cloud Run

Posted by Wesley Chun (@wescpy), Developer Advocate, Google Cloud

Blue header

An easier yet still optional migration

In the previous episode of the Serverless Migration Station video series, developers learned how to containerize their App Engine code for Cloud Run using Docker. While Docker has gained popularity over the past decade, not everyone has containers integrated into their daily development workflow, and some prefer "containerless" solutions but know that containers can be beneficial. Well today's video is just for you, showing how you can still get your apps onto Cloud Run, even If you don't have much experience with Docker, containers, nor Dockerfiles.

App Engine isn't going away as Google has expressed long-term support for legacy runtimes on the platform, so those who prefer source-based deployments can stay where they are so this is an optional migration. Moving to Cloud Run is for those who want to explicitly move to containerization.

Migrating to Cloud Run with Cloud Buildpacks video

So how can apps be containerized without Docker? The answer is buildpacks, an open-source technology that makes it fast and easy for you to create secure, production-ready container images from source code, without a Dockerfile. Google Cloud Buildpacks adheres to the buildpacks open specification and allows users to create images that run on all GCP container platforms: Cloud Run (fully-managed), Anthos, and Google Kubernetes Engine (GKE). If you want to containerize your apps while staying focused on building your solutions and not how to create or maintain Dockerfiles, Cloud Buildpacks is for you.

In the last video, we showed developers how to containerize a Python 2 Cloud NDB app as well as a Python 3 Cloud Datastore app. We targeted those specific implementations because Python 2 users are more likely to be using App Engine's ndb or Cloud NDB to connect with their app's Datastore while Python 3 developers are most likely using Cloud Datastore. Cloud Buildpacks do not support Python 2, so today we're targeting a slightly different audience: Python 2 developers who have migrated from App Engine ndb to Cloud NDB and who have ported their apps to modern Python 3 but now want to containerize them for Cloud Run.

Developers familiar with App Engine know that a default HTTP server is provided by default and started automatically, however if special launch instructions are needed, users can add an entrypoint directive in their app.yaml files, as illustrated below. When those App Engine apps are containerized for Cloud Run, developers must bundle their own server and provide startup instructions, the purpose of the ENTRYPOINT directive in the Dockerfile, also shown below.

Starting your web server with App Engine (app.yaml) and Cloud Run with Docker (Dockerfile) or Buildpacks (Procfile)

Starting your web server with App Engine (app.yaml) and Cloud Run with Docker (Dockerfile) or Buildpacks (Procfile)

In this migration, there is no Dockerfile. While Cloud Buildpacks does the heavy-lifting, determining how to package your app into a container, it still needs to be told how to start your service. This is exactly what a Procfile is for, represented by the last file in the image above. As specified, your web server will be launched in the same way as in app.yaml and the Dockerfile above; these config files are deliberately juxtaposed to expose their similarities.

Other than this swapping of configuration files and the expected lack of a .dockerignore file, the Python 3 Cloud NDB app containerized for Cloud Run is nearly identical to the Python 3 Cloud NDB App Engine app we started with. Cloud Run's build-and-deploy command (gcloud run deploy) will use a Dockerfile if present but otherwise selects Cloud Buildpacks to build and deploy the container image. The user experience is the same, only without the time and challenges required to maintain and debug a Dockerfile.

Get started now

If you're considering containerizing your App Engine apps without having to know much about containers or Docker, we recommend you try this migration on a sample app like ours before considering it for yours. A corresponding codelab leading you step-by-step through this exercise is provided in addition to the video which you can use for guidance.

All migration modules, their videos (when available), codelab tutorials, and source code, can be found in the migration repo. While our content initially focuses on Python users, we hope to one day also cover other legacy runtimes so stay tuned. Containerization may seem foreboding, but the goal is for Cloud Buildpacks and migration resources like this to aid you in your quest to modernize your serverless apps!

Containerizing Google App Engine apps for Cloud Run

Posted by Wesley Chun (@wescpy), Developer Advocate, Google Cloud

Google App Engine header

An optional migration

Serverless Migration Station is a video mini-series from Serverless Expeditions focused on helping developers modernize their applications running on a serverless compute platform from Google Cloud. Previous episodes demonstrated how to migrate away from the older, legacy App Engine (standard environment) services to newer Google Cloud standalone equivalents like Cloud Datastore. Today's product crossover episode differs slightly from that by migrating away from App Engine altogether, containerizing those apps for Cloud Run.

There's little question the industry has been moving towards containerization as an application deployment mechanism over the past decade. However, Docker and use of containers weren't available to early App Engine developers until its flexible environment became available years later. Fast forward to today where developers have many more options to choose from, from an increasingly open Google Cloud. Google has expressed long-term support for App Engine, and users do not need to containerize their apps, so this is an optional migration. It is primarily for those who have decided to add containerization to their application deployment strategy and want to explicitly migrate to Cloud Run.

If you're thinking about app containerization, the video covers some of the key reasons why you would consider it: you're not subject to traditional serverless restrictions like development language or use of binaries (flexibility); if your code, dependencies, and container build & deploy steps haven't changed, you can recreate the same image with confidence (reproducibility); your application can be deployed elsewhere or be rolled back to a previous working image if necessary (reusable); and you have plenty more options on where to host your app (portability).

Migration and containerization

Legacy App Engine services are available through a set of proprietary, bundled APIs. As you can surmise, those services are not available on Cloud Run. So if you want to containerize your app for Cloud Run, it must be "ready to go," meaning it has migrated to either Google Cloud standalone equivalents or other third-party alternatives. For example, in a recent episode, we demonstrated how to migrate from App Engine ndb to Cloud NDB for Datastore access.

While we've recently begun to produce videos for such migrations, developers can already access code samples and codelab tutorials leading them through a variety of migrations. In today's video, we have both Python 2 and 3 sample apps that have divested from legacy services, thus ready to containerize for Cloud Run. Python 2 App Engine apps accessing Datastore are most likely to be using Cloud NDB whereas it would be Cloud Datastore for Python 3 users, so this is the starting point for this migration.

Because we're "only" switching execution platforms, there are no changes at all to the application code itself. This entire migration is completely based on changing the apps' configurations from App Engine to Cloud Run. In particular, App Engine artifacts such as app.yaml, appengine_config.py, and the lib folder are not used in Cloud Run and will be removed. A Dockerfile will be implemented to build your container. Apps with more complex configurations in their app.yaml files will likely need an equivalent service.yaml file for Cloud Run — if so, you'll find this app.yaml to service.yaml conversion tool handy. Following best practices means there'll also be a .dockerignore file.

App Engine and Cloud Functions are sourced-based where Google Cloud automatically provides a default HTTP server like gunicorn. Cloud Run is a bit more "DIY" because users have to provide a container image, meaning bundling our own server. In this case, we'll pick gunicorn explicitly, adding it to the top of the existing requirements.txt required packages file(s), as you can see in the screenshot below. Also illustrated is the Dockerfile where gunicorn is started to serve your app as the final step. The only differences for the Python 2 equivalent Dockerfile are: a) require the Cloud NDB package (google-cloud-ndb) instead of Cloud Datastore, and b) start with a Python 2 base image.

Image of The Python 3 requirements.txt and Dockerfile

The Python 3 requirements.txt and Dockerfile

Next steps

To walk developers through migrations, we always "START" with a working app then make the necessary updates that culminate in a working "FINISH" app. For this migration, the Python 2 sample app STARTs with the Module 2a code and FINISHes with the Module 4a code. Similarly, the Python 3 app STARTs with the Module 3b code and FINISHes with the Module 4b code. This way, if something goes wrong during your migration, you can always rollback to START, or compare your solution with our FINISH. If you are considering this migration for your own applications, we recommend you try it on a sample app like ours before considering it for yours. A corresponding codelab leading you step-by-step through this exercise is provided in addition to the video which you can use for guidance.

All migration modules, their videos (when published), codelab tutorials, START and FINISH code, etc., can be found in the migration repo. We hope to also one day cover other legacy runtimes like Java 8 so stay tuned. We'll continue with our journey from App Engine to Cloud Run ahead in Module 5 but will do so without explicit knowledge of containers, Docker, or Dockerfiles. Modernizing your development workflow to using containers and best practices like crafting a CI/CD pipeline isn't always straightforward; we hope content like this helps you progress in that direction!

Container Structure Tests: Unit Tests for Docker Images

Usage of containers in software applications is on the rise, and with their increasing usage in production comes a need for robust testing and validation. Containers provide great testing environments, but actually validating the structure of the containers themselves can be tricky. The Docker toolchain provides us with easy ways to interact with the container images themselves, but no real way of verifying their contents. What if we want to ensure a set of commands runs successfully inside of our container, or check that certain files are in the correct place with the correct contents, before shipping?

The Container Tools team at Google is happy to announce the release of the Container Structure Test framework. This framework provides a convenient and powerful way to verify the contents and structure of your containers. We’ve been using this framework at Google to test all of our team’s released containers for over a year now, and we’re excited to finally share it with the public.

The framework supports four types of tests:
  • Command Tests - to run a command inside your container image and verify the output or error it produces
  • File Existence Tests - to check the existence of a file in a specific location in the image’s filesystem
  • File Content Tests - to check the contents and metadata of a file in the filesystem
  • A unique Metadata Test - to verify configuration and metadata of the container itself
Users can specify test configurations through YAML or JSON. This provides a way to abstract away the test configuration from the implementation of the tests, eliminating the need for hacky bash scripting or other solutions to test container images.

Command Tests

The Command Tests give the user a way to specify a set of commands to run inside of a container, and verify that the output, error, and exit code were as expected. An example configuration looks like this:
globalEnvVars:
- key: "VIRTUAL_ENV"
value: "/env"
- key: "PATH"
value: "/env/bin:$PATH"

commandTests:

# check that the python binary is in the correct location
- name: "python installation"
command: "which"
args: ["python"]
expectedOutput: ["/usr/bin/python\n"]

# setup a virtualenv, and verify the correct python binary is run
- name: "python in virtualenv"
setup: [["virtualenv", "/env"]]
command: "which"
args: ["python"]
expectedOutput: ["/env/bin/python\n"]

# setup a virtualenv, install gunicorn, and verify the installation
- name: "gunicorn flask"
setup: [["virtualenv", "/env"],
["pip", "install", "gunicorn", "flask"]]
command: "which"
args: ["gunicorn"]
expectedOutput: ["/env/bin/gunicorn"]
Regexes are used to match the expected output, and error, of each command (or excluded output/error if you want to make sure something didn’t happen). Additionally, setup and teardown commands can be run with each individual test, and environment variables can be specified to be set for each individual test, or globally for the entire test run (shown in the example).

File Tests

File Tests allow users to verify the contents of an image’s filesystem. We can check for existence of files, as well as examine the contents of individual files or directories. This can be particularly useful for ensuring that scripts, config files, or other runtime artifacts are in the correct places before shipping and running a container.
fileExistenceTests:

# check that the apt-packages text file exists and has the correct permissions
- name: 'apt-packages'
path: '/resources/apt-packages.txt'
shouldExist: true
permissions: '-rw-rw-r--'
Expected permissions and file mode can be specified for each file path in the form of a standard Unix permission string. As with the Command Tests’ “Excluded Output/Error,” a boolean can be provided to these tests to tell the framework to be sure a file is not present in a filesystem.

Additionally, the File Content Tests verify the contents of files and directories in the filesystem. This can be useful for checking package or repository versions, or config file contents among other things. Following the pattern of the previous tests, regexes are used to specify the expected or excluded contents.
fileContentTests:

# check that the default apt repository is set correctly
- name: 'apt sources'
path: '/etc/apt/sources.list'
expectedContents: ['.*httpredir\.debian\.org/debian jessie main.*']

# check that the retry policy is correctly specified
- name: 'retry policy'
path: '/etc/apt/apt.conf.d/apt-retry'
expectedContents: ['Acquire::Retries 3;']

Metadata Test

Unlike the previous tests which all allow any number to be specified, the Metadata test is a singleton test which verifies a container’s configuration. This is useful for making sure things specified in the Dockerfile (e.g. entrypoint, exposed ports, mounted volumes, etc.) are manifested correctly in a built container.
metadataTest:
env:
- key: "VIRTUAL_ENV"
value: "/env"
exposedPorts: ["8080", "2345"]
volumes: ["/test"]
entrypoint: []
cmd: ["/bin/bash"]
workdir: ["/app"]

Tiny Images

One interesting case that we’ve put focus on supporting is “tiny images.” We think keeping container sizes small is important, and sometimes the bare minimum in a container image might even exclude a shell. Users might be used to running something like:
`docker run -d "cat /etc/apt/sources.list && grep -rn 'httpredir.debian.org' image"`
… but this breaks without a working shell in a container. With the structure test framework, we convert images to in-memory filesystem representations, so no shell is needed to examine the contents of an image!

Dockerless Test Runs

At their core, Docker images are just bundles of tarballs. One of the major use cases for these tests is running in CI systems, and often we can't guarantee that we'll have access to a working Docker daemon in these environments. To address this, we created a tar-based test driver, which can handle the execution of all file-related tests through simple tar manipulation. Command tests are currently not supported in this mode, since running commands in a container requires a container runtime.

This means that using the tar driver, we can retrieve images from a remote registry, convert them into filesystems on disk, and verify file contents and metadata all without a working Docker daemon on the host! Our container-diff library is leveraged here to do all the image processing; see our previous blog post for more information.
structure-test -test.v -driver tar -image gcr.io/google-appengine/python:latest structure-test-examples/python/python_file_tests.yaml

Running in Bazel

Structure tests can also be run natively through Bazel, using the “container_test” rule. Bazel provides convenient build rules for building Docker images, so the structure tests can be run as part of a build to ensure any new built images are up to snuff before being released. Check out this example repo for a quick demonstration of how to incorporate these tests into a Bazel build.

We think this framework can be useful for anyone building and deploying their own containers in the wild, and hope that it can promote their usage everywhere through increasing the robustness of containers. For more detailed information on the test specifications, check out the documentation in our GitHub repository.

By Nick Kubala, Container Tools team

Introducing container-diff, a tool for quickly comparing container images

Originally posted by Nick Kubala, Colette Torres, and Abby Tisdale from the Container Tools team, on the Google Open Source Blog

The Google Container Tools team originally built container-diff, a new project to help uncover differences between container images, to aid our own development with containers. We think it can be useful for anyone building containerized software, so we're excited to release it as open source to the development community.

Containers and the Dockerfile format help make customization of an application's runtime environment more approachable and easier to understand. While this is a great advantage of using containers in software development, a major drawback is that it can be hard to visualize what changes in a container image will result from a change in the respective Dockerfile. This can lead to bloated images and make tracking down issues difficult.

Imagine a scenario where a developer is working on an application, built on a runtime image maintained by a third-party. During development someone releases a new version of that base image with updated system packages. The developer rebuilds their application and picks up the latest version of the base image, and suddenly their application stops working; it depended on a previous version of one of the installed system packages, but which one? What version was it on before? With no currently existing tool to easily determine what changed between the two base image versions, this totally stalls development until the developer can track down the package version incompatibility.

Introducing container-diff

container-diff helps users investigate image changes by computing semantic diffs between images. What this means is that container-diff figures out on a low-level what data changed, and then combines this with an understanding of package manager information to output this information in a format that's actually readable to users. The tool can find differences in system packages, language-level packages, and files in a container image.

Users can specify images in several formats - from local Docker daemon (using the prefix `daemon://` on the image path), a remote registry (using the prefix `remote://`), or a file in the .tar in the format exported by "docker save" command. You can also combine these formats to compute the diff between a local version of an image and a remote version. This can be useful when experimenting with new builds of an image that you might not be quite ready to push yet. container-diff supports image tarballs and the registry protocol natively, enabling it to run in environments without a Docker daemon.

Examples and Use Cases

Here is a basic Dockerfile that installs Python inside our Debian base image. Running container-diff on the base image and the new one with Python, users can see all the apt packages that were installed as dependencies of Python.

➜  debian_with_python cat Dockerfile
FROM gcr.io/google-appengine/debian8
RUN apt-get update && apt-get install -qq --force-yes python
➜ debian_with_python docker build -q -t debian_with_python .
sha256:be2cd1ae6695635c7041be252589b73d1539a858c33b2814a66fe8fa4b048655
➜ debian_with_python container-diff diff gcr.io/google-appengine/debian8:latest daemon://debian_with_python:latest

-----Apt-----
Packages found only in gcr.io/google-appengine/debian8:latest: None

Packages found only in debian_with_python:latest:
NAME VERSION SIZE
-file 1:5.22 15-2+deb8u3 76K
-libexpat1 2.1.0-6 deb8u4 386K
-libffi6 3.1-2 deb8u1 43K
-libmagic1 1:5.22 15-2+deb8u3 3.1M
-libpython-stdlib 2.7.9-1 54K
-libpython2.7-minimal 2.7.9-2 deb8u1 2.6M
-libpython2.7-stdlib 2.7.9-2 deb8u1 8.2M
-libsqlite3-0 3.8.7.1-1 deb8u2 877K
-mime-support 3.58 146K
-python 2.7.9-1 680K
-python-minimal 2.7.9-1 163K
-python2.7 2.7.9-2 deb8u1 360K
-python2.7-minimal 2.7.9-2 deb8u1 3.7M

Version differences: None

And below is a Dockerfile that inherits from our Python base runtime image, and then installs the mock and six packages inside of it. Running container-diff with the pip differ, users can see all the Python packages that have either been installed or changed as a result of this:

➜  python_upgrade cat Dockerfile
FROM gcr.io/google-appengine/python
RUN pip install -U six
➜ python_upgrade docker build -q -t python_upgrade .
sha256:7631573c1bf43727d7505709493151d3df8f98c843542ed7b299f159aec6f91f
➜ python_upgrade container-diff diff gcr.io/google-appengine/python:latest daemon://python_upgrade:latest --types=pip

-----Pip-----

Packages found only in gcr.io/google-appengine/python:latest: None

Packages found only in python_upgrade:latest:
NAME VERSION SIZE
-funcsigs 1.0.2 51.4K
-mock 2.0.0 531.2K
-pbr 3.1.1 471.1K

Version differences:
PACKAGE IMAGE1 (gcr.io/google-appengine/python:latest) IMAGE2 (python_upgrade:latest)
-six 1.8.0, 26.7K

This can be especially useful when it's unclear which packages might have been installed or changed incidentally as a result of dependency management of Python modules.

These are just a few examples. The tool currently has support for Python and Node.js packages installed via pip and npm, respectively, as well as comparison of image filesystems and Docker history. In the future, we'd like to see support added for additional runtime and language differs, including Java, Go, and Ruby. External contributions are welcome! For more information on contributing to container-diff, see this how-to guide.

Now that we've seen container-diff compare two images in action, it's easy to imagine how the tool may be integrated into larger workflows to aid in development:

  • Changelog generation: Given container-diff's capacity to facilitate investigation of filesystem and package modifications, it can do most of the heavy lifting in discerning changes for automatic changelog generation for new releases of an image.
  • Continuous integration: As part of a CI system, users can leverage container-diff to catch potentially breaking filesystem changes resulting from a Dockerfile change in their builds.

container-diff's default output mode is "human-readable," but also supports output to JSON, allowing for easy automated parsing and processing by users.

Single Image Analysis

In addition to comparing two images, container-diff has the ability to analyze a single image on its own. This can enable users to get a quick glance at information about an image, such as its system and language-level package installations and filesystem contents.

Let's take a look at our Debian base image again. We can use the tool to easily view a list of all packages installed in the image, along with each one's installed version and size:

➜  Development container-diff analyze gcr.io/google-appengine/debian8:latest

-----Apt-----
Packages found in gcr.io/google-appengine/debian8:latest:
NAME VERSION SIZE
-acl 2.2.52-2 258K
-adduser 3.113 nmu3 1M
-apt 1.0.9.8.4 3.1M
-base-files 8 deb8u9 413K
-base-passwd 3.5.37 185K
-bash 4.3-11 deb8u1 4.9M
-bsdutils 1:2.25.2-6 181K
-ca-certificates 20141019 deb8u3 367K
-coreutils 8.23-4 13.9M
-dash 0.5.7-4 b1 191K
-debconf 1.5.56 deb8u1 614K
-debconf-i18n 1.5.56 deb8u1 1.1M
-debian-archive-keyring 2017.5~deb8u1 137K

We could use this to verify compatibility with an application we're building, or maybe sort the packages by size in another one of our images and see which ones are taking up the most space.

For more information about this tool as well as a breakdown with examples, uses, and inner workings of the tool, please take a look at documentation on our GitHub page. Happy diffing!

Special thanks to Colette Torres and Abby Tisdale, our software engineering interns who helped build the tool from the ground up.

Introducing container-diff, a tool for quickly comparing container images

The Google Container Tools team originally built container-diff, a new project to help uncover differences between container images, to aid our own development with containers. We think it can be useful for anyone building containerized software, so we’re excited to release it as open source to the development community.

Containers and the Dockerfile format help make customization of an application’s runtime environment more approachable and easier to understand. While this is a great advantage of using containers in software development, a major drawback is that it can be hard to visualize what changes in a container image will result from a change in the respective Dockerfile. This can lead to bloated images and make tracking down issues difficult.

Imagine a scenario where a developer is working on an application, built on a runtime image maintained by a third-party. During development someone releases a new version of that base image with updated system packages. The developer rebuilds their application and picks up the latest version of the base image, and suddenly their application stops working; it depended on a previous version of one of the installed system packages, but which one? What version was it on before? With no currently existing tool to easily determine what changed between the two base image versions, this totally stalls development until the developer can track down the package version incompatibility.

Introducing container-diff

container-diff helps users investigate image changes by computing semantic diffs between images. What this means is that container-diff figures out on a low-level what data changed, and then combines this with an understanding of package manager information to output this information in a format that’s actually readable to users. The tool can find differences in system packages, language-level packages, and files in a container image.

Users can specify images in several formats - from local Docker daemon (using the prefix `daemon://` on the image path), a remote registry (using the prefix `remote://`), or a file in the .tar in the format exported by "docker save" command. You can also combine these formats to compute the diff between a local version of an image and a remote version. This can be useful when experimenting with new builds of an image that you might not be quite ready to push yet. container-diff supports image tarballs and the registry protocol natively, enabling it to run in environments without a Docker daemon.

Examples and Use Cases

Here is a basic Dockerfile that installs Python inside our Debian base image. Running container-diff on the base image and the new one with Python, users can see all the apt packages that were installed as dependencies of Python.


And below is a Dockerfile that inherits from our Python base runtime image, and then installs the mock and six packages inside of it. Running container-diff with the pip differ, users can see all the Python packages that have either been installed or changed as a result of this:


This can be especially useful when it’s unclear which packages might have been installed or changed incidentally as a result of dependency management of Python modules.

These are just a few examples. The tool currently has support for Python and Node.js packages installed via pip and npm, respectively, as well as comparison of image filesystems and Docker history. In the future, we’d like to see support added for additional runtime and language differs, including Java, Go, and Ruby. External contributions are welcome! For more information on contributing to container-diff, see this how-to guide.

Now that we’ve seen container-diff compare two images in action, it’s easy to imagine how the tool may be integrated into larger workflows to aid in development:
  • Changelog generation: Given container-diff’s capacity to facilitate investigation of filesystem and package modifications, it can do most of the heavy lifting in discerning changes for automatic changelog generation for new releases of an image.
  • Continuous integration: As part of a CI system, users can leverage container-diff to catch potentially breaking filesystem changes resulting from a Dockerfile change in their builds.
container-diff’s default output mode is “human-readable,” but also supports output to JSON, allowing for easy automated parsing and processing by users.

Single Image Analysis

In addition to comparing two images, container-diff has the ability to analyze a single image on its own. This can enable users to get a quick glance at information about an image, such as its system and language-level package installations and filesystem contents.

Let’s take a look at our Debian base image again. We can use the tool to easily view a list of all packages installed in the image, along with each one’s installed version and size:


We could use this to verify compatibility with an application we’re building, or maybe sort the packages by size in another one of our images and see which ones are taking up the most space.

For more information about this tool as well as a breakdown with examples, uses, and inner workings of the tool, please take a look at documentation on our GitHub page. Happy diffing!

Special thanks to Colette Torres and Abby Tisdale, our software engineering interns who helped build the tool from the ground up.

By Nick Kubala, Container Tools team


Docker + Dataflow = happier workflows

When I first saw the Google Cloud Dataflow monitoring UI -- with its visual flow execution graph that updates as your job runs, and convenient links to the log messages -- the idea came to me. What if I could take that UI, and use it for something it was never built for? Could it be connected with open source projects aimed at promoting reproducible scientific analysis, like Common Workflow Language (CWL) or Workflow Definition Language (WDL)?
Screenshot of a Dockerflow workflow for DNA sequence analysis.

In scientific computing, it’s really common to submit jobs to a local high-performance computing (HPC) cluster. There are tools to do that in the cloud, like Elasticluster and Starcluster. They replicate the local way of doing things, which means they require a bunch of infrastructure setup and management that the university IT department would otherwise do. Even after you’re set up, you still have to ssh into the cluster to do anything. And then there are a million different choices for workflow managers, each unsatisfactory in its own special way.

By day, I’m a product manager. I hadn’t done any serious coding in a few years. But I figured it shouldn’t be that hard to create a proof-of-concept, just to show that the Apache Beam API that Dataflow implements can be used for running scientific workflows. Now, Dataflow was created for a different purpose, namely, to support scalable data-parallel processing, like transforming giant data sets, or computing summary statistics, or indexing web pages. To use Dataflow for scientific workflows would require wrapping up shell steps that launch VMs, run some code, and shuttle data back and forth from an object store. It should be easy, right?

It wasn’t so bad. Over the weekend, I downloaded the Dataflow SDK, ran the wordcount examples, and started modifying. I had a “Hello, world” proof-of-concept in a day.

To really run scientific workflows would require more, of course. Varying VM shapes, a way to pass parameters from one step to the next, graph definition, scattering and gathering, retries. So I shifted into prototyping mode.

I created a new GitHub project called Dockerflow. With Dockerflow, workflows can be defined in YAML files. They can also be written in pretty compact Java code. You can run a batch of workflows at once by providing a CSV file with one row per workflow to define the parameters.

Dataflow and Docker complement each other nicely:

  • Dataflow provides a fully managed service with a nice monitoring interface, retries,  graph optimization and other niceties.
  • Docker provides portability of the tools themselves, and there's a large library of packaged tools already available as Docker images.

While Dockerflow supports a simple YAML workflow definition, a similar approach could be taken to implement a runner for one of the open standards like CWL or WDL.

To get a sense of working with Dockerflow, here’s “Hello, World” written in YAML:

defn:
  name: HelloWorkflow
steps:
- defn:
    name: Hello
    inputParameters:
      name: message
      defaultValue: Hello, World!
    docker:
      imageName: ubuntu
      cmd: echo $message

And here’s the same example written in Java:

public class HelloWorkflow implements WorkflowDefn {
  @Override
  public Workflow createWorkflow(String[] args) throws IOException {
    Task hello =
        TaskBuilder.named("Hello").input("message", “Hello, World!”).docker(“ubuntu”).script("echo $message").build();
    return TaskBuilder.named("HelloWorkflow").steps(hello).args(args).build();
  }
}

Dockerflow is just a prototype at this stage, though it can run real workflows and includes many nice features, like dry runs, resuming failed runs from mid-workflow, and, of course, the nice UI. It uses Cloud Dataflow in a way that was never intended -- to run scientific batch workflows rather than large-scale data-parallel workloads. I wish I’d written it in Python rather than Java. The Dataflow Python SDK wasn’t quite as mature when I started.

Which is all to say, it’s been a great 20% project, and the future really depends on whether it solves a problem people have, and if others are interested in improving on it. We welcome your contributions and comments! How do you run and monitor scientific workflows today?

By Jonathan Bingham, Google Genomics and Verily Life Sciences