Tag Archives: GKE

Kubernetes 1.30 is now available in GKE in record time

Kubernetes 1.30 is now available in the Google Kubernetes Engine (GKE) Rapid Channel less than 20 days after the OSS release! For more information about the content of Kubernetes 1.30, read the Kubernetes 1.30 Release Notes and the specific GKE 1.30 Release Notes.


Control Plane Improvements

We're excited to announce that ValidatingAdmissionPolicy graduates to GA in 1.30. This is an exciting feature that enables many admission webhooks to be replaced with policies defined using the Common Expression Language (CEL) and evaluated directly in the kube-apiserver. This feature benefits both extension authors and cluster administrators by dramatically simplifying the development and operation of admission extensions. Many existing webhooks may be migrated to validating admission policies. For webhooks not ready or able to migrate, Match Conditions may be added to webhook configurations using CEL rules to pre-filter requests to reduce webhooks invocations.

Validation Ratcheting makes CustomResourceDefinitions even safer and easier to manage. Prior to Kubernetes 1.30, when updating a custom resource, validation was required to pass for all fields, even fields not changed by the update. Now, with this feature, only fields changed in the custom resource by an update request must pass validation. This limits validation failures on update to the changed portion of the object, and reduces the risk of controllers getting stuck when a CustomResourceDefinition schema is changed, either accidentally or as part of an effort to increase the strictness of validation.

Aggregated Discovery graduates to GA in 1.30, dramatically improving the performance of clients, particularly kubectl, when fetching the API information needed for many common operations. Aggregated discovery reduces the fetch to a single request and allows caches to be kept up-to-date by offering ETags that clients can use to efficiently poll the server for changes.


Data Plane Improvements

Dynamic Resource Allocation (DRA) is an alpha Kubernetes feature added in 1.26 that enables flexibility in configuring, selecting, and allocating specialized devices for pods. Feedback from SIG Scheduling and SIG Autoscaling revealed that the design needed revisions to reduce scheduling latency and fragility, and to support cluster autoscaling. In 1.30, the community introduced a new alpha design, DRA Structured Parameters, which takes the first step towards these goals. This is still an alpha feature with a lot of changes expected in upcoming releases. The newly formed WG Device Management has a charter to improve device support in Kubernetes - with a focus on GPUs and similar hardware - and DRA is a key component of that support. Expect further enhancements to the design in another alpha in 1.31. The working group has a goal of releasing some aspects to beta in 1.32.


Kubernetes continues the effort of eliminating perma-beta features: functionality that has long been used in production, but still wasn’t marked as generally available. With this release, AppArmor support got some attention and got closer to the final being marked as GA.

There are also quality of life improvements in Kubernetes Data Plane. Many of them will be only noticeable for system administrators and not particularly helpful for GKE users. This release, however, a notable Sleep Action KEP entered beta stage and is available on GKE. It will now be easier to use slim images while allowing graceful connections draining, specifically for some flavors of nginx images.

Acknowledgements

We want to thank all the Googlers that provide their time, passion, talent and leadership to keep making Kubernetes the best container orchestration platform. From the features mentioned in this blog, we would like to mention especially: Googlers Cici Huang, Joe Betz, Jiahui Feng, Alex Zielenski, Jeffrey Ying, John Belamaric, Tim Hockin, Aldo Culquicondor, Jordan Liggitt, Kuba Tużnik, Sergey Kanzhelev, and Tim Allclair.

Posted by Federico Bongiovanni – Google Kubernetes Engine

Kubernetes 1.29 is available in the Regular channel of GKE

Kubernetes 1.29 is now available in the GKE Regular Channel since January 26th, and was available in the Rapid Channel January 11th, less than 30 days after the OSS release! For more information about the content of Kubernetes 1.29, read the Kubernetes 1.29 Release Notes.

New Features

Using CEL for Validating Admission Policy

Validating admission policies offer a declarative, in-process alternative to validating admission webhooks.

Validating admission policies use the Common Expression Language (CEL) to declare the validation rules of a policy. Validation admission policies are highly configurable, enabling policy authors to define policies that can be parameterized and scoped to resources as needed by cluster administrators. [source]

Validating Admission Policy graduates to beta in 1.29. We are especially excited about the work that Googlers Cici Huang, Joe Betz, and Jiahui Feng have led in this release to get to the beta milestone. As we move toward v1, we are actively working to ensure scalability and would appreciate any end-user feedback. [public doc here for those interested]

The beta of ValidatingAdmissionPolicy feature can be opted into by enabling the beta APIs.

InitContainers as a Sidecar

InitContainers can now be configured as sidecar containers and kept running alongside normal containers in a Pod. This is only supported by nodes running version 1.29 or later, so ensure all nodes in a cluster are at version 1.29 or later before using this feature in Pods. The feature was long awaited. This is evident by the fact that Istio has already widely tested it and the Istio community working hard to make sure that the enablement of it can be done early with minimal disruption for the clusters with older nodes. You can participate in the discussion here.

A big driver to deliver the feature is the growing number of AI/ML workloads which are often represented by Pods running to completion. Thos Pods need infrastructure sidecars - Istio and GCSFuse are examples of it, and Google recognizes this trend.

Implementation of sidecar containers is and continues to be the community effort. We are proud to highlight that Googler Sergey Kanzhelev is driving it via the Sidecar working group, and it was a great effort of many other Googlers to make sure this KEP landed so fast. John Howard made sure the early versions of implementation were tested with Istio, Wojciech Tyczyński made sure the safe rollout vie production readiness review, Tim Hockin spent many hours in API review of the feature, and Clayton Coleman gave advice and helped with code reviews.

New APIs

API Priority and Fairness/Flow Control

We are super excited to share that API Priority and Fairness graduated to Stable V1 / GA in 1.29! Controlling the behavior of the Kubernetes API server in an overload situation is a key task for cluster administrators, and this is what APF addresses. This ambitious project was initiated by Googler and founding API Machinery SIG lead Daniel Smith, and expanded to become a community-wide effort. Special thanks to Googler Wojciech Tyczyński and API Machinery members Mike Spreitzer from IBM and Abu Kashem from RedHat, for landing this critical feature in Kubernetes 1.29 (more details in the Kubernetes publication). In Google GKE we tested and utilized it early. In fact, any version above 1.26.4 is setting higher kubelet QPS values trusting the API server to handle it gracefully.

Deprecations and Removals

  • The previously deprecated v1beta2 Priority and Fairness APIs are no longer served in 1.29, so update usage to v1beta3 before upgrading to 1.29.
  • With the API Priority and Fairness graduation to v1, the v1beta3 Priority and Fairness APIs are newly deprecated in 1.29, and will no longer be served in 1.32.
  • In the Node API, take a look at the changes to the status.kubeProxyVersion field, which will not be populated starting in v1.33. The field is currently populated with the kubelet version, not the kube-proxy version, and might not accurately reflect the kube-proxy version in use. For more information, see KEP-4004.
  • 1.29 removed support for the insecure SHA1 algorithm. To prevent impact on your clusters, you must replace incompatible certificates of webhook servers and extension API servers before upgrading your clusters to version 1.29.
    • GKE will not auto-upgrade clusters with webhook backends using incompatible certificates to 1.29 until you replace the certificates or until version 1.28 reaches end of life. For more information refer to the official GKE documentation.
  • The Ceph CephFS (kubernetes.io/cephfs) and RBD (kubernetes.io/rbd) volume plugins are deprecated since 1.28 and will be removed in a future release

Shoutout to the Production Readiness Review (PRR) team

For each new Kubernetes Release, there is a dedicated sub group of SIG Architecture, composed of very senior contributors in the Kubernetes Community, that regularly conducts Production Readiness reviews for each new release, going through each feature.

  • OSS Production Readiness Reviews (PRR) reduce toil for all the different Cloud Providers, by shifting the effort onto OSS developers.
  • OSS Production Readiness Reviews surface production safety, observability, and scalability issues with OSS features at design time, when it is still possible to affect the outcomes.
  • By ensuring feature gates, solid enable → disable → enable testing, and attention to upgrade and rollout considerations, OSS Production Readiness Reviews enable rapid mitigation of failures in new features.

As part of this group, we want to thank Googlers John Belamaric and Wojciech Tyczyński for doing this remarkable, heavy lifting on non shiny, and often invisible work. Additionally, we’d like to congratulate Googler Joe Betz who recently graduated as a new PRR reviewer, after shadowing during all 2023 the process.

By Jordan Liggitt, Jago Macleod, Sergey Kanzhelev, and Federico Bongiovanni – Google Kubernetes Kernel team

Gateway API Graduates to Beta

For many years, Kubernetes users have wanted more advanced routing capabilities to be configurable in a Kubernetes API. With Google leadership, Gateway API has been developed to dramatically increase the number of features available. This API enables many new features in Kubernetes, including traffic splitting, header modification, and forwarding traffic to backends in different namespaces, just to name a few.
Since the project was originally proposed, Googlers have helped lead the open source efforts. Two of the top contributors to the project are from Google, while more than 10 engineers from Google have contributed to the API.

This week, the API has graduated from alpha to beta. This marks a significant milestone in the API and reflects new-found stability. There are now over a dozen implementations of the API and many are passing a comprehensive set of conformance tests. This ensures that users will have a consistent experience when using this API, regardless of environment or underlying implementation.

A Simple Example

To highlight some of the new features this API enables, it may help to walk through an example. We’ll start with a Gateway:

apiVersion: gateway.networking.k8s.io/v1beta1

kind: Gateway

metadata:

  name: store-xlb

spec:

  gatewayClassName: gke-l7-gxlb

  listeners:  

  - name: http

    protocol: HTTP

    port: 80

This Gateway uses the gke-l7-gxlb Gateway Class, which means a new external load balancer will be provisioned to serve this Gateway. Of course, we still need to tell the load balancer where to send traffic. We’ll use an HTTPRoute for this:

apiVersion: gateway.networking.k8s.io/v1beta1

kind: HTTPRoute

metadata:

  name: store

spec:

  parentRefs:

  - name: store-xlb

  rules:

  - matches:

    - path:

        type: PathPrefix

        value: /

    backendRefs:

    - name: store-svc

      port: 3080

      weight: 9

    - name: store-canary-svc

      port: 3080

      weight: 1

This simple HTTPRoute tells the load balancer to route traffic to one of the “store-svc” or “store-canary-svc” on port 3080. We’re using weights to do some basic traffic splitting here. That means that approximately 10% of requests will be routed to our canary Service.

Now, imagine that you want to provide a way for users to opt in or out of the canary service. To do that, we’ll add an additional HTTPRoute with some header matching configuration:

apiVersion: gateway.networking.k8s.io/v1beta1

kind: HTTPRoute

metadata:

  name: store-canary-option

spec:

  parentRefs:

  - name: store-xlb

  rules:

  - matches:

    - header:

        name: env

        value: stable

    backendRefs:

    - name: store-svc

      port: 3080

  - matches:

    - header:

        name: env

        value: canary

    backendRefs:

    - name: store-canary-svc

      port: 3080

This HTTPRoute works in conjunction with the first route we created. If any requests set the env header to “stable” or “canary” they’ll be routed directly to their preferred backend.

Getting Started

Unlike previous Kubernetes APIs, you don’t need to have the latest version of Kubernetes to use this API. Instead, this API is built with Custom Resource Definitions (CRDs) that can be installed in any Kubernetes cluster, as long as it is version 1.16 or newer (released almost 3 years ago).

To try this API on GKE, refer to the GKE specific installation instructions. Alternatively, if you’d like to use this API with another implementation, refer to the OSS getting started page.

What’s next for Gateway API?

As the core capabilities of Gateway API are stabilizing, new features and concepts are actively being explored. Ideas such as Route Delegation and a new GRPCRoute are deep in the design process. A new service mesh workstream has been established specifically to build consensus among mesh implementations for how this API can be used for service-to-service traffic. As with many open source projects, we’re trying to find the right balance between enabling new use cases and achieving API stability. This API has already accomplished a lot, but we’re most excited about what’s ahead.


By Rob Scott – GKE Networking

Assess the security of Google Kubernetes Engine (GKE) with InSpec for GCP

We are excited to announce the GKE CIS 1.1.0 Benchmark InSpec profile under an open source software license is now available on GitHub, which allows you to assess Google Kubernetes Engine (GKE) clusters against security controls recommended by CIS. You can validate the security posture of your GKE clusters using Chef InSpec™ by assessing their compliance against the Center for Internet Security (CIS) 1.1.0 benchmark for GKE.

Validating security compliance of GKE

GKE is a popular platform to run containerized applications. Many organizations have selected GKE for its scalability, self-healing, observability and integrations with other services on Google Cloud. Developer agility is one of the most compelling arguments for moving to a microservices architecture on Kubernetes, introducing configuration changes at a faster pace and demanding security checks as part of the development lifecycle.

Validating the security settings of your GKE cluster is a complex challenge and requires an analysis of multiple layers within your Cloud infrastructure:

GKE is a managed service on GCP, with controls to tweak the cluster’s behaviour which have an impact on its security posture. These Cloud resource configurations can be configured and audited via Infrastructure-as-Code (IaC) frameworks such as Terraform, the gcloud command line or the Google Cloud Console.

Application workloads are deployed on GKE by interacting via the Kubernetes (K8S) API. Kubernetes resources such as pods, deployments and services are often deployed from yaml templates using the command line tool kubectl.

Kubernetes uses configuration files (such as the kube-proxy and kubelet file) typically in yaml format which are stored on the nodes’ file system.

InSpec for auditing GKE

InSpec is a popular DevSecOps framework that checks the configuration state of resources in virtual machines and containers, on Cloud providers such as Google Cloud, AWS, and Microsoft Azure. The InSpec GCP resource pack 1.8 (InSpec-GCP) provides a consistent way to audit GCP resources and can be used to validate the attributes of a GKE cluster against a desired state declared in code. We previously released a blog post on how to validate your Google Cloud resources with InSpec-GCP against compliance profiles such as the CIS 1.1.0 benchmark for GCP.

While you can use the InSpec-GCP resource pack to define the InSpec controls to validate resources against the Google Cloud API, it does not directly allow you to validate configurations of other relevant layers such as Kubernetes resources and config files on the nodes. Luckily, the challenge to audit Kubernetes resources with InSpec has already been solved by the inspec-k8s resource pack. Further, files on nodes can be audited using remote access via SSH. All together, we can validate the security posture of GKE holistically using the inspec-gcp and inspec-k8s resource packs as well as controls using the InSpec file resource executed in an ssh session.

Running the CIS for GKE compliance profile with InSpec

With the GKE CIS 1.1.0 Benchmark InSpec Profile we have implemented the security controls to validate a GKE cluster against the recommended settings on GCP resource level, Kubernetes API level and file system level. The repository is split into three profiles (inspec-gke-cis-gcp, inspec-gke-cis-k8s and inspec-gke-cis-ssh), since each profile requires a different “target”, or -t parameter when run using the InSpec command line. For ease of use, a wrapper script run_profiles.sh has been provided in the root directory of the repository with the purpose of running all three profiles and storing the reports in the dedicated folder reports.
The script requires the cluster name (-c), ssh username (-u), private key file for ssh authentication (-k), cluster region or zone (-r or -z) and InSpec input file as required by the inspec.yml files in each profile (-i). As an example, the following line will run all three profiles to validate the compliance of cluster inspec-cluster in zone us-central1-a:

./run_profiles.sh -c inspec-cluster \
                           -u konrad \
                           -k /home/konrad/.ssh/google_compute_engine \
                           -z us-central1-a \
                           -i inputs.yml
Running InSpec profile inspec-gke-cis-gcp ...

Profile: InSpec GKE CIS 1.1 Benchmark (inspec-gke-cis-gcp)
Version: 0.1.0
Target: gcp://<service account used for InSpec>

<lots of InSpec output omitted>

Profile Summary: 16 successful controls, 10 control failures2 controls skipped
Test Summary: 18 successful, 11 failures, 2 skipped
Stored report in reports/inspec-gke-cis-gcp_report.
Running InSpec profile inspec-gke-cis-k8s …

Profile: InSpec GKE CIS 1.1 Benchmark (inspec-gke-cis-k8s)
Version: 0.1.0
Target: kubernetes://<IP address of K8S endpoint>:443

<lots of InSpec output omitted>

Profile Summary: 9 successful controls, 1 control failure, 0 controls skipped
Test Summary: 9 successful, 1 failure, 0 skipped
Stored report in reports/inspec-gke-cis-gcp_report.
Running InSpec profile inspec-gke-cis-ssh on node <cluster node 1> ...

Profile: InSpec GKE CIS 1.1 Benchmark (inspec-gke-cis-ssh)
Version: 0.1.0
Target: ssh://<username>@<cluster node 1>:22

<lots of InSpec output omitted>

Profile Summary: 10 successful controls, 5 control failures, 1 control skipped
Test Summary: 12 successful, 6 failures, 1 skipped
Stored report in reports/inspec-gke-cis-ssh_<cluster node 1>_report.


Analyze your scan reports

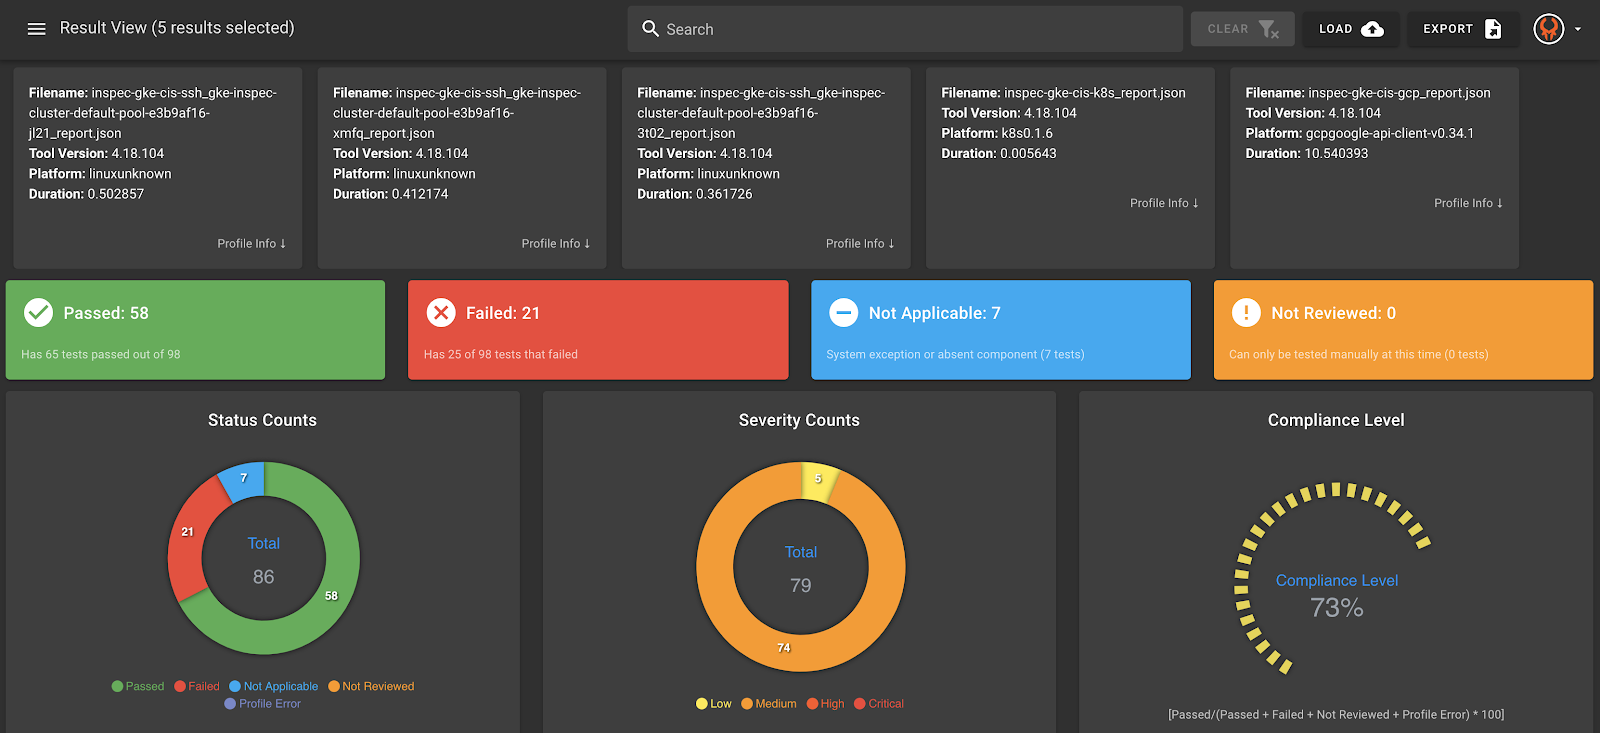
Once the wrapper script has completed successfully you should analyze the JSON or HTML reports to validate the compliance of your GKE cluster. One way to perform the analysis is to upload the collection of JSON reports of a single run from the reports folder to the open source InSpec visualization tool Heimdall Lite (GitHub) by the Mitre Corporation. An example of a compliance dashboard is shown below:
Scan Reports dashboard


Try it yourself and run the GKE CIS 1.1.0 Benchmark InSpec profile in your Google Cloud environment! Clone the repository and follow the CLI example in the Readme file to run the InSpec profiles against your GKE clusters. We also encourage you to report any issues on GitHub that you may find, suggest additional features and to contribute to the project using pull requests. Also, you can read our previous blog post on using InSpec-GCP for compliance validations of your GCP environment.

By Bakh Inamov, Security Specialist Engineer and Konrad Schieban, Infrastructure Cloud Consultant

Using MicroK8s with Anthos Config Management in the world of IoT

When dealing with large scale Kubernetes deployments, managing configuration and policy is often very complicated. We discussed why Kubernetes’ declarative approach to configuration as data has become the most popular choice for most users a few weeks ago. Today, we will discuss bringing this approach to your MicroK8 deployments using Anthos Config Management.
Image of Anthos Config Management + Cloud Source Repositories + MicroK8s
Anthos Config Management helps you easily create declarative security and operational policies and implement them at scale for your Kubernetes deployments across hybrid and multi-cloud environments. At a high level, you represent the desired state of your deployment as code committed to a central Git repository. Anthos Config Management will ensure the desired state is achieved and also maintained across all your registered clusters.

You can use Anthos Config Management for both your Kubernetes Engine (GKE) clusters as well as on Anthos attached clusters. Anthos attached clusters is a deployment option that extends Anthos’ reach into Kubernetes clusters running in other clouds as well as edge devices and the world of IoT, the Internet of Things. In this blog you will learn by experimenting with attached clusters with MicroK8s, a conformant Kubernetes platform popular in IoT and edge environments.

Consider an organization with a large number of distributed manufacturing facilities or laboratories that use MicroK8s to provide services to IoT devices. In such a deployment, Anthos can help you manage remote clusters directly from the Anthos Console rather than investing engineering resources to build out a multitude of custom tools.

Consider the diagram below.

Diagram of Anthos Config Management with MicroK8s on the Factory Floor with IoT
This diagram shows a set of “N” factory locations each with a MicroK8s cluster supporting IoT devices such as lights, sensors, or even machines. You register each of the MicroK8s clusters in an Anthos environ: a logical collection of Kubernetes clusters. When you want to deploy the application code to the MicroK8s clusters, you commit the code to the repository and Anthos Config Management takes care of the deployment across all locations. In this blog we will show you how you can quickly try this out using a MicroK8s test deployment.

We will use the following Google Cloud services:
  • Compute Engine provides an Ubuntu instance for a single-node MicroK8s cluster. Ubuntu will use cloud-init to install MicroK8s and generate shell scripts and other files to save time.
  • Cloud Source Repositories will provide the Git-based repository to which we will commit our workload.
  • Anthos Config Management will perform the deployment from the repository to the MicroK8s cluster.

Let’s start with a picture

Here’s a diagram of how these components fit together.

Diagram of how Anthos Config Management works together with MicroK8s
  • A workstation instance is created from which Terraform is used to deploy four components: (1) an IAM service account, (2) a Google Compute Engine Instance with MicroK8s using permissions provided by the service account, (3) a Kubernetes configuration repo provided by Cloud Source Repositories, and (4) a public/private key pair.
  • The GCE instance will use the service account key to register the MicroK8s cluster with an Anthos environ.
  • The public key from the public/ private key pair will be registered to the repository while the private key will be registered with the MicroK8s cluster.
  • Anthos Config Management will be configured to point to the repository and branch to poll for updates.
  • When a Kubernetes YAML document is pushed to the appropriate branch of the repository, Anthos Config Management will use the private key to connect to the repository, detect that a commit has been made against the branch, fetch the files and apply the document to the MicroK8s cluster.
Anthos Config Management enables you to deploy code from a Git repository to Kubernetes clusters that have been registered with Anthos. Google Cloud officially supports GKE, AKS, and EKS clusters, but you can use other conformant clusters such as MicroK8s in accordance with your needs. The repository below shows you how to register a single MicroK8s cluster to receive deployments. You can also scale this to larger numbers of clusters all of which can receive updates from commitments to the repository. If your organization has large numbers of IoT devices supported by Kubernetes clusters you can update all of them from the Anthos console to provide for consistent deployments across the organization regardless of the locations of the clusters, including the IoT edge. If you would like to learn more, you can build this project yourself. Please check out this Git repository and learn firsthand about how Anthos can help you manage Kubernetes deployments in the world of IoT.

By Jeff Levine, Customer Engineer – Google Cloud

Container Structure Tests: Unit Tests for Docker Images

Usage of containers in software applications is on the rise, and with their increasing usage in production comes a need for robust testing and validation. Containers provide great testing environments, but actually validating the structure of the containers themselves can be tricky. The Docker toolchain provides us with easy ways to interact with the container images themselves, but no real way of verifying their contents. What if we want to ensure a set of commands runs successfully inside of our container, or check that certain files are in the correct place with the correct contents, before shipping?

The Container Tools team at Google is happy to announce the release of the Container Structure Test framework. This framework provides a convenient and powerful way to verify the contents and structure of your containers. We’ve been using this framework at Google to test all of our team’s released containers for over a year now, and we’re excited to finally share it with the public.

The framework supports four types of tests:
  • Command Tests - to run a command inside your container image and verify the output or error it produces
  • File Existence Tests - to check the existence of a file in a specific location in the image’s filesystem
  • File Content Tests - to check the contents and metadata of a file in the filesystem
  • A unique Metadata Test - to verify configuration and metadata of the container itself
Users can specify test configurations through YAML or JSON. This provides a way to abstract away the test configuration from the implementation of the tests, eliminating the need for hacky bash scripting or other solutions to test container images.

Command Tests

The Command Tests give the user a way to specify a set of commands to run inside of a container, and verify that the output, error, and exit code were as expected. An example configuration looks like this:
globalEnvVars:
- key: "VIRTUAL_ENV"
value: "/env"
- key: "PATH"
value: "/env/bin:$PATH"

commandTests:

# check that the python binary is in the correct location
- name: "python installation"
command: "which"
args: ["python"]
expectedOutput: ["/usr/bin/python\n"]

# setup a virtualenv, and verify the correct python binary is run
- name: "python in virtualenv"
setup: [["virtualenv", "/env"]]
command: "which"
args: ["python"]
expectedOutput: ["/env/bin/python\n"]

# setup a virtualenv, install gunicorn, and verify the installation
- name: "gunicorn flask"
setup: [["virtualenv", "/env"],
["pip", "install", "gunicorn", "flask"]]
command: "which"
args: ["gunicorn"]
expectedOutput: ["/env/bin/gunicorn"]
Regexes are used to match the expected output, and error, of each command (or excluded output/error if you want to make sure something didn’t happen). Additionally, setup and teardown commands can be run with each individual test, and environment variables can be specified to be set for each individual test, or globally for the entire test run (shown in the example).

File Tests

File Tests allow users to verify the contents of an image’s filesystem. We can check for existence of files, as well as examine the contents of individual files or directories. This can be particularly useful for ensuring that scripts, config files, or other runtime artifacts are in the correct places before shipping and running a container.
fileExistenceTests:

# check that the apt-packages text file exists and has the correct permissions
- name: 'apt-packages'
path: '/resources/apt-packages.txt'
shouldExist: true
permissions: '-rw-rw-r--'
Expected permissions and file mode can be specified for each file path in the form of a standard Unix permission string. As with the Command Tests’ “Excluded Output/Error,” a boolean can be provided to these tests to tell the framework to be sure a file is not present in a filesystem.

Additionally, the File Content Tests verify the contents of files and directories in the filesystem. This can be useful for checking package or repository versions, or config file contents among other things. Following the pattern of the previous tests, regexes are used to specify the expected or excluded contents.
fileContentTests:

# check that the default apt repository is set correctly
- name: 'apt sources'
path: '/etc/apt/sources.list'
expectedContents: ['.*httpredir\.debian\.org/debian jessie main.*']

# check that the retry policy is correctly specified
- name: 'retry policy'
path: '/etc/apt/apt.conf.d/apt-retry'
expectedContents: ['Acquire::Retries 3;']

Metadata Test

Unlike the previous tests which all allow any number to be specified, the Metadata test is a singleton test which verifies a container’s configuration. This is useful for making sure things specified in the Dockerfile (e.g. entrypoint, exposed ports, mounted volumes, etc.) are manifested correctly in a built container.
metadataTest:
env:
- key: "VIRTUAL_ENV"
value: "/env"
exposedPorts: ["8080", "2345"]
volumes: ["/test"]
entrypoint: []
cmd: ["/bin/bash"]
workdir: ["/app"]

Tiny Images

One interesting case that we’ve put focus on supporting is “tiny images.” We think keeping container sizes small is important, and sometimes the bare minimum in a container image might even exclude a shell. Users might be used to running something like:
`docker run -d "cat /etc/apt/sources.list && grep -rn 'httpredir.debian.org' image"`
… but this breaks without a working shell in a container. With the structure test framework, we convert images to in-memory filesystem representations, so no shell is needed to examine the contents of an image!

Dockerless Test Runs

At their core, Docker images are just bundles of tarballs. One of the major use cases for these tests is running in CI systems, and often we can't guarantee that we'll have access to a working Docker daemon in these environments. To address this, we created a tar-based test driver, which can handle the execution of all file-related tests through simple tar manipulation. Command tests are currently not supported in this mode, since running commands in a container requires a container runtime.

This means that using the tar driver, we can retrieve images from a remote registry, convert them into filesystems on disk, and verify file contents and metadata all without a working Docker daemon on the host! Our container-diff library is leveraged here to do all the image processing; see our previous blog post for more information.
structure-test -test.v -driver tar -image gcr.io/google-appengine/python:latest structure-test-examples/python/python_file_tests.yaml

Running in Bazel

Structure tests can also be run natively through Bazel, using the “container_test” rule. Bazel provides convenient build rules for building Docker images, so the structure tests can be run as part of a build to ensure any new built images are up to snuff before being released. Check out this example repo for a quick demonstration of how to incorporate these tests into a Bazel build.

We think this framework can be useful for anyone building and deploying their own containers in the wild, and hope that it can promote their usage everywhere through increasing the robustness of containers. For more detailed information on the test specifications, check out the documentation in our GitHub repository.

By Nick Kubala, Container Tools team

Introducing container-diff, a tool for quickly comparing container images

Originally posted by Nick Kubala, Colette Torres, and Abby Tisdale from the Container Tools team, on the Google Open Source Blog

The Google Container Tools team originally built container-diff, a new project to help uncover differences between container images, to aid our own development with containers. We think it can be useful for anyone building containerized software, so we're excited to release it as open source to the development community.

Containers and the Dockerfile format help make customization of an application's runtime environment more approachable and easier to understand. While this is a great advantage of using containers in software development, a major drawback is that it can be hard to visualize what changes in a container image will result from a change in the respective Dockerfile. This can lead to bloated images and make tracking down issues difficult.

Imagine a scenario where a developer is working on an application, built on a runtime image maintained by a third-party. During development someone releases a new version of that base image with updated system packages. The developer rebuilds their application and picks up the latest version of the base image, and suddenly their application stops working; it depended on a previous version of one of the installed system packages, but which one? What version was it on before? With no currently existing tool to easily determine what changed between the two base image versions, this totally stalls development until the developer can track down the package version incompatibility.

Introducing container-diff

container-diff helps users investigate image changes by computing semantic diffs between images. What this means is that container-diff figures out on a low-level what data changed, and then combines this with an understanding of package manager information to output this information in a format that's actually readable to users. The tool can find differences in system packages, language-level packages, and files in a container image.

Users can specify images in several formats - from local Docker daemon (using the prefix `daemon://` on the image path), a remote registry (using the prefix `remote://`), or a file in the .tar in the format exported by "docker save" command. You can also combine these formats to compute the diff between a local version of an image and a remote version. This can be useful when experimenting with new builds of an image that you might not be quite ready to push yet. container-diff supports image tarballs and the registry protocol natively, enabling it to run in environments without a Docker daemon.

Examples and Use Cases

Here is a basic Dockerfile that installs Python inside our Debian base image. Running container-diff on the base image and the new one with Python, users can see all the apt packages that were installed as dependencies of Python.

➜  debian_with_python cat Dockerfile
FROM gcr.io/google-appengine/debian8
RUN apt-get update && apt-get install -qq --force-yes python
➜ debian_with_python docker build -q -t debian_with_python .
sha256:be2cd1ae6695635c7041be252589b73d1539a858c33b2814a66fe8fa4b048655
➜ debian_with_python container-diff diff gcr.io/google-appengine/debian8:latest daemon://debian_with_python:latest

-----Apt-----
Packages found only in gcr.io/google-appengine/debian8:latest: None

Packages found only in debian_with_python:latest:
NAME VERSION SIZE
-file 1:5.22 15-2+deb8u3 76K
-libexpat1 2.1.0-6 deb8u4 386K
-libffi6 3.1-2 deb8u1 43K
-libmagic1 1:5.22 15-2+deb8u3 3.1M
-libpython-stdlib 2.7.9-1 54K
-libpython2.7-minimal 2.7.9-2 deb8u1 2.6M
-libpython2.7-stdlib 2.7.9-2 deb8u1 8.2M
-libsqlite3-0 3.8.7.1-1 deb8u2 877K
-mime-support 3.58 146K
-python 2.7.9-1 680K
-python-minimal 2.7.9-1 163K
-python2.7 2.7.9-2 deb8u1 360K
-python2.7-minimal 2.7.9-2 deb8u1 3.7M

Version differences: None

And below is a Dockerfile that inherits from our Python base runtime image, and then installs the mock and six packages inside of it. Running container-diff with the pip differ, users can see all the Python packages that have either been installed or changed as a result of this:

➜  python_upgrade cat Dockerfile
FROM gcr.io/google-appengine/python
RUN pip install -U six
➜ python_upgrade docker build -q -t python_upgrade .
sha256:7631573c1bf43727d7505709493151d3df8f98c843542ed7b299f159aec6f91f
➜ python_upgrade container-diff diff gcr.io/google-appengine/python:latest daemon://python_upgrade:latest --types=pip

-----Pip-----

Packages found only in gcr.io/google-appengine/python:latest: None

Packages found only in python_upgrade:latest:
NAME VERSION SIZE
-funcsigs 1.0.2 51.4K
-mock 2.0.0 531.2K
-pbr 3.1.1 471.1K

Version differences:
PACKAGE IMAGE1 (gcr.io/google-appengine/python:latest) IMAGE2 (python_upgrade:latest)
-six 1.8.0, 26.7K

This can be especially useful when it's unclear which packages might have been installed or changed incidentally as a result of dependency management of Python modules.

These are just a few examples. The tool currently has support for Python and Node.js packages installed via pip and npm, respectively, as well as comparison of image filesystems and Docker history. In the future, we'd like to see support added for additional runtime and language differs, including Java, Go, and Ruby. External contributions are welcome! For more information on contributing to container-diff, see this how-to guide.

Now that we've seen container-diff compare two images in action, it's easy to imagine how the tool may be integrated into larger workflows to aid in development:

  • Changelog generation: Given container-diff's capacity to facilitate investigation of filesystem and package modifications, it can do most of the heavy lifting in discerning changes for automatic changelog generation for new releases of an image.
  • Continuous integration: As part of a CI system, users can leverage container-diff to catch potentially breaking filesystem changes resulting from a Dockerfile change in their builds.

container-diff's default output mode is "human-readable," but also supports output to JSON, allowing for easy automated parsing and processing by users.

Single Image Analysis

In addition to comparing two images, container-diff has the ability to analyze a single image on its own. This can enable users to get a quick glance at information about an image, such as its system and language-level package installations and filesystem contents.

Let's take a look at our Debian base image again. We can use the tool to easily view a list of all packages installed in the image, along with each one's installed version and size:

➜  Development container-diff analyze gcr.io/google-appengine/debian8:latest

-----Apt-----
Packages found in gcr.io/google-appengine/debian8:latest:
NAME VERSION SIZE
-acl 2.2.52-2 258K
-adduser 3.113 nmu3 1M
-apt 1.0.9.8.4 3.1M
-base-files 8 deb8u9 413K
-base-passwd 3.5.37 185K
-bash 4.3-11 deb8u1 4.9M
-bsdutils 1:2.25.2-6 181K
-ca-certificates 20141019 deb8u3 367K
-coreutils 8.23-4 13.9M
-dash 0.5.7-4 b1 191K
-debconf 1.5.56 deb8u1 614K
-debconf-i18n 1.5.56 deb8u1 1.1M
-debian-archive-keyring 2017.5~deb8u1 137K

We could use this to verify compatibility with an application we're building, or maybe sort the packages by size in another one of our images and see which ones are taking up the most space.

For more information about this tool as well as a breakdown with examples, uses, and inner workings of the tool, please take a look at documentation on our GitHub page. Happy diffing!

Special thanks to Colette Torres and Abby Tisdale, our software engineering interns who helped build the tool from the ground up.

Introducing container-diff, a tool for quickly comparing container images

The Google Container Tools team originally built container-diff, a new project to help uncover differences between container images, to aid our own development with containers. We think it can be useful for anyone building containerized software, so we’re excited to release it as open source to the development community.

Containers and the Dockerfile format help make customization of an application’s runtime environment more approachable and easier to understand. While this is a great advantage of using containers in software development, a major drawback is that it can be hard to visualize what changes in a container image will result from a change in the respective Dockerfile. This can lead to bloated images and make tracking down issues difficult.

Imagine a scenario where a developer is working on an application, built on a runtime image maintained by a third-party. During development someone releases a new version of that base image with updated system packages. The developer rebuilds their application and picks up the latest version of the base image, and suddenly their application stops working; it depended on a previous version of one of the installed system packages, but which one? What version was it on before? With no currently existing tool to easily determine what changed between the two base image versions, this totally stalls development until the developer can track down the package version incompatibility.

Introducing container-diff

container-diff helps users investigate image changes by computing semantic diffs between images. What this means is that container-diff figures out on a low-level what data changed, and then combines this with an understanding of package manager information to output this information in a format that’s actually readable to users. The tool can find differences in system packages, language-level packages, and files in a container image.

Users can specify images in several formats - from local Docker daemon (using the prefix `daemon://` on the image path), a remote registry (using the prefix `remote://`), or a file in the .tar in the format exported by "docker save" command. You can also combine these formats to compute the diff between a local version of an image and a remote version. This can be useful when experimenting with new builds of an image that you might not be quite ready to push yet. container-diff supports image tarballs and the registry protocol natively, enabling it to run in environments without a Docker daemon.

Examples and Use Cases

Here is a basic Dockerfile that installs Python inside our Debian base image. Running container-diff on the base image and the new one with Python, users can see all the apt packages that were installed as dependencies of Python.


And below is a Dockerfile that inherits from our Python base runtime image, and then installs the mock and six packages inside of it. Running container-diff with the pip differ, users can see all the Python packages that have either been installed or changed as a result of this:


This can be especially useful when it’s unclear which packages might have been installed or changed incidentally as a result of dependency management of Python modules.

These are just a few examples. The tool currently has support for Python and Node.js packages installed via pip and npm, respectively, as well as comparison of image filesystems and Docker history. In the future, we’d like to see support added for additional runtime and language differs, including Java, Go, and Ruby. External contributions are welcome! For more information on contributing to container-diff, see this how-to guide.

Now that we’ve seen container-diff compare two images in action, it’s easy to imagine how the tool may be integrated into larger workflows to aid in development:
  • Changelog generation: Given container-diff’s capacity to facilitate investigation of filesystem and package modifications, it can do most of the heavy lifting in discerning changes for automatic changelog generation for new releases of an image.
  • Continuous integration: As part of a CI system, users can leverage container-diff to catch potentially breaking filesystem changes resulting from a Dockerfile change in their builds.
container-diff’s default output mode is “human-readable,” but also supports output to JSON, allowing for easy automated parsing and processing by users.

Single Image Analysis

In addition to comparing two images, container-diff has the ability to analyze a single image on its own. This can enable users to get a quick glance at information about an image, such as its system and language-level package installations and filesystem contents.

Let’s take a look at our Debian base image again. We can use the tool to easily view a list of all packages installed in the image, along with each one’s installed version and size:


We could use this to verify compatibility with an application we’re building, or maybe sort the packages by size in another one of our images and see which ones are taking up the most space.

For more information about this tool as well as a breakdown with examples, uses, and inner workings of the tool, please take a look at documentation on our GitHub page. Happy diffing!

Special thanks to Colette Torres and Abby Tisdale, our software engineering interns who helped build the tool from the ground up.

By Nick Kubala, Container Tools team