Tag Archives: developers

Updated basemap style for Google Maps APIs


Google Maps APIs will soon be updated with a new look and feel to provide an experience in line with the recent updates to Google Maps. Late last year, we refined the color, typography, and iconography of the Google Maps basemap to improve focus, clarity of information, and readability.


This means that the maps in your products will eventually get an update as well, with stylistic changes such as:


  • New basemap with an updated color scheme and typography

  • An updated pin style marks points of interest on the map in place of the previous circular icons

  • Different colors and icons reflecting categories of points of interest (Food & Drink, Shopping, Transport, etc.)


Existing design


New design

Timeline

The transition to the new look will happen over time and by individual API, with an opt-in period (defaulting to the previous style) and an opt-out period (defaulting to the new style) before the new style is enforced.


The first APIs to offer the new look are the Google Maps SDK for iOS and the Google Places API for iOS, which we are launching as opt-in today. To get updates on the timelines for each API, star the following issues on the Maps APIs Issue Tracker.


If you experience any issues with the Google Maps APIs new styles please let us know by creating a bug report.


API


Estimated opt-in launch


Tracking issue


Google Maps SDK for iOS


13 February


Google Places API for iOS


13 February


Google Maps JavaScript API


14 February (version 3.32)


Google Static Maps API


Mid February


Google Maps Android API


April


Google Places API for Android


May


The updated style is already live across all Google products that incorporate Google Maps, including the Assistant, Search and Android Auto. Opt-in to the new style to give your users the same consistent experience no matter how or where they see our maps.


Updated basemap style for Google Maps APIs


Google Maps APIs will soon be updated with a new look and feel to provide an experience in line with the recent updates to Google Maps. Late last year, we refined the color, typography, and iconography of the Google Maps basemap to improve focus, clarity of information, and readability.

This means that the maps in your products will eventually get an update as well, with stylistic changes such as:

  • New basemap with an updated color scheme and typography
  • An updated pin style marks points of interest on the map in place of the previous circular icons
  • Different colors and icons reflecting categories of points of interest (Food & Drink, Shopping, Transport, etc.)
Existing design
New design
Timeline
The transition to the new look will happen over time and by individual API, with an opt-in period (defaulting to the previous style) and an opt-out period (defaulting to the new style) before the new style is enforced.

The first APIs to offer the new look are the Google Maps SDK for iOS and the Google Places API for iOS, which we are launching as opt-in today. To get updates on the timelines for each API, star the following issues on the Maps APIs Issue Tracker.

If you experience any issues with the Google Maps APIs new styles please let us know by creating a bug report.

API
Estimated opt-in launch
Tracking issue
Google Maps SDK for iOS
13 February
Google Places API for iOS
13 February
Google Maps JavaScript API
14 February (version 3.32)
Google Static Maps API
Mid February
Google Maps Android API
Early March
Google Places API for Android
May

The updated style is already live across all Google products that incorporate Google Maps, including the Assistant, Search and Android Auto. Opt-in to the new style to give your users the same consistent experience no matter how or where they see our maps.

Introducing the Gmail Developer Preview of AMP in Email


You may have heard of the open-source framework, Accelerated Mobile Pages (AMP). It’s a framework for developers to create faster-loading mobile content on the web. Beyond simply loading pages faster, AMP now supports building a wide range of rich pages for the web. Today, we’re announcing AMP for Email so that emails can be formatted and sent as AMP documents. As a part of this, we’re also kicking off the Gmail Developer Preview of AMP for Email—so once you’ve built your emails, you’ll be able to test them in Gmail.

AMP for Email opens up several new possibilities:
  • Design interactive components for email using a large library of supported AMP components like amp-carousel, amp-form, amp-bind, amp-list and more
  • Help your content stay up-to-date and interactive for your users.
  • Create more engaging and actionable email experiences
Here’s an example:
Brows and save your favorite items in Pinterest


<!doctype html>
<html ⚡4email>
<head>
<meta charset="utf-8">
<script async src="https://cdn.ampproject.org/v0.js">&lt'/script>
<!-- The AMP4email boilerplate. -->
<style amp4email-boilerplate>body{visibility:hidden}</style>
<script async custom-element="amp-carousel" src="https://cdn.ampproject.org/v0/amp-carousel-0.1.js"></script>
<script async custom-element="amp-selector" src="https://cdn.ampproject.org/v0/amp-selector-0.1.js"></script>
<script async custom-element="amp-bind" src="https://cdn.ampproject.org/v0/amp-bind-0.1.js"></script>
<script async custom-element="amp-form" src="https://cdn.ampproject.org/v0/amp-form-0.1.js"></script>
<script async custom-template="amp-mustache" src="https://cdn.ampproject.org/v0/amp-mustache-0.1.js"></script>
<style amp-custom> html{font-family: 'Roboto';}
...
</style>
</head>
<body>
<h2>Hello dear user,</h2>
<div class="photo-gallery">
<div class="text">Photos from your latest trips:
<span [text]="+selectedSlide + 1">1</span>/4</div>
<amp-selector layout="container" name="carousel-selector"...>
<amp-carousel controls width="430" height="80">
<amp-img ...></amp-img>
...
</amp-carousel>
</amp-selector>
<amp-carousel ...>
<amp-img ...></amp-img>
...
</amp-carousel>
<div class="trip-location">Please rate your trip location:</div>
<form id="rating" class="p2" method="post" ...>
<fieldset class="rating">
<input name="rating" type="radio" id="rating1" value="1" .../>
<label for="rating1" title="1 stars">★</label>
...
</fieldset>
<div submit-success>
<template type="amp-mustache">
<div class="text">Thanks for rating {{rating}} star(s)!</div>
</template>
</div>
</form>
</div>
</body>
</html>
[Full example in AmpByExample’s Playground]

The AMP for Email spec is available today and will be supported in Gmail later this year. To get preview access to how Gmail will support AMP for Email, sign up here. Since it’s an open spec, we look forward to seeing other email clients adopt it, too.

Android Developer Story: Big Fish Games uses open beta testing to de-risk their game launch

Posted by Kacey Fahey, Developer Marketing, Google Play

Based in Seattle, Big Fish Games was founded in 2002. Starting as a game studio, they quickly turned into a major publisher and distributor of casual games. Leading up to the launch of their hit time management game, Cooking Craze, the team ran an open beta on Google Play.

Big Fish Games found that using open beta provided more than 10x the amount of user feedback from around the world, and also gave them access to key metrics and Android Vitals in the Play Console. The ability to monitor game performance metrics pre-launch allowed the team to focus on areas of improvement, which lead to a 21% reduction in crash rate. The larger sample size of beta testers also provided more insights on player behavior and helped achieve a +7% improvement in day 1, day 7, and day 30 retention rates.

You can also learn more pre-launch best practices and strategies to improve performance post-launch at our Google Developer Day on Monday, March 19th at GDC. Sign up to stay informed.

How useful did you find this blogpost?

Publish Gmail Add-ons to your domain


We extended the Gmail Add-on preview toward the end of last year, so that developers can bring the functionality of business apps they rely on directly into Gmail. Now, we’re also making it easier for you to develop and publish Gmail Add-ons domain-wide. Create add-ons for users to access tools directly in their inbox, like your company directory, HR tools or other CRM solutions.

You can now:
  • Publish Gmail Add-ons to users in your G Suite domain. This lets you build and deploy custom add-ons for workflows or processes that are unique to your company.
  • Install Gmail Add-ons for G Suite accounts before they’re published. This way, you can test your add-on before releasing widely in the workplace.
  • Plus, G Suite admins can install add-ons for their domains. This helps G Suite users perform domain-wide installs for any add-on you build, so more people have the chance to try your add-on (or experiment with add-ons domain-wide).
Check out this video to see what it’s like to build an add-on then start building it yourself with this hands-on codelab. You can also view already-built add-ons in the G Suite Marketplace. Or, if you have another project in mind, submit your add-on idea for consideration.

We’re on a mission to make work easier and a big part of that means giving you the tools you need to speed up workflows. Build on!

3 new tools to help improve your Apps Script development and management experience


Apps Script has come a long way since we first launched scripting with Google Sheets. Now, Apps Script supports more than 5 million weekly active scripts that are integrated with a host of G Suite apps, and more than 1 billion daily executions.

As developers increasingly rely on Apps Script for mission-critical enterprise applications, we've redoubled our efforts to improve its power, reliability and operational monitoring, like our recently announced integration with Stackdriver for logging and error reporting. Today, we’re providing three new tools to help further improve your workflows and manage Apps Script projects:

  1. Apps Script dashboard, to help you manage, debug and monitor all of your projects in one place. 
  2. Apps Script API, so you can programmatically manage Apps Script source files, versions and deployments. 
  3. Apps Script Command Line Interface, for easy access to Apps Script API functionality from your terminal and shell scripts. 

Apps Script dashboard 

Over the next few weeks we’ll be making a new dashboard available to help you manage, debug and monitor all of your Apps Script projects from one place.
In this new dashboard—available at script.google.com—you will be able to:
  • View and search all of your projects. 
  • Monitor the health and usage of projects you care about. 
  • View details about individual projects. 
  • View a log of project executions and terminate long-running executions. 
Check out the documentation for more detail on the dashboard. If you encounter any issues, please use the feedback link in the left column of the new dashboard or file a bug.

Apps Script API 

The new Apps Script dashboard is built on top of a powerful new Apps Script API which replaces and extends the Execution API. This new Apps Script API provides a RESTful interface for developers to create, manage, deploy and execute their scripts from their preferred programming language. This gives you control to create development workflows and deployment strategies that fit your needs. With this new API, you can:
  • Create, read, update and delete script projects, source files and versions. 
  • Manage project deployments and entry points (web app, add-on, execution). 
  • Obtain project execution metrics and process data. 
  • Run script functions. 
To learn more about the new Apps Script API, check out the documentation. If you encounter any issues please ask a question on Stack Overflow or file a bug.

Apps Script Command Line Interface 

Lastly, we’re pleased to introduce the first open-source client of the Apps Script API, a command-line interface tool called clasp (Command Line Apps Script Projects). clasp allows you to access the management functionality of the Apps Script API with intuitive terminal commands and is available as an open-source project on GitHub.
clasp allows developers to create, pull and push Apps Script projects, plus manage deployments and versions with terminal commands and shell scripts. clasp also allows you to write and maintain your Apps Script projects using the development tools of your choice including your native IDE, Git and GitHub.

To get started, try the clasp codelab. You can file issues or ask questions on the clasp project GitHub page.

We’re doubling down on powerful platforms like Apps Script. We hope these new additions help ease your development process.

Hangouts Meet now available in the Google Calendar API


Thousands of developers use Google Calendar API to read, create and modify Google Calendar events, and quite often, these events represent meetings happening not just face-to-face but also remotely. We introduced Hangouts Meet earlier this year to give users richer conference experiences, adding video call links and phone numbers for G Suite Enterprise. Starting today, we are making it possible to access all that conference information through the Google Calendar API. With this update, developers can now:
  • Read conference data associated with events 
  • Copy conference data from one event to another 
  • Request new conference generation for an event 
The API supports all Hangouts versions.

Reading conference data 

Conference information is stored in a new event attribute called conferenceData. conferenceData provides information about the solution that was used to create the conference (such as Hangouts Meet) and a set of entry points (like a video call link and phone number). Everything the user needs to know to join a conference call is there.

To help you build even better user experiences, we also give you access to icons and user-readable labels that you can use in your products. In JSON format, conferenceData looks something like this (of course, your actual meeting IDs and phone numbers will vary):
"conferenceData": {
"entryPoints": [
{
"entryPointType": "video",
"uri": "https://meet.google.com/wix-pvpt-njj",
"label": "meet.google.com/wix-pvpt-njj"
},
{
"entryPointType": "more",
"uri": "https://tel.meet/wix-pvpt-njj?pin=1701789652855",
"pin": "1701789652855"
},
{
"entryPointType": "phone",
"uri": "tel:+44-20-3873-7654",
"label": "+44 20 3873 7654",
"pin": "6054226"
}
],
"conferenceSolution": {
"key": {
"type": "hangoutsMeet"
},
"name": "Hangouts Meet",
"iconUri": "https://lh5.googleusercontent.com/proxy/bWvYBOb7O03a7HK5iKNEAPoUNPEXH1CHZjuOkiqxHx8OtyVn9sZ6Ktl8hfqBNQUUbCDg6T2unnsHx7RSkCyhrKgHcdoosAW8POQJm_ZEvZU9ZfAE7mZIBGr_tDlF8Z_rSzXcjTffVXg3M46v"
},
"conferenceId": "wix-pvpt-njj",
"signature": "ADwwud9tLfjGQPpT7bdP8f3bq3DS"
}

And this, for example, is how you would retrieve and display conference solution name and icon:
var solution = event.conferenceData.conferenceSolution;

var content = document.getElementById("content");
var text = document.createTextNode("Join " + solution.name);
var icon = document.createElement("img");
icon.src = solution.iconUri;

content.appendChild(icon);
content.appendChild(text);
The result of the code above will look like this in the user interface:

Copying conferences across events 

Sometimes displaying information is not enough—you might want to update it as well. This is especially true when scheduling multiple Calendar events with the same conference details. Say you’re developing a recruiting application that sets up separate events for the candidate and the interviewer; you want to protect the interviewer’s identity, but you also want to make sure all participants join the same conference call. To do this, you can now copy conference information from one event to another by simply writing to conferenceData.

To ensure that only existing Hangouts conferences are copied, and to help safeguard your users against malicious actors, copied conference data will always be verified by the Google Calendar API using the signature field, so don’t forget to copy it too.

Creating a new conference for an event 

Finally, the API allows developers to request conference creation. Simply provide a conferenceData.createRequest and set the conferenceDataVersion request parameter to 1 when creating or updating events. Conferences are created asynchronously, but you can always check the status of your request to let your users know what’s happening. For example, to request conference generation for an existing event (again, your request and event IDs will be different):
var eventPatch = {
conferenceData: {
createRequest: {requestId: "7qxalsvy0e"}
}
};

gapi.client.calendar.events.patch({
calendarId: "primary",
eventId: "7cbh8rpc10lrc0ckih9tafss99",
resource: eventPatch,
sendNotifications: true,
conferenceDataVersion: 1
}).execute(function(event) {
console.log("Conference created for event: %s", event.htmlLink);
});
The immediate response to this call might not yet contain the fully-populated conferenceData which is indicated by status pending:
"conferenceData": {
"createRequest": {
"requestId": "7qxalsvy0e",
"conferenceSolutionKey": {
"type": "hangoutsMeet"
},
"status": {
"statusCode": "pending"
}
}
}
Once the statusCode changes to success, the conference information is populated. Finally, if you are developing a Google Calendar client, you might also want to know beforehand which of the three Hangouts solutions (consumer Hangouts, classic Hangouts and Hangouts Meet) will be used to create the conference. You can get that information by checking allowedConferenceSolutionTypes in a calendar’s conferenceProperties.

To get started, check out the documentation page for managing conference data. We can’t wait to see what you build with these new features in the Google Calendar API.

The new maker toolkit: IoT, AI and Google Cloud Platform

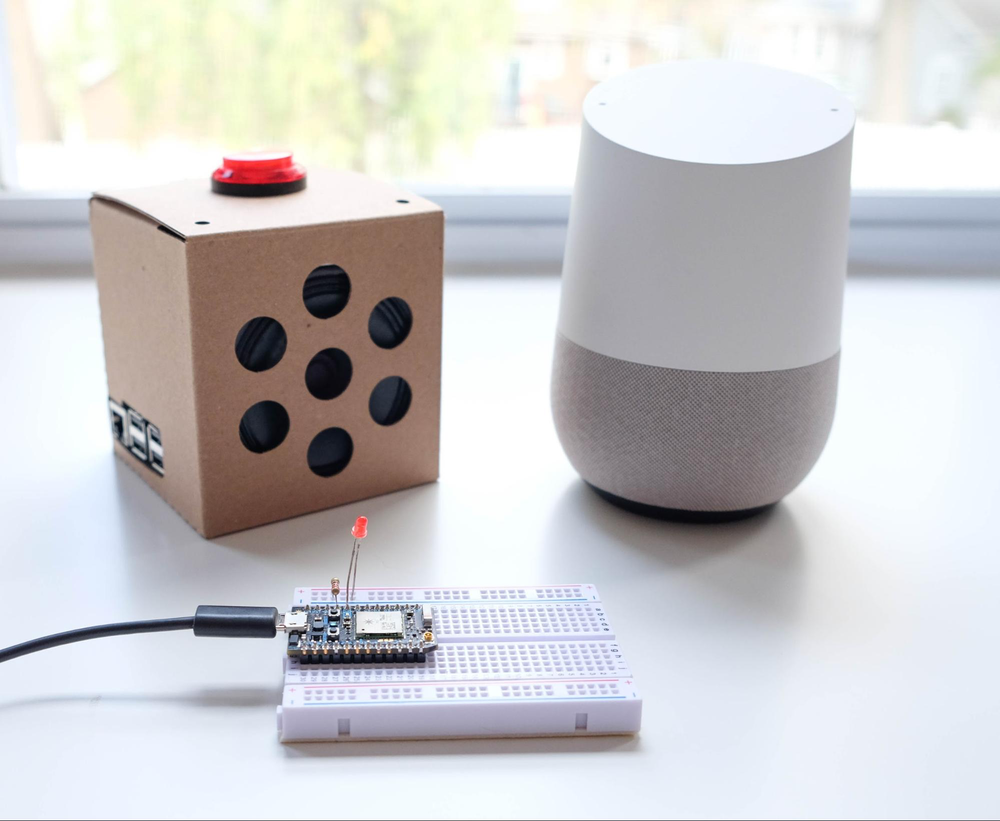
Voice interaction is everywhere these days—via phones, TVs, laptops and smart home devices that use technology like the Google Assistant. And with the availability of maker-friendly offerings like Google AIY’s Voice Kit, the maker community has been getting in on the action and adding voice to their Internet of Things (IoT) projects.

As avid makers ourselves, we wrote an open-source, maker-friendly tutorial to show developers how to piggyback on a Google Assistant-enabled device (Google Home, Pixel, Voice Kit, etc.) and add voice to their own projects. We also created an example application to help you connect your project with GCP-hosted web and mobile applications, or tap into sophisticated AI frameworks that can provide more natural conversational flow.

Let’s take a look at what this tutorial, and our example application, can help you do.

Particle Photon: the brains of the operation

The Photon microcontroller from Particle is an easy-to-use IoT prototyping board that comes with onboard Wi-Fi and USB support, and is compatible with the popular Arduino ecosystem. It’s also a great choice for internet-enabled projects: every Photon gets its own webhook in Particle Cloud, and Particle provides a host of additional integration options with its web-based IDE, JavaScript SDK and command-line interface. Most importantly for the maker community, Particle Photons are super affordable, starting at just $19.

voice-kit-gcp-particle

Connecting the Google Assistant and Photon: Actions on Google and Dialogflow

The Google Assistant (via Google Home, Pixel, Voice Kit, etc.) responds to your voice input, and the Photon (through Particle Cloud) reacts to your application’s requests (in this case, turning an LED on and off). But how do you tie the two together? Let’s take a look at all the moving parts:


  • Actions on Google is the developer platform for the Google Assistant. With Actions on Google, developers build apps to help answer specific queries and connect users to products and services. Users interact with apps for the Assistant through a conversational, natural-sounding back-and-forth exchange, and your Action passes those user requests on to your app.

  • Dialogflow (formerly API.AI) lets you build even more engaging voice and text-based conversational interfaces powered by AI, and sends out request data via a webhook.

  • A server (or service) running Node.js handles the resulting user queries.


Along with some sample applications, our guide includes a Dialogflow agent, which lets you parse queries and route actions back to users (by voice and/or text) or to other applications. Dialogflow provides a variety of interface options, from an easy-to-use web-based GUI to a robust Node.js-powered SDK for interacting with both your queries and the outside world. In addition, its powerful machine learning tools add intelligence and natural language processing. Your applications can learn queries and intents over time, exposing even more powerful options for making and providing better results along the way. (The recently announced Dialogflow Enterprise Edition offers greater flexibility and support to meet the needs of large-scale businesses.)


Backend infrastructure: GCP

It’s a no-brainer to build your IoT apps on a Google Cloud Platform (GCP) backend, as you can use a single Google account to sign into your voice device, create Actions on Google apps and Dialogflow agents, and host the web services. To help get you up and running, we developed two sample web applications based on different GCP technologies that you can use as inspiration when creating a voice-powered IoT app:


  • Cloud Functions for Firebase. If your goal is quick deployment and iteration, Cloud Functions for Firebase is a simple, low-cost and powerful option—even if you don’t have much server-side development experience. It integrates quickly and easily with the other tools used here. Dialogflow, for example, now allows you to drop Cloud Functions for Firebase code directly into its graphical user interface.

  • App Engine. For those of you with more development experience and/or curiosity, App Engine is just as easy to deploy and scale, but includes more options for integrations with your other applications, additional programming language/framework choices, and a host of third-party add-ons. App Engine is a great choice if you already have a Node.js application to which you want to add voice actions, you want to tie into more of Google’s machine learning services, or you want to get deeper into device connection and management.


Next steps

As makers, we’ve only just scratched the surface of what we can do with these new tools like IoT, AI and cloud. Check out our full tutorials, and grab the code on Github. With these examples to build from, we hope we’ve made it easier for you to add voice powers to your maker project. For some extra inspiration, check out what other makers have built with AIY Voice Kit. And for even more ways to add machine learning to your maker project, check out the AIY Vision Kit, which just went on pre-sale today.

We can’t wait to see what you build!

Source: Google Cloud


The new maker toolkit: IoT, AI and Google Cloud Platform

Voice interaction is everywhere these days—via phones, TVs, laptops and smart home devices that use technology like the Google Assistant. And with the availability of maker-friendly offerings like Google AIY’s Voice Kit, the maker community has been getting in on the action and adding voice to their Internet of Things (IoT) projects.

As avid makers ourselves, we wrote an open-source, maker-friendly tutorial to show developers how to piggyback on a Google Assistant-enabled device (Google Home, Pixel, Voice Kit, etc.) and add voice to their own projects. We also created an example application to help you connect your project with GCP-hosted web and mobile applications, or tap into sophisticated AI frameworks that can provide more natural conversational flow.

Let’s take a look at what this tutorial, and our example application, can help you do.

Particle Photon: the brains of the operation

The Photon microcontroller from Particle is an easy-to-use IoT prototyping board that comes with onboard Wi-Fi and USB support, and is compatible with the popular Arduino ecosystem. It’s also a great choice for internet-enabled projects: every Photon gets its own webhook in Particle Cloud, and Particle provides a host of additional integration options with its web-based IDE, JavaScript SDK and command-line interface. Most importantly for the maker community, Particle Photons are super affordable, starting at just $19.

voice-kit-gcp-particle

Connecting the Google Assistant and Photon: Actions on Google and Dialogflow

The Google Assistant (via Google Home, Pixel, Voice Kit, etc.) responds to your voice input, and the Photon (through Particle Cloud) reacts to your application’s requests (in this case, turning an LED on and off). But how do you tie the two together? Let’s take a look at all the moving parts:


  • Actions on Google is the developer platform for the Google Assistant. With Actions on Google, developers build apps to help answer specific queries and connect users to products and services. Users interact with apps for the Assistant through a conversational, natural-sounding back-and-forth exchange, and your Action passes those user requests on to your app.

  • Dialogflow (formerly API.AI) lets you build even more engaging voice and text-based conversational interfaces powered by AI, and sends out request data via a webhook.

  • A server (or service) running Node.js handles the resulting user queries.


Along with some sample applications, our guide includes a Dialogflow agent, which lets you parse queries and route actions back to users (by voice and/or text) or to other applications. Dialogflow provides a variety of interface options, from an easy-to-use web-based GUI to a robust Node.js-powered SDK for interacting with both your queries and the outside world. In addition, its powerful machine learning tools add intelligence and natural language processing. Your applications can learn queries and intents over time, exposing even more powerful options for making and providing better results along the way. (The recently announced Dialogflow Enterprise Edition offers greater flexibility and support to meet the needs of large-scale businesses.)


Backend infrastructure: GCP

It’s a no-brainer to build your IoT apps on a Google Cloud Platform (GCP) backend, as you can use a single Google account to sign into your voice device, create Actions on Google apps and Dialogflow agents, and host the web services. To help get you up and running, we developed two sample web applications based on different GCP technologies that you can use as inspiration when creating a voice-powered IoT app:


  • Cloud Functions for Firebase. If your goal is quick deployment and iteration, Cloud Functions for Firebase is a simple, low-cost and powerful option—even if you don’t have much server-side development experience. It integrates quickly and easily with the other tools used here. Dialogflow, for example, now allows you to drop Cloud Functions for Firebase code directly into its graphical user interface.

  • App Engine. For those of you with more development experience and/or curiosity, App Engine is just as easy to deploy and scale, but includes more options for integrations with your other applications, additional programming language/framework choices, and a host of third-party add-ons. App Engine is a great choice if you already have a Node.js application to which you want to add voice actions, you want to tie into more of Google’s machine learning services, or you want to get deeper into device connection and management.


Next steps

As makers, we’ve only just scratched the surface of what we can do with these new tools like IoT, AI and cloud. Check out our full tutorials, and grab the code on Github. With these examples to build from, we hope we’ve made it easier for you to add voice powers to your maker project. For some extra inspiration, check out what other makers have built with AIY Voice Kit. And for even more ways to add machine learning to your maker project, check out the AIY Vision Kit, which just went on pre-sale today.

We can’t wait to see what you build!