Category Archives: Android Developers Blog

An Open Handset Alliance Project

New! Learn advanced skills for developing Android apps in Kotlin

Posted by Aleks Haecky

Advanced Android in Kotlin, developed by Google together with Udacity, is our newly-released, free, self-paced online course. In this course expert instructors from the Android team at Google will introduce you to some of the advanced features you can build into your Android apps.

This course is intended for developers who have mastered the basics of building an Android app in Kotlin, and want to dive deeper into advanced functionality. To benefit most from this course, you need skills equivalent to what's taught in our Android Fundamentals Udacity or codelab courses.

Advanced Android in Kotlin teaches you about notifications, graphics and animations on Android, using third-party authentication for login, and how to add maps to your apps. Learn how to create custom views that can look like anything you want, draw to a canvas, and have eye-catching animations. And, most importantly, you will learn how to properly test your apps!

Here is a sample of apps you will build:

  • An egg timer that implements various types of notifications.
  • A painting app that converts what the user traces on the screen into a colorful drawing.
  • Animations of the moon and a rain of falling stars.

Check out the YouTube course trailer below for additional information about the course and apps:

Different people like to learn in different ways, so we are offering this course as both a Udacity video-based course and as a series of codelabs with topics that you can explore in any order. Whether you prefer to work on your own with just the text and code, or to have an instructor help walk through the code with you on video, we’ve got you covered; just choose your path and get learning!

3 things to know about Android Studio from Android Dev Summit 2019

Posted by Deepanshu Madan, Product Manager

Last month’s #AndroidDevSummit was jam-packed with announcements and technical news...so much that we wouldn’t be surprised if you missed something. So all this month, we’ll be diving into key areas from throughout the summit so you don’t miss anything. Earlier this week, we spotlighted Kotlin and Jetpack Compose, and today, we’re highlighting Android Studio, with the top three things you should know:

#1: Support for Jetpack Compose

For the best experience developing with Jetpack Compose, you can now use the latest version of Android Studio 4.0 in the canary channel, and benefit from smart editor features, such as New Project templates, code completion and the ability to immediately preview your Jetpack Compose UI.

#2: What’s new in Android Studio session

We covered both new features and successes of our quality initiative called Project Marble. On the quality aspect, we discuss improvements around hangs and latency, memory leak detection, automatic IDE heap sizing and build speed. Also during the session you will find demos on new developments & features in Android Studio such as Build Attribution tool which helps you understand and diagnose problems with your build system, Java 8 library desugaring, View binding, Kotlin Android live templates, an updated live Layout inspector which allows you to drill into resources right from the view to find where a property value originates in the source code with a 3D visualization of your view hierarchy.

#3: Android Studio Design tools

We introduced new features of Layout & Navigation editor including a new split view, new tools such as Multi-preview which allows you to visualize your layout in different configurations and MotionEditor, visual design editor for the MotionLayout layout type, making it easier to create and preview animations. The Motion Editor provides a simple interface for manipulating elements from the MotionLayout library that serves as the foundation for animation in Android apps. In previous releases, creating and altering these elements required manually editing constraints in XML resource files. Now, the Motion Editor can generate this XML for you, with support for start and end states, keyframes, transitions, and timelines.

You can find the entire playlist of Android Dev Summit sessions and videos here. We’ll continue to spotlight other areas later this month, so keep an eye out and follow AndroidDevelopers on Twitter. Thanks so much for letting us be a part of this experience with you!

Still Using InstallBroadcast? Switch to the Play Referrer API by March 1, 2020

Posted by Marcus Leal, Product Manager, Google Play Ads

How do people find your app? It’s the million-dollar question for any developer, and the answer can help you make the right choices about your marketing strategy and budget. Accurate install referral data is crucial for understanding which traffic sources send users to download your app from the Google Play Store, as well as identifying fraudulent attempts to claim install attributions.

That’s why in 2017, we launched the Play Install Referrer API, which provides a reliable and robust mechanism for apps to retrieve referral information directly from the Play Store. It was a big step forward from the old install_referrer intent broadcast, so many developers made the switch right away, including App Attribution Program partners like Adjust, AppsFlyer, and Kochava. Now, because it’s been replaced by the new API, we’ve decided to deprecate the install_referrer intent broadcast mechanism on March 1, 2020. After this date, new versions of the Play Store app will no longer broadcast the install_referrer intent after app installs.

We are asking developers who still rely on the install_referrer to use the Play Install Referrer API instead. Among other advantages, the Install Referrer API offers better performance, uses a secure communication channel between your app and the Play Store, and offers a more robust solution against spoof and attribution fraud.

If you still use the Broadcast API and the install_referrer intent to track your referrals, be sure to make the switch by March 1, 2020. Migration is easy, and the cost of adoption is low. Learn how to use the Play Install Referrer API to track your app installs today.

3 things to know about Kotlin from Android Dev Summit 2019

Last month’s #AndroidDevSummit was jam-packed with announcements and technical news...so much that we wouldn’t be surprised if you missed something. So all this month, we’ll be diving into key areas from throughout the summit so you don’t miss anything. First up, we’re spotlighting Kotlin, with the top things you should know:

#1: Kotlin momentum on Android

Kotlin is at the heart of modern Android development — and we’ve been excited to see how quickly it has won over developers around the world. At Android Dev Summit we announced that nearly 60% of the top 1000 Android apps on the Play Store now use Kotlin, and we’re seeing more developers adopt it every day. Kotlin has helpful features like null safety, data classes, coroutines, and complete interoperability with the Java programming language. We’re doubling down on Kotlin with more Kotlin-first APIs even beyond AndroidX — we just released KTX extensions, including coroutines support, for Play Core. There’s never been a better time to give Kotlin a try.

#2: Learn more: Getting started with Kotlin & diving into advanced Kotlin with coroutines

If you’re introducing Kotlin into an existing codebase, chances are that you’ll be calling the Java programming language from Kotlin and vice versa. At Android Dev Summit, developer advocates Murat Yener, Nicole Borrelli, and Wenbo Zhu took a look at how nullability, getters, setters, default parameters, exceptions, and more work across the two languages.

For those looking into more advanced Kotlin topics, we recommend watching Jose Alcérreca's and Yigit Boyar's talk that explains how coroutines and Flow can fit together with LiveData in your app's architecture and one on testing coroutines by Sean McQuillan and Manuel Vivo.

#3: Get certified in Kotlin

We announced the launch of our Associate Android Developer certification in Kotlin. Now you can prove your proficiency with modern Kotlin development on Android to your coworkers, your professional network, or even your future employer. As part of this launch, you can take this exam at a discount when using the code ADSCERT99 through January 25.

It’s especially great to hear from you, the Android community, at events like Android Dev Summit: what do you want to hear more about, and how can we help with something you’re working on. We asked you to submit your burning questions on Twitter and the livestream, and developer advocates Florina Muntenescu and Sean McQuillan answered your Kotlin and coroutines questions live during our #AskAndroid segment:

You can find the entire playlist of Android Dev Summit sessions and videos here. We’ll continue to spotlight other areas later this month, so keep an eye out and follow Android Developers on Twitter. Thanks so much for letting us be a part of this experience with you!

Java is a registered trademark of Oracle and/or its affiliates.

3 things to know about Jetpack Compose from Android Dev Summit 2019

Posted by Anna-Chiara Bellini, @dr0nequeen

Last month’s #AndroidDevSummit was jam-packed with announcements and technical news...so much that we wouldn’t be surprised if you missed something. So all this month, we’ll be diving into key areas from throughout the summit so you don’t miss anything. Earlier today, we spotlighted Kotlin and now we’re diving into Jetpack Compose, with the top three things you should know:

#1: Jetpack Compose is available in Developer Preview!

Jetpack Compose is Android’s modern toolkit for building native UI. It allows developers to write beautiful Android apps in an intuitive way, writing less code and accelerating development. It's powerful, because when writing code is a pleasure, you can focus on making your apps look beautiful and giving your users the best experience. At #AndroidDevSummit, we released the Developer Preview, to enable more feedback as we work towards bringing Jetpack Compose to beta next year. All you need to do is download the Android Studio 4.0 Canary build to try it out. To give feedback, feel free to reach out through the Kotlinlang Slack channel or our Bug Tracker to let us know what you think. It's your chance to help us build the right thing!

#2: See what's new in Jetpack Compose

At Android Dev Summit we showed how we've designed Compose to simplify development of Android apps, details on the new Material UI components we are building, and insights on some of the learnings that are informing the way we think about Compose. We also showcased how to write a small app, including layout and state management for a list of elements, in just a few lines of code.

Watch the Android Dev Summit session video to learn more:

If you want to take a look behind the scenes, we also had a tech deep dive into the inner workings of Compose:

#3: Try it out, with our tutorial, sample app, and codelab!

Jetpack Compose is still in Developer Preview, which means it's a great time to try it out and let us know what you think about it. To help you with that, you can follow our tutorial, which will take you through the first steps of building a Compose app, and also take a look at our sample app, Jetnews, that shows what is currently possible with Jetpack Compose. We also have a popular codelab available to take you through how to build UIs with Compose, how to manage state in composable functions, and data flow principles in Compose.

Jetnews sample app

...and we also heard from you!

But Android Dev Summit isn’t just about what we’ve got to say; it’s also about you telling us what you’d like to see worked on to make your life easier. And this year, one thing we heard strongly from our community was how important it is to have the right tools to manage your layouts on so many different form factors and devices. Jetpack Compose has full Android Studio support and you can iterate fast with live Previews.

Android Dev Summit is over for this year, but you can keep giving us your feedback through the Kotlinlang Slack channel and Bug Tracker.

You can find the entire playlist of Android Dev Summit sessions and videos here. We’ll continue to spotlight other areas later this month, so keep an eye out and follow AndroidDevelopers on Twitter. Thanks so much for letting us be a part of this experience with you!

Modern app and game distribution on Google Play

Posted by Kobi Glick, Product Lead, Google Play

Today we’re kicking off Playtime, our annual event series where we host developers from all over the world to discuss features and best practices to help you grow your apps and games businesses. Last month’s Android Dev Summit focused on modern Android development. Here on the Google Play team, we’re focusing on modern app and game distribution — our set of powerful and customizable distribution features and tools that work together to power your success on Google Play.

The future of Android distribution

The Android App Bundle is foundational to modern app and game distribution, replacing the monolithic APK. Since it launched 18 months ago, over 270K apps and games have made the switch, representing over 25% of active installs. Those that switched have seen an average size savings of 20% compared to a universal APK and more efficient releases as a result.

A recent internal analysis revealed that users with storage-constrained devices are much more likely to uninstall apps, so optimizing how much space your app needs is important. Our new metrics on the app size report in the Play Console can show you how many of your active users have little free storage on their devices and if they’re uninstalling more than other users.

New tools to speed up your workflows and engineering velocity

Testing app bundles is now much easier with internal app sharing. Make anyone in your company an uploader without giving them access to the Play Console and they’ll be able to share test builds of your app as easily as they used to share APKs. With internal app sharing, you can be sure that each device is receiving exactly what Play would deliver in the wild. You don’t need to use version codes or the prod signing key, you can upload debuggable artifacts, and you’ll soon be able to get install links for old versions of your app, too.

The app bundle also lets you modularize your app with dynamic feature modules. Modularization speeds up build times and engineering velocity, since different teams can design, build, test, and debug features in parallel rather than working on the same complex code for a monolithic app. Based on your feedback, we’ve made it easier to develop modular apps with tools such as the new Dynamic Feature Navigator library and FakeSplitInstallManager, which lets you test on-demand delivery while offline instead of waiting for the Play Store.

Get more users on your latest release with improved in-app updates

In-app updates let you prompt users to update to the latest version of your app, without them having to leave your app. More than 10% of the top apps and games are already using in-app updates with an average acceptance rate of 24%. Based on your feedback, we’re also giving you more control over how and when you show update prompts:

  • Set an update priority per release to determine whether the user is interrupted with an immediate or flexible update flow or no prompt at all.
  • Get app staleness, the number of days the app on this device has had an update available without upgrading. You can use both priority and staleness as you’d like when determining which update flow to trigger.
  • You can check the download progress of a flexible update so that you can display your own progress bar in your app.
  • Finally, you can now test your in-app update flows using internal app sharing.

Modern game distribution

For some games with rich content, the 150MB app bundle size limit is not enough. Using expansion files or content delivery networks can get around this but could introduce complexity when you’re building and releasing your game, and can result in a poor user experience. That’s why we’re extending the app bundle format to support asset delivery with a new delivery construct called asset packs which can go up to multiple gigabytes.

Asset packs are packaged in the app bundle alongside your binary, so you can publish a single artifact to Play that contains everything your game needs, giving you full control of your asset delivery. Play’s asset delivery will also enable texture compression targeting, so that your users only get the assets suitable for their device with no wasted space or bandwidth. And you can rely on Play to keep your assets up to date, just as it does with your game binary. We’re currently testing this with some early partners and hope to make it more widely available soon.

Here’s to another successful Playtime

Look out for the sessions from this year’s Playtime, which will be added to the Android Developers YouTube channel. We look forward to sharing more tools and services for your apps and games, made possible by the app bundle and our new dynamic framework. And as always, please give us your feedback and let us know what you think.

How useful did you find this blog post?

Privacy protections for physical activity in Android 10

Since Google Fit was released in 2015, apps with an abundance of features for health and fitness tracking have integrated with the Google Fit APIs. Over the years, the number of users using Google Fit as a central repository for their fitness and wellness data has grown significantly.

With Android 10, we're making further updates to give users even more control over this personal data. One key change concerns how Android apps can monitor a user’s physical activity and retrieve data from Android sensor APIs and the Google Fit platform.

In Android 10: Activity recognition permission

Android 10 introduces a new runtime permission for activity recognition for apps that make use of the user's step and calorie count or classify the user's physical activity, such as walking, biking, or moving in a vehicle through one of the following APIs:

If your app relies only on raw data from other built-in sensors on the device, such as the accelerometer and gyroscope, you don't need to declare this new permission in your app.

Activity Recognition Permission Enforcement

  • Starting December 2019, data will be restricted from apps not including the Google Play Services legacy activity recognition permission in the manifest. If your app doesn’t currently request this permission, you should add it today to ensure no loss of service for your users.
  • When a user upgrades to Android 10, the system auto-grants this permission to your app if it previously requested the legacy permission.
  • As you begin targeting Android 10, you should register the ACTIVITY_RECOGNITION permission and adopt the new permission model to adhere to the new policy.

Google Fit physical activity APIs

This new permission affects a subset of data types available in the Google Fit APIs on Android. If your app accesses these types from Google Fit today, then you need to update your app inline with the new permissions.

The activity recognition runtime permission is required for accessing the following APIs / data types:

  • RecordingAPI - recording the following data types:
    • com.google.step_count.delta
    • com.google.step_count.cadence
    • com.google.activity.segment
    • com.google.calories.expended
  • HistoryAPI - reading the following data types:
    • com.google.step_count.delta
    • com.google.step_count.cadence
    • com.google.activity.segment
    • com.google.activity.exercise
    • com.google.activity.summary

With Android 10 now launched and SDK 29 becoming your primary development target, now is the time to make sure your apps are compatible with the new runtime permission.

Introducing Google Play Points in the U.S.

Posted by Paul Feng, Product Manager, Google Play

three mobile displays with apps At Google Play, we continue to build new experiences to delight users and help developers succeed. Today, we’re excited to announce that the Google Play Points rewards program is expanding to the United States following successful launches in Japan and Korea, where millions of people have already enrolled. The program is designed to show appreciation to our users and help increase engagement with your games and apps.

Google Play Points rewards users for any purchase they make on Play — including apps, games, in-app items, music, movies, books, and subscriptions - and for downloading select apps and games. For all developers, if you’re on Play billing, users will earn points on your apps and games immediately.

Play Points can then be redeemed for unique rewards like special items and discounts in Candy Crush, Homescapes, Lords Mobile and many others. We’re fortunate to be working with a select group of developers to offer these rewards for the U.S. launch — including Niantic, King, Electronic Arts, Playrix, Jam City, Kabam, Ludia, Kongregate, and others. Users can also redeem their points for Google Play Credit, and spend it on your app or game just as they do today.

Users are finding value in our initial Play Points markets, Japan and Korea, and developers there are incredibly happy with the results. In the future, we look forward to working with additional partners to deliver more unique rewards to users as Google Play Points evolves.

Google Play Points is rolling out in the US over the next few days. If you’d like to enroll as a user in the program, open the Play Store app on your Android device, tap menu, then tap Play Points to get started.

How useful did you find this blog post?

One Biometric API Over all Android

Posted by Isai Damier, Android Developer Platform Engineering (@isaidamier)

Kevin Chyn, Android Framework

Curtis Belmonte, Android Framework

With the launch of Android 10 (API level 29), developers can now use the Biometric API, part of the AndroidX Biometric Library, for all their on-device user authentication needs. The Android Framework and Security team has added a number of significant features to the AndroidX Biometric Library, which makes all of the biometric behavior from Android 10 available to all devices that run Android 6.0 (API level 23) or higher. In addition to supporting multiple biometric authentication form factors, the API has made it much easier for developers to check whether a given device has biometric sensors. And if there are no biometric sensors present, the API allows developers to specify whether they want to use device credentials in their apps.

The features do not just benefit developers. Device manufacturers and OEMs have a lot to celebrate as well. The framework is now providing a friendly, standardized API for OEMs to integrate support for all types of biometric sensors on their devices. In addition, the framework has built-in support for facial authentication in Android 10 so that vendors don’t need to create a custom implementation.

A bit of background

The FingerprintManager class was introduced in Android 6.0 (API level 23). At the time -- and up until Android 9 (API level 28) -- the API provided support only for fingerprint sensors, and with no UI. Developers needed to build their own fingerprint UI.

Based on developer feedback, Android 9 introduced a standardized fingerprint UI policy. In addition, BiometricPrompt was introduced to encompass more sensors than just fingerprint. In addition to providing a safe, familiar UI for user authentication, it enabled a small, maintainable API surface for developers to access the variety of biometric hardware available on OEM devices. OEMs can now customize the UI with necessary affordances and iconography to expose new biometrics, such as outlines for in-display sensors. With this, app developers don’t need to worry about implementing customized, device-specific implementations for biometric authentication.

Then, in Android 10, the team introduced some pivotal features to turn the biometric API into a one-stop-shop for in-app user authentication. BiometricManager enables developers to check whether a device supports biometric authentication. Furthermore, the setDeviceCredentialAllowed() method was added to allow developers the option to use a device’s PIN/pattern/password instead of biometric credentials, if it makes sense for their app.

The team has now packaged every biometric feature you get in Android 10 into the androidx.biometric Gradle dependency so that a single, consistent, interface is available all the way back to Android 6.0 (API level 23).

How it works

The androidx.biometric Gradle dependency is a support library for the Android framework Biometric classes. On API 29 and above, the library uses the classes under android.hardware.biometrics, FingerprintManager back to API 23, and Confirm Credential all the way back to API 21. Because of the variety of APIs, we strongly recommend using the androidx support library regardless of which API level your app targets.

To use the Biometric API in your app, do the following.

1. Add the Gradle dependency to your app module

$biometric_version is the latest release of the library

def biometric_version= '1.0.0-rc02'
implementation "androidx.biometric:biometric:$biometric_version"

2. Check whether the device supports biometric authentication

The BiometricPrompt needs to be recreated every time the Activity/Fragment is created; this should be done inside onCreate() or onCreateView() so that BiometricPrompt.AuthenticationCallback can start receiving callbacks properly.

To check whether the device supports biometric authentication, add the following logic:

val biometricManager = BiometricManager.from(context)
if (biometricManager.canAuthenticate() == BiometricManager.BIOMETRIC_SUCCESS){
   // TODO: show in-app settings, make authentication calls.
}

3. Create an instance of BiometricPrompt

The BiometricPrompt constructor requires both an Executor and an AuthenticationCallback object. The Executor allows you to specify a thread on which your callbacks should be run.

The AuthenticationCallback has three methods:

  1. onAuthenticationSucceeded() is called when the user has been authenticated using a credential that the device recognizes.
  2. onAuthenticationError() is called when an unrecoverable error occurs.
  3. onAuthenticationFailed() is called when the user is rejected, for example when a non-enrolled fingerprint is placed on the sensor, but unlike with onAuthenticationError(), the user can continue trying to authenticate.

The following snippet shows one way of implementing the Executor and how to instantiate the BiometricPrompt:

private fun instanceOfBiometricPrompt(): BiometricPrompt {
   val executor = ContextCompat.getmainExecutor(context)

   val callback = object: BiometricPrompt.AuthenticationCallback() {
       override fun onAuthenticationError(errorCode: Int, errString: CharSequence) {
           super.onAuthenticationError(errorCode, errString)
           showMessage("$errorCode :: $errString")
       }

       override fun onAuthenticationFailed() {
           super.onAuthenticationFailed()
           showMessage("Authentication failed for an unknown reason")
       }

       override fun onAuthenticationSucceeded(result: BiometricPrompt.AuthenticationResult) {
           super.onAuthenticationSucceeded(result)
           showMessage("Authentication was successful")
       }
   }

   val biometricPrompt = BiometricPrompt(context, executor, callback)
   return biometricPrompt
}

Instantiating the BiometricPrompt should be done early in the lifecycle of your fragment or activity (e.g., in onCreate or onCreateView). This ensures that the current instance will always properly receive authentication callbacks.

4. Build a PromptInfo object

Once you have a BiometricPrompt object, you ask the user to authenticate by calling biometricPrompt.authenticate(promptInfo). If your app requires the user to authenticate using a Strong biometric or needs to perform cryptographic operations in KeyStore, you should use authenticate(PromptInfo, CryptoObject) instead.

This call will show the user the appropriate UI, based on the type of biometric credential being used for authentication – such as fingerprint, face, or iris. As a developer you don’t need to know which type of credential is being used for authentication; the API handles all of that for you.

This call requires a BiometricPrompt.PromptInfo object. A PromptInfo is where you define the text that appears in the prompt: such as title, subtitle, description. Without a PromptInfo, it is not clear to the end user which app is asking for their biometric credentials. PromptInfo also allows you to specify whether it’s OK for devices that do not support biometric authentication to grant access through the device credentials, such as password, PIN, or pattern that are used to unlock the device.

Here is an example of a PromptInfo declaration:

private fun getPromptInfo(): BiometricPrompt.PromptInfo {
   val promptInfo = BiometricPrompt.PromptInfo.Builder()
       .setTitle("My App's Authentication")
       .setSubtitle("Please login to get access")
       .setDescription("My App is using Android biometric authentication")
              .setDeviceCredentialAllowed(true)
       .build()
   return promptInfo
}

For actions that require a confirmation step, such as transactions and payments, we recommend using the default option -- setConfirmationRequired(true) -- which will add a confirmation button to the UI, as shown in Figure 2.

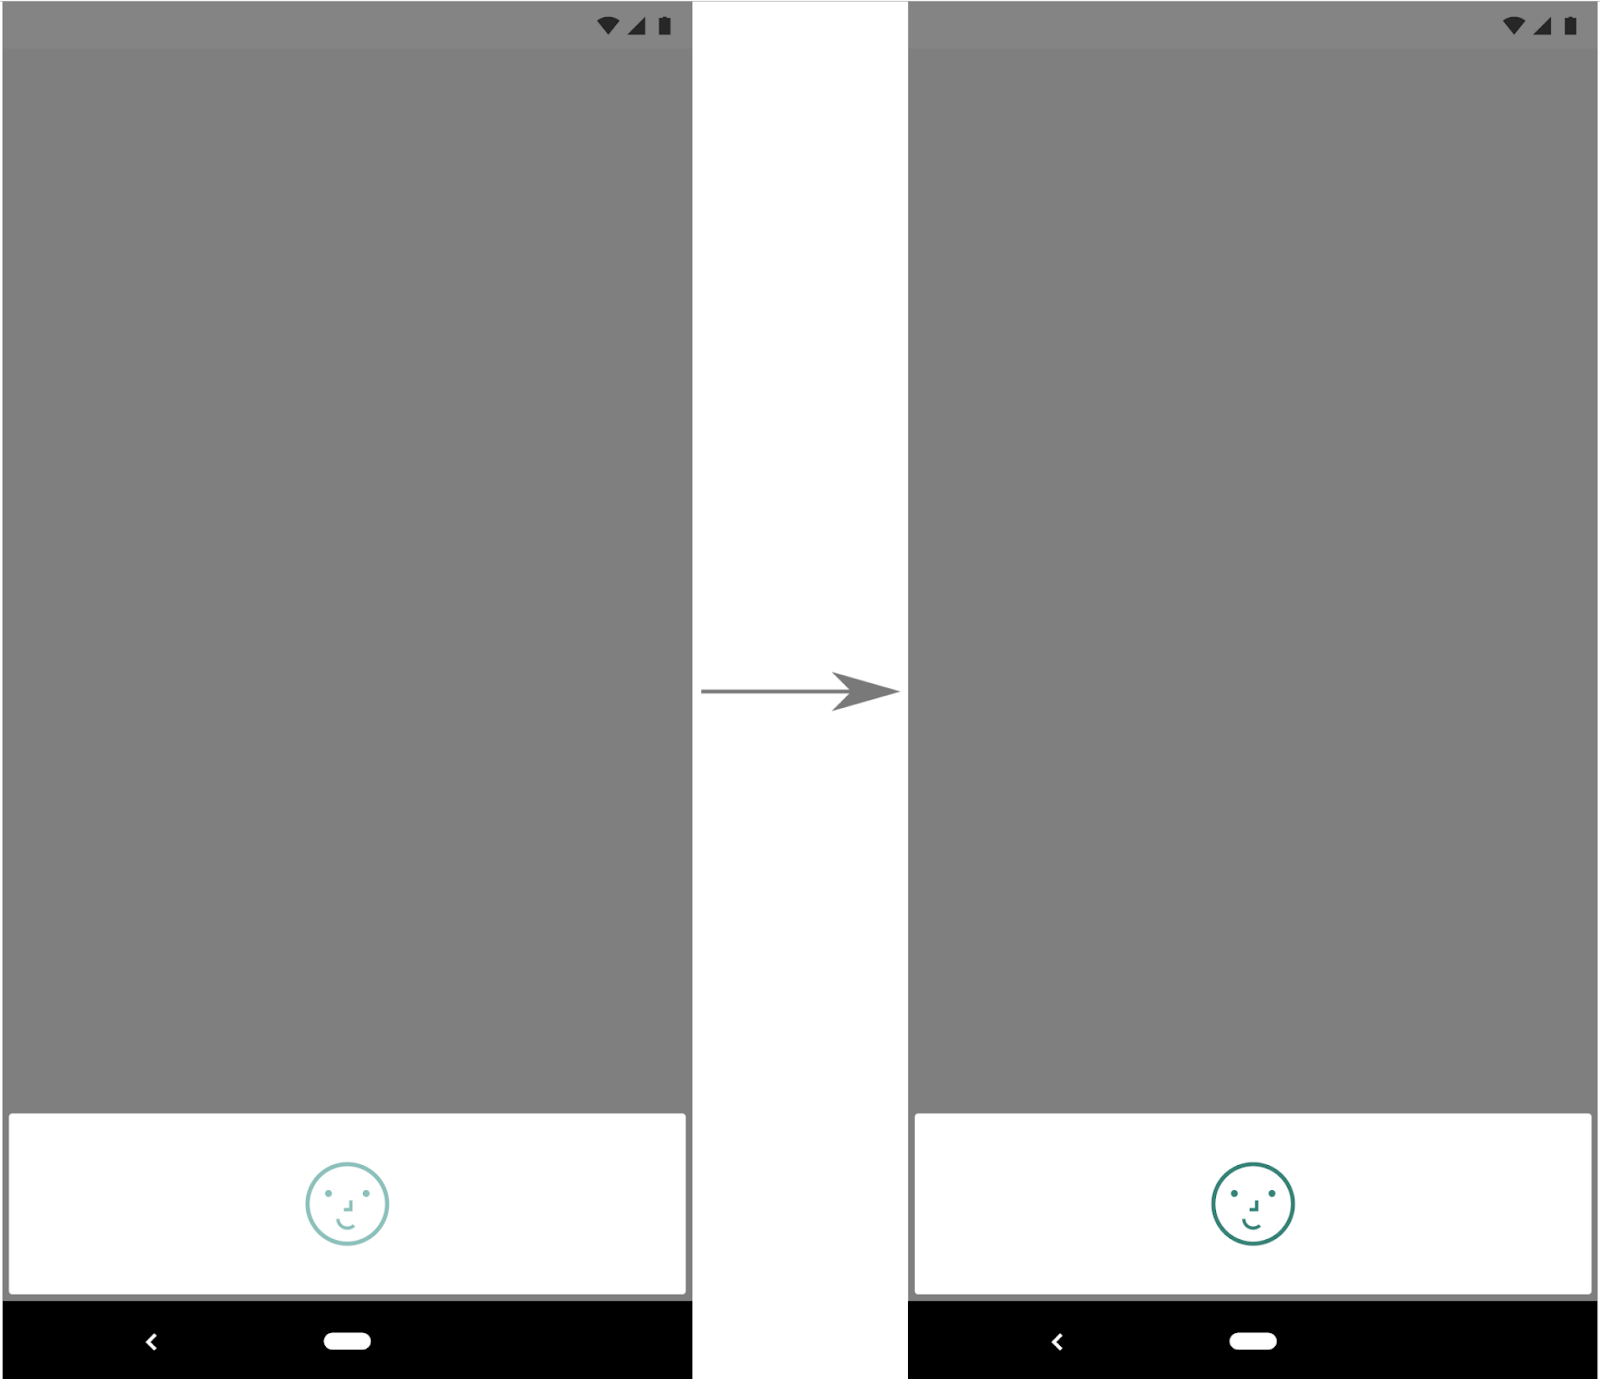
Figure 1. Example face authentication flow using BiometricPrompt with setConfirmationRequired(false).

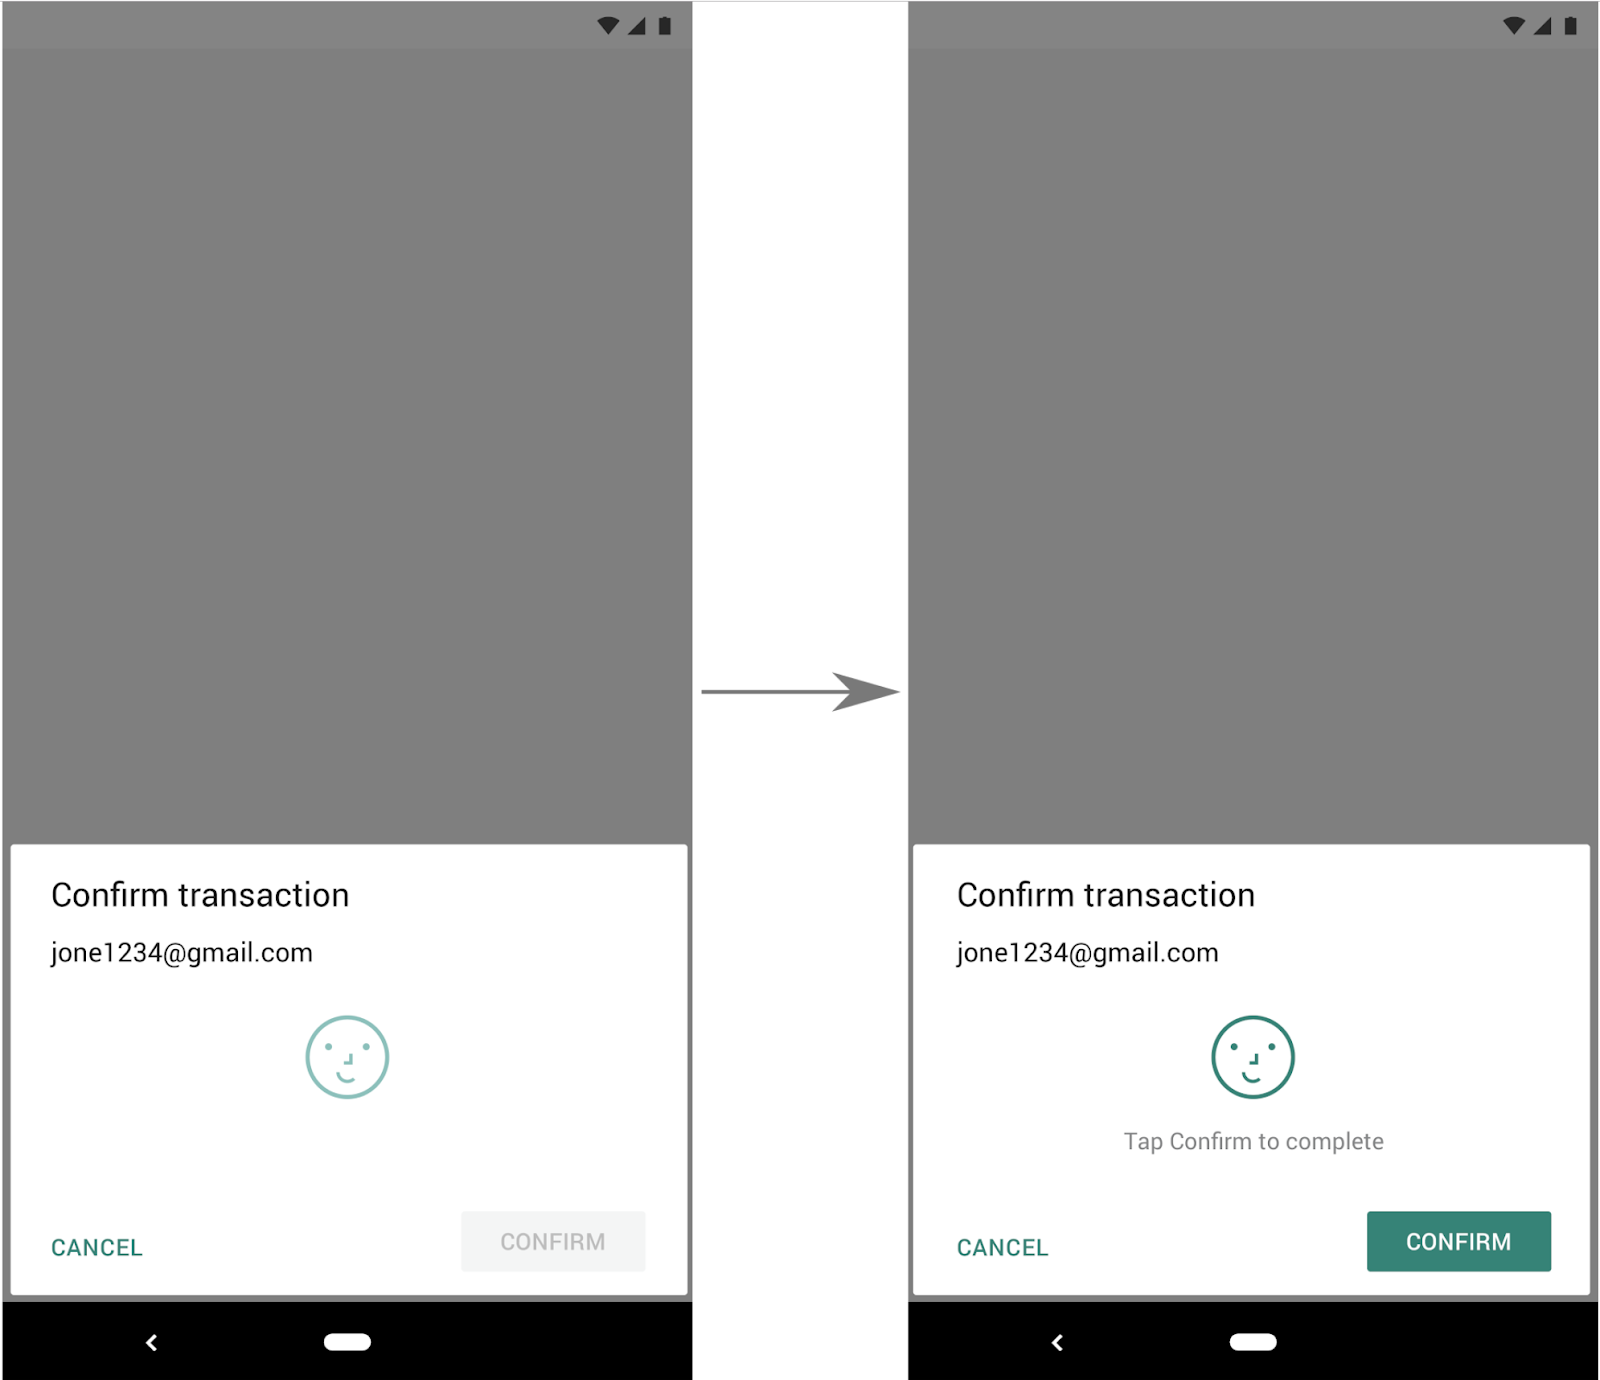
Figure 2. Example face authentication flow using BiometricPrompt with setConfirmationRequired(true) (default behavior).

5. Ask the user to authenticate

Now that you have all the required pieces, you can ask the user to authenticate.

val canAuthenticate = biometricManager.canAuthenticate()
if (canAuthenticate == BiometricManager.BIOMETRIC_SUCCESS) {
   biometricPrompt.authenticate(promptInfo)
} else {
   Log.d(TAG, "could not authenticate because: $canAuthenticate")
}

And that’s it! You should now be able to perform authentication, using biometric credentials, on any device that runs Android 6.0 (API level 23) or higher.

Going forward

Because the ecosystem continues to evolve rapidly, the Android Framework team is constantly thinking about how to provide long-term support for both OEMs and developers. Given the biometric library’s consistent, system-themed UI, developers don’t need to worry about device-specific requirements, and users get a more trustworthy experience.

We welcome any feedback from developers and OEMs on how to make it more robust, easier to use, and supportive of a wider range of use cases.

For in-depth examples that showcase additional use cases and demonstrate how you might integrate this library into your app, check out our repo, which contains functional sample apps that make use of the library. You can also read the associated developer guide and API reference for more information.

High engagement, larger screens: How Android developers can reach users on any device

Posted by Allan Livingston, Product Management Director, Chrome OS App Ecosystem

Android fuels mobile apps on devices that range far beyond your typical small-screen smartphone, from new Chromebooks like the lightweight, high-performance Google Pixelbook Go to multi-display devices and foldable phones like the Samsung Galaxy Fold. Not to mention the more than 175M Android tablets that have the Google Play store installed.1

These large-screen devices set the stage for more engaging and visually immersive experiences, whether by creating a larger canvas for creativity or by giving users faster, more flexible ways to work. As we’ve continued to prioritize large-screen devices with OEM partners like Samsung, Asus, and Lenovo, we’ve been able to expand our reach to a huge new audience of users.

During the week of Black Friday in 2018, 1 in 3 notebooks sold in the U.S. were Chromebooks.2 Chromebook unit sales also increased 22% YoY, while the rest of the notebook category decreased -6.1%.3 And we’re not just reaching more users — we’re reaching more engaged users. In fact, in just the last year, the total amount of time spent in Android apps on Chrome OS has grown 4X.4

YoY notebook sales in the U.S.

By making adjustments for larger screens, you can provide richer experiences across all these devices and tap into a wider audience of app users. Development teams around the world — including Adobe Lightroom, Evernote, and Gameloft, among many others — have already seen some incredible results:

App developers driving engagement on larger screens

With the goal of allowing users to play any video file, anywhere, on any device or screen size, the developers at VideoLAN project decided to adapt VLC — an open source, cross-platform multimedia player — for all screens. The team started by adding keyboard and mouse support before designing multiple versions of the layout to allow users to easily scale and resize the app.

Users can now enjoy the same immersive experience across a range of different devices and form factors, and VideoLAN has already received overwhelmingly positive feedback from users around the world.

War Robots — a 12-player real-time battle game developed by Pixonic — was originally designed for early-generation phones. The team enabled windowed gameplay so users could play in one window while watching their favorite streamers or upgrading their robots in another, created new tutorials and controls that appear whenever players switch between desktop and tablet mode, and added support for keyboard and mouse input.

More than 100,000 players have already played War Robots on Chrome OS since Pixonic rolled out the latest optimizations, which made War Robots’ battles even more thrilling and engaging on larger screens, and Pixonic has seen 25% longer user sessions on Chromebooks as a result.

Is your app optimized for large-screen devices? Here are a few things to consider:

1) Laptop and tablet mode
Test your core app functions to make sure everything works smoothly without crashing as users switch between different modes.

2) Window management and layout
Support multi-window mode and free-form window resizing, and be sure to design optimized layouts for both landscape and portrait orientations. Set up your app to correctly handle configuration changes to avoid crashes when people rotate their devices.

Suite of devices

3) Keyboard and mouse input
Make sure your app is fully functional without touch input, and add support for keyboards, mice, and game controllers (if applicable).

4) Hardware support
If you’re using NDK, be sure to support x86 (32 and 64bit) ABIs to ensure the highest possible performance.

Build, test, and run Android apps on a Chromebook

From the start, our goal has been to make the Chromebook a simple, secure, and speedy environment for everyone. The launch of Linux (Beta) on Chrome OS allowed Android developers to build and test apps with a Chromebook. And earlier this year at I/O, we announced that Android Studio 3.5 now fully supports Chrome OS with a simple one-click installation.

Since then, we’ve been working on a few improvements that make Chromebooks an even better place for safe and seamless Android app development. Let’s start with the biggest one:

Deploying an app directly to Chrome OS to enable full Android development
In the past, you could only test your apps by deploying them to Android phones. With Chrome OS’s upcoming M80 release, you’ll be able to deploy Android apps directly to your Chromebook. That way, you can develop and test your app on the same machine, all without a connected device or needing to put your laptop in developer mode. Developers can start testing this feature in developer channel in November.

GPU acceleration for a snappier, jank-free UI (now in beta channel)
We’ve enabled GPU support to reduce latency and deliver a snappier UI. That goes for developer apps such as Android Studio, Unity Editor, or Visual Studio Code. And for developers who also work on web apps, GPU acceleration means faster testing with Chrome Canary or Firefox.

Container backup and restore to easily move between devices
Previously, Linux files and apps were tied entirely to the device — if you lost your device, you lost all the work inside of it. Now, Chrome OS’s container-based architecture allows you to pack up your entire workspace and export it to external storage or Drive. The backup file can be restored at any point, either on the same machine — which is helpful when jumping back to a previous state — or to move to another Chromebook.

You can now find import and export buttons in your Linux settings.

Picture-in-picture (PiP) support

If you’ve built PIP support into your Android apps, you’ll see that function work seamlessly in Chrome OS in 2020. But you can start testing this feature now by enabling PiP in Android settings → Developer options.

Build your apps with larger screens in mind

With millions of users on Chromebooks, tablets, foldables, and now multi-display devices, designing app experiences with larger screens in mind is crucial. Seize this opportunity to engage more users by optimizing your existing apps to work great across all screens. And the latest Linux features on Chrome OS give you the power to use a single machine to build and run Android apps. Don’t hesitate to take action to ensure your apps work seamlessly on larger screens with Linux on Chrome OS.


Sources

1. The number of tablets only accounts for devices that have the Google Play Store installed (e.g., excluding tablets in China); the actual number of tablets capable of running Android applications is much larger.

2. The NPD Group, Inc., Retail Tracking Service, U.S., Notebook Computers, Chrome OS, based on units, Nov. 18, 2018–Nov. 24, 2018 vs. Nov. 19, 2017–Nov. 25, 2017.

3. The NPD Group, Inc., U.S. Retail Tracking Service, Notebook Computers, based on units, Sept. 2018–Aug. 2019. Sales are adjusted for 5 weeks in Jan. 2018 vs. 4 weeks in Jan. 2019.

4. Google Internal Data, March 2018–March 2019.