Posted by Florina Muntenescu, Android Developer Advocate,
Rohit Sathyanarayana, Software Engineer
Welcome Jetpack DataStore, now in alpha - a new and improved data storage solution aimed at replacing SharedPreferences. Built on Kotlin coroutines and Flow, DataStore provides two different implementations: Proto DataStore, that lets you store typed objects (backed by protocol buffers) and Preferences DataStore, that stores key-value pairs. Data is stored asynchronously, consistently, and transactionally, overcoming most of the drawbacks of SharedPreferences.
SharedPreferences vs DataStore
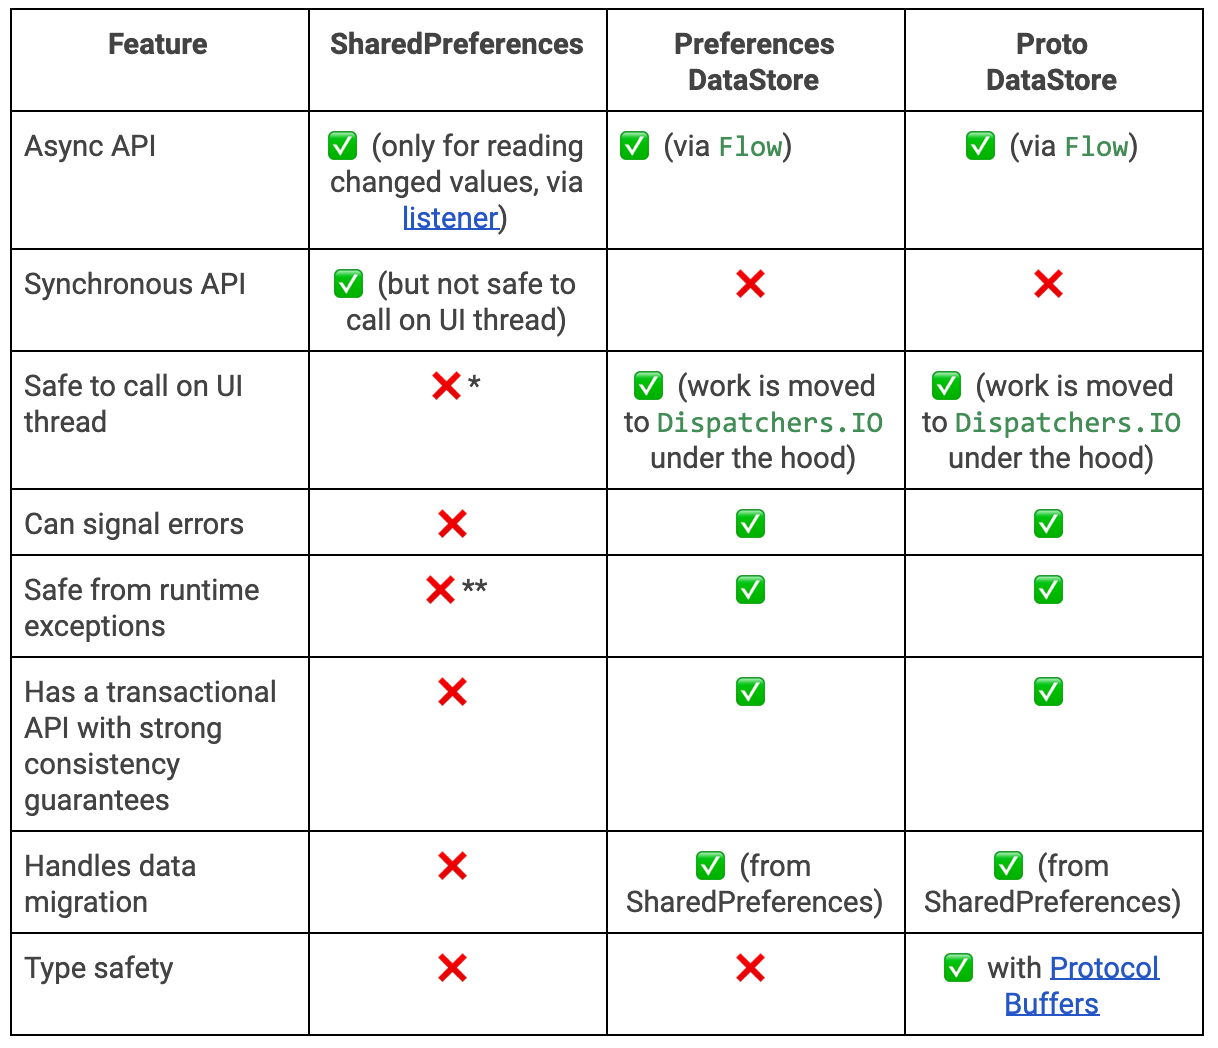
* SharedPreferences has a synchronous API that can appear safe to call on the UI thread, but which actually does disk I/O operations. Furthermore, apply() blocks the UI thread on fsync(). Pending fsync() calls are triggered every time any service starts or stops, and every time an activity starts or stops anywhere in your application. The UI thread is blocked on pending fsync() calls scheduled by apply(), often becoming a source of ANRs.
** SharedPreferences throws parsing errors as runtime exceptions.
In both implementations, DataStore saves the preferences in a file and performs all data operations on Dispatchers.IO unless specified otherwise.
While both Preferences DataStore and Proto DataStore allow saving data, they do this in different ways:
- Preference DataStore, like SharedPreferences, has no way to define a schema or to ensure that keys are accessed with the correct type.
- Proto DataStore lets you define a schema using Protocol buffers. Using Protobufs allows persisting strongly typed data. They are faster, smaller, simpler, and less ambiguous than XML and other similar data formats. While Proto DataStore requires you to learn a new serialization mechanism, we believe that the strongly typed schema advantage brought by Proto DataStore is worth it.
Room vs DataStore
If you have a need for partial updates, referential integrity, or support for large/complex datasets, you should consider using Room instead of DataStore. DataStore is ideal for small , simple datasets and does not support partial updates or referential integrity.
Using DataStore
Start by adding the DataStore dependency. If you’re using Proto DataStore, make sure you also add the proto dependency:
// Preferences DataStore
implementation "androidx.datastore:datastore-preferences:1.0.0-alpha01"


// Proto DataStore
implementation  "androidx.datastore:datastore-core:1.0.0-alpha01"
When working with Proto DataStore, you define your schema in a proto file in the app/src/main/proto/ directory. See the protobuf language guide for more information on defining a proto schema.
syntax = "proto3";

option java_package = "<your package name here>";
option java_multiple_files = true;

message Settings {
  int my_counter = 1;
}
Create the DataStore
Create the DataStore with the Context.createDataStore() extension functions.
// with Preferences DataStore
val dataStore: DataStore<Preferences> = context.createDataStore(
    name = "settings"
)
If you’re using Proto DataStore, you’ll also have to implement the Serializer interface to tell DataStore how to read and write your data type.
object SettingsSerializer : Serializer<Settings> {
    override fun readFrom(input: InputStream): Settings {
        try {
            return Settings.parseFrom(input)
        } catch (exception: InvalidProtocolBufferException) {
            throw CorruptionException("Cannot read proto.", exception)
        }
    }

    override fun writeTo(t: Settings, output: OutputStream) = t.writeTo(output)
}


// with Proto DataStore
val settingsDataStore: DataStore<Settings> = context.createDataStore(
    fileName = "settings.pb",
    serializer = SettingsSerializer
)
Read data from DataStore
DataStore exposes the stored data in a Flow, either in a Preferences object or as the object defined in your proto schema. DataStore ensures that data is retrieved on Dispatchers.IO so your UI thread isn’t blocked.
With Preferences DataStore:
val MY_COUNTER = preferencesKey<Int>("my_counter")
val myCounterFlow: Flow<Int> = dataStore.data
     .map { currentPreferences ->
        // Unlike Proto DataStore, there's no type safety here.
        currentPreferences[MY_COUNTER] ?: 0
   }
With Proto DataStore:
val myCounterFlow: Flow<Int> = settingsDataStore.data
    .map { settings ->
        // The myCounter property is generated for you from your proto schema!
        settings.myCounter
    }
Write data to DataStore
To write data, DataStore offers a suspending DataStore.updateData() function that gives you the current state of the stored data as a parameter—either as a Preferences object, or an instance of the object defined in the proto schema. The updateData() function updates the data transactionally in an atomic read-write-modify operation. The coroutine completes once the data is persisted on disk.
Preferences DataStore also provides a DataStore.edit() function to make it easier to update data. Instead of receiving a Preferences object, you receive a MutablePreferences object which you edit. As with updateData(), the changes are applied to disk after the transform block completes, and the coroutine completes once data is persisted to disk.
With Preferences DataStore:
suspend fun incrementCounter() {
    dataStore.edit { settings ->
        // We can safely increment our counter without losing data due to races!
        val currentCounterValue = settings[MY_COUNTER] ?: 0
        settings[MY_COUNTER] = currentCounterValue + 1
    }
}
With Proto DataStore:
suspend fun incrementCounter() {
    settingsDataStore.updateData { currentSettings ->
        // We can safely increment our counter without losing data due to races!
        currentSettings.toBuilder()
            .setMyCounter(currentSettings.myCounter + 1)
            .build()
    }
}
Migrate from SharedPreferences to DataStore
To migrate from SharedPreferences to DataStore, you need to pass in a SharedPreferencesMigration object to the DataStore builder. DataStore can automatically migrate from SharedPreferences to DataStore for you. Migrations are run before any data access can occur in DataStore. This means that your migration must have succeeded before DataStore.data returns any values and before DataStore.updateData() can update the data.
If you’re migrating to Preferences DataStore, you can use the default SharedPreferencesMigration implementation and just pass in the name used to construct your SharedPreferences.
With Preferences DataStore:
val dataStore: DataStore<Preferences> = context.createDataStore(
    name = "settings",
    migrations = listOf(SharedPreferencesMigration(context, "settings_preferences"))
)
When migrating to Proto DataStore, you’ll have to implement a mapping function that defines how to migrate from the key-value pairs used by SharedPreferences to the DataStore schema you defined.
With Proto DataStore:
val settingsDataStore: DataStore<Settings> = context.createDataStore(
    produceFile = { File(context.filesDir, "settings.preferences_pb") },
    serializer = SettingsSerializer,
    migrations = listOf(
        SharedPreferencesMigration(
            context,
            "settings_preferences"
        ) { sharedPrefs: SharedPreferencesView, currentData: UserPreferences ->
            // Map your sharedPrefs to your type here
          }
    )
)
Wrap-up
SharedPreferences comes with several drawbacks: a synchronous API that can appear safe to call on the UI thread, no mechanism for signaling errors, lack of transactional API, and more. DataStore is a replacement for SharedPreferences that addresses most of these shortcomings. DataStore includes a fully asynchronous API using Kotlin coroutines and Flow, handles data migration, guarantees data consistency, and handles data corruption.
As DataStore is still in alpha, we need your help to make it better! To get started, find out more about DataStore in our documentation and try it out by taking our codelabs: Preferences DataStore codelab and Proto DataStore codelab. Then, let us know how we can improve the library by creating issues on the Issue Tracker.