 Posted by Chris Wailes - Senior Software Engineer

The performance, safety, and developer productivity provided by Rust has led to rapid adoption in the Android Platform. Since slower build times are a concern when using Rust, particularly within a massive project like Android, we've worked to ship the fastest version of the Rust toolchain that we can. To do this we leverage multiple forms of profiling and optimization, as well as tuning C/C++, linker, and Rust flags. Much of what I’m about to describe is similar to the build process for the official releases of the Rust toolchain, but tailored for the specific needs of the Android codebase. I hope that this post will be generally informative and, if you are a maintainer of a Rust toolchain, may make your life easier.
Android’s Compilers
While Android is certainly not unique in its need for a performant cross-compiling toolchain this fact, combined with the large number of daily Android build invocations, means that we must carefully balance tradeoffs between the time it takes to build a toolchain, the toolchain’s size, and the produced compiler’s performance.
Our Build Process
To be clear, the optimizations listed below are also present in the versions of rustc that are obtained using rustup. What differentiates the Android toolchain from the official releases, besides the provenance, are the cross-compilation targets available and the codebase used for profiling. All performance numbers listed below are the time it takes to build the Rust components of an Android image and may not be reflective of the speedup when compiling other codebases with our toolchain.
Codegen Units (CGU1)
When Rust compiles a crate it will break it into some number of code generation units. Each independent chunk of code is generated and optimized concurrently and then later re-combined. This approach allows LLVM to process each code generation unit separately and improves compile time but can reduce the performance of the generated code. Some of this performance can be recovered via the use of Link Time Optimization (LTO), but this isn’t guaranteed to achieve the same performance as if the crate were compiled in a single codegen unit.
To expose as many opportunities for optimization as possible and ensure reproducible builds we add the -C codegen-units=1 option to the RUSTFLAGS environment variable. This reduces the size of the toolchain by ~5.5% while increasing performance by ~1.8%.
Be aware that setting this option will slow down the time it takes to build the toolchain by ~2x (measured on our workstations).
GC Sections
Many projects, including the Rust toolchain, have functions, classes, or even entire namespaces that are not needed in certain contexts. The safest and easiest option is to leave these code objects in the final product. This will increase code size and may decrease performance (due to caching and layout issues), but it should never produce a miscompiled or mislinked binary.
It is possible, however, to ask the linker to remove code objects that aren’t transitively referenced from the main()function using the --gc-sections linker argument. The linker can only operate on a section-basis, so, if any object in a section is referenced, the entire section must be retained. This is why it is also common to pass the -ffunction-sections and -fdata-sections options to the compiler or code generation backend. This will ensure that each code object is given an independent section, thus allowing the linker’s garbage collection pass to collect objects individually.
This is one of the first optimizations we implemented and, at the time, it produced significant size savings (on the order of 100s of MiBs). However, most of these gains have been subsumed by those made from setting -C codegen-units=1 when they are used in combination and there is now no difference between the two produced toolchains in size or performance. However, due to the extra overhead, we do not always use CGU1 when building the toolchain. When testing for correctness the final speed of the compiler is less important and, as such, we allow the toolchain to be built with the default number of codegen units. In these situations we still run section GC during linking as it yields some performance and size benefits at a very low cost.
Link-Time Optimization (LTO)
A compiler can only optimize the functions and data it can see. Building a library or executable from independent object files or libraries can speed up compilation but at the cost of optimizations that depend on information that’s only available when the final binary is assembled. Link-Time Optimization gives the compiler another opportunity to analyze and modify the binary during linking.
For the Android Rust toolchain we perform thin LTO on both the C++ code in LLVM and the Rust code that makes up the Rust compiler and tools. Because the IR emitted by our clang might be a different version than the IR emitted by rustc we can’t perform cross-language LTO or statically link against libLLVM. The performance gains from using an LTO optimized shared library are greater than those from using a non-LTO optimized static library however, so we’ve opted to use shared linking.
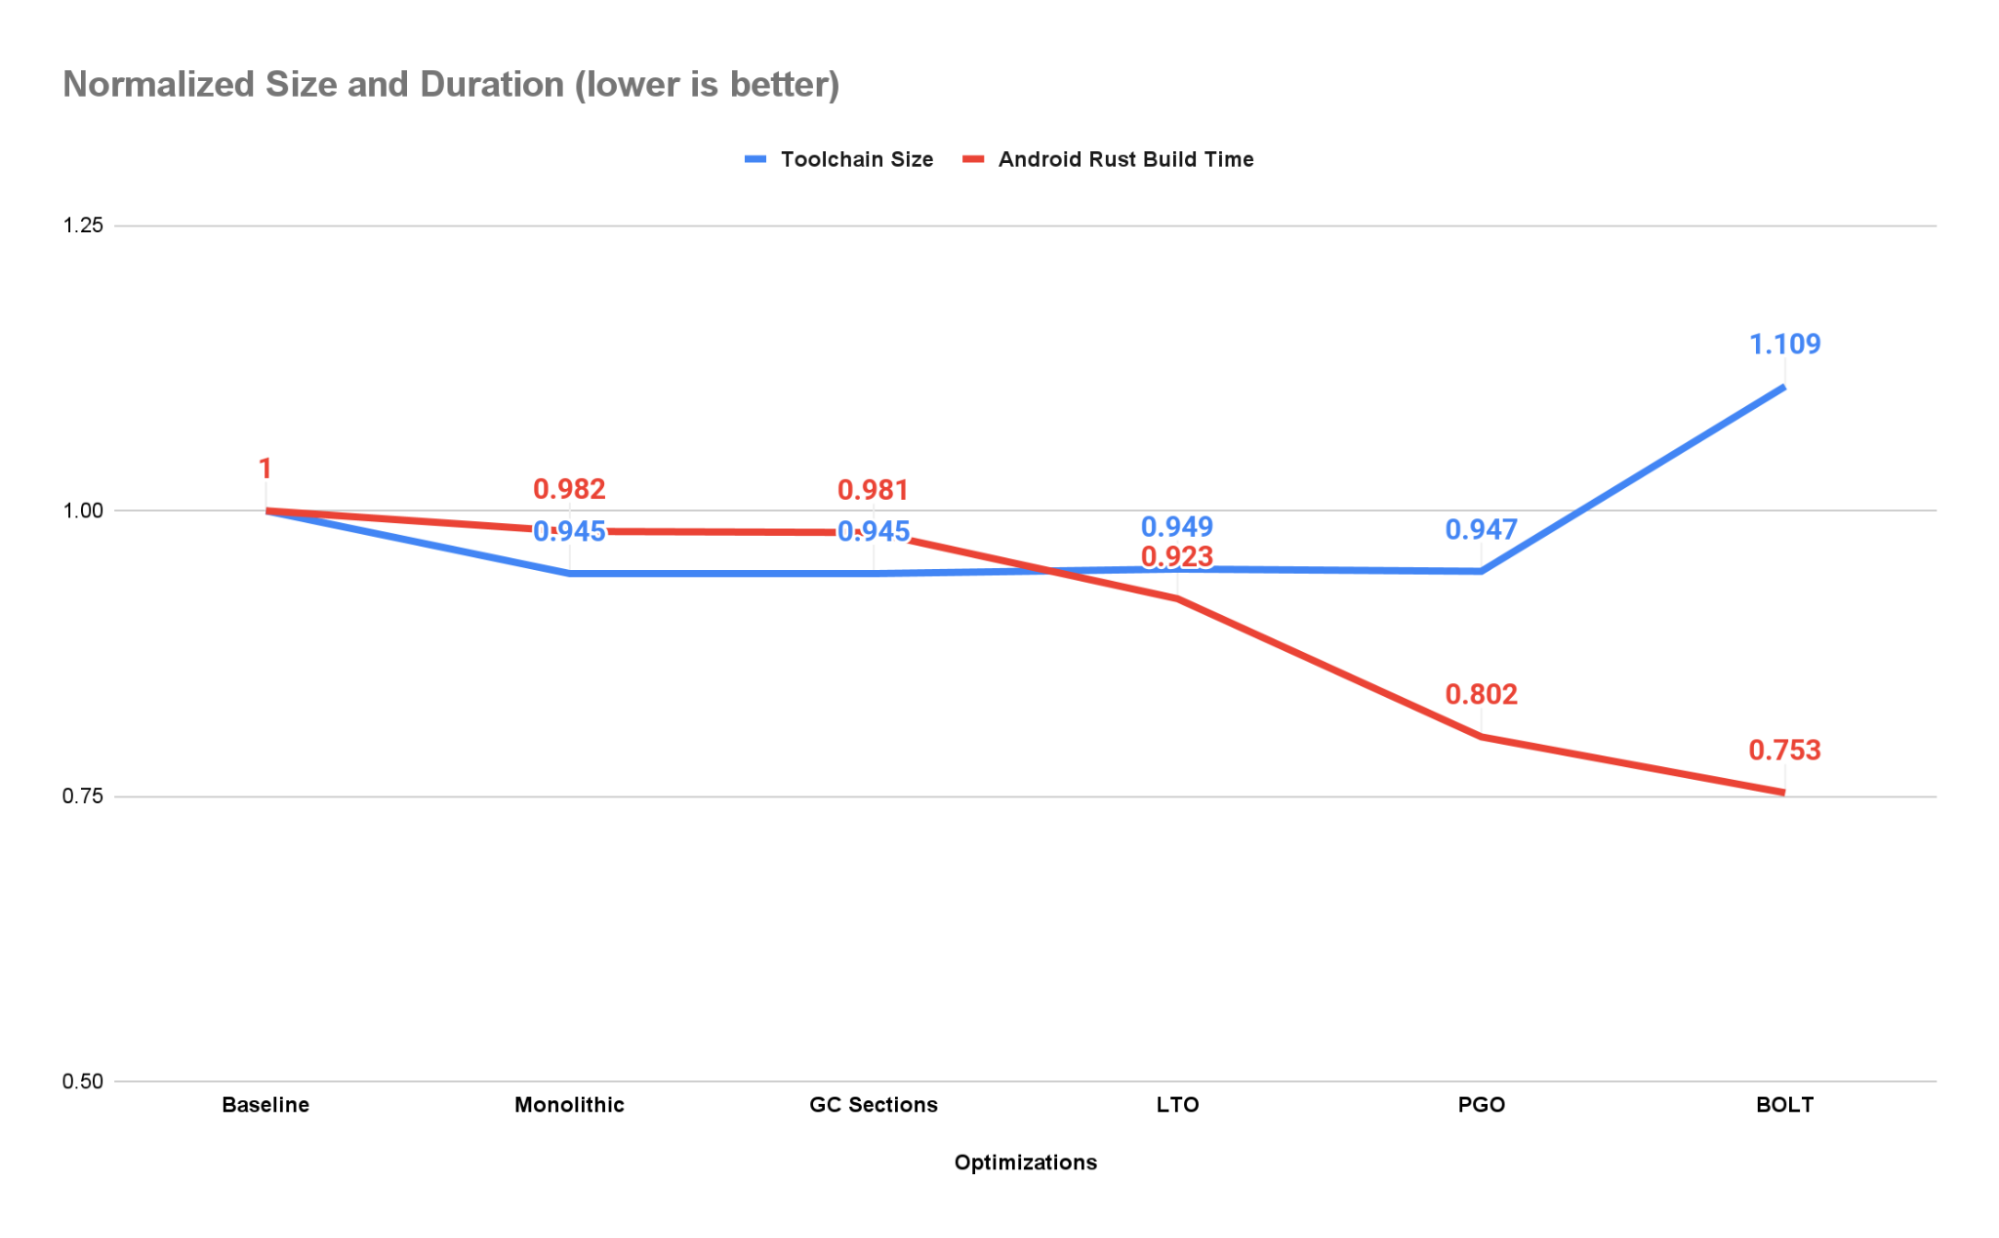
Using CGU1, GC sections, and LTO produces a speedup of ~7.7% and size improvement of ~5.4% over the baseline. This works out to a speedup of ~6% over the previous stage in the pipeline due solely to LTO.
Profile-Guided Optimization (PGO)
Command line arguments, environment variables, and the contents of files can all influence how a program executes. Some blocks of code might be used frequently while other branches and functions may only be used when an error occurs. By profiling an application as it executes we can collect data on how often these code blocks are executed. This data can then be used to guide optimizations when recompiling the program.
We use instrumented binaries to collect profiles from both building the Rust toolchain itself and from building the Rust components of Android images for x86_64, aarch64, and riscv64. These four profiles are then combined and the toolchain is recompiled with profile-guided optimizations.
As a result, the toolchain achieves a ~19.8% speedup and 5.3% reduction in size over the baseline compiler. This is a 13.2% speedup over the previous stage in the compiler.
BOLT: Binary Optimization and Layout Tool
Even with LTO enabled the linker is still in control of the layout of the final binary. Because it isn’t being guided by any profiling information the linker might accidentally place a function that is frequently called (hot) next to a function that is rarely called (cold). When the hot function is later called all functions on the same memory page will be loaded. The cold functions are now taking up space that could be allocated to other hot functions, thus forcing the additional pages that do contain these functions to be loaded.
BOLT mitigates this problem by using an additional set of layout-focused profiling information to re-organize functions and data. For the purposes of speeding up rustc we profiled libLLVM, libstd, and librustc_driver, which are the compiler’s main dependencies. These libraries are then BOLT optimized using the following options:
--peepholes=all
--data=<path-to-profile>
--reorder-blocks=ext-tsp
–-reorder-functions=hfsort
--split-functions
--split-all-cold
--split-eh
--dyno-stats
Any additional libraries matching lib/*.so are optimized without profiles using only --peepholes=all.
Applying BOLT to our toolchain produces a speedup over the baseline compiler of ~24.7% at a size increase of ~10.9%. This is a speedup of ~6.1% over the PGOed compiler without BOLT.
If you are interested in using BOLT in your own project/build I offer these two bits of advice: 1) you’ll need to emit additional relocation information into your binaries using the -Wl,--emit-relocs linker argument and 2) use the same input library when invoking BOLT to produce the instrumented and the optimized versions.
Conclusion
By compiling as a single code generation unit, garbage collecting our data objects, performing both link-time and profile-guided optimizations, and leveraging the BOLT tool we were able to speed up the time it takes to compile the Rust components of Android by 24.8%. For every 50k Android builds per day run in our CI infrastructure we save ~10K hours of serial execution.
Our industry is not one to stand still and there will surely be another tool and another set of profiles in need of collecting in the near future. Until then we’ll continue making incremental improvements in search of additional performance. Happy coding!
 Posted by Clément Béra, Senior software engineer