Tag Archives: A/B Testing

How to effectively A/B test power consumption for your Android app’s features

Posted by Mayank Jain - Product Manager, and Yasser Dbeis - Software Engineer; Android Studio

Android developers have been telling us they're looking for tools to help optimize power consumption for different devices on Android.

The new Power Profiler in Android Studio helps Android developers by showing power consumption happening on devices as the app is being used. Understanding power consumption across Android devices can help Android developers identify and fix power consumption issues in their apps. They can run A/B tests to compare the power consumption of different algorithms, features or even different versions of their app.

The new Power Profiler in Android Studio

Apps which are optimized for lower power consumption lead to an improved battery and thermal performance of the device, which means an improved user experience on Android.

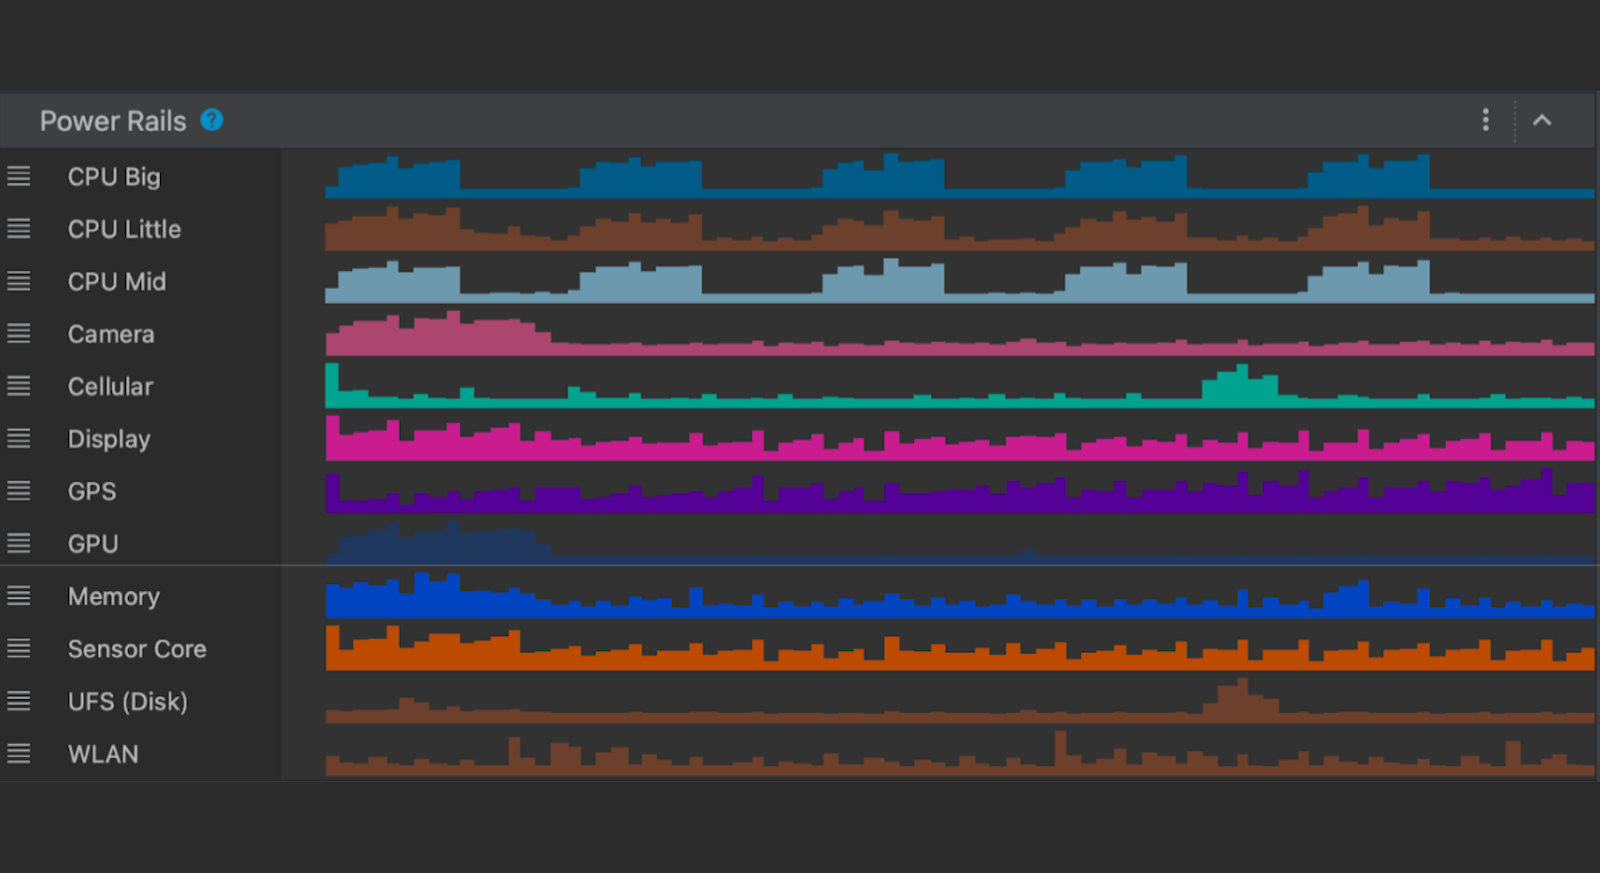
This power consumption data is made available through the On Device Power Monitor (ODPM) on Pixel 6+ devices, segmented by each sub-system called “Power Rails”. See Profileable power rails for a list of supported sub-systems.

The Power Profiler can help app developers detect problems in several areas:

    • Detecting unoptimized code that is using more power than necessary.
    • Finding background tasks that are causing unnecessary CPU usage.
    • Identifying wakelocks that are keeping the device awake when they are not needed.

Once a power consumption issue has been identified, the Power Profiler can be used when testing different hypotheses to understand why the app could be consuming excessive power. For example, if the issue is caused by background tasks, the developer can try to stop the tasks from running unnecessarily or for longer periods. And if the issue is caused by wakelocks, the developer can try to release the wakelocks when the resource is not in use or use them more judiciously. Then compare the power consumption before/after the change using the Power Profiler.

In this blog post, we showcase a technique which uses A/B testing to understand how your app’s power consumption characteristics might change with different versions of the same feature - and how you can effectively measure them.

A real-life example of how the Power Profiler can be used to improve the battery life of an app.

Let’s assume you have an app through which users can purchase their favorite movies.

Sample app to demonstrate A/B testing for measure power consumption
Sample app to demonstrate A/B testing for measure power consumption 
Video (c) copyright Blender Foundation | www.bigbuckbunny.org

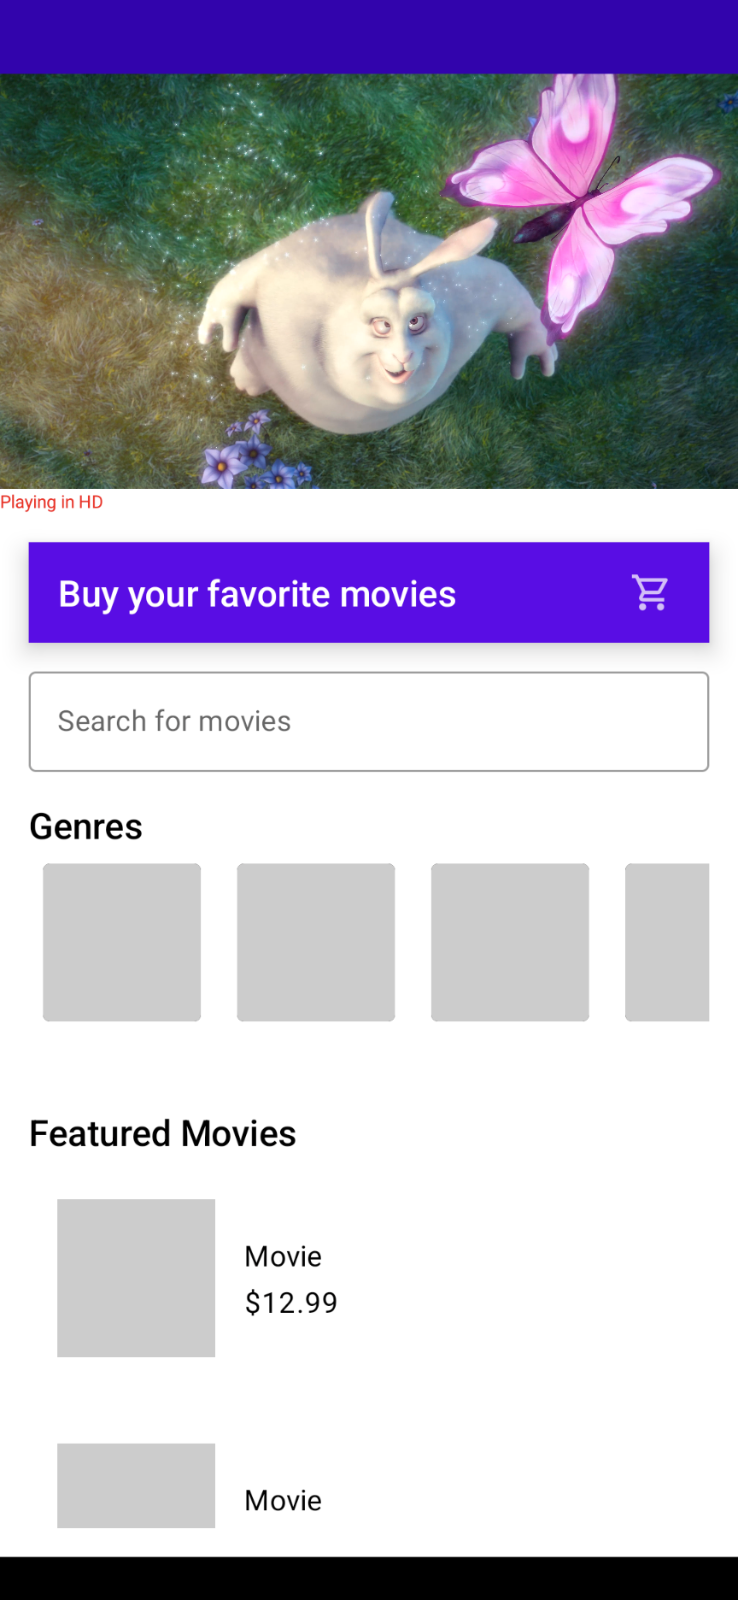
As your app becomes popular and is used by more users, you realize that a high quality 4K video takes very long to load every time the app is started. Because of its large size, you want to understand its impact on power consumption on the device.

Originally, this video was in 4K quality in the best of intentions, so as to showcase the best possible movie highlights to your customers.

This makes you think…

    • Do you really need a 4K video banner on the home screen?
    • Does it make sense to load a 4K video over the network every time your app is run?
    • How will the power consumption characteristics of your app change if you replace the 4K video with something of lower quality (while still preserving the vivid look & feel of the video)?

This is a perfect scenario to perform an A/B test for power consumption

With an A/B test, you can test two slightly different variations of the video banner feature and choose the one with the better power consumption characteristics.

Scenario A : Run the app with 4K video banner on screen & measure power consumption

Scenario B : Run the app with lower resolution video banner on screen & measure power consumption

A/B Test setup

Let's take a moment and set up our Android Studio profiler to run this A/B test. We need to start the app and attach the CPU profiler to it and trigger a system trace (where the Power Profiler will be shown).

Step 1

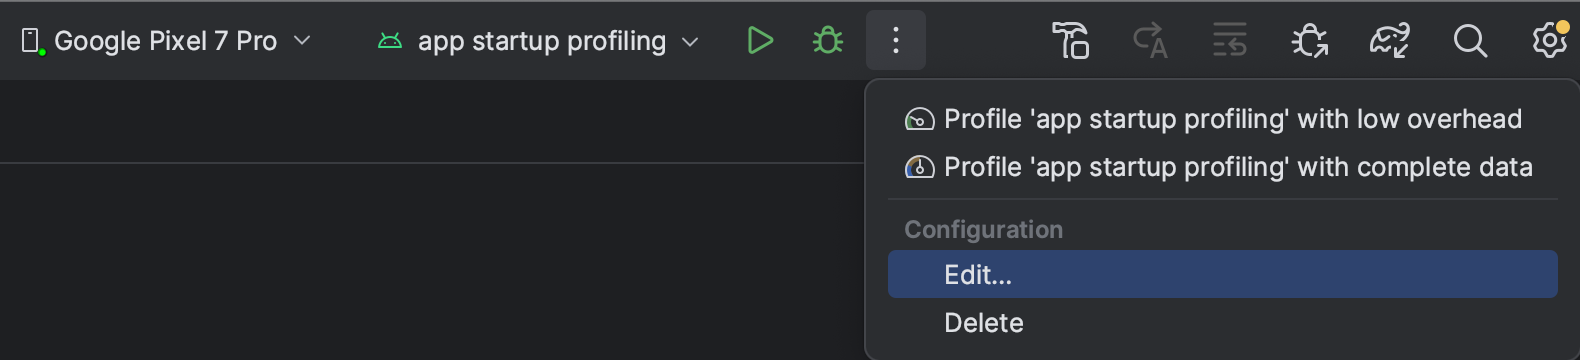
Create a custom “Run configuration” by clicking the 3 dot menu > Edit

Custom run configuration

Step 2

Then select the “Profiling” tab and ensure that “Start this recording on startup” and CPU Activity > System Trace is selected. Then click “Apply”.

Edit configuration settings

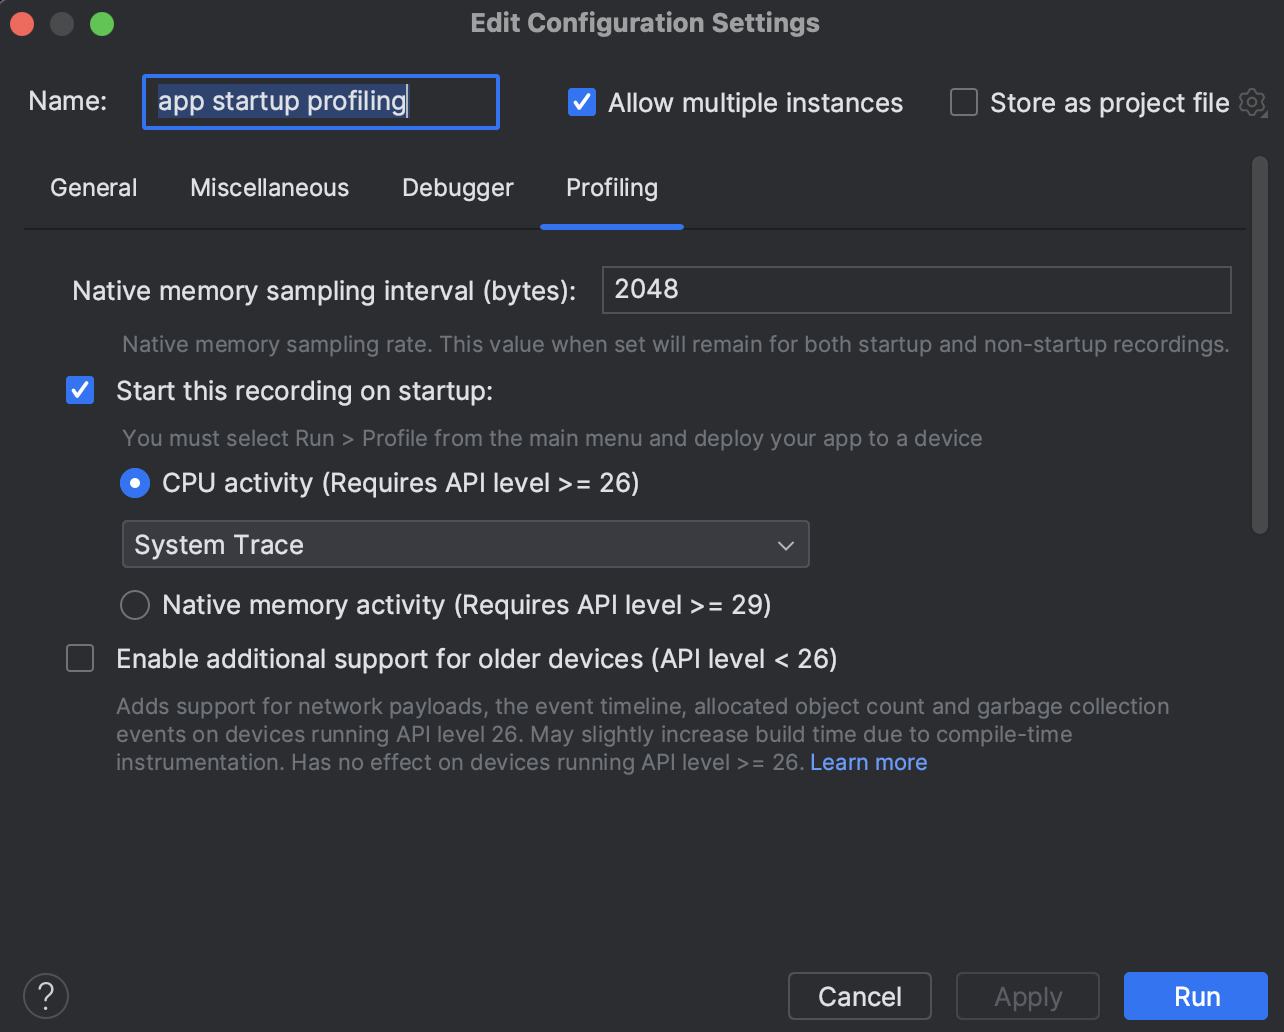
Now simply run the “Profile app startup profiling with low overhead” whenever you want to run this app from start and attach the CPU profiler to it.

Note on precision

The following example scenarios use the entire app startup for estimating the power consumption for this blog’s purpose. However you can use more advanced techniques to have even higher precision in getting power readings. Some techniques to try are:

    • Isolate and measure power consumption for video playback only after a tap event on the video player
    • Use the trace markers API to mark the start and stop time for power measurement timeline - and then only measure power consumption within that marked window

Scenario A

In this scenario, we run the app with 4K video playing and measure power consumption for the first 30 seconds. We can optionally also run the scenario A multiple times and average out the readings. Once the System trace is shown in Android Studio, select the 0-30 second time range from the timeline selection panel and record as a screenshot for comparing against scenario B

Power consumption in scenario A - playing a 4k video

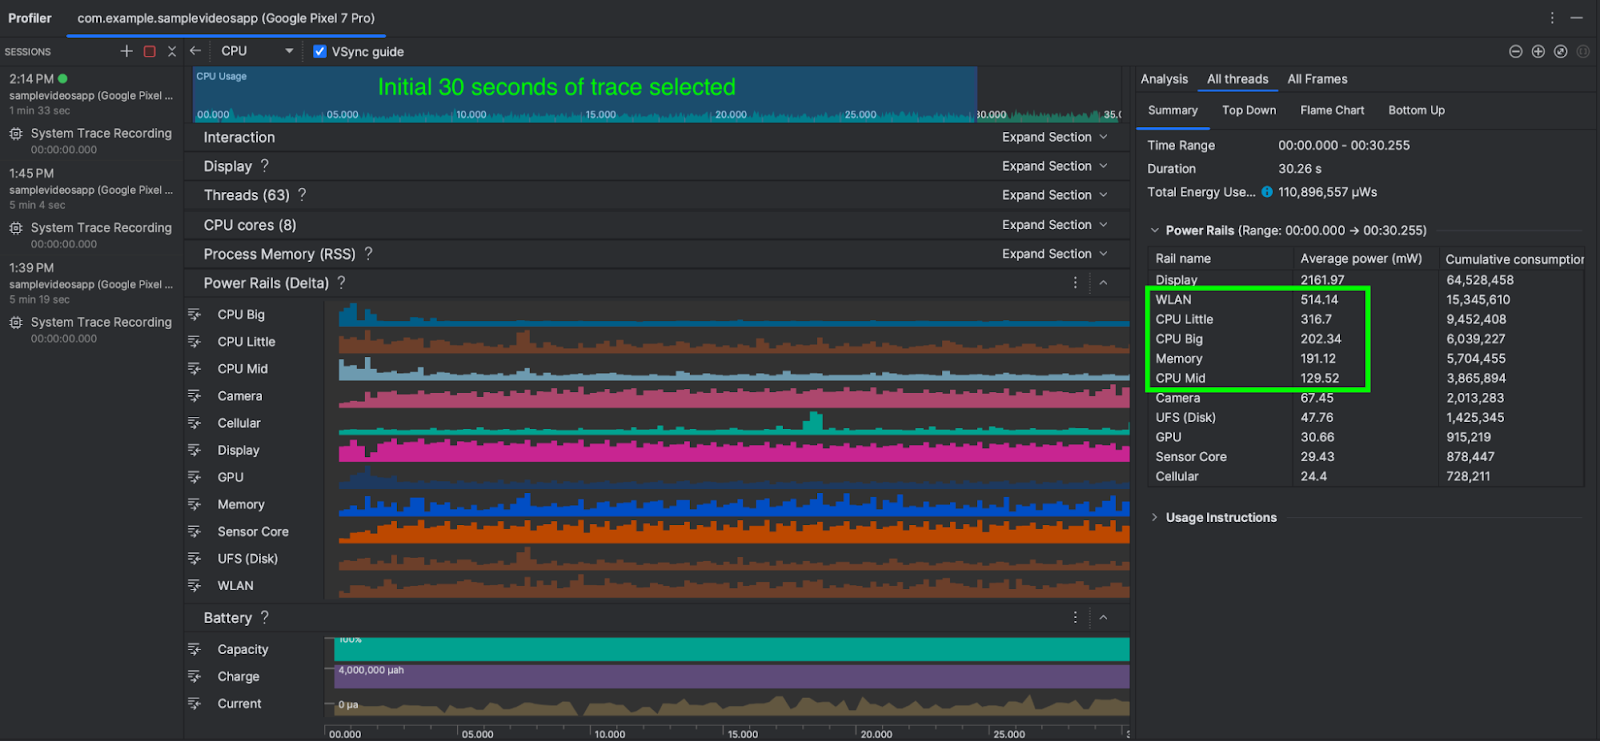
As you can see, the average power consumed by WLAN, CPU cores & Memory combined is about 1,352 mW (milliwatts)

Now let's compare and contrast how this power consumption changes in Scenario B

Scenario B

In this scenario, we run the app with low quality video playing and measure power consumption for the first 30 seconds. As before, we can also optionally run scenario B multiple times and average out the power consumption readings. Again, once the System trace is shown in Android Studio, select the 0-30 second time range from the timeline selection panel.

Power consumption in scenario B - playing a lower quality video

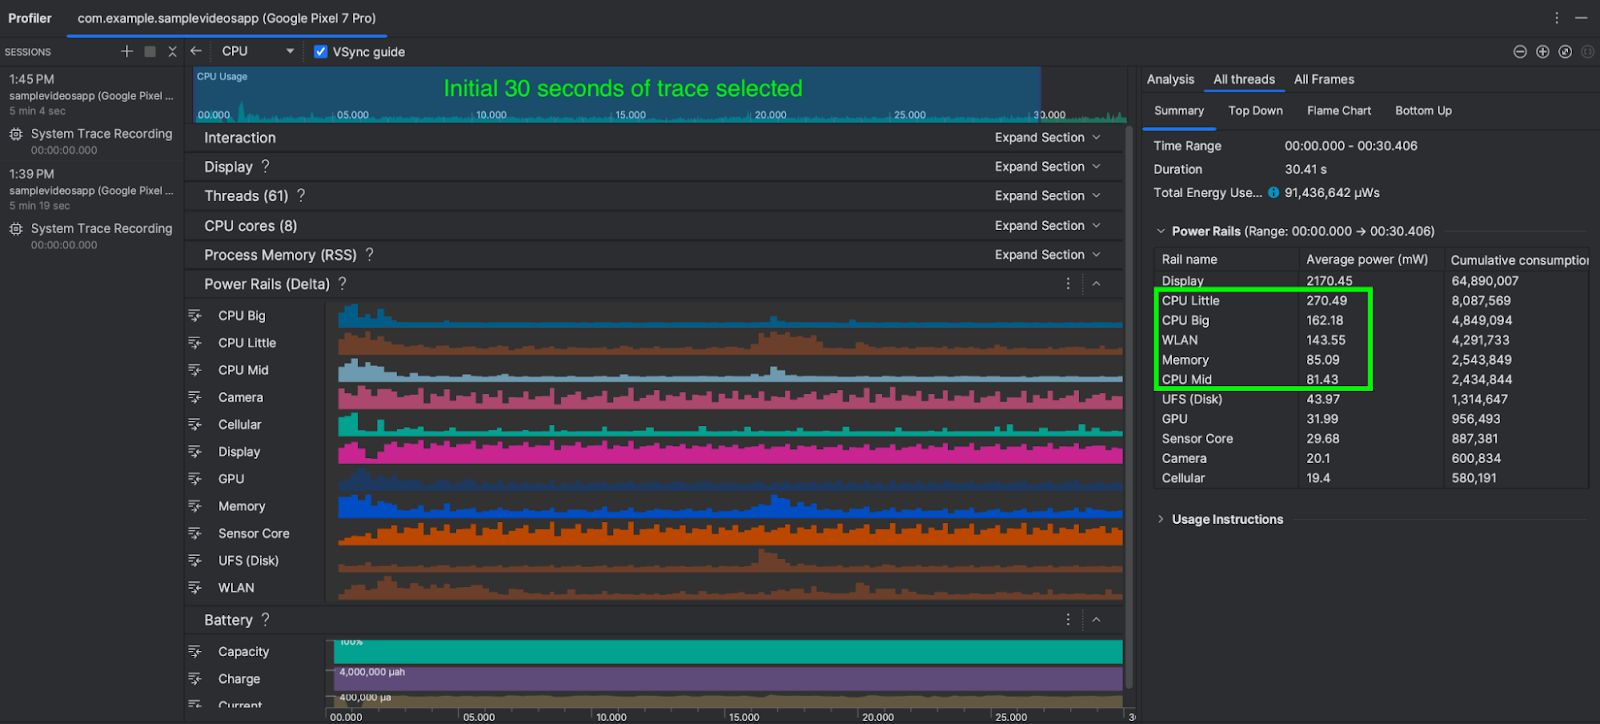
The total power consumed by WLAN, CPU Little, CPU Big and CPU Mid & Memory is about 741 mW (milliwatts)

Conclusion

All else being equal, Scenario B (with lower quality video) consumed 741 mW power as compared to Scenario A (with 4K video) which required 1,352 mW power.

Scenario B (lower quality video) took 45% less power than Scenario A (4K) - while the lower quality video provides little to no visual difference in perceived quality of the app’s screen.

As a result of this A/B test for power consumption, you conclude that replacing the 4K video with a lower quality video on our app’s home screen not only reduces power consumption by 45%, also reduces the required network bandwidth and can potentially also improve the thermal performance of the devices.

If your app’s business logic still requires the 4K video to be shown on the app’s screen, you can explore strategies like:

    • Caching the 4K video across subsequent runs of the app.
    • Loading video on a user tap.
    • Loading an image initially and only load the video after the screen has fully rendered (delayed loading).

The overall power consumption numbers presented in the above A/B test scenario might seem small, but it shows the techniques that app developers can use to effectively A/B test power consumption for their app’s features using the Power Profiler in Android Studio.

Next Steps

The new Power Profiler is available in Android Studio Hedgehog onwards. To know more, please head over to the official documentation.

In reviews we trust — Making Google Play ratings and reviews more trustworthy

Posted by Fei Ye, Software Engineer and Kazushi Nagayama, Ninja Spamologist

Google Play ratings and reviews are extremely important in helping users decide which apps to install. Unfortunately, fake and misleading reviews can undermine users' trust in those ratings. User trust is a top priority for us at Google Play, and we are continuously working to make sure that the ratings and reviews shown in our store are not being manipulated.

There are various ways in which ratings and reviews may violate our developer guidelines:

  • Bad content: Reviews that are profane, hateful, or off-topic.
  • Fake ratings: Ratings and reviews meant to manipulate an app's average rating or top reviews. We've seen different approaches to manipulate the average rating; from 5-star attacks to positively boost an app's average rating, to 1-star attacks to influence it negatively.
  • Incentivized ratings: Ratings and reviews given by real humans in exchange for money or valuable items.

When we see these, we take action on the app itself, as well as the review or rating in question.

In 2018, the Google Play Trust & Safety teams deployed a system that combines human intelligence with machine learning to detect and enforce policy violations in ratings and reviews. A team of engineers and analysts closely monitor and study suspicious activities in Play's ratings and reviews, and improve the model's precision and recall on a regular basis. We also regularly ask skilled reviewers to check the decisions made by our models for quality assurance.

It's a big job. To give you a sense of the volume we manage, here are some numbers from a recent week:

  • Millions of reviews and ratings detected and removed from the Play Store.
  • Thousands of bad apps identified due to suspicious reviews and rating activities on them.

Our team can do a lot, but we need your help to keep Google Play a safe and trusted place for apps and games.

If you're a developer, you can help us by doing the following:

  • Don't buy fake or incentivized ratings.
  • Don't run campaigns, in-app or otherwise, like "Give us 5 stars and we'll give you this in-app item!" That counts as incentivized ratings, and it's prohibited by policy.
  • Do read the Google Play Developer Policy to make sure you are not inadvertently making violations.

Example of a violation: incentivized ratings is not allowed

If you're a user, you can follow these simple guidelines as well:

  • Don't accept or receive money or goods (even virtual ones) in exchange for reviews and ratings.
  • Don't use profanity to criticize an app or game; keep your feedback constructive.
  • Don't post gibberish, hateful, sexual, profane or off-topic reviews; they simply aren't allowed.
  • Do read the comment posting policy. It's pretty concise and talks about all the things you should consider when posting a review to the public.

Finally, if you find bad ratings and reviews on Google Play, help us improve by sending your feedback! Users can mark the review as "Spam" and developers can submit feedback through the Play Console.

Tooltip to flag the review as Spam.

Thanks for helping us keep Google Play a safe and trusted place to discover some of the world's best apps and games.

How useful did you find this blog post?

How to test your rewarded ads

Have you started using AdMob rewarded video, but feel like you could be getting more out of it?

We know it can be hard to get it right the first time, so we recommend A/B testing when implementing rewarded video in your app. Why? Because rewarded video gives you so much more flexibility and even the smallest tweaks can make a huge difference in your app revenue or give you peace of mind that you’re improving your user experience. With that in mind, here are four steps to help you run an effective A/B test.

1. Start with a defined goal and a hypothesis: Step back and decide on a single hypothesis that has the most potential to improve your business and start there. So where should you start testing?  One good place is the design elements in your ad template and how it can impact greater user ad engagement.For example, if you have a hypothesis that font sizes impact clarity and user engagement then you could create two variations with different font sizes (10pm and 13pm) to test key metrics like click through rates, ad revenue and of course, app exit rates. Meanwhile, key metrics to look for would be click through rate, ad revenue, and app exit rates.

Example variables that you could test are:

  • Font size
  • Ad size
  • Reward settings
  • Ad placement within app

2. Remember to test only one variation at a time for it to be a true A/B test: The testing stage will require two variations of your app screen – the current version and your re-designed version. When creating these variations, using an A/B testing platform will make it easy to design, run, and monitor your tests.

3. Run the experiment: Time to test your results. Set up your app to randomly show your original set-up to half of your users (i.e., the “control group”) and the second variation to the other 50% (i.e.,  the “experimental group”). By using a control group, you’re collecting baseline data to compare against your results. Without it, you can’t tell the difference between the response to your new designs or other variables, like seasonal chance.

4. Make a decision: Once the experiment is done, it’s time to crunch the data. First thing to do is to revisit your initial goal and hypothesis, and make that all-important final calls on whether the new variation is worth changing. Don’t be too hasty to lock in a new look. If the changes are significant, it’s smart to run the experiment over several time periods to ensure the results aren’t due to seasonality, or other variables.

As you continue to run more tests, remember that even with helpful tools, testing takes time and resources. Don’t waste time testing elements that won’t significantly impact your goal. Use app analytics data to help uncover spots in your app with a lot of opportunity and potential (think: screens with high traffic, high engagement, or large user drop off, for example). A good idea might be to have a devoted team member spend 25% of their time on monitoring analytics, identifying ad optimization ideas, and testing them.

Until next time, be sure to stay connected on all things AdMob by following our Twitter, LinkedIn and Google+ pages.

The AdMob Team

Source: Inside AdMob