Posted by Dave Burke, VP of Engineering
Last week at Mobile World Congress we saw that Android's ecosystem of developers, device makers, and silicon partners continues to bring amazing experiences to users worldwide.
Looking ahead, today we're sharing the first developer preview of Android P, the newest version of Android. It's an early baseline build for developers only -- you're our most trusted reviewers and testers ;-) Early feedback from our developer community is crucial in helping us evolve the platform to meet your needs. We'd love to get you started exercising the new features and APIs in P, and as always, we depend on your early feedback and ideas, so please give us your input!
This first developer preview of Android P is just the start - we'll have lots more to share at Google I/O in May, stay tuned!
Here's a look at some of the cool features in this first preview of Android P that we want you to try and give feedback on.
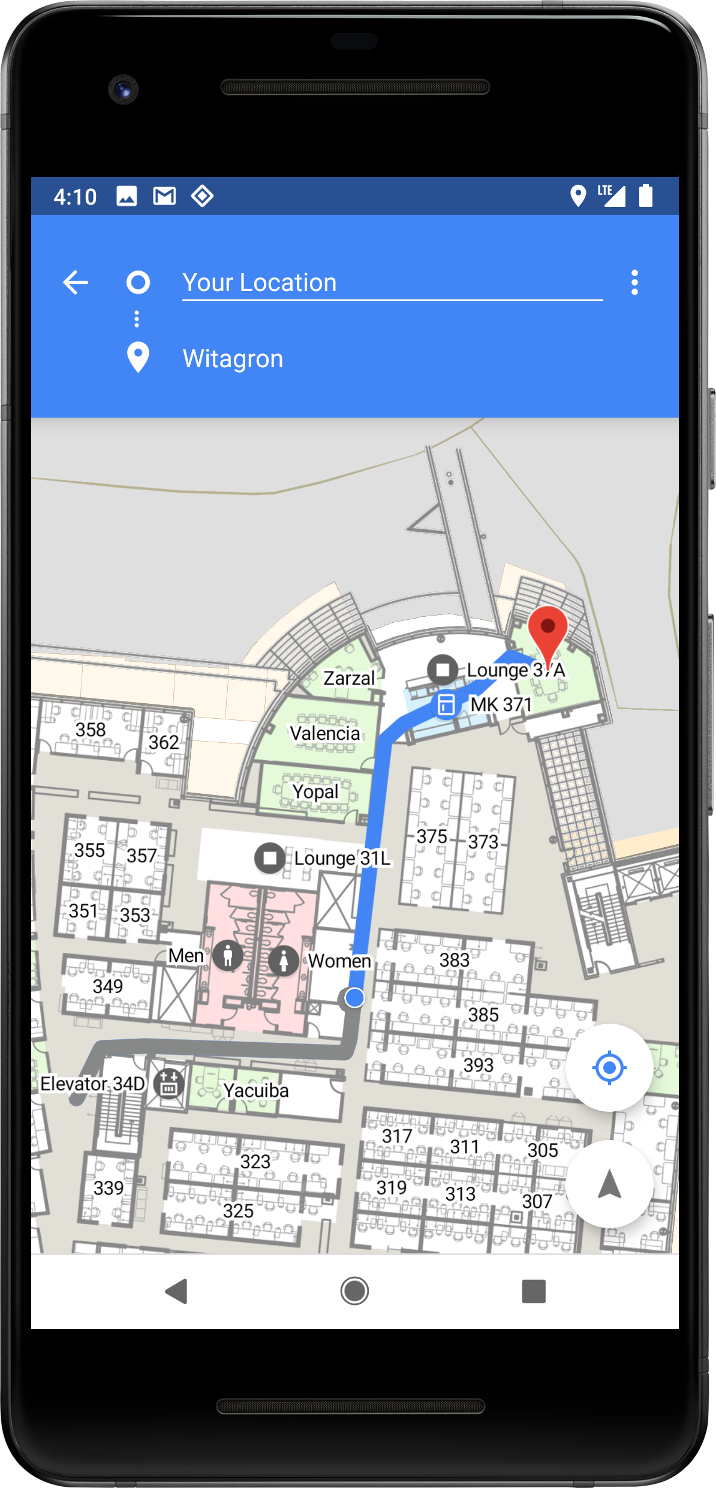
Indoor positioning with Wi-Fi RTT
Accurate indoor positioning has been a long-standing challenge that opens new opportunities for location-based services. Android P adds platform support for the IEEE 802.11mc WiFi protocol -- also known as WiFi Round-Trip-Time (RTT) -- to let you take advantage of indoor positioning in your apps.
On Android P devices with hardware support, location permission, and location enabled, your apps can use RTT APIs to measure the distance to nearby WiFi Access Points (APs). The device doesn't need to connect to the APs to use RTT, and to maintain privacy, only the phone is able to determine the distance, not the APs.
Knowing the distance to 3 or more APs, you can calculate the device position with an accuracy of 1 to 2 meters. With this accuracy, you can build new experiences like in-building navigation; fine-grained location-based services such as disambiguated voice control (e.g.,'Turn on this light'); and location-based information (e.g., 'Are there special offers for this product?').
Display cutout support
Now apps can take full advantage of the latest device screens with fullscreen content. We've added display cutout into the platform, along with APIs that you can use to manage how your content is displayed.
Cutout support works seamlessly for apps, with the system managing status bar height to separate your content from the cutout. If you have critical, immersive content, you can also use new APIs to check the cutout shape and request full-screen layout around it. You can check whether the current device has a cutout by calling getDisplayCutout(), and then determine the location and shape of the cutout area using DisplayCutout. A new window layout attribute, layoutInDisplayCutoutMode, lets you tell the system how and when lay out your content relative to the cutout area. Details are here.
To make it easier to build and test cutout support in your app, we've added a Developer Option that simulates a cutout on any device. We recommend testing your existing apps with display cutout enabled to ensure that your content displays properly.

Apps with immersive content can display content fullscreen on devices with a display cutout.
Improved messaging notifications
In Android P we've put a priority on improving visibility and function in notifications. Try the new MessagingStyle notification style -- it highlights who is messaging and how you can reply. You can show conversations, attach photos and stickers, and even suggest smart replies. See the details here.
In MessagingStyle notifications you can now show conversations and smart replies [left] and even attach images and stickers [right].
Multi-camera API
You can now access streams simultaneously from two or more physical cameras on devices running Android P. On devices with either dual-front or dual-back cameras, you can create innovative features not possible with just a single camera, such as seamless zoom, bokeh, and stereo vision. The API also lets you call a logical or fused camera stream that automatically switches between two or more cameras. We're looking forward to seeing your new and exciting creations as Android P devices supporting multiple cameras reach the market in the year ahead.
Other improvements in camera include new Session parameters that help to reduce delays during initial capture, and Surface sharing that lets camera clients handle various use-cases without the need to stop and start camera streaming. We've also added APIs for display-based flash support and access to OIS timestamps for app-level image stabilization and special effects.
ImageDecoder for bitmaps and drawables
Android P gives you an easier way to decode images to bitmaps or drawables -- ImageDecoder, which deprecates BitmapFactory. ImageDecoder lets you create a bitmap or drawable from a byte buffer, file, or URI. It offers several advantages over BitmapFactory, including support for exact scaling, single-step decoding to hardware memory, support for post-processing in decode, and decoding of animated images.
You can decode and scale to an exact size just by calling setResize() with the target dimensions. You can also call getSampledSize() to get the image dimensions at a specific sample rate, then scale to those dimensions. If you want post-process an image -- such as applying rounded corners for circle masks or more complicated effects -- you can pass ImageDecoder any android.graphics.PostProcessor. You can also create Drawables directly, with ImageDecoder.decodeDrawable(). If the encoded image is an animated GIF or WebP, the Drawable will be an instance of the new AnimatedImageDrawable.
HDR VP9 Video, HEIF image compression, and Media APIs
Android P adds built-in support for HDR VP9 Profile 2, so you can now deliver HDR-enabled movies to your users from YouTube, Play Movies, and other sources on HDR-capable devices.
We're excited to add HEIF (heic) image encoding to the platform. HEIF is a popular format for photos that improves compression to save on storage and network data. With platform support on Android P devices, it's easy to send and utilize HEIF images from your backend server. Once you've made sure that your app is compatible with this data format for sharing and display, give HEIF a try as an image storage format in your app. You can do a jpeg-to-heic conversion using ImageDecoder or BitmapFactory to obtain a bitmap from jpeg, and you can use HeifWriter in the new Support Library alpha to write HEIF still images from YUV byte buffer, Surface, or Bitmap.
We're also in the process of enhancing and refactoring the media APIs to make them easier to develop and integrate with -- watch for details coming later this year.
Data cost sensitivity in JobScheduler
JobScheduler is Android's central service to help you manage scheduled tasks or work across Doze, App Standby, and Background Limits changes. In Android P, JobScheduler handles network-related jobs better for the user, coordinating with network status signals provided separately by carriers.
Jobs can now declare their estimated data size, signal prefetching, and specify detailed network requirements—carriers can report networks as being congested or unmetered. JobScheduler then manages work according to the network status. For example, when a network is congested, JobScheduler might defer large network requests. When unmetered, it can run prefetch jobs to improve the user experience, such as by prefetching headlines.
When you are adding jobs, try using setEstimatedNetworkBytes(), setIsPrefetch() and setRequiredNetwork() to let JobScheduler handle the work properly. When your job executes, be sure to use the Network object returned by JobParameters.getNetwork(), otherwise you'll implicitly use the device's default network which may not meet your requirements, causing unintended data usage.
Neural Networks API 1.1
We introduced the Neural Networks API in Android 8.1 to accelerate on-device machine learning on Android. In Android P we're expanding and improving this API, adding support for nine new ops -- Pad, BatchToSpaceND, SpaceToBatchND, Transpose, Strided Slice, Mean, Div, Sub, and Squeeze. If you have a Pixel 2 device, the DP1 build now includes an Qualcomm Hexagon HVX driver with acceleration for quantized models.
Autofill improvements
In Android P we're continuing to improve the Autofill Framework based on feedback from users and developers. Along with key bugfixes, this release includes new APIs that allow password managers to improve the Autofill user experience, such as better dataset filtering, input sanitization, and compatibility mode. Compatibility mode in particular has a high impact on end users because it lets password managers take the accessibility-based approach in apps that don't yet have full Autofill support, but without impacts on performance or security. See all the details on what's new here.
Open Mobile API for NFC payments and secure transactions
Android P adds an implementation of the GlobalPlatform Open Mobile API to Android. On supported devices, apps can use the OMAPI API to access secure elements (SE) to enable smart-card payments and other secure services. A hardware abstraction layer (HAL) provides the underlying API for enumerating a variety of Secure Elements (eSE, UICC, and others) available.
In Android P we're continuing our long-term investment to make Android the best platform for developers.
Security for apps
In Android P we're moving to a more consistent UI for fingerprint authentication across apps and devices. Android now provides a standard system dialog to prompt the user to touch the fingerprint sensor, managing text and placement as appropriate for the device. Apps can trigger the system fingerprint dialog using a new FingerprintDialog API. We recommend switching to the new system dialog as soon as possible.
As part of a larger effort to move all network traffic away from cleartext (unencrypted HTTP) to TLS, we're also changing the defaults for Network Security Configuration to block all cleartext traffic. If you are using a Network Security Configuration, you'll now need to make connections over TLS, unless you explicitly opt-in to cleartext for specific domains.
Privacy for users
To better ensure privacy, Android P restricts access to mic, camera, and all SensorManager sensors from apps that are idle. While your app's UID is idle, the mic reports empty audio and sensors stop reporting events. Cameras used by your app are disconnected and will generate an error if the app tries to use them. In most cases, these restrictions should not introduce new issues for existing apps, but we recommend removing these requests from your apps.
We will also enable encryption of Android backups with a client-side secret. This feature is still in active development and will be launched in a future Android P preview release.
Longer term we're working to bring support for per-network randomization of associated MAC addresses to the platform. On supported devices running Android P, you can enable this experimentally for testing as a new developer option.
Android P also gives the user control over access to the platform's build.serial identifier by putting it behind the READ_PHONE_STATE permission. Direct access to this identifier has been deprecated since Android 8.0. In order to access the build.serial identifier, you should use the Build.getSerial() method.
ART performance
We're working to bringing performance and efficiency improvements to all apps through the ART runtime. We've expanded ART's use of execution profiles to optimize apps and reduce in-memory footprint of compiled app code. ART now uses profile information for on-device rewriting of DEX files, with reductions up to 11% across a range of popular apps. We expect these to correlate closely with reductions in system DEX memory usage and faster startup times for your apps.
Optimized Kotlin
Kotlin is a first-class language on Android, and if you haven't tried it yet, you should! We've made an enduring commitment to Kotlin in Android and continue to expand support including optimizing the performance of Kotlin code. In P you'll see the first results of this work -- we've improved several compiler optimizations, especially those that target loops, to extract better performance. We're also continuing to work in partnership with JetBrains to optimize Kotlin's generated code. You can get all of the latest Kotlin performance improvements just by keeping Android Studio's Kotlin plugin up-to-date.
Power efficiency
In Android P we continue to refine Doze, App Standby, and Background Limits to further improve battery life; please be sure to try your apps with these and send feedback.
Targeting modern Android
Android P is shaped by our longer-term initiatives to modernize the foundations of Android and the apps that run on it. As we announced recently, Google Play will require all app updates to target Android Oreo (targetSdkVersion 26 or higher) by November 2018, with support for 64-bit hardware on the horizon for 2019.
In line with these changes, Android P will warn users with a dialog when they install an app that targets a platform earlier than Android 4.2 (targetSdkVersion less than 17), and future platform versions will continue to increment that lower bound. We're encouraging every Android developer to start planning the migration to target API 26 now, and to start the migration work as soon as possible. Here's a checklist of resources for help and support -- we're looking forward to seeing your apps getting the most from modern Android.
Improving app compatibility through public APIs
A key issue for users and developers is app compatibility -- making sure that apps are ready for new platform versions as they arrive, without risk of crashes for users and emergency rollouts for developers. Apps that use Android's public APIs from the SDK or NDK are in a good position to be compatible, but apps that use private Android interfaces and libraries are not.
So with Android P we're starting a gradual process to restrict access to selected non-SDK interfaces, asking developers -- including app teams inside Google -- to use the public equivalents instead. In cases where there is no public equivalent for your use-case, please let us know -- we want to make sure that this process is as smooth as possible for developers, so we'll use your feedback to ensure the initial rollout only affects APIs where developers can easily migrate to public alternatives. More about the restrictions is here.
First, make your app compatible to give your users a seamless transition to Android P. Just download a device system image or emulator system image, install your current app, and test -- the app should run and look great, and handle behavior changes properly. After you've made any necessary updates, we recommend publishing to Google Play right away without changing the app's platform targeting.
Remember, you don't need a supported Pixel device to test or develop on Android P. For most uses we highly recommend setting up an Android Virtual Device on the Android Emulator as a test environment instead. If you haven't tried the emulator recently, you'll find that it's incredibly fast , boots in under 6 seconds, convenient to use, and you can even model next-gen screens -- such as long screens and screens with camera cutout.

Next, change your app's targeting to "P" and run it with the full Android P experience. Set your app's targetSdkVersion to 'P' and compileSdkVersion to android-P, build, and test. Make sure to read the behavior changes for apps targeting P to find areas you will want to test and might need to adjust.
When you're ready, dive into Android P and learn about the many new features and APIs you can take advantage of in your app. To make it easier to explore the new APIs, take a look at the API diff report, along with the Android P API reference. Visit the P Developer Preview site for details on the preview timeline and support resources. Also check out this video highlighting what's new in Android P for developers.
To get started building with Android P, download the P Developer Preview SDK and tools into Android Studio 3.1 or use the latest Android Studio 3.2 canary version. We're also releasing an alpha version of the 28.0.0 support library for you to try.
The Android P Developer Preview includes an updated SDK with system images for testing on the official Android Emulator and on Pixel, Pixel XL Pixel 2, and Pixel 2 XL devices.
We plan to update the preview system images and SDK regularly throughout the preview. This initial release is for developers only and not intended for daily or consumer use, so we're making it available by manual download and flash only. Downloads and instructions are here.
As we get closer to a final product, we'll be inviting consumers to try it out as well, and we'll open up enrollments through Android Beta at that time. Stay tuned for details, but for now please note that Android Beta is not currently available for Android P.
As always, your feedback is critical, so please let us know what you think — the sooner we hear from you, the more of your feedback we can integrate. When you find issues, please report them here. We have separate hotlists for filing platform issues, app compatibility issues, and third-party SDK issues.