With eSIM, getting wireless service is as easy as turning on your phone. Gone are the days of going to the store to get a SIM card and fumbling around to try and place it into a small slot. With eSIM, we hope to bring you instant connectivity across more carrier networks, and devices in the Google ecosystem—from Android smartphones to Chromebooks to Wear OS smartwatches.
Pixel 2 was the first major smartphone with eSIM, and now, on Pixel 3, we’re expanding eSIM support to more carriers. If you’re in the U.S. and would like to purchase a phone that has eSIM, head over to Google Fi or the Google Store. If you’re in Germany, look out for the ability to purchase Pixel 3 with eSIM functionality from Deutsche Telekom and Vodafone soon. Sprint in the U.S., EE in the UK, Airtel and Reliance Jio in India, and Truphone and Gigsky in various countries will also roll out eSIM support for Pixel 3 in the coming months.
To enable a consistent and simple experience across the ecosystem, we’re also creating a program that allows Android device makers to build eSIM-capable smartphones. We look forward to continuing our work with our partners on the potential benefits of eSIM—whether that’s getting you connected to a phone, watch, tablet, or laptop—in the future.
Posted by Rahul Garg, Research Scientist and Neal Wadhwa, Software Engineer
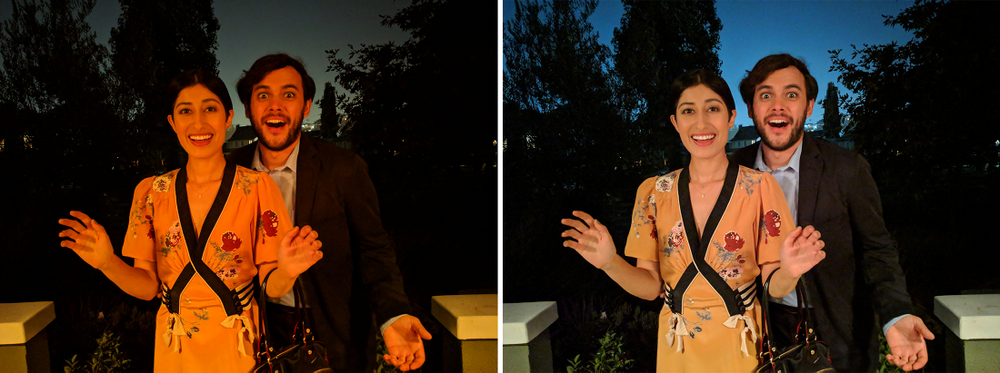
Portrait Mode on the Pixel smartphones lets you take professional-looking images that draw attention to a subject by blurring the background behind it. Last year, we described, among other things, how we compute depth with a single camera using its Phase-Detection Autofocus (PDAF) pixels (also known as dual-pixel autofocus) using a traditional non-learnedstereo algorithm. This year, on the Pixel 3, we turn to machine learning to improve depth estimation to produce even better Portrait Mode results.
Left: The original HDR+ image. Right: A comparison of Portrait Mode results using depth from traditional stereo and depth from machine learning. The learned depth result has fewer errors. Notably, in the traditional stereo result, many of the horizontal lines behind the man are incorrectly estimated to be at the same depth as the man and are kept sharp. (Mike Milne)
A Short Recap As described in last year’s blog post, Portrait Mode uses a neural network to determine what pixels correspond to people versus the background, and augments this two layer person segmentation mask with depth information derived from the PDAF pixels. This is meant to enable a depth-dependent blur, which is closer to what a professional camera does.
PDAF pixels work by capturing two slightly different views of a scene, shown below. Flipping between the two views, we see that the person is stationary, while the background moves horizontally, an effect referred to as parallax. Because parallax is a function of the point’s distance from the camera and the distance between the two viewpoints, we can estimate depth by matching each point in one view with its corresponding point in the other view.
The two PDAF images on the left and center look very similar, but in the crop on the right you can see the parallax between them. It is most noticeable on the circular structure in the middle of the crop.
However, finding these correspondences in PDAF images (a method called depth from stereo) is extremely challenging because scene points barely move between the views. Furthermore, all stereo techniques suffer from the aperture problem. That is, if you look at the scene through a small aperture, it is impossible to find correspondence for lines parallel to the stereo baseline, i.e., the line connecting the two cameras. In other words, when looking at the horizontal lines in the figure above (or vertical lines in portrait orientation shots), any proposed shift of these lines in one view with respect to the other view looks about the same. In last year’s Portrait Mode, all these factors could result in errors in depth estimation and cause unpleasant artifacts.
Improving Depth Estimation With Portrait Mode on the Pixel 3, we fix these errors by utilizing the fact that the parallax used by depth from stereo algorithms is only one of many depth cues present in images. For example, points that are far away from the in-focus plane appear less sharp than ones that are closer, giving us a defocus depth cue. In addition, even when viewing an image on a flat screen, we can accurately tell how far things are because we know the rough size of everyday objects (e.g. one can use the number of pixels in a photograph of a person’s face to estimate how far away it is). This is called a semantic cue.
Designing a hand-crafted algorithm to combine these different cues is extremely difficult, but by using machine learning, we can do so while also better exploiting the PDAF parallax cue. Specifically, we train a convolutional neural network, written in TensorFlow, that takes as input the PDAF pixels and learns to predict depth. This new and improved ML-based method of depth estimation is what powers Portrait Mode on the Pixel 3.
Our convolutional neural network takes as input the PDAF images and outputs a depth map. The network uses an encoder-decoder style architecture with skip connections and residual blocks.
Training the Neural Network In order to train the network, we need lots of PDAF images and corresponding high-quality depth maps. And since we want our predicted depth to be useful for Portrait Mode, we also need the training data to be similar to pictures that users take with their smartphones.
To accomplish this, we built our own custom “Frankenphone” rig that contains five Pixel 3 phones, along with a Wi-Fi-based solution that allowed us to simultaneously capture pictures from all of the phones (within a tolerance of ~2 milliseconds). With this rig, we computed high-quality depth from photos by using structure from motion and multi-view stereo.
Left: Custom rig used to collect training data. Middle: An example capture flipping between the five images. Synchronization between the cameras ensures that we can calculate depth for dynamic scenes, such as this one. Right: Ground truth depth. Low confidence points, i.e., points where stereo matches are not reliable due to weak texture, are colored in black and are not used during training. (Sam Ansari and Mike Milne)
The data captured by this rig is ideal for training a network for the following main reasons:
Five viewpoints ensure that there is parallax in multiple directions and hence no aperture problem.
The arrangement of the cameras ensures that a point in an image is usually visible in at least one other image resulting in fewer points with no correspondences.
The baseline, i.e., the distance between the cameras is much larger than our PDAF baseline resulting in more accurate depth estimation.
Synchronization between the cameras ensure that we can calculate depth for dynamic scenes like the one above.
Portability of the rig ensures that we can capture photos in the wild simulating the photos users take with their smartphones.
However, even though the data captured from this rig is ideal, it is still extremely challenging to predict the absolute depth of objects in a scene — a given PDAF pair can correspond to a range of different depth maps (depending on lens characteristics, focus distance, etc). To account for this, we instead predict the relative depths of objects in the scene, which is sufficient for producing pleasing Portrait Mode results.
Putting it All Together This ML-based depth estimation needs to run fast on the Pixel 3, so that users don’t have to wait too long for their Portrait Mode shots. However, to get good depth estimates that makes use of subtle defocus and parallax cues, we have to feed full resolution, multi-megapixel PDAF images into the network. To ensure fast results, we use TensorFlow Lite, a cross-platform solution for running machine learning models on mobile and embedded devices and the Pixel 3’s powerful GPU to compute depth quickly despite our abnormally large inputs. We then combine the resulting depth estimates with masks from our person segmentation neural network to produce beautiful Portrait Mode results.
Try it Yourself In Google Camera App version 6.1 and later, our depth maps are embedded in Portrait Mode images. This means you can use the Google Photos depth editor to change the amount of blur and the focus point after capture. You can also use third-partydepthextractors to extract the depth map from a jpeg and take a look at it yourself. Also, here is an album showing the relative depth maps and the corresponding Portrait Mode images for traditional stereo and the learning-based approaches.
Acknowledgments This work wouldn’t have been possible without Sam Ansari, Yael Pritch Knaan, David Jacobs, Jiawen Chen, Juhyun Lee and Andrei Kulik. Special thanks to Mike Milne and Andy Radin who captured data with the five-camera rig.
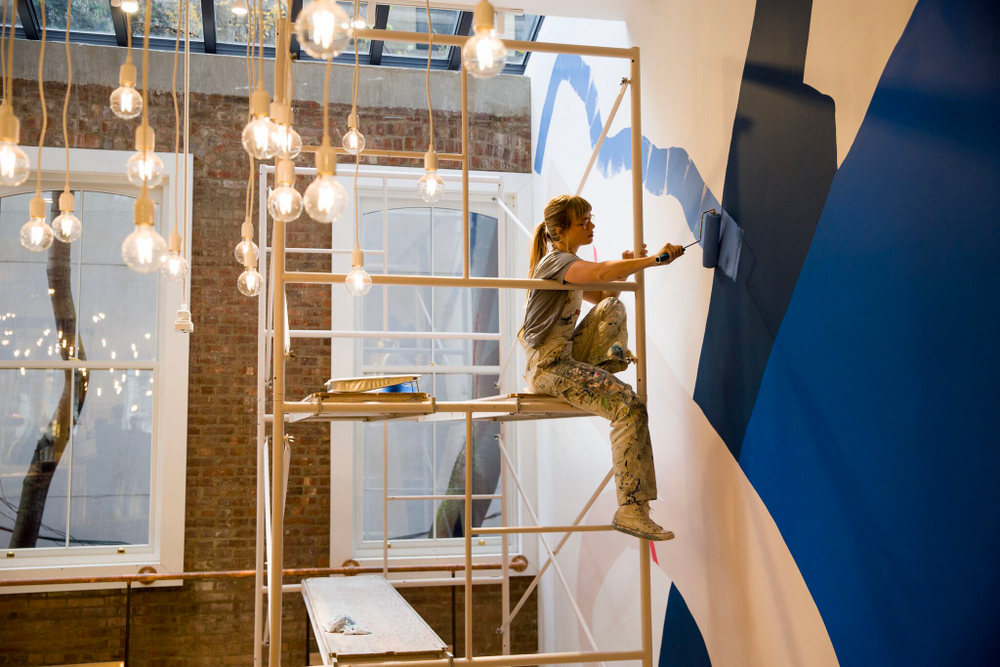
These days San Francisco-based artist Heather Day is painting more than just canvas. In fact, she recently brought her unique perspective and energetic composition to the walls of our New York City pop-up store where she painted the town red … and blue … and Not Pink.
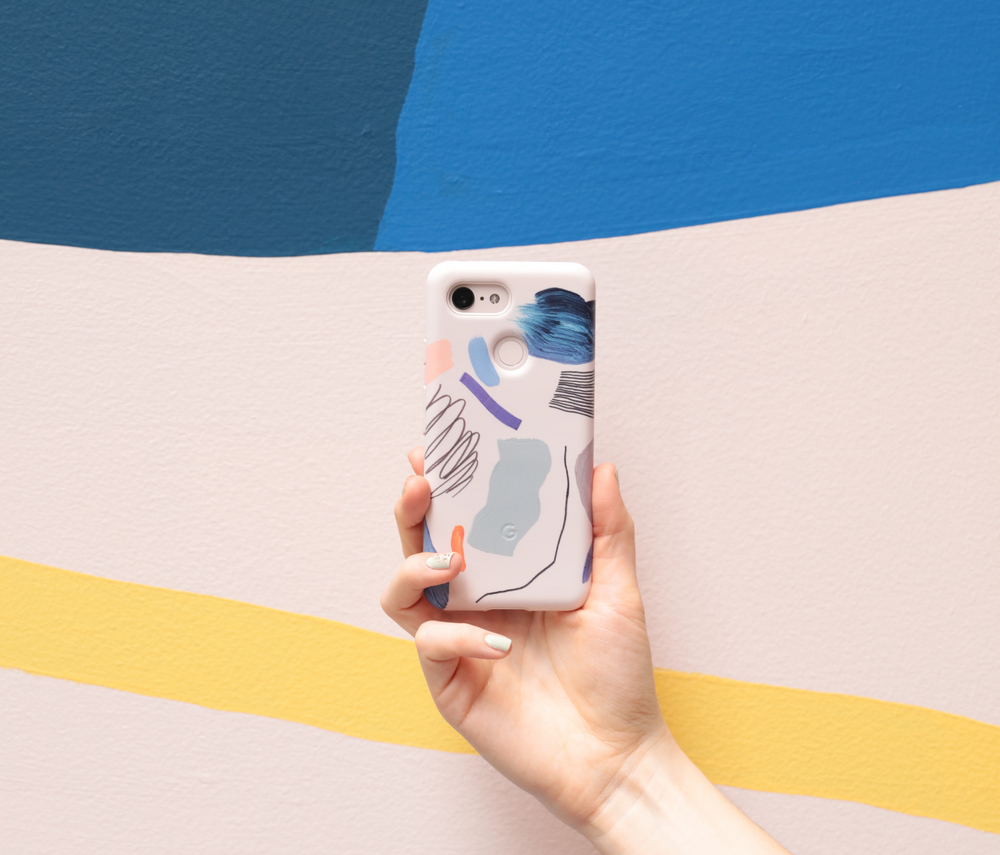
The same bright lines, playful scribbles and washes of color that make up her fresh mural in SoHo can also be found in our latest artist collection of My Cases—Google Pixel cases that are available in more than one hundred designs.
In between brush strokes, we caught up with Heather Day to find out what inspires her work, how technology helps bring her abstract paintings to life and who her dream dinner guest is.
Artist Heather Day's painting comes to life on the walls of our pop-up store. Photo credit: Minü Han.
What was your inspiration for this mural?
I wanted this mural to be playful, easily palatable and encourage visitors to stay for a while. While I was making this piece, I thought about the energy constantly pulsing through New York City and the patterns therein. The city itself feels like a collage of complex shapes, hemmed in by the borders of wandering lines. The mural mirrors this concept.
How does technology play a role in your creative process?
I primarily work with traditional mediums, as in physical mediums. To take an idea from draft to reality, I use the Pixel Slate and digital pen to draw renderings of my plans for a mural. I can make marks fast and do all of this in a minimal amount of time, from anywhere. I don’t have to be in my studio to experiment.
Using a digital drawing pad gives me a more true-to-form picture of what my work will look like at scale. It’s hard to get that perspective working on paper. Now, I can zoom in and out of a space while I’m painting, albeit digitally.
Your artwork also appears on Pixel My Cases. How did you come up with the designs for your My Case collection?
My process was playful. I approached this piece the same way I would a painting on canvas, but my medium was different this time. I worked on about 70 different paintings, experimenting with the Not Pink color on paper. In my studio, I played with spills of lush acrylic paint, pairing those markings against energetic streaks of pastel.
One of Heather Day's designs on the latest collection of My Cases for Pixel.
You’re also a recent Pixel convert—welcome to #teampixel! What is your favorite feature so far?
So far, it’s the camera. I love how it takes such beautiful photos in low light with Night Sight.
You host a dinner series in San Francisco. Who is your dream dinner guest and where would you take them to grab a bite to eat?
Yes! We started the dinner series as a small experiment to bring a diverse group of strangers around my table for dinner. Now, it’s evolved into what we call Studio Table.
My dream dinner guest would be abstract painter Katharina Grosse. I’d imagine we’d keep it simple and pick up sandwiches from a bodega and take a walk around Central Park and talk art.
Heather Day's mural set the mood for a brunch we event we hosted at the Google pop-up store.
These days San Francisco-based artist Heather Day is painting more than just canvas. In fact, she recently brought her unique perspective and energetic composition to the walls of our New York City pop-up store where she painted the town red … and blue … and Not Pink.
The same bright lines, playful scribbles and washes of color that make up her fresh mural in SoHo can also be found in our latest artist collection of My Cases—Google Pixel cases that are available in more than one hundred designs.
In between brush strokes, we caught up with Heather Day to find out what inspires her work, how technology helps bring her abstract paintings to life and who her dream dinner guest is.
Artist Heather Day's painting comes to life on the walls of our pop-up store. Photo credit: Minü Han.
What was your inspiration for this mural?
I wanted this mural to be playful, easily palatable and encourage visitors to stay for a while. While I was making this piece, I thought about the energy constantly pulsing through New York City and the patterns therein. The city itself feels like a collage of complex shapes, hemmed in by the borders of wandering lines. The mural mirrors this concept.
How does technology play a role in your creative process?
I primarily work with traditional mediums, as in physical mediums. To take an idea from draft to reality, I use the Pixel Slate and digital pen to draw renderings of my plans for a mural. I can make marks fast and do all of this in a minimal amount of time, from anywhere. I don’t have to be in my studio to experiment.
Using a digital drawing pad gives me a more true-to-form picture of what my work will look like at scale. It’s hard to get that perspective working on paper. Now, I can zoom in and out of a space while I’m painting, albeit digitally.
Your artwork also appears on Pixel My Cases. How did you come up with the designs for your My Case collection?
My process was playful. I approached this piece the same way I would a painting on canvas, but my medium was different this time. I worked on about 70 different paintings, experimenting with the Not Pink color on paper. In my studio, I played with spills of lush acrylic paint, pairing those markings against energetic streaks of pastel.
One of Heather Day's designs on the latest collection of My Cases for Pixel.
You’re also a recent Pixel convert—welcome to #teampixel! What is your favorite feature so far?
So far, it’s the camera. I love how it takes such beautiful photos in low light with Night Sight.
You host a dinner series in San Francisco. Who is your dream dinner guest and where would you take them to grab a bite to eat?
Yes! We started the dinner series as a small experiment to bring a diverse group of strangers around my table for dinner. Now, it’s evolved into what we call Studio Table.
My dream dinner guest would be abstract painter Katharina Grosse. I’d imagine we’d keep it simple and pick up sandwiches from a bodega and take a walk around Central Park and talk art.
Heather Day's mural set the mood for a brunch we event we hosted at the Google pop-up store.
Pixel’s camera is designed to help you capture life’s best moments effortlessly. With features like HDR+, Portrait mode, Top Shot, and Super Res Zoom, Pixel 3 uses computational photography and machine learning to help you capture stunning, creative and even professional photos. All you need to do is press the shutter button.
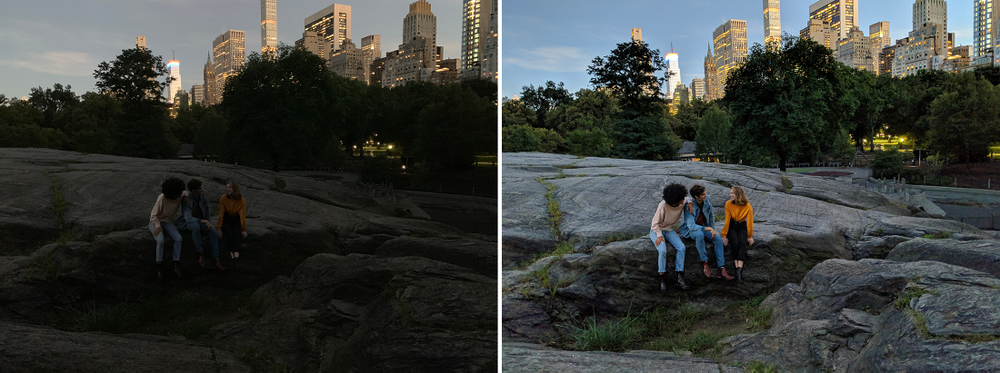
Because life’s best moments aren’t always perfectly lit, we developed Night Sight, a new feature for the Pixel camera that helps you capture vibrant and detailed low-light photos without a flash or tripod. Over the next few days, Night Sight will be coming to the front and rear cameras on all three generations of Pixel phones.
iPhone XS with SmartHDR (left), and Pixel 3 with Night Sight (right).
Why photography is difficult at night
The key ingredient for a photo is light. When it’s dark, cameras compensate by spending more time capturing light and increasing their sensitivity to light, often adding unwanted motion blur and noise to your photo.
Flash helps by adding light to the scene, but it awkwardly blinds your friends and can annoy others around you. Not to mention, it usually creates unflattering photos and isn’t even allowed in many places where photography is permitted. Flash also only brightens nearby subjects and isn’t useful for landscapes or faraway objects.
Tripods stabilize the camera, allowing it to capture more light, but they’re bulky and impractical for everyday use. By enabling longer captures, tripods may also introduce unwanted motion blur from moving objects.
How Night Sight works
Night Sight constantly adapts to you and the environment, whether you’re holding Pixel or propping it on a steady surface. Before you press the shutter button, Night Sight measures your natural hand shake, as well as how much motion is in the scene. If Pixel is stable and the scene is still, Night Sight will spend more time capturing light to minimize noise; if Pixel is moving or there’s significant scene motion, Night Sight will use shorter exposures, capturing less light to minimize motion blur.
Night Sight can capture more light when Pixel and the scene are still. Photo by Narayan Hegde (Pixel 3, Night Sight).
If your subject moves during the capture, Night Sight can adapt to prevent a modest amount of motion from ruining the shot. Instead of capturing one bright and blurry photo, Night Sight captures an equal amount of light over a burst of many photos that are dark but sharp. By merging this burst, Night Sight prevents motion blur and brightens the photo, giving you a bright and sharp photo.
Night Sight is robust to moderate levels of hand shake and scene motion. It merges many dark but sharp photos into one bright photo.
Night Sight is designed to capture true-to-life photos, adapting to the various lighting conditions you’ll see at night. Using machine learning, Night Sight balances the color of your photo so that objects show their natural color at night.
Night Sight uses machine learning to balance colors.
For more details on how Night Sight helps you capture vibrant and detailed low-light photos, head over to the Google AI blog.
How and when to use Night Sight
If you’re taking a photo in low light, Pixel will suggest using Night Sight. You can enter Night Sight by tapping this suggestion or manually navigating to the mode. After you tap the shutter button, try to hold still until Night Sight finishes capturing the photo.
Night Sight on Pixel 3 XL
Night Sight adapts to you and the environment so you can capture the moment effortlessly. Here are some additional tips to get the most out of your phone’s camera in low light:
If you’re taking a photo of someone, ask them to hold still for a few seconds before and after you press the shutter button.
Hold the phone steady. If you can, try propping it against a stable surface.
Make sure the camera lens is clean. It can accumulate oil from fingerprints, creating blurry and soft photos.
Try tapping on or around your subject to help your camera focus when taking photos in very dark conditions.
Avoid pointing your camera at bright light sources, which may cause unwanted reflections in your photo.
Cameras don’t work in complete darkness, so you’ll still need some light to capture a photo.
Night Sight will be rolling out over the next few days with an update to the Google Camera app. Share your photos using #teampixel and #nightsight, and check out some Night Sight photos in this Google Photos shared album.
To show you some of the features on the new Pixel 3 phone, we created Sights of Sound powered by YouTube Music, an immersive pop-up experience coming to San Francisco, Los Angeles, Austin, Miami and Atlanta this fall.
Visitors step inside rooms inspired by four musicians and use a Pixel 3 to navigate, capture and share the experience. To bring each room to life, you’ll need to solve a puzzle using Google Lens, the visual tool that lets you search what you see. Throughout the pop-up, you and your friends can try out Pixel’s brilliant camera by using Group Selfie Cam, Top Shot and Photobooth Mode.
We collaborated with Ella Mai, Future, J Balvin and Marshmello to create each immersive space in the pop-up. Dive deep into Ella Mai’s Inner Reflections, sit like royalty among snakes and nine-foot tall golden lions in Future’s Trap Mansion, dance your way through J Balvin’s Reggaeton World, bounce your troubles away in Marshmello’s Happier Place and capture it all on the Pixel 3’s incredible camera.
For more information on dates, times and locations for Sights of Sound, visit g.co/sightsofsound. If you’re in San Francisco, Los Angeles, Austin, Miami or Atlanta, we hope to see you there!
With Pixel, we want to give you a camera that you can always trust and rely on. That means a camera which is fast, can take photos in any light and has built-in intelligence to capture those moments that only happen once. The camera should also give you a way to get creative with your photos and videos and be able to easily edit and share.
To celebrate Pixel 3 hitting the shelves in the US today, here are 10 things you can do with the Pixel camera.
1. Just point and shoot!
The Pixel camera has HDR+ on by default which uses computational photography to help you take better pictures in scenes where there is a range of brightness levels. When you press the shutter button, HDR+ actually captures a rapid burst of pictures, then quickly combines them into one. This improves results in both low-light and high dynamic range situations.
2. Top Shot
Get the best shot on the first try. When you take a motion photo, Top Shot captures alternate high-quality shots, then recommends the best one—even if it’s not exactly when you hit the shutter. Behind the scenes,Top Shot looks for those shots where everyone is smiling, with eyes open and facing the camera. Just click on the thumbnail when you take a picture and you’ll get a suggestion to choose a better picture when one is available. You can also find top shots on photos whenever you want by swiping up on the photo in Google Photos. Top Shot works best on people and is getting better all the time.
Top Shot on Pixel 3
3. Night Sight
In low light scenes when you'd typically use flash—but don't want to because it makes a big scene, blinds your friends, and leaves harsh, uneven lighting—Night Sight can help you take colorful, detailed and low-noise pictures in super low light. Night Sight is coming soon to Pixel.
4. Super Res Zoom
Pixel 3 lets you zoom in and still get sharp, detailed images. Fun fact: this works by taking advantage of the natural shaking of your hand when you take a photo. For every zoomed shot, we combine a burst of slightly different images, resulting in better resolution, and lower noise. So when you pinch-zoom before pressing the shutter, you’ll definitely get a lot more details in your picture than if you crop afterwards.
Full FOV
Full field of view
Super Res
The same scene with 1.63x Super Res Zoom
Super Res 2
The same scene with 2.15x Super Res Zoom
5. Group Selfie Cam
If you’re having trouble fitting everyone in shot, or you want the beautiful scenery as well as your beautiful face, try our new wide angle lens that lets you get much more in your selfie. You can get up to 184% more in the shot*, or 11 people is my own personal record. Wide angle lenses fit more people in the shot, but they also stretch and distort faces that are on the edge. The Pixel camera uses AI to correct this, so every face looks natural and you can use the full field of view of the selfie cam.
6. Photobooth
You spend ages getting the selfie at precisely the right angle, but then you try and reach the shutter button and lose the frame. Photobooth mode lets you take photos without pressing the shutter button: simply smile, poke your tongue out, or pucker those lips.
Bring more of your imagination to a scene with Playmoji— augmented reality characters that react to each other and to you—and add animated stickers and fun captions to your photos and videos. Playground also works on the front camera, so you can up your selfie game by standing next to characters you love, like Iron Man from the Marvel Cinematic Universe.
Playground on Pixel 3 helps you create and play with the world around you
8. Google Lens Suggestions
Just point the Pixel 3 camera at contact info, URLs, and barcodes and it’ll automatically suggest things to do like calling the number, or sending an email. This all happens without you having to type anything and Lens will show the suggestions even when you’re offline. It’s particularly helpful with business cards, movie posters, and takeout menus.
9. Portrait Mode
Our improved Portrait Mode on Pixel is designed to give you even sharper and more beautiful images this year. Plus we’ve added some fun editing options in Google Photos—like being able to change the blurriness of the background, or change the part of the picture in focus after you’ve taken it. Google Photos can also make the subject of your photo pop by leaving them in color, while changing the background to black and white.
Portrait Mode and color pop with Pixel 3 and Google Photos
10. Smooth video
We’ve added new selfie video stabilization so now you can get super smooth video from the front or back cameras. And if you’re recording someone or something that is moving, just tap on them and the video will lock on the subject as they, or you, move—so you don’t lose focus.
Finally, if you’re a pro photographer, we’ve added a bunch of new features to help you manage your photography from the ability to export RAW, to external mic support, to synthetic fill flash which mimics professional lighting equipment to bring a beautiful glow to your pictures.
Once you’ve taken all those amazing photos and videos, Pixel comes with unlimited storage so you never get that “storage full” pop up at a crucial moment.**
Share your pics using #teampixel so we can see what you create with Pixel 3.
*Compared to iPhone Xs
**Free, unlimited online original-quality storage for photos/videos uploaded from Pixel 3 to Google Photos through 1/31/2022, and those photos/videos will remain free at original quality. g.co/help/photostorage
Security has always been a top priority for Pixel, spanning both the hardware and software of our devices. This includes monthly security updates and yearly OS updates, so Pixel always has the most secure version of Android, as well as Google Play Protect to help safeguard your phone from malware. Last year on Pixel 2, we also included a dedicated tamper-resistant hardware security module to protect your lock screen and strengthen disk encryption.
This year, with Pixel 3, we’re advancing our investment in secure hardware with Titan M, an enterprise-grade security chip custom built for Pixel 3 to secure your most sensitive on-device data and operating system. With Titan M, we took the best features from the Titan chip used in Google Cloud data centers and tailored it for mobile.
Here are a few ways Titan M protects your phone.
Security in the Bootloader
First, to protect Android from outside tampering, we’ve integrated Titan M into Verified Boot, our secure boot process.
Titan M helps the bootloader—the program that validates and loads Android when the phone turns on—make sure that you’re running the right version of Android. Specifically, Titan M stores the last known safe Android version and prevents “bad actors” from moving your device back to run on an older, potentially vulnerable, version of Android behind your back. Titan M also prevents attackers running in Android attempting to unlock the bootloader.
Lock Screen Protection & Disk Encryption On-Device
Pixel 3 also uses Titan M to verify your lock screen passcode. It makes the process of guessing multiple password combinations harder by limiting the amount of logon attempts, making it difficult for bad actors to unlock your phone. Only upon successful verification of your passcode will Titan M allow for decryption.
In addition, the secure flash and fully independent computation of Titan M makes it harder for an attacker to tamper with this process to gain the secrets to decrypt your data.
Secure Transactions in Third-Party Apps
Third, Titan M is used not only to protect Android and its functionality, but also to protect third-party apps and secure sensitive transactions. With Android 9, apps can now take advantage of StrongBox KeyStore APIs to generate and store their private keys in Titan M. The Google Pay team is actively testing out these new APIs to secure transactions.
For apps that rely on user interaction to confirm a transaction, Titan M also enables Android 9 Protected Confirmation, an API for protecting the most security-critical operations. As more processes come online and go mobile—like e-voting, and P2P money transfers—these APIs can help to ensure that the user (not malware) has confirmed the transaction. Pixel 3 is the first device to ship with this protection.
Insider Attack Resistance
Last, but not least, to prevent tampering, Titan M is built with insider attack resistance. The firmware on Titan M will never be updated unless you have entered your passcode, meaning bad actors cannot bypass your lock screen to update the firmware to a malicious version.
With the Pixel 3, we’ve increased our investment in security and put industry-leading hardware features into the device, so you can rest assured that your security and privacy are well protected. In the coming months, the security community will be able to audit Titan through its open-source firmware. In the meantime, you can test out Titan M and all of the smarts Pixel 3 brings, when it goes on sale on Thursday, October 18 in the U.S.
Last week we announced Pixel 3 and Pixel 3XL, our latest smartphones that combine the best of Google’s AI, software, and hardware to deliver radically helpful experiences. AI is a key ingredient in Pixel that unlocks new, useful capabilities, dramatically changing how we interact with our phones and the world around us.
But what exactly is AI?
Artificial intelligence (AI) is a fancy term for all the technology that lets our devices learn by example and act a bit smarter, from understanding written or spoken language to recognizing people and objects in images. AI is built by “training” machine learning models—a computer learns patterns from lots of example data, and uses these patterns to generate predictions. We’ve built one of the most secure and robust cloud infrastructures for processing this data to make our products smarter. Today, AI helps with everything from filtering spam emails in Gmail to getting answers on Google Search.
Machine learned models in the cloud are a secure way to make Google products smarter over time.
Bringing the best AI experiences to Pixel 3 involved some re-thinking from the ground up. Our phones are powerful computers with multiple sensors which enable new helpful and secure experiences when data is processed on your device. These AI-powered features can work offline and don’t require a network connection. And they can keep data on device, private to you. With Pixel 3, we complement our traditional approach to AI, where machine learning and data processing is done in the cloud, with reliable, accessible AI on device, when you’re on the go.
The most powerful machine learning models can now run directly on your Pixel to power fast experiences which work even when you’re offline.
Benefits of on-device AI
We’ve been working to miniaturize AI models to bring the power of machine learning and computing in the cloud directly to your Pixel. With on-device AI, new kinds of experiences become possible—that are lightning fast, are more battery efficient, and keep data on your device. We piloted this technology last year with Now Playing, bringing automatic music recognition to Pixel 2. This year, your Phone app and camera both use on-device AI to give you new superpowers, allowing you to interact more seamlessly with the world around you.
On-device AI works without having to go back to a server and consumes less of your battery life.
Take Call Screen, a new feature in the Phone app, initially launching in English in the U.S., where the Google Assistant helps you screen calls, including from unknown or unrecognized numbers. Anytime you receive an incoming call, just tap the “Screen Call” button and on-device speech recognition is used to transcribe the conversation from the caller (who is calling? why they are calling?) so you can decide whether to pick up, hang up, or mark as spam and block. Because everything happens on your device, neither the audio nor transcript from a screened call is sent to anyone other than you.
Call Screen uses on-device speech recognition to transcribe the caller’s responses in real time, without sending audio or transcripts off your phone.
This year’s Pixel camera helps you capture great moments and do more with what you see by building on-device AI right into your viewfinder. New low-power vision models can recognize facial expressions, objects, and text without having to send images off your device. Photobooth Mode is powered by an image scoring model that analyzes facial expressions and photo quality in real time. This will automatically capture smiles and funny faces so you can take selfies without having to reach for the shutter button. Top Shot uses the same kind of image analysis to suggest great, candid moments from a motion photo—recommending alternative shots in HDR+.
Playground creates an intelligent AR experience by using AI models to recommend Playmoji, stickers, and captions so that you can express yourself based on the scene you’re in. And without having to take a photo at all, image recognition lets you act on info from the world around you—surfacing Google Lens suggestions to call phone numbers or show website addresses—right from your camera.
Pixel 3 is just the beginning. We want to empower people with new AI-driven abilities. With our advances in on-device AI, we can develop new, helpful experiences that run right on your phone and are fast, efficient, and private to you.
Posted by Bartlomiej Wronski, Software Engineer and Peyman Milanfar, Lead Scientist, Computational Imaging
Digital zoom using algorithms (rather than lenses) has long been the “ugly duckling” of mobile device cameras. As compared to the optical zoom capabilities of DSLR cameras, the quality of digitally zoomed images has not been competitive, and conventional wisdom is that the complex optics and mechanisms of larger cameras can't be replaced with much more compact mobile device cameras and clever algorithms.
With the new Super Res Zoom feature on the Pixel 3, we are challenging that notion.
The Super Res Zoom technology in Pixel 3 is different and better than any previous digital zoom technique based on upscaling a crop of a single image, because we merge many frames directly onto a higher resolution picture. This results in greatly improved detail that is roughly competitive with the 2x optical zoom lenses on many other smartphones. Super Res Zoom means that if you pinch-zoom before pressing the shutter, you’ll get a lot more details in your picture than if you crop afterwards.
Crops of 2x Zoom: Pixel 2, 2017 vs. Super Res Zoom on the Pixel 3, 2018.
The Challenges of Digital Zoom Digital zoom is tough because a good algorithm is expected to start with a lower resolution image and "reconstruct" missing details reliably — with typical digital zoom a small crop of a single image is scaled up to produce a much larger image. Traditionally, this is done by linear interpolation methods, which attempt to recreate information that is not available in the original image, but introduce a blurry- or “plasticy” look that lacks texture and details. In contrast, most modern single-image upscalers use machine learning (including our own earlier work, RAISR). These magnify some specific image features such as straight edges and can even synthesize certain textures, but they cannot recover natural high-resolution details. While we still use RAISR to enhance the visual quality of images, most of the improved resolution provided by Super Res Zoom (at least for modest zoom factors like 2-3x) comes from our multi-frame approach.
Color Filter Arrays and Demosaicing Reconstructing fine details is especially difficult because digital photographs are already incomplete — they’ve been reconstructed from partial color information through a process called demosaicing. In typical consumer cameras, the camera sensor elements are meant to measure only the intensity of the light, not directly its color. To capture real colors present in the scene, cameras use a color filter array placed in front of the sensor so that each pixel measures only a single color (red, green, or blue). These are arranged in a Bayer pattern as shown in the diagram below.
A Bayer mosaic color filter. Every 2x2 group of pixels captures light filtered by a specific color — two green pixels (because our eyes are more sensitive to green), one red, and one blue. This pattern is repeated across the whole image.
A camera processing pipeline then has to reconstruct the real colors and all the details at all pixels, given this partial information.* Demosaicing starts by making a best guess at the missing color information, typically by interpolating from the colors in nearby pixels, meaning that two-thirds of an RGB digital picture is actually a reconstruction!
Demosaicing reconstructs missing color information by using neighboring neighboring pixels.
In its simplest form, this could be achieved by averaging from neighboring values. Most real demosaicing algorithms are more complicated than this, but they still lead to imperfect results and artifacts - as we are limited to only partial information. While this situation exists even for large-format DSLR cameras, their bigger sensors and larger lenses allow for more detail to be captured than is typical in a mobile camera.
The situation gets worse if you pinch-zoom on a mobile device; then algorithms are forced to make up even more information, again by interpolation from the nearby pixels. However, not all is lost. This is where burst photography and the fusion of multiple images can be used to allow for super-resolution, even when limited by mobile device optics. From Burst Photography to Multi-frame Super-resolution While a single frame doesn't provide enough information to fill in the missing colors , we can get some of this missing information from multiple images taken successively. The process of capturing and combining multiple sequential photographs is known as burst photography. Google’s HDR+ algorithm, successfully used in Nexus and Pixel phones, already uses information from multiple frames to make photos from mobile phones reach the level of quality expected from a much larger sensor; could a similar approach be used to increase image resolution?
It has been known for more than a decade, including in astronomy where the basic concept is known as “drizzle”, that capturing and combining multiple images taken from slightly different positions can yield resolution equivalent to optical zoom, at least at low magnifications like 2x or 3x and in good lighting conditions. In this process, called muti-frame super-resolution, the general idea is to align and merge low-resolution bursts directly onto a grid of the desired (higher) resolution. Here's an example of how an idealized multi-frame super-resolution algorithm might work:
As compared to the standard demosaicing pipeline that needs to interpolate the missing colors (top), ideally, one could fill some holes from multiple images, each shifted by one pixel horizontally or vertically.
In the example above, we capture 4 frames, three of them shifted by exactly one pixel: in the horizontal, vertical, and both horizontal and vertical directions. All the holes would get filled, and there would be no need for any demosaicing at all! Indeed, some DSLR cameras support this operation, but only if the camera is on a tripod, and the sensor/optics are actively moved to different positions. This is sometimes called "microstepping".
Over the years, the practical usage of this “super-res” approach to higher resolution imaging remained confined largely to the laboratory, or otherwise controlled settings where the sensor and the subject were aligned and the movement between them was either deliberately controlled or tightly constrained. For instance, in astronomical imaging, a stationary telescope sees a predictably moving sky. But in widely used imaging devices like the modern-day smartphone, the practical usage of super-res for zoom in applications like mobile device cameras has remained mostly out of reach.
This is in part due to the fact that in order for this to work properly, certain conditions need to be satisfied. First, and most important, is that the lens needs to resolve detail better than the sensor used (in contrast, you can imagine a case where the lens is so poorly-designed that adding a better sensor provides no benefit). This property is often observed as an unwanted artifact of digital cameras called aliasing.
Image Aliasing Aliasing occurs when a camera sensor is unable to faithfully represent all patterns and details present in a scene. A good example of aliasing are Moiré patterns, sometimes seen on TV as a result of an unfortunate choice of wardrobe. Furthermore, the aliasing effect on a physical feature (such as an edge of a table) changes when things move in a scene. You can observe this in the following burst sequence, where slight motions of the camera during the burst sequence create time-varying alias effects:
Left: High-resolution, single image of a table edge against a high frequency patterned background, Right: Different frames from a burst. Aliasing and Moiré effects are visible between different frames — pixels seem to jump around and produce different colored patterns.
However, this behavior is a blessing in disguise: if one analyzes the patterns produced, it gives us the variety of color and brightness values, as discussed in the previous section, to achieve super-resolution. That said, many challenges remain, as practical super-resolution needs to work with a handheld mobile phone and on any burst sequence. Practical Super-resolution Using Hand Motion As noted earlier, some DSLR cameras offer special tripod super-resolution modes that work in a way similar to what we described so far. These approaches rely on the physical movement of the sensors and optics inside the camera, but require a complete stabilization of the camera otherwise, which is impractical in mobile devices, since they are nearly always handheld. This would seem to create a catch-22 for super-resolution imaging on mobile platforms.
However, we turn this difficulty on its head, by using the hand-motion to our advantage. When we capture a burst of photos with a handheld camera or phone, there is always some movement present between the frames. Optical Image Stabilization (OIS) systems compensate for large camera motions - typically 5-20 pixels between successive frames spaced 1/30 second apart - but are unable to completely eliminate faster, lower magnitude, natural hand tremor, which occurs for everyone (even those with “steady hands”). When taking photos using mobile phones with a high resolution sensor, this hand tremor has a magnitude of just a few pixels.
Effect of hand tremor as seen in a cropped burst, after global alignment.
To take advantage of hand tremor, we first need to align the pictures in a burst together. We choose a single image in the burst as the “base” or reference frame, and align every other frame relative to it. After alignment, the images are combined together roughly as in the diagram shown earlier in this post. Of course, handshake is unlikely to move the image by exactly single pixels, so we need to interpolate between adjacent pixels in each newly captured frame before injecting the colors into the pixel grid of our base frame.
When hand motion is not present because the device is completely stabilized (e.g. placed on a tripod), we can still achieve our goal of simulating natural hand motion by intentionally “jiggling” the camera, by forcing the OIS module to move slightly between the shots. This movement is extremely small and chosen such that it doesn’t interfere with normal photos - but you can observe it yourself on Pixel 3 by holding the phone perfectly still, such as by pressing it against a window, and maximally pinch-zooming the viewfinder. Look for a tiny but continuous elliptical motion in distant objects, like that shown below.
Overcoming the Challenges of Super-resolution The description of the ideal process we gave above sounds simple, but super-resolution is not that easy — there are many reasons why it hasn’t widely been used in consumer products like mobile phones, and requires the development of significant algorithmic innovations. Challenges can include:
A single image from a burst is noisy, even in good lighting. A practical super-resolution algorithm needs to be aware of this noise and work correctly despite it. We don’t want to get just a higher resolution noisy image - our goal is to both increase the resolution but also produce a much less noisy result.
Left: Single frame frame from a burst taken in good light conditions can still contain a substantial amount of noise due to underexposure. Right: Result of merging multiple frames after burst processing.
Motion between images in a burst is not limited to just the movement of the camera. There can be complex motions in the scene such as wind-blown leaves, ripples moving across the surface of water, cars, people moving or changing their facial expressions, or the flicker of a flame — even some movements that cannot be assigned a single, unique motion estimate because they are transparent or multi-layered, such as smoke or glass. Completely reliable and localized alignment is generally not possible, and therefore a good super-resolution algorithm needs to work even if motion estimation is imperfect.
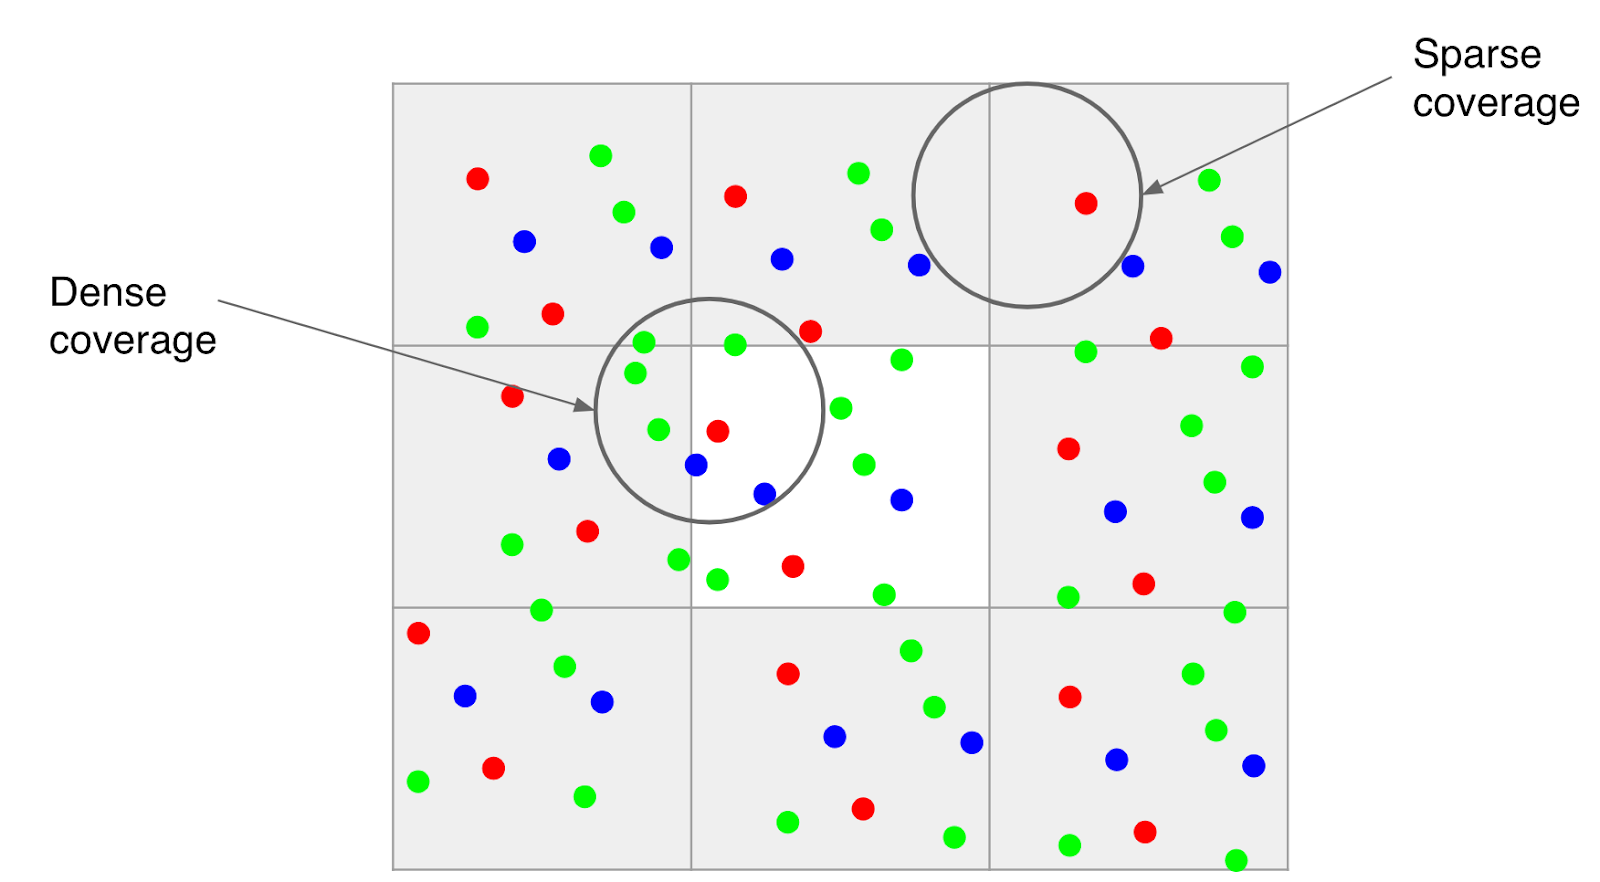
Because much of motion is random, even if there is good alignment, the data may be dense in some areas of the image and sparse in others. The crux of super-resolution is a complex interpolation problem, so the irregular spread of data makes it challenging to produce a higher-resolution image in all parts of the grid.
All the above challenges would seem to make real-world super-resolution either infeasible in practice, or at best limited to only static scenes and a camera placed on a tripod. With Super Res Zoom on Pixel 3, we’ve developed a stable and accurate burst resolution enhancement method that uses natural hand motion, and is robust and efficient enough to deploy on a mobile phone.
Here’s how we’ve addressed some of these challenges:
To effectively merge frames in a burst, and to produce a red, green, and blue value for every pixel without the need for demosaicing, we developed a method of integrating information across the frames that takes into account the edges of the image, and adapts accordingly. Specifically, we analyze the input frames and adjust how we combine them together, trading off increase in detail and resolution vs. noise suppression and smoothing. We accomplish this by merging pixels along the direction of apparent edges, rather than across them. The net effect is that our multi-frame method provides the best practical balance between noise reduction and enhancement of details.
Left: Merged image with sub-optimal tradeoff of noise reduction and enhanced resolution. Right: The same merged image with a better tradeoff.
To make the algorithm handle scenes with complex local motion (people, cars, water or tree leaves moving) reliably, we developed a robustness model that detects and mitigates alignment errors. We select one frame as a “reference image”, and merge information from other frames into it only if we’re sure that we have found the correct corresponding feature. In this way, we can avoid artifacts like “ghosting” or motion blur, and wrongly merged parts of the image.
A fast moving bus in a burst of images. Left: Merge without robustness model. Right: Merge with robustness model.
Pushing the State of the Art in Mobile Photography The Portrait mode last year, and the HDR+ pipeline before it, showed how good mobile photography can be. This year, we set out to do the same for zoom. That’s another step in advancing the state of the art in computational photography, while shrinking the quality gap between mobile photography and DSLRs. Here is an album containing full FOV images, followed by Super Res Zoom images. Note that the Super Res Zoom images in this album are not cropped — they are captured directly on-device using pinch-zoom.
Left: Crop of 7x zoomed image on Pixel 2. Right: Same crop from Super Res Zoom on Pixel 3.
The idea of super-resolution predates the advent of smart-phones by at least a decade. For nearly as long, it has also lived in the public imagination through films and television. It’s been the subject of thousands of papers in academic journals and conferences. Now, it is real — in the palm of your hands, in Pixel 3.
An illustrative animation of Super Res Zoom. When the user takes a zoomed photo, the Pixel 3 takes advantage of the user’s natural hand motion and captures a burst of images at subtly different positions. These are then merged together to add detail to the final image.
Acknowledgements Super Res Zoom is the result of a collaboration across several teams at Google. The project would not have been possible without the joint efforts of teams managed by Peyman Milanfar, Marc Levoy, and Bill Freeman. The authors would like to thank Marc Levoy and Isaac Reynolds in particular for their assistance in the writing of this blog.
The authors wish to especially acknowledge the following key contributors to the Super Res Zoom project: Ignacio Garcia-Dorado, Haomiao Jiang, Manfred Ernst, Michael Krainin, Daniel Vlasic, Jiawen Chen, Pascal Getreuer, and Chia-Kai Liang. The project also benefited greatly from contributions and feedback by Ce Liu, Damien Kelly, and Dillon Sharlet.
How to get the most out of Super Res Zoom? Here are some tips on getting the best of Super Res Zoom on a Pixel 3 phone:
Pinch and zoom, or use the + button to increase zoom by discrete steps.
Double-tap the preview to quickly toggle between zoomed in and zoomed out.
Super Res works well at all zoom factors, though for performance reasons, it activates only above 1.2x. That’s about half way between no zoom and the first “click” in the zoom UI.
There are fundamental limits to the optical resolution of a wide-angle camera. So to get the most out of (any) zoom, keep the magnification factor modest.
Avoid fast moving objects. Super Res zoom will capture them correctly, but you will not likely get increased resolution.
* It’s worth noting that the situation is similar in some ways to how we see — in human (and other mammalian) eyes, different eye cone cells are sensitive to some specific colors, with the brain filling in the details to reconstruct the full image.


