Tag Archives: Editors

Remove or select a custom color for chart borders in Google Sheets

Quick launch summary 

You now have more options for customizing chart borders in Google Sheets. Currently, the default border for a chart is dark gray — now, you can change the border to a custom color or remove the border:

  • Double click on any chart to open the Chart editor and select the Customize tab. 
  • Under Chart style, you can select a border color or select “None” to remove the border. 

The default border is shown on the left, customization options shown on the right. 


We hope this new feature helps you better customize your Sheets.

Availability 

Rollout details 


G Suite editions 

  • Available to all G Suite editions 


On/off by default? 

  • This feature will be ON by default.


Stay up to date with G Suite launches

New features for Slides Present mode

What’s changing 

We’re adding new features in Slides Present mode to make navigating a presentation easier while you’re presenting. With these new features, you’ll be able to:

  • Resize speaker notes and slide thumbnails in the presenter view 
  • Navigate to any specific slide with a keyboard shortcut 
  • Control video playback with keyboard shortcuts 
  • View all available Present mode keyboard shortcuts by clicking the new “tips” button in the presentation control bar. 

Who’s impacted 

End users

Why you’d use it 

On a small screen, it's sometimes tough to see your upcoming slides and read your speaker notes. Now, you can easily resize these components and confidently present, regardless of the device you’re using.

Additionally, our new keyboard shortcuts make moving through slides while presenting easy. Whether you need to quickly pause a video to answer a question, or jump to a specific slide to revisit a talking point, you can now quickly navigate and control the presentation with your keyboard.

How to get started 


  • Admins: No action required. 
  • End users: 
  • To resize speaker notes, in the toolbar select Present > Presenter View and drag the separator line between the slide preview and speaker notes accordingly. 


  • To view a list of new keyboard shortcuts press Present > Tips: 


Helpful links 


Availability 

Rollout details 


G Suite editions 
Available to all G Suite editions

On/off by default? 
This feature will be ON by default.


Stay up to date with G Suite launches

View the edit history of a cell in Sheets

What’s changing 

“Show edit history” is a new feature in Sheets that will help you easily see the edit history of a cell, including who made the last edit, when that edit was made, and the cell’s previous value.


Who’s impacted 

End users

Why you’d use it 

Tracking edits made by collaborators is important for keeping information accurate and understanding why specific changes were made and by whom. This is especially critical when there are several collaborators working in a sheet.

Previously, you would need to open up Version History and manually look through past versions of a sheet to determine who changed a cell and when. With Show edit history, you can quickly surface the edit history of a cell: who edited, when, and the previous value.

How to get started 


  • Admins: No action required. 
  • End users: To start using Show edit history: 
    • Right click on any cell and select “Show edit history” from the dropdown menu. 
    • A dialogue box will appear that will show you: 
      • The user who last made a direct edit in the cell 
      • A timestamp of the edit 
      • The previous value and current value of the cell 
      • Arrow keys in the top right corner which toggle back and forth between edits 

Additional details 

The following changes are considered previous edits to a cell:

  • Adding, editing, or removing content — like changing the value of a cell from “3” to “5”
  • Changing a formula — like changing “=A1+B1” to “=A1+C5” 
  • Adding, editing, or removing a link from a cell 
Note: Some changes may not show up in the edit history. Some examples are:

  • Added or deleted rows and columns 
  • Changes to the cell’s format 
  • Changes made by formulas 

Helpful links 


Availability 

Rollout details 


G Suite editions 

  • Available to all G Suite editions 

On/off by default? 

  • This feature will be ON by default.


Stay up to date with G Suite launches

See changes in Google Docs over time with Compare Documents

What’s changing 

It’s now easier to compare two Google docs. This feature will show you the differences between the docs as “Suggested Edits” in a new document.


Who’s impacted 

End users


Why you’d use it 

This feature makes it easy to see changes between two docs over time. For instance, educators can use this tool to compare essays and track revisions, saving them time when grading.

On the other hand, business users can use this tool during contract negotiations to see what terms have changed throughout the negotiation process and to compare the final version of the doc to the initial version.


How to get started 


  • Admins: No action required. 
  • End users: To compare Docs: 
    • Open any Google Doc — this will become your ‘base’ document. 
    • From the toolbar, select Tools > Compare Documents
      • In the dialogue, click on Choose document to select the second Google Doc to compare against. 
      • In the “Attribute differences to field”, enter the name of the user who will be labelled as the author of the suggested edits in the comparison output file. 
    • Select Compare


A new document will be generated that shows all existing suggested edits from both docs as accepted. Users will be able to see the differences between both documents as suggested edits labeled with the name defined in the Attribute differences to field.


Additional details 

Doc owners and those with edit access can use this feature to compare documents.

Helpful links 


Availability 

Rollout details 


G Suite editions 


  • Available to all G Suite Editions 

On/off by default? 


  • This feature will be ON by default

Stay up to date with G Suite launches

Two new formatting tools available in Docs

Quick launch summary 

We’re introducing two new features in Google Docs that will help you format your work:

Insert section breaks and view section breaks in Docs
You can now insert a next page or continuous section break in Google Docs by going to Insert > Break. From here, you can select next or continuous. Note both types of breaks will start at the place of your cursor location.

To easily view where section breaks are located in your document, you can use the new show section breaks tool by going to View > Show section breaks. When Show selection breaks is enabled, you’ll see a blue dotted line where each section break is located.


Adjust margins per section 
It’s now possible to use the ruler to adjust the left and right margins by section. Previously, it was only possible to adjust the margins for the entire document.

If you don’t make a selection, the ruler will adjust the margins for the section that corresponds to the cursor location. Or, you can highlight multiple sections of your doc to be adjusted.

You can also adjust margins per-section by going to File > Page Setup.

Availability

Rollout details


G Suite editions

  • Available for all G Suite editions.

On/off by default?

  • This features will be ON by default.

Stay up to date with G Suite launches

Update all linked content with one click in Docs and Slides

What’s changing 

We’re adding a new “Linked objects” sidebar where users can see all linked content in their documents, such as embedded charts, tables, slides, and drawings.

Who’s impacted 

End users

Why you’d use it 

The Linked objects sidebar gives users the ability to quickly access all linked content to see if anything is outdated and update all the content with a single click.


How to get started 

Admins: No action required.
End users: To update the data in a multiple charts or tables:

  • In Docs or Slides, at the top click Tools > Linked objects
  • A sidebar will open on the right, at the bottom click Update all
    • Note: Click Update next to specific objects to update them individually. 

Additional details 

If you don’t see Update or Update All, your charts, tables, or slides may not be linked. To learn how to link charts, tables, or slides see this article in our Help Center.

Helpful links 

Update charts, tables, slides or drawings in a document or presentation. 
Link a chart, table, or slide to Google Docs or Slides. 

Availability 

Rollout details 

  • Rapid Release domains: Extended rollout (potentially longer than 15 days for feature visibility) starting on May 20, 2019. 
  • Scheduled Release domains: Extended rollout (potentially longer than 15 days for feature visibility) starting on June 17, 2019. 

G Suite editions

  • Available to all G Suite editions. 

On/off by default? 

  • This feature will be ON by default.

Stay up to date with G Suite launches

Three new features to format and work with data in Sheets

What’s changing 

We’re introducing three new features that will help you clean up and work with your data in Sheets. These features are: 

  • Remove duplicates 
  • Trim whitespace 
  • Compatible spreadsheet shortcuts 

Who’s impacted 

End users

Why you’d use them 

Remove duplicates: 
A highly requested feature, you can use this tool to easily remove duplicate values from your sheet, saving you time by eliminating the need to write an app script or manually remove duplicate data.


Trim whitespace: 
Sometimes when you add data to a sheet, it may not be the format you need. Now, you can easily keep your sheet standardized by using the trim whitespace feature to remove any leading, trailing, or excessive whitespace from a cell or array of data.


Compatible keyboard shortcuts: 
You can now use popular keyboard shortcuts from other spreadsheets in Sheets. These familiar shortcuts will make navigating and working with data in Sheets quicker for users.


How to get started 

Admins: No action required.
End users:
  • To remove duplicates from a range of data: 
    • Select range of data in your sheet 
    • From the toolbar, select Data > Remove duplicates. In the dialogue box, you’ll see your selected range of data. 
    • Select Remove duplicates. You’ll see an additional dialogue box that details how many duplicates were removed from your dataset.
  • To trim whitespaces: 
    • Select a cell or range of data that contains whitespace on your sheet 
    • From the toolbar, select Data > Trim whitespace 
    • You’ll then see a dialogue box that details how many cells whitespace was removed from. 
  • To enable compatible keyboard shortcuts: 
    • Users can access keyboard shortcuts by going to Help > Keyboard shortcuts
      • From here, you can see a list of keyboard shortcuts and their corresponding commands. Note that compatible shortcuts will be denoted with an info icon. 
      • At the bottom, you can enable compatible spreadsheet shortcuts. 
      • You can click “View compatible shortcuts” at the bottom right to see a complete list of all newly available shortcuts. 

Additional details 

The remove duplicates and trim whitespaces features will be supported in Apps Script, macro recording, and one platform APIs in early June 2019.

Helpful links 

Keyboard shortcuts for Google Docs. 
Split text, remove duplicates, or trim whitespace in Sheets.
Separate cell text into columns. 

Availability 

Rollout details 


G Suite editions 

  • Available to all G Suite editions. 

On/off by default? 

  • This feature will be ON by default.

Stay up to date with G Suite launches

Work anywhere with Google Docs, Sheets, and Slides in new offline mode

What’s changing 

It’s now possible for users to work on Docs, Sheets, and Slides files when your device is offline or have a bad internet connection within Google Drive. You can also preview which files are available offline with a new offline preview mode.

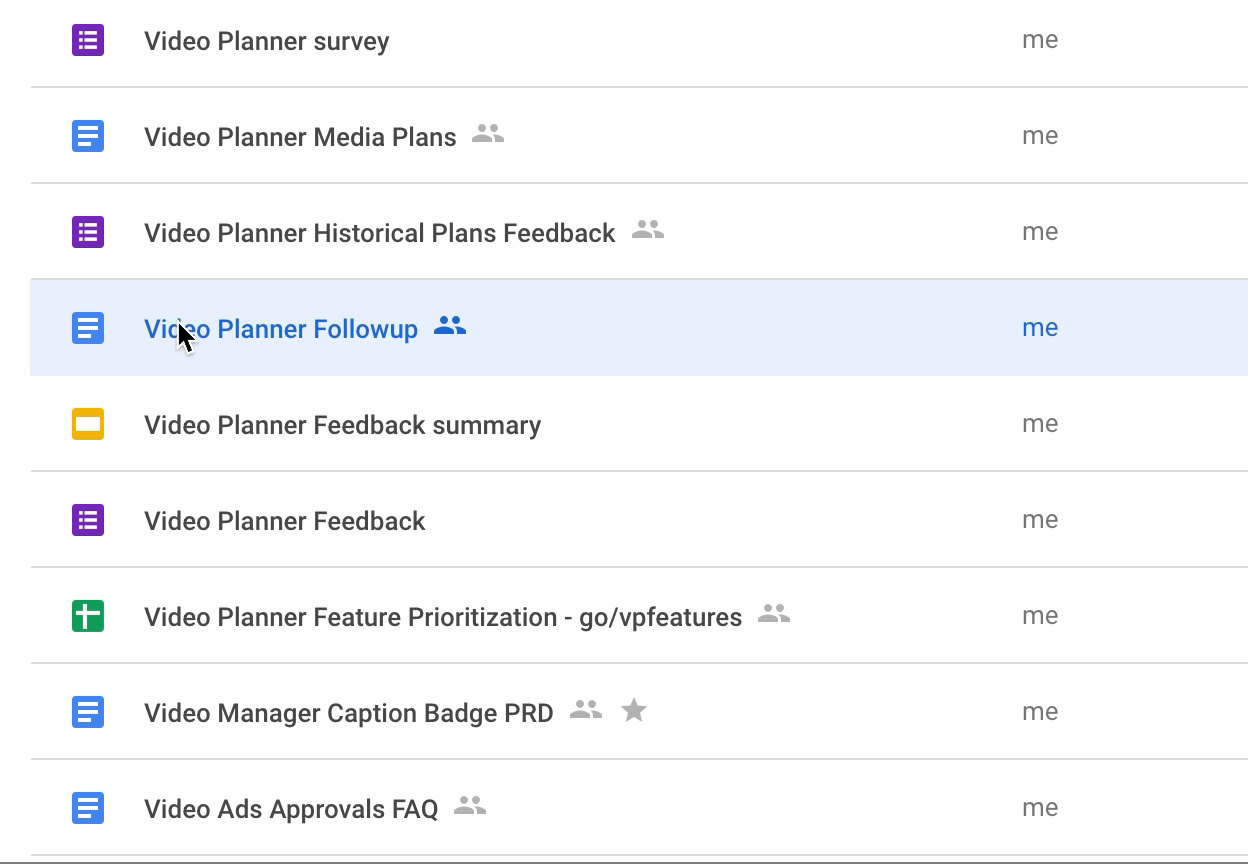
Right click on Docs, Sheets, and Slides files from within Google Drive to make those files available offline.

You can preview which files are available offline using the Offline preview mode

Who’s impacted 

Admins and end users.

Why you’d use it 

We know it’s important for users to access and work on their files while traveling or when there’s low connectivity. With offline mode, it’s now possible to create, edit, and comment on Docs, Sheets, or Slides files. Any changes made to files while offline will then sync in Drive once the user is connected again.

How to get started 

  • Admins: Admins can enable this feature for all or some users:
    • To let users enable offline access (recommended), go to Apps > G Suite > Drive and Docs.
    • To enable offline access for specific devices, see this article in our Help Center.
    • Note: The default for this feature is that all users can enable offline access on any device they sign into, but it is not enabled automatically except on Chromebooks 
  • End users: To work with your files while offline, you’ll need to enable offline access in your Drive settings:
    • From Google Drive, click the gear icon at the top right corner, select Settings > General and select Sync Google Docs, Sheets, Slides, and Drawings files to this computer so that you can edit offline.
    • Once offline access is enabled, a checkmark icon will appear in the top right next to Settings (gear icon) and Support (question mark). When you click this icon, you can find the offline preview toggle. 


Additional details 

To make files available offline in Google Drive, right click on any file and toggle Available offline from the menu while connected.

When offline access is enabled, Google Drive also automatically and intelligently makes a certain number of Google Docs/Sheets/Slides files available offline based on how recently you accessed them. You can preview which files are already available offline automatically using the offline preview mode. You can also mark a file available offline -- so that it always remains available offline -- while in offline preview mode, as long as you are connected.

Helpful links 

Availability 

Rollout details 
  • Rapid Release domains: Gradual rollout (up to 15 days for feature visibility) starting on April 24, 2019 
  • Scheduled Release domains: Extended rollout (potentially longer than 15 days for feature visibility) starting on May 21, 2019. 
G Suite editions 
  • Available to all G Suite editions.
On/off by default? 
  • This feature will be ON by default for users who already have offline enabled.
Stay up to date with G Suite launches