Posted By Dave Burke, VP of Engineering
![]()
Earlier today we unveiled a beta version of Android P, the next release of Android. Android P puts AI at the core of the operating system and focuses on intelligent and simple experiences. You can read more about the new user features here.
For developers, Android P beta offers a range of ways to take advantage of these new smarts, especially when it comes to increasing engagement with your apps.
You can get Android P beta on Pixel devices by enrolling here. And thanks to Project Treble, you can now get the beta on top devices from our partners as well -- Essential, Nokia, Oppo, Sony, Vivo, and Xiaomi, with others on the way.
Visit android.com/beta for the full list of devices, and details on how to get Android P beta on your device. To get started developing with Android P beta, visit developer.android.com/preview.
A smarter smartphone, with machine learning at the core
Android P makes a smartphone smarter, helping it learn from and adapt to the user. Your apps can take advantage of the latest in machine intelligence to help you reach more users and offer new kinds of experiences.
Adaptive Battery
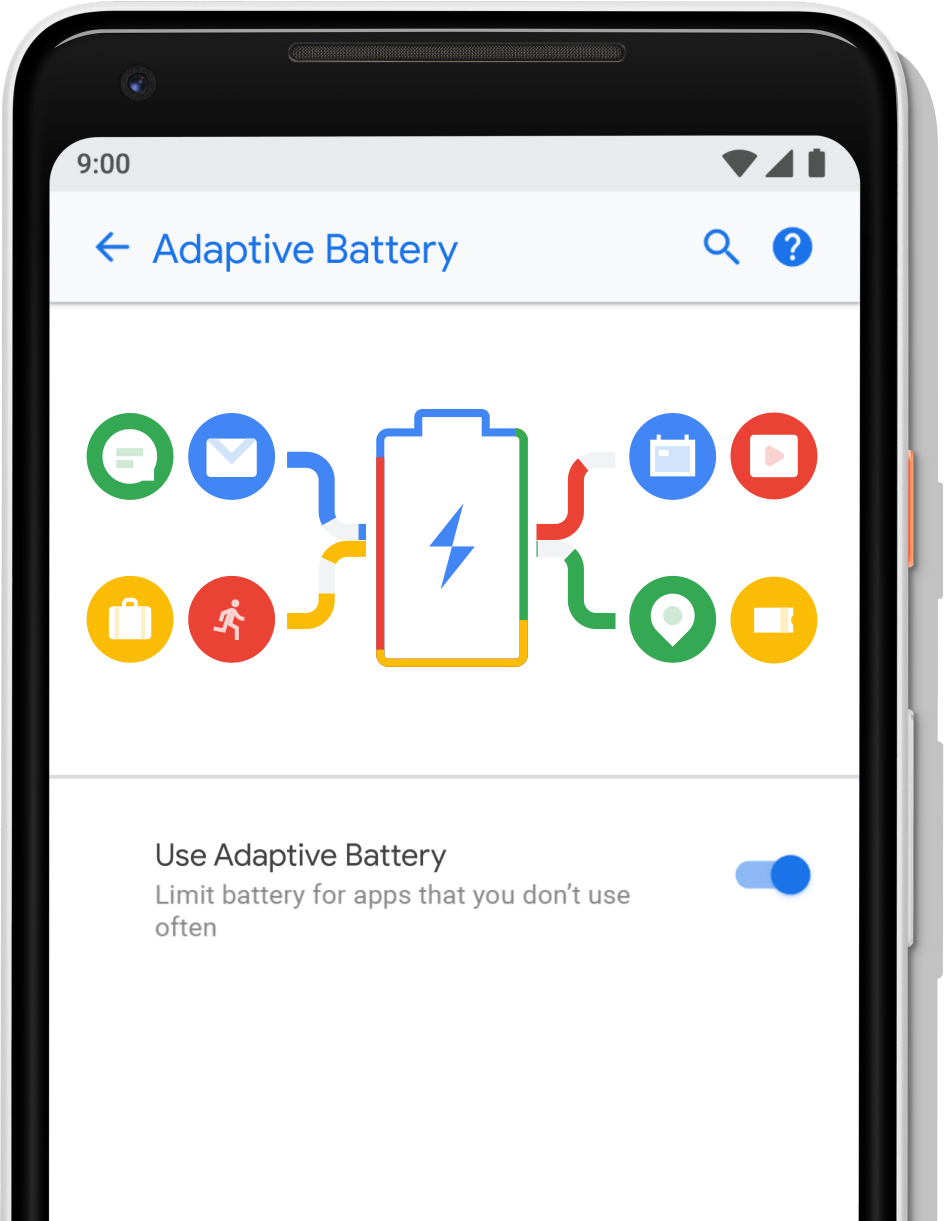
Battery is the number one priority we hear from mobile phone users, regardless of the device they are using. In Android P we've partnered with DeepMind on a new feature we call Adaptive Battery that optimizes how apps use battery.
Adaptive Battery uses machine learning to prioritize access to system resources for the apps the user cares about most. It puts running apps into groups with different restrictions using four new "App Standby buckets" ranging from "active" to "rare". Apps will change buckets over time, and apps not in the "active" bucket will have restrictions in: jobs, alarms, network and high-priority Firebase Cloud Messages.
If your app is optimized for Doze, App Standby, and Background Limits, Adaptive Battery should work well for you right out of the box. We recommend testing your app in each of the four buckets. Check out the documentation for the details.
App Actions
App Actions are a new way to raise the visibility of your app to users as they start their tasks. They put your app's core capabilities in front of users as suggestions to handle their tasks, from key touch-points across the system like the Launcher and Smart Text Selection, Google Play, Google Search app, and the Assistant.
Actions use machine learning to surface just the right apps to users based on their context or recent interactions. Because Actions highlight your app where and when it's most relevant, they're a great way to reach new users and re-engage with existing users.
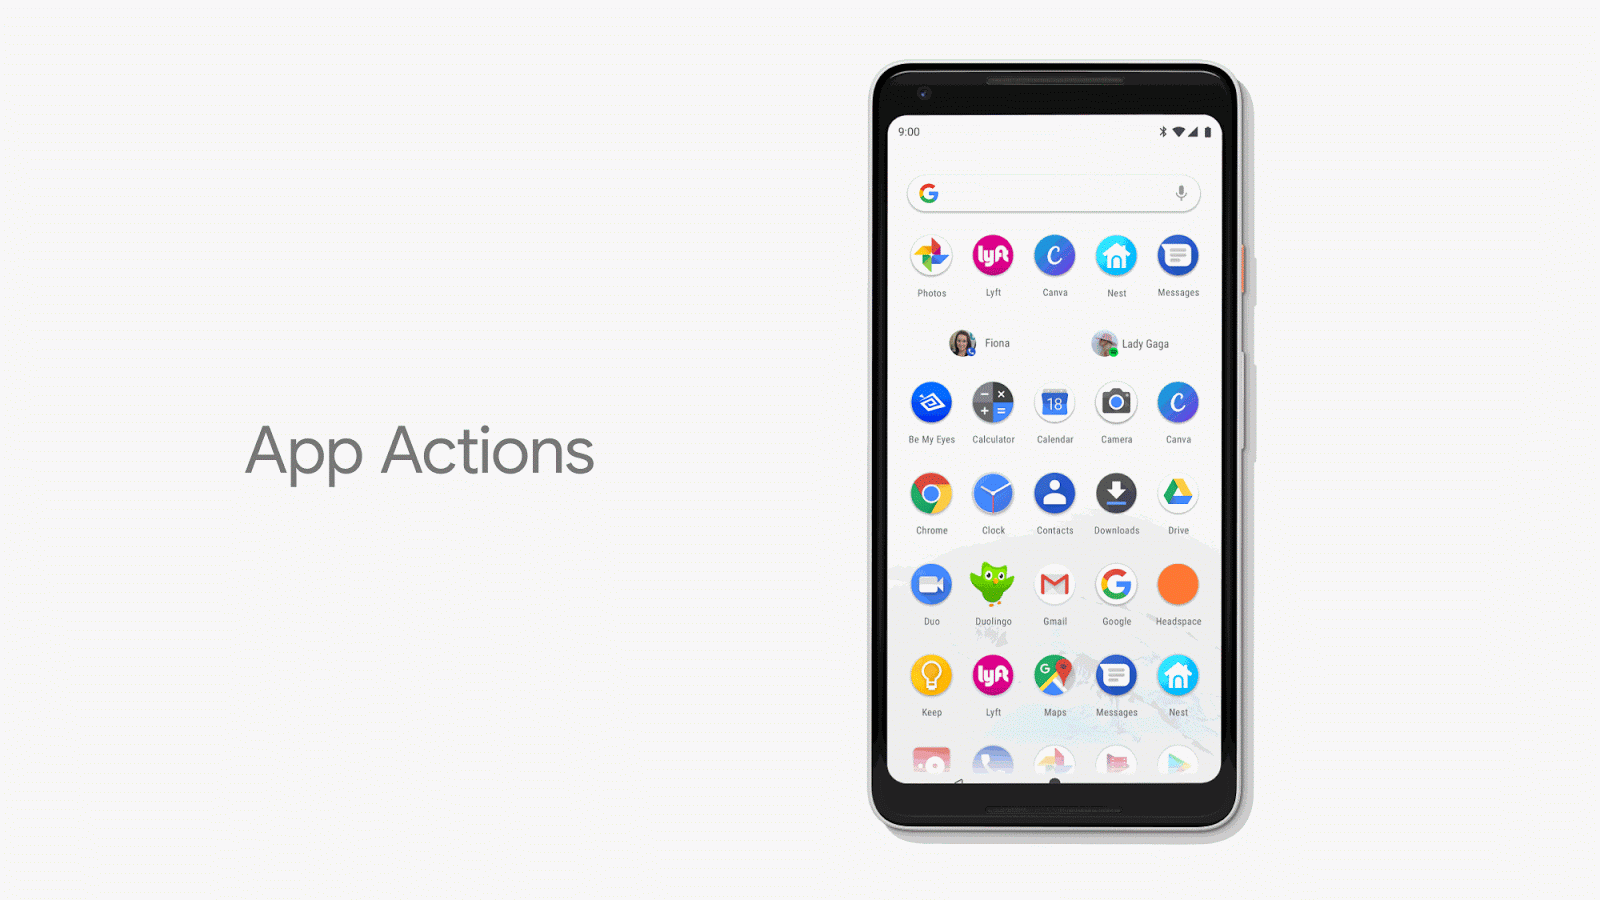
To support App Actions, just define your app's capabilities as semantic intents. App Actions use the same catalog of common intents as conversational Actions for the Google Assistant, which surface on voice-activated speakers, Smart displays, cars, TVs, headphones, and more. There's no API surface needed for App Actions, so they will work on any supported Android platform version.
Actions will be available soon for developers to try, sign up here if you'd like to be notified.
Slices
Along with App Actions we're introducing Slices, a new way for your apps to provide remote content to users. With Slices you can surface rich, templated UI in places like Google Search and Assistant. Slices are interactive with support for actions, toggles, sliders, scrolling content, and more.
Slices are a great new way to engage users and we wanted them to be available as broadly as possible. We added platform support in Android P, and we built the developer APIs and templates into Android Jetpack, our new set of libraries and tools for building great apps. Through Jetpack, your Slices implementation can target users all the way back to Kitkat -- across 95% of active Android devices. We'll also be able to update the templates regularly to support new use cases and interactions (such as text input).
Check out the Getting Started guide to learn how to build with Slices -- you can use the SliceViewer tool to see how your Slices look. Over time we plan to expand the number of places that your Slices can appear, including remote display in other apps.
Smart reply in notifications
The Smart Reply feature in Gmail and Inbox are excellent examples of how machine intelligence can positively transform an app experience. In Android P we've brought Smart Replies to Notifications with an API to let you provide this optimization to your users. To make it easier to populate replies in your notifications, you'll soon be able to use ML Kit -- see developers.google.com/mlkit for details.
Text Classifier
In Android P we've extended the ML models that identify entities in content or text input to support more types like Dates and Flight Numbers and we're making those improvements available to developers through the TextClassifier API. We're also updating the Linkify API that automatically creates links to take advantage of these TextClassification models and have enriched the options the user has for quick follow on actions. Developers will have additional options of linkifying any of the entities recognized by the TextClassifier service. Smart Linkify has significant improvements in accuracy and precision of detection and performance.
Even better, the models are now updated directly from Google Play, so your apps can take advantage of model improvements using the same APIs. Once the updated models are installed, all of the entity recognition happens on-device and data is not sent over the network.
Simplicity
We put a special emphasis on simplicity in Android P, evolving Android's UI to streamline and enhance user tasks. For developers, the changes help improve the way users find, use, and manage your apps.
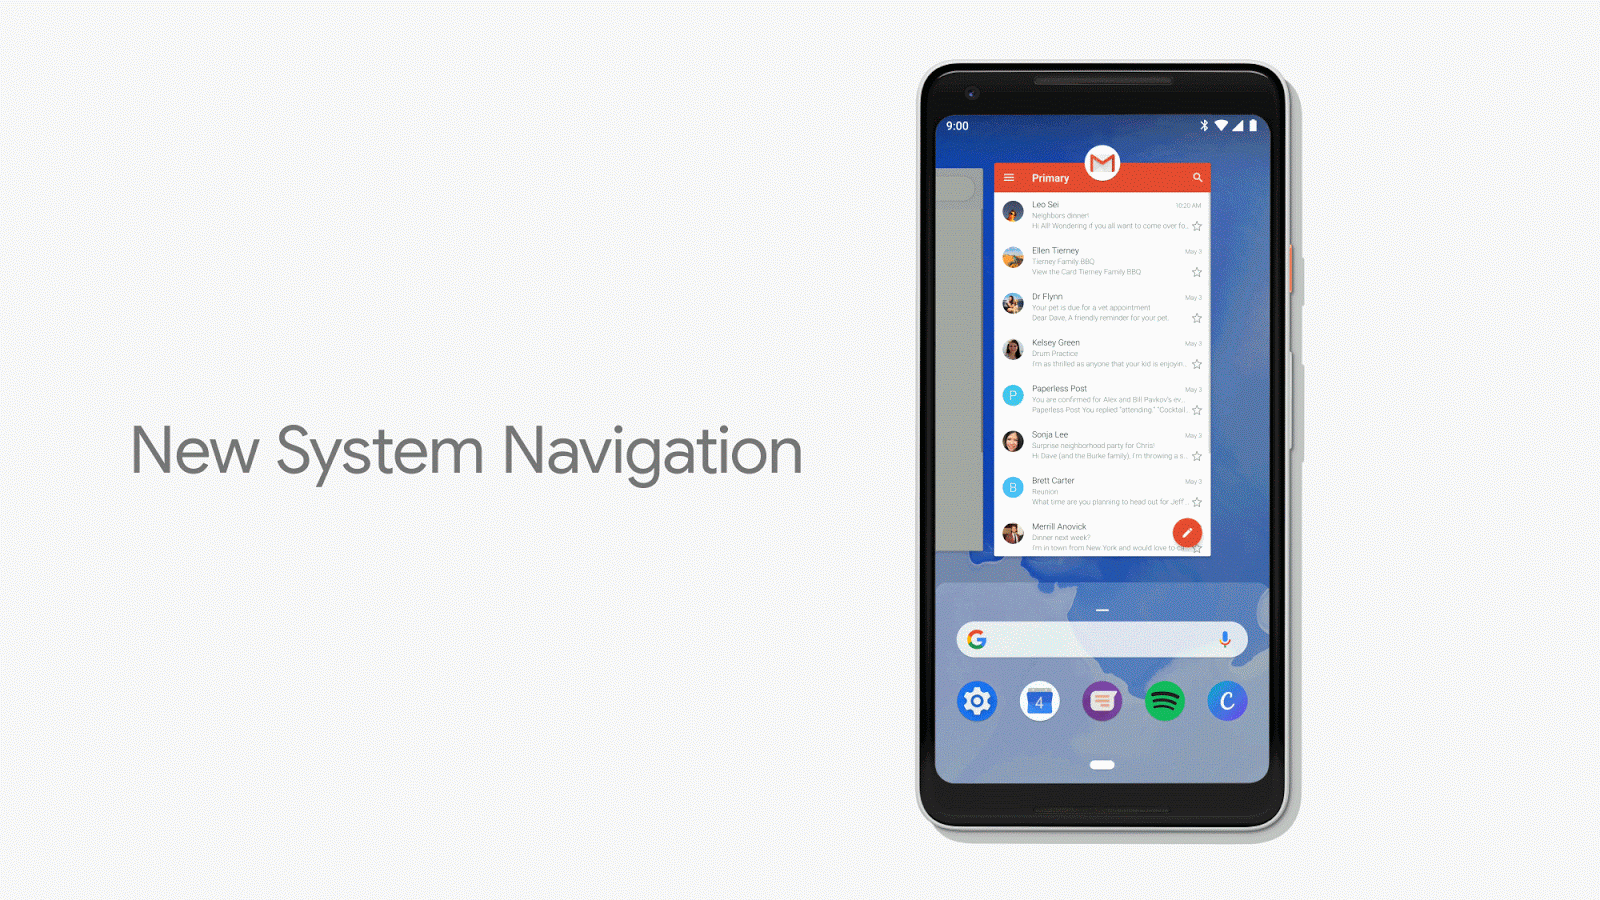
New system navigation
We're introducing a new system navigation in Android P that gives users easier access to Home, Overview, and the Assistant from a single button on every screen. The new navigation simplifies multitasking and makes discovering related apps much easier. In the Overview, users have a much larger view of what they were doing when they left each app, making it much easier to see and resume the activity. The Overview also provides access to search, predicted apps, and App Actions, and takes users to All Apps with another swipe.
Text Magnifier
In Android P we've also added a new Magnifier widget, designed to make it easier to select text and manipulate the text cursor in text. By default, classes that extend TextView automatically support the magnifier, but you can use the Magnifier API to attach it to any custom View, which opens it up to a variety of uses.
Background restrictions
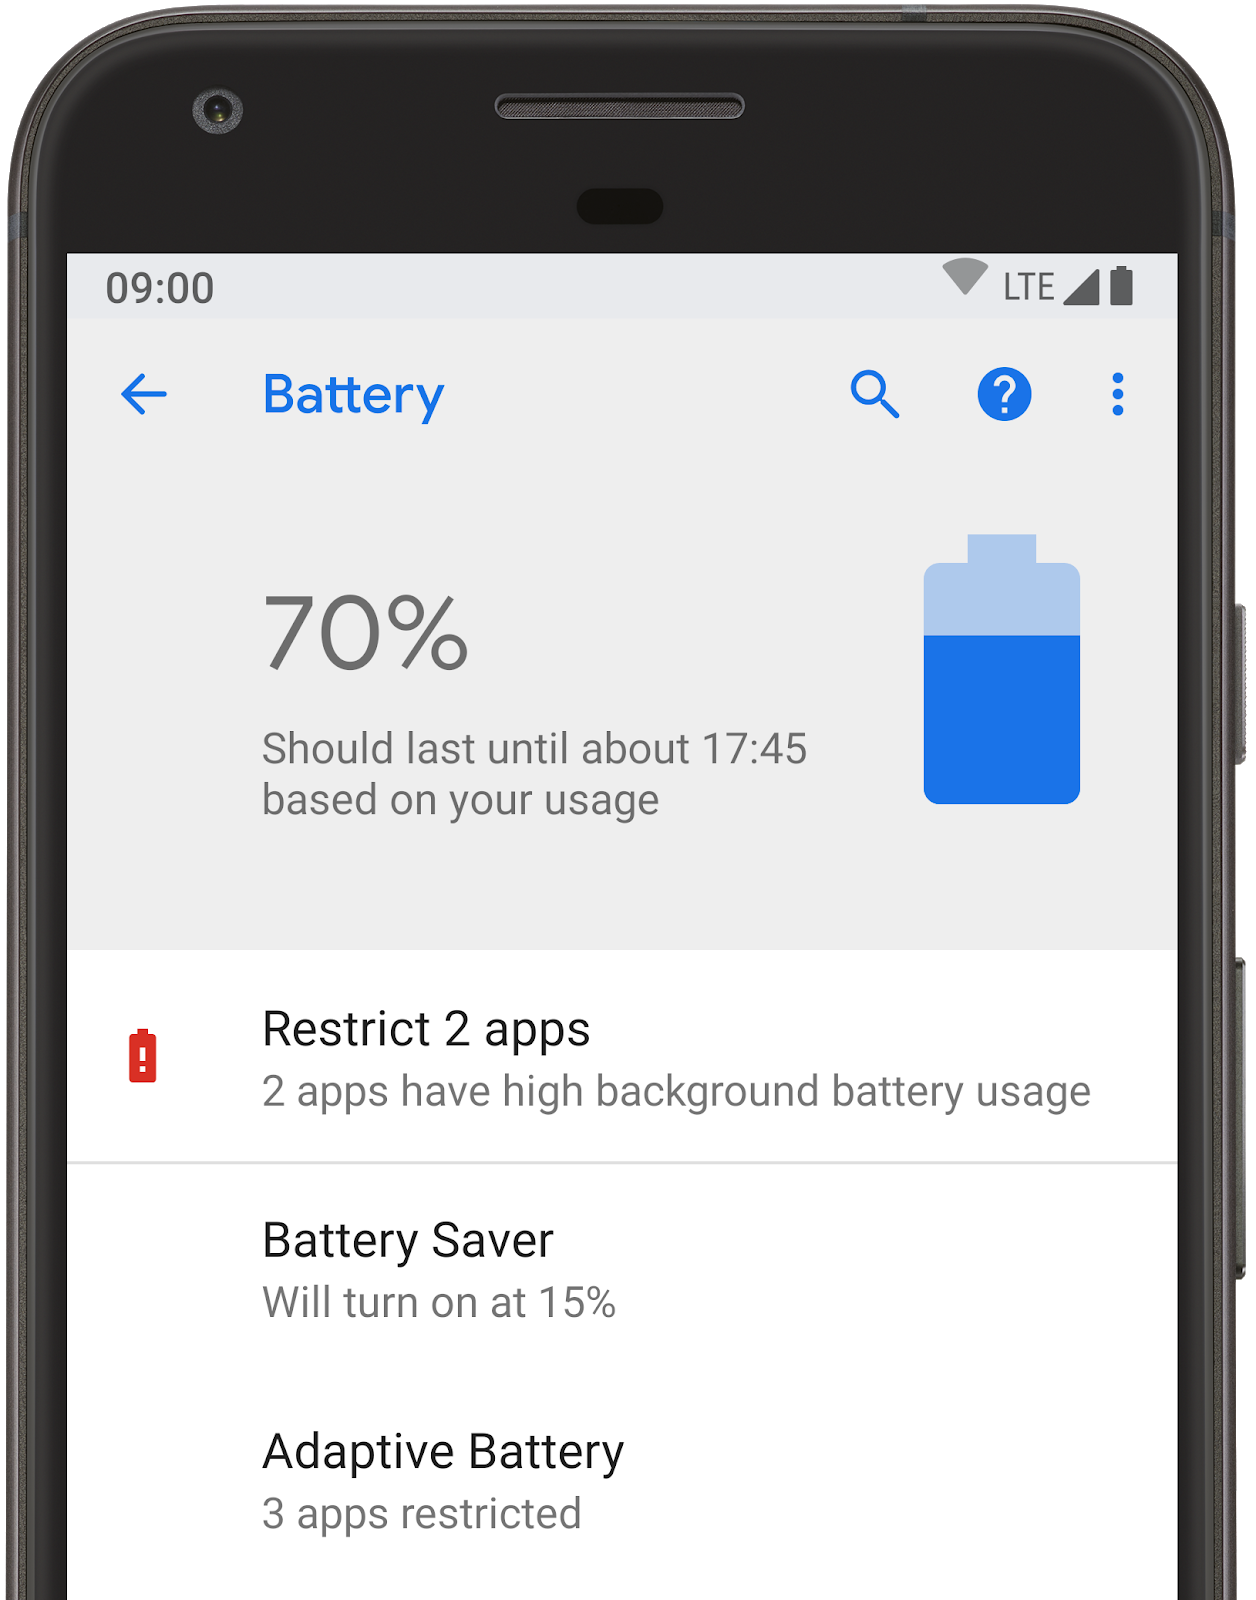
We're making it simple for users to identify and manage apps that are using battery in the background. From our work on Android Vitals, Android can detect battery-draining app behaviors such as excessive wake locks and others. Now in Android P, Battery Settings lists such apps and lets users restrict their background activities with a single tap.
When an app is restricted, its background jobs, alarms, services, and network access are affected. To stay off of the list, pay attention to your Android Vitals dashboard in the Play Console, which can help you understand performance and battery issues.
Background Restrictions ensures baseline behaviors that developers can build for across devices and manufacturers. Although device makers can add restrictions on top of the core set, they must provide user controls via Battery Settings.
We've added a standard API to let apps check whether they are restricted, as well as new ADB commands to let you manually apply restrictions to your apps for testing. See the documentation for details. We also plan to add restrictions related metrics to your Play Console Android Vitals dashboard in the future.
Enhanced audio with Dynamics Processing
Android P introduces a new Dynamics Processing Effect in the Audio Framework that lets developers improve audio quality. With Dynamics Processing, you can isolate specific frequencies and lower loud or increase soft sounds to enhance the acoustic quality of your application. For example, your app can improve the sound of someone who speaks quietly in a loud, distant or otherwise acoustically challenging environment.
The Dynamics Processing API gives you access to a multi-stage, multi-band dynamics processing effect that includes a pre-equalizer, a multi-band compressor, a post-equalizer and a linked limiter. It lets you modify the audio coming out of Android devices and optimize it according to the preferences of the listener or the ambient conditions. The number of bands and active stages is fully configurable, and most parameters can be controlled in realtime, such as gains, attack/release times, thresholds, etc.
To see what you can do with the Dynamics Processing Effect, please see the documentation.

Security
Biometric prompt
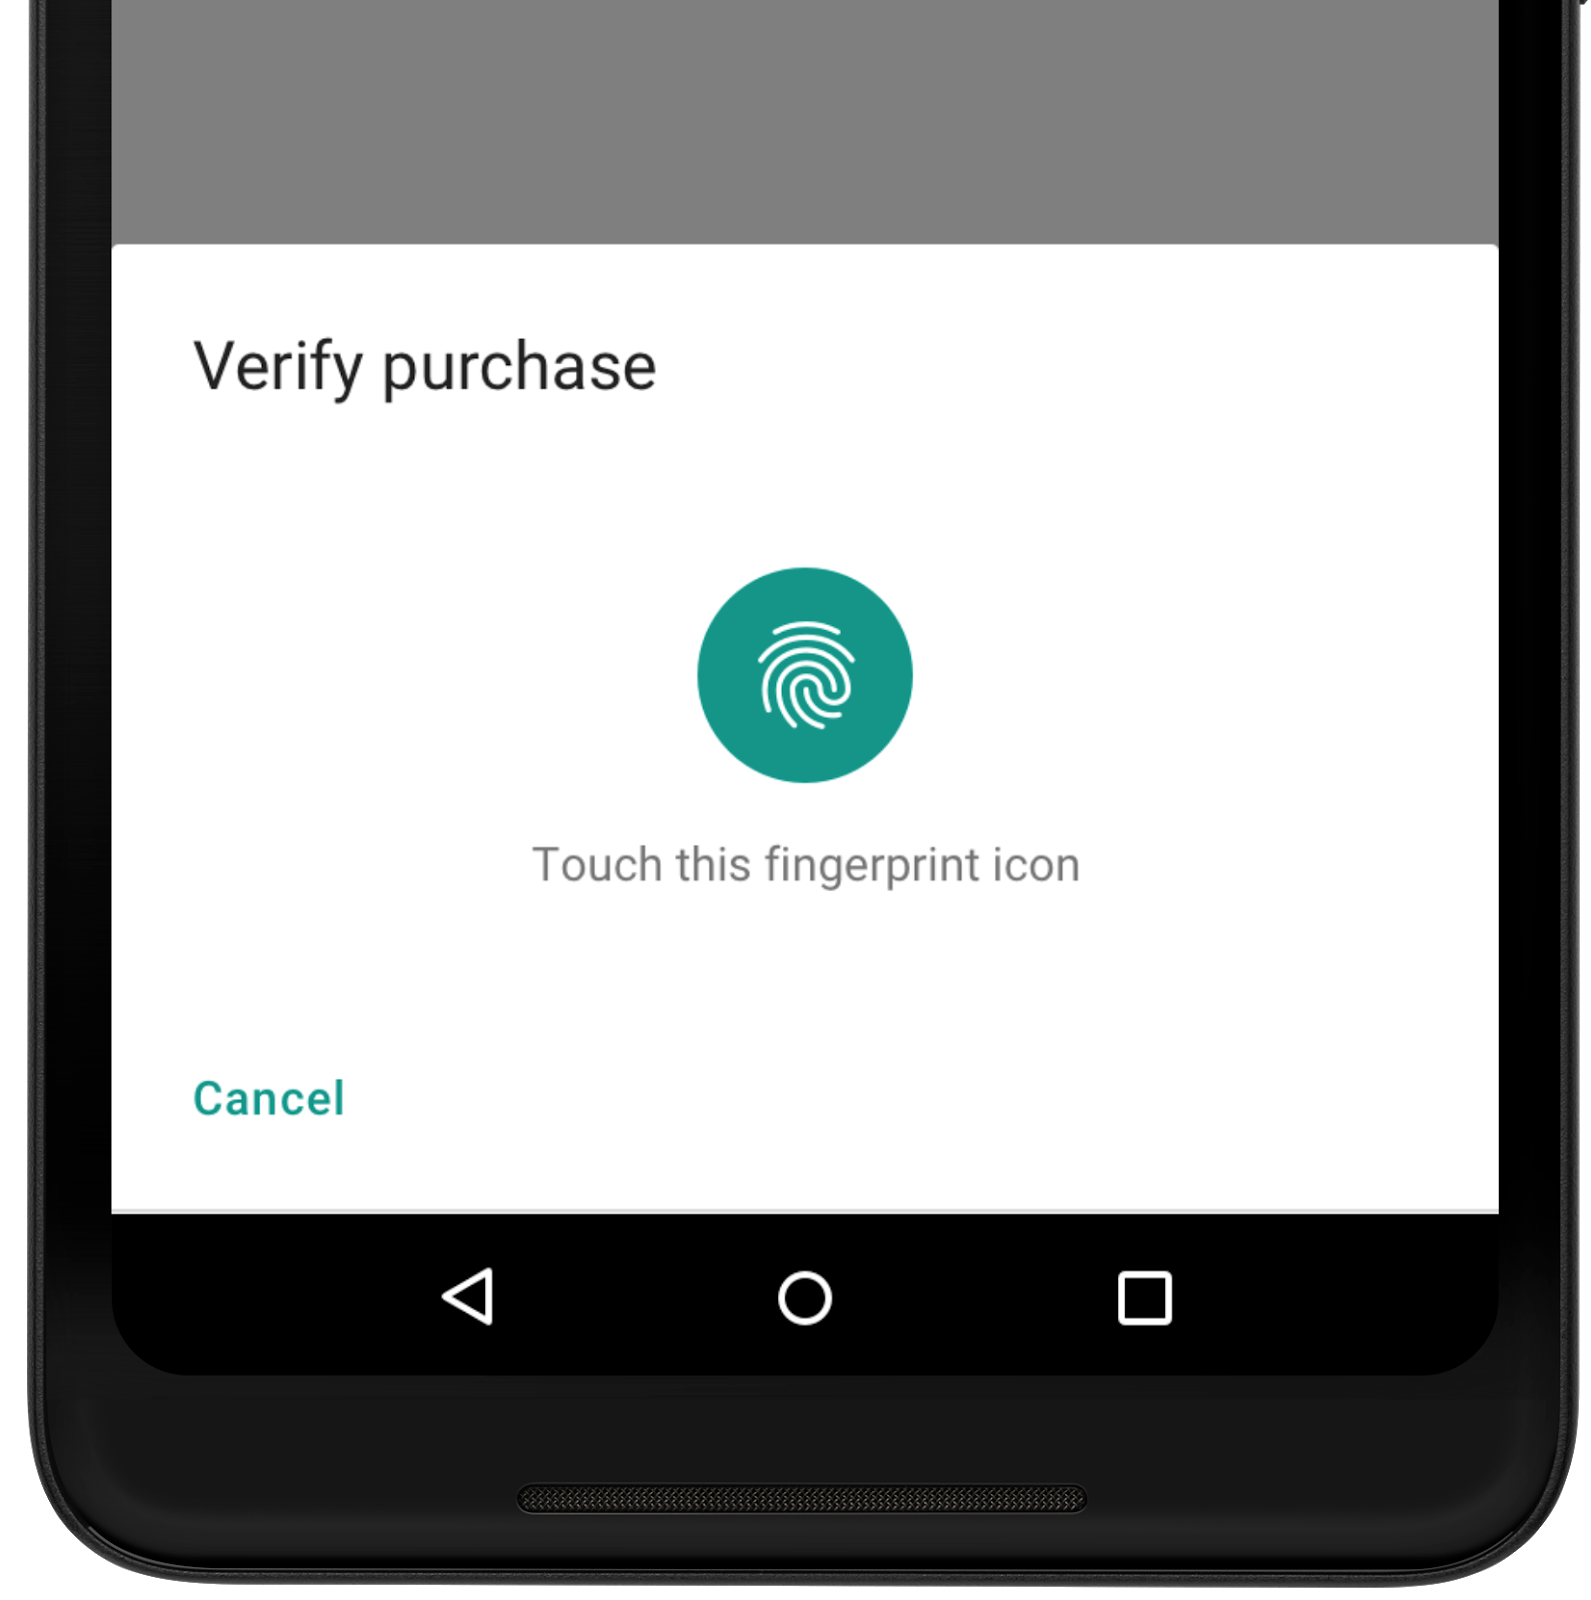
Android P provides a standard authentication experience across the growing range of biometric sensors. Apps can use the new BiometricPrompt API instead of displaying their own biometric auth dialogs. This new API replaces the FingerprintDialog API added in DP1. In addition to supporting Fingerprints (including in-display sensors), it also supports Face and Iris authentication, providing a system-wide consistent experience. There is a single USE_BIOMETRIC permission that covers all device-supported biometrics. FingerprintManager and the corresponding USE_FINGERPRINT permission are now deprecated, so please switch to BiometricPrompt as soon as possible.
Protected Confirmation
Android P introduces Android Protected Confirmation, which use the Trusted Execution Environment (TEE) to guarantee that a given prompt string is shown and confirmed by the user. Only after successful user confirmation will the TEE then sign the prompt string, which the app can verify.
Stronger protection for private keys
We've added StrongBox as a new KeyStore type, providing API support for devices that provide key storage in tamper-resistant hardware with isolated CPU, RAM, and secure flash. You can set whether your keys should be protected by a StrongBox security chip in your KeyGenParameterSpec.
Android P Beta
Bringing a new version of Android to users takes a combined effort across Google, silicon manufacturers (SM), device manufacturers (OEMs), and carriers. The process is technically challenging and can take time -- to make it easier, we launched Project Treble last year as part of Android Oreo. Since then we've been working with partners on the initial bring-up and now we're seeing proof of what Treble can do.
Today we announced that 6 of our top partners are joining us to release Android P Beta on their devices -- Sony Xperia XZ2, Xiaomi Mi Mix 2S, Nokia 7 Plus, Oppo R15 Pro, Vivo X21UD and X21, and Essential PH‑1. We're inviting early adopters and developers around the world to try Android P Beta on any of these devices -- as well as on Pixel 2, Pixel 2 XL, Pixel, and Pixel XL.
You can see the full list of supported partner and Pixel devices at android.com/beta. For each device you'll find specs and links to the manufacturer's dedicated site for downloads, support, and to report issues. For Pixel devices, you can now enroll your device in the Android Beta program and automatically receive the latest Android P Beta over-the-air.
Try Android P Beta on your favorite device today and let us know your feedback! Stay tuned for updates on Project Treble coming soon.
Make your apps compatible
With more users starting to get Android P Beta on their devices, now is the time to test your apps for compatibility, resolve any issues, and publish an update as soon as possible. See the migration guide for steps and a recommended timeline.
To test for compatibility, just install your current app from Google Play onto a device or emulator running Android P Beta and work through the user flows. The app should run and look great, and handle the Android P behavior changes properly. In particular, pay attention to adaptive battery, Wi-Fi permissions changes, restrictions on use of camera and sensors from the background, stricter SELinux policy for app data, and changes in TLS enabled by default, and Build.SERIAL restriction.
Compatibility through public APIs
It's important to test your apps for uses of non-SDK interfaces. As noted previously, in Android P we're starting a gradual process to restrict access to selected non-SDK interfaces, asking developers -- including app teams inside Google -- to use the public equivalents instead.
If your apps are using private Android interfaces and libraries, you should move to using public APIs from the Android SDK or NDK. The first developer preview displayed a toast warning for uses of non-SDK interfaces -- starting in Android P Beta, uses of non-SDK interfaces that are not exempted will generate errors in your apps -- so you'll now get exceptions thrown instead of a warning.
To help you identify reflective usage of non-SDK APIs, we've added two new methods in StrictMode. You can use detectNonSdkApiUsage() to warn when your app accesses non-SDK APIs via reflection or JNI, and you can use permitNonSdkApiUsage() to suppress StrictMode warnings for those accesses. This can help you understand your app's use of non-SDK APIs -- even if the APIs are exempted at this time, it's best to plan for the future and eliminate their use.
In cases where there is no public API that meets your use-case, please let us know immediately. We want to make sure that the initial rollout only affects interfaces where developers can easily migrate to public alternatives. More about the restrictions is here.
Test with display cutout
It's also important to test your app with display cutout. Now you can use several of our partner devices running Android Beta to make sure your app looks its best with a display cutout. You can also use the emulated cutout support that's available on any Android P device through Developer options.
Get started with Android P
When you're ready, dive into Android P and learn about the many new features and APIs you can take advantage of in your apps. To make it easier to explore the new APIs, take a look at the API diff reports (API 27->DP2, DP1->DP2) along with the Android P API reference. Visit the Developer Preview site for details. Also check out this video highlighting what's new for developers in Android P Beta.
To get started with Android P, download the P Developer Preview SDK and tools into Android Studio 3.1 or use the latest version of Android Studio 3.2. If you don't have a device that runs Android P Beta, you can use the Android emulator to run and test your app.
As always, your feedback is critical, so please let us know what you think — the sooner we hear from you, the more of your feedback we can integrate. When you find issues, please report them here. We have separate hotlists for filing platform issues, app compatibility issues, and third-party SDK issues.


 Posted by Alan Viverette (