Posted by Chris Shallue, Senior Software Engineer, Google Brain TeamRecently, we discovered
two exoplanets by training a
neural network to analyze data from NASA’s
Kepler space telescope and accurately identify the most promising planet signals. And while this was only an initial analysis of ~700 stars, we consider this a successful proof-of-concept for using machine learning to discover exoplanets, and more generally another example of using machine learning to make meaningful gains in a variety of scientific disciplines (e.g.
healthcare,
quantum chemistry, and
fusion research).
Today, we’re excited to
release our code for processing the Kepler data, training our neural network model, and making predictions about new candidate signals. We hope this release will prove a useful starting point for developing similar models for other NASA missions, like
K2 (Kepler’s second mission) and the upcoming
Transiting Exoplanet Survey Satellite mission. As well as announcing the release of our code, we’d also like take this opportunity to dig a bit deeper into how our model works.
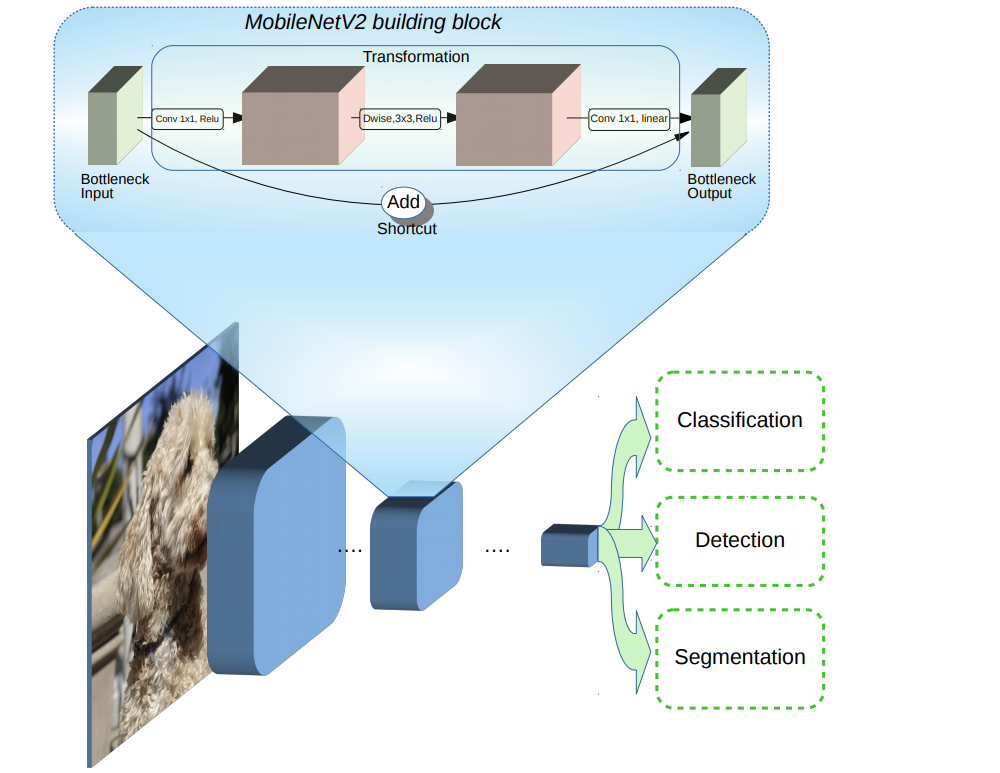
A Planet Hunting PrimerFirst, let’s consider how data collected by the Kepler telescope is used to detect the presence of a planet. The plot below is called a light curve, and it shows the brightness of the star (as measured by
Kepler’s photometer) over time. When a planet passes in front of the star, it temporarily blocks some of the light, which causes the measured brightness to decrease and then increase again shortly thereafter, causing a “U-shaped” dip in the light curve.
 |
| A light curve from the Kepler space telescope with a “U-shaped” dip that indicates a transiting exoplanet. |
However, other astronomical and instrumental phenomena can also cause the measured brightness of a star to decrease, including
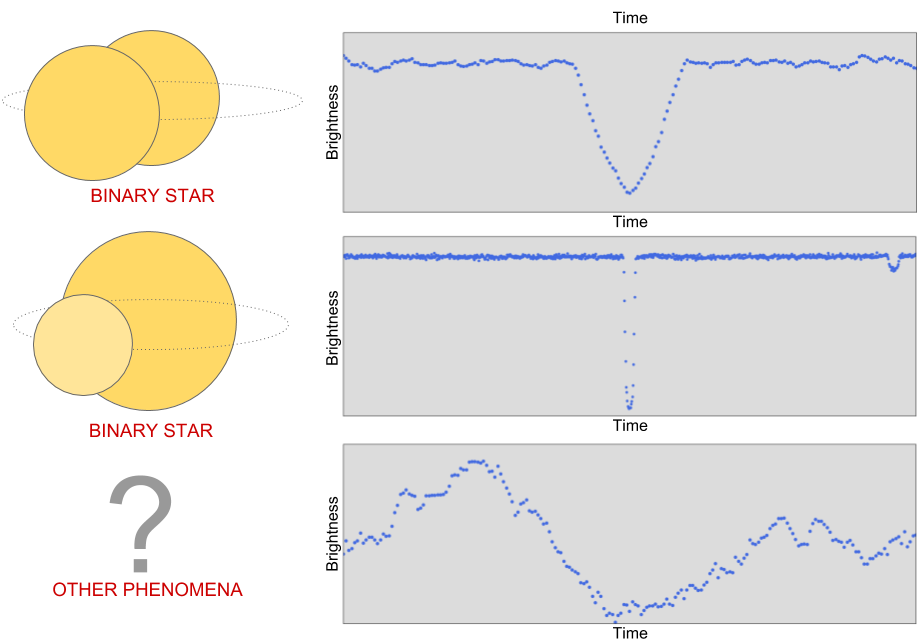
binary star systems,
starspots,
cosmic ray hits on Kepler’s photometer, and instrumental noise.
 |
| The first light curve has a “V-shaped” pattern that tells us that a very large object (i.e. another star) passed in front of the star that Kepler was observing. The second light curve contains two places where the brightness decreases, which indicates a binary system with one bright and one dim star: the larger dip is caused by the dimmer star passing in front of the brighter star, and vice versa. The third light curve is one example of the many other non-planet signals where the measured brightness of a star appears to decrease. |
To search for planets in Kepler data, scientists use automated software (e.g. the
Kepler data processing pipeline) to detect signals that might be caused by planets, and then manually follow up to decide whether each signal is a planet or a false positive. To avoid being overwhelmed with more signals than they can manage, the scientists apply a cutoff to the automated detections: those with
signal-to-noise ratios above a fixed threshold are deemed worthy of follow-up analysis, while all detections below the threshold are discarded. Even with this cutoff, the number of detections is still formidable: to date, over 30,000 detected Kepler signals have been manually examined, and about 2,500 of those have been validated as actual planets!
Perhaps you’re wondering: does the signal-to-noise cutoff cause some real planet signals to be missed? The answer is, yes! However, if astronomers need to manually follow up on every detection, it’s not really worthwhile to lower the threshold, because as the threshold decreases the rate of false positive detections increases rapidly and actual planet detections become increasingly rare. However, there’s a tantalizing incentive: it’s possible that some potentially habitable planets like Earth, which are relatively small and orbit around relatively dim stars, might be hiding just below the traditional detection threshold — there might be hidden gems still undiscovered in the Kepler data!
A Machine Learning ApproachThe
Google Brain team applies machine learning to a diverse variety of data, from
human genomes to
sketches to
formal mathematical logic. Considering the massive amount of data collected by the Kepler telescope, we wondered what we might find if we used machine learning to analyze some of the previously unexplored Kepler data. To find out, we teamed up with
Andrew Vanderburg at UT Austin and developed a neural network to help search the low signal-to-noise detections for planets.
Luckily, we had 30,000 Kepler signals that had already been manually examined and classified by humans. We used a subset of around 15,000 of these signals, of which around 3,500 were verified planets or strong planet candidates, to train our neural network to distinguish planets from false positives. The inputs to our network are two separate views of the same light curve: a wide view that allows the model to examine signals elsewhere on the light curve (e.g., a secondary signal caused by a binary star), and a zoomed-in view that enables the model to closely examine the shape of the detected signal (e.g., to distinguish “U-shaped” signals from “V-shaped” signals).
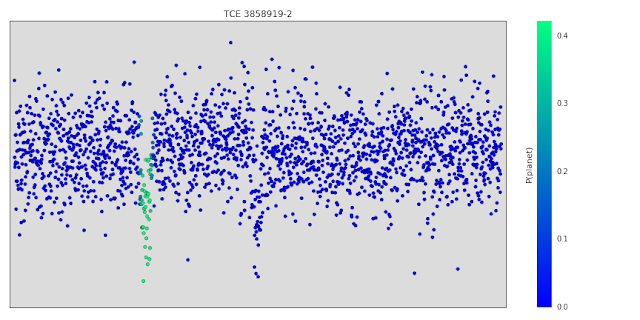
Once we had trained our model, we investigated the features it learned about light curves to see if they matched with our expectations. One technique we used (originally suggested in
this paper) was to systematically occlude small regions of the input light curves to see whether the model’s output changed. Regions that are particularly important to the model’s decision will change the output prediction if they are occluded, but occluding unimportant regions will not have a significant effect. Below is a light curve from a binary star that our model correctly predicts is not a planet. The points highlighted in green are the points that most change the model’s output prediction when occluded, and they correspond exactly to the secondary “dip” indicative of a binary system. When those points are occluded, the model’s output prediction changes from ~0% probability of being a planet to ~40% probability of being a planet. So, those points are part of the reason the model rejects this light curve, but the model uses other evidence as well - for example, zooming in on the centred primary dip shows that it's actually “V-shaped”, which is also indicative of a binary system.
Once we were confident with our model’s predictions, we tested its effectiveness by searching for new planets in a small set 670 stars. We chose these stars because they were already known to have multiple orbiting planets, and we believed that some of these stars might host additional planets that had not yet been detected. Importantly, we allowed our search to include signals that were below the signal-to-noise threshold that astronomers had previously considered. As expected, our neural network rejected most of these signals as spurious detections, but a handful of promising candidates rose to the top, including our two newly discovered planets:
Kepler-90 i and Kepler-80 g.
Find your own Planet(s)!Let’s take a look at how the code released today can help (re-)discover the planet
Kepler-90 i. The first step is to train a model by following the instructions on the code’s
home page. It takes a while to download and process the data from the Kepler telescope, but once that’s done, it’s relatively fast to train a model and make predictions about new signals. One way to find new signals to show the model is to use an algorithm called
Box Least Squares (BLS), which searches for periodic “box shaped” dips in brightness (see below). The BLS algorithm will detect “U-shaped” planet signals, “V-shaped” binary star signals and many other types of false positive signals to show the model. There are various freely available software implementations of the BLS algorithm, including
VARTOOLS and
LcTools. Alternatively, you can even look for candidate planet transits by eye, like the
Planet Hunters.
 |
| A low signal-to-noise detection in the light curve of the Kepler 90 star detected by the BLS algorithm. The detection has period 14.44912 days, duration 2.70408 hours (0.11267 days) beginning 2.2 days after 12:00 on 1/1/2009 (the year the Kepler telescope launched). |
To run this detected signal though our trained model, we simply execute the following command:
python predict.py  --kepler_id=11442793 --period=14.44912 --t0=2.2
--duration=0.11267 --kepler_data_dir=$HOME/astronet/kepler
--output_image_file=$HOME/astronet/kepler-90i.png
--model_dir=$HOME/astronet/model
The output of the command is
prediction = 0.94, which means the model is 94% certain that this signal is a real planet. Of course, this is only a small step in the overall process of discovering and validating an exoplanet: the model’s prediction is not proof one way or the other. The process of validating this signal as a real exoplanet requires significant follow-up work by an expert astronomer — see Sections 6.3 and 6.4 of
our paper for the full details. In this particular case, our follow-up analysis validated this signal as a bona fide exoplanet, and it’s now called Kepler-90 i!
Our work here is far from done. We’ve only searched 670 stars out of 200,000 observed by Kepler — who knows what we might find when we turn our technique to the entire dataset. Before we do that, though, we have a few improvements we want to make to our model. As we discussed in
our paper, our model is not yet as good at rejecting binary stars and instrumental false positives as some more mature computer heuristics. We’re hard at work improving our model, and now that it’s open sourced, we hope others will do the same!
If you’d like to learn more, Chris is featured on the latest episode of This Week In Machine Learning & AI discussing his work.