Tag Archives: Security

Google OAuth incremental authorization improvement

Posted by Vikrant Rana, Product Manager, and Badi Azad, Group Product Manager

Summary

Google Identity strives to be the best stewards for Google Account users who entrust us to protect their data. At the same time, we want to help our developer community build apps that give users amazing experiences. Together, Google and developers can provide users three important ways to manage sharing their data:

  1. Give users control in deciding who has access to their account data
  2. Make it easier and safer for users to share their Google Account data with your app when they choose to do so
  3. Make it clear to users the specific data they are sharing with apps

What we are doing today

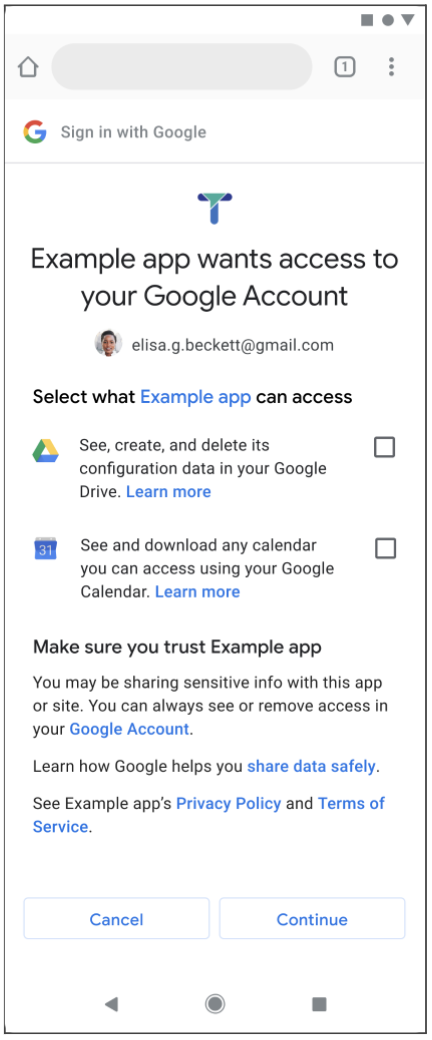
In service of that stewardship, today we are announcing an OAuth consent experience that simplifies how users can share data with apps. This experience also improves the consent conversion for apps that use incremental authorization, which requests only one scope. Users can now easily share this kind of request with a single tap.

Screenshot compares the previous screen and the new screen you see when Example app wants to access your account

Previous Screen                                               New Screen

A quick recap

Let’s summarize a few past improvements so you have a full picture of the work we have been doing on the OAuth consent flow.

In mid-2019, we significantly overhauled the consent screen to give users fine-grained control over the account data they chose to share with a given app. In that flow, when an app requested access to multiple Google resources, the user would see one screen for each scope.

In July 2021, we consolidated these multiple-permission requests into a single screen, while still allowing granular data sharing control for users. Our change today represents a continuation of improvements on that experience.

Screenshot that shows the option to select what Example app can access

The Identity team will continue to gather feedback and further enhance the overall user experience around Google Identity Services and sharing account data.

What do developers need to do?

There is no change you need to make to your app. However, we recommend using incremental authorization and requesting only one resource at the time your app needs it. We believe that doing this will make your account data request more relevant to the user and therefore improve the consent conversion. Read more about incremental authorization in our developer guides.

If your app requires multiple resources at once, make sure it can handle partial consent gracefully and reduce its functionality appropriately as per the OAuth 2.0 policy.

Related content

Making sign-in safer and more convenient

For most of us, passwords are the first line of defense for our digital lives. However, managing a set of strong passwords isn’t always convenient, which leads many people to look for  shortcuts (i.e. dog’s name + birthday) or to neglect password best practices altogether, which opens them up to online risks. At Google, we protect our users with products that are secure by default – it’s how we keep more people safe online than anyone else in the world. 


As we celebrate Cybersecurity Awareness Month, we’d like to share all the ways we are making your sign-in safer


Making password sign-in seamless and safe


Everyday, Google checks the security of 1 billion passwords to protect your accounts from being hacked. Google’s Password Manager, built directly into Chrome, Android and the Google App, uses the latest security technology to keep your passwords safe across all the sites and apps you use. It makes it easier to create and use strong and unique passwords on all your devices, without the need to remember or repeat each one.


On iOS you can select Chrome to autofill saved passwords in other apps, too. That means your sign-in experience goes from remembering and typing in a password on each individual site to literally one tap.  And soon, you will be able to take advantage of Chrome’s strong password generation feature for any iOS app, similar to how Autofill with Google works on Android today.  


We're also rolling out a feature in the Google app that allows you to access all of the passwords you've saved in Google Password Manager right from the Google app menu. These enhancements are designed to make your password experience easier and safer—not just on Google, but across the web.


Getting people enrolled in 2SV  


In addition to passwords, we know that having a second form of authentication dramatically decreases an attacker’s chance of gaining access to an account. For years, Google has been at the forefront of innovation in two-step verification (2SV), one of the most reliable ways to prevent unauthorized access to accounts and networks. 2SV is strongest when it combines both "something you know" (like a password) and "something you have" (like your phone or a security key).


2SV has been core to Google’s own security practices and today we make it seamless for our users with a Google prompt, which requires a simple tap on your mobile device to prove it’s really you trying to sign in. And because we know the best way to keep our users safe is to turn on our security protections by default, we have started to automatically configure our users’ accounts into a more secure state. By the end of 2021, we plan to  auto-enroll an additional 150 million Google users in 2SV and require  2 million YouTube creators to turn it on.

We also recognize that today’s 2SV options aren’t suitable for everyone, so we are working on technologies that provide a convenient, secure authentication experience and reduce the reliance on passwords in the long-term. Right now we are auto-enrolling Google accounts that have the proper backup mechanisms in place to make a seamless transition to 2SV. To make sure your account has the right settings in place, take our quick Security Checkup


Building security keys into devices 


As part of our security work, we led the invention of security keys — another form of authentication that requires you to tap your key during suspicious sign-in attempts. We know security keys provide the highest degree of sign-in security possible, that’s why we've partnered with organizations to provide free security keys to over 10,000 high risk users this year. 


To make security keys more accessible, we built the capability right into Android phones and our Google Smart Lock app on Apple devices. Today, over two billion devices around the world automatically support the strongest, most convenient 2SV technology available. 


Additional sign-in enhancements 


We recently launched One Tap and a new family of Identity APIs called Google Identity Services, which uses secure tokens, rather than passwords, to sign users into partner websites and apps, like Reddit and Pinterest. With the new Google Identity Services, we've combined Google's advanced security with easy sign in to deliver a convenient experience that also keeps users safe. These new services represent the future of authentication and protect against vulnerabilities like click-jacking, pixel tracking, and other web and app-based threats.


Ultimately, we want all of our users to have an easy, seamless sign-in experience that includes the best security protections across all of their devices and accounts. To learn more about all the ways we’re making every day safer with Google visit our Safety Center


Posted by Guemmy Kim, Director, Account Security and Safety and AbdelKarim Mardini, Group Product Manager, Chrome


Google Protects Your Accounts – Even When You No Longer Use Them


What happens to our digital accounts when we stop using them? It’s a question we should all ask ourselves, because when we are no longer keeping tabs on what’s happening with old accounts, they can become targets for cybercrime.

In fact, quite a few recent high-profile breaches targeted inactive accounts. The Colonial Pipeline ransomware attack came through an inactive account that didn’t use multifactor authentication, according to a consultant who investigated the incident. And in the case of the recent T-Mobile breach this summer, information from inactive prepaid accounts was accessed through old billing files. Inactive accounts can pose a serious security risk.

For Google users, Inactive Account Manager helps with that problem. You can decide when Google should consider your account inactive and whether Google should delete your data or share it with a trusted contact.

Here’s How it Works

Once you sign up for Inactive Account Manager, available in My Account settings, you are asked to decide three things:
  1. When the account should be considered inactive: You can choose 3, 6, 12 or 18 months of inactivity before Google takes action on your account. Google will notify you a month before the designated time via a message sent to your phone and an email sent to the address you provide.
  2. Who to notify and what to share: You can choose up to 10 people for Google to notify once your Google Account becomes inactive (they won’t be notified during setup). You can also give them access to some of your data. If you choose to share data with your trusted contacts, the email will include a list of the selected data you wanted to share with them, and a link they can follow to download that data. This can include things like photos, contacts, emails, documents and other data that you specifically choose to share with your trusted contact. You can also choose to set up a Gmail AutoReply, with a custom subject and message explaining that you’ve ceased using the account.
  3. If your inactive Google Account should be deleted: After your account becomes inactive, Google can delete all its content or send it to your designated contacts. If you’ve decided to allow someone to download your content, they’ll be able to do so for 3 months before it gets deleted. If you choose to delete your Google Account, this will include your publicly shared data (for example, your YouTube videos, or blogs on Blogger). You can review the data associated with your account on the Google Dashboard. If you use Gmail with your account, you'll no longer be able to access that email once your account becomes inactive. You'll also be unable to reuse that Gmail username.
Setting up an Inactive Account plan is a simple step you can take to protect your data, secure your account in case it becomes inactive, and ensure that your digital legacy is shared with your trusted contacts in case you become unable to access your account. Our Privacy Checkup now reminds you to set up a plan for your account, and we’ll send you an occasional reminder about your plan via email.

At Google, we are constantly working to keep you safer online. This October, as we celebrate Cybersecurity Awareness Month, we want to remind our users of the security and privacy controls they have at their fingertips. For more ways to enhance your security check out our top five safety tips and visit our Safety Center to learn all the ways Google helps keep you safer online, every day.

Introducing the Secure Open Source Pilot Program


Over the past year we have made a number of investments to strengthen the security of critical open source projects, and recently announced our $10 billion commitment to cybersecurity defense including $100 million to support third-party foundations that manage open source security priorities and help fix vulnerabilities.

Today, we are excited to announce our sponsorship for the Secure Open Source (SOS) pilot program run by the Linux Foundation. This program financially rewards developers for enhancing the security of critical open source projects that we all depend on. We are starting with a $1 million investment and plan to expand the scope of the program based on community feedback.


Why SOS?

SOS rewards a very broad range of improvements that proactively harden critical open source projects and supporting infrastructure against application and supply chain attacks. To complement existing programs that reward vulnerability management, SOS’s scope is comparatively wider in the type of work it rewards, in order to support project developers.


What projects are in scope?

Since there is no one definition of what makes an open source project critical, our selection process will be holistic. During submission evaluation we will consider the guidelines established by the National Institute of Standards and Technology’s definition in response to the recent Executive Order on Cybersecurity along with criteria listed below:
  • The impact of the project:
    • How many and what types of users will be affected by the security improvements?
    • Will the improvements have a significant impact on infrastructure and user security?
    • If the project were compromised, how serious or wide-reaching would the implications be?
  • The project’s rankings in existing open source criticality research:

What security improvements qualify? 

The program is initially focused on rewarding the following work:

  • Software supply chain security improvements including hardening CI/CD pipelines and distribution infrastructure. The SLSA framework suggests specific requirements to consider, such as basic provenance generation and verification.
  • Adoption of software artifact signing and verification. One option to consider is Sigstore's set of utilities (e.g. cosign).
  • Project improvements that produce higher OpenSSF Scorecard results. For example, a contributor can follow remediation suggestions for the following Scorecard checks:
    • Code-Review
    • Branch-Protection
    • Pinned-Dependencies
    • Dependency-Update-Tool
    • Fuzzing
  • Use of OpenSSF Allstar and remediation of discovered issues.
  • Earning a CII Best Practice Badge (which also improves the Scorecard results).
We'll continue adding to the above list, so check our FAQ for updates. You may also submit improvements not listed above, if you provide justification and evidence to help us understand the complexity and impact of the work.

Only work completed after October 1, 2021 qualifies for SOS rewards.

Upfront funding is available on a limited case by case basis for impactful improvements of moderate to high complexity over a longer time span. Such requests should explain why funding is required upfront and provide a detailed plan of how the improvements will be landed.

How to participate

Review our FAQ and fill out this form to submit your application.

Please include as much data or supporting evidence as possible to help us evaluate the significance of the project and your improvements. 


Reward amounts

Reward amounts are determined based on complexity and impact of work:
  • $10,000 or more for complicated, high-impact and lasting improvements that almost certainly prevent major vulnerabilities in the affected code or supporting infrastructure.
  • $5,000-$10,000 for moderately complex improvements that offer compelling security benefits.
  • $1,000-$5,000 for submissions of modest complexity and impact.
  • $505 for small improvements that nevertheless have merit from a security standpoint.

Looking Ahead

The SOS program is part of a broader effort to address a growing truth: the world relies on open source software, but widespread support and financial contributions are necessary to keep that software safe and secure. This $1 million investment is just the beginning—we envision the SOS pilot program as the starting point for future efforts that will hopefully bring together other large organizations and turn it into a sustainable, long-term initiative under the OpenSSF. We welcome community feedback and interest from others who want to contribute to the SOS program. Together we can pool our support to give back to the open source community that makes the modern internet possible.

Announcing New Patch Reward Program for Tsunami Security Scanner


One year ago, we published the Tsunami security scanner with the goal of detecting high severity, actively exploited vulnerabilities with high confidence. In the last several months, the Tsunami scanner team has been working closely with our vulnerability rewards program, Bug Hunters, to further improve Tsunami's security detection capabilities.

Today, we are announcing a new experimental Patch Reward Program for the Tsunami project. Participants in the program will receive patch rewards for providing novel Tsunami detection plugins and web application fingerprints. We hope this program will allow us to quickly extend the detection capabilities of the scanner to better benefit our users and uncover more vulnerabilities in their network infrastructure.

For this launch, we will accept two types of contributions:
  • Vulnerability detection plugins: In order to expand Tsunami scanner's detection capabilities, we encourage everyone who is interested in making contributions to this project to add new vulnerabilities detection plugins. All plugin contributions will be reviewed by our panel members in Google's Vulnerability Management team and the reward amount will be determined by the severity as well as the time sensitivity of the vulnerability.
  • Web application fingerprints: Several months ago, we added new web application fingerprinting capabilities to Tsunami that detect popular off-the-shelf web applications. It achieves this goal by matching application fingerprints against a database of known web application fingerprints. More fingerprint data is needed for this approach to support more web applications. You will be rewarded with a flat amount for each application added to the database.

As with other Security Reward Programs, rewards can be donated to charity—and we'll double your donation if you choose to do so. We'll run this program in iterations so that everyone interested has the opportunity to participate.

To learn more about this program, please check out our official rules and guidelines. And if you have any questions or suggestions for the program, feel free to contact us at [email protected].

Distroless Builds Are Now SLSA 2

A few months ago we announced that we started signing all distroless images with cosign, which allows users to verify that they have the correct image before starting the build process. Signing our images was our first step towards fully securing the distroless supply chain. Since then, we’ve implemented even more accountability in our supply chain and are excited to announce that distroless builds have achieved SLSA 2. SLSA is a security framework for increasing supply chain security, and Level 2 ensures that the build service is tamper resistant.


This means that in addition to a signature, each distroless image now has an associated signed provenance. This provenance is an in-toto attestation and includes information around how each image was built, what command was run, and what build system was used. It also includes any special parameters that were passed in, the exact commit the images were built at, and more. This provenance is a useful tool for builds that need to be audited in the future.

SLSA 2 Requirement

Distroless

Source - Version controlled

Source code in Github

Build - Scripted build

Build script exists as a Tekton Pipeline, invoked as a Google Cloud Build step

Build - Build service

All steps run on Kubernetes with Tekton

Provenance - Available

Provenance is available in the rekor transparency log as an in-toto attestation

Provenance - Authenticated

Provenance is signed with the distroless GCP KMS key

Provenance - Service generated

Provenance is generated by Tekton Chains from a Tekton TaskRun


Achieving SLSA 2 required some changes to the distroless build pipeline: we set up Tekton Pipelines and Tekton Chains in a GKE cluster to automate building images and generating provenance. Every time a pull request is merged to the distroless Github repo, a Tekton Pipeline is triggered. This Pipeline builds the distroless images, and Tekton Chains is responsible for generating signed provenance for each image. Tekton Chains stores the signed provenance alongside the image in an OCI registry and also stores a record of the provenance in the rekor transparency log.

Don't trust us?


You can try the build yourself. Because distroless builds are reproducible, all the information to replicate the build is in the provenance, and you or a trusted third party can build the image yourselves and verify the build is correct by matching image digests.


You can verify an attestation for a distroless image with cosign and the distroless public key:

$ cosign verify-attestation -key cosign.pub gcr.io/distroless/base@sha256:4f8aa0aba190e375a5a53bb71a303c89d9734c817714aeaca9bb23b82135ed91


Verification for gcr.io/distroless/base@sha256:4f8aa0aba190e375a5a53bb71a303c89d9734c817714aeaca9bb23b82135ed91 --

The following checks were performed on each of these signatures:

  - The cosign claims were validated

  - The signatures were verified against the specified public key

  - Any certificates were verified against the Fulcio roots.


...


And you can find the provenance for the image in the rekor transparency log with the rekor-cli tool. For example, you could find the provenance for the above image by using the image’s digest and running:

$ rekor-cli search --sha sha256:4f8aa0aba190e375a5a53bb71a303c89d9734c817714aeaca9bb23b82135ed91


af7a9687d263504ccdb2759169c9903d8760775045c6e7554e365ec2bf29f6f8


$ rekor-cli get --uuid af7a9687d263504ccdb2759169c9903d8760775045c6e7554e365ec2bf29f6f8 --format json | jq -r .Attestation | base64 --decode | jq


{

  "_type": "distroless-provenance",

  "predicateType": "https://tekton.dev/chains/provenance",

  "subject": [

    {

      "name": "gcr.io/distroless/base",

      "digest": {

        "sha256": "703a4726aedc9ec7a7e32251087565246db117bb9a141a7993d1c4bb4036660d"

      }

    },

    {

      "name": "gcr.io/distroless/base",

      "digest": {

        "sha256": "d322ed16d530596c37eee3eb57a039677502aa71f0e4739b0272b1ebd8be9bce"

      }

    },

    {

      "name": "gcr.io/distroless/base",

      "digest": {

        "sha256": "2dfdd5bf591d0da3f67a25f3fc96d929b256d5be3e0af084db10952e5da2c661"

      }

    },

    {

      "name": "gcr.io/distroless/base",

      "digest": {

        "sha256": "4f8aa0aba190e375a5a53bb71a303c89d9734c817714aeaca9bb23b82135ed91"

      }

    },

    {

      "name": "gcr.io/distroless/base",

      "digest": {

        "sha256": "dc0a793d83196a239abf3ba035b3d1a0c7a24184856c2649666e84bc82fc5980"

      }

    },

    {

      "name": "gcr.io/distroless/base-debian10",

      "digest": {

        "sha256": "2dfdd5bf591d0da3f67a25f3fc96d929b256d5be3e0af084db10952e5da2c661"

      }

    },

    {

      "name": "gcr.io/distroless/base-debian10",

      "digest": {

        "sha256": "703a4726aedc9ec7a7e32251087565246db117bb9a141a7993d1c4bb4036660d"

      }

    },

    {

      "name": "gcr.io/distroless/base-debian10",

      "digest": {

        "sha256": "4f8aa0aba190e375a5a53bb71a303c89d9734c817714aeaca9bb23b82135ed91"

      }

    },

    {

      "name": "gcr.io/distroless/base-debian10",

      "digest": {

        "sha256": "d322ed16d530596c37eee3eb57a039677502aa71f0e4739b0272b1ebd8be9bce"

      }

    },

    {

      "name": "gcr.io/distroless/base-debian10",

      "digest": {

        "sha256": "dc0a793d83196a239abf3ba035b3d1a0c7a24184856c2649666e84bc82fc5980"

      }

    },

    {

      "name": "gcr.io/distroless/base-debian11",

      "digest": {

        "sha256": "c9507268813f235b11e63a7ae01526b180c94858bd718d6b4746c9c0e8425f7a"

      }

    },

    {

      "name": "gcr.io/distroless/cc",

      "digest": {

        "sha256": "4af613acf571a1b86b1d3c50682caada0b82024e566c1c4c2fe485a70f3af47d"

      }

    },

    {

      "name": "gcr.io/distroless/cc",

      "digest": {

        "sha256": "2c4bb6b7236db0a55ec54ba8845e4031f5db2be957ac61867872bf42e56c4deb"

      }

    },

    {

      "name": "gcr.io/distroless/cc",

      "digest": {

        "sha256": "2c4bb6b7236db0a55ec54ba8845e4031f5db2be957ac61867872bf42e56c4deb"

      }

    },

    {

      "name": "gcr.io/distroless/cc-debian10",

      "digest": {

        "sha256": "4af613acf571a1b86b1d3c50682caada0b82024e566c1c4c2fe485a70f3af47d"

      }

    },

    {

      "name": "gcr.io/distroless/cc-debian10",

      "digest": {

        "sha256": "2c4bb6b7236db0a55ec54ba8845e4031f5db2be957ac61867872bf42e56c4deb"

      }

    },

    {

      "name": "gcr.io/distroless/cc-debian10",

      "digest": {

        "sha256": "2c4bb6b7236db0a55ec54ba8845e4031f5db2be957ac61867872bf42e56c4deb"

      }

    },

    {

      "name": "gcr.io/distroless/java",

      "digest": {

        "sha256": "deb41661be772c6256194eb1df6b526cc95a6f60e5f5b740dda2769b20778c51"

      }

    },

    {

      "name": "gcr.io/distroless/nodejs",

      "digest": {

        "sha256": "927dd07e7373e1883469c95f4ecb31fe63c3acd104aac1655e15cfa9ae0899bf"

      }

    },

    {

      "name": "gcr.io/distroless/nodejs",

      "digest": {

        "sha256": "927dd07e7373e1883469c95f4ecb31fe63c3acd104aac1655e15cfa9ae0899bf"

      }

    },

    {

      "name": "gcr.io/distroless/nodejs",

      "digest": {

        "sha256": "f106757268ab4e650b032e78df0372a35914ed346c219359b58b3d863ad9fb58"

      }

    },

    {

      "name": "gcr.io/distroless/nodejs-debian10",

      "digest": {

        "sha256": "927dd07e7373e1883469c95f4ecb31fe63c3acd104aac1655e15cfa9ae0899bf"

      }

    },

    {

      "name": "gcr.io/distroless/nodejs-debian10",

      "digest": {

        "sha256": "f106757268ab4e650b032e78df0372a35914ed346c219359b58b3d863ad9fb58"

      }

    },

    {

      "name": "gcr.io/distroless/nodejs-debian10",

      "digest": {

        "sha256": "927dd07e7373e1883469c95f4ecb31fe63c3acd104aac1655e15cfa9ae0899bf"

      }

    },

    {

      "name": "gcr.io/distroless/python3",

      "digest": {

        "sha256": "aa8a0358b2813e8b48a54c7504316c7dcea59d6ae50daa0228847de852c83878"

      }

    },

    {

      "name": "gcr.io/distroless/python3-debian10",

      "digest": {

        "sha256": "aa8a0358b2813e8b48a54c7504316c7dcea59d6ae50daa0228847de852c83878"

      }

    },

    {

      "name": "gcr.io/distroless/static",

      "digest": {

        "sha256": "9acfd1fdf62b26cbd4f3c31422cf1edf3b7b01a9ecee00a499ef8b7e3536914d"

      }

    },

    {

      "name": "gcr.io/distroless/static",

      "digest": {

        "sha256": "e50641dbb871f78831f9aa7ffa59ec8f44d4cc33ae4ee992c9f4b046040e97f2"

      }

    },

    {

      "name": "gcr.io/distroless/static-debian10",

      "digest": {

        "sha256": "9acfd1fdf62b26cbd4f3c31422cf1edf3b7b01a9ecee00a499ef8b7e3536914d"

      }

    },

    {

      "name": "gcr.io/distroless/static-debian10",

      "digest": {

        "sha256": "e50641dbb871f78831f9aa7ffa59ec8f44d4cc33ae4ee992c9f4b046040e97f2"

      }

    }

  ],

  "predicate": {

    "invocation": {

      "parameters": [

        "MANIFEST_SUBSECTION={string 0 []}",

        "CHAINS-GIT_COMMIT={string 976c1c9bc178ac0371d8888d69893145c3df09f0 []}",

        "CHAINS-GIT_URL={string https://github.com/GoogleContainerTools/distroless []}"

      ],

      "recipe_uri": "task://distroless-provenance",

      "event_id": "531c282f-806e-41e4-b3ad-b596c4283381",

      "builder.id": "tekton-chains"

    },

    "recipe": {

      "steps": [

        {

          "entryPoint": "#!/bin/sh\nset -ex\n\n# get the digests for a subset of images built, and store in the IMAGES result\ngo run provenance/provenance.go images $(params.MANIFEST_SUBSECTION) > $(results.IMAGES.path)\n",

          "arguments": null,

          "environment": {

            "container": "provenance",

            "image": "docker.io/library/golang@sha256:cb1a7482cb5cfc52527c5cdea5159419292360087d5249e3fe5472f3477be642"

          },

          "annotations": null

        }

      ]

    },

    "metadata": {

      "buildStartedOn": "2021-09-16T00:03:04Z",

      "buildFinishedOn": "2021-09-16T00:04:36Z"

    },

    "materials": [

      {

        "uri": "https://github.com/GoogleContainerTools/distroless",

        "digest": {

          "revision": "976c1c9bc178ac0371d8888d69893145c3df09f0"

        }

      }

    ]

  }

}


As you might guess, our next step is getting distroless to SLSA 3, which will require adding non-falsifiable provenance and isolated builds to the distroless supply chain. Stay tuned for more!

An update on Memory Safety in Chrome

Security is a cat-and-mouse game. As attackers innovate, browsers always have to mount new defenses to stay ahead, and Chrome has invested in ever-stronger multi-process architecture built on sandboxing and site isolation. Combined with fuzzing, these are still our primary lines of defense, but they are reaching their limits, and we can no longer solely rely on this strategy to defeat in-the-wild attacks.

Last year, we showed that more than 70% of our severe security bugs are memory safety problems. That is, mistakes with pointers in the C or C++ languages which cause memory to be misinterpreted.

This sounds like a problem! And, certainly, memory safety is an issue which needs to be taken seriously by the global software engineering community. Yet it’s also an opportunity because many bugs have the same sorts of root-causes, meaning we may be able to squash a high proportion of our bugs in one step.

Chrome has been exploring three broad avenues to seize this opportunity:

  1. Make C++ safer through compile-time checks that pointers are correct.
  2. Make C++ safer through runtime checks that pointers are correct.
  3. Investigating use of a memory safe language for parts of our codebase.

“Compile-time checks” mean that safety is guaranteed during the Chrome build process, before Chrome even gets to your device. “Runtime” means we do checks whilst Chrome is running on your device.

Runtime checks have a performance cost. Checking the correctness of a pointer is an infinitesimal cost in memory and CPU time. But with millions of pointers, it adds up. And since Chrome performance is important to billions of users, many of whom are using low-power mobile devices without much memory, an increase in these checks would result in a slower web.

Ideally we’d choose option 1 - make C++ safer, at compile time. Unfortunately, the language just isn’t designed that way. You can learn more about the investigation we've done in this area in Borrowing Trouble: The Difficulties Of A C++ Borrow-Checker that we're also publishing today.

So, we’re mostly left with options 2 and 3 - make C++ safer (but slower!) or start to use a different language. Chrome Security is experimenting with both of these approaches.

You’ll see major investments in C++ safety solutions - such as MiraclePtr and ABSL/STL hardened modes. In each case, we hope to eliminate a sizable fraction of our exploitable security bugs, but we also expect some performance penalty. For example, MiraclePtr prevents use-after-free bugs by quarantining memory that may still be referenced. On many mobile devices, memory is very precious and it’s hard to spare some for a quarantine. Nevertheless, MiraclePtr stands a chance of eliminating over 50% of the use-after-free bugs in the browser process - an enormous win for Chrome security, right now.

In parallel, we’ll be exploring whether we can use a memory safe language for parts of Chrome in the future. The leading contender is Rust, invented by our friends at Mozilla. This is (largely) compile-time safe; that is, the Rust compiler spots mistakes with pointers before the code even gets to your device, and thus there’s no performance penalty. Yet there are open questions about whether we can make C++ and Rust work well enough together. Even if we started writing new large components in Rust tomorrow, we’d be unlikely to eliminate a significant proportion of security vulnerabilities for many years. And can we make the language boundary clean enough that we can write parts of existing components in Rust? We don’t know yet. We’ve started to land limited, non-user-facing Rust experiments in the Chromium source code tree, but we’re not yet using it in production versions of Chrome - we remain in an experimental phase.

That’s why we’re pursuing both strategies in parallel. Watch this space for updates on our adventures in making C++ safer, and efforts to experiment with a new language in Chrome.

Making permissions auto-reset available to billions more devices

Posted by Peter Visontay, Software Engineer; Bessie Jiang, Software Engineer

Contributors: Inara Ramji, Software Engineer; Rodrigo Farell, Interaction Designer; James Kelly, Product Manager; Henry Chin, Program Manager.

Illustration of person holding phone

Most users spend a lot of time on their smartphones. Whether working, playing games, or connecting with friends, people often use apps as the primary gateway for their digital lives. In order to work, apps often need to request certain permissions, but with dozens of apps on any given device, it can be tough to keep up with the permissions you’ve previously granted – especially if you haven’t used an app for an extended period of time.

In Android 11, we introduced the permission auto-reset feature. This feature helps protect user privacy by automatically resetting an app’s runtime permissions – which are permissions that display a prompt to the user when requested – if the app isn’t used for a few months. Starting in December 2021, we are expanding this to billions more devices. This feature will automatically be enabled on devices with Google Play services that are running Android 6.0 (API level 23) or higher.

The feature will be enabled by default for apps targeting Android 11 (API level 30) or higher. However, users can enable permission auto-reset manually for apps targeting API levels 23 to 29.

So what does this mean for developers?


Exceptions

Some apps and permissions are automatically exempted from revocation, like active Device Administrator apps used by enterprises, and permissions fixed by enterprise policy.


Request user to disable auto-reset

If needed, developers can ask the user to prevent the system from resetting their app's permissions. This is useful in situations where users expect the app to work primarily in the background, even without interacting with it. The main use cases are listed here.


Comparing current and new behavior

Current behavior New behavior
Permissions are automatically reset on Android 11 (API level 30) and higher devices. Permissions are automatically reset on the following devices:
  • Devices with Google Play services that are running a version between Android 6.0 (API level 23) and Android 10 (API level 29), inclusive.
  • All devices running Android 11 (API level 30) and higher devices.
Permissions are reset by default for apps targeting Android 11 or later. The user can manually enable auto-reset for apps targeting Android 6.0 (API level 23) or later. No change from the current behavior.
Apps can request the user to disable auto-reset for the app. No change from the current behavior.


Necessary code changes

If an app targets at least API 30, and asks the user to disable permission auto-reset, then developers will need to make a few simple code changes. If the app does not disable auto-reset, then no code changes are required.

Note: this API is only intended for apps whose targetSDK is API 30 or higher, because permission auto-reset only applies to these apps by default. Developers don’t need to change anything if the app‘s targetSDK is API 29 or lower.

The table below summarizes the new, cross-platform API (compared to the API published in Android 11):

Action Android 11 API
(works only on Android 11 and later devices)
New, cross-platform API
(works on Android 6.0 and later devices, including Android 11 and later devices)
Check if permission auto-reset is enabled on the device Check if Build.VERSION.SDK_INT >= Build.VERSION_CODES.R Call androidx.core.content.PackageManagerCompat.getUnusedAppRestrictionsStatus()
Check if auto-reset is disabled for your app Call PackageManager.
isAutoRevokeWhitelisted()
Call androidx.core.content.
PackageManagerCompat.
getUnusedAppRestrictionsStatus()
Request that the user disable auto-reset for your app Send an intent with action
Intent.ACTION_AUTO_REVOKE_PERMISSIONS
Send an intent created with androidx.core.content.
IntentCompat.
createManageUnusedAppRestrictionsIntent()


This cross-platform API is part of the Jetpack Core library, and will be available in Jetpack Core v1.7.0. This API is now available in beta.

Sample logic for an app that needs the user to disable auto-reset:

val future: ListenableFuture<Int> =
    PackageManagerCompat.getUnusedAppRestrictionsStatus(context)
future.addListener(
  { onResult(future.get()) },
   ContextCompat.getMainExecutor(context)
)

fun onResult(appRestrictionsStatus: Int) {
  when (appRestrictionsStatus) {
    // Status could not be fetched. Check logs for details.
    ERROR -> { }

    // Restrictions do not apply to your app on this device.
    FEATURE_NOT_AVAILABLE -> { }
    // Restrictions have been disabled by the user for your app.
    DISABLED -> { }

    // If the user doesn't start your app for months, its permissions 
    // will be revoked and/or it will be hibernated. 
    // See the API_* constants for details.
    API_30_BACKPORT, API_30, API_31 -> 
      handleRestrictions(appRestrictionsStatus)
  }
}

fun handleRestrictions(appRestrictionsStatus: Int) {
  // If your app works primarily in the background, you can ask the user
  // to disable these restrictions. Check if you have already asked the
  // user to disable these restrictions. If not, you can show a message to 
  // the user explaining why permission auto-reset and Hibernation should be 
  // disabled. Tell them that they will now be redirected to a page where 
  // they can disable these features.

  Intent intent = IntentCompat.createManageUnusedAppRestrictionsIntent
    (context, packageName)

  // Must use startActivityForResult(), not startActivity(), even if 
  // you don't use the result code returned in onActivityResult().
  startActivityForResult(intent, REQUEST_CODE)
}

The above logic will work on Android 6.0 – Android 10 and also Android 11+ devices. It is enough to use just the new APIs; you won’t need to call the Android 11 auto-reset APIs anymore.


Compatibility with App Hibernation in Android 12

The new APIs are also compatible with app hibernation introduced by Android 12 (API level 31). Hibernation is a new restriction applied to unused apps. This feature is not available on OS versions before Android 12.

The getUnusedAppRestrictionsStatus() API will return API_31 if both permission auto-reset and app hibernation apply to an app.


Launch Timeline

  • September 15, 2021 - The cross-platform auto-reset APIs are now in beta (Jetpack Core 1.7.0 beta library), so developers can start using these APIs today. Their use is safe even on devices that don’t support permission auto-reset (the API will return FEATURE_NOT_AVAILABLE on these devices).
  • October 2021 - The cross-platform auto-reset APIs become available as stable APIs (Jetpack Core 1.7.0).
  • December 2021 - The permission auto-reset feature will begin a gradual rollout across devices powered by Google Play Services that run a version between Android 6.0 and Android 10. On these devices, users can now go to the auto-reset settings page and enable/disable auto-reset for specific apps. The system will start to automatically reset the permissions of unused apps a few weeks after the feature launches on a device.
  • Q1 2022 - The permission auto-reset feature will reach all devices running a version between Android 6.0 and Android 10.

Google Supports Open Source Technology Improvement Fund


We recently pledged to provide $100 million to support third-party foundations that manage open source security priorities and help fix vulnerabilities. As part of this commitment, we are excited to announce our support of the Open Source Technology Improvement Fund (OSTIF) to improve security of eight open-source projects.

Google’s support will allow OSTIF to launch the Managed Audit Program (MAP), which will expand in-depth security reviews to critical projects vital to the open source ecosystem. The eight libraries, frameworks and apps that were selected for this round are those that would benefit the most from security improvements and make the largest impact on the open-source ecosystem that relies on them. The projects include:
  • Git - de facto version control software used in modern DevOps.
  • Lodash - a modern JavaScript utility library with over 200 functions to facilitate web development, can be found in most environments that support JavaScript, which is most of the world wide web.
  • Laravel - a php web application framework that is used by many modern, full-stack web applications, including integrations with Google Cloud.
  • Slf4j - a logging facade for various Java logging frameworks.
  • Jackson-core & Jackson-databind - a JSON for Java, Streaming API, and extra shared components and the base for Jackson data-bind package.
  • Httpcomponents-core & Httpcomponents-client - these projects are responsible for creating and maintaining a toolset of low-level Java components focused on HTTP and associated protocols. 
We are excited to help OSTIF build a safer open source environment for everyone. If you are interested in getting involved or learning more please visit the OSTIF blog.