Tag Archives: Developer Tools & Insights

Repairing network hardware at scale with SRE principles


To support our Google Cloud Platform (GCP) customers, we run a complex global network that depends on multiple providers and a lot of hardware. Google network engineering uses a diverse set of vendor equipment to route user traffic from an internet service provider to one of our serving front ends inside a GCP data center. This equipment is proprietary and made by external networking vendors such as Arista, Cisco and Juniper. Each vendor has distinct operational methods, configurations and operational consoles.

With hundreds of distinct components utilized across our global network, we routinely deal with hardware failures—for example, a failed power supply, line card or control plane card. The complexity of today’s cloud networks means that there are a huge number of places where failure can occur. When we first began building and operating our own data centers, Google had a team of engineers, network engineers and site reliability engineers (SREs) who performed fault detection, mitigation and repair work on these devices, using manual processes guided by a ticket system. Google’s SRE principles are prescriptive, and aim to guide developers and operations teams toward better systems reliability. As with DevOps, avoiding toil—the manual tasks that can eat up too much time—is an essential goal.

We realized after becoming familiar with common hardware problems that any ticket type that we encountered repeatedly and that follows a predetermined sequence of steps can easily be automated. Our team created a list of playbooks over time that detailed steps of how to deal with each hardware failure scenario, taking into account relevant software and hardware bugs and typical steps to resolution. Each playbook is used when an alert is received. Given that we already knew in advance how to deal with each issue as it arose, it made sense to automate the work. Here’s how we did it.

Building the automation interface

“In the old way of doing things, we treat our servers like pets, for example, Bob the mail server. If Bob goes down, it’s all hands on deck. The CEO can’t get his email and it’s the end of the world. In the new way, servers are numbered, like cattle in a herd. For example, www001 to www100. When one server goes down, it’s taken out back, shot, and replaced on the line.”
- Randy Bias

The above quote describes a classic engineering scenario often applied within SRE: "Pets vs. cattle," which describes a way of looking at data center hardware as either individual components or a herd of them. The two categories of equipment can be described as follows:

Pet:
  • An individual device you work on. You're familiar with all of its particular failure modes. 
  • When it gets sick, you come to the rescue.

Cattle:
  • A fleet of devices with a common interface.
  • You manage the "herd" of devices as a group.
  • The common interface lets you perform the same basic operations on any device, regardless of its manufacturer.
Before we moved to automating network hardware failure resolution, we were stuck handling our networking equipment like pets, with an eye toward what made it unique, rather than as cattle, with an eye toward what made it a commodity. We needed to make it easier not to custom-manage all these networking devices. Our initial automation design aimed to turn our fleet into cattle by providing a common interface for interacting with networking equipment. Specifically, we used the underlying primitives to implement a higher-level interface for performing common operations—in this case, the basic operations of a line card in a network device, regardless of vendor: "Bring it online," "Take it offline" and "Check the status." We defined the following interface for a line card, using the Go programming language.


type Linecard interface {
  Online() error
  Offline() error 
  Status() error
}
The error qualifier in Go simply means that the function returns an error object if it fails. The underlying code implementing this interface for a Juniper line card varies significantly from implementation on the Cisco line card, but the caller of the function is insulated from the implementation. The upper level code imports the library, and when it operates on a line card, it can only perform one of those three actions we specified above.

We then realized that we could apply the same interface to many hardware components—for example, a fan. For certain vendors, the Online() and Offline() functions did nothing, because those vendors didn't support turning a fan off, so we just used the interface to check the status.
type Fan interface {
  Online() error
  Offline() error 
  Status() error
}
Building upon this line of thought, we realized that we could generalize this interface to define a common interface for all hardware components within a device.
type Component interface {
  Online() error
  Offline() error 
  Status() error
}
By structuring the code this way, anyone can add a device from a new vendor. Moreover, anyone can add any type of new component as a library. Once the library implements this common interface, it can be registered as a handler for that specific vendor and component.

Deciding what to automate

The system needed to interact with humans at various stages of the automation. To decide what to automate, we drew a flow chart of the normal human-based repair sequence and drew boxes around stages we believed we could replace with automation. We used the task of replacing a vendor control plane board as an example. Many of the steps have self-explanatory names, but these are definitions of some of the more complex ones:
  • Determine control plane: Find faulty control plane unit.
  • Determine state: Is it the master or the backup? 
  • Copy image to control plane: Copy the appropriate software image to the master control plane.
  • Offline control plane: Send the backup control plane offline.
  • Toggle mastership: Make the replaced control plane the new master.
Figure 1: Manual workflow for replacing a vendor control plane board
When we needed to carry out this workflow, a Google network engineer performed each step in Figure 1, with the exception of pulling out and replacing the failed control plane, which was performed by someone on-site at a data center location.

Once we had defined this task, we created an automated workflow. The goal of the new system was to provide a UI for our hardware engineers in a data center that allowed them to perform one of those operations at a specific time under specific conditions and with various automated safety checks, followed by an entire device audit at the end of the operation. Previously, a human had performed all of these steps, but now a human only needed to perform the step “hardware gets replaced” in Figure 2—the hardware replacement.
Figure 2: Automated workflow for replacing a vendor control plane board
Automation, before and after
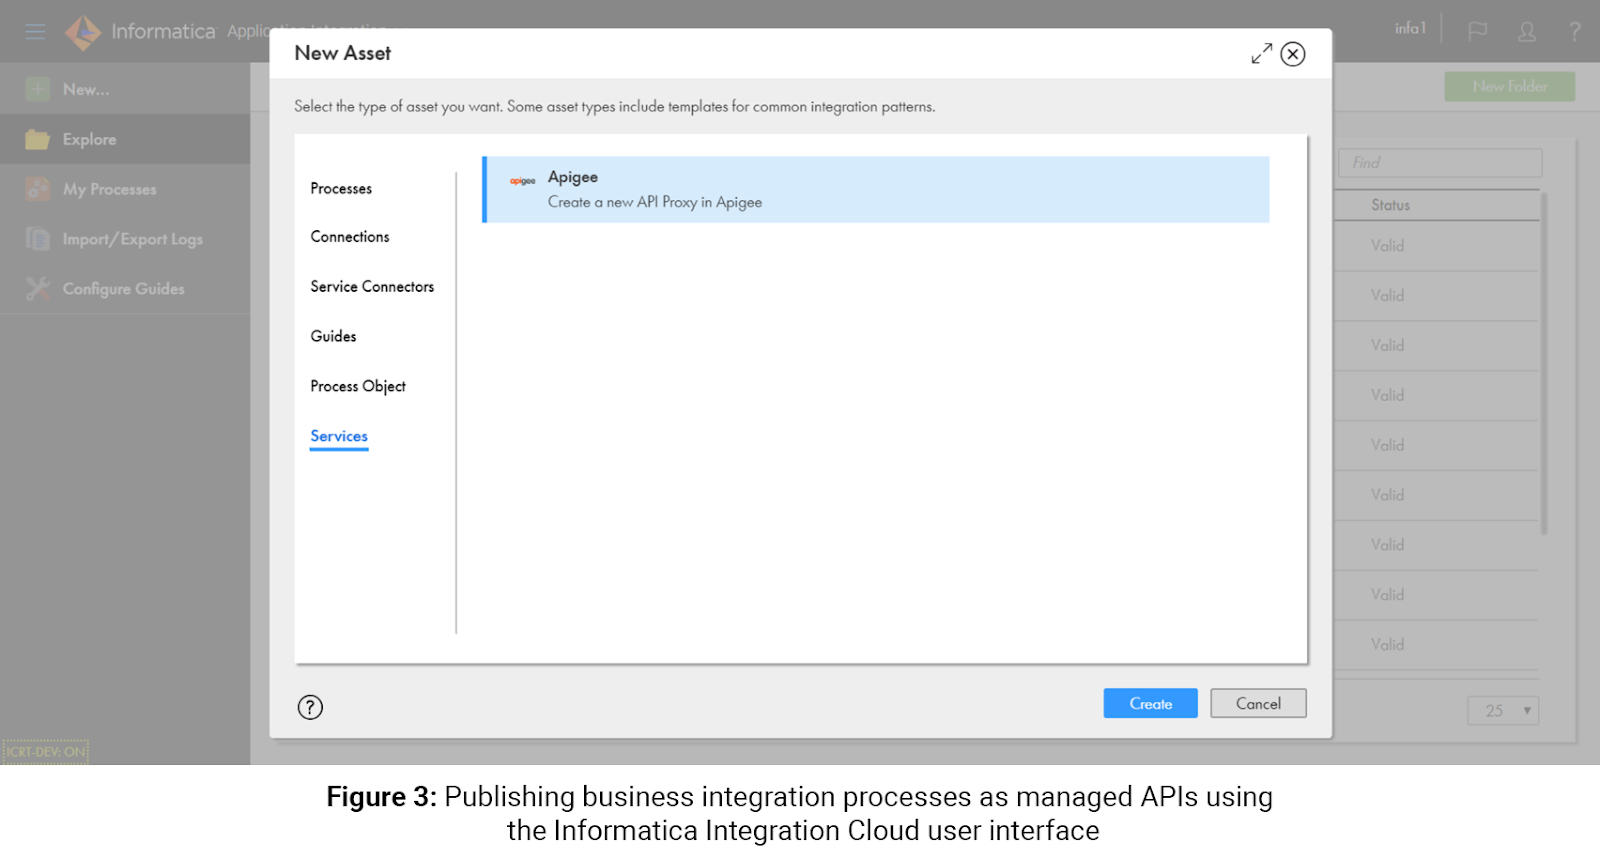
Figure 3: High-level system view.
You can see in Figure 3 what the system looked like after automation. Before automating this workflow, there would have been a lot of manual work. When an alert initially came in, an engineer would have stopped traffic to the device, and offlined by hand the bad component. Our network operations center (NOC) team would then work with the vendor—for example, Juniper or Cisco— to get a replacement part on-site. Next, we would file a change request in our change management system, noting the date of the operation.

On the day of the operation:
  • The data center technician would click “start” on the change management system to begin the repair.
  • Our system picks up this change and is ready to begin the repair.
  • The technician clicks “start” on our UI.
  • An “offline” state machine starts proceeding through the various steps to take the component offline safely.
  • The UI notifies the user each step of the way.
  • Once the state machine has completed, it notifies the technician, who can safely replace the component.
  • Once the component is replaced and re-cabled, the technician returns to the UI and begins the “online” state machine, which safely returns the component into production.
When we reviewed our original automation design, we noticed there would be a lot of work involved in building the various systems needed to implement the automated workflow. To facilitate collaboration, we created ticket items for each component of the system, so multiple engineers could work on the project in parallel.

Automation lessons learned

We used an iterative approach in our planning and execution. We first focused on replacing the line card for one vendor, then moved on to multiple vendors and multiple components. Due to the modular design of the code base and the interacting systems, adding more modules and scaling the code horizontally was easy. 

For example, adding a new library that handled fan replacements meant simply creating the code to handle this and ensuring it implemented the above interface. Then it registered itself in the main function.

We had the option to extend or repurpose existing automation systems owned by our software management teams to meet our needs. We had to carefully consider whether to use those systems or build our own, potentially duplicating work if we chose the latter. Ultimately, we built our own automation because the other systems were understaffed. Trying to extend their tools would have disrupted other teams' project work and delayed our own project.

What worked well
Leveraging multiple engineers to automate our internal part of the workflow allowed us to take the project from design to implementation within a short period—about one year.

What didn’t
We haven't yet fully automated our hardware replacement workflow. Doing so involves troubleshooting hardware issues with vendors and persuading them that each individual failure merits a device or component replacement. We work around this gap in our automation by keeping spares on site for use with our repair automation, and handling the vendor workflow portion of the process separately and mostly manually through our NOC. We are currently working toward a fully automated vendor interaction with our vendor partners.

Measuring automation success
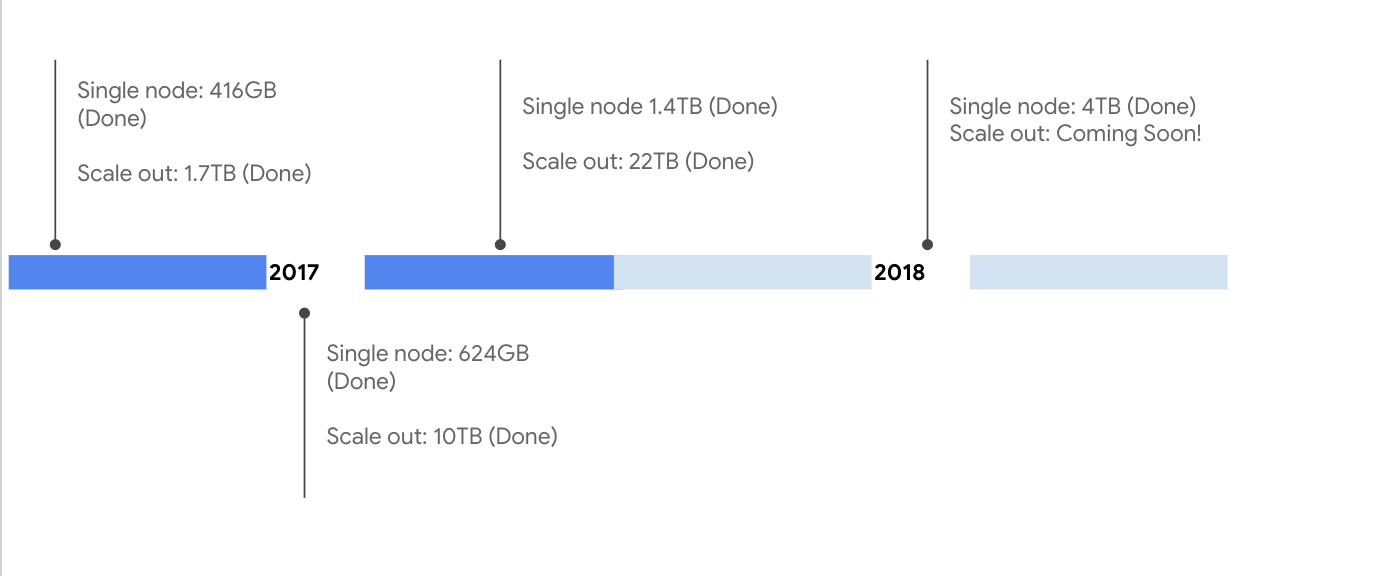
We can measure the hours our automation saves engineers using Google's production change logging service, which all internal tools use to record changes made to the production environment. The service logs changes made by tools manually invoked by engineers as well as tools that provide end-to-end automation without manual input. Thus we can compare how long each network repair action used to take when performed manually vs. the number of repair actions that are undertaken by today's fully automated system. These two data sets allow us to calculate the total time savings from automation. As shown in Figure 4, network hardware repair automation saves us hundreds of hours every month.

Tips for reducing toil through automation

While strategies for eliminating toil must be tailored to your individual environment and use cases, some approaches are universal. Based upon our own experience eliminating toil by automating network repair tasks, we recommend the following: 
  • Measure your toil.  
  • Tackle the biggest sources of toil first, and don't try to solve all problems at once.  
  • Carefully consider whether to enhance existing tools or build new ones. Even if you can partially repurpose another team's work, would creating a tool from scratch actually make more sense cost- or resource-wise? 
  • Take a design-driven approach. Iterate on the design, starting small and iterating quickly. Don't try to design the perfect approach from the start.  
  • Measure your time savings to determine your return on investment.
Automation has proved useful for our team of network site reliability engineers at GCP. Learn more about the practice of SRE and how you might apply its principles to your own network projects.

Access Google Cloud services, right from IntelliJ IDEA


Great news for IntelliJ users: You can now use Google Cloud services and APIs right from JetBrains’ integrated development environment (IDE). With the Cloud Tools for IntelliJ plugin, you can now discover APIs, consume them, and test against them locally, all without leaving your IDE.

The Cloud Tools plugin for IntelliJ streamlines the development process by integrating tasks into the IDE, such as enabling Google Cloud APIs, creating service accounts for local development, and adding the corresponding Java client libraries to your build.
Example: Using the Cloud Translation API with the Cloud Tools for IntelliJ plugin

Say you are interested in using the Cloud Translation API in our Java Maven-based project. If the Cloud Tools for IntelliJ plugin isn’t already configured, then first install it as described in this quickstart.

Clone the example Cloud Translation project, which allows you to translate some input text from English to French.

git clone https://github.com/GoogleCloudPlatform/java-docs-samples.git
Open the project, located under “java-docs-samples/translate”:

At this point, you might simply try to run the application by navigating to the main method and clicking the play button:

… and configuring the input arguments to translate some text from English to French by editing the newly created run configuration:

Run the program again, and this time you get the following error:

As you may have already guessed, you’re missing authentication rights to access the Cloud Translation API from your local machine. To overcome this, you’d normally have to go through the following steps:
  1. Enable the service on your Google Cloud Platform (GCP) project
  2. Create a new service account with the appropriate roles for accessing the service
  3. Update your local run configuration with the necessary environment variables to access the service
Thankfully, the Cloud Tools for IntelliJ plugin can help. In IntelliJ, navigate to the Cloud Tools menu item under “Tools > Google Cloud Tools > Add Cloud libraries …”:

Select the Cloud Translation API and your GCP project, and click “Add Cloud Libraries”:

In the confirmation window that appears, you can see that Cloud Tools for IntelliJ takes care of enabling the API and creating the service account for you:

Lastly, select the run configuration that you created earlier so that the plugin can inject the necessary environment variables for accessing the Cloud Translation service from your local machine:

Run the program again and your input text is successfully translated from English to French using the Cloud Translation service:

The Cloud Tools for IntelliJ plugin also assists with the following:
  • Adding Java client libraries to your Maven pom.xml if they are not already present
  • Writing a Bill of Materials (BOM) to your pom.xml to help avoid dependency version conflicts
  • Detecting and acting on potential misconfigurations, including a missing BOM, through pom.xml file inspections with quick-fixes
The Cloud Tools for IntelliJ plugin provides many more features to help optimize your development workflow including support for Google App Engine, Stackdriver Debugger, Cloud Repositories, and Cloud Storage. For more information and to leave feedback please visit the official documentation and GitHub pages:

Cloud Tools for IntelliJ:

Google Cloud and GitHub collaborate to make CI fast and easy


Today, Google Cloud and GitHub are delivering a new integrated experience that connects GitHub with Google’s Cloud Build, our new CI/CD platform. Together, we will provide fast, frictionless, and convenient Continuous Integration (CI) for any repository on GitHub, integrated directly into the GitHub developer workflow.

Millions of developers trust GitHub today to store and collaborate around source code. Working with GitHub, we realized we had an opportunity to help make it significantly easier for any repository to add CI, integrate DevOps practices, and improve velocity and productivity. We set out to build that together, and today’s release is the first step in that collaboration.

Continuous Integration drives developer productivity

“Continuous integration is a crucial element of modern software development, but historically one that has required development teams to invest significant effort in patching together disparate software products and services to build a working, streamlined pipeline. This is an area where partners with adjacent offerings can add real value by pre-integrating the necessary pieces to deliver a seamless experience. This is what GitHub and Google have set out to do.”
- Rachel Stephens, Analyst, RedMonk
Software development is built on trust. We work in teams and trust our fellow developers to write the right code together. We use open-source operating systems, tools, and libraries so we can focus on the code that we need to write. We trust cloud platforms so we can develop, test, run, and manage our applications securely, at scale. Google Cloud builds on that trust by developing and using open technologies such as Kubernetes, TensorFlow, and Go.

DevOps is also built on trust. Trust is what lets us go faster. We know that mistakes and errors happen and that we will learn from them. We create a culture of trust through transparency and data-driven decisions, through a spirit of shared-fate and blameless post-mortems for continuous improvement. We use automation everywhere, especially CI, to create a safety net. Trust in our tests and our tools lets us go faster. Cloud Build provides the DevOps tools to unleash developer productivity, and help teams go faster.

Collaborations are built on trust too. Google and GitHub have a long history of working together to make software development better for all developers. We have a shared belief in the principles and practices of open source, and a shared vision of productive developers and software teams. We have worked together on improvements to the Git client and protocol, as well as other projects. And Google uses GitHub too: Googlers contributed to nearly 30,000 repos on GitHub last year, some of which are among the most popular projects on GitHub.

Cloud Build and GitHub, better together

“GitHub is excited to partner with Google to make CI for cloud-native application development painless. The ability to use Cloud Build for CI as a part of the GitHub workflow is just the start of this partnership and we look forward to building more in the future with Google.”
- Jason Warner, SVP of Technology at GitHub (read more in GitHub’s blog post)
The integration of Cloud Build with GitHub makes it quick to adopt CI and validate changes by integrating code early and often, bringing a host of benefits to developers, directly from their GitHub workflow.

Zero-config Docker builds: In one step, you can run automated container builds and tests on changes pushed to a GitHub repository as a part of every pull request. GitHub will automatically detect and recommend CI for repositories that contain a Dockerfile.

Scalability: Cloud Build meets the growing needs of your organization. You can go from a single build on your local machine to multiple builds in parallel in the cloud across numerous projects, all in a matter of minutes.

Security: The builds run on infrastructure protected by Google’s security. You get full control over who can create and view your builds, what source code can be used, and where your build artifacts are stored.

Flexibility: For advanced use cases, you can include a cloudbuild.yaml file when setting up CI using Cloud Build. This lets you define custom build steps, speed up builds by caching a Docker image, build leaner containers, and deploy directly to Google Kubernetes Engine, Google App Engine, on-prem clusters (in alpha soon), or another cloud provider.

Insights: Once the build is complete, details about build times, failures and artifacts are available within GitHub through the Checks API, so you can understand and diagnose build results from within the familiar GitHub environment. Full logs and history are available in Cloud Build’s UI in the Google Cloud Console.

Join us

Today’s integration is already available in the GitHub Marketplace. Smart CI recommendations will be rolled out to all GitHub users on a phased basis. Please try it out, and share your feedback with us.

Google and GitHub have had a long relationship serving developers, and this is just the next step. We know there are many other ways we can make software development better for developers. We trust you’ll join us on this journey.

Accelerating software teams with Cloud Build


Software development has come a long way from the days of “it compiles, ship it!” Today’s software teams need to deliver more business value faster than ever—in an environment where the pace of change is accelerating. And while change can mean faster hardware, better security, and more features, it can also come at a cost: new vulnerabilities are discovered every day and seemingly innocuous updates can cause applications to break.

DevOps has learned a lot from manufacturing. The best time to catch and fix a problem is as early and automatically as possible. In software, a similar culture of continuous improvement is essential, along with new tools to automate best practices, like continuous integration and continuous delivery (CI/CD).

Many organizations have embraced CI/CD, but the engineering cost and complexity of operating and maintaining secure and reliable CI/CD infrastructure is high. Incorporating best practices takes time. These are resources better spent writing software. That’s why we introduced Cloud Build, a fully-managed CI/CD platform that lets you build and test applications in the cloud–at scale.
"We found Cloud Build to be feature rich yet also easy to learn and use. We use its parallelization and caching capabilities to speed up our container builds, and leverage its container analysis API to bless our images. Its reliability has allowed us to focus our attention on other areas."
- Riley Shott, Production Engineer at Shopify
In creating Cloud Build we worked with and listened to you, software developers from every walk of life, on teams of every size. We also spent time understanding what helped our own internal engineering teams be productive. Three things consistently stood out.

Scalability: No build is ever too quick. No test suite runs too fast. As a project grows over time and new developers join the team, your CI/CD system must keep up. Built on top of Google's cloud infrastructure, with a range of CPU sizes available and pay-for-what-you-use pricing, Cloud Build can grow with your organization.

Flexibility: Software development is an increasingly complex web of ever-changing frameworks, dependencies, services, languages, and tools. Your applications are deployed across multiple clouds, on-premise resources and mobile app stores. To support your development needs, Cloud Build works with major source repositories like GitHub, GitLab, Cloud Source Repositories, and BitBucket. It also features built-in support for Docker, Maven, Gradle, Bazel, Go, and npm. An ecosystem of add-ons and the ability to bring your own tasks and toolchains as containers makes integrating into your existing developer workflow easy. You can use Cloud Build for hybrid scenarios with VPC networking and custom workers (in alpha).

Security: Security isn’t just for runtimes, it’s a full lifecycle problem that extends into every tool and pipeline you use. Cloud Build uses GCP’s world-class security and policy controls so you have control and visibility of your source and build. Cloud Build runs every build on its own VM, which reduces the risk of information leaking between builds or build errors caused by inconsistent build environments. Vulnerability scanning automatically finds known vulnerabilities in your container images (in alpha for Ubuntu, Debian, and Alpine).

As Rob Pike describes it, “Software engineering is what happens to programming when you add time and other programmers.” Striking a balance between time, quality, velocity and security is hard—but not insurmountable. The key to this balance is trust. When you can trust your tools as a safety net and your culture as a compass it’s much easier to take risks and move fast. Cloud Build makes high velocity software development safer and easier, and unleashes your team’s productivity -- try it out today!

Cloud Services Platform: bringing the best of the cloud to you


In the decade since cloud computing became mainstream, it’s captured the hearts and minds of developers and enterprises everywhere. But for most IT organizations, cloud is still but a glimmer of what it could be—or what it should be. Today, we’re excited to share our vision for Cloud Services Platform, an integrated family of cloud services that lets you increase speed and reliability, improve security and governance and build once to run anywhere, across GCP and on-premise environments. With Cloud Services Platform, we bring the benefits of the cloud to you, no matter where you deploy your IT infrastructure today—or tomorrow.

Cloud Services Platform puts all your IT resources into a consistent development, management and control framework, automating away low-value and insecure tasks across your on-premise and Google Cloud infrastructure. Specifically, we’re announcing:
  • Service mesh: Availability of Istio 1.0 in open source, Managed Istio, and Apigee API Management for Istio
  • Hybrid computing: GKE On-Prem with multi-cluster management
  • Policy enforcement: GKE Policy Management, to take control of Kubernetes workloads
  • Ops tooling: Stackdriver Service Monitoring
  • Serverless computing: GKE Serverless add-on and Knative, an open source serverless framework
  • Developer tools: Cloud Build, a fully managed CI/CD platform
The Cloud Services Platform family

“We needed a consistent platform to deploy and manage containers on-premise and in the cloud. As Kubernetes has become the industry standard, it was natural for us to adopt Kubernetes Engine on GCP to reduce the risk and cost of our deployments.”
- Dinesh KESWANI, Global Chief Technology Officer at HSBC
Cloud Services Platform is technologically and architecturally aligned with the joint hybrid cloud products we've been developing and bringing to market with our partner, Cisco, with whom we have been collaborating closely. Our joint solution, Cisco Hybrid Cloud Platform for Google Cloud, will be generally available next month and is now certified to be consistent with Kubernetes Engine, enabling GCP out of the box.

Today, let’s take a look at aspects of the Cloud Services Platform, and how it lays a foundation for a fully realized cloud infrastructure.

Modernizing application architecture with Istio

Last year, we took a step toward helping organizations move from reactive IT management to proactive service operations—the idea of managing at a higher layer of the stack, enabling greater application awareness and control. In collaboration with several industry partners, we announced Istio, an open-source service mesh that gives operators the controls they need to manage microservices at scale. We are excited to say that open-source Istio will move to version 1.0 shortly, making it ready for production deployments.

Building on that open-source foundation, we are announcing a managed Istio service that you can use to manage services within a Kubernetes Engine cluster. Managed Istio, in alpha, is an Istio-powered service mesh available in Kubernetes Engine, complete with enterprise support. Managed Istio accelerates your journey to service operations with three high-level capabilities:
  • Service discovery and intelligent traffic management—Managed Istio surfaces all the services running in your cluster and manages network traffic between them. Using application-level load balancing and sophisticated traffic routing for container and VM workloads, it also provides health checks, plus canary and blue/green deployments, enabling fault tolerant applications with circuit breaking and timeouts.
  • Secure, authenticated communications—Managed Istio offers segmentation and granular policy for endpoints, compliance and detecting anomalous behavior, and traffic encryption by default using mTLS.
  • Monitoring and management—Understand and troubleshoot the system of services running across Managed Istio, including integration with Stackdriver, our suite of monitoring and management tools.
It's still early days, but we are very excited about Istio and Managed Istio, foundational technologies that will drive the use of containers and microservices, while helping to make your environment much more manageable, scalable and available.

Enterprise-grade Kubernetes, wherever you go

A great path to well-managed applications is undoubtedly containers and microservices, and having a common Kubernetes management layer can help get you there that much faster. Four years ago, we released Kubernetes, and the resulting Kubernetes Engine managed service is battle-tested and growing by leaps and bounds: In 2017 Kubernetes Engine core-hours grew 9X year over year.

Today, we are excited to bring that same managed Kubernetes Engine experience to your on-premise infrastructure. GKE On-Prem, soon to be in alpha, is Google-configured Kubernetes that you can deploy in the environment of your choice. GKE On-Prem makes it easy to install and upgrade Kubernetes and provides access to the following capabilities across GCP and on-premise:
  • Unified multi-cluster registration and upgrade management
  • Centralized monitoring and logging with Stackdriver integration
  • Hybrid Identity and Access Management
  • GCP Marketplace for Kubernetes applications
  • Unified cluster management for GCP and on-premise
  • Professional services and enterprise-grade support
Now, with GKE On-Prem, you can begin to modernize existing applications on-premise, without necessarily moving to the cloud. You gain control of your journey to the cloud at your own pace.

Automatically take control of your Kubernetes workloads

When it comes to managing clusters at scale, it’s imperative to have the right security controls in place and ensure your policies can be easily managed and enforced. Today, we’re pleased to announce GKE Policy Management which delivers centralized capabilities that make it far easier for administrators to configure Kubernetes (wherever it may be running).

With GKE Policy Management, Kubernetes administrators create a single source of truth for their policies that automatically syncs with any enrolled cluster. GKE Policy Management supports policies stored as definitions in a repository, and can also use your existing Google Cloud IAM policies to make it simple to secure your clusters. GKE Policy Management is coming soon to alpha; sign up here to express interest.

A service-centric view of your environment

More than simply making it easier to migrate workloads to the cloud, the technologies found in Cloud Services Platform lay the groundwork for improving service operations, by providing administrators with a service-centric view of their infrastructure, rather than infrastructure views of services. Today, we are announcing Stackdriver Service Monitoring, which provides the following new views:
  • Service graph: A real-time bird’s-eye visualization of the entire environment—see all your microservices, how they communicate, and their dependencies.
  • Service level objective (SLO) monitoring: Monitor and alert in the same customer-centric, low-toil manner as Google Site Reliability Engineers (SRE) do for our own services.
  • Service dashboard: All your signals for a given service are in a single place so that you can debug faster and easier than ever before and lower your mean-time-to-resolution (MTTR).
Stackdriver Service Monitoring is designed for workloads running on opinionated Istio infrastructure, as well as App Engine.

When microservices become APIs

Microservices provide a simple, compelling way for organizations to accelerate moving workloads to the cloud, serving as a path towards a larger cloud strategy. Istio enables service discovery, connection and management for microservices. But as soon as those services are needed for internal groups, partners or developers outside of the enterprise, they quickly cross the line and become APIs.

Just as organizations need services management for microservices, they need API management for their APIs. Apigee API Management complements Istio with the robust features of Google Cloud's Apigee API management platform, Apigee Edge, by extending API management natively into the microservices stack. Apigee Edge features include API usage, access, productization, catalog and discovery, plus a developer portal to create a smooth experience for developers and increase API consumption.

Making cloud all it could be

Here at Google, we could never have done what we do today without containers and Kubernetes, but taking a service-oriented view of our operations has been equally critical. In addition to the core capabilities mentioned above, Cloud Services Platform provides access to other new areas of functionality:
  • GKE serverless add-on lets you run serverless workloads on Kubernetes Engine with a one-step deploy. You can go from source to containers amazingly fast, auto-scale your stateless container-based workloads, and even scale down to zero. Sign up for an early preview for the GKE serverless add-on here.
  • Knative (pronounced kay-nay-tiv), open-source serverless components from the same technology that enables the GKE serverless add-on. Knative lets you create modern, container-based and cloud-native applications by providing building blocks you need to build and deploy container-based serverless applications anywhere on Kubernetes.
  • Cloud Build is a fully-managed Continuous Integration/Continuous Delivery (CI/CD) platform that lets you build, test, and deploy software quickly, at scale.
Now, with Cloud Services Platform, we’re excited to bring the full potential of the cloud to you, wherever your workloads may be. For more on Cloud Services Platform, you can read about how it relates to serverless computing.

Bringing the best of serverless to you


Every business wants to innovate—and deliver—great software, faster. In recent years, serverless computing has changed application development, bringing the focus on the application logic instead of infrastructure. With zero server management, auto-scaling to meet any traffic demands, and managed integrated security, developers can move faster, stay agile and focus on what matters most—building great applications.

Google helped pioneer the notion of serverless more than 10 years ago with the introduction of App Engine. Making developers more productive is just as important today as it was then. Over the past few years, we have been working hard to bring the benefits of serverless that we learned from App Engine to our compute, storage, database, messaging services, data analytics, and machine learning offerings.

Today, in tandem with the launch of our Cloud Services Platform, we are sharing several important developments to our serverless compute stack:
  • New App Engine runtimes
  • Cloud Functions general availability, support for additional languages, plus performance, networking and security features
  • Serverless containers on Cloud Functions
  • GKE serverless add-on
  • Knative, Kubernetes-based building blocks for serverless workloads
  • Integration of Cloud Firestore with GCP services

Expanding serverless compute

Today we are announcing support for new second-generation App Engine standard runtimes such as Python 3.7 and PHP 7.2 in addition to recent support for Node.js 8. Second generation runtimes provide developers idiomatic, open-source language runtimes capable of running any framework, library, or binary. Based on gVisor technology, these new runtimes enable faster deployments and increased application performance.

Also, Cloud Functions, our event-driven compute service, is generally available starting today, complete with predictable service guaranteed by an SLA, and a global footprint with new regions in Europe and Asia. In addition, we are bolstering Cloud Functions with a range of new and heavily requested features including support for Python 3.7 and Node.js 8, networking and security controls, and performance improvements across the board. Cloud Functions also lets you seamlessly connect and extend more than 20 GCP services such as BigQuery, Cloud Pub/Sub, machine learning APIs, G Suite, Google Assistant and many more.

Serverless and containers: the best of both worlds

Whether you’re using App Engine or Cloud Functions, Google’s serverless platform offers a complete mix of tools and services. However, many customers tell us they have custom requirements like specific runtimes, custom binaries, or workload portability. More often than not, they turn to containers for an answer. At Google Cloud, we want to bring the best of both serverless and containers together.

Today, we’re also introducing serverless containers, which allow you to run container-based workloads in a fully managed environment and still only pay for what you use. Sign up for an early preview of serverless containers on Cloud Functions to run your own containerized functions on GCP with all the benefits of serverless.

And what if you are already using Kubernetes Engine? A new GKE serverless add-on lets you run serverless workloads on Kubernetes Engine with a one-step deploy. You can go from source to containers instantaneously, auto-scale your stateless container-based workloads, and even scale down to zero. Here’s what T-mobile had to say about running their serverless workloads on Kubernetes Engine:
"The technology behind the GKE serverless add-on enabled us to focus on just the business logic, as opposed to worrying about overhead tasks such as build/deploy, autoscaling, monitoring and observability"
-Ram Gopinathan, Principal Technology Architect, T- Mobile

With Knative, run your serverless workloads anywhere

While we believe Google Cloud is a great place to run all types of workloads, some customers need to run on-premises or across multiple clouds. Based on this feedback, we’re excited to announce Knative (pronounced kay-nay-tiv), which is an open-source set of components from the same technology that enables the GKE serverless add-on.

Developed in close partnership with Pivotal, IBM, Red Hat, and SAP, Knative pushes Kubernetes-based computing forward by providing the building blocks you need to build and deploy modern, container-based serverless applications.

Knative focuses on the common but challenging parts of running apps, such as orchestrating source-to-container builds, routing and managing traffic during deployment, auto-scaling workloads, and binding services to event ecosystems. Knative provides you with familiar, idiomatic language support and standardized patterns you need to deploy any workload, whether it’s a traditional application, function, or container.

Knative provides reusable implementations of common patterns and codified best practices, shared by successful, real-world Kubernetes-based frameworks and applications. For instance, Knative comes with a build component that provides powerful abstraction and flexible workflow for building, testing, or deploying container images or non-container artifacts on a Kubernetes cluster. By integrating Knative into your own platform, you don’t have to choose between the portability and familiarity of containers and the automation and efficiency of serverless computing. And you can enjoy the benefits of Google Cloud’s extensive experience delivering serverless computing whether you run on GCP, on-premises or in any other cloud. Get started today with Knative or join the conversation.

A comprehensive serverless ecosystem

Of course, serverless computing is a non-starter if you can’t easily build and deploy the code, store your data, and manage your applications in production as part of your overall IT environment. At Google Cloud, we’re committed to enabling the comprehensive ecosystem of serverless offerings.

Cloud Build, for instance, lets you create a continuous integration and delivery (CI/CD) pipeline for your serverless applications. You can define custom workflows for building, testing, and deploying across multiple serverless environment such Cloud Functions, App Engine and even Knative.

Cloud Firestore, one of the most recent additions to our serverless stack, lets you store and sync your app data at global scale. Soon, app developers will be able to easily access Cloud Firestore within the GCP Console, and it will also be compatible with Cloud Datastore.

Finally, our Stackdriver suite has four core capabilities—monitoring, logging, application performance management (APM) and the newly released Service Monitoring—and lets you operate and rapidly diagnose your serverless applications in production.

Toward ubiquitous serverless computing

We’re firm believers in finding ways to simplify operations and bring solutions to market faster. Last week’s launch of commercial Kubernetes applications in GCP Marketplace demonstrates how third-party solutions providers are adopting new technologies rapidly to support enterprise demand for extensible solutions. Now, with these new offerings, we’ll help more developers adopt serverless computing in the languages and platforms of their choice.

Click here to learn about the full breadth of Google Cloud serverless technologies.

Now shipping: ultramem machine types with up to 4TB of RAM


Today we are announcing the general availability of Google Compute Engine “ultramem” memory-optimized machine types. You can provision ultramem VMs with up to 160 vCPUs and nearly 4TB of memory--the most vCPUs you can provision on-demand in any public cloud. These ultramem machine types are great for running memory-intensive production workloads such as SAP HANA, while leveraging the performance and flexibility of Google Cloud Platform (GCP).

The ultramem machine types offer the most resources per VM of any Compute Engine machine type, while supporting Compute Engine’s innovative differentiators, including:

SAP-certified for OLAP and OLTP workloads

Since we announced our partnership with SAP in early 2017, we’ve rapidly expanded our support for SAP HANA with new memory-intensive Compute Engine machine types. We’ve also worked closely with SAP to test and certify these machine types to bring you validated solutions for your mission-critical workloads. Our supported VM sizes for SAP HANA now meet the broad range of Google Cloud Platform’s customers’ demands. Over the last year, the size of our certified instances grew by more than 10X for both scale-up and scale-out deployments. With up to 4TB of memory and 160 vCPUs, ultramem machine types are the largest SAP-certified instances on GCP for your OLAP and OLTP workloads.
Maximum memory per node and per cluster for SAP HANA on GCP, over time


We also offer other capabilities to manage your HANA environment on GCP including automated deployments, and Stackdriver monitoring. Click here for a closer look at the SAP HANA ecosystem on GCP.

Up to 70% discount for commited use

We are also excited to share that GCP now offers deeper committed use discounts of up to 70% for memory-optimized machine types, helping you improve your total cost of ownership (TCO) for sustained, predictable usage. This allows you to control costs through a variety of usage models: on-demand usage to start testing machine types, committed use discounts when you are ready for production deployments, and sustained use discounts for mature, predictable usage. For more details on committed use discounts for these machine types check our docs, or use the pricing calculator to assess your savings on GCP.

GCP customers have been doing exciting things with ultramem VMs

GCP customers have been using ultramem VMs for a variety of memory-intensive workloads including in-memory databases, HPC applications, and analytical workloads.

Colgate has been collaborating with SAP and Google Cloud as an early user of ultramem VMs for S/4 HANA.

"As part of our partnership with SAP and Google Cloud, we have been an early tester of Google Cloud's 4TB instances for SAP solution workloads. The machines have performed well, and the results have been positive. We are excited to continue our collaboration with SAP and Google Cloud to jointly create market changing innovations based upon SAP Cloud Platform running on GCP.”
- Javier Llinas, IT Director, Colgate

Getting started

These ultramem machine types are available in us-central1, us-east1, and europe-west1, with more global regions planned soon. Stay up-to-date on additional regions by visiting our available regions and zones page.

It’s easy to configure and provision n1-ultramem machine types programmatically, as well as via the console. To learn more about running your SAP HANA in-memory database on GCP with ultramem machine types, visit our SAP page, and go to the GCP Console to get started.

Introducing new Apigee capabilities to deliver business impact with APIs


Whether it's delivering new experiences through mobile apps, building a platform to power a partner ecosystem, or modernizing IT systems, virtually every modern business uses APIs (application programming interfaces).

Google Cloud’s Apigee API platform helps enterprises adapt by giving them control and visibility into the APIs that connect applications and data across the enterprise and across clouds. It enables organizations to deliver connected experiences, create operational efficiencies, and unlock the power of their data.

As enterprise API programs gain traction, organizations are looking to ensure that they can seamlessly connect data and applications, across multi-cloud and hybrid environments, with secure, manageable and monetizable APIs. They also need to empower developers to quickly build and deliver API products and applications that give customers, partners, and employees secure, seamless experiences.

We are making several announcements today to help enterprises do just that. Thanks to a new partnership with Informatica, a leading integration-platform-as-a-service (iPaaS) provider, we’re making it easier to connect and orchestrate data services and applications, across cloud and on-premise environments, using Informatica Integration Cloud for Apigee. We’ve also made it easier for API developers to access Google Cloud services via the Apigee Edge platform.

Discover and invoke business integration processes with Apigee

We believe that for an enterprise to accelerate digital transformation, it needs API developers to focus on business-impacting programs rather than low-level tasks such as coding, rebuilding point-to-point integrations, and managing secrets and keys.

From the Apigee Edge user interface, developers can now use policies to discover and invoke business integration processes that are defined in Informatica’s Integration Cloud.

Using this feature, an API developer can add a callout policy inside an API proxy that invokes the required Informatica business integration process. This is especially useful when the business integration process needs to be invoked before the request gets routed to the configured backend target.

To use this feature, API developers:
  • Log in to Apigee Edge user interface with their credentials
  • Create a new API proxy, configure backend target, add policies
  • Add a callout policy to select the appropriate business integration process
  • Save and deploy the API proxy

Access Google Cloud services from the Apigee Edge user interface

API developers want to easily access and connect with Google Cloud services like Cloud Firestore, Cloud Pub/Sub, Cloud Storage, and Cloud Spanner. In each case, there are a few steps to perform to deal with security, data formats, request/response transformation, and even wire protocols for those systems.

Apigee Edge includes a new feature that simplifies interacting with these services and enables connectivity to them through a first-class policy interface that an API developer can simply pick from the policy palette and use. Once configured, these can be reused across all API proxies.

We’re working to expand this feature to cover more Google Cloud services. Simultaneously, we’re working with Informatica to include connections to other software-as-a-service (SaaS) applications and legacy services like hosted databases.

Publish business integration processes as managed APIs

Integration architects, working to connect data and applications across the enterprise, play an important role in packaging and publishing business integration processes as great API products. Working with Informatica, we’ve made this possible within Informatica’s Integration Cloud.

Integration architects that use Informatica's Integration Cloud for Apigee can now author composite services using business integration processes to orchestrate data services and applications, and directly publish them as managed APIs to Apigee Edge. This pattern is useful when the final destination of the API call is an Informatica business integration process.

To use this feature, integration architects need to execute the following steps:
  • Log in to their Informatica Integration Cloud user interface
  • Create a new business integration process or modify an existing one
  • Create a new service of type (“Apigee”), select options (policies) presented on the wizard, and publish the process as an API proxy
  • Apply additional policies to the generated API proxy by logging in to the Apigee Edge user interface.
API documentation can be generated and published on a developer portal, and the API endpoint can be shared with app developers and partners. APIs are an increasingly central part of organizations’ digital strategy. By working with Informatica, we hope to make APIs even more powerful and pervasive. Click here for more on our partnership with Informatica.

Verifying PostgreSQL backups made easier with new open-source tool


When was the last time you verified a database backup? If that question causes you to break into a cold sweat, rest assured you’re not alone.

Verifying backups should be a common practice, but it often isn’t. This can be an issue if there’s a disaster or—as is more likely at most companies—if someone makes a mistake when deploying database changes. One industry survey indicates that data loss is one of the biggest risks when making database changes.

PostgreSQL Page Verification Tool

At Google Cloud Platform (GCP), we recently wrote a tool to fight data loss and help detect data corruption early in the change process. We made it open source, because data corruption can happen to anybody, and we’re committed to making code available to ensure secure, reliable backups. If you use Google Cloud SQL for PostgreSQL, then you’re in luck—we’re already running the PostgreSQL Page Verification Tool on your behalf. It’s also available now as open source code.

This new PostgreSQL Page Verification tool is a command-line tool that you can execute against a Postgres database. Since PostgreSQL version 9.3, it’s been possible to enable checksums on data pages to avoid ignoring data corruption. However, with the release of this utility, you can now verify all data files, online or offline. The Page Verification Tool can calculate and verify checksums for each data page.

How the Page Verification tool works

To use the PostgreSQL Page Verification tool, you must enable checksums during initialization of a new PostgreSQL database cluster. You can’t go back in and do it after the fact. Once checksums are turned on, the Page Verification tool computes its own checksum and compares it to the Postgres checksum to confirm that they are identical. If the checksum does not match, the tool identifies which data page is at fault and causing the corruption.

The Page Verification Tool can be run against a database that’s online or offline. It verifies checksums on PostgreSQL data pages without having to load each page into a shared buffer cache, and supports subsequent segments for tables larger than 1GB.

The tool skips Free Space Map, Visibility Map and pg_internal.init files, since they can be regenerated. While the tool can run against a database continuously, it does have a performance overhead associated with it, so we advise incorporating the tool into your backup process and running it on a separate server.

How to start using the PostgreSQL Page Verification tool

The Page Verification tool is integrated into Google Cloud SQL, so it runs automatically. We’re using the tool at scale to validate our customers’ backups. We do the verification process on internal instances of Cloud SQL to make sure your database doesn’t take a performance hit.

The value of the PostgreSQL Page Verification Tool comes from detecting data corruption early to minimize data loss resulting from data corruption. Organizations that use the tool and achieve a successful verification have assurance of a useful backup in case disaster strikes.

At Google, when we make a database better, we make it better for everyone, so the PostgreSQL Page Verification tool is available to you via open source. We encourage Postgres users to download the tool at Google Open Source or GitHub. The best detection is early detection, not when you need to restore a backup.

7 best practices for building containers


Kubernetes Engine is a great place to run your workloads at scale. But before being able to use Kubernetes, you need to containerize your applications. You can run most applications in a Docker container without too much hassle. However, effectively running those containers in production and streamlining the build process is another story. There are a number of things to watch out for that will make your security and operations teams happier. This post provides tips and best practices to help you effectively build containers.

1. Package a single application per container

Get more details

A container works best when a single application runs inside it. This application should have a single parent process. For example, do not run PHP and MySQL in the same container: it’s harder to debug, Linux signals will not be properly handled, you can’t horizontally scale the PHP containers, etc. This allows you to tie together the lifecycle of the application to that of the container.
The container on the left follows the best practice. The container on the right does not.


2. Properly handle PID 1, signal handling, and zombie processes

Get more details

Kubernetes and Docker send Linux signals to your application inside the container to stop it. They send those signals to the process with the process identifier (PID) 1. If you want your application to stop gracefully when needed, you need to properly handle those signals.

Google Developer Advocate Sandeep Dinesh’s article —Kubernetes best practices: terminating with grace— explains the whole Kubernetes termination lifecycle.

3. Optimize for the Docker build cache

Get more details

Docker can cache layers of your images to accelerate later builds. This is a very useful feature, but it introduces some behaviors that you need to take into account when writing your Dockerfiles. For example, you should add the source code of your application as late as possible in your Dockerfile so that the base image and your application’s dependencies get cached and aren’t rebuilt on every build.

Take this Dockerfile as example:
FROM python:3.5
COPY my_code/ /src
RUN pip install my_requirements
You should swap the last two lines:
FROM python:3.5
RUN pip install my_requirements
COPY my_code/ /src
In the new version, the result of the pip command will be cached and will not be rerun each time the source code changes.

4. Remove unnecessary tools

Get more details

Reducing the attack surface of your host system is always a good idea, and it’s much easier to do with containers than with traditional systems. Remove everything that the application doesn’t need from your container. Or better yet, include just your application in a distroless or scratch image. You should also, if possible, make the filesystem of the container read-only. This should get you some excellent feedback from your security team during your performance review.

5. Build the smallest image possible

Get more details

Who likes to download hundreds of megabytes of useless data? Aim to have the smallest images possible. This decreases download times, cold start times, and disk usage. You can use several strategies to achieve that: start with a minimal base image, leverage common layers between images and make use of Docker’s multi-stage build feature.
The Docker multi-stage build process.

Google Developer Advocate Sandeep Dinesh’s article —Kubernetes best practices: How and why to build small container images— covers this topic in depth.

6. Properly tag your images

Get more details

Tags are how the users choose which version of your image they want to use. There are two main ways to tag your images: Semantic Versioning, or using the Git commit hash of your application. Whichever your choose, document it and clearly set the expectations that the users of the image should have. Be careful: while users expect some tags —like the “latest” tag— to move from one image to another, they expect other tags to be immutable, even if they are not technically so. For example, once you have tagged a specific version of your image, with something like “1.2.3”, you should never move this tag.

7. Carefully consider whether to use a public image

Get more details

Using public images can be a great way to start working with a particular piece of software. However, using them in production can come with a set of challenges, especially in a high-constraint environment. You might need to control what’s inside them, or you might not want to depend on an external repository, for example. On the other hand, building your own images for every piece of software you use is not trivial, particularly because you need to keep up with the security updates of the upstream software. Carefully weigh the pros and cons of each for your particular use-case, and make a conscious decision.

Next steps

You can read more about those best practices on Best Practices for Building Containers, and learn more about our Kubernetes Best Practices. You can also try out our Quickstarts for Kubernetes Engine and Container Builder.