
It’s official: new emoji are here, there, and everywhere.
But what exactly is “new” and where is “here”? Great question.
Emoji have long eclipsed their humble beginnings in sms text messages in the 1990’s. Today, they appear in places you'd never expect like self-checkout kiosks, television screens and yes, even refrigerators ?. As emoji increase in popularity and advance in how they are used, the Noto Emoji project has stepped up our emoji game to help everyone get “?” without having to buy a new device (or a new refrigerator).
Over the past couple of years we’ve been introducing a suite of updates to make it easier than ever for apps to embrace emoji. Today, we’re taking it a step further by introducing new emoji characters (in color and in monochrome), metadata like shortcodes, a new font standard called COLRv1, open source animated emotes, and customization features in emoji kitchen. Now it’s easier than ever to operate at the speed of language online.

New Emoji!
First and foremost, earlier today the Unicode Consortium published all data files associated with the Unicode 15.0 release, including 31 new emoji characters.?Among the collection includes a wing(?), a leftwards and rightwards hand, and a shaking face (?). Now you too can make pigs fly (??), high five (????), and shake in your boots all in emoji form (?????).
These new characters bring our emoji total to 3,664 and all of them are all coming to Android soon and will become available across Google products early next year.
Can’t wait until then? You can download the font today and use it today (wherever color vector fonts are supported). Our entire emoji library including the source files and associated metadata like short codes is open source on Github for you to go build with and build on (Note: Keep an eye open for those source files on Github later this week).
And before you ask, yes the variable monochrome version of Noto Emoji that launched earlier this year is fully up to date to the new Unicode Standard. ???

Dancing Emotes
While emoji are almost unrecognizable today from what they were in the late 1990's, there are some things I miss about the original emoji sets from Japan. Notably, the animation. Behold the original dancer emoji via phone operator KDDI:Just as language doesn’t stand still, neither do emoji. Say hello to our first set of animations!!!!!
New Color Font Support
Emoji innovation isn't limited to mobile anymore and there is a lot to be explored in web environments. Thanks to a new font format called COLRv1, color fonts — such as Noto Color emoji — can render with the crispness we’ve come to expect from digital imagery. You can also do some sweet things to customize the appearance of color fonts. If you’re viewing this on the latest version of Chrome. Go ahead, give it a whirl.


If you’d like to send goth emoji today in a messaging app, you’ll have to use Emoji Kitchen stickers in Gboard to customize their color. *COLRv1 is available on Google Chrome and in Edge. Expect it in other browsers such as Firefox soon.
Customized Emotes
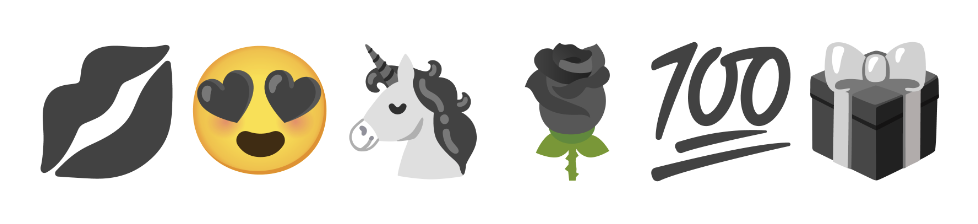
That’s right, you can change the color of emoji using emoji kitchen. No shade: I love that “pink heart” was anointed the title of “Most anticipated emoji” on social media earlier this summer but what if … changing the color of an emote happened with the simple click of a button and didn’t require the Unicode Consortium, responsible for digitizing the world’s languages, to do a cross-linguistic study of color terms to add three new colored hearts?Customizing and personalizing emotes is becoming more technically feasible, thanks to Noto Emoji. Look no further than Emoji Kitchen available on Gboard: type a sequence of emoji including a colored heart to change its color.
No lime emoji? No problem.??
.gif)
Red rose too romantic for the moment? Try a yellow rose??

Feeling goth? ??

Go Cardinals! ❤️?
While technically these are stickers, it’s a lovely example of how emoji are rapidly evolving. Whether you're a developer, designer, or just a citizen of the Internet, Noto Emoji has something for everyone and we love seeing what you make with it.
Source: Google Developers Blog
Game Performance: Layout Qualifiers
Let’s start with a simple vertex shader and change it as we go along.
This basic vertex shader takes position and texture coordinates, transforms the position and outputs the data to the fragment shader:
attribute vec4 vertexPosition;
attribute vec2 vertexUV;

uniform mat4 matWorldViewProjection;

varying vec2 outTexCoord;

void main()
{
  outTexCoord = vertexUV;
  gl_Position = matWorldViewProjection * vertexPosition;
}
Vertex Attribute Index
To draw a mesh on to the screen, you need to create a vertex buffer and fill it with vertex data, including positions and texture coordinates for this example.In our sample shader, the vertex data may be laid out like this:
struct Vertex
{
  Vector4 Position;
  Vector2 TexCoords;
};
Therefore, we defined our vertex shader attributes like this:attribute vec4 vertexPosition; attribute vec2 vertexUV;To associate the vertex data with the shader attributes, a call to
glGetAttribLocation will get the handle of the named attribute. The attribute format is then detailed with a call to glVertexAttribPointer.GLint handleVertexPos = glGetAttribLocation( myShaderProgram, "vertexPosition" ); glVertexAttribPointer( handleVertexPos, 4, GL_FLOAT, GL_FALSE, 0, 0 ); GLint handleVertexUV = glGetAttribLocation( myShaderProgram, "vertexUV" ); glVertexAttribPointer( handleVertexUV, 2, GL_FLOAT, GL_FALSE, 0, 0 );But you may have multiple shaders with the vertexPosition attribute and calling
glGetAttribLocation for every shader is a waste of performance which increases the loading time of your game.Using layout qualifiers you can change your vertex shader attributes declaration like this:
layout(location = 0) in vec4 vertexPosition;
layout(location = 1) in vec2 vertexUV;
To do so you also need to tell the shader compiler that your shader is aimed at GL ES version 3.1. This is done by adding a version declaration:
#version 300 esLet’s see how this affects our shader, changes are marked in bold:
#version 300 es

layout(location = 0) in vec4 vertexPosition;
layout(location = 1) in vec2 vertexUV;

uniform mat4 matWorldViewProjection;

out vec2 outTexCoord;

void main()
{
  outTexCoord = vertexUV;
  gl_Position = matWorldViewProjection * vertexPosition;
}
Note that we also changed outTexCoord from varying to out. The varying keyword is deprecated from version 300 es and requires changing for the shader to work.Note that Vertex Attribute qualifiers and
#version 300 es are supported from OpenGL ES 3.0. The desktop equivalent is supported on OpenGL 3.3 and using #version 330.Now you know your position attributes always at 0 and your texture coordinates will be at 1 and you can now bind your shader format without using
glGetAttribLocation:const int ATTRIB_POS = 0; const int ATTRIB_UV = 1; glVertexAttribPointer( ATTRIB_POS, 4, GL_FLOAT, GL_FALSE, 0, 0 ); glVertexAttribPointer( ATTRIB_UV, 2, GL_FLOAT, GL_FALSE, 0, 0 );This simple change leads to a cleaner pipeline, simpler code and saved performance during loading time.
To learn more about performance on Android, check out the Android Performance Patterns series.
Posted by Shanee Nishry, Games Developer Advocate


Source: Android Developers Blog
Using the Hardware Scaler for Performance and Efficiency
Posted by Hak Matsuda and Dirk Dougherty, Android Developer Relations team
If you develop a performance-intensive 3D game, you’re always looking for ways to give users richer graphics, higher frame rates, and better responsiveness. You also want to conserve the user’s battery and keep the device from getting too warm during play. To help you optimize in all of these areas, consider taking advantage of the hardware scaler that’s available on almost all Android devices in the market today.
How it works and why you should use it
Virtually all modern Android devices use a CPU/GPU chipset that includes a hardware video scaler. Android provides the higher-level integration and makes the scaler available to apps through standard Android APIs, from Java or native (C++) code. To take advantage of the hardware scaler, all you have to do is render to a fixed-size graphics buffer, rather than using the system-provided default buffers, which are sized to the device's full screen resolution.
When you render to a fixed-size buffer, the device hardware does the work of scaling your scene up (or down) to match the device's screen resolution, including making any adjustments to aspect ratio. Typically, you would create a fixed-size buffer that's smaller than the device's full screen resolution, which lets you render more efficiently — especially on today's high-resolution screens.
Using the hardware scaler is more efficient for several reasons. First, hardware scalers are extremely fast and can produce great visual results through multi-tap and other algorithms that reduce artifacts. Second, because your app is rendering to a smaller buffer, the computation load on the GPU is reduced and performance improves. Third, with less computation work to do, the GPU runs cooler and uses less battery. And finally, you can choose what size rendering buffer you want to use, and that buffer can be the same on all devices, regardless of the actual screen resolution.
Optimizing the fill rate
In a mobile GPU, the pixel fill rate is one of the major sources of performance bottlenecks for performance game applications. With newer phones and tablets offering higher and higher screen resolutions, rendering your 2D or 3D graphics on those those devices can significantly reduce your frame rate. The GPU hits its maximum fill rate, and with so many pixels to fill, your frame rate drops.

Power consumed in the GPU at different rendering resolutions, across several popular chipsets in use on Android devices. (Data provided by Qualcomm).
To avoid these bottlenecks, you need to reduce the number of pixels that your game is drawing in each frame. There are several techniques for achieving that, such as using depth-prepass optimizations and others, but a really simple and effective way is making use of the hardware scaler.
Instead of rendering to a full-size buffer that could be as large as 2560x1600, your game can instead render to a smaller buffer — for example 1280x720 or 1920x1080 — and let the hardware scaler expand your scene without any additional cost and minimal loss in visual quality.
Reducing power consumption and thermal effects
A performance-intensive game can tend to consume too much battery and generate too much heat. The game’s power consumption and thermal conditions are important to users, and they are important considerations to developers as well.
As shown in the diagram, the power consumed in the device GPU increases significantly as rendering resolution rises. In most cases, any heavy use of power in GPU will end up reducing battery life in the device.
In addition, as CPU/GPU rendering load increases, heat is generated that can make the device uncomfortable to hold. The heat can even trigger CPU/GPU speed adjustments designed to cool the CPU/GPU, and these in turn can throttle the processing power that’s available to your game.
For both minimizing power consumption and thermal effects, using the hardware scaler can be very useful. Because you are rendering to a smaller buffer, the GPU spends less energy rendering and generates less heat.
Accessing the hardware scaler from Android APIs
Android gives you easy access to the hardware scaler through standard APIs, available from your Java code or from your native (C++) code through the Android NDK.
All you need to do is use the APIs to create a fixed-size buffer and render into it. You don’t need to consider the actual size of the device screen, however in cases where you want to preserve the original aspect ratio, you can either match the aspect ratio of the buffer to that of the screen, or you can adjust your rendering into the buffer.
From your Java code, you access the scaler through SurfaceView, introduced in API level 1. Here’s how you would create a fixed-size buffer at 1280x720 resolution:
surfaceView = new GLSurfaceView(this);
surfaceView.getHolder().setFixedSize(1280, 720);
If you want to use the scaler from native code, you can do so through the NativeActivity class, introduced in Android 2.3 (API level 9). Here’s how you would create a fixed-size buffer at 1280x720 resolution using NativeActivity:
int32_t ret = ANativeWindow_setBuffersGeometry(window, 1280, 720, 0);
By specifying a size for the buffer, the hardware scaler is enabled and you benefit in your rendering to the specified window.
Choosing a size for your graphics buffer
If you will use a fixed-size graphics buffer, it's important to choose a size that balances visual quality across targeted devices with performance and efficiency gains.
For most performance 3D games that use the hardware scaler, the recommended size for rendering is 1080p. As illustrated in the diagram, 1080p is a sweet spot that balances a visual quality, frame rate, and power consumption. If you are satisfied with 720p, of course you can use that size for even more efficient operations.
More information
If you’d like to take advantage of the hardware scaler in your app, take a look at the class documentation for SurfaceView or NativeActivity, depending on whether you are rendering through the Android framework or native APIs.
