Tag Archives: Partners

Introducing Network Policy support for Google Container Engine, with Project Calico and Tigera


[Editor’s Note: Today we announced the beta of Kubernetes Network Policy in Google Container Engine, a feature we implemented in close collaboration with our partner Tigera, the company behind Project Calico. Read on for more details from Tigera co-founder and vice president of product, Andy Randall.]

When it comes to network policy, a lot has changed. Back in the day, we protected enterprise data centers with a big expensive network appliance called a firewall that allowed you to define rules about what traffic to allow in and out of the data center. In the cloud world, virtual firewalls provide similar functionality for virtual machines. For example, Google Compute Engine allows you to configure firewall rules on VPC networks.

In a containerized microservices environment such as Google Container Engine, network policy is particularly challenging. Traditional firewalls provide great perimeter security for intrusion from outside the cluster (i.e. “north-south” traffic), but aren’t designed for “east-west” traffic within the cluster at a finer-grained level. And while Container Engine automates the creation and destruction of containers (each with its own IP address), not only do you have many more IP endpoints than you used to, the automated create-run-destroy life-cycle of a container can result in churn up to 250x that of virtual machines.

Traditional firewall rules are no longer sufficient for containerized environments; we need a more dynamic, automated approach that is integrated with the orchestrator. (For those interested in why we can’t just continue with traditional virtual network / firewall approaches, see Christopher Liljenstolpe’s blog post, Micro-segmentation in the Cloud Native World.)


We think the Kubernetes Network Policy API and the Project Calico implementation present a solution to this challenge. Given Google’s leadership role in the community, and its commitment to running Container Engine on the latest Kubernetes release, it’s only natural that they would be the first to include this capability in their production hosted Kubernetes service, and we at Tigera are delighted to have helped support this effort.


Kubernetes Network Policy 1.0

What exactly does Kubernetes Network Policy let you do? Kubernetes Network Policy allows you to easily specify the connectivity allowed within your cluster, and what should be blocked. (It is a stable API as of Kubernetes v1.7.)

You can find the full API definition in the Kubernetes documentation but the key points are as follows:
  • Network policies are defined by the NetworkPolicy resource type. These are applied  to the Kubernetes API server like any other resource (e.g., kubectl apply -f my-network-policy.yaml).
  • By default, all pods in a namespace allow unrestricted access. That is, they can accept incoming network connections from any source.
  • A NetworkPolicy object contains a selector expression (“podSelector”) that selects a set of pods to which the policy applies, and the rules about which incoming connections will be allowed (“ingress” rules). Ingress rules can be quite flexible, including their own namespace selector or pod selector expressions.
  • Policies apply to a namespace. Every pod in that namespace selected by the policy’s podSelector will have the ingress rules applied, so any connection attempts that are not explicitly allowed are rejected. Calico enforces this policy extremely efficiently using iptables rules programmed into the underlying host’s kernel. 


Here is an example NetworkPolicy resource to give you a sense of how this all fits together:

apiVersion: networking.k8s.io/v1
kind: NetworkPolicy
metadata:
  name: test-network-policy
spec:
  podSelector:
    matchLabels:
      role: db
  ingress:
  - from:
    - namespaceSelector:
        matchLabels:
          project: myproject
    - podSelector:
        matchLabels:
          role: frontend
    ports:
    - protocol: TCP
      port: 6379


In this case, the policy is called “test-network-policy” and applies to the default namespace. It restricts inbound connections to every pod in the default namespace that has the label “role: db” applied. The selectors are disjunctive, i.e., either can be true. That means that connections can come from any pod in a namespace with label “project: myproject”, OR any pod in the default namespace with the label “role: frontend”. Further, these connections must be on TCP port 6379 (the standard port for Redis).

As you can see, Network Policy is an intent-based policy model, i.e., you specify your desired end-state and let the system ensure it happens. As pods are created and destroyed, or a label (such as “role: db”) is applied or deleted from existing pods, you don’t need to update anything: Calico automatically takes care of things behind the scenes and ensures that every pod on every host has the right access rules applied.

As you can imagine, that’s quite a computational challenge at scale, and Calico’s policy engine contains a lot of smarts to meet Container Engine’s production performance demands. The good news is that you don’t need to worry about that. Just apply your policies and Calico takes care of the rest.


Enabling Network Policy in Container Engine

For new and existing clusters running at least Kubernetes v1.7.6, you can enable network policy on Container Engine via the UI, CLI or API. For new clusters, simply set the flag (or check the box in the UI) when creating the cluster. For existing clusters there is a two-step process:
  1. Enable the network policy add-on on the master.
  2. Enable network policy for the entire cluster’s node-pools.
Here’s how to do that during cluster creation:

# Create a cluster with Network Policy Enabled
gcloud beta container clusters create <CLUSTER> --project=<PROJECT_ID> 
--zone=&ltZONE> --enable-network-policy --cluster-version=1.7.6


Here’s how to do it for existing clusters:
# Create a cluster with Network Policy Enabled

# Enable the addon
gcloud beta container clusters update <CLUSTER> --project=<PROJECT_ID> 
--zone=<ZONE>--update-addons=NetworkPolicy=ENABLE

# Enable on nodes (This re-creates the node pools)
gcloud beta container clusters update <CLUSTER> --project=<PROJECT_ID> 
--zone=<ZONE> --enable-network-policy

Looking ahead 

Environments running Kubernetes 1.7 can use the NetworkPolicy API capabilities that we discussed above, essentially ingress rules defined by selector expressions. However, you can imagine wanting to do more, such as:

  • Applying egress rules (restricting which outbound connections a pod can make) 
  • Referring to IP addresses or ranges within rules 

The good news is that the new Kubernetes 1.8 includes these capabilities, and Google and Tigera are working together to make them available in Container Engine. And, beyond that, we are working on even more advanced policy capabilities. Watch this space!

Attend our joint webinar! 

Want to learn more? Google Product Manager Matt DeLio will join Casey Davenport, the Kubernetes Networking SIG leader and a software engineer at Tigera, to talk about best practices and design patterns for securing your applications with network policy. Register here for the October 5th webinar.

How to analyze Fastly real-time streaming logs with BigQuery


[Editor’s note: Today we hear from Fastly, whose edge cloud platform allows web applications to better serve global users with services for content delivery, streaming, security and load-balancing. In addition to improving response times for applications built on Google Cloud Platform (GCP), Fastly now supports streaming its logs to Google Cloud Storage and BigQuery, for deeper analysis. Read on to learn more about the integration and how to set it up in your environment.] 

Fastly’s collaboration with Google Cloud combines the power of GCP with the speed and flexibility of the Fastly edge cloud platform. Private interconnects with Google at 14 strategic locations across the globe give GCP and Fastly customers dramatically improved response times to Google services and storage for traffic going over these interconnects.

Today, we’ve announced our BigQuery integration; we can now stream real-time logs to Google Cloud Storage and BigQuery, allowing companies to analyze unlimited amounts of edge data. If you’re a Fastly customer, you can get actionable insights into website page views per month and usage by demographic, geographic location and other dimensions. You can use this data to troubleshoot connectivity problems, pinpoint configuration areas that need performance tuning, identify the causes of service disruptions and improve your end users’ experience. You can even combine Fastly log data with other data sources such as Google Analytics, Google Ads data and/or security and firewall logs using a BigQuery table. You can save Fastly’s real-time logs to Cloud Storage for additional redundancy; in fact, many customers back up logs directly into Cloud Storage from Fastly.
A Fastly POP fronts a GCP-based application, and streams its logs to BigQuery

Let’s look at how to set up and start using Cloud Storage and BigQuery to analyze Fastly logs.

Fastly / BigQuery quick setup 


Before adding BigQuery as a logging endpoint for Fastly services, you need to register for a Cloud Storage account and create a Cloud Storage bucket. Once you've done that, follow these steps to integrate with Fastly.
  1. Create a Google Cloud service account
    BigQuery uses service accounts for third-party application authentication. To create a new service account, see Google's guide on generating service account credentials. When you create the service account, set the key type to JSON.  

  2. Obtain the private key and client email
    Once you’ve created the service account, download the service account JSON file. This file contains the credentials for your BigQuery service account. Open the file and make a note of the private_key and client_email.

  3. Enable the BigQuery API (if not already enabled)
    To send your Fastly logs to your Cloud Storage bucket, you'll need to enable the BigQuery API in the GCP API Manager. 

  4. Create the BigQuery dataset
    After you've enabled the BigQuery API, follow these instructions to create a BigQuery dataset:
    • Log in to BigQuery.
    • Click the arrow next to your account name on the sidebar and select Create new dataset.
    • The Create Dataset window appears.

    • In the Dataset ID field, type a name for the dataset (e.g., fastly_bigquery), and click the OK button. 
  5. Add a BigQuery table

    After you've created the BigQuery dataset, you'll need to add a BigQuery table. There are three ways of creating the schema for the table:
    1. Edit the schema using the BigQuery web interface
    2. Edit the schema using the text field in the BigQuery web interface
    3. Use an existing table
    We recommend creating a new table and creating the schema using the user interface. However, you can also edit a text-based representation of the table schema. In fact, you can switch between the text version and the UI at any time. For your convenience, at the bottom of this blogpost we've included an example of the logging format to use in the Fastly user interface and the corresponding BigQuery schema in text format. Note: It's important that the data you send to BigQuery from Fastly matches the schema for the table, or it could result in the data being corrupted or just silently being dropped.

    As per the BigQuery documentation, click the arrow next to the dataset name on the sidebar and select Create new table.
    The Create Table page appears:
    • In the Source Data section, select Create empty table.
    • In the Table name field, type a name for the table (e.g., logs).
    • In the Schema section of the BigQuery website, use the interface to add fields and complete the schema. Click the Create Table button.

  6. Add BigQuery as a logging endpoint
    Follow these instructions to add BigQuery as a logging endpoint:
    • Review the information in our Setting Up Remote Log Streaming guide.
    • Click the BigQuery logo. The Create a BigQuery endpoint page appears:
    • Fill out the Create a BigQuery endpoint fields as follows:
      • In the Name field, supply a human-readable endpoint name.
      • In the Log format field, enter the data to send to BigQuery. See the example format section for details.
      • In the Email field, type the client_email address associated with the BigQuery account.
      • In the Secret key field, type the secret key associated with the BigQuery account.
      • In the Project ID field, type the ID of your GCP project.
      • In the Dataset field, type the name of your BigQuery dataset.
      • In the Table field, type the name of your BigQuery table.
      • In the Template field, optionally type an strftime compatible string to use as the template suffix for your table.
    • Click Create to create the new logging endpoint.
    • Click the Activate button to deploy your configuration changes. 

Formatting JSON objects to send to BigQuery 

The data you send to BigQuery must be serialized as a JSON object, and every field in the JSON object must map to a string in your table's schema. The JSON can have nested data in it (e.g., the value of a key in your object can be another object). Here's an example format string for sending data to BigQuery:
{
  "timestamp":"%{begin:%Y-%m-%dT%H:%M:%S%z}t",
  "time_elapsed":%{time.elapsed.usec}V,
  "is_tls":%{if(req.is_ssl, "true", "false")}V,
  "client_ip":"%{req.http.Fastly-Client-IP}V",
  "geo_city":"%{client.geo.city}V",
  "geo_country_code":"%{client.geo.country_code}V",
  "request":"%{req.request}V",
  "host":"%{req.http.Fastly-Orig-Host}V",
  "url":"%{cstr_escape(req.url)}V",
  "request_referer":"%{cstr_escape(req.http.Referer)}V",
  "request_user_agent":"%{cstr_escape(req.http.User-Agent)}V",
  "request_accept_language":"%{cstr_escape(req.http.Accept-Language)}V",
  "request_accept_charset":"%{cstr_escape(req.http.Accept-Charset)}V",
  "cache_status":"%{regsub(fastly_info.state, "^(HIT-(SYNTH)|(HITPASS|HIT|MISS|PASS|ERROR|PIPE)).*", "\\2\\3") }V"
}

Example BigQuery schema 

The textual BigQuery schema for the example format shown above would look something like this:
timestamp:STRING,time_elapsed:FLOAT,is_tls:BOOLEAN,client_ip:STRING,geo_city:STRING,geo_co
untry_code:STRING,request:STRING,host:STRING,url:STRING,request_referer:STRING,request_use
r_agent:STRING,request_accept_language:STRING,request_accept_charset:STRING,cache_status:S
TRING
When creating your BigQuery table, click on the "Edit as Text" link and paste this example in.

Get started now

Congratulations! You’ve just configured Fastly to send its logs in real time to Cloud Storage and BigQuery, where you can easily analyze them to better understand how users are interacting with your applications. Please contact us with any questions. If you’re a current customer, we’d love to hear about how you're using Fastly and GCP. And if you’re new to Fastly, you can try it out for free; simply sign up here to get going.

Introducing automated deployment to Kubernetes and Google Container Engine with Codefresh


Editor’s Note: Today we hear from our partner Codefresh, which just launched a deep integration with Google Container Engine to make it easier to deploy containers to Kubernetes. Read on for more details about the integration and how to automate deployments to Container Engine in just a few minutes.

Codefresh is an opinionated toolchain for delivering containers. Our customers use it to handle both the automated and manual tasks associated with building, testing, debugging and deploying containers. Container-based applications running on Kubernetes are more scalable and reliable, and we want to streamline the process for getting containers deployed. That’s why we’re proud to announce Codefresh’s 10-minute setup for deploying to Kubernetes.

We’ve tested this integration with new and advanced users. Novice Kubernetes users tell us that Codefresh makes it incredibly easy to get their applications deployed to Kubernetes. Advanced users tell us that they like how they can easily access the full features of Kubernetes and configure them for their applications.

How to start deploying to Kubernetes in four steps

In just a few steps, you can get up and running with Codefresh and start deploying containers to Kubernetes. Here’s a short video that shows how it’s done.

Alternately, here’s an overview:

Step 1: Create cluster On Google Cloud
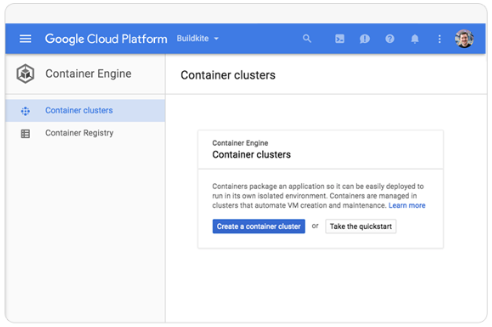
From Google Cloud Console, Navigate to Container Engine and click "Create a container cluster."
Step 2: Connect Codefresh to Google Cloud Platform (GCP)
Login to Codefresh (it’s free), go to Admin->Integrations and login with Google.
Step 3: Add a cluster
Once you’ve added a cluster, it’s available in automated pipelines and manual image deployments.
Step 4: Start deploying!
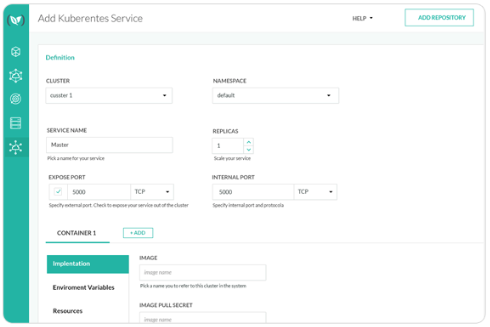
Set ports, replicas, expose services or just let the defaults be your guide.
Step 5 (optional): Tweak generated Yaml files
Codefresh’s configuration screens also generate deployment.yml and pod.yml files, which you can then edit directly. Advanced users can use their own yml files and let Codefresh handle the authentication, deployment, etc.

Connecting the build, test, deploy pipeline

Once you’ve configured Codefresh and GCP, you can automate deployment with testing, approval workflows and certification. With Codefresh, developers and DevOps teams can agree upfront on rules and criteria for when images should go to manual testing, onto canary clusters or deployment in production.
Further, this mix of infrastructure and automation allows teams to iterate faster and ultimately provide higher-quality code changes.

Join us for a webinar co-hosted by GCP and Codefresh

Want to learn more? Google Container Engine Product Manager, William Denniss, will join Full-Stack Developer, Dan Garfield of Codefresh to show how development velocity speeds up when connected to a Kubernetes-native pipeline. Register here for the August 30th webinar.

Want to get started deploying to Kubernetes? Codefresh is offering 200 builds per month for free and $500 in GCP credits for new accounts1. Try it out.


1 Terms and conditions apply

Going Hybrid with Kubernetes on Google Cloud Platform and Nutanix


Recently, we announced a strategic partnership with Nutanix to help remove friction from hybrid cloud deployments for enterprises. You can find the announcement blog post here.

Hybrid cloud allows organizations to run a variety of applications either on-premise or in the public cloud. With this approach, enterprises can:
  • Increase the speed at which they're releasing products and features
  • Scale applications to meet customer demand
  • Move applications to the public cloud at their own pace
  • Reduce time spent on infrastructure and increase time spent on writing code
  • Reduce cost by improving resource utilization and compute efficiency
The vast majority of organizations have a portfolio of applications with varying needs. In some cases, data sovereignty and compliance requirements force a jurisdictional deployment model where an application and its data must reside in an on-premises environment or within a country’s boundaries. Alternatively, mobile and IoT applications are characterized with unpredictable consumption models that make the on-demand, pay-as-you-go cloud model the best deployment target for these applications.

Hybrid cloud deployments can help deliver the security, compliance and compute power you require with the agility, flexibility and scale you need. Our hybrid cloud example will encompass three key components:
  1. On-premise: Nutanix infrastructure
  2. Public cloud: Google Cloud Platform (GCP)
  3. Open source: Kubernetes and Containers
Containers provide an immutable and highly portable infrastructure that enables developers to predictably deploy apps across any environment where the container runtime engine can run. This makes it possible to run the same containerized application on bare metal, private cloud or public cloud. However, as developers move towards microservice architectures, they must solve a new set of challenges such as scaling, rolling updates, discovery, logging, monitoring and networking connectivity.

Google’s experience running our own container-based internal systems inspired us to create Kubernetes, and Google Container Engine, an open source and Google Cloud managed platform for running containerized applications across a pool of compute resources. Kubernetes abstracts away the underlying infrastructure, and provides a consistent experience for running containerized applications. Kubernetes introduces the concept of a declarative deployment model. In this model, an ops person supplies a template that describes how the application should run, and Kubernetes ensures the application’s actual state is always equal to the desired state. Kubernetes also manages container scheduling, scaling, health, lifecycle, load balancing, data persistence, logging and monitoring.

In a first phase, the Google Cloud-Nutanix partnership focuses on easing hybrid operations using Nutanix Calm as a single control plane for workload management across both on-premises Nutanix and GCP environments, using Kubernetes as the container management layer across the two. Nutanix Calm was recently announced at Nutanix .NEXT conference and once publicly available, will be used to automate provisioning and lifecycle operations across hybrid cloud deployments. Nutanix Enterprise Cloud OS supports a hybrid Kubernetes environment running on Google Compute Engine in the cloud and a Kubernetes cluster on Nutanix on-premises. Through this, customers can deploy portable application blueprints that run on both an on-premises Nutanix environment as well as in GCP.

Let’s walk through the steps involved in setting up a hybrid environment using Nutanix and GCP.

The steps involved are as follows:
  1. Provision an on premise 4-node Kubernetes cluster using a Nutanix Calm blueprint
  2. Provision a Google Compute Engine 4-node Kubernetes cluster using the same Nutanix Calm Kubernetes blueprint, configured for Google Cloud
  3. Use Kubectl to manage both on premise and Google Cloud Kubernetes clusters
  4. Using Helm, we’ll deploy the same Wordpress chart on both on premise and Google Cloud Kubernetes clusters

Provisioning an on-premise Kubernetes cluster using a Nutanix Calm blueprint

You can use Nutanix Calm to provision a Kubernetes cluster on premise, and Nutanix Prism, an infrastructure management solution for virtualized data centers, to bootstrap a cluster of virtualized compute and storage. This results in a Nutanix managed pool of compute and storage that's now ready to be orchestrated by Nutanix Calm, for one-click deployment of popular commercial and open source packages.
The tools used to deploy the Nutanix and Google hybrid cloud stacks.
You can then select the Kubernetes blueprint to target the Nutanix on-premise environment.

The Calm Kubernetes blueprint pictured below configures a four-node Kubernetes cluster that includes all the base software on all the nodes and the master. We’ve also customized our Kubernetes blueprint to configure Helm Tiller on the cluster, so you can use Helm to deploy a Wordpress chart. Calm blueprints also allow you to create workflows so that configuration tasks can take place in a specified order, as shown below with the “create” action.
Now, launch the Kubernetes Blueprint:
After a couple of minutes, the Kubernetes cluster is up and running with five VMs (one master node and four worker nodes):

Provisioning a Kubernetes cluster on Google Compute Engine with the same Nutanix Calm Kubernetes blueprint

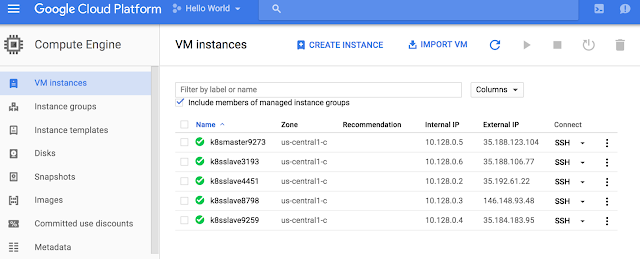
Using Nutanix Calm, you can now deploy the Kubernetes blueprint onto GCP. The Kubernetes cluster is up and running on Compute Engine within a couple of minutes, again with five VMs (one master node + four worker nodes):


You’re now ready to deploy workloads across the hybrid environment. In this example, you'll deploy a containerized WordPress stack.

Using Kubectl to manage both on-premise and Google Cloud Kubernetes clusters

Kubectl is a command line interface tool that comes with Kubernetes to run commands against Kubernetes clusters.

You can now target each Kubernetes cluster across the hybrid environment and use kubectl to run basic commands. First, ssh into your on-premise environment and run a few commands.

# List out the nodes in the cluster

$ kubectl get nodes

NAME          STATUS    AGE
10.21.80.54   Ready     16m
10.21.80.59   Ready     16m
10.21.80.65   Ready     16m
10.21.80.67   Ready     16m

# View the cluster config

$ kubectl config view

apiVersion: v1
clusters:
- cluster:
    server: http://10.21.80.66:8080
  name: default-cluster
contexts:
- context:
    cluster: default-cluster
    user: default-admin
  name: default-context
current-context: default-context
kind: Config
preferences: {}
users: []

# Describe the storageclass configured. This is the Nutanix storage volume plugin for Kubernetes

$ kubectl get storageclass

NAME      KIND
silver    StorageClass.v1.storage.k8s.io

$ kubectl describe storageclass silver

Name:  silver
IsDefaultClass: No
Annotations: storageclass.kubernetes.io/is-default-class=true
Provisioner: kubernetes.io/nutanix-volume

Using Helm, you can deploy the same WordPress chart on both on-premise and Google Cloud Kubernetes clusters

This example uses Helm, a package manager used to install and manage Kubernetes applications. In this example, the Calm Kubernetes blueprint includes Helm as part of the cluster setup. The on-premise Kubernetes cluster is configured with Nutanix Acropolis, a storage provisioning system, which automatically creates Kubernetes persistent volumes for the WordPress pods.

Let’s deploy WordPress on-premise and on Google Cloud:

# Deploy wordpress

$ helm install wordpress-0.6.4.tgz

NAME:   quaffing-crab
LAST DEPLOYED: Sun Jul  2 03:32:21 2017
NAMESPACE: default
STATUS: DEPLOYED

RESOURCES:
==> v1/Secret
NAME                     TYPE    DATA  AGE
quaffing-crab-mariadb    Opaque  2     1s
quaffing-crab-wordpress  Opaque  3     1s

==> v1/ConfigMap
NAME                   DATA  AGE
quaffing-crab-mariadb  1     1s

==> v1/PersistentVolumeClaim
NAME                     STATUS   VOLUME  CAPACITY  ACCESSMODES  STORAGECLASS  AGE
quaffing-crab-wordpress  Pending  silver  1s
quaffing-crab-mariadb    Pending  silver  1s

==> v1/Service
NAME                     CLUSTER-IP     EXTERNAL-IP  PORT(S)                     AGE
quaffing-crab-mariadb    10.21.150.254         3306/TCP                    1s
quaffing-crab-wordpress  10.21.150.73       80:32376/TCP,443:30998/TCP  1s

==> v1beta1/Deployment
NAME                     DESIRED  CURRENT  UP-TO-DATE  AVAILABLE  AGE
quaffing-crab-wordpress  1        1        1           0          1s
quaffing-crab-mariadb  


Then, you can run a few kubectl commands to browse the on-premise deployment.

# Take a look at the persistent volume claims 

$ kubectl get pvc

NAME                      STATUS    VOLUME                                                                               CAPACITY   ACCESSMODES   AGE
quaffing-crab-mariadb     Bound     94d90daca29eaafa7439b33cc26187536e2fcdfc20d78deddda6606db506a646-nutanix-k8-volume   8Gi        RWO           1m
quaffing-crab-wordpress   Bound     764e5462d809a82165863af8423a3e0a52b546dd97211dfdec5e24b1e448b63c-nutanix-k8-volume   10Gi       RWO           1m

# Take a look at the running pods

$ kubectl get po

NAME                                      READY     STATUS    RESTARTS   AGE
quaffing-crab-mariadb-3339155510-428wb    1/1       Running   0          3m
quaffing-crab-wordpress-713434103-5j613   1/1       Running   0          3m

# Take a look at the services exposed

$ kubectl get svc

NAME                      CLUSTER-IP      EXTERNAL-IP   PORT(S)                      AGE
kubernetes                10.254.0.1              443/TCP                      16d
quaffing-crab-mariadb     10.21.150.254           3306/TCP                     4m
quaffing-crab-wordpress   10.21.150.73    #.#.#.#     80:32376/TCP,443:30998/TCP   4m


This on-premise environment did not have a load balancer provisioned, so we used the cluster IP to browse the WordPress site. The Google Cloud WordPress deployment automatically assigned a load balancer to the WordPress service along with an external IP address.

Summary

  • Nutanix Calm provided a one-click consistent deployment model to provision a Kubernetes cluster on both Nutanix Enterprise Cloud and Google Cloud.
  • Once the Kubernetes cluster is running in a hybrid environment, you can use the same tools (Helm, kubectl) to deploy containerized applications targeting the respective environment. This represents a “write once deploy anywhere” model. 
  • Kubernetes abstracts away the underlying infrastructure constructs, making it possible to consistently deploy and run containerized applications across heterogeneous cloud environments

Next steps


Partnering on open source: Google and Ansible engineers on managing GCP infrastructure


It's time for the third chapter in the Partnering on open source series. This time around, we cover some of the work we’ve done with Ansible, a popular open source IT automation engine, and how to use it to provision, manage and orchestrate Google Cloud Platform (GCP) resources.

Ansible, by Red Hat, is a simple automation language that can perfectly describe an IT application infrastructure on GCP including virtual machines, disks, network load-balancers, firewall rules and more. In this series, I'll walk you through my former life as a DevOps engineer at a satellite space imaging company. You'll get a glimpse into how I used Ansible to update satellites in orbit along with other critical infrastructure that serve imagery to interested viewers around the globe.

In this first video, we set the stage and talk about Ansible in general, before diving into hands-on walkthroughs in subsequent episodes.


Upcoming videos demonstrate how to use Ansible and GCP to:

  • Apply a camera-settings hotfix to a satellite orbiting Earth by spinning up a Google Compute Engine instance, testing the latest satellite image build and pushing the settings to the satellite.
  • Provision and manage GCP's advanced networking features like globally available load-balancers with L7 routing to serve satellite ground images on a public website.
  • Create a set of networks, routes and firewall rules with security rules to help isolate and protect the various systems involved in the imagery processing pipeline. The raw images may contain sensitive data that must be appropriately screened and scrubbed before being added to the public image repository and network security is critical.

The series wraps up with a demonstration of how to extend Ansible's capabilities by writing custom modules. The videos in this series make use of custom and publicly available modules for GCP.

Join us on YouTube to watch the upcoming videos or go back and watch the other videos on the series. You can also follow Google Cloud on YouTube, or @GoogleCloud on Twitter to find out when new videos are published. And stay tuned for more blog posts and videos about work we’re doing with open-source providers like Puppet, Chef, Cloud Foundry, Red Hat, SaltStack and others.

Join the Intelligent App Challenge brought to you by SAP and Google Cloud


Does your organization use SAP? At SAP SAPPHIRE last month, Nan Boden, Google Cloud head of Global Technology Partners, announced the Intelligent App Challenge designed to encourage innovative integrations between the SAP and Google Cloud ecosystems, and we’re accepting submissions through August 1, 2017. Winning entries could receive up to US $20,000 in GCP credits, tickets to SAP TechEd '17 and SAP Sapphire '18, and on-stage presence at SAP TechEd '17.

Earlier this year, we announced a strategic partnership with SAP at Google Cloud Next '17 with a focus on developing and integrating Google’s best cloud and machine learning solutions with SAP enterprise applications. The partnership includes certification of the in-memory database SAP HANA on Google Cloud Platform (GCP), new G Suite integrations, Google’s machine learning capabilities and data governance collaboration. It also offers Google Cloud and SAP customers more scope, scalability and opportunities to create new products, and has already resulted in the certification of several SAP products on GCP.

The SAP + GCP collaboration allows developers to take advantage of SAP’s in-memory database running on GCP to store and index large amounts of transactional (OLTP) and analytical (OLAP) data in HANA, and combine it with GCP to use it in new ways. For example, you could build sophisticated and large-scale machine learning (ML) models without needing to transport or transform large subsets of data, or build out the ML infrastructure required to consume and analyze this information. Use Google Cloud Machine Learning tools and APIs along with SAP HANA, express edition to design intelligent business applications such as fraud detection, recommendation engines, talent engagement, intelligent campaign management, conversational interfaces, etc.

We're excited to see how the ecosystem of partners of SAP and Google take our platform and use it to solve pressing business challenges. It’s our platform, and your imagination  to build solutions that solve customer problems in new and unique ways.

Entries to the Intelligent App Challenge must be built on GCP with SAP HANA, express edition. Extra consideration will be given to entries who use Machine Learning tools and capabilities.

Registered applicants for the Intelligent App Challenge will also have access to a number of resources and tutorials. Judges will include industry experts, developers, mentors and industry analysts.

Please visit the Intelligent App Challenge page to learn more, or register your company today.

Solution guide: Best practices for migrating Virtual Machines


Migrating to the cloud can be a challenging project for any sized company. There are many different considerations in migrations, but one of the core tasks is to migrate virtual machines. Due to the variety of hardware, hypervisors and operating systems in use today, this can be a complex and daunting prospect.

The customer engineering team at Google Cloud has helped a number of customers migrate to GCP - customers like Spotify and Evernote. Based on those experiences and our understanding of how our own cloud works, we've released an article describing our recommended best practices on migrating virtual machines.

One of the tools that can help customers move to Google Cloud is CloudEndure. CloudEndure powers the Google VM Migration Service, and can simplify the process of moving virtual machines. CloudEndure joined us in this article with practical case studies of migrations that they've done for various customers.

We hope you find this article helpful while migrating to the cloud. If you decide to use the Migration Service, take a look at our tutorial to help guide you through the process.

Guest post: Supercharging container pipelines with Codefresh and Google Cloud


[Editor’s note: Today we hear from Codefresh, which makes a Docker-native continuous integration/continuous delivery (CI/CD) platform. Read on to learn how Codefresh’s recent integrations with Kubernetes and Google Container Registry will make it easier for you to build, test and deploy your cloud-native applications to Google Cloud, including Container Engine and Kubernetes.]

Traditional pipelines weren’t designed with containers and cloud services in mind. At Codefresh, we’ve built our platform specifically around Docker and cloud services to simplify the entire pipeline and make it easier to build, test and deploy web apps. We recently partnered with Google Cloud to add two key features into our platform: an embedded registry (powered by Google’s own Container Registry) and one-click deploy to Google Container Engine.

Advantages of an embedded registry

Codefresh’s embedded registry doesn’t replace production registries but rather provides a developer-focused registry for testing and development. The production registry becomes a single source of truth for production grade images, while Codefresh’s embedded registry maintains the images needed for development.

This approach has a couple of other big advantages:
  • Image quality control is higher since it’s built right into the test flow
  • Build-assist images (for example, those used with Java and other compiled languages) stay nicely organized in the dev space
  • Codefresh extends the images with valuable metadata (e.g., test results, commit info, build SHA, logs, issue id, etc.), creating a sandbox-like registry for developers
  • Build speed is faster since the embedded registry is "closer" to the build machines
The embedded registry also allows developers to call images by tag and extended metadata from the build flow. For example, if you want to test a service based on how it works with different versions of another service, you can reference images based on their git commit ID (build SHA).

To try out the embedded registry, you’ll need to join the beta.

One-click deploy to Kubernetes

We manage the Codefresh production environment with Kubernetes running on Container Engine. Because we use Codefresh to build, test and deploy Codefresh itself, we wanted to make sure there was a simple way to deploy to Kubernetes. To do that, we’re adding Kubernetes deployment images to Codefresh, available both in the UI and Codefresh YAML. The deploy images contain a number of scripts that make pushing new images a simple matter of passing credentials. This makes it easy to automate the deployments, and when paired with branch permissions, makes it easy for anyone authorized to approve and push code to production.

To try this feature in Codefresh, just select the deploy script in the pipeline editor and add the needed build arguments. For more information checkout our documentation on deploying to Kubernetes.

Or add this code to your Codefresh.yml

deploy-to-kubernetes-staging:
    image: codefreshio/kubernetes-deployer:master
    tag: latest
    working-directory: ${{initial-clone}}
commands:
      - /deploy/bin/deploy.sh ./root
    environment:
      - ENVIRONMENT=${{ENVIRONMENT}}
      - KUBERNETES_USER=${{KUBERNETES_USER}}
      - KUBERNETES_PASSWORD=${{KUBERNETES_PASSWORD}}
      - KUBERNETES_SERVER=${{KUBERNETES_SERVER}}
      - DOCKER_IMAGE_TAG=${{CF_REVISION}}

Migrating to Google Cloud’s Container Engine

For those migrating to Container Engine or another Kubernetes environment, the Codefresh deploy images simplify everything. Pushing to Kubernetes is cloud agnostic  just point it at your Kubernetes deployment, and you’re good to go.

About Codefresh, CI/CD for Docker

Codefresh is CI for Docker used by open source and business. We automatically deploy and scale build and test infrastructure for each Docker image. We also deploy shareable environments for every code branch. Check it out https://codefresh.io/ and join the embedded registry beta.

Enterprise Slack apps on Google Cloud–now easier than ever


Slack recently announced a new, streamlined path to building apps, opening the door to corporate engineers to build fully featured internal integrations for companies of all sizes.

You can now make an app that supports any Slack API feature such as message buttons, threads and the Events API without having to enable app distribution. This means you can keep the app private to your team as an internal integration.
With support for the Events API in internal integrations, you can now use platforms like Google App Engine or Cloud Functions to host a Slack bot or app just for your team. Even if you're building an app for multiple teams, internal integrations let you focus on developing your app logic first and wait to implement the OAuth2 flow for distribution until you're ready.

We've updated the Google Cloud Platform samples for Slack to use this new flow. With samples for multiple programming languages, including Node.js, Java, and Go, it's easier than ever to get started building Slack apps on Google Cloud Platform (GCP).

Slack bots also made an appearance at Google Cloud Next '17. Check out the video for best practices for building bots for the enterprise from Amir Shevat, head of developer relations at Slack, and Alan Ho from Google Cloud.


Questions? Comments? Come chat with us on the #bots channel in the Google Cloud Platform Slack community.