Tag Archives: Compute

GCP Podcast hits 100 episodes — here are the 10 most popular episodes


It was 2015, and we were having coffee in a Google cafeteria when we, Francesc and Mark, came up with the idea for the Google Cloud Platform Podcast. Shortly thereafter, the first episode “We Got a Podcast” was released on the internet. And now, after years of interviewing Google Cloud Platform (GCP) customers, product managers, engineers, developer experts, salespeople, support staff and more, we’ve released our 100th episode!

To celebrate this milestone, we invited as our guest the venerable Vint Cerf, who's one of the “Fathers of the Internet,” having co-designed the TCP/IP protocols and the architecture of the internet, and who is currently vice president and Chief Internet Evangelist at Google. We talked to him about the history of the internet, net neutrality, the next billion users, interplanetary networks and more. His interview is totally amazing and you should definitely listen to it.

It also got us thinking about all the other amazing interviews we’ve done over the years. If you aren’t familiar with the Google Cloud Platform Podcast — or if you just want to relive the glory — here are the top 10 most downloaded episodes since it was introduced:

10. #93 What's AI with Melanie Warrick 
Fellow Developer Advocate, Melanie talks to us all about the differences between ML and AI, as well as discussing applications and where she sees this technology going in the future.

9. #82 Prometheus with Julius Volz 
Julius, co-founder of open source monitoring platform Prometheus talks to us all about the history of the platform as well as its capabilities as a monitoring and alerting system.

8. #90 Office of the CTO with Greg DeMichillie 
Greg DeMichillie talks about how GCP interacts with enterprise customers through the Office of the CTO, and lessons that he learned from them.

7. #56 A Year in Review
A review of Mark and Francesc’s favorite moments of 2016 — a great historical snapshot of the technology of GCP in 2016.
6. #76 Kubernetes 1.6 with Daniel Smith
We’re joined by one of the engineers on Kubernetes, Daniel Smith, and we talk in depth about the new features of Kubernetes 1.6, and how developers can take advantage of them. (Mark really nerds out on this one).

5. #62 Cloud Spanner with Deepti Srivastava
Cloud Spanner has been a hugely popular product for GCP, and we talk to Product Manager Deepti Srivastava about why it’s so technologically amazing as well as a game changer for customers looking for a distributed, horizontally scalable database.

4. #71 Cloud Machine Learning Engine with Yufeng Guo 
Another Developer Advocate, Yufeng, comes onto the podcast to introduce us to machine learning, and discuss how Cloud Machine Learning Engine can be used to train, as well as host, TensorFlow models.

3. #75 Container Engine with Chen Goldberg 
We're delighted to have Chen, Google Engineering Director for Container Engine and Kubernetes, to talk with us about the history of Kubernetes and why it’s open source, as well the integrations between Container Engine and GCP that make it so special.

2. #91 The Future of Media with Machine Learning with Amit Pande 
This is a fantastic episode with Amit, Product Management Leader for Google Cloud, to provide practical examples of how machine learning could be applied to the media and entertainment industry. Many things were learned!

1. #88 Kubernetes 1.7 with Tim Hockin 
One of the engineers that started the Kubernetes project, Tim comes onto the podcast to tell us all about the new feature of Kubernetes 1.7. Also, Tim is a super nice guy.

Lastly, the Google Cloud Platform Podcast would like to say thank you to all you listeners that have downloaded the podcast, the interviewees that gave us their time and all the people behind the scenes that helped edit, promote, procure equipment and more. Without all of you, the 100th episode would never have been possible.

To listen to more GCP podcasts, visit gcppodcast.com, or search for it in your favorite podcast app. See you all next week!

Looking back on our migration from bare metal to GCP: Sentry


[Editor’s note: Is the thought of migrating to Google Cloud Platform (GCP) simultaneously exciting and daunting? You’re not alone. This summer, after months of planning, Sentry took the plunge and moved its hosted open-source error tracking service from a bare-metal provider to GCP. Read on to learn about why it decided to switch and how it settled on its migration game-plan.]

It was the first weekend in July. And because we’re in San Francisco, it was so foggy and windy that we may as well have been huddled inside an Antarctic research station trying to avoid The Thing.

The Sentry operations team had gathered at HQ in SOMA to finish migrating our infrastructure to GCP. The previous two and a half months had been tireless (and tiring), but we finished the day by switching over sentry.io’s DNS records and watched as traffic slowly moved from our colo provider in Texas to us-central1 in Iowa.

We’ve now gone several months without dedicated hardware, with no downtime along the way, and we feel good about having made the switch from bare metal to a cloud provider. Here’s what we learned along the way.

It’s all about meeting unpredictable demand

As an error tracking service, Sentry’s traffic is naturally unpredictable, as there’s simply no way to foresee when a user’s next influx of events will be. On bare metal, we handled this by preparing for the worst(ish) and over-provisioning machines in case of a spike. We’re hardly the only company to do this; it’s a popular practice for anyone running on dedicated hardware. And since providers often compete on price, users like us reap the benefits of cheap computing power.

Unfortunately, as demand grew, our window for procuring new machines shrunk. We demanded more from our provider, requesting machines before we really needed them and kept them idle for days on end. This was exacerbated when we needed bespoke machines, since databases and firewalls took even more time to piece together than commodity boxes.

But even in the best case, you still had an onsite engineer sprinting down the floor clutching a machine like Marshawn Lynch clutches a football. It was too nerve-wracking. We made the decision to switch to GCP because the machines are already there, they turn on in seconds after we request them, and we only pay for them when they’re on.

Building the bridge is harder than crossing it

We decided that migrating to GCP was possible in April, and the operations team spent the next two months working diligently to make it happen. Our first order of business: weed out all the single data center assumptions that we’d made. Sentry was originally constructed for internal services communicating across the room from each other. Increasing that distance to hundreds of miles during the migration would change behaviour in ways that we never planned for. At the same time, we wanted to make certain that we could sustain the same throughput between two providers during the migration that we previously sustained inside of only one.

The first fork in the road that we came to was the literal network bridge. We had two options: Maintain our own IPsec VPN or encrypt arbitrary connections between providers. Weighing the options, we agreed that public end-to-end latency was low enough that we could rely on stunnel to protect our private data across the public wire. Funneling this private traffic through machines acting as pseudo-NATs yielded surprisingly solid results. For two providers that were roughly 650 miles apart, we saw latencies of around 15 milliseconds for established connections.

The rest of our time was spent simulating worst-case scenarios, like “What happens if this specific machine disappears?” and “How do we point traffic back the other way if something goes wrong?” After a few days of back-and-forth on disaster scenarios, we ultimately determined that we could successfully migrate with the caveat that the more time we spent straddled between two providers, the less resilient we would be.

Every change to infrastructure extends your timeline

A lot of conversations about migrating to the cloud weigh the pros and cons of doing a “lift and shift” vs. re-architecting for the cloud. We chose the former. If we were going to be able to migrate quickly, it was because we were treating GCP as a hardware provider. We gave them money, they gave us machines to connect to and configure. Our entire migration plan was focused around moving off of our current provider, not adopting a cloud-based architecture.

Sure, there were solid arguments for adopting GCP services as we started moving, but we cast those arguments aside and reminded ourselves that the primary reason for our change was not about architecture  it was about infrastructure. Minimizing infrastructure changes not only reduced the work required, but also reduced the possibility for change in application behavior. Our focus was on building the bridge, not rebuilding Sentry.

Migrate like you’re stealing a base

Once we agreed that we’d built the bridge correctly, we sought out to divert our traffic the safest way we could think of: slow and thorough testing, followed by quick and confident migrating. We spent a week diverting our L4 traffic to GCP in short bursts, which helped us build confidence that we could process data in one provider and store it in the other.

Then the migration really got underway. It started with failing over our single busiest database, just to be extra certain that Google Compute Engine could actually keep up with our IO. Those requirements met, it was a race to get everything else into GCP the other databases, the workers writing to them and the web machines reading from them. We did everything we could to rid ourselves of hesitation. Like stealing a base, successful migrations are the result of careful planning and confident execution.


Dust doesn’t settle, you settle dust

The fateful and foggy July day when we switched over finally came. After a few days, we deleted our old provider’s dashboard from our Bookmarks and set out to get comfortable in GCP: we hung a few pictures, removed the shims we put in place for the migration and checked what time the bar across the street had happy hour. More to the point, now that we had a clearer picture of resource requirements, we could start resizing our instances.

No matter how long we spent projecting resource usage within Compute Engine, we never would have predicted our increased throughput. Due to GCP’s default microarchitecture, Haswell, we noticed an immediate performance increase across our CPU-intensive workloads, namely source map processing. The operations team spent the next few weeks making conservative reductions in our infrastructure, and still managed to cut our infrastructure costs by roughly 20%. No fancy cloud technology, no giant infrastructure undertaking  just new rocks that were better at math.

Now that we’ve finished our apples-to-apples migration, we can finally explore all of the features that GCP provides in hopes of adding even more resilience to Sentry. We’ll talk about these features, as well as the techniques we use to cut costs, in future blog posts.

I’d like to send out a special thanks to Matt Robenolt and Evan Ralston for their contributions to this project; you are both irreplaceable parts of the Sentry team. We would love to have another person on our team to help us break ground on our next infrastructure build-out. Maybe that person is you?

App Engine firewall now generally available


Securing applications in the cloud is critical for a variety of reasons: restricting access to trusted sources, protecting user data and limiting your application's bandwidth usage in the face of a DoS attack. The App Engine firewall lets you control access to your App Engine app through a set of rules, and is now generally available, ready to secure access to your production applications. Simply set up an application, provide a list of IP ranges to deny or allow, and App Engine does the rest.

With this release, you can now use the IPv4 and IPv6 address filtering capability in the App Engine firewall to enforce more comprehensive security policies rather than requiring developers to modify their application.

We have received lots of great feedback from our customers and partners about the security provided by the App Engine firewall, including Reblaze and Cloudflare:
"Thanks to the newly released App Engine firewall, Reblaze can now prevent even the most resourceful hacker from bypassing our gateways and accessing our customers’ App Engine applications directly. This new feature enables our customers to take advantage of Reblaze's comprehensive web security (including DDoS protection, WAF/IPS, bot mitigation, full remote management, etc.) on App Engine." 
 Tzury Bar Yochay, CTO of Reblaze Technologies
"With the App Engine firewall, our customers can lock down their application to only accept traffic from Cloudflare IPs. Because Cloudflare uses a reverse-proxy server, this integration further prevents direct access to an application’s origin servers and allows Cloudflare to filter and block malicious activity." 
 Travis Perkins, Head of Alliances at Cloudflare

Simple and effective 


Getting started with the App Engine firewall is easy. You can set up rules in the Google Cloud Platform Console, via REST requests in the App Engine Admin API, or with our gcloud CLI.

For example, let's say you have an application that's being attacked by several addresses on a rogue network. First, get the IP addresses from your application’s request logs. Then, add a deny rule for the rogue network to the firewall. Make sure the default rule is set to allow so that other users can still access the application.

And that's it! No need to modify and redeploy the application; access is now restricted to your whitelisted IP addresses. The IP addresses that match a deny rule will receive an HTTP 403 request before the request reaches your app, which means that your app won't spin up additional instances or be charged for handling the request.

Verify rules for any IP


Some applications may have complex rulesets, making it hard to determine whether an IP will be allowed or denied. In the Cloud Console, the Test IP tab allows you to enter an IP and see if your firewall will allow or deny the request.

Here, we want to make sure an internal developer IP is allowed. However, when we test the IP, we can see that the "rogue net" blocking rule takes precedence.
Rules are evaluated in priority order, with the first match being applied, so we can fix this by allowing the developer IP with a smaller priority value than the blocked network it lies within.
Another check, and we can see it's working as intended.
For more examples and details, check out the full App Engine firewall documentation.

We'd like to thank all you beta users who gave us feedback, and encourage anyone with questions, concerns or suggestions to reach out to us by reporting a public issue, posting in the App Engine forum, or messaging us on the App Engine slack channel.

Introducing Grafeas: An open-source API to audit and govern your software supply chain


Building software at scale requires strong governance of the software supply chain, and strong governance requires good data. Today, Google, along with JFrog, Red Hat, IBM, Black Duck, Twistlock, Aqua Security and CoreOS, is pleased to announce Grafeas, an open source initiative to define a uniform way for auditing and governing the modern software supply chain. Grafeas (“scribe” in Greek) provides organizations with a central source of truth for tracking and enforcing policies across an ever growing set of software development teams and pipelines. Build, auditing and compliance tools can use the Grafeas API to store, query and retrieve comprehensive metadata on software components of all kinds.

As part of Grafeas, Google is also introducing Kritis, a Kubernetes policy engine that helps customers enforce more secure software supply chain policies. Kritis (“judge” in Greek) enables organizations to do real-time enforcement of container properties at deploy time for Kubernetes clusters based on attestations of container image properties (e.g., build provenance and test status) stored in Grafeas.
“Shopify was looking for a comprehensive way to track and govern all the containers we ship to production. We ship over 6,000 builds every weekday and maintain a registry with over 330,000 container images. By integrating Grafeas and Kritis into our Kubernetes pipeline, we are now able to automatically store vulnerability and build information about every container image that we create and strictly enforce a built-by-Shopify policy: our Kubernetes clusters only run images signed by our builder. Grafeas and Kritis actually help us achieve better security while letting developers focus on their code. We look forward to more companies integrating with the Grafeas and Kritis projects.”  
Jonathan Pulsifer, Senior Security Engineer at Shopify. (Read more in Shopify’s blog post.)

The challenge of governance at scale 


Securing the modern software supply chain is a daunting task for organizations both large and small, exacerbated by several trends:

  • Growing, fragmented toolsets: As an organization grows in size and scope, it tends to use more development languages and tools, making it difficult to maintain visibility and control of its development lifecycle. 
  • Open-source software adoption: While open-source software makes developers more productive, it also complicates auditing and governance. 
  • Decentralization and continuous delivery: The move to decentralize engineering and ship software continuously (e.g., “push on green”) accelerates development velocity, but makes it difficult to follow best practices and standards. 
  • Hybrid cloud deployments: Enterprises increasingly use a mix of on-premises, private and public cloud clusters to get the best of each world, but find it hard to maintain 360-degree visibility into operations across such diverse environments. 
  • Microservice architectures: As organizations break down large systems into container-based microservices, it becomes harder to track all the pieces.

As a result, organizations generate vast quantities of metadata, all in different formats from different vendors and are stored in many different places. Without uniform metadata schemas or a central source of truth, CIOs struggle to govern their software supply chains, let alone answer foundational questions like: “Is software component X deployed right now?” “Did all components deployed to production pass required compliance tests?” and “Does vulnerability Y affect any production code?” 

The Grafeas approach 

Grafeas offers a central, structured knowledge-base of the critical metadata organizations need to successfully manage their software supply chains. It reflects best practices Google has learned building internal security and governance solutions across millions of releases and billions of containers. These include:

  • Using immutable infrastructure (e.g., containers) to establish preventative security postures against persistent advanced threats 
  • Building security controls into the software supply chain, based on comprehensive component metadata and security attestations, to protect production deployments 
  • Keeping the system flexible and ensuring interoperability of developer tools around common specifications and open-source software

Grafeas is designed from the ground up to help organizations apply these best practices in modern software development environments, using the following features and design points:

  • Universal coverage: Grafeas stores structured metadata against the software component’s unique identifier (e.g., container image digest), so you don’t have to co-locate it with the component’s registry, and so it can store metadata about components from many different repositories. 
  • Hybrid cloud-friendly: Just as you can use JFrog Artifactory as the central, universal component repository across hybrid cloud deployments, you can use the Grafeas API as a central, universal metadata store. 
  • Pluggable: Grafeas makes it easy to add new metadata producers and consumers (for example, if you decide to add or change security scanners, add new build systems, etc.) 
  • Structured: Structured metadata schemas for common metadata types (e.g., vulnerability, build, attestation and package index metadata) let you add new metadata types and providers, and the tools that depend on Grafeas can immediately understand those new sources. 
  • Strong access controls: Grafeas allows you to carefully control access for multiple metadata producers and consumers. 
  • Rich query-ability: With Grafeas, you can easily query all metadata across all of your components so you don’t have to parse monolithic reports on each component.

Defragmenting and centralizing metadata 

At each stage of the software supply chain (code, build, test, deploy and operate), different tools generate metadata about various software components. Examples include the identity of the developer, when the code was checked in and built, what vulnerabilities were detected, what tests were passed or failed, and so on. This metadata is then captured by Grafeas. See the image below for a use case of how Grafeas can provide visibility for software development, test and operations teams as well as CIOs.
(click to enlarge)

To give a comprehensive, unified view of this metadata, we built Grafeas to promote cross-vendor collaboration and compatibility; we’ve released it as open source, and are working with contributors from across the ecosystem to further develop the platform:

  • JFrog is implementing Grafeas in the JFrog Xray API and will support hybrid cloud workflows that require metadata in one environment (e.g., on-premises in Xray) to be used elsewhere (e.g., on Google Cloud Platform). Read more on JFrog’s blog
  • Red Hat is planning on enhancing the security features and automation of Red Hat Enterprise Linux container technologies in OpenShift with Grafeas. Read more on Red Hat’s blog
  • IBM plans to deliver Grafeas and Kristis as part of the IBM Container Service on IBM Cloud, and to integrate our Vulnerability Advisor and DevOps tools with the Grafeas API. Read more on IBM’s blog
  • Black Duck is collaborating with Google to implement the Google artifact metadata API implementation of Grafeas, to bring improved enterprise-grade open-source security to Google Container Registry and Google Container Engine. Read more on Black Duck’s blog
  • Twistlock will integrate with Grafeas to publish detailed vulnerability and compliance data directly into orchestration tooling, giving customers more insight and confidence about their container operations. Read more on Twistlock’s blog.
  • Aqua Security will integrate with Grafeas to publish vulnerabilities and violations, and to enforce runtime security policies based on component metadata information. Read more on Aqua’s blog
  • CoreOS is exploring integrations between Grafeas and Tectonic, its enterprise Kubernetes platform, allowing it to extend its image security scanning and application lifecycle governance capabilities. 

Already, several contributors are planning upcoming Grafeas releases and integrations:

  • JFrog’s Xray implementation of Grafeas API 
  • A Google artifact metadata API implementation of Grafeas, together with Google Container Registry vulnerability scanning 
  • Bi-directional metadata sync between JFrog Xray and the Google artifact metadata API 
  • Black Duck integration with Grafeas and the Google artifact metadata API 
Building on this momentum, we expect numerous other contributions to the Grafeas project early in 2018.

Join us!

The way we build and deploy software is undergoing fundamental changes. If scaled organizations are to reap the benefits of containers, microservices, open source and hybrid cloud, they need a strong governance layer to underpin their software development processes. Here are some ways you can learn more about and contribute to the project:


 We hope you will join us!

4 ways you can deploy an ASP.NET Core app to GCP


For the past several months, all you .NET developers out there have been kicking the tires on running .NET Core apps on App Engine flexible environment. Now, thanks to all your great feedback, we’re really happy to announce that .NET Core support is generally available on App Engine flexible environment as well as Container Engine. We support .NET Core 1.0, 1.1 and 2.0 with Google-supported Docker images that are optimized for running on Google Cloud Platform (GCP).

Now that you can run your .NET Core apps on GCP in a supported fashion, the question becomes what’s the best way to get your apps there? In a nutshell, there are four basic methods for deploying an ASP.NET Core app to GCP, depending on your target environment:
  1. Deploy from Visual Studio directly using the Cloud Tools for Visual Studio extension 
  2. Deploy a Framework Dependent Deployment bundle with "dotnet publish"
  3. Deploy to App Engine flexible environment with a custom Dockerfile 
  4. Deploy to Container Engine with a custom Dockerfile 

Method 1 is arguably the simplest, most direct way to get your app up and running on GCP, and takes care of creating all necessary components, including the Dockerfile, behind the scenes. Methods 2, 3 and 4 are appropriate when you cannot use Visual Studio, and can be performed directly from the command line. These methods require you to gather and create the several components necessary to deploy your app, including:
  • Build artifacts, such as .dlls, that are the result of publishing your app and which include all the necessary dependencies to be able to run
  • In the case of App Engine, an app.yaml file that defines the deployment, and that sits at the root of the app’s deployment files
Deploying your app will also require you to build a Docker image, for which you’ll need to create a Dockerfile that describes to the Docker service how to build the image. App Engine creates the Dockerfile for you while it deploys your app (see “Method 3: Deploy to App Engine with a custom Dockerfile” below). If you’re deploying to Container Engine, however, you’ll need to create the Dockerfile yourself.

Let’s take a deeper look at these four methods.

Method 1: Deploy from Visual Studio 


To deploy your ASP.NET Core apps to GCP, you can use our Cloud Tools for Visual Studio extension, which takes care of all the necessary details to deploy your app from right inside the Visual Studio IDE.

Method 2: Deploy a Framework Dependent Deployment bundle 


The simplest way to deploy an app from the command line, meanwhile, is to deploy the result of running "dotnet publish" to create a Framework Dependent Deployment bundle. This directory contains your app’s dlls and all of the dependencies referenced in your project files.

To deploy this directory to App Engine flexible environment, you also need to place your app.yaml in the build artifacts directory. To make this placement automatic, place the app.yaml file in the root of the startup project of the solution, next to the the .csproj file, and add app.yaml to .csproj as a file to be copied to the output. You can do this by adding the following snippet to .csproj:

<ItemGroup>
  <None Include="app.yaml" CopyToOutputDirectory="PreserveNewest" />
</ItemGroup>

And here’s the minimum app.yaml file necessary to deploy to App Engine flexible:

runtime: aspnetcore
env: flex

This app.yaml indicates that you're using the “aspnetcore” runtime to run ASP.NET Core apps, and that you're running in App Engine flexible environment. You can further customize your app with these additional app.yaml settings.

Once you’ve made the above change to your .csproj, publishing the app with the "dotnet publish" command copies app.yaml to the output directory. This creates a directory that's ready to be deployed.

To deploy this directory to App Engine flexible environment, follow these steps:

  1. From the startup project’s directory, run “dotnet publish” with the configuration of your choice, for example:
    dotnet publish -c Release

    This publishes the release build to the directory “bin\<configuration>\netcore<version>\publish” with the app’s deployment files, including app.yaml if you included it in .csproj. 

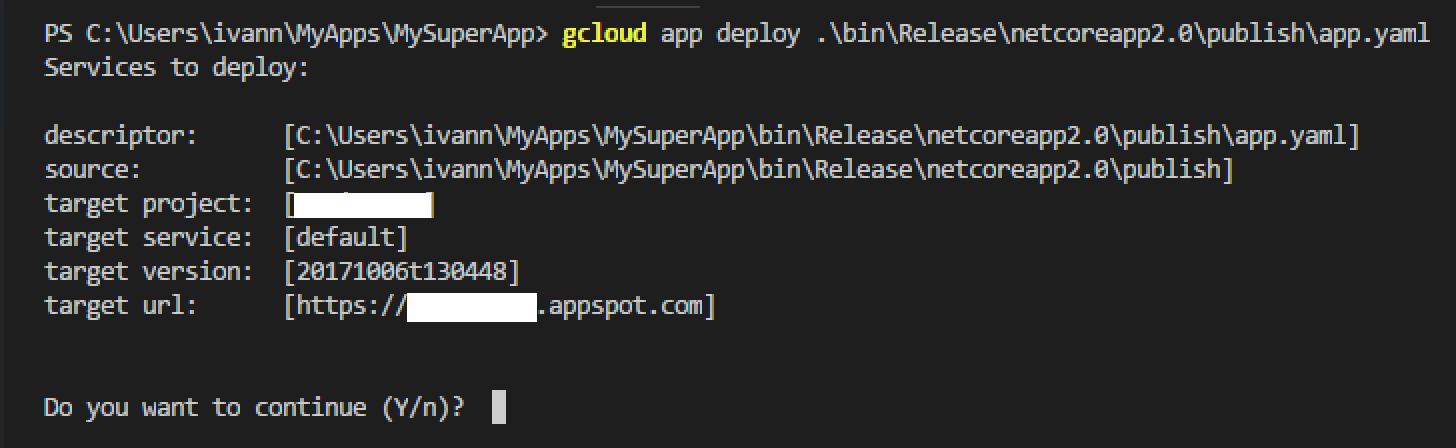
  2. Deploy the app to App Engine flexible by running:
    gcloud app deploy 
    bin\<configuration>\netcore<version>\publish\app.yaml

    This deploys the app to App Engine for you, and gcloud takes care of all of the complexities of wrapping your app into a Docker image.

Method 3: Deploy to App Engine with a custom Dockerfile 


If you need more control over how your app’s container is built, you can specify your own Dockerfile. This happens when you need to install custom packages in the container, extra tools or need more control over the contents of the container.

In this case, you’ll need the following app.yaml:
runtime: custom
env: flex

The “runtime: custom” setting tells App Engine that you'll supply the Dockerfile to build your app’s image.

Next, you need to create a Dockerfile for your app. Here are two possible ways to write the Dockerfile, depending on your needs.

  1. Creating a Dockerfile for a published app 

  2. If you want to keep going down the published app route, you can specify a Dockerfile to build the app’s image based on a published directory. The Dockerfile looks like this:

    FROM gcr.io/google-appengine/aspnetcore:2.0
    ADD ./ /app
    ENV ASPNETCORE_URLS=http://*:${PORT}
    WORKDIR /app
    ENTRYPOINT [ "dotnet", "MainProject.dll" ]


    Notice how this Dockerfile example uses the “gcr.io/google-appengine/aspnetcore:2.0” as its base image. We've created a set of Docker images that are optimized for running ASP.NET Core apps in App Engine and Container Engine, and we highly recommend that you use them for your custom Dockerfiles. These are the same images we use when we generate Dockerfiles for you during deployment. Be sure to change it to refer to the correct .NET Core runtime version for your app.

    To ensure that the Dockerfile is in the published directory, add it to your .csproj so it's published when the app is published. Assuming that the Dockerfile is in the root of the startup project, on the same level as .csproj and app.yaml, add the following snippet to .csproj:

    <ItemGroup>
      <None Include="app.yaml" CopyToOutputDirectory="PreserveNewest" />
      <None Include="Dockerfile" CopyToOutputDirectory="PreserveNewest" />
    </ItemGroup>

    With this change, whenever you run “dotnet publish” both files are copied to the published directory. To deploy, just follow the same steps as before:

    dotnet publish -c Release


    gcloud app deploy 
    bin\<configuration>\netcore<version>\publish\app.yaml


  3. Creating a Dockerfile that compiles and publishes the app
    If you can easily build your ASP.NET Core app on Linux, you should consider using a multi-stage Dockerfile that performs the restore and publish steps during the build process, before building the final app’s image. This makes it a bit more convenient to deploy the app, as the build is done during deployment.

    Here’s what that Dockerfile looks like:  

  4. # First let’s build the app and publish it.
    FROM gcr.io/cloud-builders/csharp/dotnet AS builder
    COPY . /src
    WORKDIR /src
    RUN dotnet restore --packages /packages
    RUN dotnet publish -c Release -o /published
    
    # Now let's build the app's image.
    FROM gcr.io/google-appengine/aspnetcore:2.0
    COPY --from=builder /published /app
    ENV ASPNETCORE_URLS=http://*:${PORT}
    WORKDIR /app
    ENTRYPOINT [ "dotnet", "multistage-2.0.dll" ]
    This Dockerfile uses the “gcr.io/cloud-builders/csharp/dotnet” builder image that wraps the .NET SDKs for all supported versions of .NET Core.

    The main advantage of this method is that you can put app.yaml and the Dockerfile in the root of your project, next to .csproj. Then, to deploy the app, simply run the following command:

    gcloud app deploy app.yaml

    This uploads your app sources to Cloud Builder where the build will take place. The resulting build artifacts will then be used to produce the final app image, which will be deployed to App Engine. You can also run tests during the build process, making this a complete CI/CD solution.


Method 4: Deploy to Container Engine 


When you need more control over your workloads, or need to use protocols not supported by App Engine, you can use Container Engine. Deploying to Container Engine is somewhat similar to deploying to App Engine you build a Docker image for your app and then deploy it to an existing cluster.

To build your app’s Docker image you can use either of the methods described above in Method 3 a Dockerfile for a published app, or a Dockerfile that builds and publishes your app during the Docker build process.

Building the app’s Docker image

While you can use any of the strategies defined earlier when writing the Dockerfile for your app, if you want to deploy to Container Engine, you’ll need to build the Docker image yourself. You’ll also need to push the image to a repository from which Container Engine can read the image. The easiest way to do this is to push the image to Cloud Container Registry, a private Docker image repository that stores images for your project in Cloud Storage.

The simplest way to build a Docker image and push it to Container Registry is to use Cloud Container Builder, a hosted Docker service that builds Docker images and pushes them to Container Registry in a single operation. First, go to your app’s root deployment directory, which was created as part of “dotnet publish” or is the root of the project, depending on the option you chose. Then run the following command:

kubectl run myservice --image=gcr.io/<your project id>/<app name> --port=8080

This command builds a Docker image called gcr.io/$PROJECT_ID/<app name> where $PROJECT_ID is automatically substituted for your GCP project ID and <app name> is the name of your app. 

Deploying the image to a Container Engine cluster 

Next, you’ll need to deploy the image you just created to Container Engine. But first, to interact with Container Engine, you need to install kubectl, which allows you to interact with your cluster from the command line.

The easiest way to install kubectl is to let gcloud do it for you by running:

gcloud components install kubectl

You must also store your cluster’s credentials on your machine so kubectl can access them. Once you’ve create your Container Engine cluster, run the following command to get those credentials:

gcloud container clusters get-credentials

Now let’s see how to deploy your app to Container Engine. First, create a deployment to run the image. You can do this easily from the command line with the following command:

kubectl run myservice --image=gcr.io/<your project id>/<app name> --port=8080

This creates a new Kubernetes deployment on which to run your app, as well as all the necessary pods. You can even specify the number of replicas of your code to run using the --replicas=n parameter, where n is any number of your choosing.

Note: Here, we assume that your Docker containers export port 8080, the default for App Engine flexible environment, and that you expose services from port 80. To change these defaults, read about how to configure HTTPS support for public Kubernetes services.

Then, expose this deployment so it can be seen from outside of your cluster. The easiest way to do this is with the following command:

kubectl expose deployment myservice --port=80 --target-port=8080 
--type=LoadBalancer

This exposes the deployment that you created above with a service of type LoadBalancer, indicating that this is a public service with a public IP address.

In conclusion

We're really excited to bring .NET developers to GCP. Whether you like App Engine flexible environment, or prefer the power that Container Engine gives you, we have you covered. We're also investing in making you really productive as a .NET developer on GCP. For more information on how to build apps with .NET for GCP, visit our .NET page, where you can learn about our .NET libraries and more.

We're fully committed to open source. You can find all our images in the https://github.com/GoogleCloudPlatform/aspnet-docker repo. We look forward to your feedback, feel free to open issues on the aspnet-docker repo with your ideas and suggestions.

Now shipping: Compute Engine machine types with up to 96 vCPUs and 624GB of memory


Got compute- and memory-hungry applications? We’ve got you covered, with new machine types that have up to 96 vCPUs and 624 GB of memory—a 50% increase in compute resources per Google Compute Engine VM. These machine types run on Intel Xeon Scalable processors (codenamed Skylake), and offer the most vCPUs of any cloud provider on that chipset. Skylake in turn provides up to 20% faster compute performance, 82% faster HPC performance, and almost 2X the memory bandwidth compared with the previous generation Xeon.1

96 vCPU VMs are available in three predefined machine types

  • Standard: 96 vCPUs and 360 GB of memory
  • High-CPU: 96 vCPUs and 86.4 GB of memory
  • High-Memory: 96 vCPUs and 624 GB of memory


You can also use custom machine types and extended memory with up to 96 vCPUs and 624GB of memory, allowing you to better create exactly the machine shape you need, avoid wasted resources, and pay for only what you use.


The new 624GB Skylake instances are certified for SAP HANA scale-up deployments. And if you want to run even larger HANA analytical workloads, scale-out configurations of up to 9.75TB of memory with 16 n1-highmem-96 nodes are also now certified for data warehouses running BW4/HANA.

You can use these new 96-core machines in beta today in four GCP regions: Central US, West US, West Europe, and East Asia. To get started, visit your GCP Console and create a new instance. Or check out our docs for instructions on creating new virtual machines using the gcloud command line tool.


Need even more compute power or memory? We’re also working on a range of new, even larger VMs, with up to 4TB of memory. Tell us about your workloads and join our early testing group for new machine types.


1 Based on comparing Intel Xeon Scalable Processor codenamed "Skylake" versus previous generation Intel Xeon processor codenamed "Broadwell." 20% based on SpecINT. 82% based on on High Performance Linpack for 4 node cluster with AVX512. Performance improvements include improvements from use of Math Kernel Library and Intel AVX512. Performance tests are measured using specific computer systems, components, software, operations and functions, and may have been optimized for performance only on Intel microprocessors. Any change to any of those factors may cause the results to vary. You should consult other information to assist you in fully evaluating your contemplated purchases. For more information go to http://www.intel.com/benchmarks

Committed use discounts for Google Compute Engine now generally available


The cloud’s original promise was higher agility, lower risk and simpler pricing. Over the last four years, we've remained focused on delivering that promise. We introduced usage-based billing, which allows you to pay for exactly what you use. Sustained use discounts automatically lower the price of your instances when you use them for a significant portion of the month. And most recently, we introduced committed use discounts, which reward your steady-state, predictable usage in a way that’s easy-to-use and can accommodate a variety of applications.

Today, committed use discounts are now generally available. Committed use discounts are ideal for predictable, steady-state use of Google Compute Engine instances. They require no upfront payments and allow you to purchase a specific number of vCPUs and a total amount of memory for up to 57% off normal prices. At the same time, you have total control over the instance types, families and zones to which you apply your committed use discounts.

Simple and flexible 


We built committed use discounts so you actually attain the savings you expect  regardless of how you configure your resources, or where you run them within a region. For example, say you run several instances for one month with aggregate vCPU and memory consumption of 10 vCPUs and 48.5 GB of RAM. Then, the next month your compute needs evolve and you change the shapes and locations of your instances (e.g., zones, machine types, operating systems), but your aggregate resource consumption stays the same. With committed use discounts, you receive the same discount both months even though your entire footprint is different!


Committed use discounts automatically apply to aggregate compute usage with no manual intervention, giving you low, predictable costs. During the beta, customers achieved over 98% utilization rates of their commitments, with little or no effort on their part.

Quizlet is one of the largest online learning communities with over 20 million monthly learners.
 "Our fleet is constantly changing with the evolving needs of our students and teachers. Even as we rapidly change instance types and Compute Engine zones, committed use discounts automatically apply to our aggregate usage, making it simple and straightforward to optimize our costs. The results speak for themselves: 60% of our total usage is now covered by committed use discounts, saving us thousands of dollars every month. Google really got the model right." 
 Peter Bakkum, Platform Lead, Quizlet 


No hidden costs 


With committed use discounts, you don’t need to make upfront payments to see deep price cuts. Prepaying is a major source of hidden costs, as it is effectively an interest-free loan to the company you're prepaying. Imagine you get a 60% discount on $300,000 of compute usage. At a reasonable 7% per year cost of capital, an all-upfront prepay reduces your realized savings from 60% to 56%.
"We see great financial benefits by using committed use discounts for predictable workloads. With committed use discounts, there are no upfront costs, unlike other platforms we have used. It’s also possible to change machine types as committed use discounts work on both vCPU and memory. We have been very happy with committed use discounts."  
 Gizem Terzi Türkoğlu, Project Coordinator, MetGlobal 

Getting the best price and performance in the cloud shouldn’t require a PhD in Finance. We remain committed to that principle and continue to innovate to keep pricing simple for all your use cases. In coming months, we'll increase the flexibility of committed use discounts by allowing them to apply across multiple projects. And rest assured, we'll do so in a way that’s easy-to-use.

For more details on committed use discounts, check out our documentation. For pricing information, take a look at our pricing page or try out our pricing calculator. To get started and try Google Cloud Platform for free, click here.

How to build a website on Google App Engine using a headless CMS like ButterCMS


Are you a web developer who creates websites and a different team, usually the marketing team, manages the content? Traditionally, there have been two ways to do that — neither of them great.

On the one hand, you could build the website using any number of Content Management Systems (CMS) and their arcane plugins. The problem with this approach is that you’re stuck having to maintain two systems — the CMS and the web framework you used to develop the main website.

Or, you anticipated that problem and roll your own homegrown CMS. The problem there is, obviously, even if you summoned your Ninja skills to replicate the features of a mature CMS in short order, you're now running two systems — for the website and the one for the CMS. A headless CMS lets you sidestep this dilemma entirely. It retrieves content using simple API calls, making it easy to integrate that content into your website while leveraging your existing style assets. Compare that to a traditional CMS where you have to rely on templates and plugins to assemble webpages. By decoupling the content from the website, your marketing team can now update the content without you needing to change templates and redeploy the site every time.

Google App Engine is a great complement to this headless approach, since it makes it easy to deploy an app built with any modern web framework and scale it automatically. This lets you focus on writing code rather than on managing infrastructure. When the content goes viral, you get to sit back and watch the site scale automatically, and enjoy the accolades on a job well done.

ButterCMS ("Butter") is a headless CMS delivered as Software as a Service (SaaS), and it’s a great option for building your next website in this way. Butter has client libraries for most popular web frameworks along with a REST API and an easy-to-use UI for content editors. Brandon Nicoll, a software engineer at Butter, recently wrote a step-by-step guide showing how to create, manage and integrate content for an example online store using Node.js, and then deploy and scale it with App Engine.

The tutorial shows you how to manage the content for the online store in Butter, and later retrieve it using the Butter API. It illustrates a good practice of encapsulating the implementation details of communicating with Butter in a separate content service. The website communicates with this content service to retrieve and render the content.
This design makes the system extensible and maintainable. For example, you could combine additional content from other sources or swap out Butter entirely for some other system, simply by changing the content service. Both the example website and the content service are deployed with App Engine.

It’s an elegant solution that shows how to use your existing web development skills, and impress your web developer colleagues by quickly building a complex, content-rich website designed in a service-oriented fashion. Your marketing colleagues, meanwhile, get a fully featured portal to manage their content, and see it scale automatically as the website goes viral. Happy developing!

Meet Compute Engine’s new managed instance group updater


A key feature of Google Compute Engine is managed instance groups, which allows you to manage collections of identical instances as a unit, to quickly deploy new VMs and ensure they're consistently configured. Today, we're pleased to announce a new managed instance group updater, to help you update your Compute Engine VMs programmatically and at scale. The updater is in beta and fully integrated into managed instance groups, making it easier than ever to update the software on your instances, patch and update them, and roll out staged and test deployments.

Specifically, the new managed instance group updater allows you to:
  • Programmatically update your instances from one instance template to another 
  • Specify how many instances to update at a time: one, several or all 
  • Deploy additional instances (temporarily) to maintain capacity while old instances are being replaced 
  • Restart, or recreate, all instances in the managed instance group without changing the template 
  • Control the rate of deployment by configuring a pause between instance updates 
At first glance, all these options can be a bit overwhelming. Instead of explaining them one by one, let’s explore three typical use cases:
  • Deploying a simple update 
  • Deploying a canary test update 
  • Recreating all instances 
We’ll show you how to use the managed instance group updater from the UI and gcloud command line, but you can also use it through the API.


Simple update 

Let’s start with the basics and deploy an update to the entire managed instance group, one instance at a time. The instance group my-instance-group starts with every instance running the template myapp-version-a, and we want to deploy myapp-version-b because we're deploying a new version of our software (we could also be doing so to patch/update the underlying OS).
gcloud beta compute instance-groups managed rolling-action 
start-update my-instance-group --version template=myapp-version-b

The managed instance group deploys myapp-version-b by first deleting an instance with myapp-version-a, while simultaneously creating an instance with myapp-version-b, waiting for that new instance to be healthy and then proceeding to the next instance until all of the instances are updated. If you want to roll back the update, just run the same command, but this time specify myapp-version-a as the target template.

gcloud beta compute instance-groups managed rolling-action 
start-update my-instance-group --version template=myapp-version-a
This is the default behavior for the updater, and it works really well for many typical deployments. If your managed instance group is large, however, updating one instance at a time might take too long. Let’s try this again, but this time, let’s update a quarter of the instances at a time.
gcloud beta compute instance-groups managed rolling-action 
start-update my-instance-group --version template=myapp-version-b 
--max-unavailable 25%

Note the new parameter, max-unavailable. It tells the updater how many instances can be taken offline at the same time, to be updated to the new template. Whether you have tens, hundreds or thousands of instances, the update proceeds at the rate you specify. If you’re wondering whether you can update all instances at the same time, the answer is yes. Just set max-unavailable to 100% and the managed instance group updates everything at once. This is a great option when consistent uptime doesn’t matter, for example in a testing environment or for batch computations.

Canary testing 


Now it’s time to consider a more advanced use case. Deploying new software to a subset of instances before committing fully is known as canary testing and is a best practice for managing robust, highly available systems. It allows you to test new software in a real environment while minimizing the impact of any issues.

For our example, let’s deploy myapp-version-b to just one instance.
gcloud beta compute instance-groups managed rolling-action 
start-update my-instance-group --version template=myapp-version-a 
--canary-version template=myapp-version-b,target-size=1

Here, the managed instance group deletes one instance of myapp-version-a and creates one instance of myapp-version-b. The update does not proceed further. If the instance group needs to scale up or down, it retains that one instance of myapp-version-b so that you can test it and make sure that it works as intended. When you’re ready, you can deploy it to a larger group, for example one half of the instances.
gcloud beta compute instance-groups managed rolling-action 
start-update my-instance-group --version template=myapp-version-a 
--canary-version template=myapp-version-b,target-size=50%

The managed instance group replaces instances running myapp-version-a with instances running myapp-version-b until the balance is 50/50. If autoscaling adds or removes instances, the managed instance group maintains this ratio, keeping the canary deployment at the level you set.

When you’re ready to commit to your new deployment, simply tell the updater that you want all of your instances to be running myapp-version-b. This is identical to what we previously did in the simple update.

gcloud beta compute instance-groups managed rolling-action 
start-update my-instance-group --version template=myapp-version-b

Recreating all instances 

Sometimes you don’t want to apply a new template, you just want to replace all of your instances, but keep the current template. This is a common pattern if you're using image families and want to make sure that your instances are using the latest version of an image. Starting a rolling replace of all instances follows the same pattern as starting an update.
gcloud beta compute instance-groups managed rolling-action replace 
my-instance-group --max-unavailable=10%

Notice that the replace action uses the same controls as max-unavailable that our earlier simple update example used to control how many instances to take offline at the same time.

Next steps 


We think these are the most common use cases for the managed instance groups updater, but realistically, we've just scratched the surface of everything that’s possible with it. Thanks to flexible controls like max-unavailable and max-surge, support for canary updates and different actuation commands such as start-update, restart and recreate, you now have a lot of options for maintaining your managed instance groups fleet. For more information, please see the documentation, and feel free to reach out to us with questions and feedback in the GCE discussion group.

You can try out the new managed instance group updater today in the console. If you’re new to Google Cloud Platform (GCP) you can also sign up to automatically get $300 worth of GCP credit to try out Compute Engine and the managed instance group updater.

How Waze tames production chaos using Spinnaker managed pipeline templates and infrastructure as code


“At an abstract level, a deployment pipeline is an automated manifestation of your process for getting software from version control into the hands of your users.” ― Jez Humble, Continuous Delivery: Reliable Software Releases through Build, Test, and Deployment Automation 

At Waze, we’ve been using Spinnaker for simultaneous deployments to multiple clouds since it was open sourced by Netflix in 2015.

However, implementing deployment pipelines can raise issues when your organization has more than 100 microservices (and growing), multiplied by the number of environments/regions/cloud providers.

  • Managing hundreds of clusters and their deployment pipelines can quickly become a major maintenance burden. Once you have a few hundred deployment pipelines or more, keeping them up to date, or making a big change to all of them, is far from trivial. 
  • There’s no code reuse among pipelines, even though many of them are probably identical. For example, bake stages, deploy stages and resize/clone/destroy stages tend to be identical except for some parameters. 
  • Providing a paved road for deployments is easier said than done. Even though each development team should decide on their deployment strategy, it’s important to have a paved road — a way that works for most teams, which saves them time and effort. Start with that, and change as needed. However, there’s no easy way to create such a paved road and maintain it over time across all relevant pipelines in the system. 
Thankfully, Netflix — with contributions from the open-source community, including Google —added pipeline template support to Spinnaker, which solves these pain points and paves the way for multi-cloud infrastructure as code. With some much-appreciated help from the Google Spinnaker team, Waze is now using managed pipeline templates in production, and we plan to use them across our entire production system.

Unlike cloud vendor-specific solutions, Spinnaker managed pipeline templates work on top of all supported providers. (Currently: Azure, GCP, AWS, Kubernetes, OpenStack, App Engine and more are on the way.)

This means that for the first time, we can start realizing the dream of infrastructure as code across multiple clouds, whether you’re deploying to multiple public clouds, to a local Kubernetes on prem or to a mixed environment. We can see a future where automation, or some form of AI, decides to change instance types and other factors to reduce cost, improve utilization or mitigate real-time production incidents.

Runnable pipelines are composed of a pipeline template combined with pipeline configurations (using variables). Multiple configurations can use the same pipeline template as their base. In addition, pipeline templates support inheritance.

The benefits of pipeline templates 


Multi-cloud/provider continuous delivery and infrastructure as code (without vendor lock-in) 

Saving pipeline templates and configs in version control, subjecting them to code review and leaving an audit trail of why each infrastructure change was made are all extremely important for keeping your production system clean. These practices allow each production change to be understood, tracked in case there are any problems, and reproducible.

Being able to reproduce infrastructure enhances existing standards like reproducible builds, provides stability across the system and makes debugging, when required, easier. For example, changing an instance type, or adding a load balancer, is no longer just a “Clone” operation in Spinnaker; it’s now a code commit, a code review and a Jenkins job picking up the pipeline-template config change and publishing it to Spinnaker. After that, you just run the resulting pipeline(s) to apply the infrastructure change. You can easily track the infrastructure’s change history.

All of this is done in a way that supports multiple cloud providers. This may even be relevant for companies using Kubernetes on a single cloud provider, because they're required to interact with two sets of APIs and two control planes to manage their infrastructure. This is also why Kubernetes is treated as a separate cloud provider in Spinnaker. Spinnaker neatly abstracts all of that, while other solutions could lead to vendor lock-in.

Code reuse for pipelines 

In a continuous-delivery environment, many pipelines can contain identical components, except for parameters. Managed pipeline templates provide a perfect way to reduce code duplication and centralize pipeline management, affecting hundreds or thousands of pipelines downstream. This method reduces mistakes, saves time and allows the same template-based configuration to provision multiple identical environments, such as staging, QA and production.


Automated checks and canary analysis on each infrastructure change 


You’re probably familiar with using deployment pipelines to manage application and configuration changes, but now you can use them for infrastructure changes, too — changed instance types, firewall rules, load balancers and so on. Having an official deployment pipeline for each application means you can now run automated testing and canary analysis to even these changes, making infrastructure changes much safer.

Defining a clear paved road for deployments + override capabilities by each application 


We've found that most deployment pipelines follow a very simple pattern:
However, most teams customize these pipelines based on their requirements. Here are just a few examples:

  • Resize previous group to zero instead of destroying. 
  • Lots of parameters for the deploy stage, wait stage. 
  • Two canary analysis stages (first with 1% of traffic, the next with 50% of traffic). 
  • Various parameters passed on to the canary analysis. 
Pipeline templates allow these teams to start off with a paved road, then mix and match stages, specify parameters, and replace or inject stages as needed, while still using the maintained paved road template. If a common stage in the base template is updated, the pipelines inherit the updates automatically. This reduces maintenance considerably for hundreds of pipelines.

Conditional stages use variables to control which stages are enabled. By utilizing conditional stages, you can use a single template for more than one use case. Here’s a video demo showing how it looks in practice.

Injecting stages allows any pipeline child template or configuration to add stages to the pipeline stage graph. For example, if a team uses a basic Bake -> Deploy -> Disable -> Wait -> Destroy pipeline template, they can easily inject a Manual Judgement stage to require a human decision before the previous group is disabled and destroyed. Here’s how this looks in practice.

Automatic deployment pipeline creation for new services 

When a new service comes online — whether in the development, staging or production environments — pipeline templates can be used to create automatic deployment pipelines as a starting point. This reduces the effort of each team as they get a tested and fully working deployment pipeline out of the box (which can later on be customized if needed). Traffic guards and canary analysis give us the confidence to do this completely automatically.


Auto-generate pipelines to perform a rolling OS upgrade across all applications 


Applying OS security updates safely across an entire large scale production system can be quite a challenge. Doing so while keeping the fleet immutable is even harder. Spinnaker pipeline templates combined with canary analysis can provide organizations with a framework to automate this task.

We use a weekly OS upgrade pipeline, which spawns the official deployment pipelines of all production applications, in a rolling manner, from least critical to most critical, spreading the upgrades to small batches which are then cascaded across the entire work week. Each iteration of the pipeline upgrades more applications than it did the day before. We use the official deployment pipelines for each application, sending a runtime parameter which says “Don’t change the binary or configuration — just rebake the base operating system with latest security updates,” and we get a new immutable image unchanged from the previous image except for those security updates. All this while still going through the usual canary analysis safeguards, load balancer health checks and traffic guards.

Pipeline templates can take this pattern one step further. Any new application can be automatically added to this main OS upgrade pipeline, ensuring the entire production fleet is always up to date for OS security updates.

Conclusion 

Spinnaker pipeline templates solve a major issue for organizations running a lot of deployment pipelines. Plus, being able to control infrastructure as code for multiple providers, having it version-controlled and living alongside the application and configuration, removes a major constraint and could be a big step forward in taming operational chaos.

Getting-started references 

To get started with pipeline templates:

  • Set up Spinnaker
  • Read the spec, review the pipeline templates getting started guide
  • Check out the converter from existing pipelines into templates, a good place to start. 
  • roer, the spinnaker thin CLI used to validate and publish templates and configurations to Spinnaker. (Note: Better tooling is on the way.) Remember: roer pipeline-template plan is your friend. Also, orca.log is a great place to debug after publishing a template. 
  • Watch the full demo
  • Try out some example templates
  • Join the Spinnaker slack community and ask questions on the #declarative-pipelines channel.